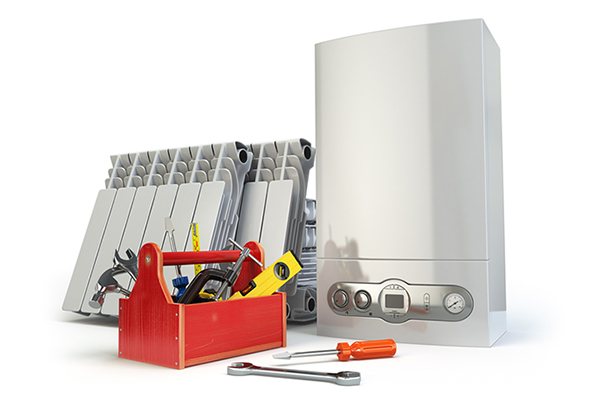
The tool you need to get the job done
First of all, for work, you should find out the exact dimensions of aluminum radiators. To measure them, you will need a construction tape or a special folding rule. Also, if both types of devices are missing, you can use the standard student ruler. It should be noted that most of the rulers are only 30 centimeters long, so you will have to make notes on the radiator (it is better to use a pencil that can be easily washed off the surface).
Each new mark will be the end of the previous measurement and the start of a new one. The resulting sizes are added to the true size. Dismantling aluminum radiators requires other tools that are desirable to use for dismantling, namely:
- Complete set of wrenches (socket and ring).
- Radiator key.
- Pliers.
- Screwdriver.
Step-by-step description of dismantling works
A few words about when you may need to disassemble the heating battery:
- In the case of replacing the old radiator with a new one with greater performance and better appearance.
- If you need to add additional sections for the battery.
- If it is necessary to replace a single section or gasket that has leaked.
The instruction begins with the preparation of the necessary tools:
Step # 1: preparing the tools
Photo of nipple wrench
Sample gas wrench
Advice: a nipple wrench, given that it is rarely needed on the farm, and its price is not the lowest, it is recommended not to buy, but to rent. This will save your family budget.
Step # 2: disconnecting the battery
Before disassembling an aluminum or cast iron radiator, it is necessary to disconnect it from the heating system. To do this, it is imperative to turn off the heating and drain the water from the riser, otherwise you will simply flood the room and get burns.
Advice: it is recommended to cover the floor under the battery with a film, rags or at least newspapers before starting dismantling to avoid getting any residual liquid on it, which may end up in the circuit even after draining the riser.
Further, depending on the complexity, three situations can be distinguished:
- Polypropylene pipes. In this case, the sleeve joint, as a rule, is twisted with bare hands, without causing any difficulties.
- Steel new. With some effort, you will most likely be able to spin the battery inlet and outlet with a gas wrench.
Disconnecting new steel pipes
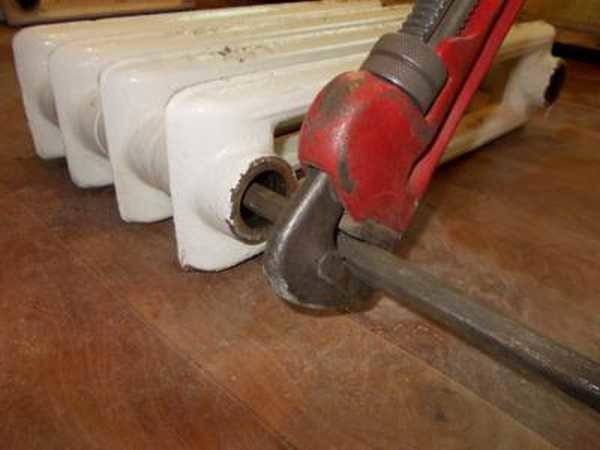
- Old steel or cast iron pipes. First, we try, removing the paint from the docking place with a blowtorch and a metal brush, we try to untwist the connection as described in the previous version. But in systems that have worked for a long time, most often this does not work, and then we simply cut off the drive with a "grinder" or autogenous.
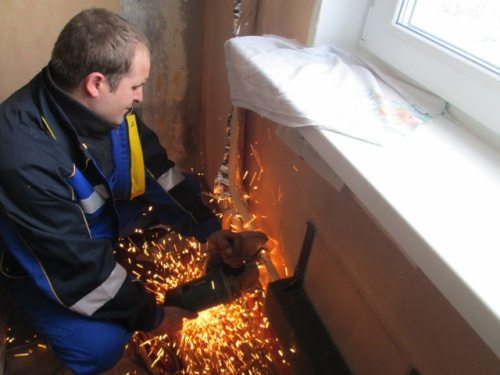
Cutting old sills using a "grinder"
After disconnecting the battery from the pipes, remove it from the hooks and place it on a flat surface.
Step # 3: disassemble the radiator
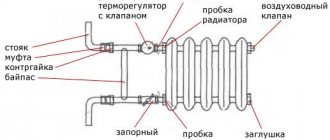
Battery section disconnection diagram
A piece of pipe or crowbar
The battery can be cast iron, aluminum or bimetallic.
The most difficult option for parsing is the first of the listed ones, and we'll start with it:
- How to disassemble a cast-iron heating radiator on your own:
Carefully, we check the thread on the futures or plugs, which can be either left or right. We insert the nipple wrench inside, we increase its torque using a piece of pipe or a crowbar.We rip off the thread by scrolling the tool a quarter of a turn, first at the top and then at the bottom. Then we also alternately continue to unscrew the nipples so that the radiator does not warp. The main problem with old batteries is that the fuses can become stuck in the course of many years of use and not give in to the key. In this case, the junction must be warmed up in a circular motion with a blowtorch, and then again try to unscrew the nipple
We repeat the procedure until the thread gives in. If, however, nothing comes of it, then you have to cut it with an autogenous gun.
Disassembled old cast-iron heating battery
- Let's find out how to disassemble a bimetallic or aluminum radiator? The procedure is almost the same as described above, but has several differences:
- A smaller nipple wrench is used.
- It does not require as much effort when unscrewing the nipples.
- Plugs and futurocks are marked with the direction of the thread in the form of the letters S and D, where the first designates the left stroke, and the second - right.
- The metal gaskets between the sections are wiped, sanded and stored until the battery is reassembled.
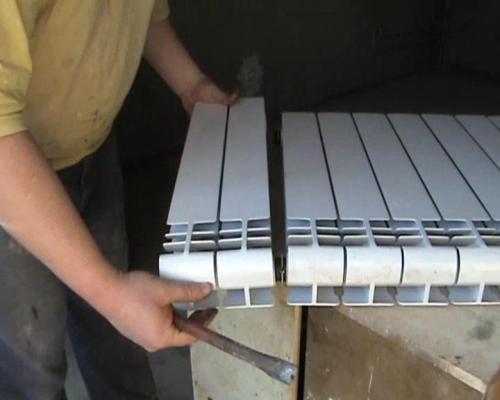
Dismantling the aluminum battery
After completing the described tasks, you can replace the leaking part, add a section, or even install a new radiator in place of the old one.
Disassembly
Instruments
Before proceeding with the disassembly of the batteries, the following tools must be prepared:
- Battery Disassembly Keys - 1 inch for bimetallic and aluminum fixtures and 5/4 for cast iron.
- Plumbing adjustable wrench;
- Blowtorch;
- Gas wrench.
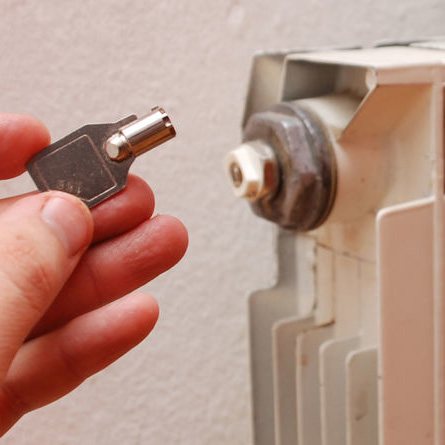
Unscrewing the nipple with a special key
Cast iron
Regardless of the type of radiator, before disassembling it, it is necessary to shut off the coolant supply, drain all the liquid from it and then dismantle it. As a rule, cast iron radiators are suspended on bracket hooks. Therefore, for dismantling, it is enough to disconnect them from the pipeline; for these purposes, you should use a plumbing wrench.
Further work is carried out in the following order:
- Before disassembling a cast-iron heating radiator, it is necessary to prepare a workplace - a flat area covered with oilcloth or tarpaulin. In the apartment, you can perform this operation in the bathroom.
- Next, you need to remove the plugs. The difficulty lies in the fact that they can have both left and right threads.
- Then a special radiator key is inserted into the hole, and the nipples that connect the sections are unscrewed. The wrench can usually be purchased from stores that sell other plumbing tools. I must say that disassembling the sections is often not easy due to the "sticking" of the nipples and sections. In this case, the joints are heated with a blowtorch in a circle, after which it is much easier to tear off the thread and separate the sections.
- After that, the sections are cleaned of scale, rust and old gaskets. The threads need to be renewed if necessary.
Spacers for laying between sectionsIn some cases it may be necessary to replace the nipples. To purchase a suitable nipple, you should take the old one with you as a sample. As a rule, the price of components for cast iron radiators is low.
- Further, the joints can be coated with a heat-resistant sealant, and new gaskets can be laid, and the sections can be assembled in the reverse order.
Advice! In parallel with the described work, you can correct the number of sections, for example, install additional ones, or vice versa - remove unnecessary ones. If sections are added, additional brackets must be installed.
This completes the process of disassembling the cast-iron battery. Now, you can paint it and install it in place.
Dismantling a bimetallic radiator
Aluminum and bimetallic
Now let's look at how to disassemble an aluminum heating radiator.It should be noted that the information below also applies to bimetallic devices, since they have the same design.
The disassembly process is in many ways similar to working with cast iron radiators, however, there are some nuances:
- Smaller nipples and therefore use different keys.
- Bimetallic and aluminum devices, as a rule, are new products; therefore, significant efforts are not required to break off threaded connections, as is the case with cast iron devices.
- On the face of the plugs, there is a designation for right or left threads.
- They are significantly lighter than their cast iron counterparts.
All this greatly simplifies and speeds up the assembly / disassembly process. The only thing is that the work should be done carefully so as not to damage the paint. To do this, before disassembling a bimetallic radiator or an aluminum battery, you need to cover the area with rags.
Aluminum battery design
Note! Metal spacers are installed between the sections of modern devices. After disassembly, it is extremely important to clean and wipe them so that they are perfectly smooth, since the tightness of the joints depends on this.
It should be noted that many models of aluminum devices are non-separable. Of course, they can be disassembled, but they will not be able to be assembled. Here, in fact, is the whole instruction for assembling and disassembling radiators of different types.
How to disassemble an aluminum heating radiator with your own hands
Removal of the aluminum battery occurs in the following cases:
- When the system changes completely.
- It is necessary to increase or remove the extra section.
- Eliminate the leak.
Before disassembling the aluminum radiator, you need to prepare a set of wrenches and a screwdriver.
Further actions are performed in the following sequence:
The coolant is discharged from the system. If disassembly takes place during the heating season, then you should wait until the battery cools down.
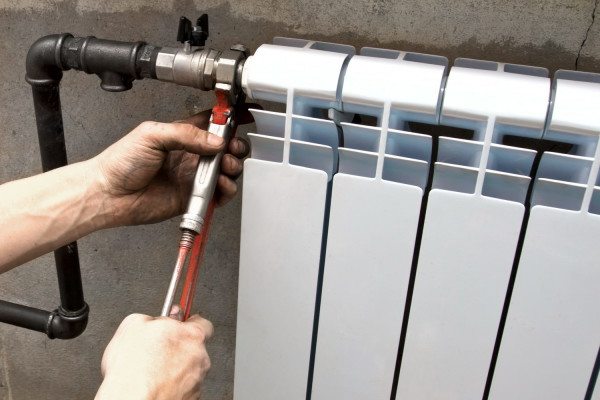
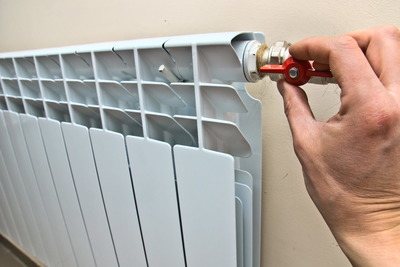
Using a wrench, unscrew the coupling that connects the hose from the battery to the heating pipe.
The disconnected radiator must be freed of water residues and placed on a flat surface with the front side up.
Remove the filter from the battery and rinse thoroughly. This must be done immediately, since the dirt accumulated in it can harden and then it will be extremely difficult to remove it.
Further work is the analysis of the battery into sections. They are interconnected with special nipple nuts. To remove them, you need a key for disassembling aluminum radiators, turning it counterclockwise, they can be easily removed from the radiator
This must be done with extreme caution to avoid skewing.
After disassembly, the battery cells are washed and reassembled in the same sequence.
If it is necessary to eliminate the leak, then a special solution of epoxy resin with the addition of bronze powder is suitable for aluminum radiators. You need to work with this composition quickly, since it dries up in a matter of minutes, so the leakage must be cleaned up and prepared in advance.
How to disassemble a bimetallic heating radiator
Before disassembling a bimetallic radiator, check what metal its core is made of. If the inside of the sections is made of copper, there is a risk of deforming the ends of the horizontal tubes. In the future, this will lead to a violation of the tightness of the radiator.
To avoid damaging the copper core, use two nipple wrenches. As soon as you tore off the connecting nuts, work them synchronously (see photo). If there is no second key, then turn each side separately no more than one turn.
Simultaneous operation with two nipple keys when disassembling a bimetallic radiator.
The procedure for disassembling a bimetallic radiator is the same as for an aluminum one:
- Turn off the heating system and wait for the battery to cool completely;
- Remove it from the wall;
- Insert the nipple wrench so that its head fits into the connecting nut;
- Unscrew it as described above.
Dismantling the old radiator
In general, the process of disassembling an old cast-iron heating radiator is carried out in the same way as a new one. But the problem is that over time, all compounds become covered with scale and practically get soldered to each other. As a result, it becomes simply impossible to do with just a plumbing radial wrench.
In addition, an additional item appears in the work - flushing. The old radiator, in any case, is clogged from the inside with all kinds of dirt. Therefore, if you have already undertaken to improve it. then you need to take care of cleaning the equipment, this will allow it to work much longer and better.
It is advisable to flush outside, so you will protect the bath from damage. The procedure is carried out using ordinary running water, there is nothing complicated about it. But the further process can be quite puzzling. If you find that the nuts are firmly attached to the radiator and do not want to part with it, then you can use three different methods in order to break this union:
- the bonded joint can be separated by heating. To do this, you will need either a blowtorch or a hair dryer. The first option is much more efficient at work, but the second can also give the desired result. Use this accessory to warm up the perimeter connection you want, and then immediately try to remove the nut without waiting for it to cool. If it doesn't help right away, repeat the same procedure a few more times, after each call again trying to deal with the problem. Please note that working with hot metal is very dangerous. do not forget to protect yourself with protective clothing - gloves and an apron - and special glasses;
- if the previous procedure did not help, then you will have to try to solve the problem with a more radical method - sawing. As a tool for this, you will need a hacksaw for metal or a Bulgarian saw. The grinder does an excellent job of sawing metal, but here again the fragility of the cast-iron battery should be taken into account - if you cut the same place for too long, the material may simply crack, and the entire radiator will have to be thrown away. To prevent this from happening, you should make the cuts in stages, giving the battery a little rest after each run. But in general. if you have the opportunity to spend a significant amount of time and effort, it is better to use a hacksaw for cutting metal. Of course, this is a much more dreary and time-consuming process than in the case of a grinder. But on the other hand, there is no risk of damaging the radiator in those places where it is not required at all;
- the third option is even more brutal. If heating did not help solve the problem, and cutting is impossible for some reason, then there is only one way out - just break the desired section. This is done with a sledgehammer. Naturally, it is not worth peeling at full swing, since in this case you will be left without a battery. You need to act carefully and slowly, starting from the middle of the section and gradually reaching the point of its connection with the neighboring one. As with the blowtorch, be sure to wear safety goggles - even if smashed gently, there is a risk that some of the shards will bounce off abruptly.
Dear readers, now you know how to properly disassemble a cast iron battery, even if it is three times your age and desperately wants to maintain its integrity. The assembly is carried out, in general, in the same way, but in the reverse order.
Even if the radiator is completely new, all joints must be thoroughly cleaned with sandpaper before assembly. And in the case of an old battery, this is generally a mandatory procedure. It is also advisable to replace all gaskets.If before that there were rubber ones, then replace them with more modern ones, made of silicone or paronite. These materials are much less susceptible to deformation and have a very long service life.
As you already understood, the most important thing in the process of disassembling a cast-iron heating radiator is accuracy. The fragility of the material requires an extremely leisurely approach
In addition, do not forget about safety, which, as you know, comes first. With the right approach to the process, your cast iron radiator will serve for a long time and efficiently. Good luck!
Wrenches for twisting and unwinding radiators (universal)
Wrenches for twisting-untwisting radiators (universal) are irreplaceable attribute when installing any types of radiators. Especially such tools are necessary for modern sectional batteries, which have been very popular lately. Both aluminum and bimetallic radiators can be easily assembled using the universal wrench. It is worth paying attention to the number of sections in the equipment, for which the key itself is selected. Manufacturers offer wrenches for assembling radiators in sizes from 6 to 10 sections. To reduce the number of sections, you will need a special key for unwinding, with its help the process will be quick and easy. In this case, no special skills are required at all, it is enough to follow the instructions for installing radiators. Wrenches for twisting-unwinding radiators (universal) are presented by different manufacturers. It is best to select heating devices, as well as all the necessary components for them from one company. This is a guarantee of high-quality installation and exact match of the key size with the connecting elements. When installing such equipment, you may need other types of universal keys used for connecting elements in the form of control and shut-off valves.
Wrenches for twisting-unwinding radiators (universal) have a T-shape. It consists of a handle and a screwdriver for the nipples with which most sectional radiators are connected. For the production of keys, high-strength steel is used, the top is coated with zinc. Thanks to this, universal keys are of high quality, strength, resistance to negative external influences, including mechanical ones, and durability. The keys are presented in different sizes, the length of 700 mm is considered traditional for such products, and the diameter is 16 mm. The diameter of the nipple head of the key can vary from 22 to 35 mm. Wrenches for twisting-untwisting radiators (universal) are also suitable for sectional cast iron batteries. They have the same parameters as the keys for other types of radiators. Made of quality tool steel, they are able to withstand torsional stress up to 7 tons. The catalog contains a wide range of universal keys in different sizes and markings. That will allow you to choose the right tool for any radiator model.
Dismantling the aluminum and bimetallic radiator
Before disassembling the radiator, prepare the necessary tools.
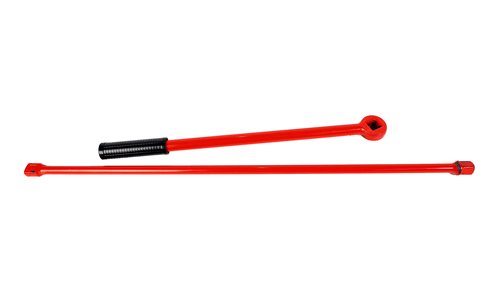
A nipple wrench is used as the main tool (can be rented in a specialized store for little money). It is a bar with a length of about 700 mm. On the one hand, a key head with a size of 24x40 mm is welded to it, and a through hole is made on the other. You can insert a metal bar into it. With its help, it will be easier to scroll the nut.
This is the main tool used when assembling / disassembling heating radiators.
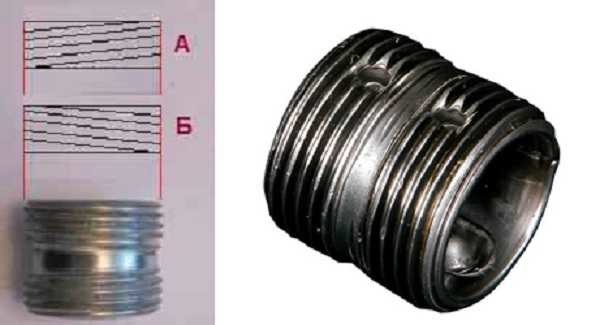
There are several notches on the surface of the key. The distance between them corresponds to the width of the radiator section. By inserting the key inside the battery, and counting the number of notches, you can easily find the nipple for the desired section.
Before disassembling the heating battery, you need to orient yourself with the direction of rotation of the key.Place the radiator face up on a flat horizontal surface. There will be a right-hand thread on the right, and a left-hand thread on the left. In order not to get confused, you can do it easier: take the nut and bait it alternately on the right and left, and then we conclude in which direction to turn the key
This is important because the threads are easy to rip off and two new sections must be purchased. Imported manufacturers make the following designations for the thread on the plugs and butts on the front side of the section: D-right, S-left
The thread on the nipple nut can be right or left, therefore, before disassembling the radiator, we determine which direction to turn
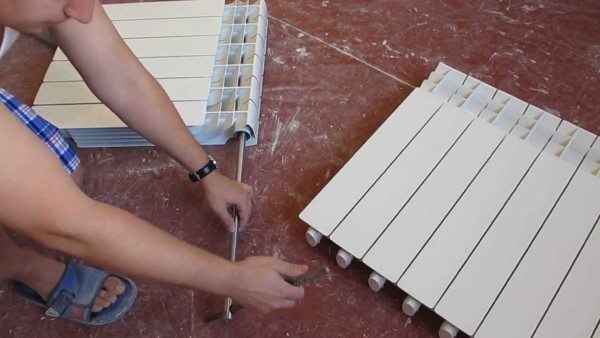
Let's say you need to unscrew one section on the right. To do this, insert the key with a "spatula" into the upper hole to the desired location, fix it in the groove of the nipple-nut and, by turning the key counterclockwise with force, "pull it off" from its place. This is where a rod inserted into the ring on the key may be needed: a decent amount of effort is required.
We make two full turns and move the key to the bottom of the radiator. We repeat the operation by rotating the key in the same direction. We unscrew the nipple by 2 turns here too. Take out the key again and repeat the procedure for the upper part. So, one by one, unscrew the section completely. This is done so that there are no distortions.
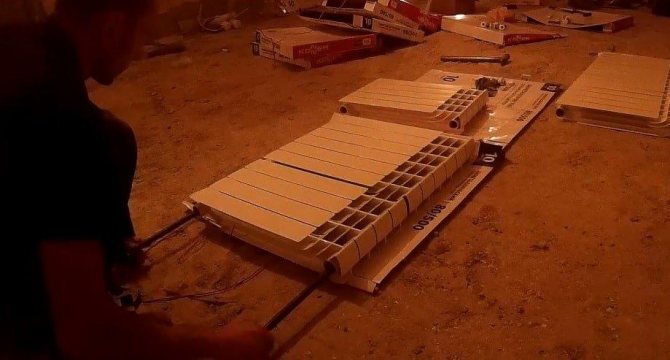
Dismantling of bimetallic and aluminum sectional products
To disconnect the radiator from the system and remove it from the mounting location, proceed as follows:
- Stop water circulation and relieve pressure.
- If the radiator is hot, you need to wait until it cools down and then disconnect from the system. To do this, unscrew the inlet and outlet couplings.
- Move the coupling away from the radiator along the pipe and remove the device from the brackets.
- Drain off remaining water and place the product face up in the disassembly area.
- Pull out and rinse the filter immediately so that dirt does not dry on it.
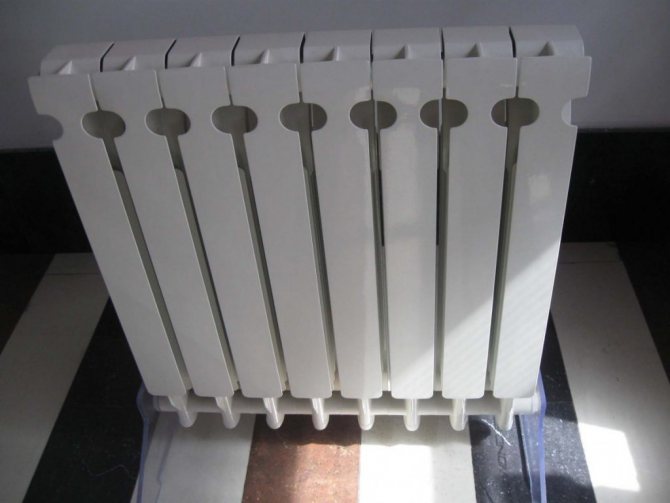
Product design
An aluminum radiator is a structure of separate sections, interconnected by means of nipple nuts. In fact, this connecting element is a cylinder, on each side of which an external thread is made. The cylinder is empty inside. Radiator sections are screwed onto each nipple-nut from both sides.
Connectors are located at both the top and bottom of the battery. Thus, each section of the radiator is attached to the adjacent one at four points. The nipple-nut is made in such a way that it is completely invisible in the assembled product.
There are projections on the inside of each connector that serve for the installation procedure. A special tool clings to them, with the help of which the nut is untwisted and tightened. In this case, the direction of the thread should be taken into account - on some elements it is right-hand, on others it is left.
In order not to play the "guessing game", just pay attention to the markings in the corresponding areas. If the letter D is indicated there, this means that the thread is right-hand
The letter S indicates the left
It is very important not to confuse, as an attempt to unscrew the nut in the opposite direction can lead to thread stripping and, consequently, damage to the element.
Wrench for aluminum and bimetallic radiators 700 mm
Pliers for crimping press fittings 16-20 mm (article VTm.293.L.1620) Attention! When buying any goods from us (parts for the installation of any pipeline) in the amount of 5,000 rubles or more. - free rental of ticks. If you do not plan to do installation immediately after purchase, you are given the right to a one-time (day) free rental of ticks within three months from the date of purchase of parts. Edit when it suits you. Price per day: 250 r. Bond amount: 5000 rub. To receive this instrument for rent, you must pay a deposit of 5000 rubles. The rental price is deducted from the deposit upon return of the instrument.Pliers for crimping press fittings 16-32 mm (article number VTm.293.0.160032) Attention! When buying from us any goods (parts for the installation of any pipeline) in the amount of 9,000 rubles or more. - free rental of ticks. If you do not plan to do installation immediately after purchase, you are given the right to a one-time (day) free rental of ticks within three months from the date of purchase of parts. Edit when it suits you. Price per day: 300 r. Bond amount: 9000 rub. To receive this instrument for rent, you must pay a deposit of 9000 rubles. The rental price is deducted from the deposit upon returning the tool Soldering iron for polypropylene 20-40 mm Attention! When buying any goods from us (parts for the installation of any pipeline) in the amount of 5,000 rubles or more. - free rental of a soldering iron. If you do not plan to do the installation immediately after purchase, you are entitled to a one-time (day) free rent of a soldering iron within three months from the date of purchase of the parts. Edit when it suits you. Price per day: 250 r. Bond amount: 5000 rub. To receive this instrument for rent, you must pay a deposit of 5000 rubles. The rental price is deducted from the deposit upon returning the tool Hydraulic crimper 60 bar (article CM-60) Attention! When buying from us any goods (parts for the installation of any pipeline) in the amount of 15,000 rubles or more. - free rental of a pressure operator. If you do not plan to do the installation immediately after purchase, you are entitled to a one-time (day) free rental of a crimper within three months from the date of purchase of parts. Edit when it suits you. Price per day: 300 r. Bond amount: 14000 rub. To receive this instrument for rent, you must pay a deposit of 14,000 rubles. The rental price is deducted from the deposit upon returning the instrument. UPONOR system installation kit (article 1004064) Attention! When buying from us any goods (parts for the installation of any pipeline) in the amount of 22,000 rubles. - free rental of the UPONOR set. If you do not plan to do installation immediately after purchase, you are entitled to a one-time (day) free rental of the tool within three months from the date of purchase of the parts. Edit when it suits you. Price per day: 350 r. Bond amount: 22,000 rubles. To receive this instrument for rent, you must pay a deposit of 22,000 rubles. The rental price is deducted from the deposit upon return of the Stripping tool for polypropylene pipes 20-25, 32-40 Attention! When buying from us any goods (parts for the installation of any pipeline) in the amount of 1000 rubles or more. - free rent of stripping 20-25 or 32-40. If you do not plan to do installation immediately after purchase, you are given the right to a one-time (day) free rent of stripping for three months from the date of purchase of parts. Edit when it suits you. Price per day: 100 r. Bond amount: 500 r. To receive this instrument for rent, you must pay a deposit of 500 rubles. The rental price is deducted from the deposit upon return of the Stripping tool for polypropylene pipes 50-63 Attention! When buying from us any goods (parts for the installation of any pipeline) in the amount of 2,000 rubles. - free rent of stripping 50-63. If you do not plan to do installation immediately after purchase, you are given the right to a one-time (day) free rent of stripping for three months from the date of purchase of parts. Edit when it suits you. Price per day: 150 r. Bond amount: 1000 rub. To receive this instrument for rent, you must pay a deposit of 1000 rubles. The rental price is deducted from the deposit upon return of the tool. Shears for cutting pipes up to diameter 63 Attention! When buying from us any goods (parts for the installation of any pipeline) in the amount of 3000 rubles. - free rental of scissors for cutting pipes up to 63. If you do not plan to do installation immediately after purchase, you are entitled to a one-time (day) free rental of scissors within three months from the date of purchase of parts. Edit when it suits you. Price per day: 200 r. Bond amount: 2500 r. To receive this instrument for rent, you must pay a deposit of 2500 rubles. The rental price is deducted from the deposit upon return of the instrument.Shears for cutting pipes 20-40 diameters Attention! When buying from us any goods (parts for the installation of any pipeline) in the amount of 3000 rubles. - free rental of scissors for cutting pipes of 20-40 diameters. If you do not plan to do installation immediately after purchase, you are entitled to a one-time (day) free rental of scissors within three months from the date of purchase of parts. Edit when it suits you. Price per day: 200 r. Bond amount: 1000 rub. To receive this instrument for rent, you must pay a deposit of 1000 rubles. The rental price is deducted from the deposit upon return of the instrument. Pipe shackle 1/2 ″, 3/4 ″, 1 ″, 1 1/4 ″ Attention! When buying from us any goods (parts for the installation of any pipeline) in the amount of 1000 rubles or more. - free rent of a pipe die. If you do not plan to do installation immediately after purchase, you are entitled to a one-time (day) free rent of a pipe die for three months from the date of purchase of parts. Edit when it suits you. Price per day: 100 r. Bond amount: 600 rub. To receive this instrument for rent, you must pay a deposit of 600 rubles. The rental price is deducted from the deposit upon return of the instrument. Radiator key Attention! When buying from us any goods (parts for the installation of any pipeline) in the amount of 2,000 rubles. - free rent of a radiator key. If you do not plan to do installation immediately after purchase, you are entitled to a one-time (day) free rent of a radiator key within three months from the date of purchase of parts. Edit when it suits you. Price per day: 150 r. Bond amount: 500 r. To receive this instrument for rent, you must pay a deposit of 500 rubles. The rental price is deducted from the deposit upon return of the instrument
Dismantling cast iron heating radiators
Dismantling cast iron radiators sometimes becomes a very laborious process, but necessary.
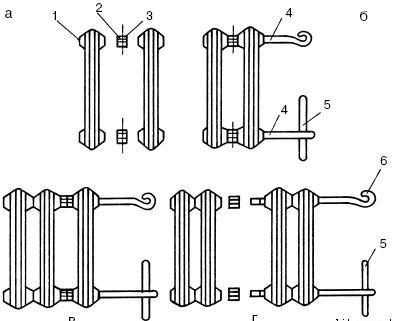
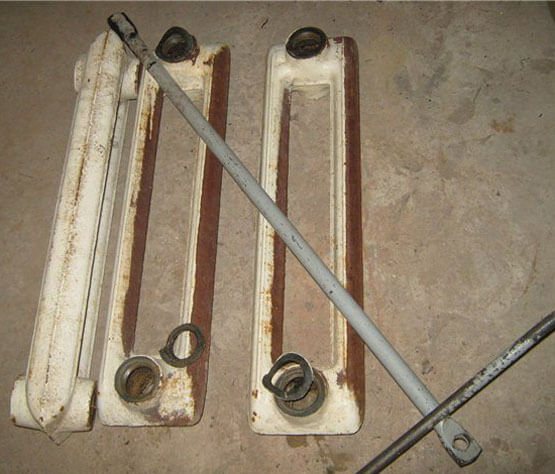
Diagram of disassembly of cast-iron heating radiators: a - nipple gripping of the threads of the sections by 2-3 threads; b - turning the nipples and joining the sections; c - connection of the third section; d - grouping of two radiators; 1 - section; 2 - nipple; 3 - gasket; 4 - short radiator key; 5 - crowbar; 6 - long radiator key.
Place the new or old radiator on a level place. At least on one side, you need to remove the usual footwear or blind plugs. On different sections of the radiators, they can be left-handed or right-handed. Typically, cast iron fittings have a right-hand thread, and plugs have a left-hand thread. If there is no disassembly skills, and there is a free section, it is better to find out, before applying force, what kind of this thread and in which direction the key should be turned. If the thread is left-handed, turn the key clockwise when disassembling the cast iron batteries.
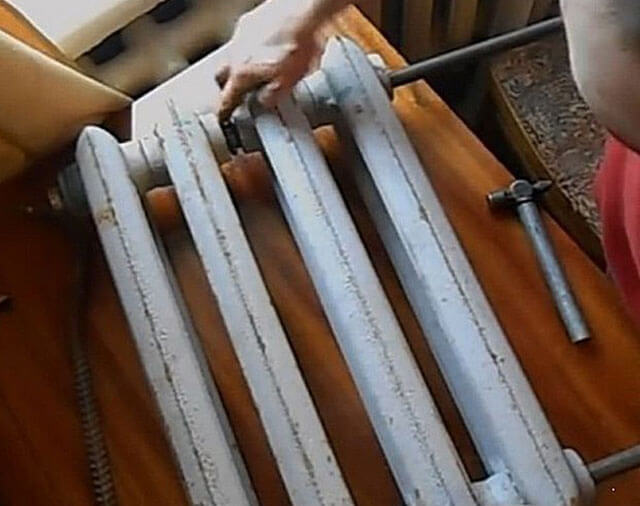
As with unscrewing any nuts, you first need to "rip" the footwear from its place, ie. turn them a quarter turn on both sides of the battery. Then the foots are unscrewed so that a gap of several millimeters forms between the sections. If you let go of the footwear more, the whole structure will begin to bend under its own weight and due to the applied forces. This can jam the threads. To prevent this from happening, an assistant must stand on the disassembled battery, who will prevent bending with his weight.
Usually, the dismantling of old heating radiators is complicated by the fact that the footboards and sections are "stuck". In order to disassemble such a battery, you will have to use an autogen or a blowtorch. The junction is warmed up in a circular motion. As soon as it is warmed up enough, the shorts are unscrewed. If it was not possible to unscrew it the first time, the steps are repeated.
If you do not have enough strength to disassemble the battery, you need to increase the length of the key. An ordinary pipe is used, which serves as a stepping stone.
The built-in nipples for venting cast-iron radiators are unscrewed in the same way.
If it was not possible to disassemble the cast-iron battery with the considered methods, it remains to cut it with a grinder or autogenous gun or break it in a supine position with a sledgehammer. You need to split or cut one section carefully. After this operation, the adhesion between the sections may weaken, the battery can be disassembled, the remaining sections will be saved.
The use of a "liquid key" or WD liquid does not give an effect, since in old cast-iron batteries the fittings were sealed with linen and paint, and liquids will not get on the threads.
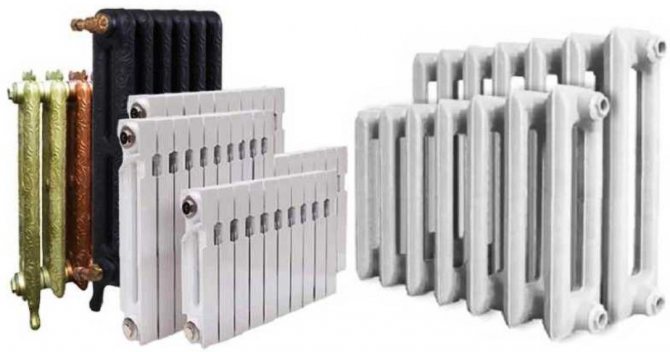
Heating radiator designs
If a heating element breaks down, especially in the cold season, it must be repaired or replaced immediately. Whether the radiator can be disassembled depends on the type of its design. Quite often, non-separable types of radiators are installed in apartments, which cannot be restored. In this case, it is best to purchase a new battery right away. But there are also collapsible models that can be dismantled to replace the damaged element and installed back.
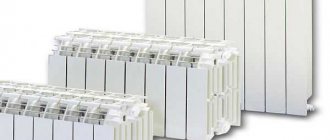
Products are divided into two main types:
- Sectional batteries assembled from several identical sections, securely connected to each other. Each of them has a channel through which water circulates, and fins that radiate heat heat the room. Sectional batteries are the most popular because the cost of such radiators is lower. In the event of a breakdown, it is enough to replace only the damaged section, and if necessary, you can always add or remove ribs.
Sectional heating batteries
- Monolithic products represent one integral structure that does not have separate sections. Outwardly, these radiators may resemble sectional counterparts, but the differences between them are obvious. In monolithic devices there are no connecting joints, due to which they are able to withstand more pressure. From this, the terms of failure-free operation of these structures are almost twice as long as those of sectional ones. But in the event of a leak, the monolithic device will have to be changed completely. In sectional products, it will be enough to replace the damaged element.
Bimetallic monolithic radiator
How to disassemble cast iron batteries with your own hands
Most often, old-style houses and apartments are equipped with MS-140 cast iron batteries. Nipple nuts and gaskets are also used to assemble their sections. It is especially difficult to disassemble an old battery. in the course of its long-term operation, the gaps between the sections boiled with rust. As a rule, in such cases, the key niches are eaten away by the coolant.
It is also important to keep in mind a significant mass of cast iron. For example, the weight of one battery for 12 sections is 90 kg: it will be difficult to cope with such a product alone.
To implement the procedure, you will need the following tools:
- Nipple radiator wrench.
- Plumbing fixtures for unscrewing sleeves and plugs.
- Small sledgehammer and chisel.
- Blowtorch (it can be replaced with a building hair dryer).
- Steel brush.
- Wooden blocks for installing the battery on the floor.
In the role of a radiator key, a round metal rod with a diameter of 18-20 mm flattened at one end is used. The dimensions of the flattened part are 28 × 40 mm, with a thickness of 6 mm. A ring is welded to the opposite edge of the rod, through which the lever is threaded. The length of the radiator wrench should be as long as half of the largest 12-section battery, plus 30 cm.
How to disassemble a cast iron heating radiator
It is much more difficult to disassemble a cast iron battery than an aluminum or bimetallic radiator. As a rule, her age is much older, so all connections are hopelessly stuck, so you have to sweat.
To work, you need the following tool:
- Nipple wrench;
- Gas wrench, preferably with a long handle;
- Bulgarian.
In old houses, cast iron batteries were often welded to pipes. Therefore, you will have to cut off pieces of pipes from all sides, where they are brought to the radiator.
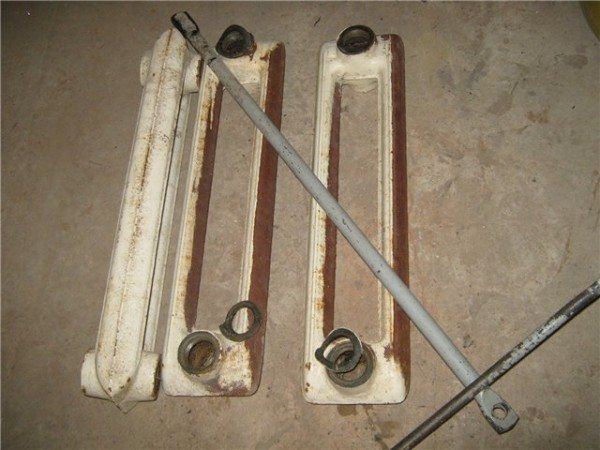
If the pipes have couplings (see photo) or nuts, unscrew them with a gas wrench. It happens so that they are stuck tightly, and paint got into the grooves. In this case, moisten the joints with a solvent to remove the paint, then treat them with a rust converter.
Disassembly procedure
It is very difficult to separate stuck intersection joints. In some cases, they stick to it so much that even significant physical effort turns out to be powerless. In such situations, the joints are warmed up before disassembly with a blowtorch or hair dryer.
How to disassemble a cast iron heating radiator:
- Cast iron is heated with a blowtorch until it starts to emit a crimson glow. After that, you can start the disassembly procedure.
- The first step is to unscrew the plugs.
- The radiator wrench is brought to the top of the battery: its head should fall on the area of unscrewing the nipple-nut. At the end of the section, you need to use chalk to mark the circle where the tool rod is located.
- The flattened part is inserted into the lower inner groove. Further, moving the tool in the desired direction, bring it to the marked circle.
Before starting the operation, it is important to find out in which direction it is necessary to twist the sections. If there is a nipple nut, it is screwed in turn on the right and left ends of the battery: this makes it possible to determine the direction of rotation of the nipple
If the thread moves, do not completely loosen it. To avoid misalignment, the top and bottom nipples must be unscrewed one full turn in turn.
From the author:
hello dear friends! Often, the question of how to disassemble an aluminum heating radiator arises before the owners of dwellings. This happens in two cases. The first is equipment breakdown, malfunctioning or leakage of one of the segments.
The second - when the power of the product is not enough to heat the room with high quality. This usually happens if the required indicator is initially incorrectly calculated. That is why it is recommended to invite a specialist for preliminary calculation of the required parameter.
A professional calculates even the slightest nuances. In this situation, all factors are important - for example, the climatic zone in which you live, the area of the premises that need heating, the condition of the window frames, the presence of an insulation layer on the walls, and much more.
It is clear that a person who does not have the appropriate knowledge and experience will not be able to correctly calculate the required power. Therefore, in fact, it often turns out that an aluminum battery is simply not able to provide the required amount of heat. Fortunately, this problem can be solved quite easily by disassembling the product and adding the required number of sections. You will learn how to do this in today's article.
Tool features
Despite the variety of models of heating devices, they are all arranged according to a similar principle. Separate sections of radiators are fastened to each other with special nipple-nuts with a counter thread. In this case, the fasteners are located deep inside the section, and unscrewing the nuts requires significant physical effort. Therefore, to assemble and disassemble sections of heating radiators, a special tool is used, which in general is a fairly long and strong piece of metal of a cylindrical section with a "blade" of the correct dimensions at the working end.
The main reasons for repairing an aluminum radiator
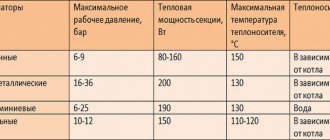
Why do such incidents occur? The fact is that aluminum heating batteries are not entirely suitable for installation and operation in such buildings, due to the limit of the permissible operating pressure of the product. For aluminum radiators, the maximum (permissible) operating pressure is within 15 atmospheres. Installation of an aluminum radiator in an apartment, with an external heat supply source, forces the product to work at its limit, since the working pressure of the central heating system, as a rule, is in the range of 12-15 atmospheres, and during pressure testing (system start-up) it reaches much more.
As you understand, an accident of an aluminum battery, in such operating conditions, is inevitable and can occur at any time and it is not necessary that you wake up, at the same time, be at home and be the first to know about it. So, based on the above, a sudden accident of an aluminum structure can lead to large - serious financial costs that will have to be spent not only on repairing your premises - an apartment, but also on compensation for the consequences of the accident, neighbors ...
But there are other reasons that force urgent repairs, interference with the integrity of the battery structure, that is, to attract a qualified specialist or disassemble and assemble an aluminum heating radiator with your own hands. If you decide to do it, in order to save money or other circumstances, on your own (on your own), then you will have to thoroughly study the topic and find out: "How to properly disassemble and assemble an aluminum heating radiator with your own hands?"
As practice shows, there are three main reasons that imply urgent, professional repair (disassembly and assembly of an aluminum heating radiator on your own):
- Clogged heating battery. The radiator is barely warm (not all sections are of the same temperature), although the pipe of the heat source is hot. Such a defect involves disassembling and washing the product;
- Between sectional battery leak. Moisture appears between the joints of the sections or fluid flows - it involves disassembling the structure and replacing the sealing elements;
- Leaking radiator section. The appearance of a crack or other defect, directly, in the section itself, which provokes the allocation or leakage of the structure, implies the replacement or restoration of the sectional element, or the entire battery.
Heating radiator key
Repairing a hole, the need to reduce or increase the number of sections in a heater - all this is not complete without a radiator key.
There is a separate key for each type of radiator, therefore, when you come to the store, you should carefully see if it fits your battery. The radiator wrench can be made by yourself by thermal heating.
How to choose a radiator key?
The choice of a radiator key should be primarily based on its technical characteristics: the number of sections for which it is designed, as well as the material of the radiator. In stores, you can find universal keys that fit all types of batteries.
It is advisable that the wrench is made of stainless steel, since you will have to work with this tool in high humidity.
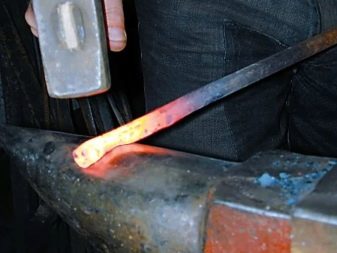
How to make a key yourself?
Any fittings from a construction site or from rolled metal are suitable for making a key. The following indicators should be taken as indicative parameters:
- Length. It is taken from 0.5 of the length of the largest heating device + 30 cm for disassembly and assembly. Maximum length - the entire length of the heater + 15 cm for disassembly and assembly.
- Diameter. The most commonly used batteries are 5/4 ″ and 1 ″ thread, and the diameter depends on this. For 5/4 ″ - 1.6-1.8 cm, and for 1 ″ - 1.2-1.4 cm.
It is better to heat the material on an autogen. If not, then you can take propane. A cutter should be placed on the hose to make the flame more powerful.You should also take care of the forging tool. A sledgehammer or other bulky tool will do.
To make a key, heat the end of the armature to a white hue (do not overdo it so that the metal does not reach the melting point), and then flatten it with the prepared tool. Repeat this procedure several times, simultaneously giving the required size and shape to the workpiece. It is advisable to prepare a nipple with the required diameter in order to measure the key being produced on it.
When the key is ready in shape and size, its working area should be hardened. To do this, heat a piece about 15 cm long from the working end, then lower it into a bucket of water. Quench in a circular motion until the wrench is completely cool.
If the working area of the finished product is larger, then it can be adjusted to the required size on a grinder or emery wheel. Please note that the tool must not be overheated when turning, so it should be periodically immersed in water.
When the workpiece is completely ready, it should be equipped with a cross from the other end. To do this, you need to take 2 fittings with a length of 15-20 cm and weld them first with an overlap, then to the end of the product.
Drawing the line
A key for a radiator is necessary for everyone who has a sectional heating device at home. The tool may be needed at the most unexpected moment. Basically, it makes no difference whether you make the key yourself or buy it from the store. The first case is more time consuming, the second is more costly.
Useful Tips
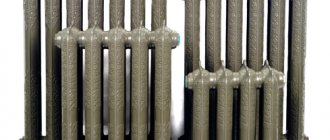
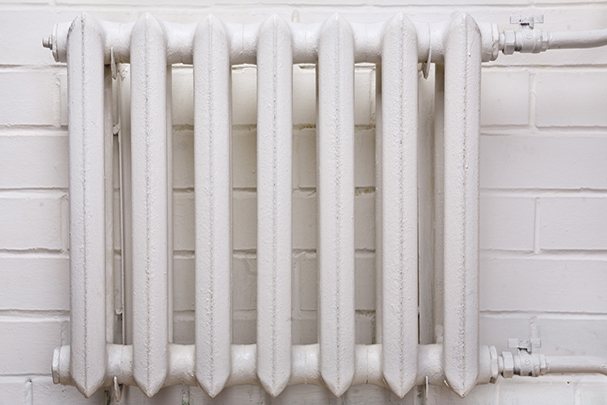
Interesting fact. Many people do not want to use cast iron radiators solely because of their appearance. But recently, it is the cast-iron retro heating batteries that have become widespread. These are the models that they so diligently left. Fans of retro style often specially order such models in stores. Admirers of more modern design can be offered to decorate cast-iron radiators with special screens.
There is no heat loss from the screens, but the batteries look somehow very simple, but stylish. Those who do not want to change their batteries can simply bring them back to their original beautiful appearance. Batteries can be repainted using modern materials or you can give them a rather unusual look yourself. When choosing materials, be sure to select those that can withstand high temperatures over 80 degrees. It is advisable to consult with sellers about painting materials. There are some paints that can change color when interacting with hot surfaces. In this case, by carefully painting the battery in a snow-white color, you can see a completely non-crystal white version during the heating period.
How to disassemble a cast-iron heating battery with your own hands
Sooner or later, it may turn out that even a cast-iron battery will require a complete replacement or you will just need to clean it. In both cases, the battery will have to be disassembled. How to disassemble a cast-iron heating battery with your own hands quickly enough and as professionally as possible? The fact is that such radiators are the best option for use in apartment buildings. These heating elements are able to withstand all the vicissitudes of an imperfect heating system. Sometimes, over time, even the cast iron has to be changed, because it has leaked or simply does not fit into the new apartment renovation.
Although even today, cast iron batteries are still relevant. Many users do not want to change such good heat sources for new ones, but such heat sources are so short-lived in comparison with cast iron. Therefore, most people try to get their batteries in order by simply repainting them. Some people use decorative screens for cast iron batteries. It is very convenient and looks like new radiators and there are no problems in design. (See also: DIY installation of heating radiators)
Any replacement of batteries can only be performed in the summer, when the heating season has not yet begun or, on the contrary, has just ended. But sometimes circumstances develop in such a way that it is necessary to change and disassemble the battery in winter. For example, if the battery leaks, what should I do? Wait for summer or the fact that one day the radiator will break through and the neighbors below will be flooded?
You can try to use the services of plumbers, but you can cope with the situation yourself. In order to disassemble a cast-iron battery, you need special tools and some knowledge, which we will tell you about.
Calculation of the required heat transfer over the area of the room
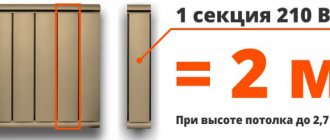
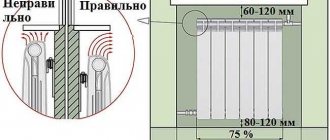
The heat transferred by the battery to the room air must compensate for its heat loss. In a simplified form, this means that for every 10 square meters of room area, radiators with a thermal power of approximately 1 kW should be installed. More details on the methods for calculating heating batteries.
In reality, this indicator is increased by an additional 15% or the resulting battery power is multiplied by another factor of 1.15
This is a very approximate method, which is used when the ceiling height in the room is not higher than 2.7 m. In addition, this method does not take into account the number of windows and the type of double-glazed windows, the number of outer walls and their thickness, and the climatic zone.
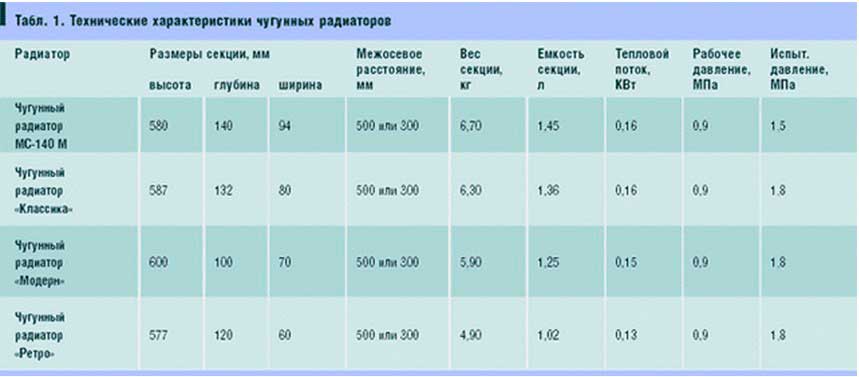
Calculation of the number of sections of a cast iron radiator
The power of the radiator is usually expressed by the power of one section. Cast iron batteries are assembled from separate sections. Each section has a power of approximately 0.15 kW (or 150 W). The value may vary slightly depending on the geometry of the section.
The power of each individual section is directly proportional to its surface area. For any typical cast iron products, the area value is the same.
A typical room with an area of about 15 square meters will require 10 cast iron sections. Each additional window is 1 or 2 additional sections. If the area of the premises is more than 20 square meters, it is better to install 2 batteries with a total capacity.
The standard power of the devices must be proportionally increased if the ceiling height exceeds 3 meters. For example, for a ceiling of 3.1 m, it is required to calculate 3.1 / 3 * 120 = 124W.
Battery assembly
In principle, having the necessary tools at hand, even a beginner will be able to assemble or disassemble an aluminum radiator with his own hands.
To install an aluminum radiator heater with your own hands, you must:
Place the battery on a flat surface. This is necessary in order to inspect the device before installation and check all the joints for possible cracks or chips.
Before connecting the elements of the heater, the threads at the joints are cleaned not only of debris, but also of factory paint. This is done using fine-grained sandpaper.
This is important, as the paint layer can crack in the future, leading to a leak. For the sake of presentation, manufacturers paint not only sections of radiators, but also their joints.
When cleaning the battery from paint, you need to make sure that the sandpaper does not leave scratches on it, which can also cause leaks in the future.
All gaskets should be washed in soapy water. and if antifreeze is supposed to be used in the heating system, then they need to be degreased, since this carrier is able to penetrate into any, even the smallest, irregularities.
Before connecting the sections, it is advisable to study the drawing of the key for assembling an aluminum radiator in order to know how to use it. This metal is very soft, so any too much force can damage the threads and then you will have to buy a new section.
A paronite seal is put on the nipple nut on both sides. The key is placed on top and can be easily turned a couple of times, the same is done with the bottom hole.Only after the joints have been tacked can you tighten them with a lever more tightly.
The hole that will not be used is closed with a plug, and the Mayevsky crane is attached to the other, and the aluminum radiator assembly is ready.
After all sections of the radiator have been assembled, it can be connected to the heating system and checked for possible leaks. Since aluminum batteries are quite lightweight, they can be easily connected by hand, even without the appropriate skills.
Assembling aluminum radiators
Aluminum heating radiators - general information and characteristics
In the 80s of the twentieth century, a model of an aluminum heating radiator was introduced to the world market. Compared with such a familiar product as cast-iron batteries, this type of heating device had a number of serious advantages, as a result of which it quickly gained popularity among consumers.
Indeed, an aluminum heating radiator has a number of characteristics, due to which it is considered one of the most convenient heating devices. Let's consider these characteristics in more detail:
- Aluminum is a material with excellent thermal conductivity, as a result of which products from it can be used in systems with an unstable coolant pressure. Half of the heat is transferred by radiation, half by thermal convection;
- Light weight - this simplifies the installation of this type of device, as well as their transportation and maintenance;
- Durability - aluminum heating radiators withstand a pressure of 16 atmospheres;
- Low cost - devices of this type are much lower than similar bimetal or copper products;
- Possibility of regulation;
- Aesthetic appearance.

Thanks to all these characteristics, aluminum radiators quickly conquered the market and began to be widely used for space heating.
However, along with the advantages, these devices also have a number of significant disadvantages:
- Aluminum is a chemically active metal and lacks corrosion resistance;
- In prefabricated models, it is impossible to use any other coolant other than water with strictly maintained acid-base characteristics;
- Aluminum radiators tend to be airy. Therefore, it is periodically necessary to bleed air from the system;
- The threaded connection in such models is a weak point. A water hammer may compromise the tightness of the product.
Aluminum batteries are available in two types:
- solid;
- prefabricated, consisting of separate sections. If desired, they can be increased - add additional sections, or vice versa, remove them.
Dismantling aluminum radiators
Disassembling an aluminum heating radiator is required, as a rule, in cases where:
- We are going to install a new heating system;
- You need to build up the battery or remove the extra sections;
- Repair the leak or replace the seals.
In order to disassemble the product, we need a set of wrenches, a screwdriver and a radiator wrench.
The first step is to dismantle the battery from the place of its attachment. To do this, we perform the following actions:
- We stop the circulation of water in the system and release the pressure;
- We make sure that the device has cooled down and the hot water inside it does not scald us, pouring out;
- We find a threaded connection in the place where the hose is attached to the battery pipe by means of a coupling. We select a wrench that is suitable in size - with its help it is necessary to untwist this connection;
- We move the coupling along the pipe, remove the device and put it on a plastic wrap specially laid on the floor. A little water may remain inside - you should drain it. We put the radiator face up;
- We take out the special filter and rinse it immediately. Otherwise, the dirt on it may dry out to such an extent that it will be impossible to clean it.In this case, you will have to buy a new filter - it will be impossible to reuse the old one.
The next step will be to disassemble the battery itself into separate sections. You should be aware that the connection of the battery sections to each other is carried out using nipple-nuts - these are empty inside nuts with external threads on both sides and grooves for installation inside. For this purpose, we use a radiator wrench specially designed for working with nipple nuts. If necessary, you can make it yourself. This is a key with a blade with serifs on the rod - the distance between them corresponds to the width of the aluminum radiator sections. That is, by checking how many serifs the key went inside, we can find out which nipple-nut we are turning at the moment.
By placing the vane in the slots of the corresponding nipple-nut in the hole at the top, we make a couple of turns counterclockwise. Then we take out the key, insert it into the hole from below into the grooves of the corresponding nipple-nut and also turn it a couple of turns. Then we return the key to the upper nut and repeat everything until the sections separate.

Unscrewing the nipple nuts in this way is necessary to avoid skewing. In order to be able to apply the necessary force, there is a through slot at the end of the key, into which, if necessary, insert a metal rod as a lever.
After we managed to disassemble the radiator, we clean it inside, change the gaskets and seals. If there is a need to build up the battery, you need to add the required number of sections.
If it is necessary to eliminate the leak, we prepare a special solution - add bronze powder to the epoxy resin and mix thoroughly. We clean the damaged area with a cable, after which we process it with the prepared composition and wait 30 - 60 minutes until it dries completely. When working with this composition, everything should be done so quickly so as not to let it dry out ahead of time.
After completing all the necessary maintenance and troubleshooting operations, the battery must be assembled and installed.
Assembling aluminum radiators
The sequence of actions when assembling the aluminum radiator:
- In order to assemble the battery back, place it on a flat surface. We carefully inspect all threaded connections for cracks and chips;
- We clean each connection from litter and dirt. If we want to add new parts, we need to clean the ends to a shine. Even the manufacturer's paint is removed - at the joints it will be a significant obstacle, causing premature coolant leaks. For cleaning we use sandpaper with a very fine grain so as not to leave scratches on the surface, which can also cause leaks;
- Degrease the ends with gasoline. Wash the gaskets in soapy water. Degreasing is mandatory in systems where antifreeze is used, and not ordinary water. They have a high flow rate and can penetrate the smallest irregularities;
- Now we can start connecting the sections. We put on the paronite seals on the nipple-nut and attach the product section on both sides. Place the key hole on top and turn it a couple of times without using the lever. Then, in the same way, we make a couple of turns of the nipple-nut in the lower hole. We do this until the key stops turning, and we stretch it with the lever. We do not apply much effort - aluminum is a soft metal and it is very easy to damage the thread. According to this scheme, we assemble the whole product;
- We put a plug on the unused hole, and on the other hand, we fasten the Mayevsky crane - it serves to bleed excess air from the system. Then we install the radiator and connect it to the system.We make sure that the coupling tightly connects the product to the water supply hose. Then we can supply water to the system, observing whether there will be coolant leaks somewhere.
Conclusion
So, we were able to make sure that it is not very difficult to disassemble and then assemble an aluminum radiator. All operations should be performed very carefully - aluminum is a very soft metal and it is very easy to damage it. To carry out the work, no special construction skills are needed - only a set of the simplest tools, attentiveness and accuracy. Thus, if you need to service the product or need to add a certain number of sections, you will be able to cope with this task on your own.
How to solder an aluminum car radiator with your own hands
Let's move on to the soldering process. First, the problem area is carefully cleaned with a file and sandpaper. Before you start replacing the Peugeot 307 timing belt with your own hands, you need to prepare the tools that we need for this operation on the nfu engine. If there are slats on it, they must be carefully removed with pliers. Aluminum radiator with your own hands, a car that, as already. Further, the place of repair is degreased with acetone.
When the brazing preparation is complete, the flux can be applied. After that, we begin to warm up the junction. If you are using a gas torch or blowtorch, be careful not to burn out the flux ahead of time. It is easier to apply it with a soldering iron. It is enough to dip its working element into the mixture and transfer it to the surface to be treated.
Now it's time to apply the solder. How to repair a toyota radiator It is better if it is in the form of a bar or wire. The solder is applied to the junction and carefully warmed up with a soldering iron (torch). When it spreads evenly, it is necessary to let it cool down, after which it is advisable to apply a second (safety) layer. At the end of the work, the formed nodules can be removed with sandpaper.
How to do it yourself?
To make a radiator wrench with your own hands, you first need to find a suitable piece of metal fittings. The size of the segment should be selected so that the length of the finished key is at least half the length of the radiator with which it is supposed to work, plus 30 cm (for dismantling 7-section aluminum / bimetallic radiators, a key 69 cm long is enough).
To make a tool, you will need an autogen, a hammer and an anvil. The intended working end of the workpiece must be heated to white heat. After that, a "scapula" is forged on the anvil with a hammer. The operation should be repeated several times until the working part of the required size is formed. Finishing can be done using a grinder or grinder.
It is useful when debugging to have an example of a nipple used in a radiator, "trying on" the tool being manufactured to it.
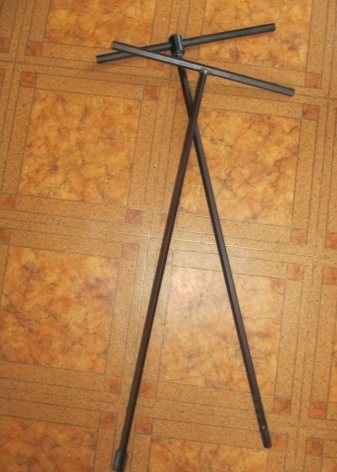
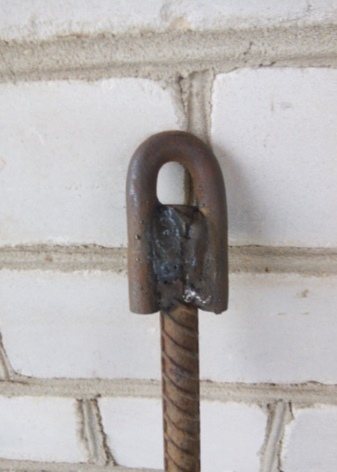
To make a T-shaped key, it is enough to weld a bar at least 20 cm long perpendicularly to the opposite end of the working end. Remember to weld on the curved edge.
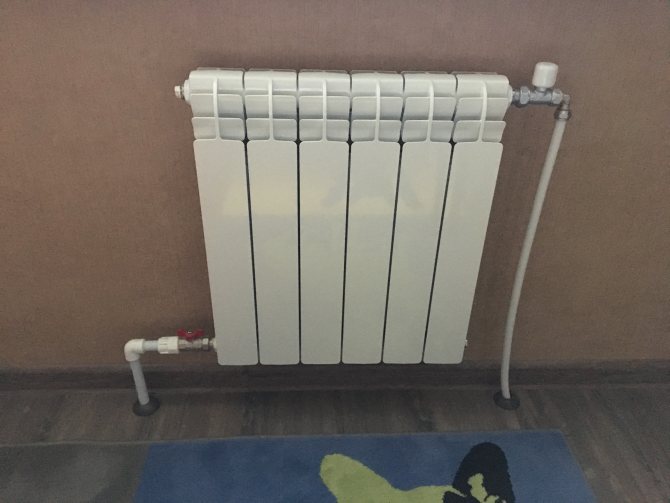
Dismantling and assembling an aluminum radiator with your own hands
The site where the radiator will be restored, covered with dense fabric
... If this is a table surface, then the main work will not take place on weight. The prepared place will protect soft aluminum from getting unnecessary deformations and scratches.
Important ! Before removing the union couplings, a rag is spread under the radiator to protect the floor from dirty liquid that may leak out during dismantling. You need to have a rag on hand to absorb the moisture remaining inside the sections
Disconnection from the heating network
Before starting disassembly, the radiator is disconnected from the heating network shut-off valves
... If the radiator has no shut-off valves, then
invite a housing and communal services worker
so that it turns off the heating riser for repair work.
During the heating season, after closing the radiator, pause. Since the water is still hot, wait a while until the liquid cools down
, and then disconnect the radiator from the heating pipes.
Heat carrier
remaining in the battery
poured into a prepared bucket
and proceed to the separation of the sections. Immediately after dismantling, the inner surface of the battery is rinsed with running water.
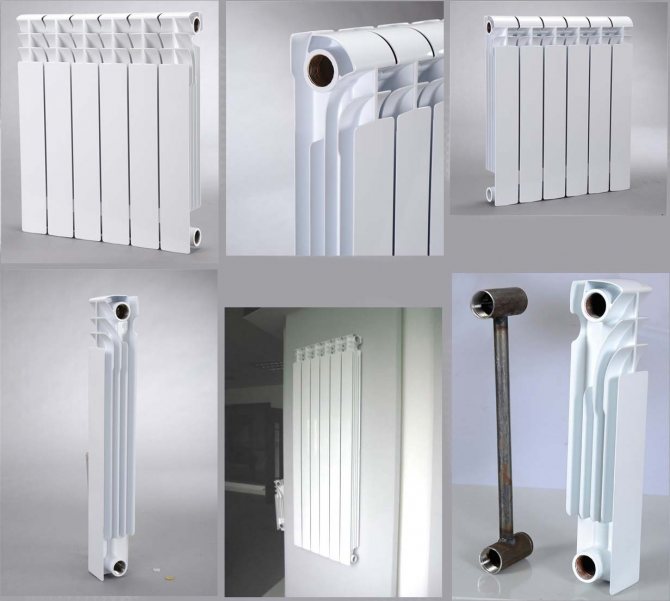
How to disassemble and reassemble the battery
Aluminum sections, connected nipple nuts
... The inner part of such a connector has protrusions for which the nut is gripped by a nipple wrench and unscrewed. The nut is like a clutch, only
her thread is external
... One nipple nut has both right-hand and left-hand threads. They are made in pairs for the top and bottom connection. When the nipple is unscrewed, the sections diverge, when tightened, they are pulled together.
Preliminary all plugs and adapters are twisted from the ends
... The connector must be accessible from all sides for the nipple wrench.
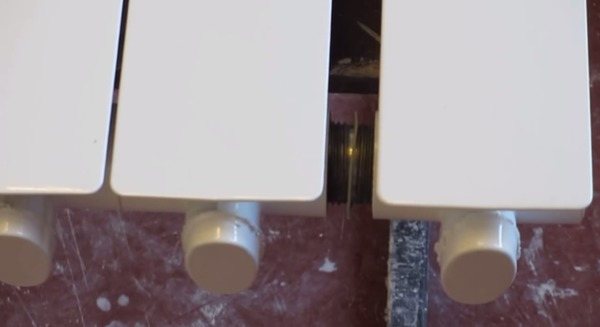
Photo 1. Fastening the sections of the aluminum radiator to each other: the nipple-nuts are unscrewed when disconnected.
To disassemble the battery, the tool blade is placed through the open end of the radiator into the slots of the unscrewed top
nipple-nuts and with some pressure make a trial
scroll counterclockwise
to move the connection. If the key turns the nut normally, then it is inserted into the grooves
bottom
nipple nut and, as in the first case, try to turn it a couple of turns.
Important ! When unscrewing the connectors, follow the sequence to avoid skewing. After disconnection, the exposed thread is carefully examined for cracks and chips, for thread integrity
If necessary, the joints are cleaned with fine emery cloth
After disconnection, exposed thread carefully examined for cracks and chips
, on the
thread integrity
... If necessary, the joints are cleaned with fine emery cloth.
Starting the assembly of the radiator sections, onto the upper and lower nipple-nuts put on o-rings made of paronite
, placed between the sections. I lightly press the sections against each other and screw them up alternately.
Turning the nuts
, so as not to get skewed, is limited
two turns of the key
.
If something went wrong
During operation joints between sections and steel nuts stick to each other
... This comes from the quality of the coolant supplied to the heating system. Sometimes even considerable physical effort is useless.
Despite the fact that sticking must be dealt with, aluminum is easily deformed
as it is a soft metal.
By heating with a construction hairdryer, the joints can be overcome stuck on rust
... If this did not help, too, having corroded too much, then the edging machine gets down to business.
Advice.
If the nipple nut does not loosen under heavy pressure, then
no need to increase the applied force with excessive leverage
... In the worst case, not only the nut itself will break, but both sections, which sit tightly on this nut, will crack.
The grinder is trimmed leaky section
, moreover, on the reverse side and stepping back from the edge of the connection by at least half the length of the coupling. This protects the working section from destruction and does not cut the connecting nut. The rust bounces off during trimming, making it easier to unwind the intact section.
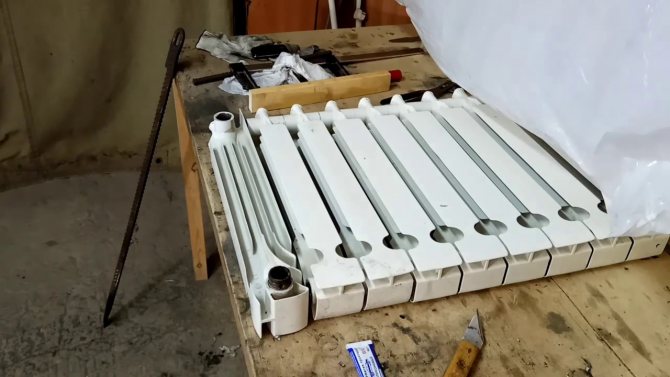
How to assemble an aluminum radiator
Putting it up in reverse order. We place the sections on a flat surface (a table of a suitable size or simply place it on the floor). If the radiator is not new, we unscrew the end cap and the Mayevsky tap.
Before installation, the threads and grooves should be well examined, they must be of high quality, without chips and drops. On the section to be mounted for the sample, we "drive" the thread by screwing in-unscrewing the nipple
Here you need to pay attention to the fact that a gasket may be located in front of the thread under a layer of factory paint. Rub lightly the end with fine sandpaper, if it is found there, then it must be carefully cut off with a knife with a sharp blade
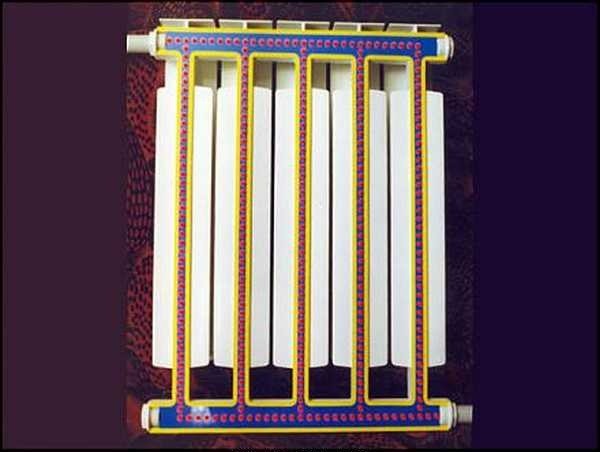
This is how an aluminum radiator looks like a cutaway.
Before adding sections of the heating radiator, be sure to clean the ends to a smooth surface. We even remove the factory paint. At the ends of the radiators, it is not needed, but will only contribute to the early manifestation of leaks. Sooner or later, coolant will begin to seep under the paint. In the case of non-freezing liquids, this will happen very soon, if water is used in the system, then not very much, but it will certainly happen. And then the coolant will begin to leak between the sections, although the gaskets are still in perfect condition. And the whole point is that the paint at the ends has exfoliated or corroded, microcracks have appeared. So be sure to clean the ends to a clean metal, but use fine sandpaper to make the metal surface smooth and scratch-free. This ensures that the system operates without leaks in the radiators.
For better tightness, the ends then need to be degreased (you can use gasoline). The gaskets are also degreased, but they must be washed with ordinary soapy water. For a system that will be filled with water, degreasing is an optional procedure, and for systems that will operate on antifreezes, it must be carried out. Antifreeze is very fluid and seeps into the smallest pores. After everything is dry, we begin to collect aluminum radiators.


Then we bait both nipple-nuts by half a turn. On top of the nipple, heat-resistant paronite (silicone) gaskets are put on to seal the joints. Now we take the section that needs to be screwed and put it tightly on the nuts, checking the tightness of their fit. Next, insert the key into the upper hole and twist it 1-2 turns. In this case, we do not use the lever yet. We twist our hands. Then we do the same operation in the lower hole. We repeat several times, alternately tightening both nuts for several turns.
Unscrew the sections gradually, one or two turns of the nut, then from the bottom, then from the top
We twist as much as we have enough strength. Only after hand tightening can the lever be used. This must be done in two steps on each nipple. It is better not to apply excessive efforts during the final tightening of the nipples, since you can easily break the thread: aluminum is a soft metal, do not forget.
If the section is completely assembled, we screw the plug onto the unused holes on one side, and on the other - the Mayevsky valve (to release air from the system). Now you know how to assemble sections of a heating radiator and, if necessary, you can expand several sections.