
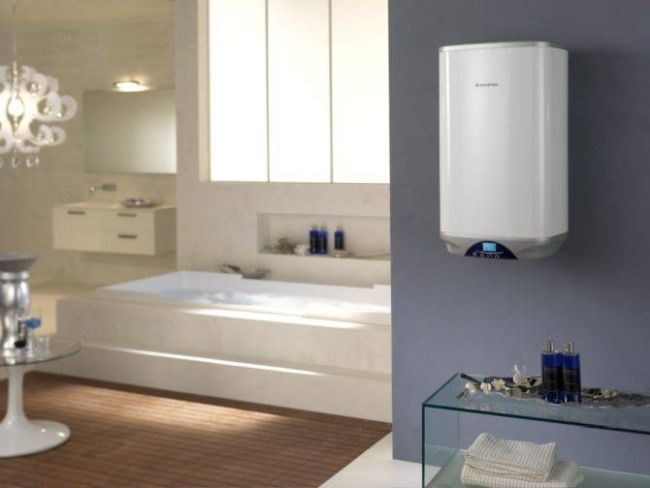
How to connect a water heater Ariston
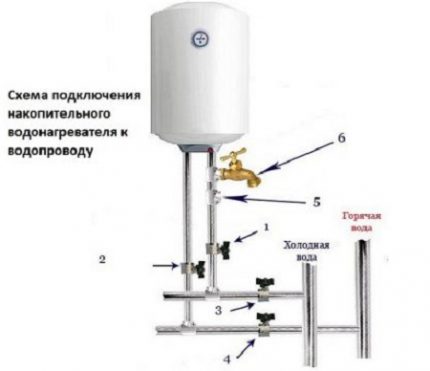
Water heater connection diagram:
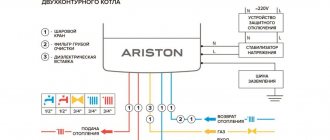
The connection of the water heater to the water supply pipe is carried out through the lower branch pipe, and a hose is connected to the outlet branch pipe for water outlet. Safety valves are installed at the inlet and outlet, they are open if the water heater is turned on, and closed if the device is turned off.
After connecting to the water supply, the tank of the device is filled with cold water. The cold water tap must always be open. The tap on the hot water outlet opens, when water flows through it, it is closed.
Boiler wiring diagram
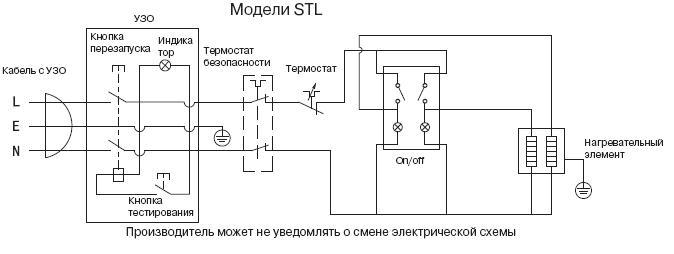
The power connection to the water heating apparatus begins with the isolation of the cable, which is carried out from the switchboard to the installation site of the boiler. The cable must be a three-core copper cable with a cross-section of at least 2.5 mm. The switchboard is equipped with an RCD device without fail, to protect people from electric shock, in the event of a leakage to the apparatus case.
The water heater is connected to an electric current through a moisture-resistant three-pole outlet, since it must be grounded. This type of connection is only suitable for low power devices. You can connect the water heater to the electrical network yourself, but it is better to entrust this to specialists.
For high-power devices, a special distribution board is allocated, the cable is supplied to the boiler without an outlet. The switchboard is installed in rooms with low humidity. The device is switched on and off by a circuit breaker. The current strength for which the machine is designed is 16 A.
Wiring diagram for water heater and boiler Ariston
Comfort in the house is provided by several components: beautiful design, solid furniture, heat from the boiler room, a well-thought-out ventilation system, cold and hot water supply. The absence of any of these factors leads to discomfort. The lack of a centralized hot water supply is compensated by the installation of a boiler or water heater.
Boiler diagram Ariston.
Among the huge number of this type of devices, Ariston water heating devices have proven themselves well in operation. They are available in different designs and modifications, differ in the principle of water heating and power.
Connection to the water supply system
Do-it-yourself storage water heater installation step-by-step guide to technical standards
Hoses and other elements of the connections used to connect to the water supply must withstand a temperature of at least 80 ° C and design pressure.
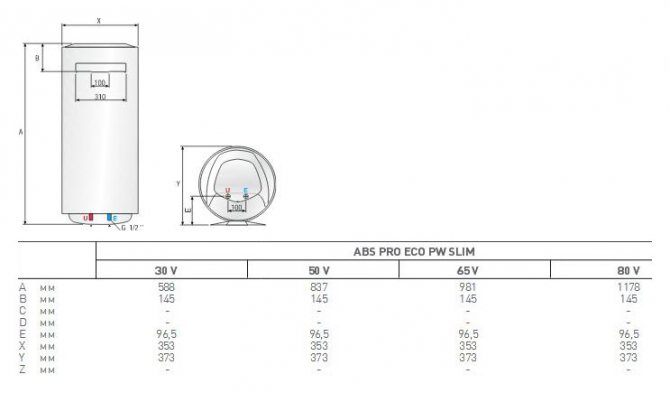
Table for determining the volume of the water heater.
Avoid directly joining two different metals, such as steel (in water pipes) and copper. Use a dielectric adapter.
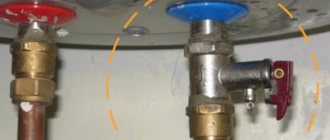
Connect the water supply to the boiler through shut-off valves and then through flexible wiring. The cold water inlet is marked with a blue mark. A valve must be mounted on it to relieve excess pressure in the system.
In front of the shut-off valves, you can also install a tee tap with a drain tap attached to it. When carrying out repairs or maintenance, this will make it possible to quickly drain the water from the boiler. Seal the threaded joints with tow or FUM tape. Connect a flexible hose that directs heated water to the outlet. After connecting, open the water and check the system for leaks, then connect to the power supply.
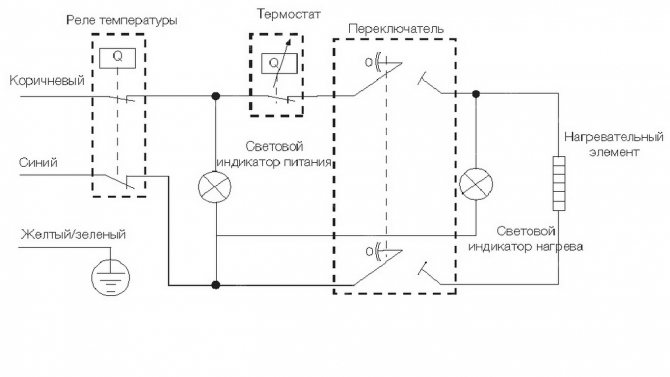
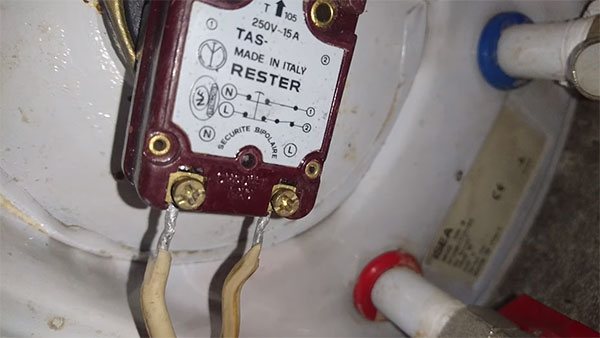
- Connect the power supply wires of the Ariston water heater to the screw terminals of the thermostat.
- When connecting, observe the phases - L, A or P1 - phase wire, N, B or P2 - zero.
- Connect the ground wire to the clamp on the heater body.
- Connect the terminals of the test lamp to the contacts.
- Press the thermostat button.
- Close the cover.
- Before plugging in, check that the boiler is filled with water.
The electrical wire must be hidden in a corrugation made of non-combustible material or in a wall. The installation of the boiler provides for grounding, which cannot be done on metal objects or pipes: for example, water supply, sewerage, etc.
Useful Tips
Diy water heater connection
Be sure to consider the advice of professionals:
- Determine in advance the number of places to which water will be dispensed from the boiler.
- Before starting work, purchase all the missing materials so that in the process you do not have to rush to the store for individual parts.
- Be sure to follow the instructions for your model.
- All water connections must be carefully sealed.
- If it is not possible to install a protective drain into the drain, place a protective pallet under the device.
- If you do not provide for the supply of tap water, you can supply the storage heater from a separate container. It is fixed at a height of about 5 meters from the top of the device.
- Do not forget about preventive procedures - be sure to change the magnesium anode at least once a year.
- If you are leaving for a long time, drain the water from the heater by first disconnecting it from the mains.
- Until the tank is completely filled with water, you cannot plug it in and set the heating mode.
- Do not operate the appliance while it is connected to electricity.
- Use only parts that are compatible with your model and recommended by the manufacturer.
Let's consider the main advantages and disadvantages of storage water heaters.
Sequencing
DIY septic tank installation: step by step instructions
It is worth mentioning right away that the startup sequence given below is correct for both flow and storage heaters. A couple of nuances - in the case of the first type, you do not have to wait for the filling of the tank with water, and close the tap in the 2nd paragraph.
- You should start by turning off the hot water supply, which comes from the city supply system. If you skip this step, the water heated by the boiler will go into the common riser, regardless of the check valve.
- We open the tap with hot water. We are waiting for the remaining liquid in them to drain from the pipes. We close the tap.
- Two pipes go to the bottom of the boiler. One, marked with a blue ring, is underwater, the other, with a red marker, serves to supply hot water to the pipes.
- We open the valve on the underwater pipe. Water begins to flow into the device's storage.
- Next, we unscrew the second valve on the boiler. Allowing some water to go out into the pipes.
- Open hot water on the mixer. We are waiting for air to leave the system and an even stream of water flows. We shut off the water.
- We connect the heater to the electrical network and set the desired temperature regime.
In a home where there is no hot water supply, the first step must be skipped. Subsequent switch-ons of the heater will follow the same pattern. The only difference is in the 6th paragraph. Then, not air, but stagnant water will begin to come out of the heater tank.
Heating mode selection
We set the heating mode. The main thing in this matter is to set the water temperature that is comfortable for the user. However, here are some tips, the implementation of which will significantly extend the life of the device. Thus, save on future repairs.
- Set the temperature to 30-40 degrees as seldom as possible.Under these conditions, bacteria will grow rapidly inside the storage tank. This will create an unpleasant moldy smell. The walls will be covered with fungus, which is difficult to remove.
- Optimal operating mode, 55-60 degrees. In this temperature range, less scale will form on the heating element. Reduces the risk of mold. It is comfortable for human skin.
- Once a week, the boiler must be set to 90 degrees. Wait a couple of hours, and return to the previous regime. This is done to completely destroy bacteria in the storage tank.
- Some devices have an economical mode of operation. The heater in this case does not consume less electricity. The settings will be set as in point 2 and we are talking about reducing the risk of breakage.
- In the case of a flow-through type heater, the temperature is also controlled by water pressure.
Storage heater working principle
Any model of the Ariston storage heater is completed with an instruction manual for the device.
Storage water heater diagram.
The manual contains a description of the device, its equipment and a detailed description of the operation, a diagram of connecting the device to the water supply and an electrical diagram of the device, rules for the safe operation of a water heater or Ariston boiler.
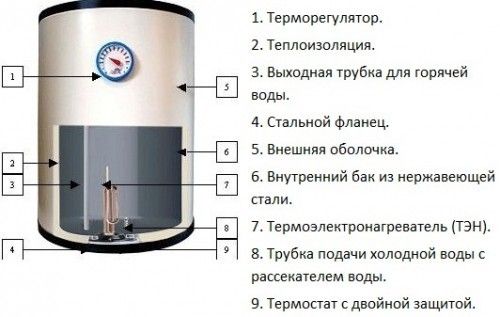
Apparatuses used to heat water consist of such parts.
The main elements of the Ariston water heater:
- Metal or plastic, covered with white enamel, housing, which holds the inner tank, made of metal. It is covered with a layer of glass porcelain or enamel, or the tank is made of stainless steel.
- The water heater has an insulating layer to retain heat and avoid a rapid drop in the temperature of the heated water. It is located between the surface of the body and the inner tank.
- There are two pipes in the tank: hot water is taken through one, cold water is supplied through the second, since hot water is always at the top of the tank, then the pipe for its intake is longer than for supplying cold water.
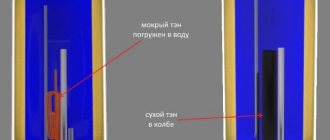
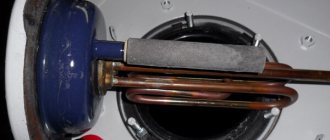
- An anode is located inside the tank to protect the heating element from scale. Heating is performed by an element, which includes a heating element and a thermostat.
- The thermostat is designed to disconnect the water heater from the electric current when the water is heated to a predetermined temperature. Outside on the body there is a heating temperature regulator, it can be mechanical or electronic. A protective decorative cover is installed below.
- The device works according to this principle: water from the water supply system is supplied under pressure inside and sinks to the bottom of the tank, where it is heated with the help of a heating element. Heated water rises upwards, during the movement it mixes with cold water. When the set heating temperature is reached, the thermostat turns off the heating element. When the water temperature drops below the set one, the thermostat is triggered and the heating element automatically turns on.
- An indicator is displayed on the protective cover of the case, allowing you to monitor the operation of the device. When the indicator light is on, it signals that the water is heating.
- A check valve is installed on the water supply pipe near the entrance to the tank, it prevents water from flowing back.
Ariston water heaters: diagram and principle of operation, popular models and connection diagram
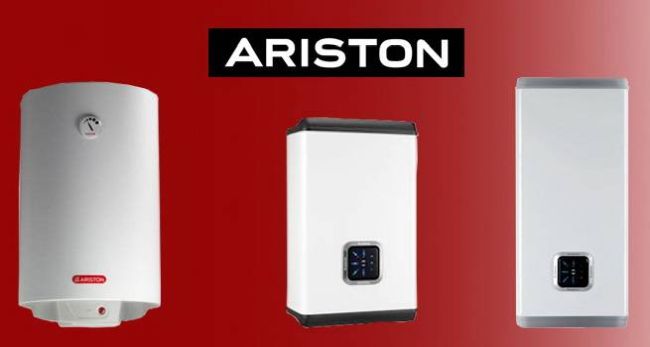
Ariston water heaters are popular in the world market. This is due to the high quality of products and a long service life, if the technical requirements are met both during the installation of the equipment and during its operation.
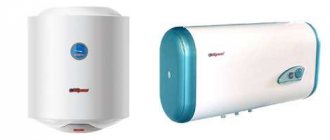
Popular models of water heaters Ariston.
Typical boiler diagram Ariston 50
Electric storage water heater Ariston consists of:
- outer case;
- bracket;
- internal reservoir;
- hot water outlet;
- magnesium anode;
- cold water inlet;
- heat insulator;
- thermostat sleeves;
- heating element (TEN);
- flange;
- thermostat;
- power cable;
- regulator knobs.
In what conditions should the device not be installed
Electrical appliances, in particular an electric water heater, must be installed under conditions that are consistent with those specified in the operating manual.
As factors unacceptable for installation, the instructions for Ariston boilers are spelled out:
- frost - this is due to the risk of water freezing in the tank and pipes;
- sunlight - do not expose the electric heater to direct sunlight;
- power outages - the voltage in the network to which the device is connected must be stable;
- vapors, dust or gas - do not install the water heater in a room with a high concentration of dust and poisonous or acidic gases / vapors in the air;
- dampness - it is not recommended to install the device in conditions of constant dampness and in unventilated rooms for a long time (this item depends on the degree of moisture resistance of the selected model of the water heater).
How to identify a malfunction
To carry out repair work, the user needs to notice a malfunction in the operation of the water heater in time. Ariston boilers are often equipped with an electronic display on which messages appear in the event of equipment failures.
Direct signs of a malfunction can be:
- activation of the machine at the moment the boiler is turned on - this indicates a malfunction of the heating element;
- heating water above the maximum permissible temperature - this indicates a failure of the thermostat;
- heating of water below the required indicators - this may indicate contamination of the heating element, the appearance of scale;
- drips in the bottom of the tank and on its walls;
- breakdown of the information board, which most often does not cause significant failures in the overall functionality of the device, however, it can reduce the comfort in the process of its use.
Extraneous noise during the operation of the electric heater can be considered an indirect sign.
Assembly and installation of the water heater at the attachment point
This work is done in reverse order:
- a gasket is placed, and the flange is mounted on it;
- it is necessary to fix the magnesium electrode and the heating element in the corresponding sockets and press them with staples;
- a thermostat is put on the terminals;
- raise the tank and carry out its installation - fix it on the wall;
- connect pipes or flexible hoses to hot and cold water pipes;
- fill the water heater with water and check the operation of all units.
Applied materials and tools:
- spanners;
- tester;
- pliers, screwdriver;
- rag and bucket;
- new heating elements, gasket and magnesium electrode (if necessary, replacement).
You can disassemble and clean the Ariston water heater yourself without calling professionals. This can be done with minimal financial costs if you carry out preventive and repair work on time.
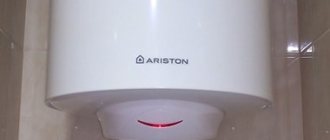
Water heater "Ariston"
It is very important to prepare in advance all the tools and consumables for the work. Before starting the installation, make sure you have the following tools:
Tools for installing a storage water heater.
- roulette;
- perforator with a drill;
- adjustable wrench;
- spanners;
- nippers;
- pliers;
- screwdrivers of two types.
- Unipack paste or FUM tape;
- tow;
- 3 stopcocks;
- 3 tees;
- 2 connecting flexible hoses (if not included in the kit);
- metal-plastic pipe of the required length.
- if it is necessary to replace the wiring - a three-core wire, socket or automatic machine.
To install a storage electric heater, you will need a 32-40 A circuit breaker, a PVA 3X6 -3X8 cable.
Plumbing connection
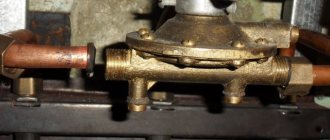
The drain hole for this type of heater, regardless of model, is usually at the bottom. First, you need to build and install a so-called security group. This is a set of valves and fittings designed to prevent various emergencies that may arise during the operation of the device.
An adapter is installed at the top, which is often called "American". Next, a bronze tee is screwed on. A check valve is attached to its bottom, which prevents water from flowing back into the water supply system. Another tee is attached to the side branch of the tee.
The diagram shows in detail the connection of a storage water heater: hot and cold water risers, water taps (1 and 2); shut-off valves (3 and 4); check valve (5); drain valve (6)
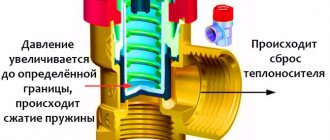
A 6 bar safety valve is attached to it to ensure that the pressure inside the tank can be automatically reduced if it has reached a critical level.
A special compression fitting for the water pipe is attached to the same tee. Through it, with excess pressure, part of the water will be discharged from the storage device into the sewer system.
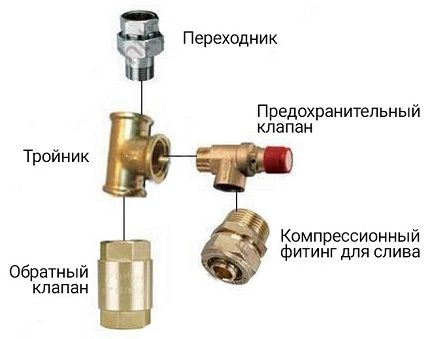
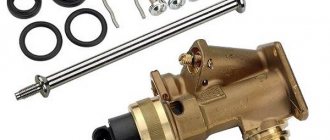
Diagram of the storage water heater safety group. This set of devices prevents dangerous emptying of the device's container and removes excess water if the pressure inside exceeds the norm.
After installing the device, be sure to make sure that the pressure valve opening remains open, otherwise the device will simply not work.
All threaded connections must be sealed and sealed. Experts recommend taking at least four hours to dry the sealant.
The photo clearly shows and signs the elements of the safety group of the storage water heater
When installing the device, it is important to precisely follow the sequence of their connection.
... To connect the device to a cold water riser, you can use steel, copper, plastic or metal-plastic pipes
When doing the installation yourself, they are most often used, since it is relatively easy to solder them.
To connect the device to a cold water riser, you can use steel, copper, plastic or metal-plastic pipes. When doing the installation yourself, they are most often used, since it is relatively easy to solder them.
Some people use flexible hoses for these purposes, but this decision does not justify itself. As practice has shown, such elements wear out quickly.

The individual elements of the safety group of the storage water heater are connected by means of a thread. In accordance with the norms, these places should be sealed and sealed with a sealant.
It is clear that the hot and cold water entering the apartment should be shut off before the pipes are cut. A shut-off valve should be installed between the cold water riser and the heater so that, if necessary, the water supply to the device can be turned off. All connections are carefully sealed.
Now you need to bring another pipe that will connect the heater to the hot water supply system in the apartment. In this area, you will need another shut-off valve: between the hot water riser and the heater.
This tap must always be closed so that the heated water from the boiler does not get into the common hot riser of the house. Again, it is necessary to observe the sealing and sealing of all joints.
A shut-off valve for cold water between the heater and the risers must be installed in such a way that, when closed, it does not interfere with the flow of water to other consumers, cutting off only the heater.
And the connection to the hot water supply system must be made so that, if necessary, it is possible to restore the flow of hot water from the common riser to the system in the apartment.
This completes the connection to the water supply system. Some experts at this stage recommend performing a preliminary check: fill the container with water, and then drain it and see if there is a leak.This check should only be done after the sealant is completely dry on all joints.
Types of electric water heaters
The most popular with buyers are two types of devices: storage-type devices, they are also called boilers, and instantaneous water heaters.
Boilers for water: an essential modern attribute in the bathroom
The first ones function as follows: cold water enters a special tank equipped with a heating element.
There it is heated to the required temperature and then fed into the water supply system. There is no storage tank in the flow heater, the water heats up while passing through a special flask in which the heating element is located.
Therefore, the procedure for connecting devices of different types to the water supply system differs significantly.
Boilers are easier to install, they are usually cheaper than flow-through heaters and are less demanding on the quality of the electrical network than flow-through devices.
Therefore, storage units are much more popular. Instantaneous heaters are installed as close as possible to the hot water draw-off point, for example, directly to the tap with water.
The device allows you to get hot water almost instantly, but the heating costs will be quite high.
The best models of the Ariston brand storage water heater

The Ariston water heater is represented by a fairly wide range of sanitary ware and corresponding standard model lines.
The products of this brand have the following categories:
- boilers are traditional;
- floor boilers;
- condensing boilers;
- floor boilers;
- boilers with indirect heating;
- instantaneous gas water heaters;
- water heaters equipped with heat pumps;
- storage water heaters for gas;
- electric water heaters with storage function.
Each appliance is equipped with heating elements, control devices and additional accessories.
Installation and connection of the boiler to the network
Important!
If the pressure in the system can exceed 6 bar, a special regulator must be installed. It is installed on the cold water supply together with pressure relief valves, ball valve, filter.
Ariston boilers are supplied with safety valves and brackets. Additionally, you need to purchase ball valves (for cold and hot water), as well as a pressure reducer and a filter. With regard to the eclectic system, a connection option is offered for maximum safety. To do this, you need to purchase a 3-wire cable, 16-amp fuse.
It is important to choose the right place where the Ariston boiler will be installed, the connection consists of 3 stages:
- Wall mount or floor mount.
- Piping and connection to the pipeline.
- Electrical wiring connection.
Installing the appliance
Non-capital walls, such as wood, plasterboard or hollow, cannot be used as a support surface. On the wall, 2 patch strips are mounted, for which the boiler mounting brackets are fixed. When calculating the height of the fastening of the strips, the height to which the device must be raised in order to hook it onto the brackets is taken into account.

Boiler piping
The equipment is connected to cold and hot piping systems. The schematic diagram of the cold water supply consists of a number of protective components, depending on the features of the installation, they can be made of different materials, and the elements can be distributed in different rooms. The main thing is that the sequence is followed and the equipment is taken into account:
- A tee is inserted into the common water supply pipe, from where the connection is supposed to start, and the wiring to the boiler goes from its free flange. It starts with the installation of a ball valve that shuts off the water supply to the heater.
- Next, a coarse filter is built in.
- If the water pressure in the pipeline is not constant or rises more than 6 bar, install a water pressure regulator in the system.
- The rest of the elements begin to be fastened from the junction on the boiler.
- A ball valve and a tee with a branch for an emergency drainage hose are connected to the equipment.
- Even lower there should be a safety valve, which has 2 functions: to exclude the drainage of water from the tank, if it is turned off in the general water supply system, and when the pressure in the boiler rises, release water.
The final stage is the connection to the "hot" circuit: only a ball valve is installed on it.
Wiring
The power range in which the boiler operates is 2.5-3.5 kW, therefore, to prevent overheating of the network, a separate line is allocated (3-core cable 2.5-3 mm). For high-power devices, it is recommended to use a direct connection instead of the usual plug-to-socket contact. Schematically, it looks like this:
Water heater Ariston: operation, maintenance and repair
To ensure efficient and safe operation, it is necessary to know and follow the basic rules for using the product.
- Do not turn on the device until the storage tank is full.
- Mechanical or other damage to electrical cables is not allowed;
- Before starting the operation of the Ariston water heater, you should make sure that the grounding is working properly;
- In the event of a malfunction, the unit should be immediately disconnected from the power supply, drained and contacted for service.
Even with correct operation, timely maintenance of the system is necessary to maintain operability. First of all, this is due to the low quality of the supplied water. Despite the presence of filters, a large amount of chemical compounds and mechanical impurities enter the internal tank, contributing to the formation of scale and other contaminants. Regular cleaning of the heating element and the inner surface of the storage tank will significantly increase the service life of the boiler. Scheduled maintenance includes:
Preliminary drainage of water from the storage tank;
Disconnecting plumbing fixtures;
Dismantling the water heater body;
Cleaning the heating element and the inner surface of the tank without the use of especially aggressive detergents, if possible avoiding mechanical and abrasive effects;
Assessment of the state of the magnesium anode and, if necessary, its replacement.
Timely implementation of these recommendations will ensure long-term and efficient operation of the Ariston autonomous heating system.
The preservation and subsequent switching on of the boiler deserves a separate consideration.
What is the risk of excess moisture in the soil
You can see the results of this phenomenon yourself - trees and shrubs perish. Why is this happening?
- the content of oxygen in the soil decreases and the content of carbon dioxide increases, which leads to a violation of the processes of air exchange, water regime and diet in the soil;
- oxygen starvation of the root-forming layer occurs, which leads to the death of plant roots;
- the intake of macro and microelements by plants (nitrogen, phosphorus, potassium, etc.) is disturbed, because excess water washes away the mobile forms of elements from the soil, and they become inaccessible for assimilation;
- there is an intensive breakdown of proteins and, accordingly, putrefaction processes are activated.
Plants can tell you what level the groundwater is at
Take a closer look at the flora of your site. The species inhabiting it will tell you at what depth the groundwater layers are located:
- top water - in this place it is best to dig a reservoir;
- at a depth of up to 0.5 m - marigold, horsetails, varieties of sedges - bubbly, holly, fox, Langsdorf reed grass grow;
- at a depth of 0.5 m to 1 m - meadowsweet, canary grass,;
- from 1 m to 1.5 m - favorable conditions for meadow fescue, bluegrass, mouse peas, ranks;
- from 1.5 m - wheatgrass, clover, wormwood, plantain.
What is important to know when planning the drainage of the site
Each group of plants has its own moisture needs:
- at a depth of groundwater from 0.5 to 1 m, vegetables and annual flowers can grow in high beds;
- the depth of the water layer up to 1.5 m is well tolerated by vegetables, cereals, annuals and perennials (flowers), ornamental and fruit and berry shrubs, trees on a dwarf rootstock;
- if the groundwater is at a depth of more than 2 m, fruit trees can be grown;
- the optimum depth of groundwater for agriculture is from 3.5 m.
Do you need drainage of the site
Write down your observations at least for a while. You yourself can understand how much drainage is needed.
Maybe it makes sense to simply redirect melt and sedimentary water along a bypass channel, rather than letting them flow through your site?
Perhaps it is necessary to design and equip a storm drain and improve the composition of the soil and this will be enough?
Or is it worth making a drainage system only for fruit and ornamental trees?
Draining water from the boiler
Boiler piping with a drain cock
Since we need to get to the inner parts of the boiler, the next step is to drain the water from it.
If the installation of the boiler was carried out strictly in accordance with the instructions attached to the water heater, then a tee with a ½ inch tap must be cut in the cold water supply system between the safety valve and the tank.
If a prudent installer on the outside of the faucet screwed in a fitting, then we just have to connect the hose to this fitting. The other end of the hose is lowered into a bathtub or toilet and the drain cock can be opened.
Only beforehand on the mixer it is necessary to open the hot water tap in order to balance the pressure outside and inside the boiler. Depending on the capacity of the boiler, the process of draining the water can take from several minutes to half an hour.
If you are unlucky, and there is no tee or relief valve, you must disconnect the cold water supply pipe along with the safety valve. Then push the hose directly onto the connection in the boiler. After draining all the water, you can proceed to dismantle the flange.
Beginning of work
Before starting work, you should once again make sure that the flange is exactly in the center. If it is slightly shifted to the side, install it correctly (loosen or tighten). After filling the tank with cold water, open the hot water outlet tap on the boiler to allow excess air to escape, then close.
When the heating pressure is turned on, a light on the water heater housing should light up. Sometimes the cold water hose heats up during operation. In some Ariston models, the temperature can be adjusted with a special knob that connects to the thermostat with a screw. Economy mode is marked on the unit with the letter "E".
In the event of an unforeseen breakdown or malfunction of a new water heater, you can contact a warranty repair workshop in your city. The usual warranty period for the Ariston boiler is 1-2 years, depending on the model (the same as for the Termeks, Bosch or Nova Tek water heaters). If before the expiration of this time you tried to open and repair the unit yourself, then, most likely, you will be denied free warranty service. Keep the warranty card issued by the store until the end of the warranty period.
The storage water heater from - the unit is quite simple to operate and reliable. If you strictly follow the instructions during installation and with further use, it will serve you faithfully for more than one year.
Technical features of connecting the boiler
If the diagram of the correct connection of the boiler to the water supply system has been drawn up, it is time to start its execution.In this case, much depends on which pipes were used to create the water supply system.
Steel pipes can often be found in old houses, although they are often replaced with more fashionable polypropylene or metal-plastic. When installing the boiler, you should take into account the peculiarities of working with pipes of various types.
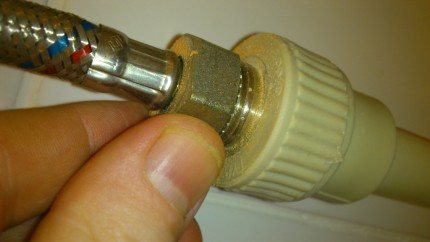
There are no special requirements for the material of structures connecting the boiler and the water supply system. They can be connected even with a sufficiently strong hose of a suitable diameter and length.
Regardless of the type of pipes, before starting any work on connecting equipment to the water supply system, be sure to turn off the water supply in the risers.
How to connect a heater to steel pipes
For this, it is not necessary to use a welding machine, since the connection can be made using special tees, the so-called "vampires".
The design of such a tee resembles a conventional clamping clamp, on the sides of which there are nozzles. Their ends are already threaded.
To install the vampire tee, first place it in a suitable location and tighten with screws.
Between the metal part of the tee and the pipe, put the gasket that comes with the device
It is important that the gaps in the gasket and the tee for mounting the hole match exactly.
Then, using a metal drill, you need to make a hole in the pipe through a special gap in the pipe and rubber gasket. After that, a pipe or a hose is screwed onto the opening of the branch pipe, with the help of which water will be supplied to the heater.
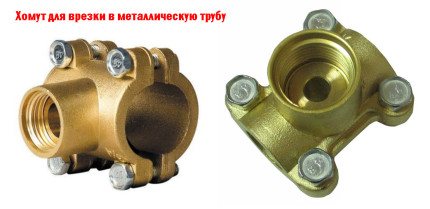
To connect a storage water heater to a steel water supply system, use a metal coupling with special nozzles equipped with threads, onto which a shut-off valve, hose or pipe section can be screwed
The most important point when connecting a water heater is the sealing of all connections. To seal the threads, FUM tape, linen thread or other similar sealant is used. There should be enough such material, but not too much.
It is believed that if the seal protrudes slightly from under the threads, this will provide a sufficiently tight connection.
Working with polypropylene pipes
If the boiler is supposed to be connected to a polypropylene water supply system, you should immediately stock up on the stopcocks, tees and couplings intended for them.
In addition, you will need special equipment: a device for cutting such pipes, as well as a device for their soldering.
To connect a boiler to a polypropylene water supply, the following procedure is usually followed:
- Shut off the water in the riser (sometimes you need to contact the housing office for this).
- Use a cutter to cut the polypropylene pipes.
- Solder tees in the branch points.
- Connect the pipes for connecting the boiler to the water supply.
- Install couplings and valves.
- Connect the boiler to the tap with a hose.
If the water pipes are hidden in the wall, you will have to dismantle the finish in order to gain free access to them.
It happens that access to pipes laid in grooves is still significantly limited. In this case, a special split-type repair coupling can be used.
The polypropylene side of such a device is soldered onto a tee, and the threaded part is connected to the water supply. After that, the removable part of the coupling is removed from the structure.
To connect a water supply system made of PVC pipes to a storage water heater, you can use a special adapter, part of which is soldered to the pipe, and a hose can be screwed onto the other part.