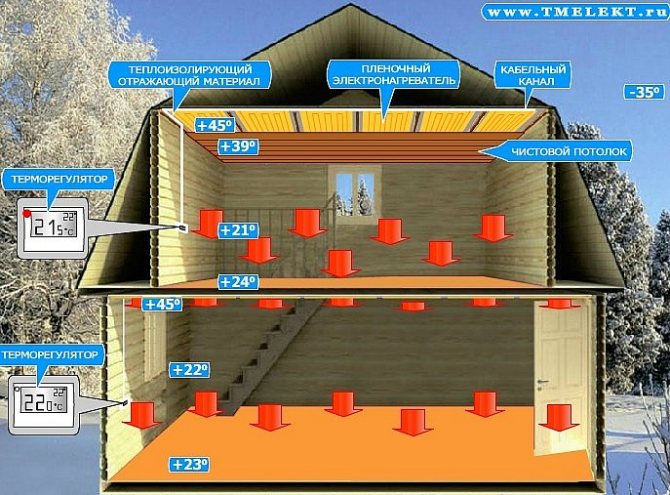
Characteristics of infrared heating film on the ceiling
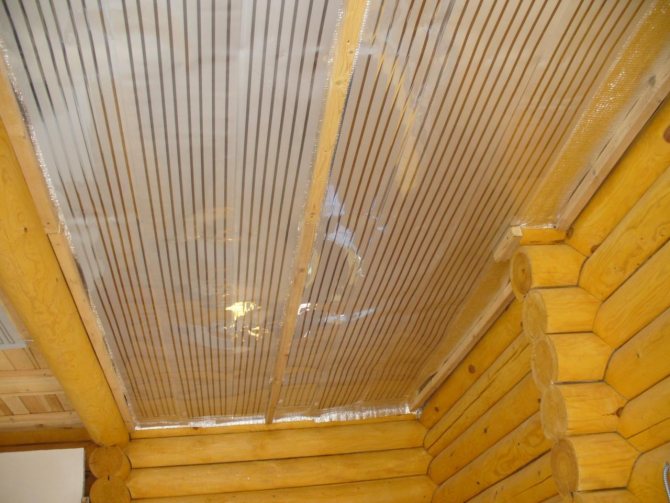
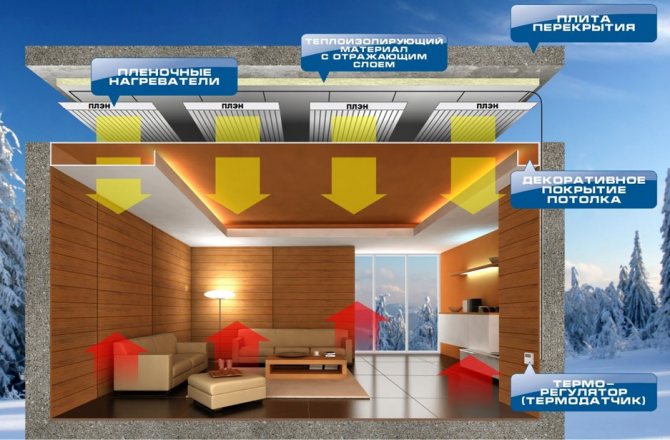
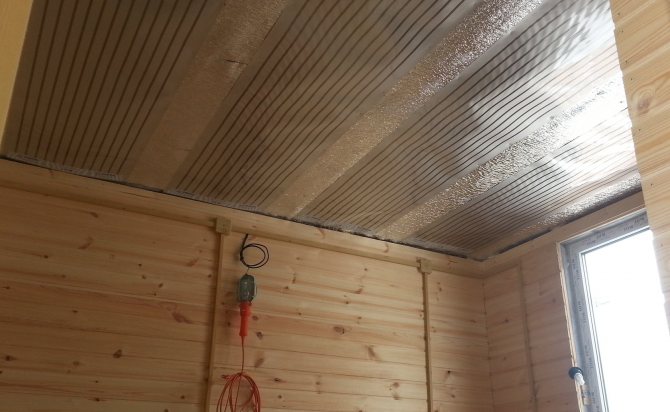
Infrared ceiling heating is a foil with heating elements inside. At the moment when the electricity supply will be carried out, this film will heat up to +45 ° C in a matter of minutes. The transmission of infrared waves is carried out in the same way as with sunlight. After the decorative ceiling is heated, the heat will be directed to the floor, from which it will be reflected in the future.
Thanks to ceiling infrared film devices, not only the air in the room will be heated, but also the existing furniture. Thus, heat will constantly accumulate in the living room, which will subsequently be given off from the surface of objects.
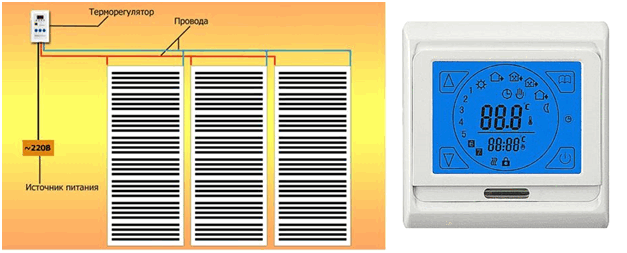
In a room at a level of about 1-1.5 m, it is necessary to install a thermostat, thanks to which the operation of the infrared film heater system, which is mounted on the ceiling surface, will be adjusted.
As a rule, the owner of a living space independently sets the level of the desired temperature regime. The moment the set temperature level is reached, the infrared ceiling heater stops working. It should be borne in mind that after the equipment stops operating, the process of maintaining the set temperature regime will be carried out. Thus, each time after switching on, the infrared film ceiling heater will operate on the electrical network for about 10 minutes.
Among the technical characteristics, the following points should be highlighted:
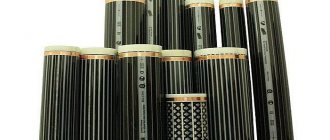
- the width of the film web can vary from 0.5 m to 1 m;
- the maximum thickness is 1.2 mm;
- maximum temperature heating of installed elements - +50 ° С;
- required voltage - 220 V;
- weight of 1 sq. m of infrared film heater is 50 g.
Many people believe that by installing this type of heating, the floor surface will be constantly cold. It is important to understand that due to the heating of objects, the lack of heat near the floor will be compensated.

Characteristics of work and the device of a warm ceiling
Structurally, a warm ceiling is not much different from a warm floor, except for the moment that all layers of the "pie" are turned upside down. The design is based on infrared (IR) film with heating elements. When the electricity is connected, the ceiling heating heats up to a temperature of + 45ºC in a few minutes. Thermal energy from the heating elements is transferred to the surrounding air through the decorative coating, thereby increasing its temperature too. Then the heat is directed to the floor and reflected from it. In this embodiment, it is advisable to install the thermostat at a height of 1 ... 1.5 meters from the floor.
Types of ceiling film infrared heaters
If we consider the types of infrared film heaters existing today, then they can be divided into 3 groups depending on the method of attachment:
- ceiling models;

- wall models;
- floor models.
Depending on the wavelength and temperature radiation, infrared films are:
- low-temperature - household heaters that heat up to +10 ° C- + 60 ° C, the radiation length of infrared waves varies from 5.6 microns to 100 microns;
- medium temperature - in this case, the temperature range is +60 ° C- + 100 ° C, while the wavelength ranges from 2.5-5.6 microns;
- high-temperature - the temperature range exceeds +100 ° С, the radiation of infrared waves is 0.74-2.5 microns.
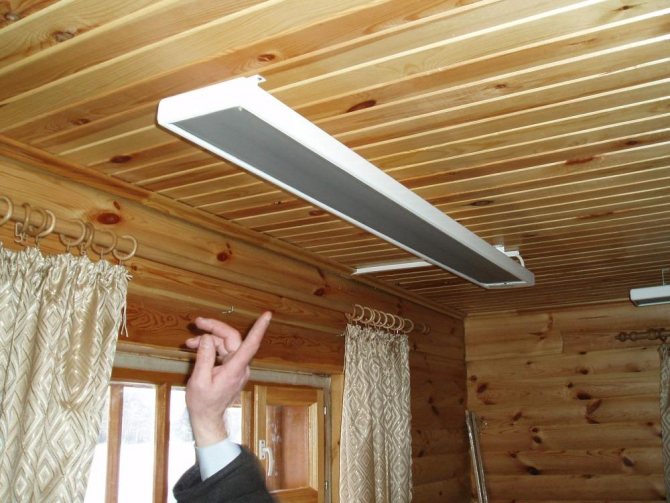
At the moment, the most popular are ceiling heating elements. Such models can be used as an additional or main source of heat. It is quite difficult to get to such elements, which excludes getting burns, especially if there are small children in the house.
If the installation work is carried out correctly, then the heating process of the ceiling surface will be uniform. Thanks to the attractive appearance of modern models, infrared ceiling heaters will only complement the interior design.
Advice! If necessary, you can install a ceiling PLEN in the living space.
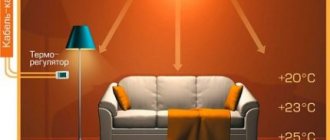
What is IR heating
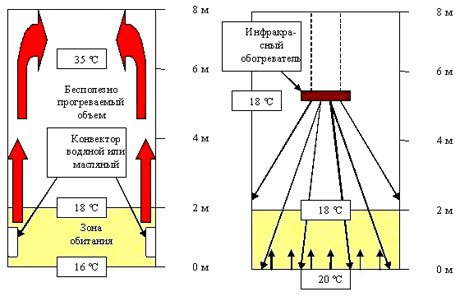
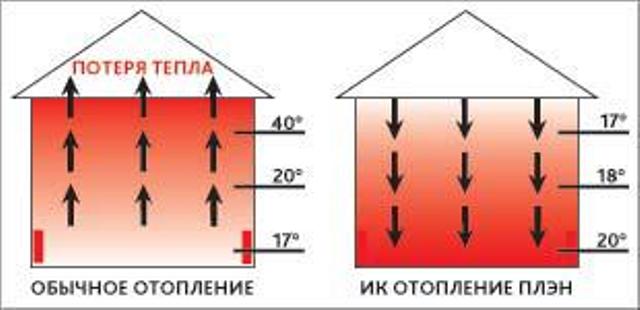
The source of heat in IR technology is electricity: any type of heating device of this type is connected to the network. Infrared heating can be either independent or additional, switched on primarily for the fastest warming up of the room. The fundamental difference between infrared heating and convection heating is the heat radiated to specific objects, which does not spread through the air currents and is wasted. Only this type of heating can warm a small area of an open terrace or a corner of a bedroom, without warming up the whole room or the street itself. A beam directed towards the floor will warm only the object at which it was directed, and that, in turn, will begin to warm the surrounding space.
Understanding this process allows you to get rid of the most common misconception: an infrared ceiling heater will not heat layers of air directly under the upper ceiling, first of all it will warm the floor or a chair located under the infrared heater. And this will happen much faster than when an oil or water heater was used as a heat source.
Comparison of IR ceiling heating with convection
Types of infrared ceiling systems
IR emitters used in ceiling heating are divided into two types - water and film.
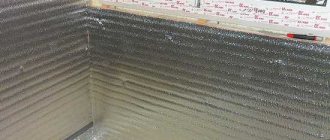
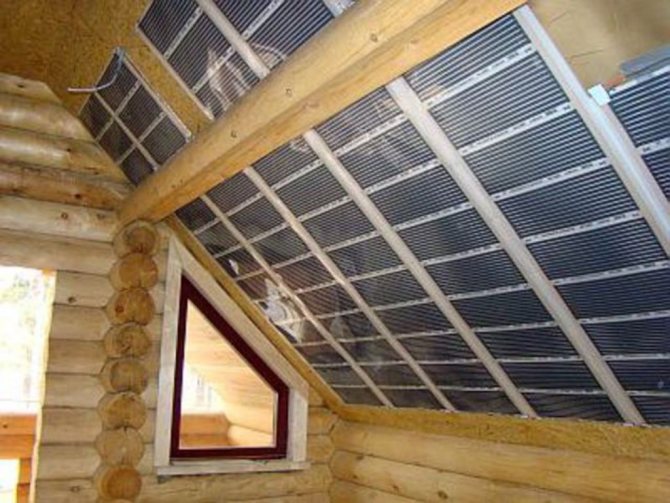
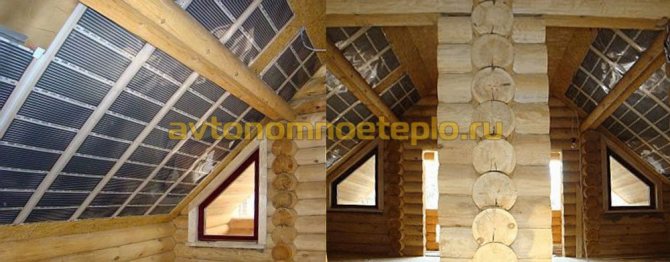
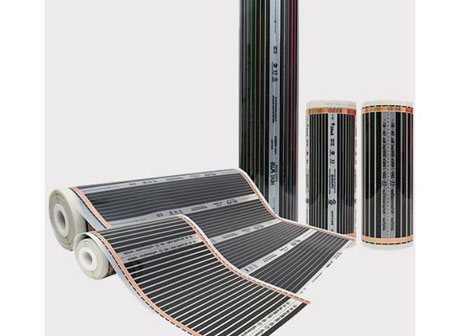
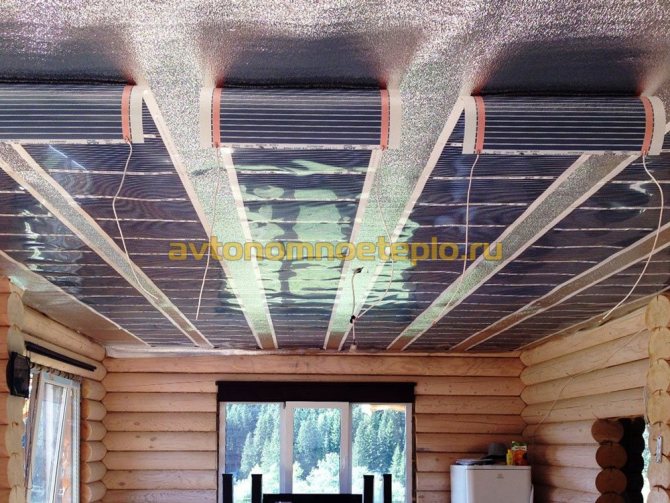
Even outwardly, these two related types of heating cannot be confused. The first is based on water tubes up to 3 cm in diameter, heated by an IR emitter. In the assembled state, it takes up 10 cm in height and looks quite cumbersome. The second type of infrared ceiling resembles a roll of film, laced with silvery metallic threads. In private houses and apartments, it is the second type that has become widespread, due to its compactness and ease of installation, although in industrial premises of a large area, water infrared heaters are also in demand.
Technically, the system of warm IR ceilings is quite complicated: between the layers of the film, the tracks of carbon paste, silver threads and copper connecting webs are sealed. But these difficulties do not concern the master working with the system, he is only required to roll out the elastic "device", place it on the ceiling or floor, connect it and enjoy the comfort. It is quite difficult to damage the system: detailed instructions for cutting and installation are attached to each purchase, even if it was decided to refuse the services of professional workers.
IR film for the equipment of warm floors and ceilings
The advantages of IR heating
The fears of skeptics who believe that there is no place for a heating device on the ceiling are understandable. It is known from the school physics course that warm air rises up on its own, leaving just those layers unheated that are important to those in the room. Installing a water heater or oil system would only confirm the law of nature, but infrared heaters do not heat the air, but the surface of an object, which in turn becomes a source of heat. You can list a number of advantages that the IR ceiling receives due to this feature.
- Heating of a certain area, for example a sofa or a bed, under the IR panel occurs several times faster, even before the air in the room as a whole heats up.
- The power consumption for such a system is several times lower, and the ability to control the temperature regime and program the cycle allows you to use the power optimally. Temperature control is provided by a set of sensors.
- The radiation of the IR film is environmentally friendly and is as close as possible to natural solar heating. The air in the room does not dry out and is not saturated with odors characteristic of other types of heating devices. When equipping the room with IR ceiling panels, you do not need to purchase air humidifiers or ionizers.
- The heating "device" placed on the ceiling does not take up space and cannot be a source of injury for children and animals. The system itself is absolutely safe and with proper installation and proper isolation of the wiring can not cause a fire.
IR ceiling system and how it works - The power of the device is calculated by a specialist taking into account the area and volume of the room.
- The warranty period of the system is from 5 years, which makes IR ceiling films a profitable investment.
Ceiling heating PLEN
Warm ceiling PLEN has a number of significant advantages:
- since the device is powered by heating electricity, the cost of electricity is minimal;
- a distinctive feature is a high level of reliability and a long service life - the conductors are sealed in a film, there are no wear elements in the design;
- PLEN can be installed under a covering made of any material; its installation does not require a lot of space;
- thanks to the automated system, it is possible to set any temperature regime.
It is worth paying attention to the fact that the work is carried out silently, while heat losses are completely absent. The manufacturer gives a guarantee for up to 25 years, the operational period is 50 years. During operation, the ceiling heating is maintenance-free.
How an infrared heating ceiling works
The basis of the "heating ceiling" heating system is electric film heaters with the following linear dimensions:
- web thickness - up to 1 mm;
- web width - 0.5 or 1 m;
- blade length - from 0.25 to 7 m.
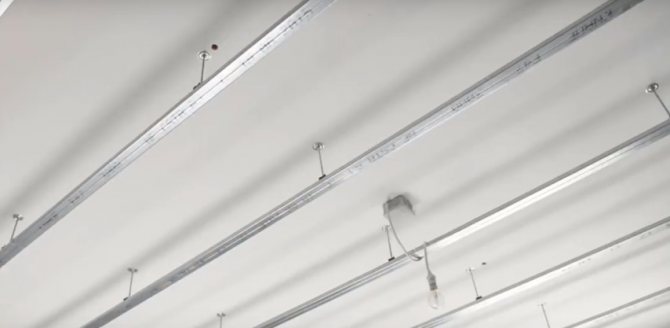
Such electric heaters can be freely installed in almost any ceiling configuration. Operating temperatures at maximum load do not exceed 50 ° С, and the average specific power of the heaters is 150-220 W / sq. m.
The principle of operation of infrared heating is extremely simple. When an electric current is passed through an electric film heater, the heaters begin to emit thermal radiation. Infrared radiation from the surface of the electric heater affects objects and building envelopes of the room, quickly heating them.
The heating ceiling is controlled by thermostats, they are installed in all rooms that the system heats. The thermostats Orbis Clima ML, Cewal RQ10, programmable E 51.716 proved to be excellent. They are sensitive to temperature changes within one degree, turning off or supplying power to the electric heaters.
The heating ceiling is absolutely safe, does not need the owners' control, but its main advantage is different. Traditional heating acts in stages, transferring energy first to the coolant, then to the heat exchangers (batteries), after which it heats the air in the room - and only then the heating object itself. At each stage, energy is lost, which means that you have to pay more. Infrared heating works directly, efficiently using every watt.
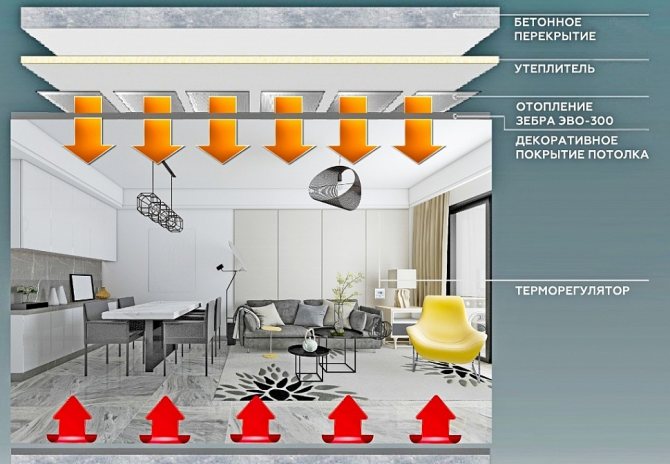
Our company works with several types of film heaters, which function according to the same principle.In practice, we check the effectiveness and efficiency of each material, choose the most reliable and profitable from the point of view of operation. We recommend using the following types of electric film heaters.
- Ceiling heater ZEBRA EVO-300 (development, Chelyabinsk).
- Heating film TM (produced by South Korea).
Installation of infrared ceiling film
In the event that this system will act as the main source of heat, it is recommended to pre-fix the mats on the surface, which will occupy about 80%. If an infrared ceiling heater is used as an additional heat source, then it is sufficient to install mats on 30% of the total area of the entire ceiling surface.
Before proceeding with the installation work, it is necessary to correctly calculate the power level of the heating elements. Thanks to the power calculation, it will be possible to select a thermostat. For example, a thermostat consumes 4 kW, for each sq. m of film accounts for 0.2 kW. In this case, the surface area should be up to 20 square meters. m.
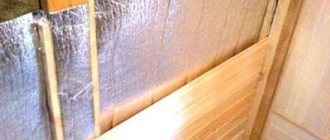
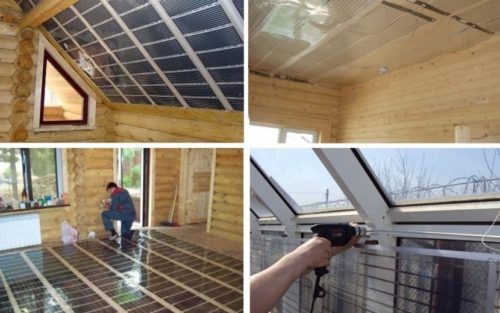
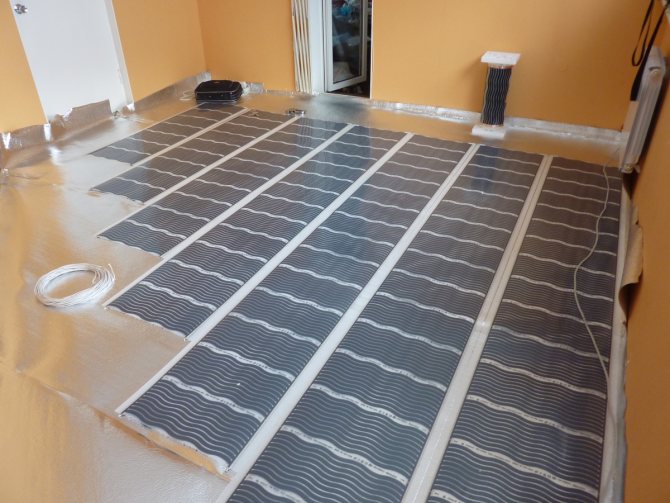
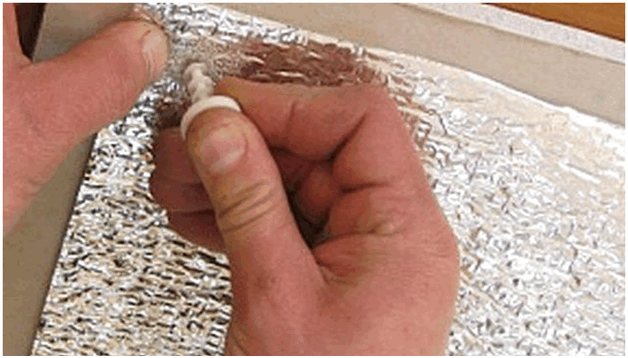
After that, they proceed to the installation of thermal insulation materials. If you plan to install an infrared heater in a multi-storey building with a concrete floor, then heat loss can be prevented thanks to thermal insulation. In wooden houses, thermal insulation prevents heat dissipation and, as a result, drying out of the wood.
For insulation, you can use expanded polystyrene, which is covered with a layer of foil on one or both sides. The material should be attached to the ceilings using refractory dowels for these purposes. It is recommended to glue the joints with foil tape. Only then can you start installing the film ceiling heater.
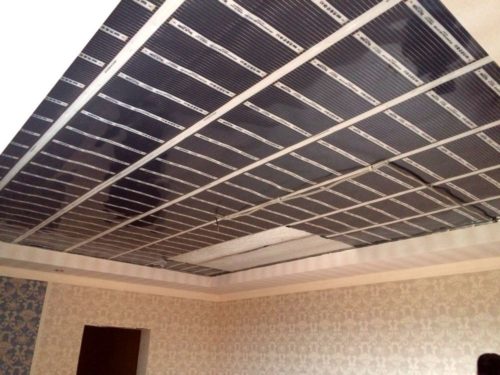
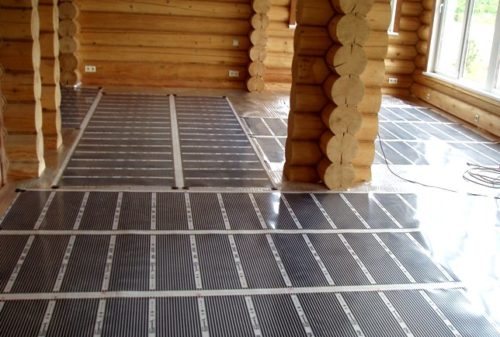
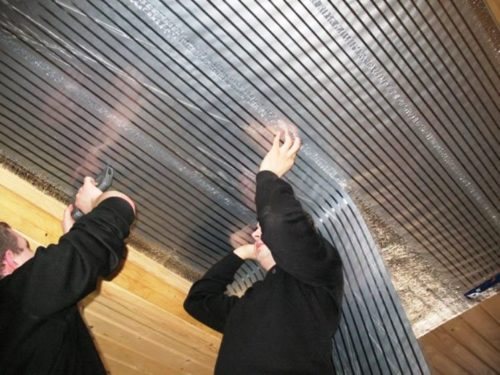
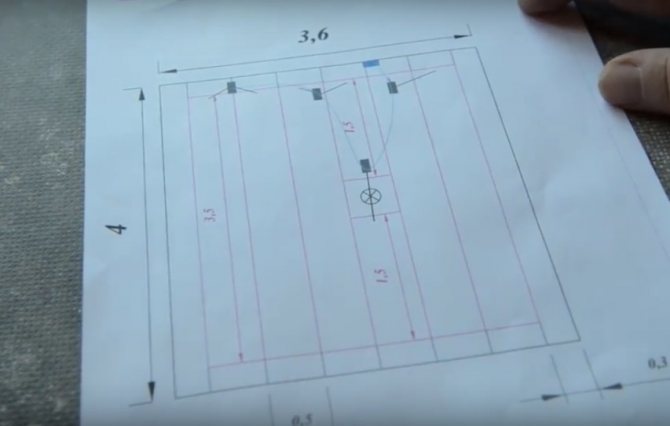
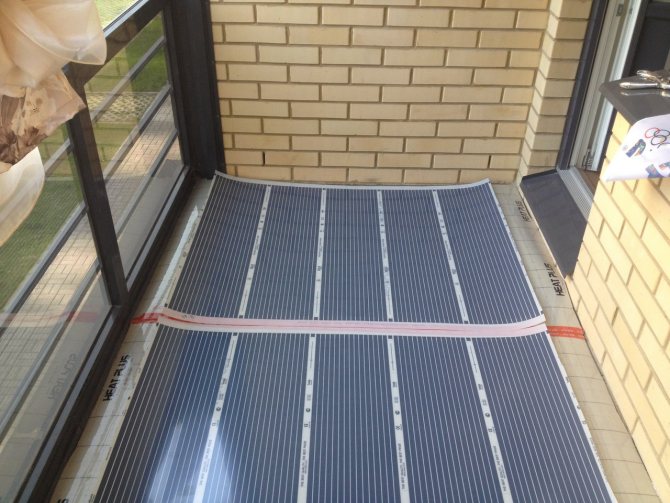
When fixing the infrared film sheet, it is necessary to first retreat about 35 cm from the walls around the entire perimeter. A distance of up to 5 cm should be left between the strips. The infrared film should be located on the ceiling surface parallel to each other. In the process of carrying out work, it is recommended to follow a special scheme, according to which heating elements should not be over sleeping places and electrical appliances.
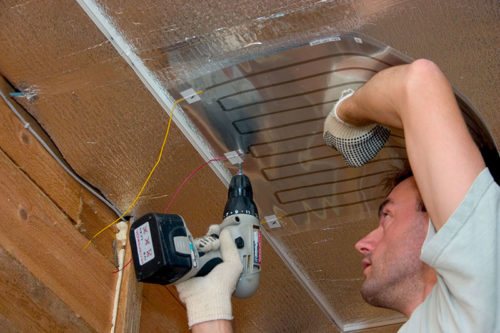
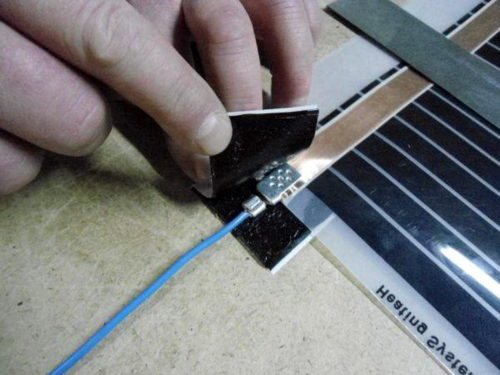
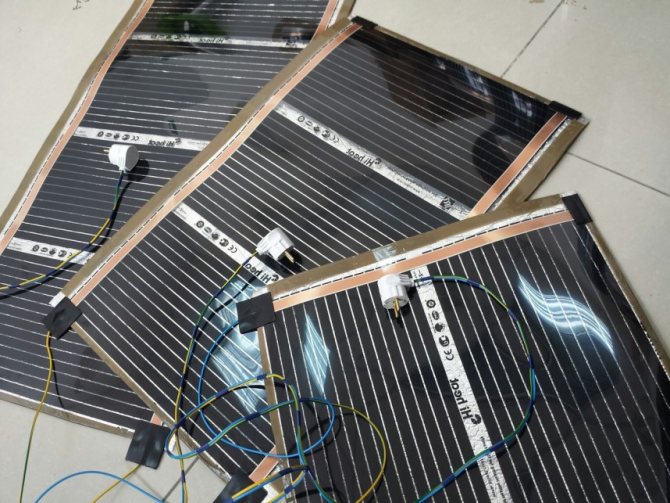
After all the elements have been fixed, it is worth checking the performance of the system. To do this, it is necessary to connect the terminals to the copper buses and clamp them tightly with pliers, the connection points must be reliably insulated.
To interconnect infrared film sheets, electrical copper wires are used, which have a minimum cross section of 2.5 square meters. mm. If necessary, the wires can be masked; for this, a strobe is made in the walls using a perforator, which is then sealed with plaster.
Attention! If necessary, you can install infrared floor heating on the ceiling.
Pros and cons of ceiling mounting scheme
Compared to other heating systems and other connection schemes, a warm ceiling has the following advantages:
- simple installation of equipment, which you can do yourself;
- there are no restrictions on use, installation is possible in the house from any materials;
- ease of control of the heating system and maintaining the set temperature;
- this version is more economical in subsequent operation than a traditional underfloor heating.
But, despite all the advantages, there are a number of restrictions that do not allow the use of a warm ceiling everywhere. In particular, ceiling heating must not be installed in rooms with a ceiling height below 2.3 meters. The best installation option is a 3-meter high rail. It is in this case that you can install film heaters and disguise them well under a multi-level decorative coating.
Coating IR films for the ceiling outside
When choosing an IR film for heating a room, it is necessary to pay special attention to the quality of the system, which must correspond to a number of basic parameters:
- the base must be made of high quality film, the polymer used must be fireproof;
- the conductive strip must be undamaged and made of copper materials, the minimum permissible width must be 15 mm;
- the silver strip must have a clear outline, without gaps, while it must go 2 mm onto the copper bus;
- the location of carbon emitters should be striped or solid, geometric shapes have no effect on the operation of the ceiling heating system;
- external lamination of the infrared film should be made of the same polymer as the base, it is not recommended to use materials with a lower thickness;
- standard films must withstand exposure to temperature conditions up to +80 ° С, high-temperature materials - up to +110 ° С;
- if high quality materials were used in the production process, then there should be no deformation during operation;
- A high-quality IR film should heat up evenly in a short period of time - about 5-10 seconds.
As practice shows, the wider the film is, the niche is the probability of its overheating during operation.
Important! If the polymer is transparent, then it deforms much faster during operation.
Choosing a decorative coating for an infrared ceiling
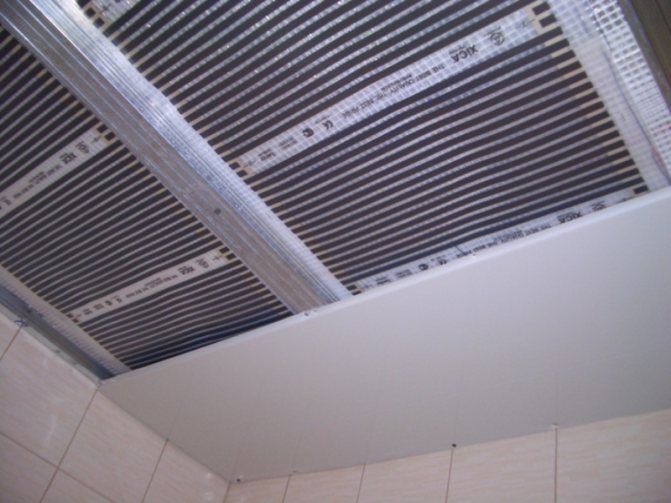
The most important thing when choosing a ceiling covering is to avoid creating a large air gap between the infrared film and the decorative material itself. Difficulties arise if the floor slabs have an initially large angle of curvature and they have to be leveled using plasterboard structures. This is a very laborious work and the installation of metal profiles in the process can damage the film.
Before laying a warm ceiling, it is necessary to eliminate the differences in the surface level. This problem can be solved with plastering.
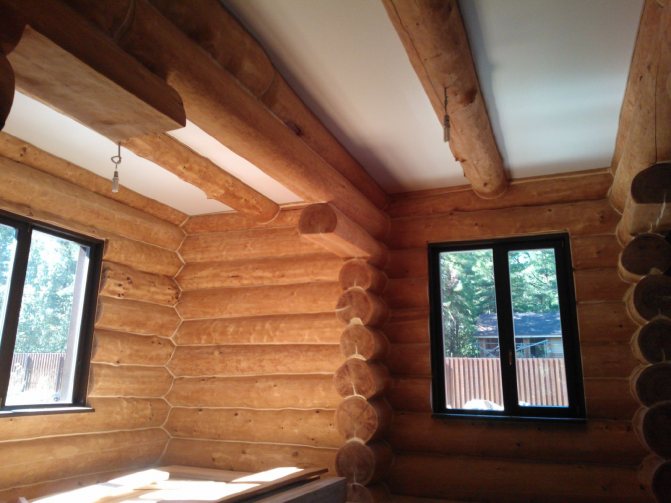
For a spacious room, the ideal option is a stretch ceiling. For its installation, narrow aluminum or plastic profiles are used, the installation of which is carried out only along the perimeter of the walls, without affecting the overlap area. A high-quality micro-perforated stretch ceiling allows warm infrared streams to pass in the best possible way.
It is possible to install euro lining in a wooden house. Such material is suitable for small rooms so that the installation of the battens does not affect the overlap area. The lining must be of good quality so that it does not lose its appearance and shape during operation. Also, in a wooden house, metal plates for the ceiling will look original, in addition, they have optimal heat transfer.
Warm ceiling installation procedure
A warm ceiling is installed in the following steps:
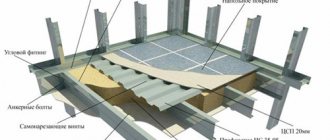
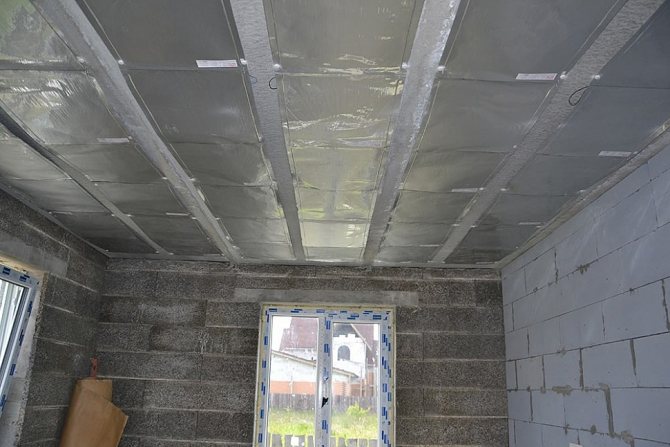
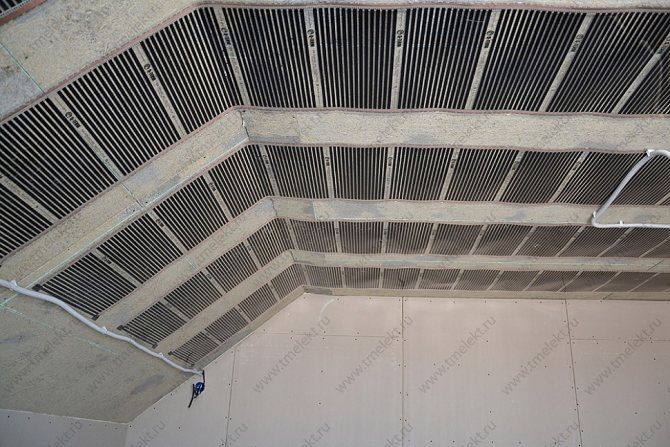
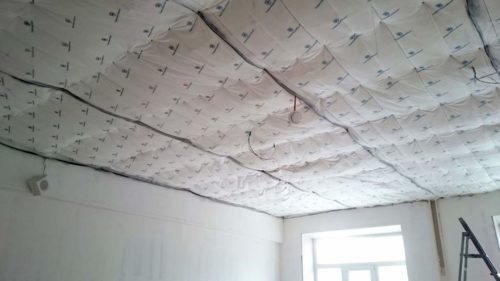
Installation of thermal insulation
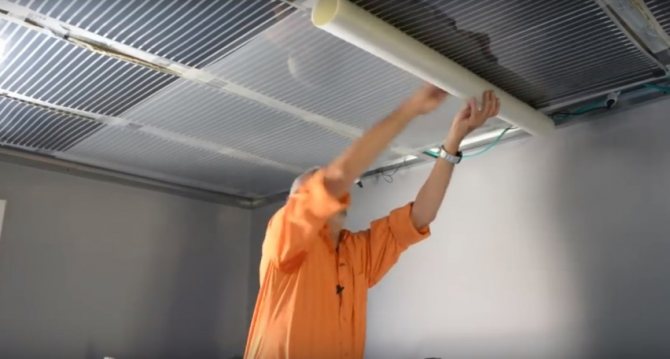
Thermal insulation is laid on the profiles in order to exclude the possibility of heat radiation upward. To prevent the thermal insulation mats from sliding off the profile wings, during all spans, at some intervals, it is worth sticking safety pieces of technical tape, as shown in the next photo. In the spans, the mats are stacked end-to-end. There should be a gap between the end of the mat and the wall.
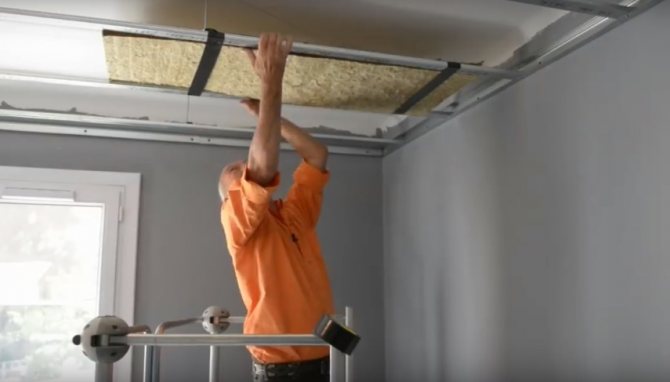
Almost the entire surface of the suspended ceiling is fitted with mats.
Laying electrical wiring
The central span is laid last with heat-insulating mats. Before laying it, electrical wiring is thrown onto the thermal insulation, which will provide power to the entire warm ceiling.
In the middle of the room in the false ceiling there should be a "window" through which the wire of the lighting fixture hanging from the ceiling will pass. Because of this "window", the heating foil placed in the central span consists of two separate sections. This must be taken into account when organizing their power supply. Therefore, a power cable with two outlets must fit this window. The rest of it fits along the wall.
To supply power to the ceiling wiring, the lead-in cable can be laid down the wall in a groove or in a cable duct. The photo shows that a hole has been drilled in the wall, and the cable is pushed through it to the apartment meter.
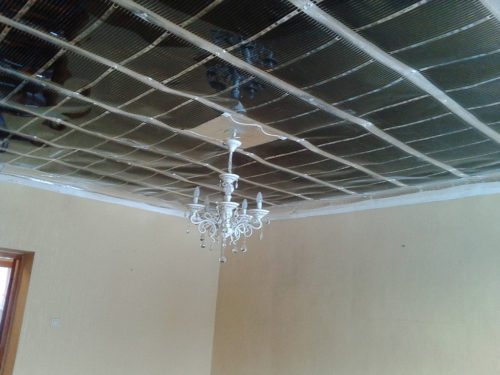
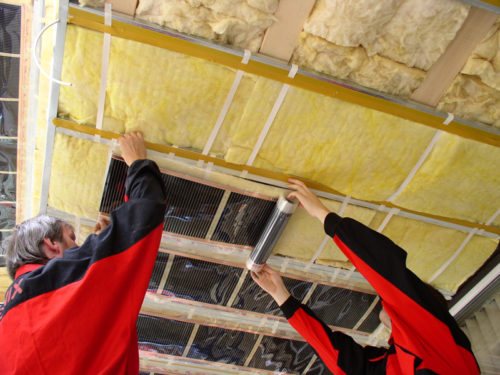
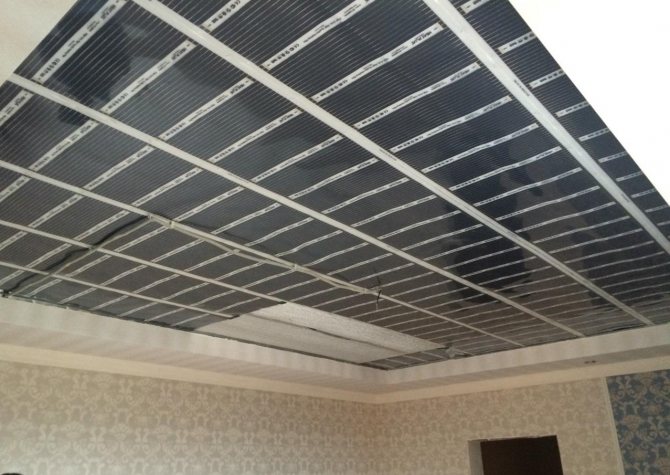
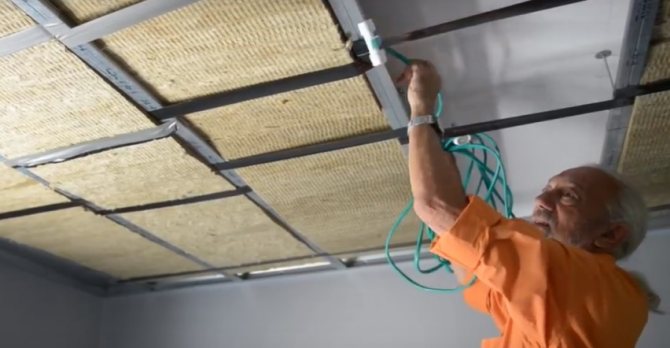
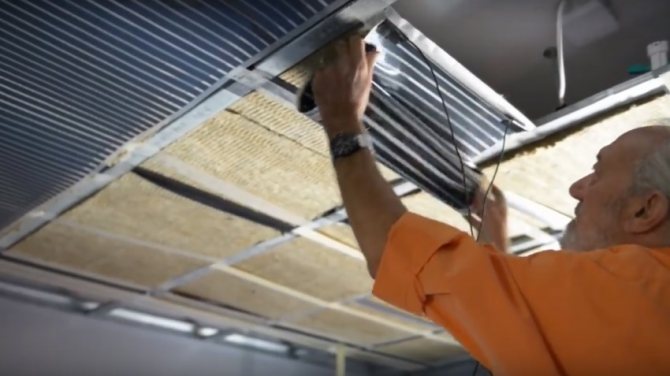
Heating foil installation and electrical connections
The heating film on the ceiling during work can be easily fixed with double-sided tape. To do this, tape is glued at some intervals throughout the room across the profiles.
Then the protective film from the double-sided tape is removed as the work is done and the heating film begins to be fixed. Moreover, they glue it strictly BETWEEN the profiles. If the film gets on the profile, then while fixing the drywall, it can be easily damaged with self-tapping screws, and the system will not work.
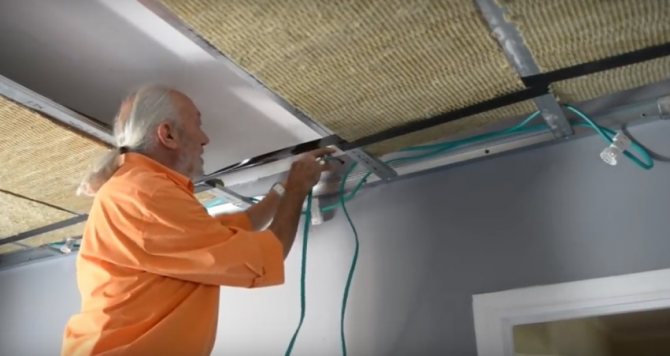
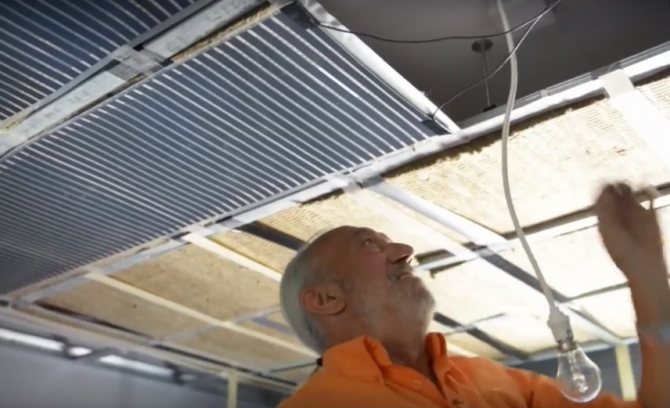
In the central span, as mentioned above, the heating foil is installed in two separate panels. This allows you to create a light fixture installation.
Through the formed "window" two central panels are connected to the power system. All wires are laid on top of heat-insulating mats. A lighting lamp is also released into the created "window".
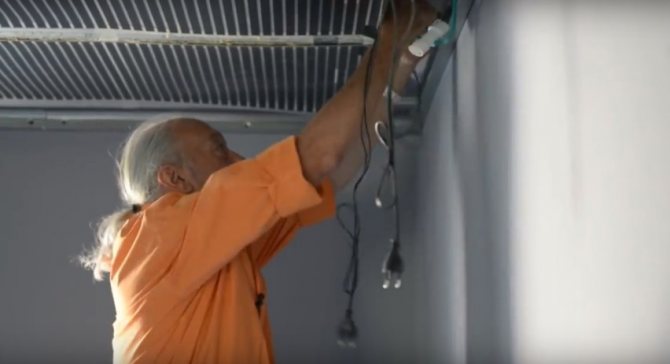
Then, all the power wires hanging from the wall are connected to the sockets of the electrical wiring laid on top. In this case, all wires must remain above the profiles.
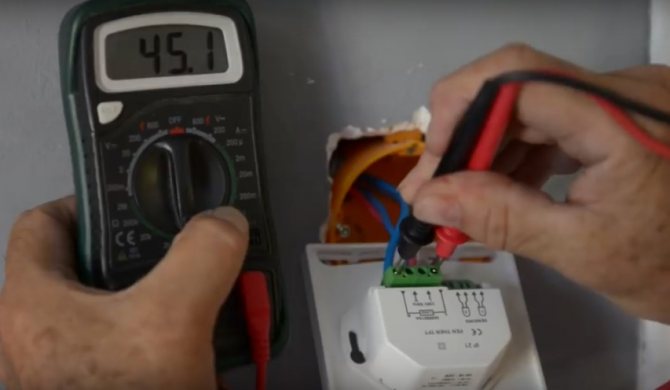
Checking the integrity of the warm ceiling system
Having completed all the connections, we go out into the next room, where the output of the supply wiring was made. Taking the wires coming from the warm ceiling, we measure the value of its resistance. If it is expressed in any specific figure, it can be concluded that there is no damage to the system. As you can see in the photo, the resistance is about 45 ohms. Therefore, the system is in good order.

At the end of the work, this measurement should be repeated to once again make sure that there is no damage.
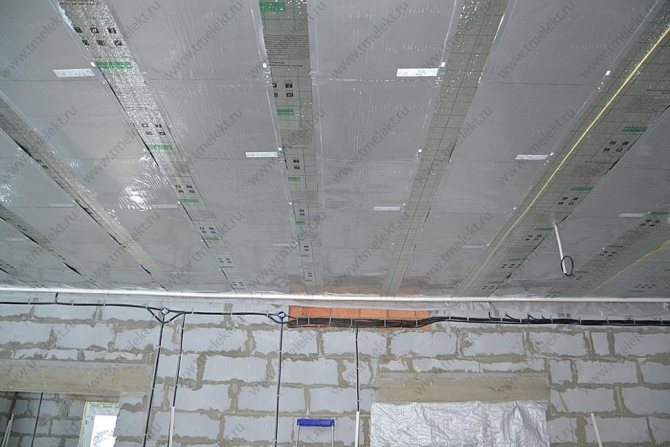
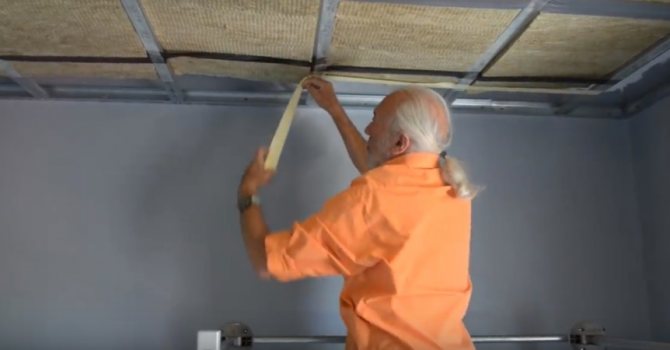
Installing a vapor barrier
A vapor barrier film is necessary to protect the electrical system of a warm ceiling from condensation. It is installed again on double-sided tape, which this time is glued directly to the profiles.
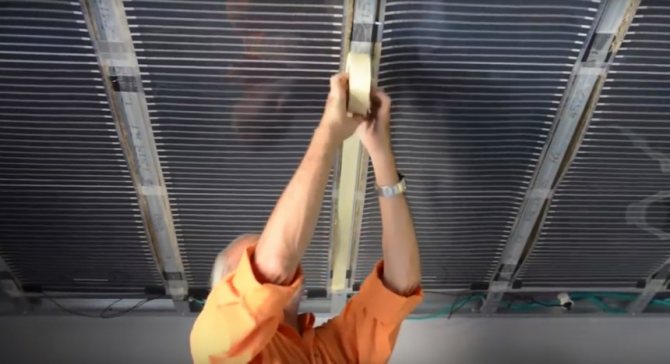
The film itself is attached to the tape across the profiles. Moreover, all adjacent panels must overlap in order to ensure the necessary tightness and moisture protection.
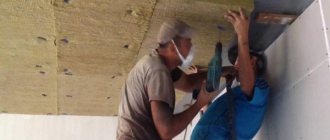
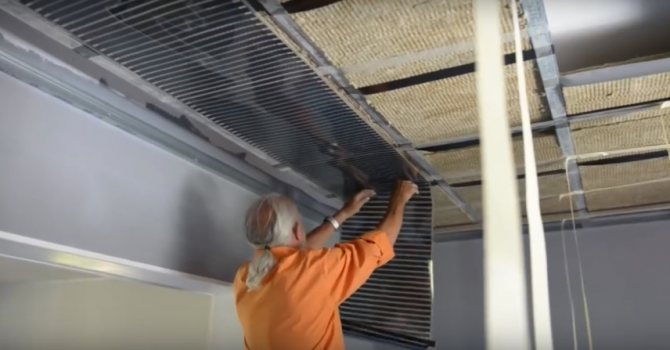
Fixing drywall sheets
It is very convenient to use a sheet lifter to lift and support drywall sheets.
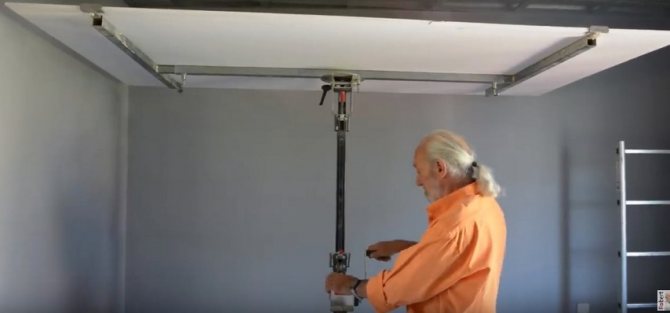
The fixation of the sheets held by the sheet lifter is carried out, as usual, with self-tapping screws screwed into the profile.
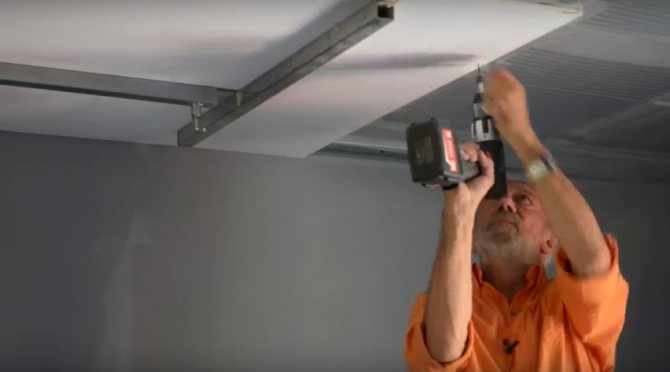
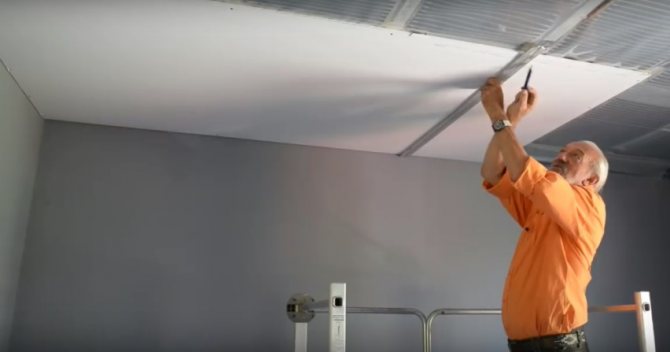
Having fixed the drywall around the edges, it is necessary to mark the location of the remaining profiles. With additional fixing, this will allow you not to accidentally damage the heating film with the self-tapping screw.
Connecting the thermostat and checking the integrity of the Warm Ceiling system
The wiring diagram for the thermostat is shown on the back of the device.
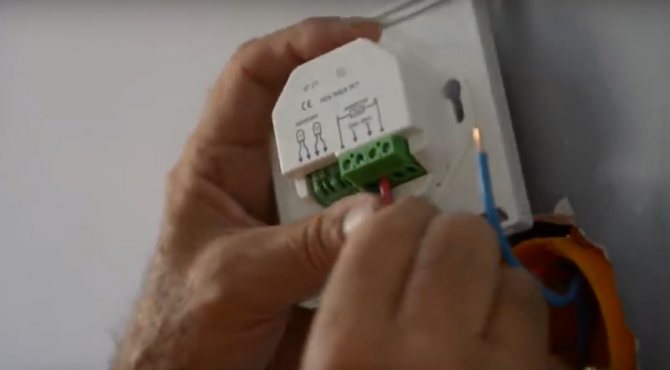
The wires coming from the warm ceiling are connected to the side terminals. It is on them that the re-measurement of the resistance of the system is made. If there are no faults in the system, then its value should be equal to the previously measured one.
The indicator part is attached to the thermostat by means of clips.
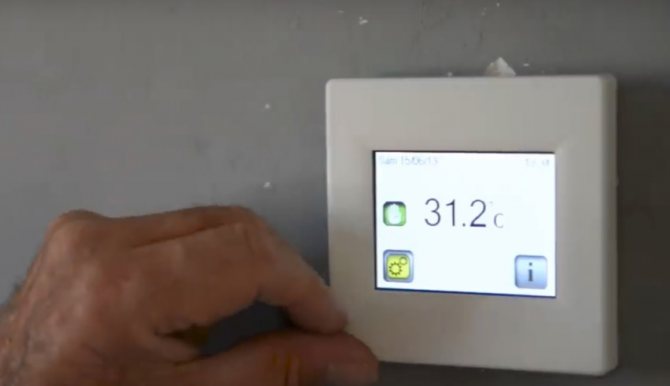
Indicator - the device is quite versatile. It displays not only the current temperature, but also the time. With its help, the desired temperature is set or programmed.

The device and principle of operation of an infrared heater
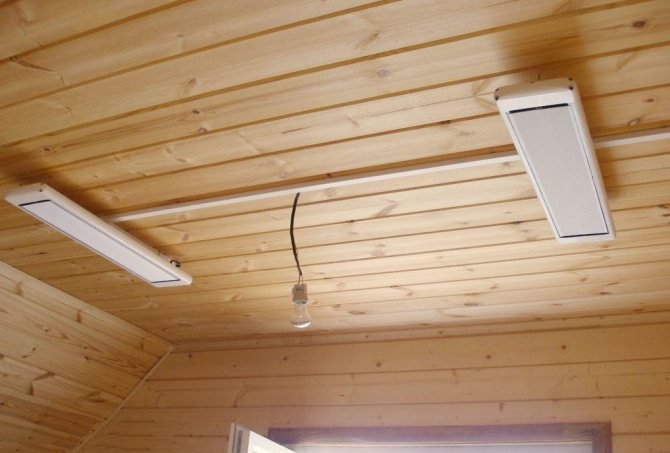
The steel body of the device contains a reflector and a heating element or emitter. When connected to the network, the emitter heats up and emits infrared waves, which are perceived by humans as heat. The heating element can be made in the form of a heating element - a tubular heater, an open or closed spiral, or a carbon coating in film heaters.
The reflector serves for directional heating and protection of the device itself from overheating. Infrared waves are completely safe for humans and animals, apart from possible overheating. To prevent it, heaters are equipped with thermostats and sensors. With their help, you can set the heating temperature and turn off the device when it is reached.
Key features and benefits
But, in addition to the convenience of control from the phone, such systems have other advantages. Among them, not the least is the environmental friendliness of the entire system. The heat emitted by heating elements is very similar to that of the sun - the heating element itself does not heat up directly, transferring heat through infrared rays. This is how the sun warms our house.
The principle of heating used will make it possible to abandon the usual types of fuel and traditional devices designed for this. You no longer need to store fuel for a heating boiler or use stove heating - with comparable costs, a warm ceiling will be much more efficient.
The film, which is responsible for creating heat, is located on the floor surface and does not take up space at all. You can close it with any kind of finish, except metal and mirrors - they do not transmit radiation or reflect it back.
Everything can be mounted in a very short time. Installation of such a device as a warm ceiling PLEN takes about two hours on an area of up to 50 square meters. If the room is larger, or if installation is carried out in a country house, more time will be needed. The entire work can take up to two days. In any case, it will be faster than installing even the simplest stationary system with a heating boiler.
Installation of film-type IR heaters
The installation of flexible film heaters, regardless of the place of installation, does not require high-class professional skills from the contractor, but must be carried out in compliance with the following rules:
- the PLEN installation site must be flat and dry;
- cutting rolls, if provided by the model, should be carried out only according to the markings indicated by the manufacturer;
- it is prohibited to check the operability by plugging in the heater folded into a roll;
- the length of one strip fragment of the film should not exceed 8 m;
- adjacent strips of the heating system are located at a distance of at least 5 mm;
- bending the PLEN by an angle of more than 90 degrees is not allowed;
- installation of the film to the base is performed with staples using a construction stapler or special fasteners (using ordinary nails and self-tapping screws is not effective);
- it is forbidden to carry out installation work at subzero air temperatures - after warming up the room, the film strips will increase in size and form folds.
Installation sequence for IR film heaters
To protect against overheating, the base for placing the PLEN should be equipped with a foil-lined reflective screen that acts as a heat and waterproof insulator, for example, penofol, isolon.
The protective coating is mounted on a base with an overlap of adjacent edges on top of each other by 3-5 cm; to speed up the process, it is advisable to use special clamps for fastening, which are available in a wide range on sale.
From above, the joints of the screen strips are glued longitudinally with a special foil tape.
The elements of the foil heater are mounted on top of the laid screen - after preliminary layout and according to the installation instructions attached to the device. Installation is carried out taking into account the rule - there should be 8-10 fasteners per 1 square meter of flexible film.
When the heating circuit is ready to be installed, it is connected to the thermostat, which should be located at a height of 1-1.5 m from the floor, and the system is checked for operability.
In addition, for correct monitoring of the temperature regime in the room, the thermostat must be located away from other heating devices, have a heat-insulating pad under it, and be protected from direct sunlight and drafts.
If the test results of the IR device are positive, the finishing materials are laid - flooring or suspended ceilings, which are mounted with a 10-15 mm gap between the cladding and the film.
Important! There are no materials absolutely transparent for PLENs - any finish on top of the film is a screen that attenuates radiation to one degree or another.