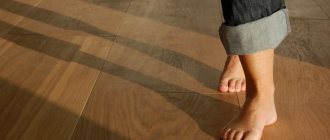

On the heating market film warm floors from exotic types of heating have already turned into a popular, efficient and quite economical alternative to classic systems. The reason is simple - the emergence of modern film materials, which are relatively inexpensive and available, do not require serious capital expenditures when equipping the premises and are quickly assembled, including independently, with minimal work skills.
This article will be a detailed analysis of the features of infrared film warm floors of Russian and South Korean production.
notethat here we consider an infrared warm floor as an additional source of heat in living quarters. If you are interested in installing a film warm floor as the main type of heating system, we recommend using a heating ceiling based on appropriate film materials. This is an order of magnitude more effective.
Types, device and principle of operation of infrared film floors
Most of the film materials used in the Russian market for organizing a warm floor are of South Korean or domestic origin. This is due to several factors:
- uniform heating of the material practically over the entire area;
- convenient standard sizes: mainly roll deliveries 100 m long of various widths (500–1000 mm) with a cutting step of 200–250 mm;
- several types of power in the range of 110-400 W / m2;
- record quality guarantees (10–20 years of operation);
- optimal cost available to most consumers.
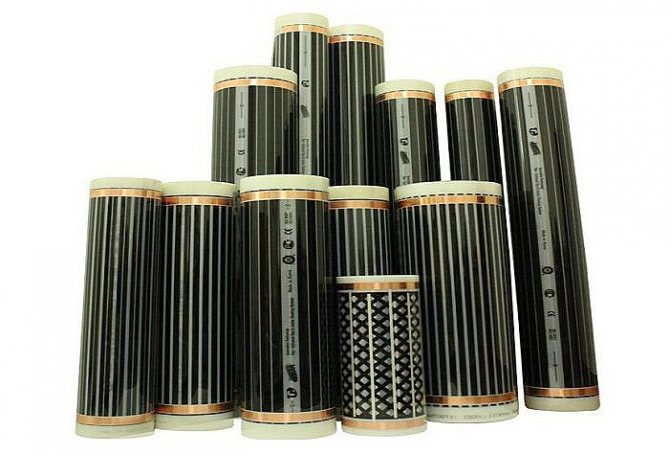
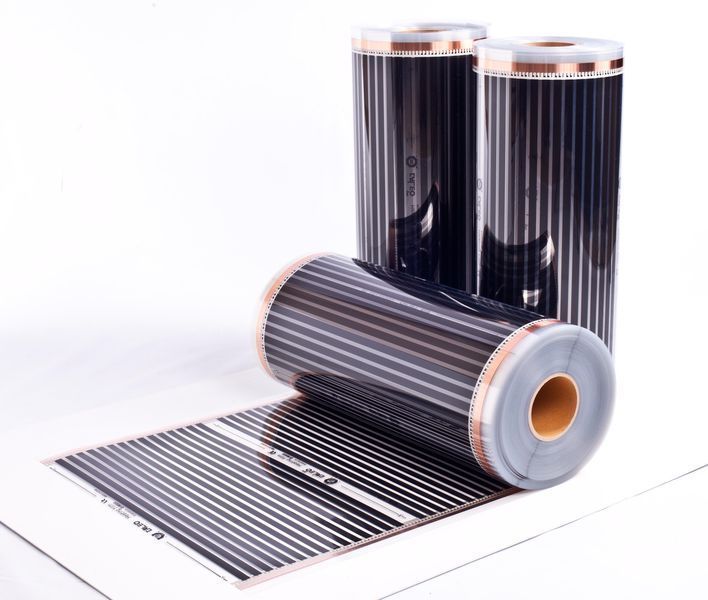
The most famous manufacturers of infrared film materials are Q-Term, Heat Plus, RexVA, STEM Energy, «Hit-Light»And several other companies. These are carbon-based electric heaters supplied in bays, the features of which we will analyze.
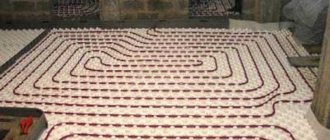
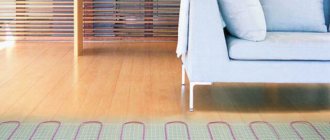
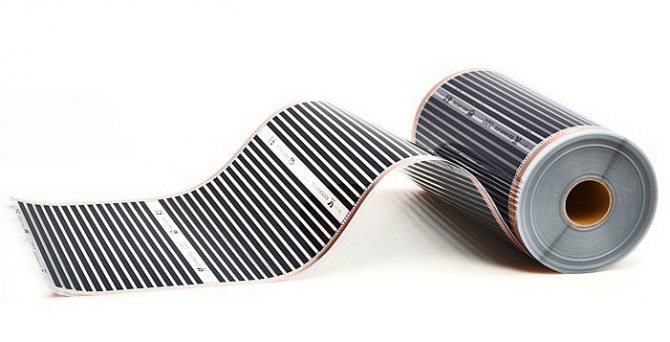
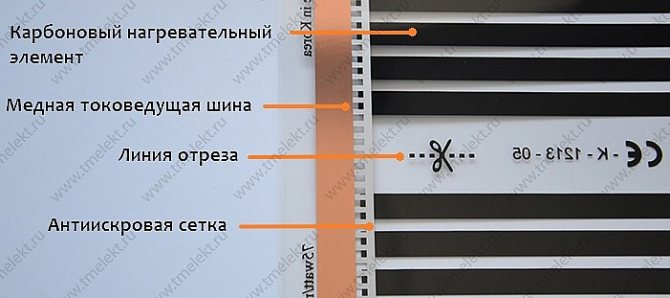
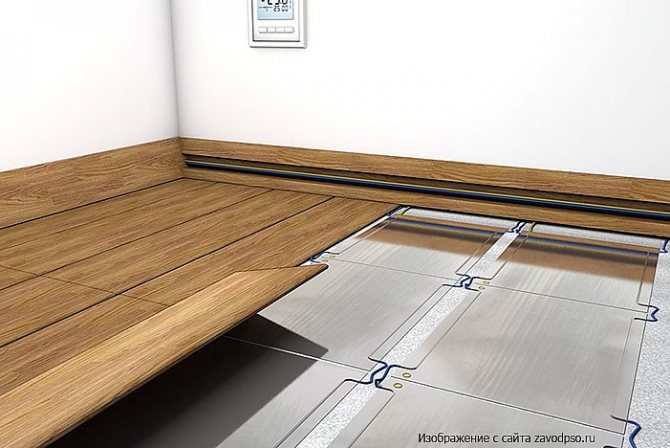
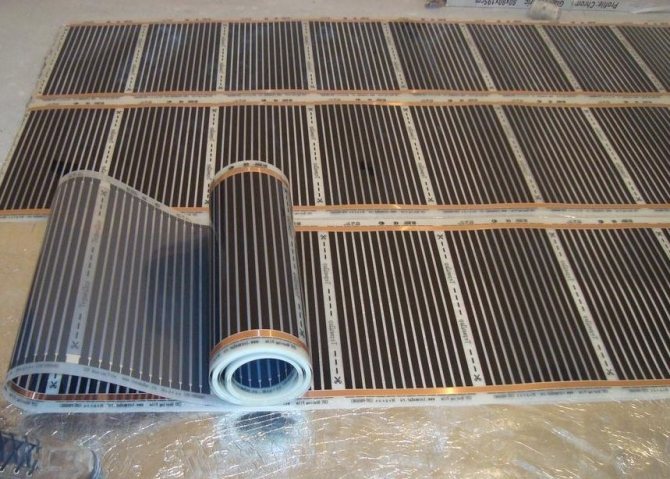
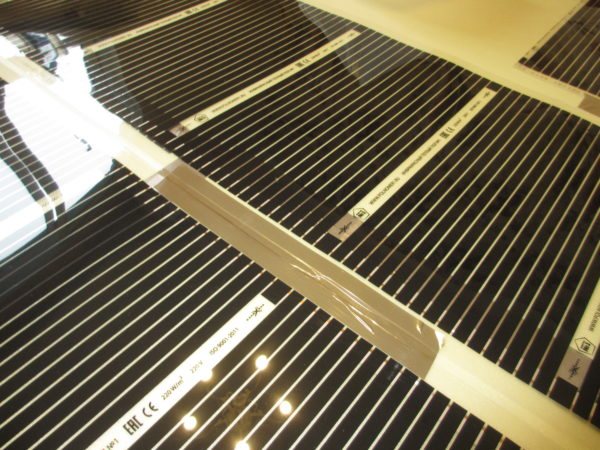
Installation of a film underfloor heating includes laying a special film, across which carbon heaters are located (see figure), which have a linear shape.
These heaters have a strictly calculated specific resistance. With the passage of an electric current, electrical energy here is converted into heat, that is, the film heats up. The resulting heat is evenly distributed over the entire surface, quickly warming up the coating of your finished floor.
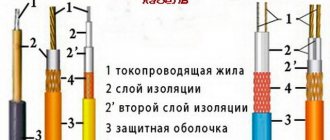
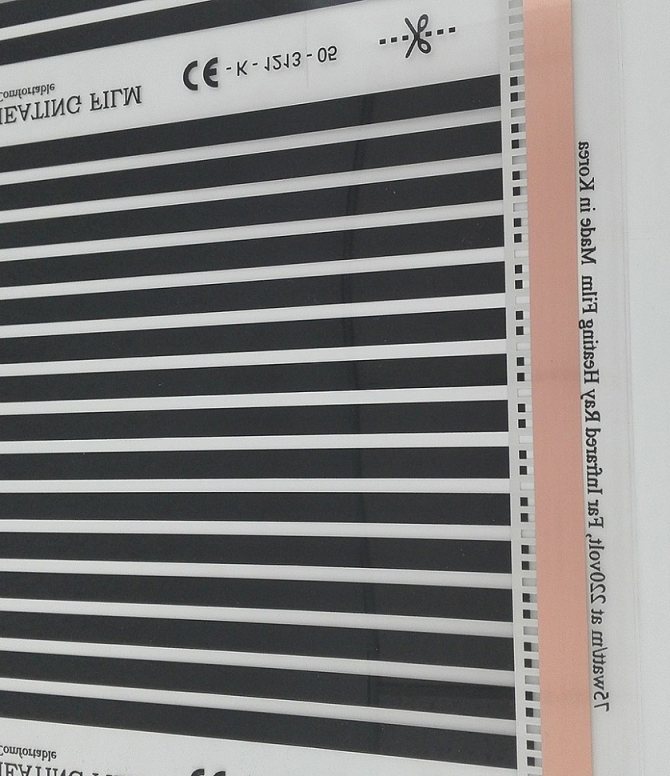
Current carrying copper strips (tires) are located at both ends of the roll. A variety of standard sizes and marking of cutting lines allows you to cut the film material right in place with virtually no loss. In addition, due to its great flexibility, elasticity and minimum thickness (total 0.338 mm) the material adheres perfectly to any surface, without requiring its special preparation when installing a film warm floor. Weight of one "square" electric heater 0,4 kg.
The main types of power of South Korean films: 150, 220, 300, 400 W / m2 (there are also less common options). The width of the material most often has the following steps: 0.5, 0.8 and 1.0 m... All South Korean heaters have proven to be excellent. The main thing is the exact connection diagram of the film floor heating, high-quality installation according to the instructions provided and correct operation. Many of these heaters are suitable not only for equipping underfloor heating, but also for heating ceilings (including as the main sources of heat).
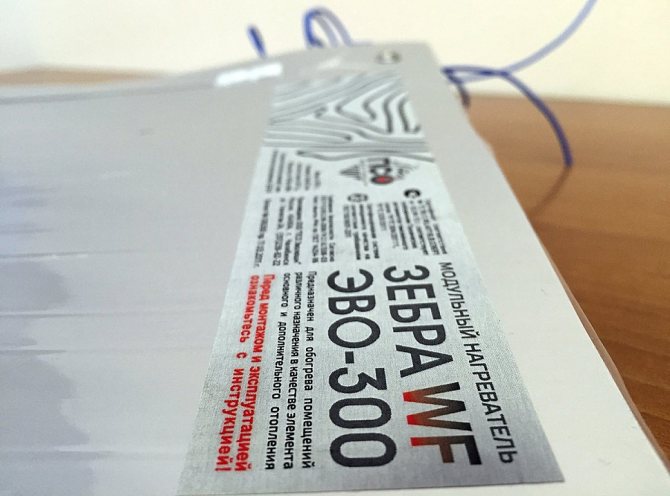
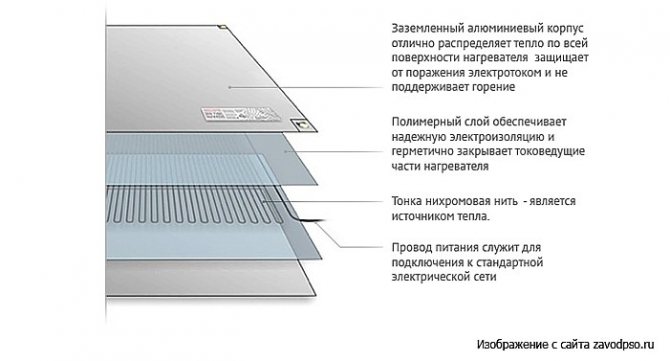
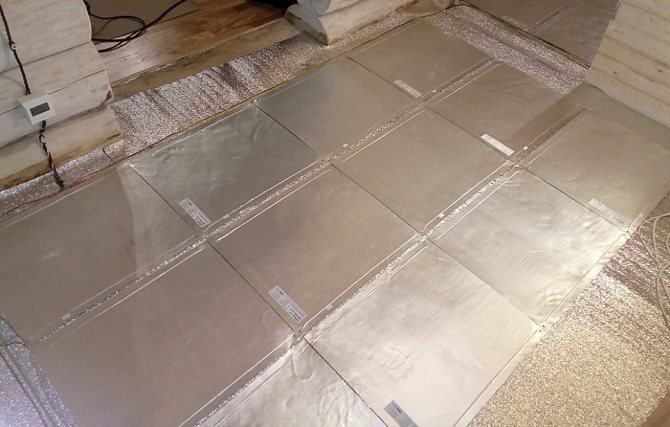
Among the Russian manufacturers of infrared electric heaters, the ZEBRA EVO-300 WF is in a special place.This is an excellent development, which became famous after the release of the popular heaters for the heating ceiling (ZEBRA EVO-300 series SOFT, ST, PRO, EX). EVO-300 WF was created specifically for warm floors. Zebra is a modular device equipped with ground loop and aluminum foil casing.
The main advantage of "Zebra" WF - unilateral heat radiation, in which up to 95% of the energy goes directly to heating, providing a record system efficiency.
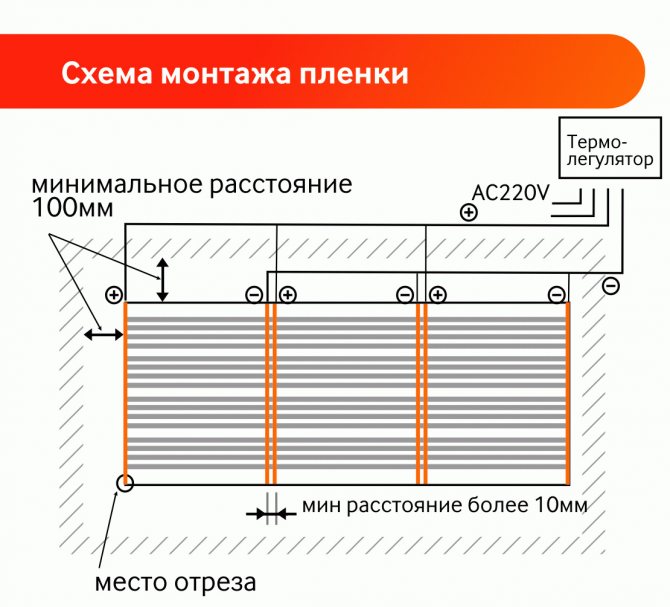
Approximate connection diagram of the film underfloor heating ZEBRA EVO-300 WF is presented below. ...
Installation and installation of an infrared floor from a film
The first good news is that when installing an IR film underfloor heating, no cement mortar or concrete is required. If your floor is even, then no "wet" work. The second good news is that in one room you can make such a floor with your own hands in one day. Even without special skills.
Payment
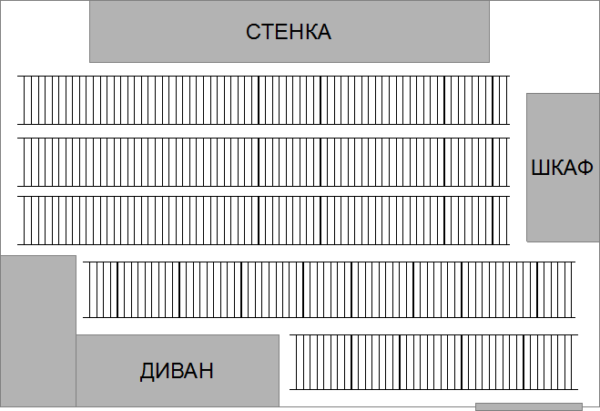
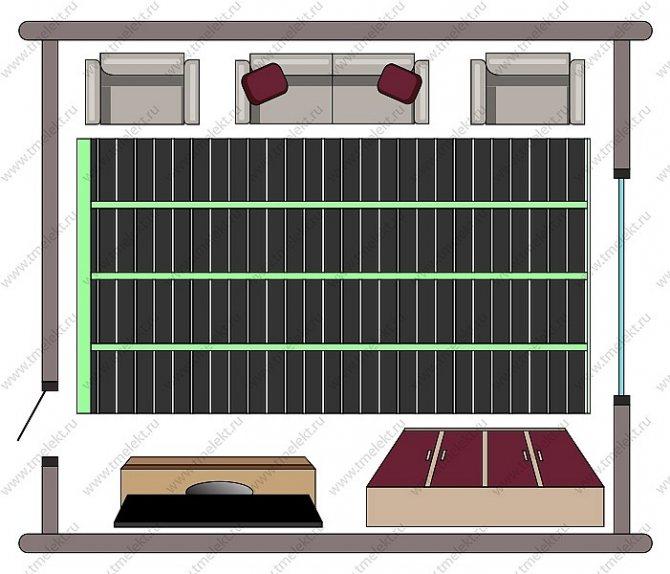
To correctly make a warm floor, you need to draw a floor plan to scale. Select the areas in which the furniture / appliances will stand. Next, you need to decide on the place where the thermostat will be installed. You need to supply power to it and connect the wires from the film heater and the temperature sensor to it. After that, on the area not occupied by furniture and appliances, it is necessary to arrange the strips of the film so that they do not overlap each other and do not intersect, but fill the entire area as much as possible.
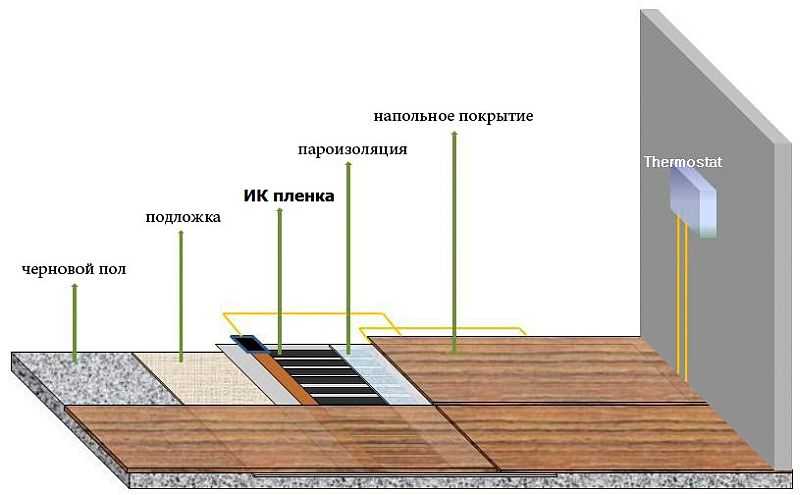
What does one of the options for the "cake" of infrared floor heating using a carbon film look like?
The choice of heating intensity depends, firstly, on whether underfloor heating is the main type of heating or additional. If floor heating is only a matter of comfort, and the main heating of the room is carried out by other systems, you can choose from low-power models from 150 W / m2. If the room is heated only from the floor, choose products with a power higher than 250 W / m2 (currently 400 W / m2 maximum).
The second factor that influences the choice of power is the type of flooring. Under the same operating conditions and the same requirements, a film of greater power must be laid under the tiles than under other types of flooring: it absorbs heat very intensively and at the same temperature it feels cold to the feet.
Installation of infrared film
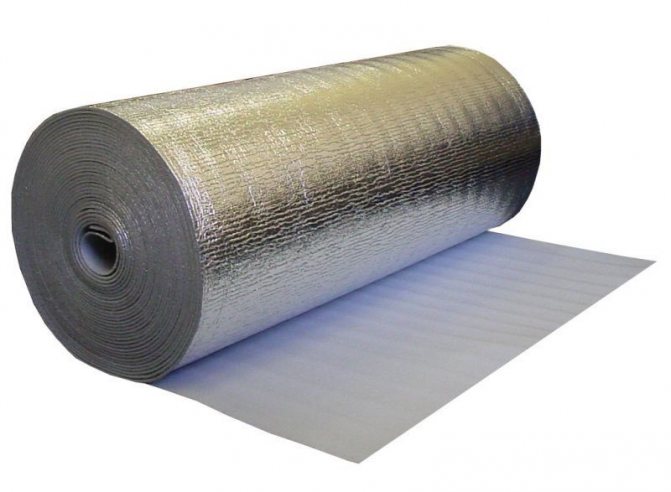
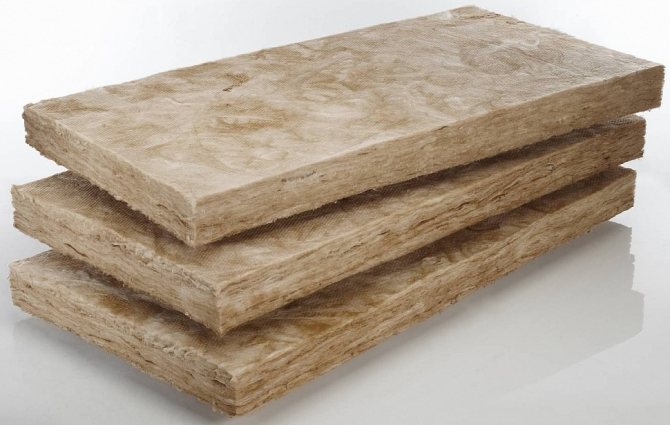
The first thing to do is to reduce heat loss through the floor and adjacent walls. To prevent leakage through the walls, a tape insulation or a strip of polystyrene foam 10 mm thick and about 10 cm high is laid around the perimeter. Then a layer of heat insulator is laid on a flat and clean subfloor (on the entire floor surface, and not just under the foam). In order for heating to be effective, it is advisable to use a foil or metallized material: it reflects the heat directed downward. Since cement mortars are used very rarely here, the foil will also serve regularly for many years (it quickly collapses in the screed). The use of such material increases heating efficiency and reduces heating costs. The heat insulator can be rolled or in the form of mats and plates. Fasten the thermal insulation to the floor with glue, double-sided tape or staples from a mounting gun.

RexVa infrared floor heating has good reviews
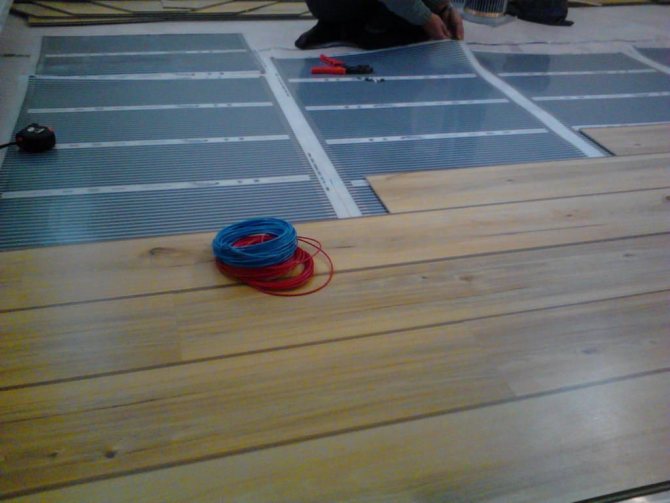
Then roll the infrared thermal foil downwards on top of the plan with a copper strip down (the top is matte, not shiny). Make sure that air does not collect underneath. Where necessary, cut the roll according to the markings (dotted line and scissors). It is more convenient if all the heating elements are turned with contacts to the wall where the thermostat will be installed. The distance between adjacent stripes is a few centimeters.If the infrared floor is planned under linoleum, it is better to lay the strips more densely so that the distance between the tires is 1 cm. But the tires should not touch and overlap under any circumstances.
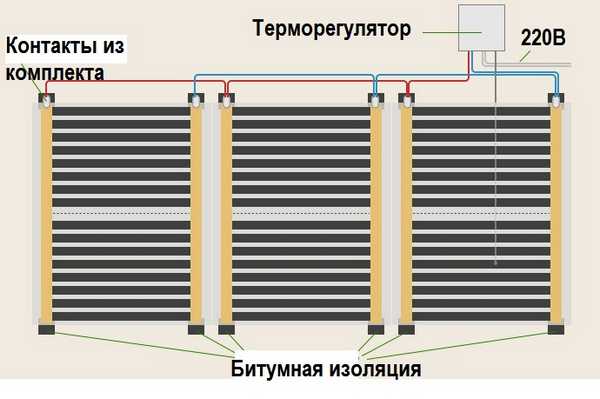
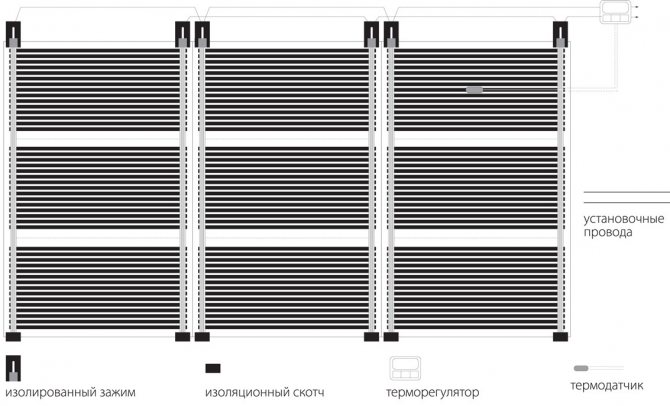
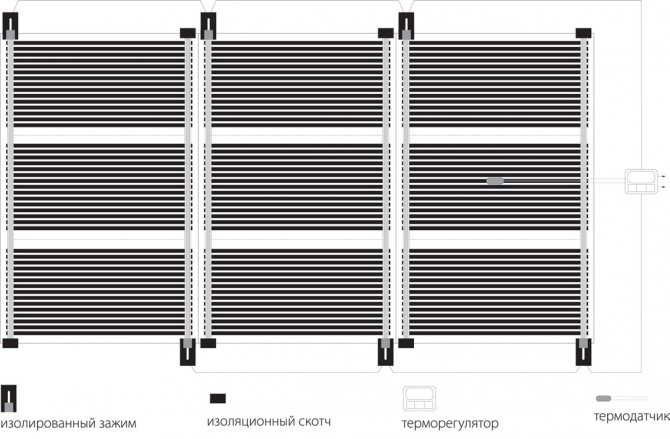
IR floor connection
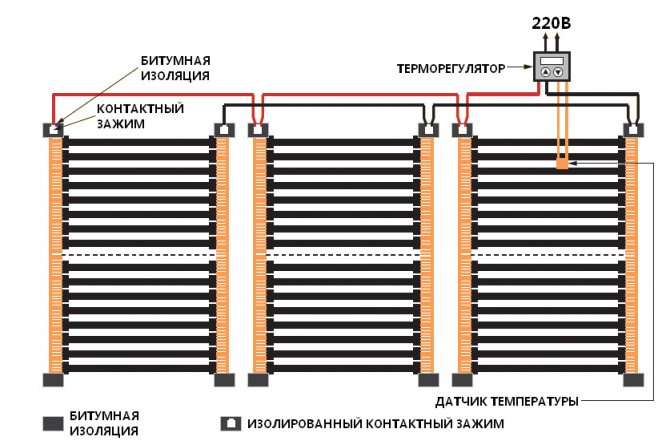
Now you need to connect all the strips with an electric cable, which usually comes with the kit. Establish a contact on a live copper strip. One part of it is located under the dwelling, the other - on top. Now crimp the contact with pliers. So you install contacts on all tires, deployed towards the thermostat. On the far side of the thermostat, open sections of the copper conductor must be closed with insulating tape (included in the kit).
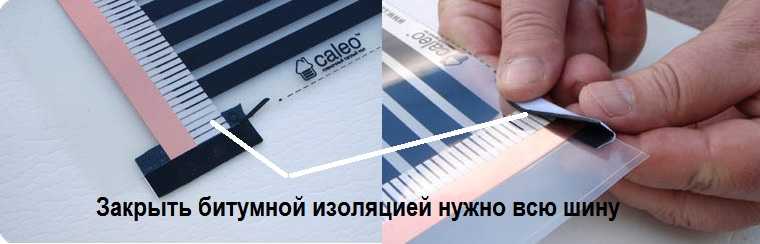
Busbars not used for connection are covered with bitumen insulation
When installing a piece of insulation, cover the entire width of the bus, including the silver mesh, if any (see illustration). Having installed all the contacts and insulators, attach the IR film with tape to the heat insulator, and fasten the strips together with it.
Connecting an infrared underfloor heating from a film
A thermostat is installed on the wall. Lead wires to it from heating strips. Under one of them, you need to make a recess in the heat-insulating material for the floor temperature sensor and wires to it. After laying and securing the sensor, run the wires from it to the thermostat too.
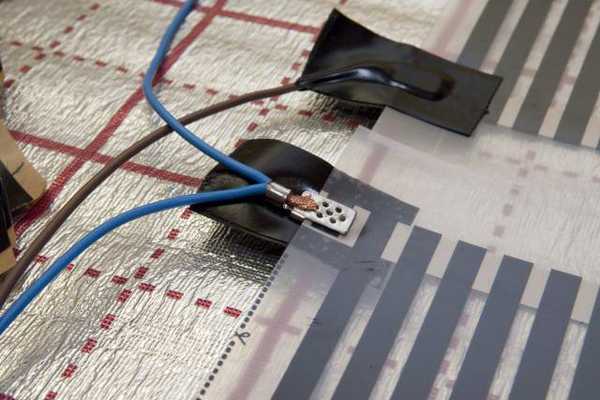
This is how the contact with the fixed wires looks like
The infrared floor connection diagram is shown in the figure. Now wires are connected to the contacts: they remove the insulation from a small area, the bare conductor (s) is inserted into the contact connector, squeezed with pliers. Check the strength of the connection and insulate with the piece of bituminous insulation that comes with the kit (two pieces, one on top, the other on the bottom, pressing them tightly together). Put all the wires on the thermostat, connect according to the diagram that is on its reverse side.
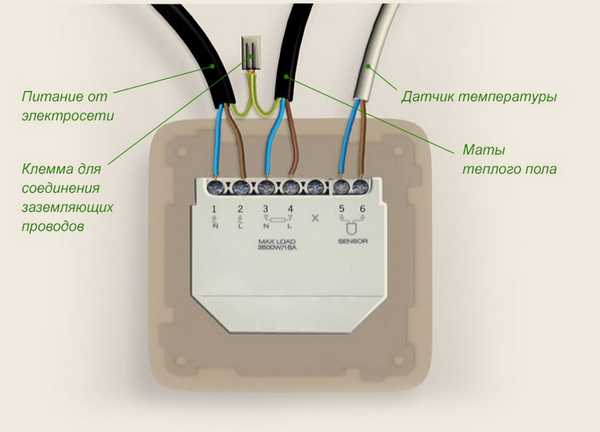
The connection to the thermostat depends on its model. This is one of the options
The electrical connection to the thermostat must be carried out by a qualified technician. After the power is on, you can test the system: set the temperature to 30 ° C, after a few minutes check if the strips are heating well and if the connections are sparking. If all is well, you can install a hard top floor covering or a base for soft materials.
Finish IR floor
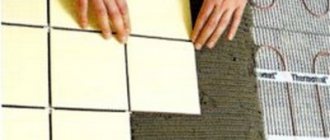
If tiles, parquet or laminate are laid on the infrared film floor, all that is needed is to roll out the protective (plastic or special) film. It will protect against water ingress on live parts during operation and will protect against damage during installation. If you are using laminate flooring, you can use a backing instead of film (or together with film). By the way, there is a special infrared film for tiles.
Under the tile, you need to lay a layer of glue 1-2 cm, and after it dries, start finishing work (special glue and grout for seams - for a warm floor). You can immediately put the tiles on the glue, but the thickness of the glue and tiles must be at least 2cm.
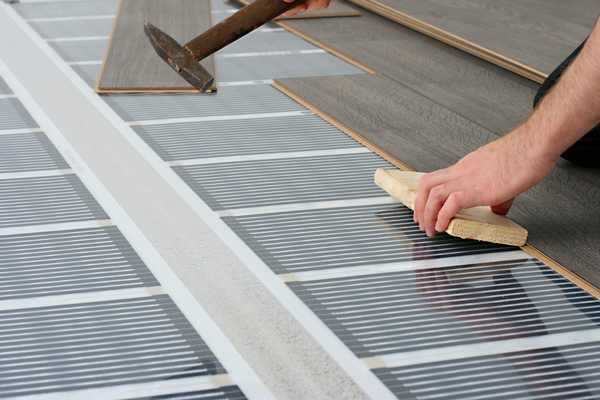
Laying a film warm floor, especially under a laminate, does not take much time
If a soft flooring is to be used, a hard base must be made for it. It can be sheets of plywood (10mm) or OSB, other similar material. It is attached to the floor with ordinary screws or dowels. Only when fixing a solid substrate should be careful not to get caught in conductive strips (copper and silver). It is also desirable to destroy as few carbon strips as possible. Having completed the manufacture of a rigid base, you can lay the floor covering - linoleum, carpet, carpet, etc. The main thing is that the temperature sensor and thermostat work, which will protect the film from overheating.
This is all the styling. You can turn on the infrared floor and warm up.By the way, the film doesn't have to be laid on the floor. You can make yourself an infrared wall or even a ceiling. There are even special IR films that are installed under suspended or stretch ceilings.
Advantages of a film warm floor
The advantages of a warm floor are many, here are just the most basic advantages that are distinguished by everyone who has installed a film warm floor:
- Rapid warming up of the room. The direct impact on the floor material significantly increases the heating rate in comparison with the vast majority of alternative systems.
- Ease and simplicity of installation.
- There is no need to make a screed: the material fits perfectly under most types of finishing coatings: laminate, linoleum or carpet.
- The room loses practically nothing in height (we remind you that the thickness of the electric heaters is only 0.388 mm).
- You can be completely calm, no water leaks threaten you.
- The infrared system works completely invisibly and absolutely silently, everything happens automatically according to your settings.
- Control is carried out using a thermostat, which is equipped with a remote temperature sensor that responds to changes in parameters within 0.5 degrees.
The manufacturer guarantees the flawless functioning of the infrared underfloor heating from 10 to 20 years old (depending on the specific company). The real service life of electric heaters exceeds 25 years.

Infrared underfloor heating installation price
The main part of the cost of installing an IR underfloor heating consists of the price of the film. Prices per square meter start at 2 thousand rubles, and increase insignificantly depending on the capacity of the purchased equipment. For example, a square meter of film from the manufacturer Caleo with a power of 170 W will cost from 1900 to 2500 rubles, depending on the store.
Manufacturers supply the film in rolls of various lengths from 1 to 20 m, so choosing the right size will not be difficult. Depending on what area will be equipped with underfloor heating, the total estimate for the work depends. The choice of a thermostat also affects the cost. The market offers various types of these devices, from simple mechanical to electronic and programmable.
The thermostat is selected depending on what requirements are imposed on the automation of heating the future system. Mechanical devices with an adjusting wheel that are coarse to set up cost an average of 2-4 thousand rubles. The price of electronic and programmable regulators with a liquid crystal or touchscreen display can go up to 10 thousand rubles. Their setting is more accurate, and also allows you to set a different mode of operation by hours and days.
For work, specialists on average charge about 500 rubles per square meter of film, plus 1000 rubles for installing a thermostat. With large volumes, the price will turn out to be significant, but it will be possible not to worry about the quality of the work performed and in the event of a breakdown, make a claim. If you have confidence in your abilities and free time you can do everything with your own hands, especially since the simplicity of the work allows you to do this.
Cons of a film warm floor
We do not idealize underfloor heating at all and objectively admit that it also has drawbacks. The disadvantages of such heating include:
- High cost of heating for rooms with a very large area and high ceilings.
- Temperature limits. According to SanPiN (SNiP RF 41-01-2003 "Heating, Ventilation and Air Conditioning"), the floor surface in rooms where people are constantly should not be heated above 26 ° C. And the temperature of the floor where people are temporarily can be raised to 31 ° C. Attempts to raise the floor temperature excessively (when the temperature outside is 30 ° C and below) will lead to discomfort: it will become too hot to walk on.
- Installation of a film underfloor heating is possible only in open areas free of furniture without legs.Otherwise, there is a threat of critical overheating of the film and its premature failure.
- The system dries up the air. This is due to the natural convection of the air during heating. This is especially evident when using an infrared warm floor as the main source of heating. In this case, we recommend installing humidifiers.
Advantages and disadvantages
The advantages of infrared underfloor heating are:
- Versatility - infrared floor heating is used to heat not only residential premises, but also various warehouses, large greenhouses.
- Simple do-it-yourself installation - the installation of this type of electric underfloor heating can be performed without much difficulty by any person with a minimum set of tools and skills to work with them.
- High installation speed - installation of a warm floor based on an infrared heating film takes no more than 2-3 days.
- Local heating - a wide variety of standard sizes of heating films allows them to be used to heat not only spacious rooms, but also small local areas (workplaces, recreation areas, etc.).
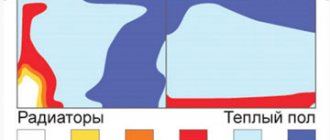
- Uniform heating of the air in the room - unlike electric convectors, central heating batteries, the warm infrared floor contributes to a more even heating of the air in the room: warm air masses that rise from the floor and rise to the ceiling cool very slowly. Thanks to this, a comfortable temperature from +22 to + 24 + 25 ° C is created in a room at a height of average human height (1.7-1.8 m).
- High efficiency - about 80-85% of the infrared radiation emitted by the carbon strips of the film is spent on heating the air in the room.
- Low thermal inertia - infrared floors have a very high heating rate, ensuring a comfortable temperature in the heated room.
- Possibility of quick dismantling of heaters - if necessary, the infrared heating element can be quickly and easily dismantled by disconnecting it from the power cable and rolling up a compact roll.
- Environmental friendliness - infrared rays emitted by the heating film do not have a negative effect on the human body.
The disadvantages of this heating system include
- Volatility - when the electricity is turned off, such a heating system stops working.
- Electric Shock Hazard - Electric current flowing through copper busbars is a potential hazard to the human body.
- High electricity bills - when using infrared floor heating as the main heating system, the cost of electricity bills in the cold season can be very high.
- Additional costs for a protective coating - when laying infrared floors under a soft covering - carpet, linoleum - they are additionally protected with sheets of plywood, moisture-resistant drywall. The use of these materials increases the cost of installing the heating system, increases the final thickness of the floor.
It will be interesting to you Editor for drawing circuits
Energy consumption of film warm floors
To find out the maximum power consumption of the system, it is enough to pay attention to the marking. For example, with a heater power of 220 W / m2 for 1 hour of operation, 1 "square" of an electric floor heating consumes 220 Wh (0.22 kWh)... At the same time, please note that the main power consumption occurs when the room is heated, and maintaining the set temperature requires periodic switching on, the frequency of which depends on the heat loss of the building envelope, as well as the parameters you set on the thermostat. Of course, the thermal insulation of the facility should be at least at the level of the SNiP recommendations of the corresponding region.
The temperature sensor is located directly on the surface of the film material, under the final finish of the floor.Let's imagine that you set the thermostat to 26 ° C, which is the most comfortable for you. When this temperature value is reached, the sensor will fix it, give a signal to the control device, and the thermostat will turn off the power. Then the floor will gradually cool down, and the speed of the process directly depends on the level of heat loss - and the thermostat will again supply power to the electric heaters.
In this way, the real power consumption at a specific facility directly depends on the frequency of turning on / off the system. The more heat loss, the higher the flow rate... We recommend that you always insulate the floor (a layer of ordinary building insulation with a thickness of 100 mm is sufficient). In this case, the specific average power consumption will be about 20-30 W per 1 sq.m of heated area.
The most common mistake of buyers of electric underfloor heating is that they want to insulate their floor with the help of them. But the film material does not retain heat: its task is to generate heat energy... And to keep the received heat must special heaters, which must be provided for in the floor structure. The modern market offers a lot of available options for insulation from various companies from different materials (Knauff, Isoverr, expanded polystyrene, etc.) with a thickness of 30 to 100 mm (the thickness is selected depending on the climatic characteristics of the region and the design of the insulation object).
What will happen if the installation of a film underfloor heating is performed without insulation? In some cases, the system can cope with heating your space, but in most cases it cannot. Without insulation, thermal energy will simply be lost, go into the atmosphere, into the ground, or be absorbed by ceilings. But in any case, the overconsumption of electricity is inevitable, because the system will have to work almost constantly to compensate for heat loss.
Is it possible to use special substrates up to 5 mm thick, because they also reduce thermal conductivity? Yes, such a substrate is better than nothing at all. However, the effectiveness of insulation is manifested with a minimum thickness of the insulation material in the floor structure from 100 mm.
Power and energy consumption
Installation of a film floor is not as difficult as it seems at first glance. The main thing is to understand the instructions, do not rush and follow all the recommendations, then everything will definitely work out. To begin with, it is important to determine what capacity is required to purchase the material itself. Depending on the indicators, the floor will heat up differently.
Selecting the power of the film warm floor
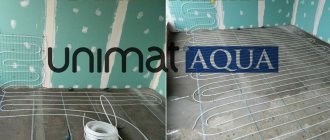
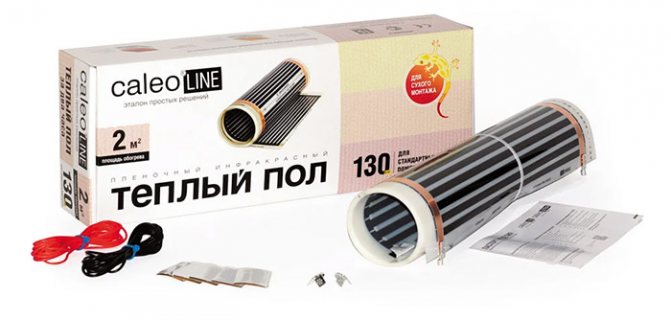
Let's look at the power indicators using the example of Caleo floors. So, the line of these films is presented in 4 variations.
- Line is the easiest option. The film is 50 cm wide and has a power of 130 W / m2. Ideal for additional underfloor heating.
- Grid is a more powerful film, but at the same time it is reliable and durable. There are two types depending on the power - 150 and 220 W / m2.
- Gold - this option can be adjusted in terms of power depending on the temperature level in the room. There are also two types - 170 and 230 W / m2.
- Platinum is a self-adjusting high-tech floor that is not afraid even of locking by interior elements, it is not afraid of overheating. The most reliable and economical 230 W / m2 option.
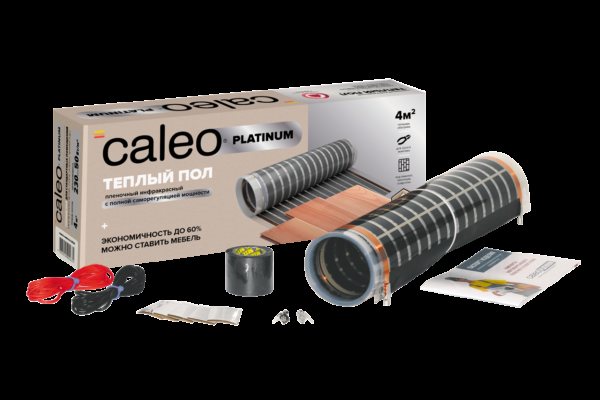
Warm floor CALEO PLATINUM
It is necessary to choose a film according to its power depending on its operating conditions. For floor heating only in the toilet (additional), you can take the simplest and low-power option, but if you plan to equip a full-fledged heating system for a large room, then you should take a more powerful film.
It is also important to pre-calculate the energy consumption. The maximum consumption can be found by looking at the material label. For example: if the power of the film is 220 W / m2, then in 60 minutes a square meter will spend about 0.22 kWh. Most of the energy is spent on heating up the system.With the regular switching on and off of floors, you can save a lot of money, provided there is good thermal insulation.
We invite you to familiarize yourself with Installation of a mixer with a rain shower
You can calculate the required film power as follows.
Step 1. If the system will be used as an additional one for floor heating (central heating will also be organized), then it should be remembered that it is enough to cover only 50% of the entire floor surface in order to achieve the desired effect.
Not the entire floor can be covered with foil
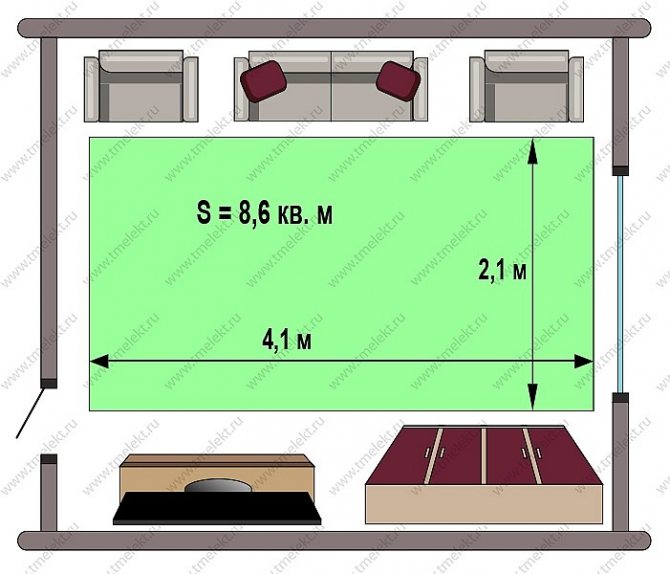
Step 2. Next, you need to find out the usable floor area. It includes only those areas where nothing is worth - an open floor. For example, the usable area is 8.6 m2. To obtain the values, it is enough to remember the mathematics, take measurements from free space and carry out simple calculations.
Determination of the usable floor area
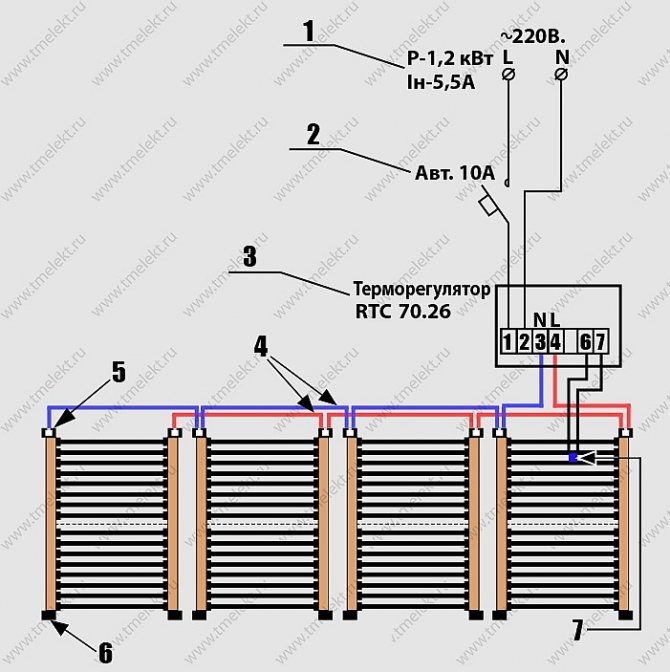
Step 3. Then you need to calculate the amount of film, but it is important to take into account its parameters (width, length, etc.). It is recommended to cover the entire usable area. So, for example, the choice fell on a film with a capacity of 150 W / m2, which has a canvas width of 50 cm.Thus, you can find out that the master will need to have 4 pieces of film 4 m long - it will turn out to be 8 m2. The total power will be 1.2 kW, the load is 5.5 A.
We calculate the required amount of film
Calculation of film underfloor heating
For the efficiency of the infrared floor heating, the correct preliminary calculation of its power is important. Let's give an example in which a warm floor is planned to be used as additional heat source (i.e. a boiler or central heating is running in parallel). In this case, it is enough to cover with a film. up to 50 % floor.
To begin with, we determine the useful heating area. Effective area - these are only its open areas, not occupied by furniture, etc. 8.6 sq.m. (S = 4.1 x 2.1 m).
Based on the size of the usable area, we select the standard sizes and the number of film electric heaters, while it is desirable to cover the entire usable area as much as possible. Here we will use a South Korean film with a capacity of 150 W / sq.m with width 500 mm... You will get 4 segments of 4 meters each, that is, 8 square meters of electric heaters with a total power 1.2 kW (8 sq.m. x 150 W / sq.m = 1200 W). We get the load current 5.5 A (1200 W / 220 V = 5.5 A).
We recommend that you draw up a laying diagram before installation. On it, you will need to mark the place of laying the film segments, the distance between the strips, the wiring diagram for the film heated floor, including the location of the power wires and the temperature sensor coming from the thermostat.
Note! It is strictly not allowed to overlap electric heaters! Along the perimeter, indents from walls and stationary heating systems should be provided along 10-20 cm... An indent of up to 50 mm.
Another very important point. At the site where installation is planned film warm floor, should have additional electrical power... Quite often, in the absence of it and high power consumption (the system operates in several rooms at the same time, including as the main one), there is network congestion problem... This leads to the constant operation of the introductory machine and other troubles.
In order to avoid such problems in the future, it is necessary to design the parameters of the facility's power supply in connection with the additional electric power of the warm floor.
Below is the recommended maximum length for South Korean carbon based film materials, depending on the roll width and heater power density.
| Table No. 1. Recommended max length of Yu. Korean film materials on a carbon basis, depending on the width of the roll and the specific power of the heater. | |||
| Roll width (m) | Specific power (W / m2) | Recommended max film length (m) | |
| 0,5 | 150 | 10 | |
| 0,5 | 220 | 8 | |
| 0,8 | 220 | 6 | |
| 1,0 | 150 | 7 | |
| 1,0 | 220 | 5 | |

Connection instructions
The process of installing an infrared warm electric floor includes designing, preparing the base, laying the substrate, thermal film, connecting the heating elements to the thermostat, checking their performance,
Design
When designing manually or using special graphic editors (AutoCad, Compas, Graphite), a large-scale diagram of the room is drawn in which it is planned to lay the warm floor. The diagram indicates the location of capital-standing furniture and household appliances (cabinets, sofas, refrigerators, etc.), the direction of laying the thermal film. Based on this scheme and taking into account the indentation of the heating film from the walls, furniture, the required amount of materials is calculated.
Preparation of the base
When preparing a concrete rough base, debris is removed from it, potholes, chips, cracks are removed with the help of a gypsum filler. With a large difference in height at various points of the subfloor, it is poured with a self-leveling quick-drying screed
It will be interesting for you Features of ballast 4x18
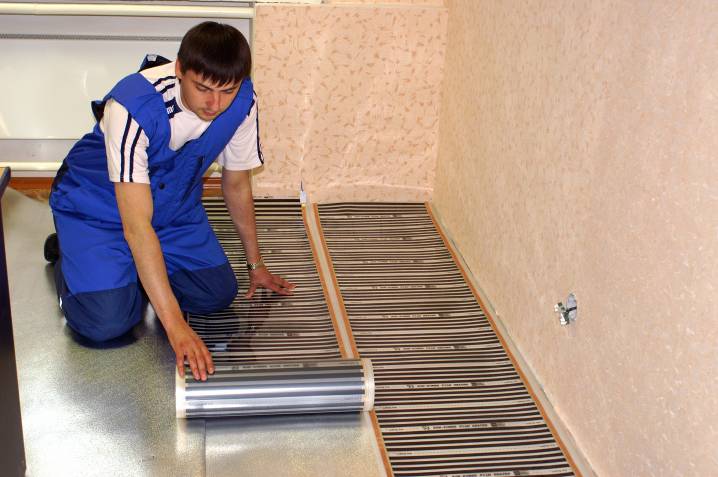
Laying a heat-reflecting layer
The underlay is laid over the entire floor area. At the same time, the neighboring lanes are connected to each other with the help of a scotch. When laying the substrate on a subfloor made of boards, the heat-insulating material is additionally fixed with a furniture stapler.
A layer of thermal insulation material laid under the thermal film
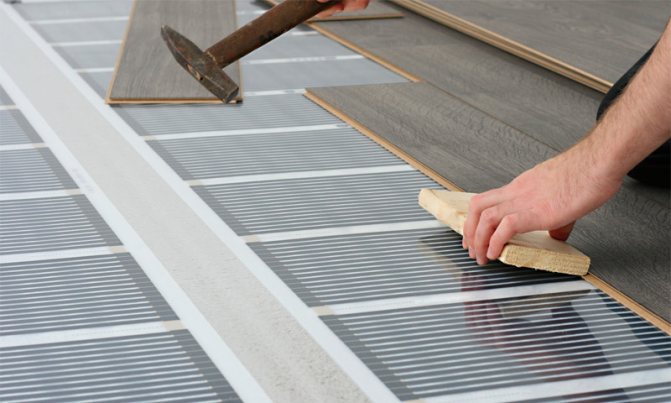
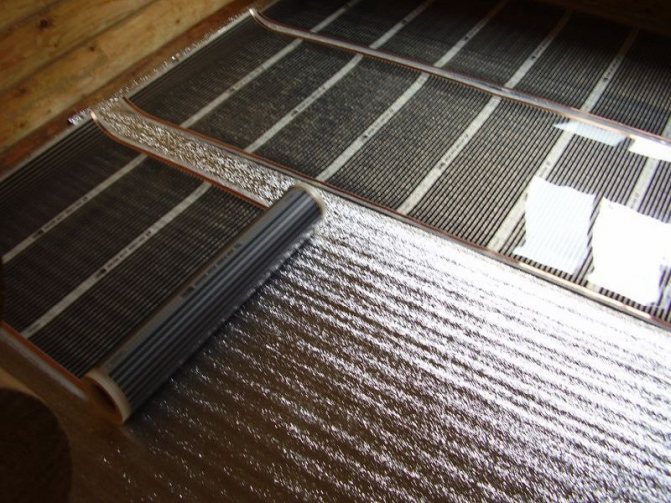
Thermal film laying
The process of laying the thermal film consists of the following manipulations:
- A roll of thermal tape is rolled out on a backing with a copper bus down.
- Using scissors or a sharp clerical knife, the thermal film is cut into strips of the required size.
- The cut strips are laid in parallel with an indent from the walls of at least 10 cm.
- Using masking tape, the thermal film strips are attached to the substrate and to each other.
Important! When laying strips and further work, use shoes with soft rubberized soles, avoid heavy tools falling onto the film.
Assembling the electrical circuit
Connecting the laid strips of thermal film is made as follows:
- Contact clamps are fixed on the copper busbars of one of the cuts of each of the strips using a special tool or pliers.
- The stripped ends of the power cables are fixed in the clamps.
- Copper busbars located on the opposite cut, as well as contact clamps, are insulated with the pieces of bitumen tape included in the delivery set.
- A thermal sensor is glued to the lower surface of one of the strips of the heating film with bitumen tape.
Power cables and terminals insulated with bitumen tape are placed in grooves and recesses cut out in the substrate.
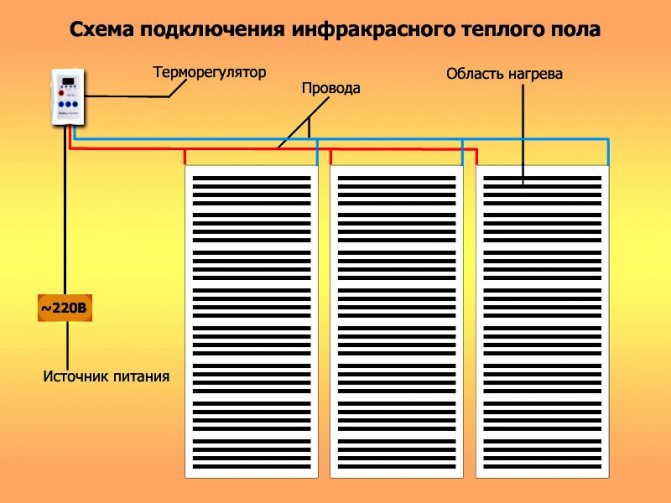
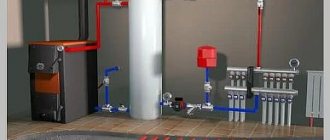
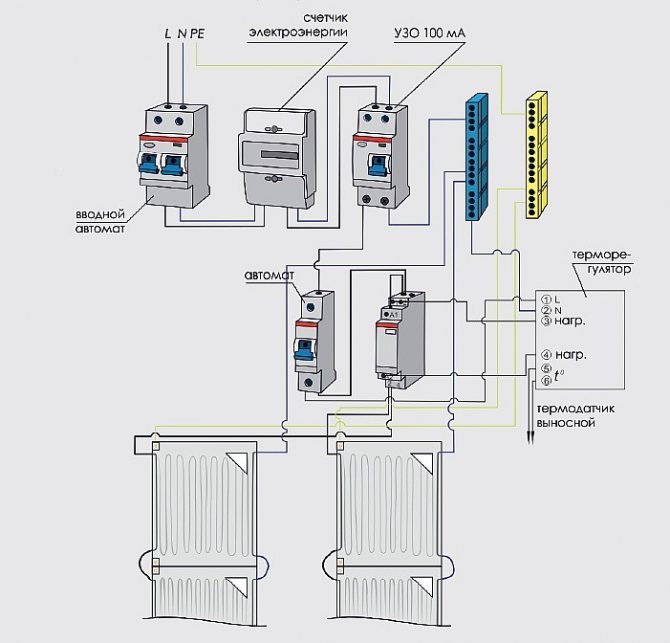
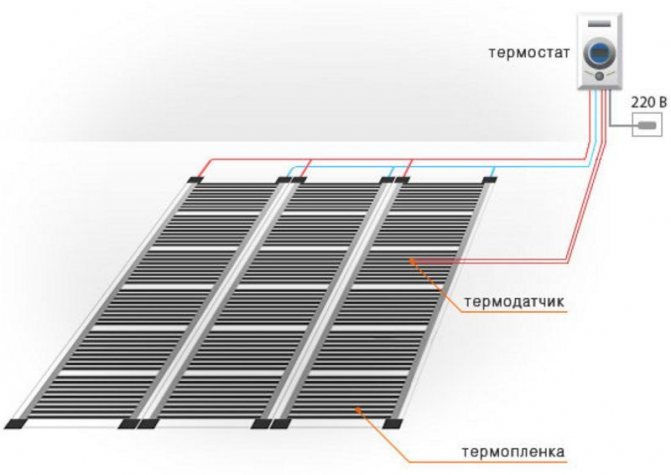
Diagram of connecting a warm floor to electricity
Connecting the thermostat
The following are connected to the terminals of the thermostat installed in the wall niche:
- two conductors of the power cable supplied from the electrical network with a voltage of 220 V;
- wires from the temperature sensor;
- cable feeding strips with heating elements;
Important! A more detailed connection diagram for a specific thermostat model is given in the instructions attached to it.
You can see how to connect a warm floor to electricity with your own hands in the following video:
We test the infrared heating system
To check the performance of the system, visually assess the integrity of the thermal film, check the reliability of the insulation on the contact clamps. After that, the thermostat is turned on, the heating temperature of the thermofilm is set at 20-220C. The uniformity of heating the bands of the infrared floor is checked after 2-3 minutes using a special device - a laser thermometer.
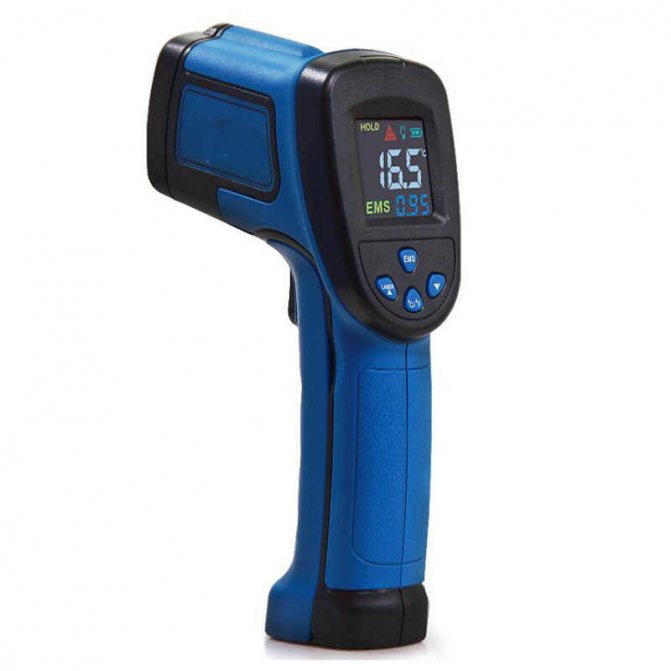
Laser thermometer
Laying the protective cover
After the installation and connection of the underfloor heating is completed, its operability is checked, the thermal film is covered with a protective coating over the entire area.
The type of material used in this case depends on what the finishing (finishing) layer of the floor will be with:
- to protect infrared heat-insulated floors laid under the laminate, a protective covering made of dense polyethylene film is used;
- when laying infrared underfloor heating under linoleum or carpet, the strips of thermal film are protected with plywood sheets.
When installing a thermal film under a ceramic tile, sheets of moisture-resistant drywall are laid on top of it as a protective coating.
Thus, an infrared floor is a convenient and reliable system for heating rooms of various sizes. Simple, reliable, easily and quickly assembled with your own hands, it is widely used not only in country houses and cottages, but also in apartments, offices, apartments, rooms of various hotels and hotels. Possessing a large number of advantages, it has two main disadvantages that are significant in a number of cases - volatility and high power consumption.
The choice of the cross-section of the electric cable for the film warm floor
The choice of the cross-section of the electric cable for the film underfloor heating is made depending on area of materials used and correspondingly, power of individual groups of film heaters... These recommendations are drawn up taking into account the rules for the installation of electrical installations (PUE), as well as taking into account the underestimated data of the cross-section of wires of some manufacturers. So, a wire marked 2.5 sq. Mm actually turns out to be with a cross-section of 2-2.1 sq. Mm. Below is a table with the recommended cross-section of copper wire, depending on the maximum area of the heaters and the power of one group.
| Table No. 2. Selection of the cross-section of the electric cable for the film underfloor heating | |||
| Film heater power (W / m2) | Copper wire cross-section (mm2) | Recommended max area of film heaters of one group (sq.m) | |
| 150 | 1,5 | up to 12 | |
| 150 | 2,5 | from 12 to 20 | |
| 150 | 4,0 | from 20 to 30 | |
| 220 | 1,5 | up to 8 | |
| 220 | 2,5 | from 8 to 14 | |
| 220 | 4,0 | from 14 to 24 | |
If the area of the heaters in a group exceeds the values indicated in the table, then when connected, they must be divided into subgroups of the permissible area in accordance with the recommendations. Example: 28 square meters of infrared underfloor heating with a power of 150 W / square meters can be easily divided into 2 subgroups of 14 "squares". In this case, each subgroup is connected to the power line with a separate wire with a cross section of 2.5 sq. Mm.
Note! The choice of the cross-section of the power wire for connecting an electric underfloor heating is very important. If you install wires with a reduced cross-section (relative to the recommended one), this threatens the wire overheating, melting of the insulating layer, which can lead to fire!
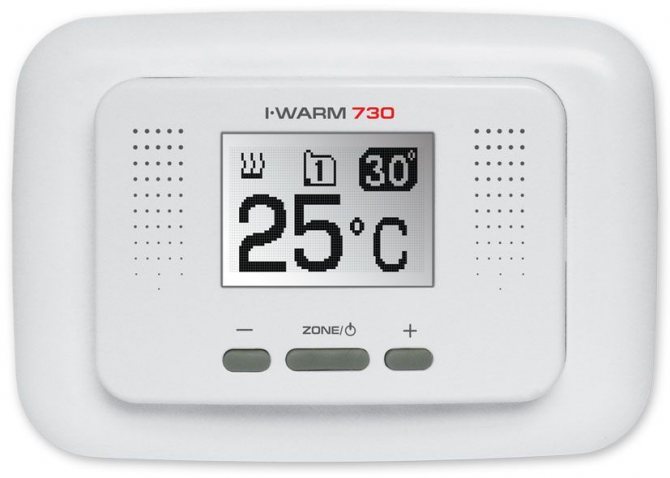
Thermoregulators for film underfloor heating
The thermostat is a control device, or simply the brain of the film heating system. It is he who allows you to automatically monitor and control the heating process, maintaining a preset temperature. The main difference between thermostats for warm floors is the presence of a remote temperature sensor, which is located on the surface of the film, immediately below the final finish of the floor.
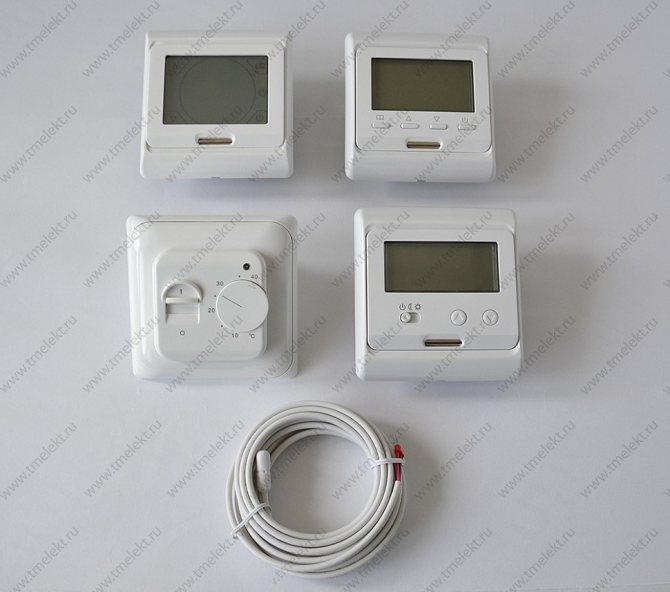
We constantly monitor the equipment market, selecting thermostats for our customers, which can definitely be entrusted with the management of film underfloor heating. Such devices include 70.26, E 31.116, E 51.716, E 91.716, Wi-Fi SIU WF-1 and some others. You can freely find a description of the advantages and a connection diagram for each device on our website.
Accessories and tools for film underfloor heating
This includes almost everything that can be included in the system, from backing to machines, tape and connecting contacts to tools that are needed for installation. Let's look at the required components using the same example that was used above. So, the useful heating area is 8.6 square meters, 4 pieces of film, the total power of the heaters is 1.2 kW. According to these data, we will select additional materials and equipment:
- Substrate for heaters.Isolon with a thickness of up to 5 mm and an area of 10 square meters is ideal here. This is both additional thermal insulation and protection of the film from accidental damage to the base of the floor. Attention! The substrate must be free of metallic coating (aluminum foil).
- Polyethylene. Performs a protective function against accidental water leaks. Enough 10 m² of polyethylene with a thickness of 50 microns.
- Circuit breaker for 10 A - 1 pc.
- Modular box (4 modules).
- Wire PUGV 1 x 1.5 sq. Mm - 2 pieces of red and blue, 10 running meters each.
- Connecting clamps (clips) - 2 pcs. for each heater + spare pair, 10 pcs in total.
- Bituminous tape for insulating the ends of the films (at the rate of 30 pieces of 50 x 50 mm: 6 for each electric heater plus a small margin).
- Household (ordinary) tape for fixing materials.
Assembly tools: screwdriver, wire cutters, pliers, assembly knife, scissors, electrical tester.
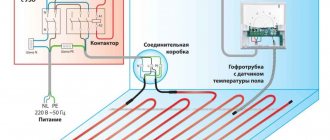
Wiring diagram of a film underfloor heating
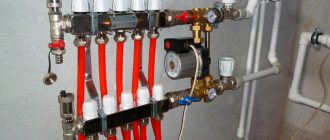
Film warm floor works from standard network 220 V, 50 Hz... Connecting tapes to the network - parallel... A schematic diagram of connecting a film warm floor (again, focusing on our example) is presented below.
- Estimated load data of the group.
- Circuit breaker 10 A.
- Thermostat RTC 70.26.
- Group wires PGV 1 x 1.5 sq. Mm.
- Insulation of the place where the group wire is connected to the film.
- Insulation of live copper busbars at the ends of the strip.
- Remote temperature sensor.