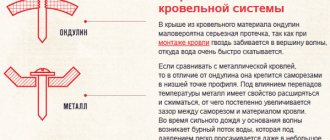
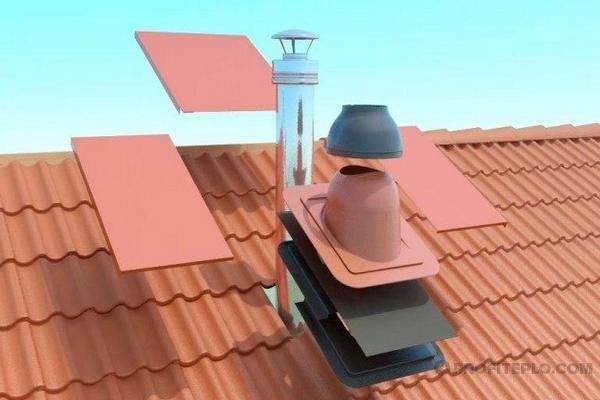
Chimney passage through the roof
Heating units operating on solid, gas or liquid fuels are equipped with a flue duct for the removal of combustion products. Increased requirements are imposed on the functionality and safety of chimneys, because due to the use of low-quality materials for their installation or violation of technology and SNiP norms, the structure itself may collapse, and a fire may occur. Particular care should be taken to equip the passage through the roof for the chimney to ensure waterproofing and fire safety of the unit. Let's consider how to properly carry out the passage of the smoke channel through the roofing system.
Smoke channel passage
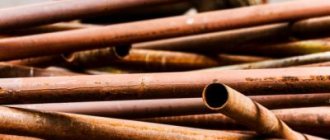
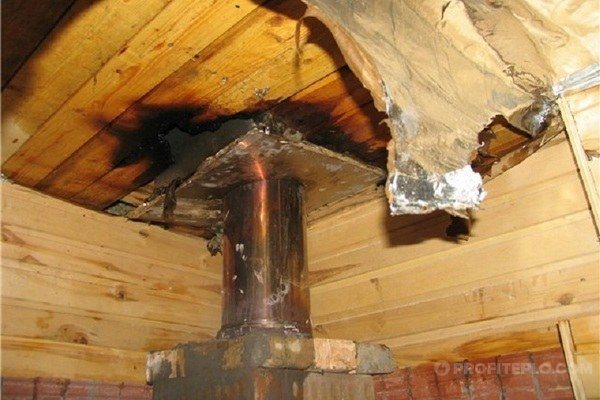
Consequences of poor-quality installation
The passage assembly must be reliably protected from moisture penetration, therefore, it is of great importance to comply with the technology of installation work, the use of reliable and durable materials. Poor waterproofing of roof pipes
:
- Leads to the destruction of the brickwork of the chimney due to the weakening of the solution, as a result of which the flue gases can penetrate into the attic. The fire hazard also increases.
- It provokes the penetration of moisture into the brick chimney and the appearance of fungus in the warm season.
- Promotes waterlogging and damage to waterproofing carpet and vapor barrier membrane.
- Increases the heat loss of the building (correspondingly, fuel costs increase).
- It disrupts the air circulation in the room under the roof, this leads to an increase in the level of humidity and provokes decay of wooden structures. In difficult cases, this leads to the need for overhaul of the roof system of the house.
- It causes the formation of ice deposits, which provoke the expansion of cracks and the destruction of the roofing next to the chimney.
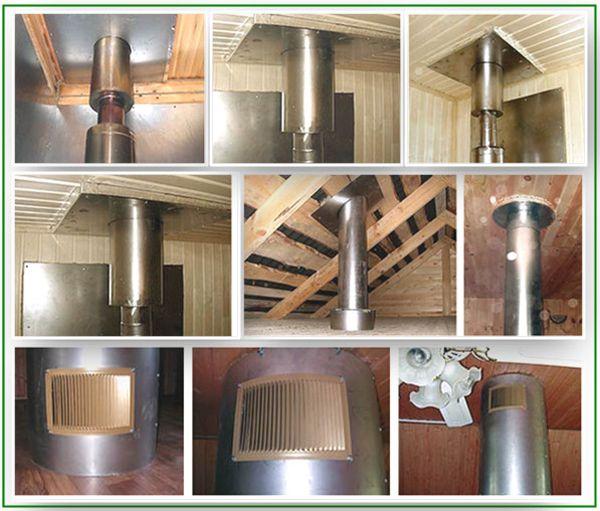
The procedure for arranging a chimney through a metal roof
The biggest problems can arise when arranging the passage of a pipe through an insulated roof. Because it consists of a certain number of insulation layers, including roofing insulating material and roof battens.
Watch the video: bypassing the chimney through the metal tile
Experienced craftsmen advise in this situation to build a separate box around the circumference of the chimney passage through the ceiling. The main thing you need to know when doing this exit is maintaining the safety of the wooden structure on the roof.
The box, passing through the ceiling, must be reliably protected from contact with the furnace smoke exhaust pipe. This is achieved through the use of mineral wool based on basalt or fiberglass.
The unit of the erected structure for the passage of the chimney is of various shapes. It depends on the type of material used in the construction of the ceiling passage. As a rule, the shape of the chimney on the roof is of the following types:
- rectangular;
- square;
- round.
The first and second views are created when erecting a structure of bricks and blocks. And through the use of metal products and cement, they create a passage for the chimney, which has a round shape.
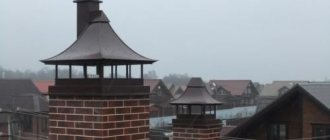
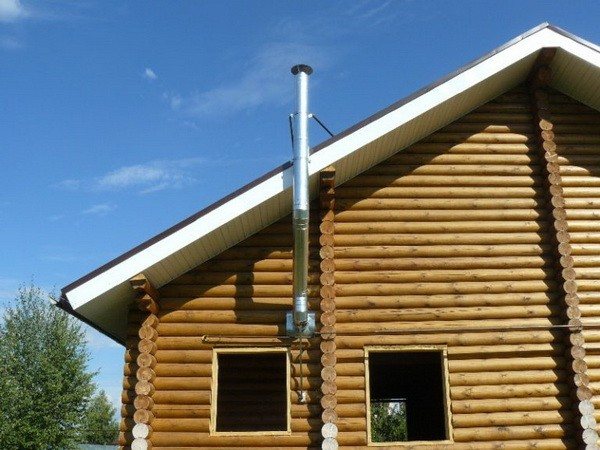
Chimney location and height
In order to ensure optimal draft force for efficient combustion of fuel, the total length of the flue duct should be between 5 and 10 meters. The height of the location of the upper edge of the chimney relative to the ridge of the roof or the wall of a higher building located in the immediate vicinity is also important.
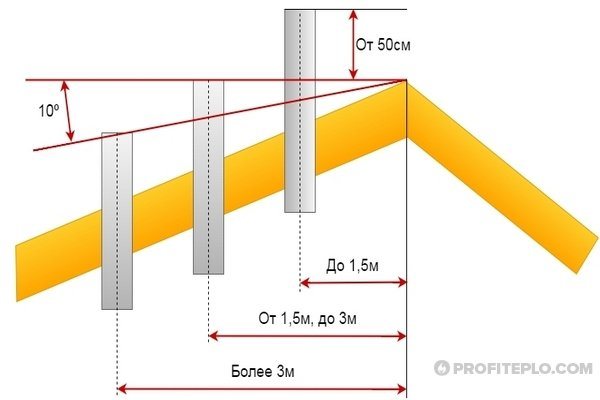
Rules for the location of pipes on the roof
When designing the passage of the chimney pipe through the roof, one should be guided by the current rules and regulations, fire safety requirements. Consider the following:
- The recommended place for arranging the chimney is at a distance of no more than one and a half meters from the highest point of the roof (ridge). In this case, the upper cut of the pipe must be at least 50 cm above the ridge.
- If the pipe is 1.5–3 meters from the ridge, its upper part can be located at the level of the ridge. When the chimney is removed by more than three meters, its height above the roof is calculated depending on the height of the ridge. The top of the ridge should be on an imaginary line drawn from the ridge at an angle of 10 ° relative to the horizontal line passing through the same point.
- The place where the chimney passes through the roof should be located between the rafters at a distance of at least 25–30 cm from the wooden elements of the roofing system. In the case of removing a part of the rafter, a special structure is mounted so that the roof frame can withstand operational loads.
- A gap of 13–25 cm should be left between the chimney pipe and the edges of the roof covering that is not resistant to fire (soft roof, roofing felt); if the roof is made of sheet metal, natural or cement-sand tiles, slate, this distance can be reduced to a minimum.

Pipe in the valley
It is not recommended to install the chimney in the place where the complex roof valley is located. Precipitation flows down it, which flows here from two slopes, in addition, snow masses will accumulate near the chimney and melt. The increased load inevitably leads to depressurization of the penetration and roof joints, they will have to be regularly checked and repaired.
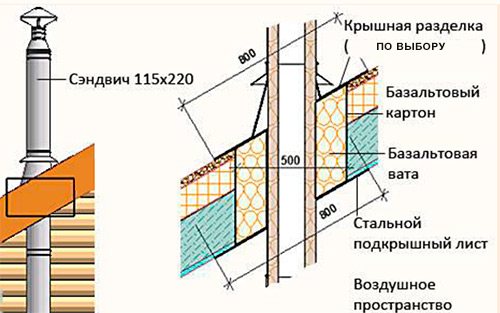
Installation principles for sandwich chimneys
To use the heater without fear of fires, carbon monoxide poisoning, it is necessary to lay a chimney, guided by fire safety rules and building codes:
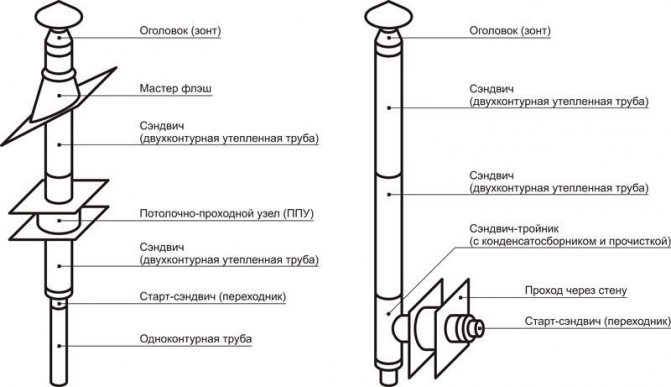
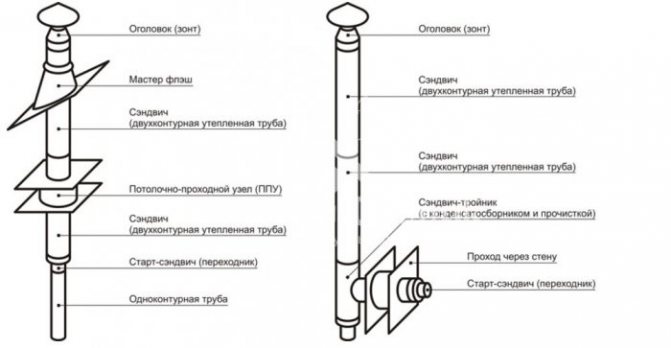
Chimney outlet through the wall and roof
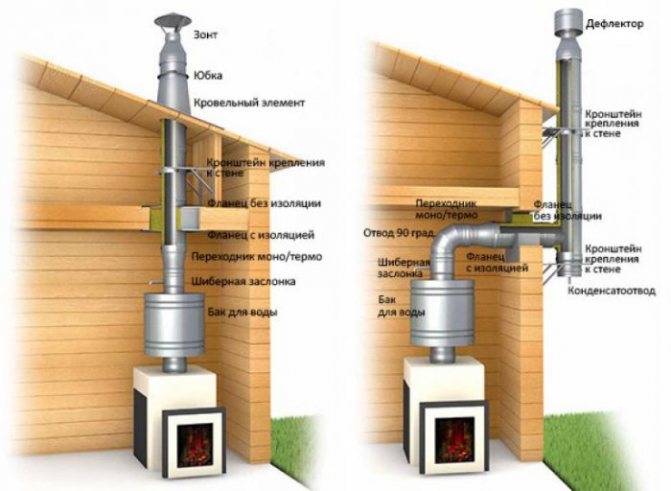
Internal and external placement of the chimney
- In places where the chimney passes through ceilings, walls or roofs, additional thermal insulation is required using a steel conduit or a pipe.
- Do not connect the sandwich pipe directly to the heater inlet. It is recommended to use sandwich pipes in the outer sections of the chimney, when the passage through the wall or roof has already been made.
- The places where the chimney passage is made in the immediate vicinity of the walls is protected with sheets of refractory material, for example, asbestos.
- If the installation is done by hand, make sure that the length of the horizontal sections that negatively affect the traction force does not exceed 100 cm.
- The diameter of the steel sandwich pipe along its entire length should not be less than the inlet pipe of the heater.
- The chimney made of steel must be assembled with your own hands so that the joints do not fall into the passage of the pipe through the roof.
- In order for the passage through the roof to fall into the gap between the elements of the rafter system, bends are used. Sandwich pipes have 45 degree elbows, if a 90 degree turn is required, two elbows are required.
- The diameter of all elements of the chimney must match so that no gaps are formed in the joints. Steel clamps and flame retardant sealant are used to seal the connection.
- In the lower part of the chimney, it installs a revision, a door or glass, through which the condition of the chimney is monitored.
Folded connection
The installation of the inner pipe contour is carried out "by condensate", that is, each subsequent element is inserted inside the previous one. And the outer casing is connected "by condensate", on the contrary, putting the upper segment on the lower one.
Fire safety
The wooden truss system and some layers of the roofing cake (waterproofing, vapor barrier) do not withstand heating and can ignite or melt. The safety of system elements that do not differ in fire resistance is ensured by installing a special box around the perimeter of the hole in the roof.
Violation of safety rules
The box is mounted from a wooden block, it should be located flush with the crate, on the outside of the roof. Along the perimeter of the box, from the outside, the edges of the vapor barrier are fixed - a carpet made of roofing felt or other waterproofing material, as well as the edges of the vapor barrier membrane from the side of the room, if we are talking about an insulated roof. In both cases, a cross-shaped incision is made in the panel and triangular fragments of material are tucked inward. For fastening, nails with wide heads or staples are used, and a sealant or adhesive tape allows you to achieve the tightness of the abutment of materials around the perimeter of the wooden box.
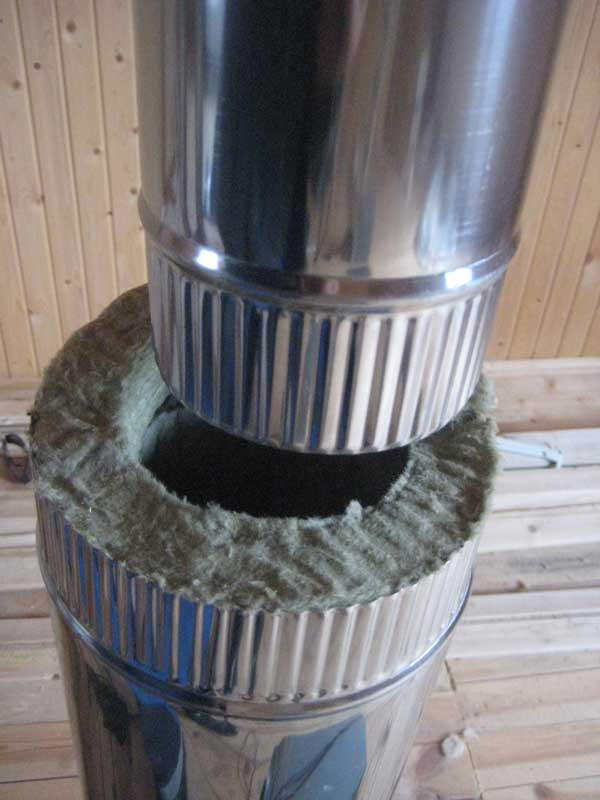
The passage through the roof of the chimney provides for thermal insulation of the chimney with basalt wool or other non-combustible materials. If possible, an air gap of 5-7 cm wide is left between the layer of insulation and the chimney itself.
Box insulation with basalt wool
If the installation of the chimney involves the use of a special element - penetration, when choosing it, first of all, make sure that the element is made of a material that is resistant to temperature extremes.
Please note: Do not use materials that are not designed for high temperatures, such as pipes and roof penetrations for ventilation ducts.
Chimney pipe insulation
It is necessary to isolate the chimney from two negative destructive factors: from overheating of structures and from leaks at the joints. Therefore, in the article we will consider two types of chimney insulation:
- Fireproof thermal insulation;
- Waterproofing.
It is recommended to immediately carry out complex insulation, solving not only the main problems, but also improving the operating conditions of the furnace. For example, insulating a pipe running through an unheated attic reduces the risk of overheating of wooden roof elements and reduces the risk of condensation, which can lead to excessive soot deposits, corrosion or pipe breakdown. Waterproofing the pipe will help to avoid rotting of the truss system and ceilings, as well as the destruction of the pipe if it gets wet.
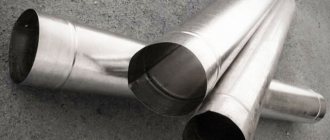
The simplest and most reliable, but not always the cheapest way is to install a "sandwich" chimney made of ceramic or metal. In such chimneys, the inner pipe, which performs the function of removing smoke, is made of heat-resistant steel or ceramics and is thermally insulated with non-combustible insulation: mineral, stone or basalt wool. The outer layer of the sandwich chimney is made of steel or ready-made claydite-concrete blocks.
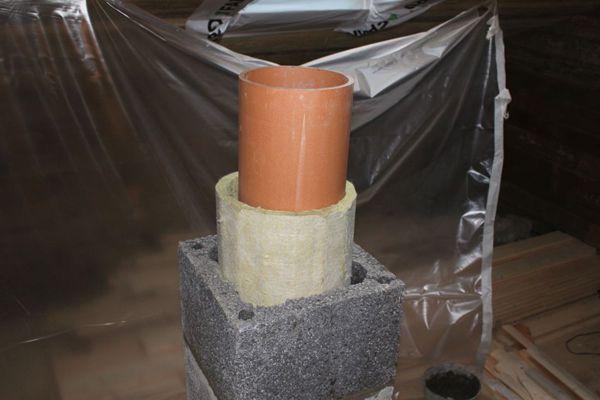
Prefabricated Ceramic Chimney - Safe Solution
Prefabricated chimneys are completed with elements for fastening, revision, maintenance, as well as for connecting several heating devices. Installation of such a chimney is simple, but it requires compliance with the instructions, only then it will be completely safe.
Thermal insulation of a "sandwich" pipe
Another insulation method used when building a stove is a brick chimney. Due to the low thermal conductivity of the brick, its walls do not heat up to dangerously high temperatures, therefore, no additional measures for insulating such a chimney are required, except for the correct execution of fire-prevention cutting of ceilings and roofs.
Thermal insulation of metal and ceramic single pipes is possible using boxes made of non-combustible materials and mineral non-combustible thermal insulation - stone or basalt wool.It is possible to operate such chimneys without thermal insulation, but the implementation of fire-prevention cutting in accordance with all the rules is mandatory in any case.
Chimney waterproofing is installed in the place of its exit to the roof. The larger the pipe and the farther from the ridge it is, the more difficult operating conditions await it: with rain, more abundant flows of water, in winter - increased snow load. With insufficient waterproofing, rain and melt water penetrates into the interior of the house, leading to leaks, decay of wood and destruction of concrete and brick structures, including the chimney itself.
The waterproofing method depends largely on the shape of the pipe and the type of roofing. For round pipes, metal or polymer cuts are used, for rectangular pipes - metal aprons and abutment strips. How to waterproof a pipe is described in detail in the article "Roof cutting of a chimney", and then we will talk about the technology of thermal insulation of a chimney.
Before proceeding with the insulation of the chimney pipe, it is necessary to check compliance with the requirements of SNiP 2.04.05-91 and, if necessary, correct the shortcomings:
- The height of the pipe to ensure good draft and allowable temperature of flue gases at the outlet should be 5 meters or more;
- If the roof covering belongs to combustible materials - slate, ondulin, roofing material - a spark arrester must be placed on top of the pipe - a fine-mesh metal mesh;
- The distance between the chimney pipe and combustible structures - ceilings, walls, rafter systems - must be at least 250 mm;
- A fire-prevention distance must be maintained between the upper ceiling of the stove and the ceiling. For metal stoves, it is at least 1.5 meters, for brick stoves with a two-row overlap - 0.5 meters, with a three-row overlap - 0.25 meters, provided the ceiling above the stove is finished with non-combustible materials;
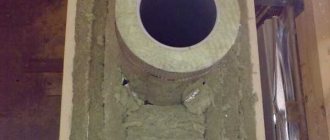
- In places where a brick chimney passes through the ceiling, fluff is performed - a thickening of the pipe. The thickness of the fluff is 1-1.5 bricks.
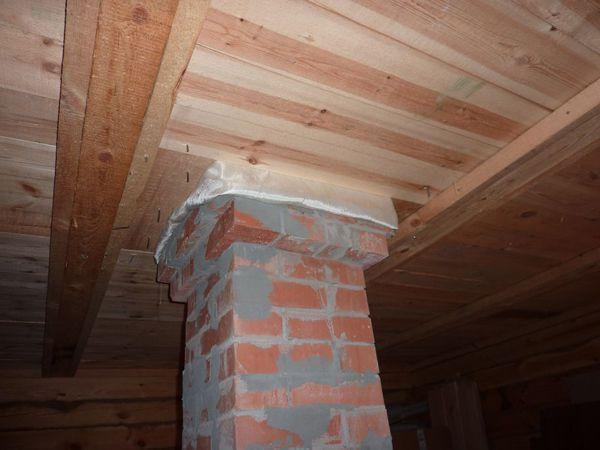
Flared brick pipe in the place of passage through the ceilings
The brick pipe does not heat up very much from the outside, therefore it is necessary to insulate it rather in order to improve operating conditions and extend its service life. The most affordable way to insulate a brick chimney is to plaster with cement mortar or a mortar based on cement and lime. Instead of sand, you can add sifted slag crumb to it.
Solution composition:
- 1 bag of cement (25 kg);
- 2 buckets of slaked lime;
- 10 buckets of sand or a mixture of sand with slag crumbs;
- 5 buckets of water.
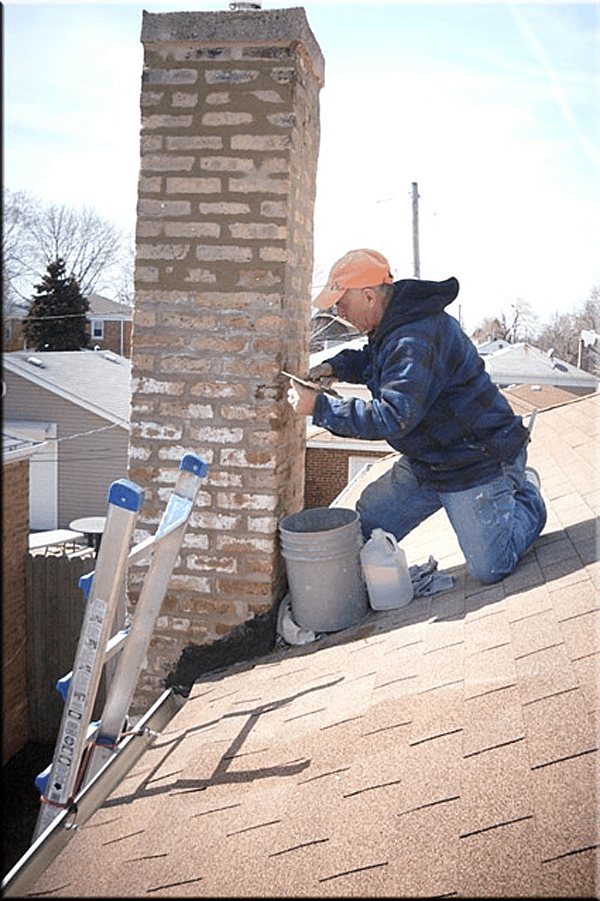
Preparing the pipe for plastering: sealing cracks and irregularities
- To prepare the solution, mix 3.5-4 buckets of water with a bag of cement and 2 buckets of slaked lime - fluff. After thorough mixing, sand and slag crumbs are added in parts, as well as the remaining norm of water. The resulting composition must be used in cool weather within 5 hours, and in hot weather - in 1-2 hours, so you can cook it in parts.
- With large irregularities in the pipe, the plaster layer turns out to be quite thick, therefore it is recommended to first seal all the cracks and drops with the specified solution, and then cover the pipe with a reinforcing mesh.
- Plastering is carried out in two layers. For the first layer, the solution is diluted a little more, to a creamy state, and applied by spraying: they take a certain amount of solution on a trowel or spatula and throw it on a dust-free and slightly moistened brick surface. The first layer is not leveled.
- A thicker solution is needed for the second layer. It is applied with a trowel and rubbed to a smooth surface. It is necessary to plaster the entire pipe from floor to ceiling or roof.
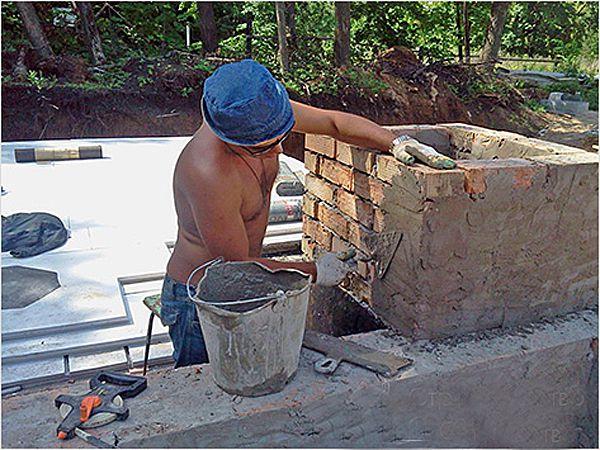
Plastering a brick chimney pipe
This method surpasses plastering in terms of heat saving by 2-2.5 times and consists in gluing asbestos-cement slabs to cement-lime mortar on the outer walls of the pipe.
- According to the above technology, a plastering solution is prepared.
- The pipe is reinforced with a mesh and the first layer of solution is sprayed on. Dry it.
- Asbestos-cement sheets are cut to fit the pipe size. The second layer of the solution is applied to the sheets of asbestos cement and glued to the surface of the chimney.
We suggest you familiarize yourself with: How to clean a vibe in an iPhone
The disadvantages of this method include the low environmental friendliness of asbestos - it emits carcinogens, therefore, this method of isolation cannot be used in living rooms. In a non-residential attic, thermal insulation of the chimney with asbestos will reduce the temperature drop from the inside and outside of the chimney and significantly reduce the formation of condensation, as well as improve its fire protection.
In addition, a brick pipe can be sewn up with sheet metal using a layer of insulation. How to do this can be found in the video.
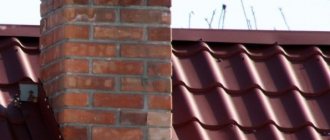
Rectangular or square tube
The brick chimney of a classic stove usually has a rectangular or square section, since this is the simplest form for installation. The outer casing of the ceramic stove chimney looks similar.
In the standard version, the chimney is located strictly vertically, but on the ceiling of the attic, you can equip a horizontal section of a small length in order to adjust the place where the chimney exits to the roof.
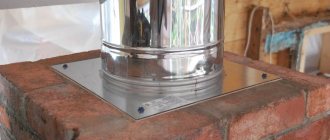
A hole is cut in the roofing pie and the wooden structure mentioned above is mounted. After the laying of the pipeline passing through the roof is completed, it is necessary to ensure reliable protection of the passage unit from atmospheric precipitation. From the inside, from the side of the attic, a steel sheet is attached to decorate the penetration site (a hole in it is cut to fit the size of the pipe, the sheet is put on the chimney in advance). The protective and decorative plate is attached to the edges of the support box with self-tapping screws, the joint along the pipe perimeter is filled with a fire-resistant sealant. The box is lined with asbestos sheets from the inside, or the gap between it and the pipe is filled with basalt wool.
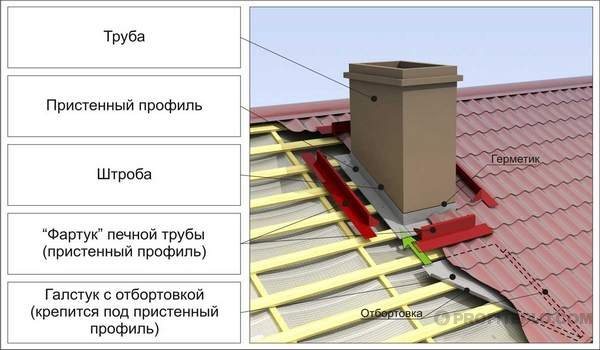
Rectangular pipe
From the outside, the edges of the waterproofing are brought onto the brick pipe, in which a cruciform incision was previously made. Each of the resulting triangles is cut so that the overlap on the chimney wall is 10–12 cm. Waterproofing is glued to the brick using a special material - an elastic metallized tape with an adhesive layer.
Then the inner apron is mounted. The structure consists of four galvanized steel strips. The upper folded edge of each plank is inserted into a brickwork, and not into a masonry seam. In the corners, the planks are joined with an overlap of 15 mm. All joints are treated with a heat-resistant sealant. The side strips should be provided with bumpers that direct the flow of water downward. A metal sheet with sides is put under the lower bar - a tie, which provides water drainage to the lower edge of the roof or to the nearest valley.
To decorate the chimney through the roof, an external apron made of galvanized sheet metal is installed. The material can be painted in the color of the roof. The method of fastening is the same as for the internal structure, but you can do without the punishment by treating the joint with a heat-resistant sealant for external work. The edges of the apron, laid on top of the roofing, are fastened with galvanized self-tapping screws.
Assembling the chimney from sandwich pipes
The passage of sandwich pipes through the roof is the most important stage in the installation of the chimney, but this is not the starting point. It is impossible to proceed with the installation of the chimney without preliminary preparation.Quite often, the preparatory measures for various types of sandwich pipes may differ, so they need to be clarified in the instructions provided by the manufacturer.
Do-it-yourself installation of a sandwich pipes for a chimney should be done from the bottom up, that is, from the chimney duct of the furnace to the roof and beyond. Subject to a preliminary study of the necessary instructions, it is possible to cope with the installation work, without the involvement of specialists, in 1-2 days. It will take less time to pull the pipe through the wall than through the roof. This is due to the fact that in the second case it will be necessary to attend to the study of the rules for installing waterproofing, vapor barrier and thermal insulation of the roof at the joints of the horizontal surface of the roof with vertical elements, in our case with a chimney.
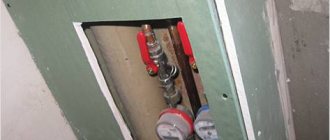
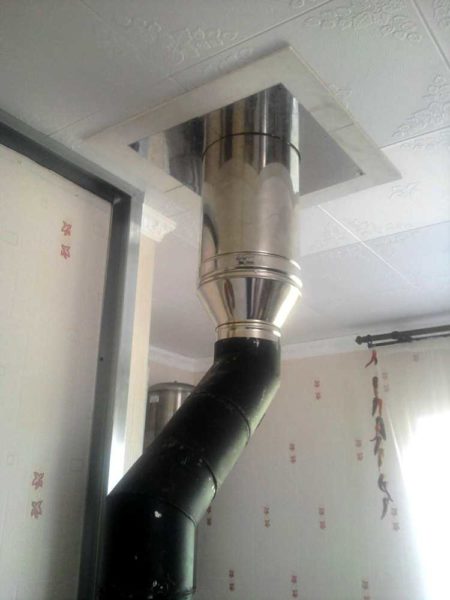
Chimney outlet through the ceiling
Any chimney pipe is a potential ignition source. This is due to the fact that the smoke temperature is quite high. Any, even the slightest violation, committed during installation can become a source of dangerous consequences.
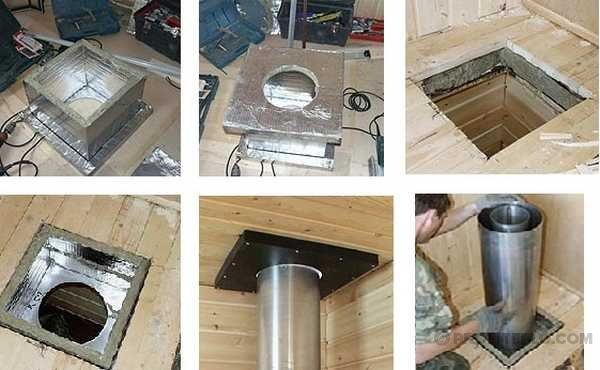
The installation of the chimney through the ceiling must begin with the manufacture of the passage unit. Its dimensions should be slightly larger than the diameter of the sandwich pipe. Thanks to this, it is possible to completely exclude the contact of the sandwich chimney with all surfaces made of combustible materials, such as wood.
Making a chimney with your own hands from metal
Assembly will be much faster and easier if you purchase a chimney unit in a store. All that is required is to install it in the ceiling and cover it with heat-insulating material on all sides, which is best used as basalt wool. It is able to withstand high temperatures.
When purchasing cotton wool, it is imperative to make sure that it can withstand temperatures up to 800 degrees. Cotton wool with such resistance will cost more, but you cannot save on the safety of your own home.
The pass-through ceiling unit for the chimney from sandwich pipes can be made independently. As a material for carrying out such work, asbestos should be used, which has performance characteristics that meet the requirements for passage units for installing chimney ducts.
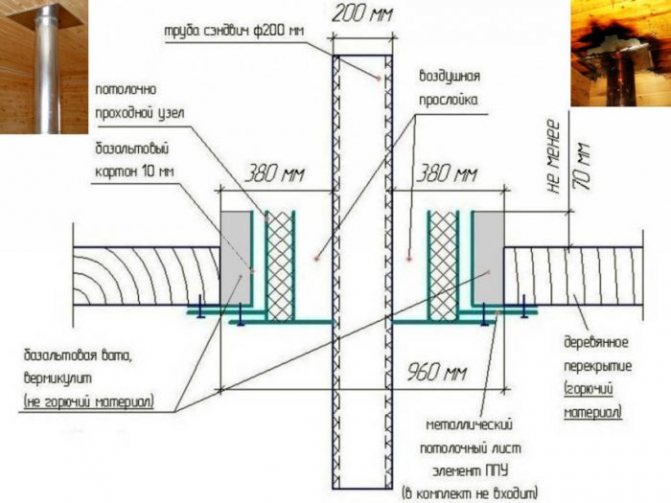
According to the current building codes and regulations, when passing the chimney through the wooden floors on the roof and ceiling, it is required to maintain a distance of at least 380 millimeters from the inner pipe of the chimney sandwich to any wooden surface. This is not always possible. The distance between the rafters does not make it possible to adhere to this rule. In such a situation, it is necessary to increase the opening with the help of additional bars.
If the distance between the pipe and wooden structures in the attic is less than 38 centimeters, then they should be additionally protected from exposure to high temperatures. For these purposes, it is recommended to use galvanized metal sheets or asbestos sheets with a thickness of at least 0.5 centimeters.
When protecting wooden elements of the attic, varnish, rafters, battens, etc., it is preferable to use galvanized sheets. They are good in that they not only prevent the spread of the flame, but are also able to evenly dissipate heat, preventing it from concentrating in one specific place. Among other things, galvanized metal sheets are good at shielding the heat radiation that comes from the pipe.
Metal sheets are installed quite simply. This does not require special mounts. You can use regular nails.
The obvious advantage of passing through the ceilings of sandwich pipes is that for an ordinary metal chimney, the distance to the nearest wooden structures should be at least 50 centimeters. Thus, it is almost impossible to pass an ordinary metal pipe through the ceiling and roof in a small building, for example, a bathhouse, so it needs to be fixed to the wall.
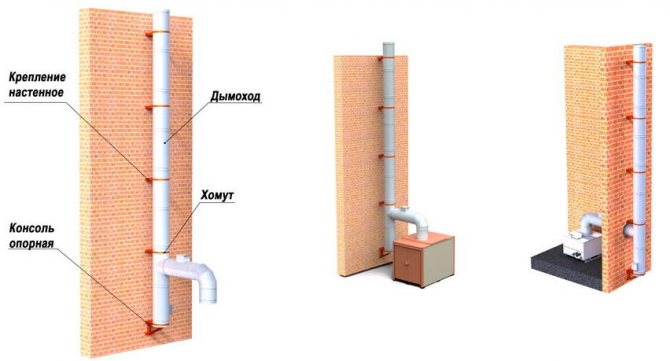
Outlet sandwich chimney through the wall
Making a spark arrester for a chimney with your own hands
As it becomes clear from the above, the installation of a chimney from sandwich pipes is performed quite often. Thanks to this solution, all work can be carried out much faster, and at the same time, to avoid contact of pipes with flammable objects.
Do not give in to delusion. The outer contour of the chimney duct, which has a structure called a "sandwich", is able to heat up to high temperatures. This is due to the fact that initially sandwich chimneys were created with the aim of increasing traction, and not providing fire safety. Thus, the outer part of the chimney pipe sometimes heats up to 300 degrees. Therefore, the installation of the flue gas duct through the wall is the ideal solution.
In connection with the above, many will probably be interested in how to install the chimney through the wall yourself. The following instructions will help you to complete all the necessary work on installing the sandwich chimney:
- the first step is to make a sandwich pipe for the chimney. It should be said right away that this work is not easy and the time of its implementation is not included in the general timing of the installation. It is much more profitable to buy ready-made chimney elements in the store. A sandwich pipe costs about the same as the materials to make it. If it was decided to carry out all the work independently, then for production you will need basalt wool and pipes of different diameters;
- after all the elements of the future chimney are prepared (purchased or made independently), installation is carried out. It starts with calculating the length of the horizontal elements of the chimney leading out through the wall;
- then the turn of installation of wall division follows. It must be filled with non-combustible material;
- the pass-through unit is closed with a lid, but the insulation gasket should remain visible. The edges of the lid are closed with materials used for the exterior decoration of the house;
- after the inlet assembly is mounted, you need to go directly to the installation of the chimney. Pipes should be inserted into each other, fastening them every 150-200 centimeters with special brackets.
How to properly mount a sandwich chimney through the wall? There are three main rules. First, the seams of the sandwich pipe must be turned towards the wall. Secondly, the bushing must be protected from fire as much as possible. Thirdly, you need to make sure that all the components of the chimney are vertical and horizontal.
Chimney sandwich passage through the roof
The passage through the roof is arranged according to the same principles as through the ceiling. In other words, the main rule is that wooden structures are sufficiently protected and the chimney is far from them.
In some cases, when passing the sandwich pipes through the attic, they must be additionally secured. This is necessary in a situation where the outer part of the chimney rises significantly above the roof. As a fastening structure, you can use braces or a frame.
For the passage of the chimney from the sandwich pipes through the layers of the roof, a special cut is used. It can be purchased in a specialized store, having made a choice taking into account the material used for the installation of the roof.
To collect and remove the chimney sandwich through the roof, you must adhere to the following sequence of actions:
- the first step is to dismantle part of the roofing pie.The passage for the pipe should be made much larger than the chimney itself, to the diameter of which at least 10 centimeters should be added on each side;
- then the cutting elements are attached. It should be installed with a significant overlap on the roofing material, at least 10 centimeters;
- after the groove is installed, the seams must be carefully sealed. This will avoid leaks in the future;
- after that, you can install the pipe, fixing it with annealed wire;
- a pre-stocked umbrella is installed on top of the chimney. It is fixed with self-tapping screws or other fasteners;
- in the end, it is necessary to carefully seal all the seams that were left unattended. This can be done with weldable or self-adhesive roofing materials. In some cases, a special waterproofing stocking is mounted in the shape of a pyramid.
When installing a chimney from sandwich pipes, you need to remember that all of the above rules were invented for a reason. They are based on practical research and fire statistics. Thus, they should be strictly observed, and then the house will not become a sad example for others.
Installing a sandwich pipe through a finished roof
In the last few years, chimneys have been made using sandwich pipes. People are attracted by its appearance, low cost and long service life.
An important condition is the ability to install a sandwich chimney with your own hands.
Installation of a vertical channel requires certain skills in the field of construction and knowledge of some of the nuances. However, with great diligence, such work can be done independently. The main thing is to figure out how to do it correctly, as well as observe safety precautions and fire safety standards.
How to lead a chimney through the roof
Such an operation requires a preliminary study of the location of the rafters and installed floor beams. The pipe should be between these parts. It is important that the outer wall of the flue duct does not touch the fuel element. In this case, it is necessary to maintain a minimum distance within 13 cm. Moreover, this part must necessarily have a heater. To fulfill this requirement, the pipe is often displaced in two places at an angle of 45 degrees.
A special hole is made in the ceiling, taking into account the fire safety requirements. The distance from the chimney should be more than 250 mm, and it is necessary to provide for the installation of thermal insulation on the ceiling.
To protect the edges of the hole, a fireproof material is used - minerite, which is fixed with ordinary nails or self-tapping screws.
Next, the sandwich construction is inserted vertically into the made box. The pipe does not need to be firmly fixed: it is enough to simply create a direction. 2-3 planks will keep it from falling, while the vertical movement will be completely free. This design is necessary so that the cylindrical product can move up or down. As the pipe heats up, it lengthens, which requires additional space and freedom of movement.
The remaining space is covered with basalt wool. You can cover everything with expanded clay or foamed glass granules.
Several years ago, ordinary sand was used for this purpose. However, over time, he began to get enough sleep through the available cracks. Today, this option has been completely abandoned.
The front side is wrapped in stainless steel. A non-combustible gasket is made under the sheet. Previously, asbestos was used for this purpose. Today, it is considered a carcinogen, because this material has been replaced with mineral wool.
But you can also use another method: close the edges of the hole with mineral wool and only then install the assembled pass-through assembly made of stainless steel sheet.
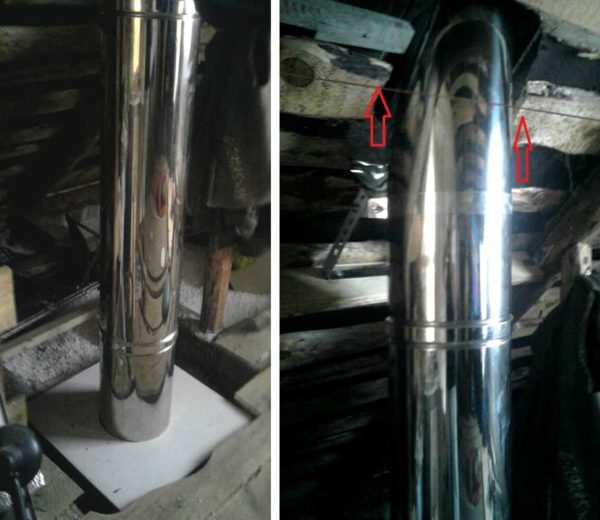
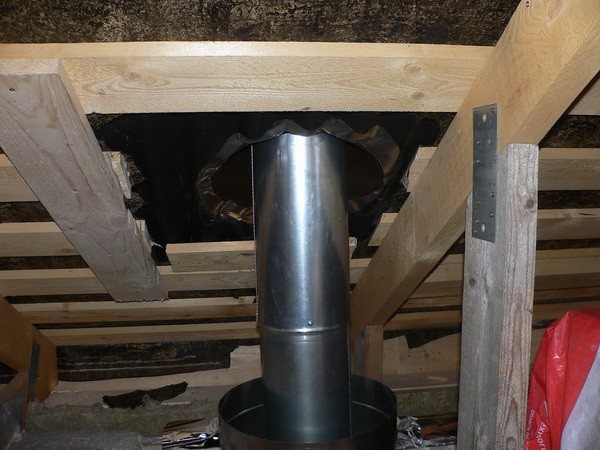
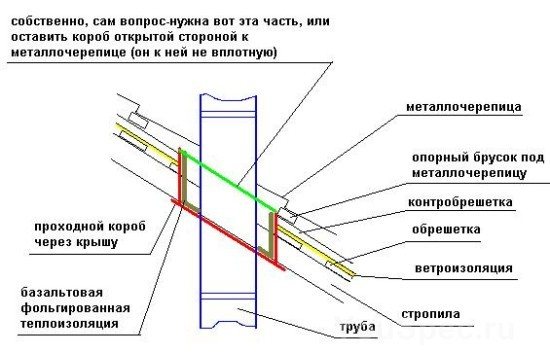
After the pipe is brought into the attic, a hole is made through the roofing pie. Next, the waterproofing is cut crosswise. The resulting triangles are carefully wrapped, then fixed with a construction stapler. The opened crate must be cut, keeping a distance of more than 13 cm to the smoke channel.
The photo, which shows the red arrows, shows an incorrect pipe passage through the roof. The segment separating the cylindrical part from the planks is insufficient in size. With the correct manufacture, the edges are trimmed with minerite, taking into account the requirements of fire safety. The next photo shows the correct passage.
Roof chimney, abutment principles
Considering options for how to install a chimney through the roof, you should pay attention to the junction installation technology. The simplest methods include pasting a pipe passing through the roof with thin sheets of metal. For this purpose, sheets of lead or aluminum with a special adhesive layer are used. This option is well suited for installing a chimney on a roof with a metal tile roof. The surface of the roof must be well degreased. The upper edge of the abutment should additionally be pressed to the pipe with a special metal drip bar, attaching it with dowels or self-tapping screws. The joint with the pipe is coated with sealant. To seal the chimney passage through the ondulin roof, complete strips are used. For surfaces transverse to the slope, an apron is used, for longitudinal surfaces - a valley. The joints should be glued with unduflesh tape. Before installing a chimney on a roof, it is necessary to familiarize yourself with the recommendations of the manufacturers of factory chimneys and roofing materials. This will allow for installation in compliance with technology and ensure the safety and reliability of the structure.
Completion of installation
At the end of the assembly of the structure, the protective film must be removed from the pipe. The ideal length of the chimney is considered, starting from the grate and ending with the head within 5-6 m. Special attention should be paid to these values. Then all gaps and existing seams are sealed.
The operation is performed using a heat-resistant polymer compound that can withstand temperatures of more than 1000 degrees. Sealant treatment is as follows:
- Inner pipes - the outer wall of the top is covered.
- External products - one external surface is processed.
The junction of double-walled products with other parts is covered with a polymer composition only on the outside of the circle.
The joints of the modules and the single-wall pipe are sealed according to the last option.
After completion of all work, it is imperative to check the hazardous areas for their ability to withstand high temperatures.
To facilitate the maintenance of the chimney, a special revision will be installed. This part has a removable part or is equipped with an opening with an opening door.
Typical errors
When installing a vertical channel in a wooden house, fire safety requirements must be strictly observed. In this case, it is important to correctly make and process the passage of the sandwich pipe through the ceilings made of wood. These places must be well protected. Usually sheet steel is used for this, in which holes are made. The free space is closed with non-flammable thermal insulation materials.
To facilitate the work, a special ceiling-throughput unit (PPU) is often installed. In its appearance, it is very similar to a box. Its installation is necessary to perform certain actions:
- If the house shrinks or deforms, the chimney must retain its original position.
- PPU protects wooden floors and prevents them from burning.
The best option for laying a vertical channel is to install a special sandwich system. Usually, problems arise only if low quality thermal insulation was used during installation, for example, general construction insulation instead of a special non-combustible material.
Basalt wool is considered one of the options for such protection.
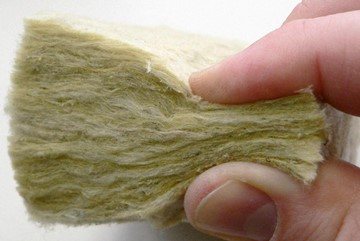
It is sometimes misused. This material is known to be capable of storing heat. If you just wrap a chimney with it, then after 4 hours of operation, the insulation will begin to give the accumulated heat back, thereby provoking overheating of the chimney. To prevent this from happening, it is required to install a special steel sleeve that would cover the cutting insulation layer. Superisole can be used as the latter.
This steel element should be in the form of a cylinder. It is important that the height of the part is equal to the thickness of the groove. The sleeve will help to avoid temperature rise and will help to remove heat from the thermal insulation.
Around the steel part, it is necessary to organize a micro-ventilation system, which is an air gap with a thickness of 3 mm. The air moving around the liner will cool it, thereby lowering the temperature.
Installing a steel product allows you to use the heater for a long time, eliminating the risk of overheating.
Possible installation errors and how to avoid them
The presence of errors during the installation of the chimney can lead to a fire in the ceiling, roof or wall. It is important to keep the minimum distances between flammable objects and the chimney.
Errors and remedies:
- A common mistake is saving space. Sandwich pipes should not heat up as long as they are in good working order. But over time, it is possible for warm air to pass through the thermal insulation layer. In this case, nearby flammable materials may ignite. The presence of sufficient space between the chimney and building materials excludes this possibility.
- Another mistake is neglecting the tightness of the compared parts. It is recommended to cover all joints between the constituent parts of the chimney with a layer of sealant, otherwise the passage of combustion products from the chimney into the environment is possible. The joints between the pipes can be additionally tightened with special clamps.
- The third common mistake is matching pipes only by the type of "smoke" or "condensate". Smoke matching means that the bell of the overlying pipe is pushed onto the underlying pipe. In this case, smoke will not accumulate in the pocket formed between the pipes, but condensation can drain there. Condensate matching means that the funnel of the underlying pipe is pushed onto the overlying pipe. Condensation cannot drain into the resulting pocket, but smoke will accumulate there. In the first case, there will be a lot of condensation in the chimney, in the second - soot. In order to take advantage of both options in a sandwich pipe, it is sufficient to match the inner cylinders “by condensate” and the outer ones “by smoke”. Matching both cylinders in the same way can quickly clog the chimney.
- A gross mistake is the use of general construction insulation instead of thermal insulation. Many insulating materials are used in construction, but when arranging a chimney, it is necessary to choose materials with the best thermal insulation. This material is mineral wool. When installing external insulation, it is allowed to use basalt wool, but if the pipe heats up significantly from the outside, after a few hours the basalt wool will begin to heat up.
Related article: How to make a shed roof with your own hands
Features of this design
A sandwich is a good option for a chimney with insulation. Warming provides you with the following advantages:
- the possibility of the functionality of the chimney while being in the zone of low temperature conditions;
- endows the pipe with the necessary fireproof properties (inside the building).
Standard versions of such chimneys have an external galvanized coating. There are also options made of stainless steel, as well as painted in any color that suits you.
Existing versions of sandwiches made of stainless steel are covered with a special protective film from the outside. The main thing - do not forget to remove it before using the chimney for its intended purpose. There are also special adapters on sale that you will need when connecting the boiler and pipe. Be careful when choosing elements for a sandwich chimney.
Sandwich pipe device diagram.
The necessary tools for work are:
- jigsaw;
- pencil or marker;
- roulette;
- level;
- Bulgarian;
- screwdriver.
Installation of a sandwich chimney
The chimney can be connected both directly to the stove and to the heat exchanger (tank), through which the chimney passage is made.
The first thing to do is to install a single-wall stainless steel pipe of the required length. Installing a single-wall pipe will help dissipate a large amount of heat at the first stage.
When installing an insulated version of the chimney (sandwich), a high degree of heating will contribute to overheating of the outer circuit of the chimney.
Layout of the passage of a sandwich pipe through the roof.
With the first option with a single-wall pipe, you will significantly reduce the heat loads on the chimney and at the same time ensure quick heating of the steam room. At the next stage, the insert-gate valve (gate) is installed in the absence of it in the oven for the bath. With a low bath ceiling, the gate is fixed directly to the stove (tank, heat exchanger), while single-wall pipes are not used.
Now it is necessary to carry out the device of the lower nozzle. It will carry out the transition between two types of pipes - single-walled and insulated (sandwich). The time has come to install the insulated bath pipe. It should be of the length you need and be placed up to the highest point of the chimney. It would be impractical to install a single-wall pipe in the upper part of the chimney after the sandwich. With this option, the flue gases will cool down rather quickly, which contributes to the deterioration of draft and the formation of condensate.
To make a passage through the floors of the bath (combustible), you can use a so-called telescope. This design provides for the presence of adjustment for the desired thickness of the existing overlap.
The installation technology is as follows:
- A hole is cut in the ceiling of wood 15 cm larger than the diameter (outer) of the sandwich pipe. This hole will accommodate a telescopic sleeve.
- The space between the overlap of the bath (house) and the installed sleeve is filled with heat-resistant insulation, as an option, expanded clay can be used.
- Square sheets attached at the bottom and top will mask the gap (where the passage is through the roof) and help maintain an attractive appearance.
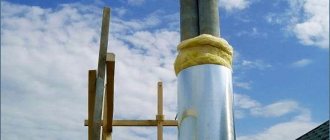
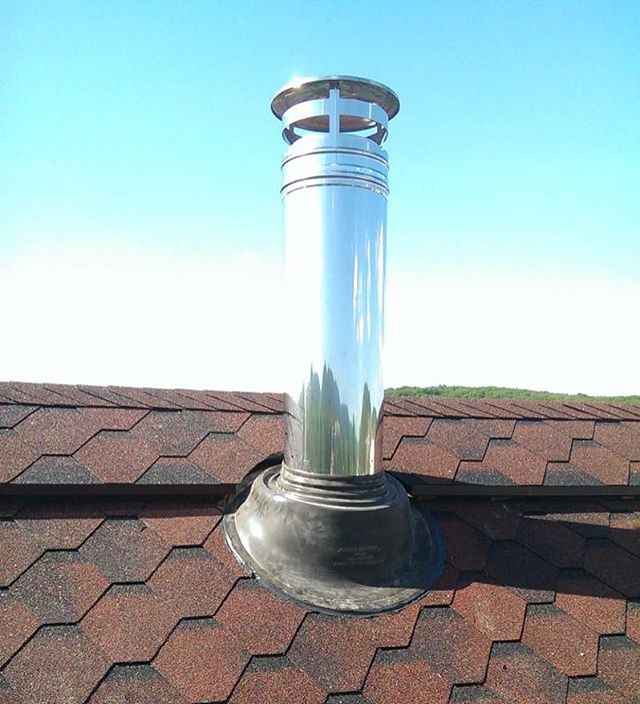
Another nuance: in order to efficiently carry out a sealed passage through the roof of the bath, it is necessary to use a special silicone penetration made on an aluminum base, which easily takes the shape of the roof.
In the upper part of the chimney, there is an insulated nozzle that covers the insulating material from the sandwich. This means that protection from moisture and destruction is provided to you. An umbrella is installed in this nozzle, designed to protect the chimney from various types of precipitation. All joints of elements and thermal insulation (nozzles, pipes, etc.) are reinforced with tightening clamps that prevent separation.
Types of location of sandwich chimneys.
General requirements for chimneys
The requirements are regulated by the collection SNiP 41-01-2003. Attention is paid to the passage of the sandwich pipe through the roof, the arrangement of horizontal and vertical sections and the height of the head above the roof surface. Excerpts from regulations:
- the minimum number of horizontal sections in the structure is allowed, the length of each does not exceed 1 m;
- the elevation is made at least 0.5 m above the surface of the flat roof;
- the top is not made below a line conditionally drawn from the ridge of the roof perpendicular to the cornice at an angle of 10 ° to the horizon;
- the pipe rises 0.5 m above the ridge when exiting on a pitched roof, the height of the outer part of the pipe reaches from 1.5 to 3.0 m;
- chimney turns are performed at an angle of 30 °;
- heating of smoke inside the cavity above 500 ° C is not allowed
- the section does not decrease when constructing inclined and horizontal sections;
- length - at least 5 m from the grate to the chimney head; in houses without an attic, a length of less than 5 m is allowed if there is good traction;
- the height of the end point is made greater than or equal to the height of the adjacent ventilation outlets;
- the chimney ends above the windows of nearby buildings.
What to consider when choosing a chimney
The inner channel is made of stainless steel, because he perceives the negative effects of temperature. A chimney pipe with a galvanized metal bed is used to remove smoke from gas units. The following circumstances are taken into account when choosing:
- The quality of the metal, which affects the life of the product and the resistance to heat.
- Thermal insulation material and its density. Indicators determine the layer's ability to withstand heating without destruction;
- Side connection on the pipe. For powerful boilers, pipes are laser welded, and rolled seams are designed for gas boilers.
The material of the outer shell is used in different ways:
- for solid fuel boilers, galvanized metal or stainless steel is recommended;
- low-temperature drainage channels are made of copper, brass, polyester.
Stainless steel grades 310 S, 316Ti and 321 are used - these are standard metals for universal use. The material can withstand heating as part of the product without destruction up to temperatures of + 850 ... + 1000 ° С.
How to choose the diameter and location of the chimney
Pipes with a diameter of 115 to 120 mm are selected for the chimney of a small private house or country cottage. Heating power does not exceed 3.6 kW in such buildings. Pipes are used with a diameter of more than 180 mm to remove smoke from heating boilers with a capacity of over 5 kW. Sandwiches are used with a diameter of more than 220 mm for ovens from 7 kW. Pipes are produced in different diameters, so the parameters are selected without difficulty.
The chimney is located on pitched roofs closest to the upper rib for the following reasons:
- Maximum air movement is required to create good traction. In this area of the roof, the highest roof barrier does not impede the movement of streams.
- The vertical riser provides the required parameters with a total length of 5 m from the grate due to its location in the most elevated part of the roof.
The height of the chimney and its location are taken into account together with individual connecting elements, the diameter of which does not differ from the main pipe. Difficulties arise if this rule is not observed, and it is required to make adapters at the connection points.
The passage of the pipe through the wooden roof. Typical errors and execution technology
When installing a chimney in a wooden house, in order to ensure fire safety requirements, particular importance is attached to how the pipe passes through wooden floors. Protection of these places is mandatory and is carried out using sheet steel equipped with holes and using non-combustible heat-insulating materials.
Often for these purposes, a special ceiling pass-through unit (PPU) is used. Its appearance resembles a box or sleeve. It is mounted to perform the following functions:
- to prevent deformation of the chimney in case of shrinkage or deformation of the structure;
- to protect wood floors from fire.
How to equip roof passages
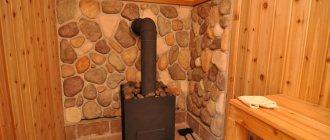
The installation of a chimney is necessary so that a draft is formed in the furnace, and the combustion products come out of it. When it comes to arranging a bath, then most often they use metal or brick pipes.
Even during the design of the building, it is necessary to decide how the chimney will be removed from the roof. Otherwise, difficulties may arise already during the period of direct construction. The passageway between the roof and the chimney must be fire-resistant, and also provide reliable protection of the room from external environmental conditions. That is, you should pay special attention to high-quality waterproofing.
There are several ways to install a chimney:
- Exiting the pipe through the load-bearing wall at an angle,
- Through a load-bearing interior partition.
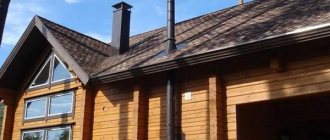
The best option is to have the pipe passage closest to the highest point of the roof. This arrangement will be able to protect the structure from leaks to the maximum. In any case, the pipe head must be raised above the coating by at least 50 cm.
The node of the passage will be equipped for each separate type of pipe in an individual way. In addition, the material from which the roof is made is also important. Modern construction markets present a large number of materials that are suitable for waterproofing a chimney under one or another type of roof.
The most important point when arranging the passage of the pipe through the roof will be the choice of the correct slope. The pipe should be positioned so that there is a distance of about 7 cm between it, the roof and the rafters. Subsequently, these holes must be filled with non-combustible insulation.
What is a sandwich pipe
Sandwich - this type of pipe received this name for its layering by analogy with the named product. The inner and outer layers of such pipes are represented by metal cylinders, and the middle layer is a layer of thermal insulation.

Metal for the chimney began to be used for a long time. A simple example is the pipe of an ordinary potbelly stove. However, soon after commissioning, it became clear that metal pipes have a number of disadvantages. The problem was that metals, having good thermal conductivity, quickly heat up and give off heat to the environment, and there is always a danger of ignition.
Related article: Modern one-story flat roof houses projects
The solution turned out to be simple - the metal pipe was wrapped in a layer of thermal protective material. However, such material does not tolerate environmental conditions well and is not very attractive from an aesthetic point of view.
Sandwich pipes are the next solution in the evolution of metal chimneys. Another metal pipe is placed on top of the thermal insulation layer, which protects the inner two layers from external influences and does not spoil the appearance of the building.
It is important! Sandwich pipes can be purchased ready-made, but you can do it yourself by choosing the materials of the required parameters. It is worth remembering that the inner pipe should be more expensive and of better quality than the outer one, but smaller in diameter, and the layer of thermal insulation is thicker, the higher the combustion temperature of the fuel in the heater.
The inner cylinder is made of stainless steel. This material is less corroded by combustion products. The steel must be of high quality and high-tech. They give preference to those options, the seams of which are welded using the TIG method - the most reliable and wear-resistant, but also the most expensive.

The middle layer provides thermal insulation and protects the surrounding surfaces from heat. For these purposes, mineral wool is used, the density of which is not less than 120 kg / m3. The thickness of this layer depends on the temperature inside the chimney. This parameter should be selected individually.
The outer cylinder is also made of steel. It is worth giving preference to stainless material, but to save money, you can choose galvanized steel. The durability of the chimney will depend on its quality to a lesser extent than on the quality of the inner cylinder. In addition, there are sandwich pipes with decorative outer cylinders on sale.
What you need to know about the removal of chimneys
The total size of the chimney should be at least 5 meters, and the part of the chimney above the flat roof should be about half a meter. And the distance from it to the rafters should be about 250 mm.
- Experts recommend moving the chimney to either side of the ridge. And the pipe must rise above it by at least 50 cm, if the distance between them is up to one and a half meters.
- When it is at a distance of up to three meters from the ridge, then you can make it flush with the ridge.
This transfer will be easy when using sandwich structures. If this is not done, then the constant accumulation of water at the junction will soon lead to a leak.
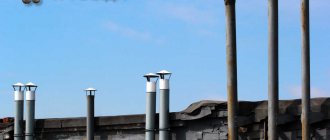
Installation of ventilation pipes
The usual version of through ventilation is a metal piece of pipe inserted into the opening of the roof and fixed to it in a metal glass. A special valve can be installed in the pipe to delay condensate, and an auxiliary deflector is placed in its upper part. The pipe ends with a protective element (a kind of umbrella), which prevents rain and snow from entering the system.
However, in hardware stores you can find a more modern version of the ventilation pipe. The principle of its operation is the same, but there are differences that make you make your choice in favor of such pipes:
- The inner part of the pipe is made of zinc coated steel, and the outer part is made of high quality polypropylene;
- The height of the pipe can vary from 50 to 100 cm;
- An O-ring is located in the lower part to eliminate a loose connection;
- The cross-section of pipes varies from 100 to 300 mm;
- The pipe is initially insulated to avoid freezing;
- It is possible to equip the pipe with an additional electric fan;
- The upper part is equipped with a deflector to increase traction, as well as protected from precipitation by the dome.
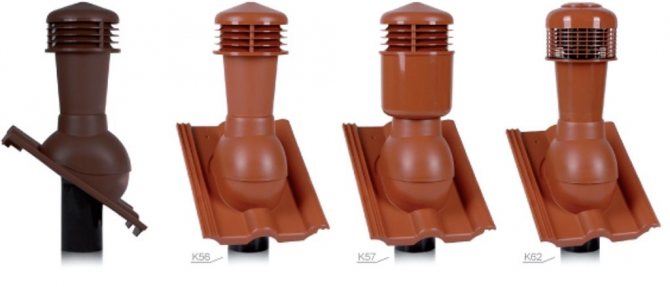
Variants of pass-through ventilation elements
Usually, pipes are equipped with pass-through elements, thanks to which they are tightly attached to the roof surface, however, there are exceptions. If your pipe was purchased without this element, you can always buy it in any hardware store. Fortunately, there are a huge number of them for any type of roof and different colors.
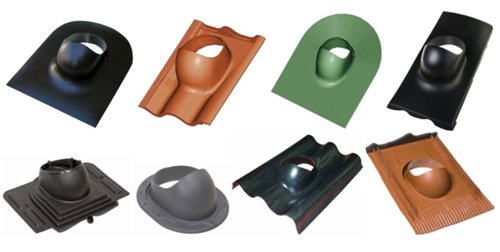
Passages for pipes
Types of arrangement of the passage
In order for the tightness of the passage assembly to be the best, high-quality execution of roof junctions is necessary. When arranging the passage, no flammable materials should be used.
How to properly organize the passage
The vapor barrier layer must be cut with an envelope and laid over the penetration. Its edges are fixed with a construction stapler to the rafter structure. It is necessary to create a crate near the passage and fill it with waterproofing material. Further, by analogy, a water-repellent carpet is made by cutting it with an envelope. Leaving about 10 cm on it, to insert the material onto the pipe wall.
It is imperative to leave a small gap around the perimeter of the chimney. This is done to ensure proper shrinkage of the structure. In addition to the described method, the following can also be applied:
- self-adhesive tapes with strips,
- special self-adhesive strips,
- special parts that are produced for a specific type of roof.
In the case when we are talking about a non-newly built building, and the arrangement of the chimney is not taken into account in the original design, then when the pipe is removed through the roofing, its integrity is always violated. In this case, it will be necessary to determine the territory where the chimney will pass through the roof.
A so-called separate box is created, in which the passage node will be located, separating it with transverse beams. This is necessary so as not to violate the integral insulation layer of the entire floor. This will reduce the thermal protection of the entire room.
The distance that forms between the pipe and the truss structure is filled with basalt wool, which tolerates high temperatures well, and does not triple its properties under the influence of humidity.