Pleasant living in an apartment or a private house is primarily due to the fact that the room should be cozy and comfortable. And this is possible only on condition that the living space is warm. Many people ask the question: what is needed for a warm floor? How to do it yourself, without resorting to the help of specialists? The answers are given in the article.
What is needed for a warm floor

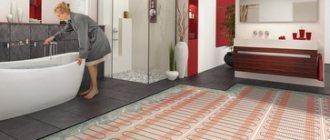
Water heat-insulated floor in the apartment
Device and principle of operation
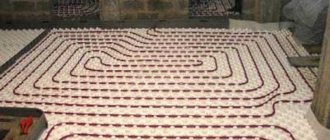
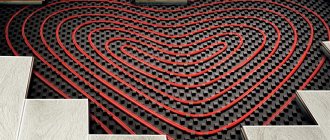
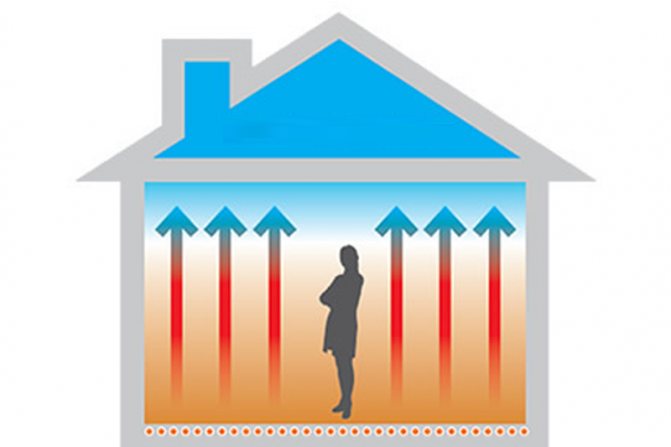
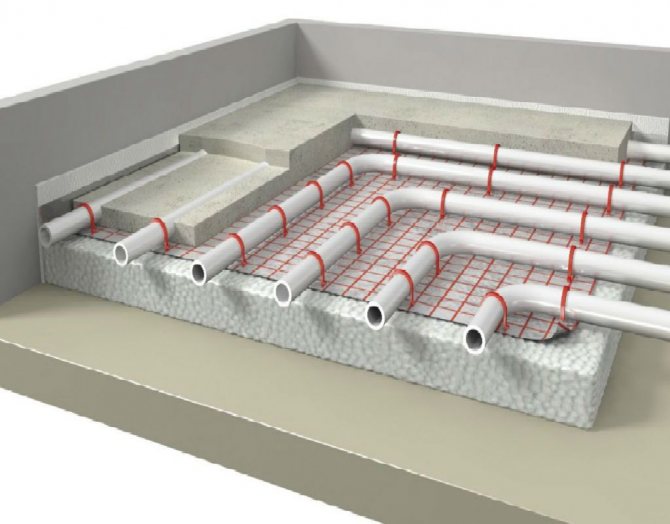
Before starting to study information about what materials may be needed for arranging a warm floor on your own, you should understand what is the principle of operation of this system. So, a warm floor is a system of pipes of small diameter assembled and laid in a certain way, inside of which there is and circulates the coolant supplied by means of a pump. The carrier of heat is ordinary water heated in a special device. During installation, pipes are laid under the floor covering or directly into the screed, depending on the installation method.
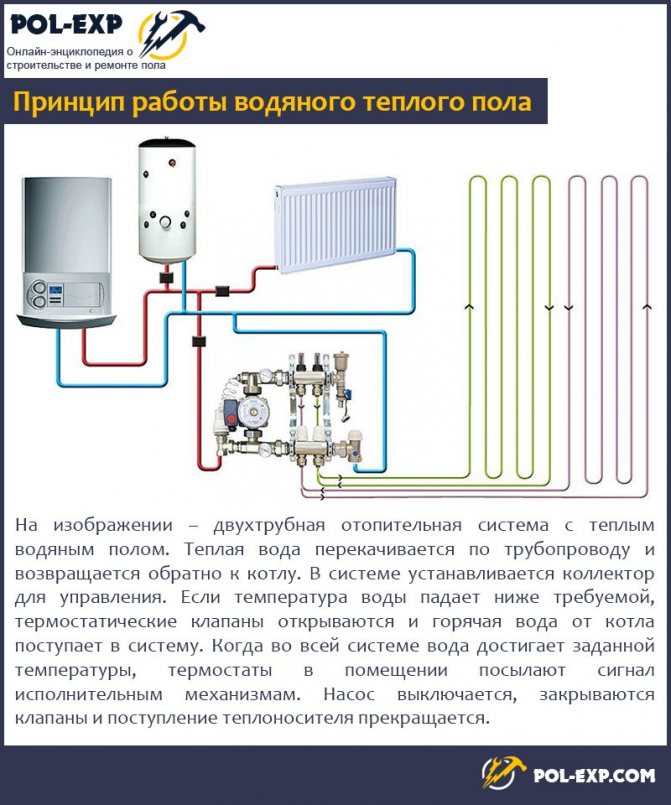
The principle of operation of a water-heated floor
Expert opinion
Afanasyev E.V.
Chief editor of the pol-exp.com project Engineer.
To make it pleasant to walk barefoot on the floor, the temperature of the coolant should not be high - no more than + 40-45 degrees. In this case, the floor covering itself will warm up to only + 25-28 degrees. However, heating equipment usually warms up the water more - up to + 60-65 degrees.
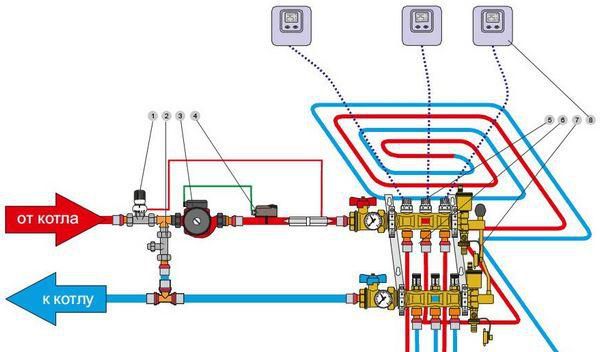
Wiring diagram for connecting a water-heated floor to the boiler
That is why it is necessary to regulate the temperature of the coolant. In a cottage, a gas condensing boiler will help to provide the ability to regulate, which, even at low temperatures, is highly efficient. Here water will be fed directly to the heating system. For some other types of boilers, it is necessary to use a specially designed mixing unit, thanks to which cooled water will be supplied to the heated water.
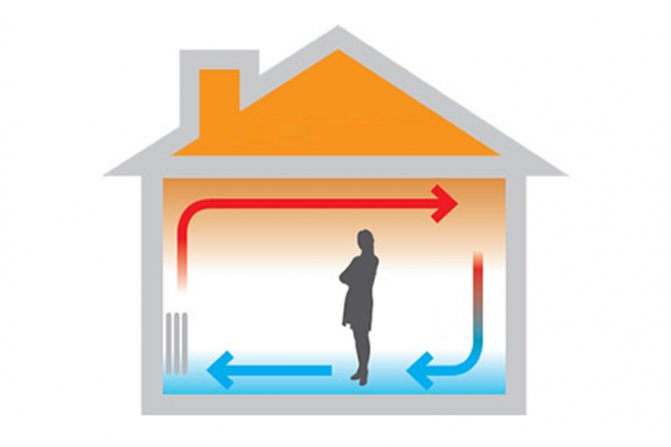
Traditional radiator heating
Traditional radiator heating
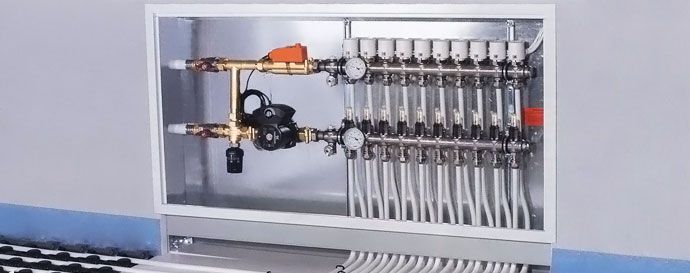
Further, water begins to be distributed along the heating circuit using a distribution manifold - a pipe branching system. It is also called a collector. It represents two pipes - supply and "return" - which supply and collect water from the branches of the system.
On a note! The distribution manifold may be absent if the underfloor heating is equipped in a small room.

Underfloor heating collector
Tools and consumables
To lay the cake you will need:
- Stationery knife;
- Roulette;
- Pliers.
For mounting fasteners for pipes (depending on the type of fasteners):
- Perforator;
- Drill;
- Screwdriver;
- Crosshead screwdriver.
Installation of metal pipes will require:
- Pipe bender;
- Pipe cutter;
- Low power welding machine;
- Solder;
- Flux;
- Crimping tool;
- Flaring kit (optional).
To lay plastic pipes you need:
- Pipe cutter;
- Pipe crimping tool;
- Pipe brazing apparatus (depending on the type of pipes);
- Adhesive and activator (depending on the type of pipes).
For installation and assembly of the manifold, connection of pressure gauges, controller. Thermostat and pump are required:
- Set of wrenches;
- A set of flat and Phillips screwdrivers;
- Fum tape;
- Sealant.
Disadvantages of underfloor heating
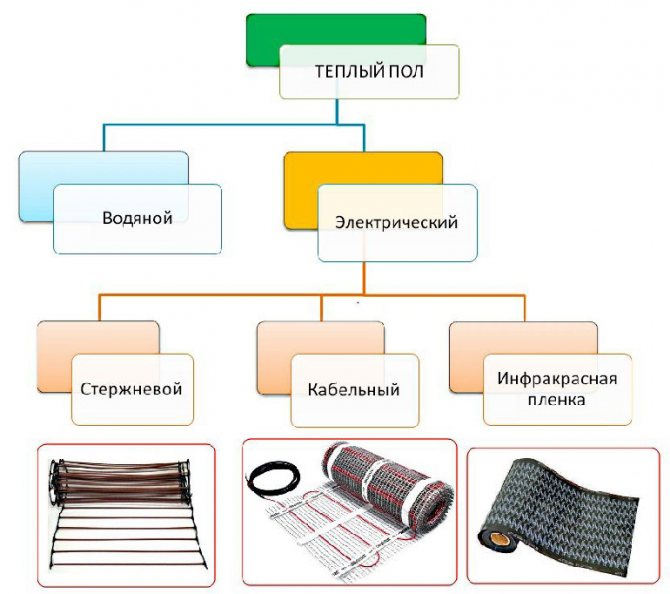
Unfortunately, in multi-storey buildings built decades ago, it will be quite difficult to make a warm water half - such apartments (or rather,the heating system in them) are simply not adapted for this technological solution. If such a floor is installed, then in winter the neighbors will complain about the cold in the apartment. And the homeowner is unlikely to be satisfied with the temperature readings at home. The management company, too, most likely will not give permission for the installation of underfloor heating. In this case, it is best to install an electric underfloor heating - it does not need a permit.
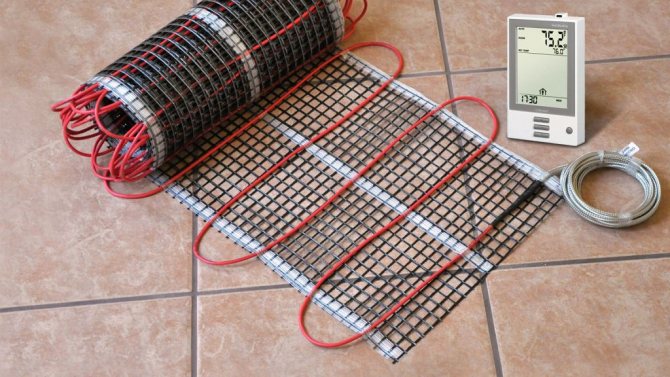
Electric underfloor heating
On a note! In new buildings now, as a rule, a special heating system is installed, which allows you to connect heated floors to it. In such buildings, you don't even have to ask permission from the ZhKO for installation.
Underfloor heating materials
The scheme of such a floor in the picture always looks rather complicated - a mass of communications interconnected, along which, moreover, water flows. However, in reality, the system does not include such an extensive list of elements.
Materials for a water-heated floor
Components for a water-heated floor:
- if there is no possibility of connection to the centralized heating system - heating boiler;
- pump, which is either built into the boiler or purchased separately. It will pump water into the system;
- directly pipesalong which the coolant will move;
- collector, which will be responsible for the distribution of water through the pipes (not always necessary);
- for collectors will need a special cabinet, splitters that distribute cold and hot water, as well as valves, an emergency drain system, devices for venting air from the system;
- fittings, ball valves etc.
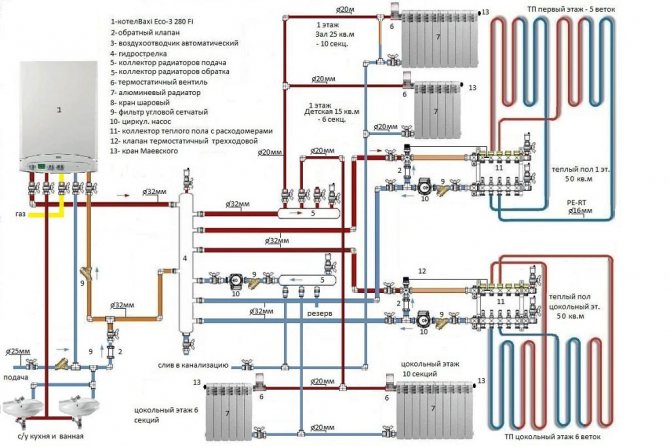
One of the options for the heating scheme in a private house with underfloor heating on the ground floor
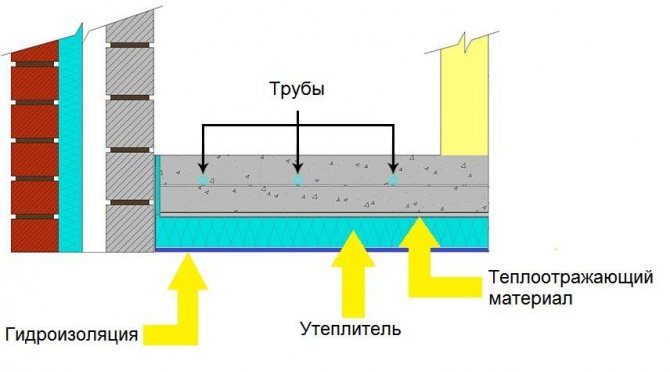
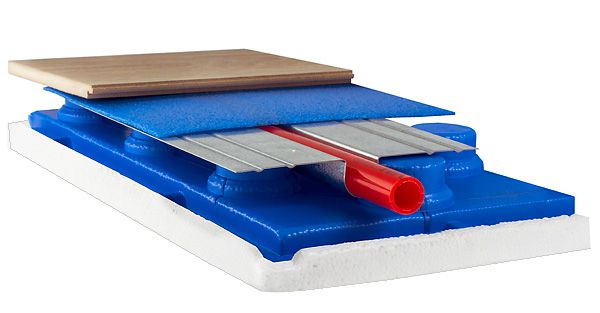
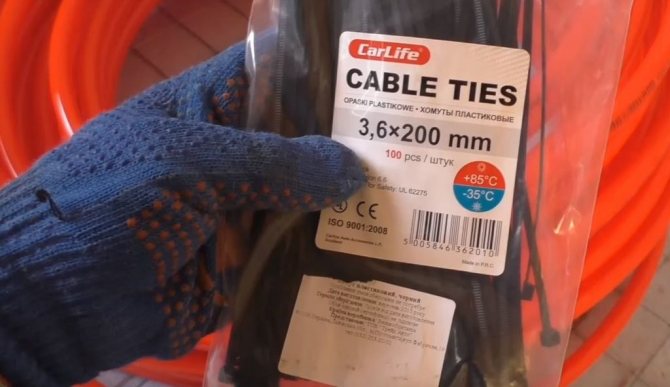
Also, for arranging a warm floor, you will need material for thermal insulation, fasteners, a reinforcing mesh, a damper tape. If a crude installation method is performed, then there is also a concrete mixture from which the screed will be made.
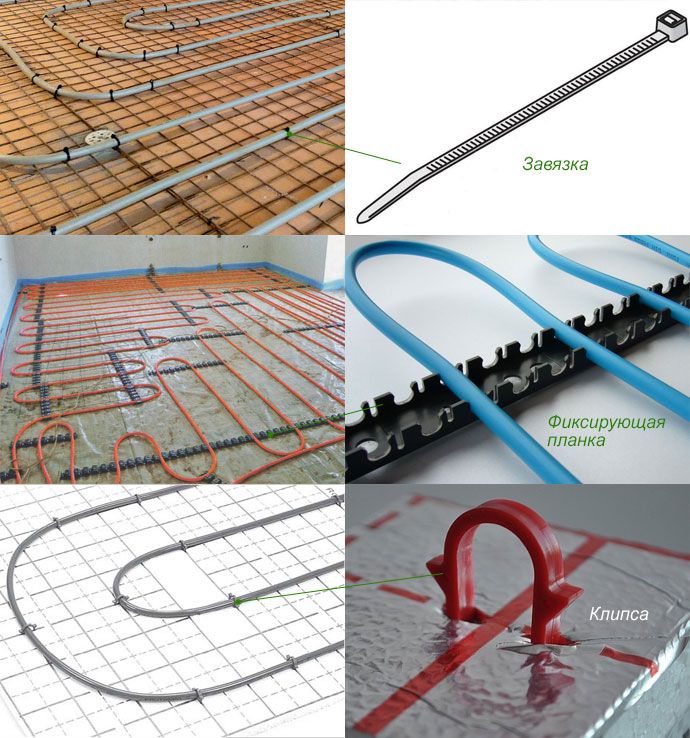
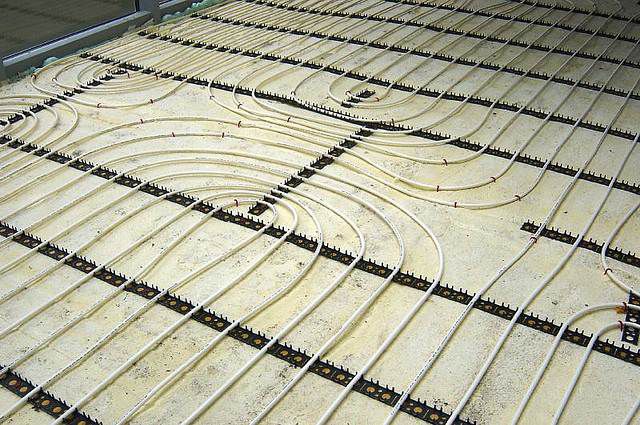
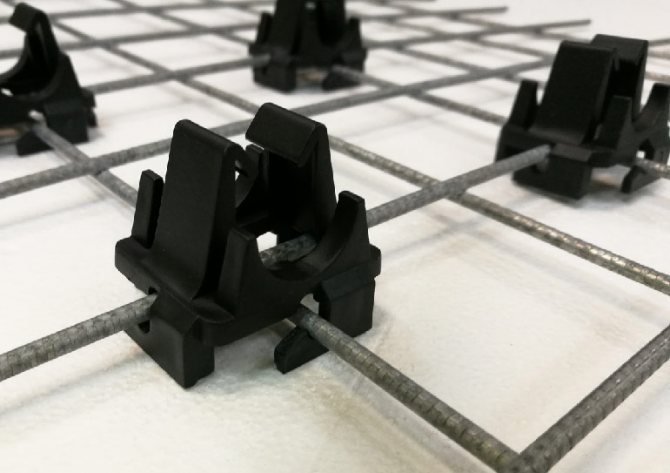
Fasteners for water floor heating pipes
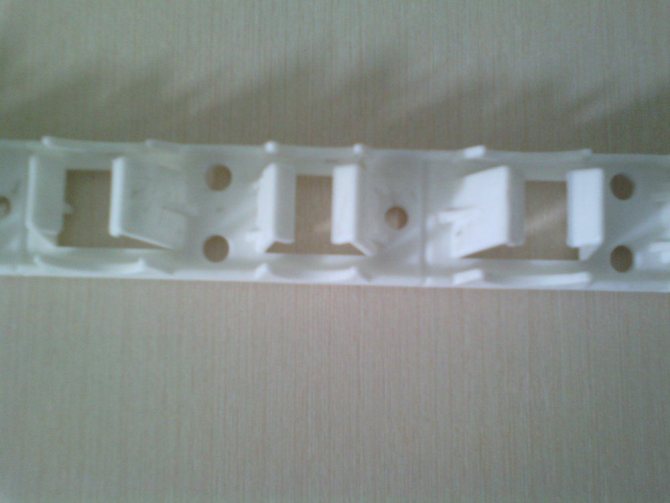
Mounting strip for underfloor heating
The choice of materials and tools for the underfloor heating system will often depend on the installation method. There are two types of equipment laying - dry and wet.
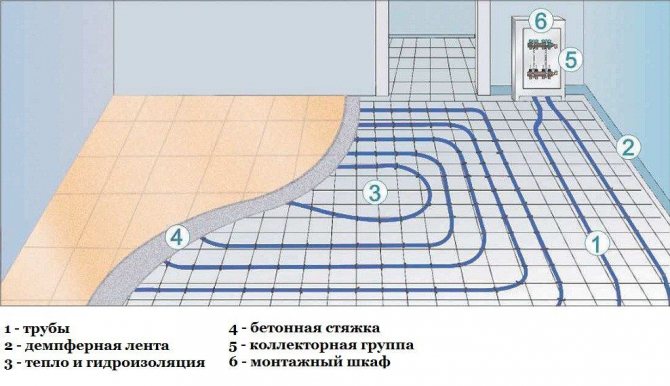
- Wet technology provides for the use of insulation, fastening system, pipes, concrete screed. After all the elements are filled with a screed, the floor covering itself is laid on top. A damper tape must be laid along the perimeter of the room. It is advisable to place a waterproofing layer under the insulation in case of water leakage - it will protect the neighbors from a possible flood.

Water heated floors. Water floor scheme
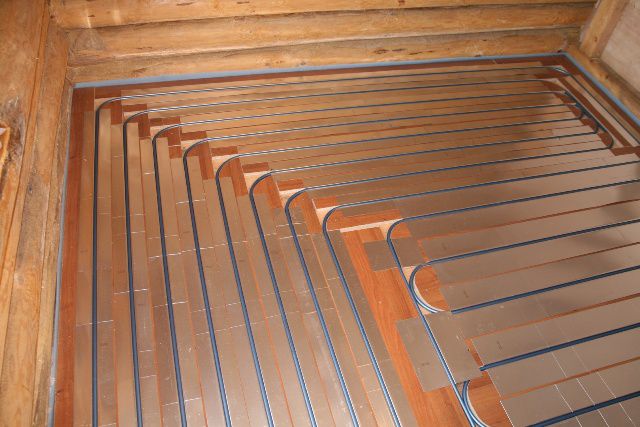
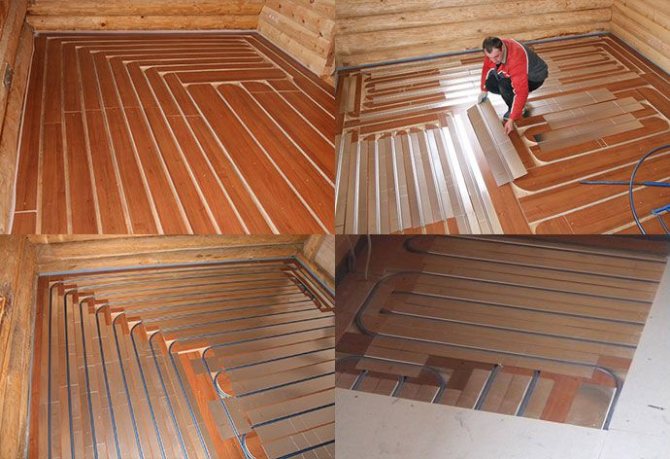
- Dry technology... In this case, the heating system is laid on wooden plates or polystyrene mats in specially made channels. Sheets of plywood or gypsum fiber board are laid on top of the system. A floor covering is mounted on top. By the way, do not lay on top of the chipboard or OSB system, since they contain substances that, under the influence of elevated temperatures, begin to evaporate and negatively affect the human body.
Warm floor without screed
Neither the first nor the second method is ideal - each has its own advantages and disadvantages. However, it is the wet method that is most often used, when the underfloor heating system is laid in a screed. The reason is simple - cheapness, although this type is rather difficult to maintain. For example, repairing screed pipes will not be easy.
Screed for underfloor heating
Preparation before installing the warm floor
An important point before installing the heating system is the preparation of the surface, and the arrangement of hydro and thermal insulation. Otherwise, the system will function less efficiently.
Any construction procedure should begin with project preparation.It is necessary to calculate the heat transfer, the step of the pipe or cable of the underfloor heating. Correctly select all the layers of the structure, and calculate the costs. In addition, it is necessary to decide on the finishing coating, not only the thickness of the screed depends on it, but also the pitch of the heating elements.
The requirement for the base for the installation of the heating system, regardless of the type, is a clean and level surface. Therefore, in advance, experts recommend preparing places for the highway, and making grooves for laying wires, so as not to litter later.
If cracks are present, they must be repaired. With large irregularities in the base, it is allowed to pour a thin rough screed under the warm floor (a mixture of cement with plasticizers), it must dry out before proceeding with further work. If there is no need for pouring, then you need to sweep out the debris and vacuum the floor from dust.
Insulation (polystyrene, mineral wool) is placed on the base, the material must be durable, it is attached with a special glue. It is this layer that helps to reduce heat loss and heating costs. For water floors, thermal insulation with a foil surface is recommended.
A waterproofing layer is placed on top. When installing a warm floor in a high-rise building, special attention should be paid to it, the condition of the ceilings of the neighbors from below in cases of leakage depends on it. If the apartment is on the ground floor, then para-waterproofing is required, since vapors from communications can penetrate from the basement.
We must not forget that the waterproofing will be located under the warm floor, so it must withstand high temperatures. The following material is recommended for use with heating systems:
- ordinary polyethylene film, not thinner than 200 microns;
- a cement-polymer mixture is an ideal option, it is elastic, absolutely waterproof and has high heat resistance;
- membrane made of liquid silicone or PVC;
- roll products.
More often, laying of plastic wrap is practiced, due to the low cost. It fits into an overlap of 10 - 15 cm, and the joints are glued with assembly tape.
Damper tape - polyethylene foam with a self-adhesive base. Its usual thickness is 6 - 8 mm. The tape compensates for expansion of the screed during the heating season. It is mounted along the entire perimeter of the square, at the junction of the walls with the floor.
The tape is equipped with a so-called "apron" made of PET film, with the help of which the joint between the tape and the thermal insulation is covered, thus, when pouring, the solution will not flow into the gaps. The height of the tape depends on the thickness of the screed, and the upper limit should be located above the floor covering.
We mount the grid
Reinforcing mesh can be laid both under pipes or underfloor heating cables, and on top of them, or on both sides. A more convenient option is a grid under the heating elements, as they are attached to it.
No need for special clips to fix parts. However, it does not reinforce the base, unlike the mesh on top, which holds the mortar and makes it a single monolith. But with high quality cement, you can do without mesh, or replace it with fiber.
Distribution manifold and cabinet for it
It makes sense to install a distribution manifold or manifold inside a cabinet specially designed for this, so that the mass of pipes does not catch the eye and does not spoil the appearance of the room. The width of such a structure should be about 12-15 cm, but the rest of the parameters will largely depend on what dimensions the entire communication system has - the larger it is, the larger the cabinet. When arranging it, the need for space for bending pipes supplied to the collector system must also be taken into account.
Collector in a niche
Important! If the underfloor heating system is divided into two rooms, then the box with the collector should be in the middle between them. In this case, it is better to install equipment that allows you to regulate the heating temperature.
collector for underfloor heating
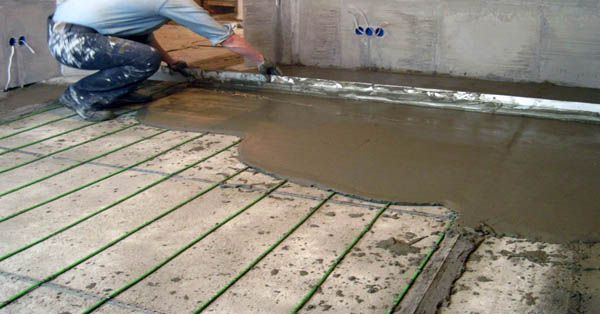
Filling the screed
A screed is made at positive temperatures. The entire area is filled in at a time. To prevent the formation of air voids, it is required to pierce the surface in several places with a thin metal object, since the air itself cannot escape from under the heavy cement layer.
If the area of the room is large, after laying the warm floor, special beacons are installed, they are levels for pouring an even layer of mortar. Beacons are placed 0.5 meters from the wall, and from each other at a distance less than the size of the rule.
Concreting is done from the far corner to the door. The solution is poured between the beacons, evenly distributed and leveled, its level should not be higher than the beacons.
In order for the screed to come out of high quality, it requires maintenance. To do this, 2 - 3 times a day for a week, its surface is wetted with water, since the solution must harden and not dry out. The underfloor heating system should be turned on after the laid screed is completely dry.
In general, the pouring procedure is straightforward. Subject to the instructions and technology for making the solution, anyone will be able to do everything on their own with their own hands.
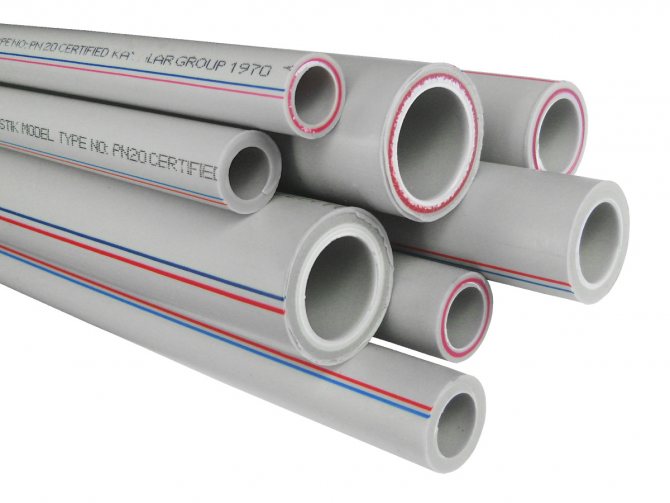
Pipes
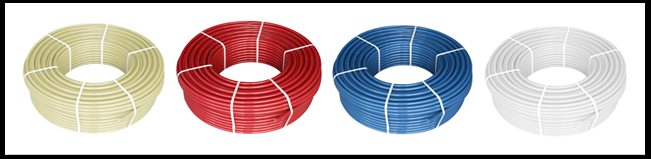
The pipes in the underfloor heating system are the most important element. After all, it is along them that the heated water will move. They must be chosen correctly.
Choosing pipes for a warm floor
Table. Types of pipes for underfloor heating.
| View | Description |
| Copper | Very nice but also very expensive view. It is ideal for installing a warm floor, but that's what the pipes themselves, that the components for them are very expensive. The underfloor heating system turns out to be reliable, capable of withstanding almost any load and very high heating temperatures, does not burst during hypothermia. |
| RE-X or XLPE | Frequently encountered pipes are quite durable and can withstand heating up to +125 degrees. When water flows through them, it is practically inaudible due to the high sound absorption of the material. Elastic and pleasant material. |
| Metal-plastic | Consists of 3-5 layers, which are interconnected with special glue. The center of the pipe is foiled, due to which the thermal conductivity of the material increases. The pipes bend well. |
Polypropylene | A cheap option, which is almost never used for installing a warm floor, since it bends poorly. It will not work to lay it with the necessary step, and its thermal conductivity is poor. |
Aluminum pipes for underfloor heating - another possible option
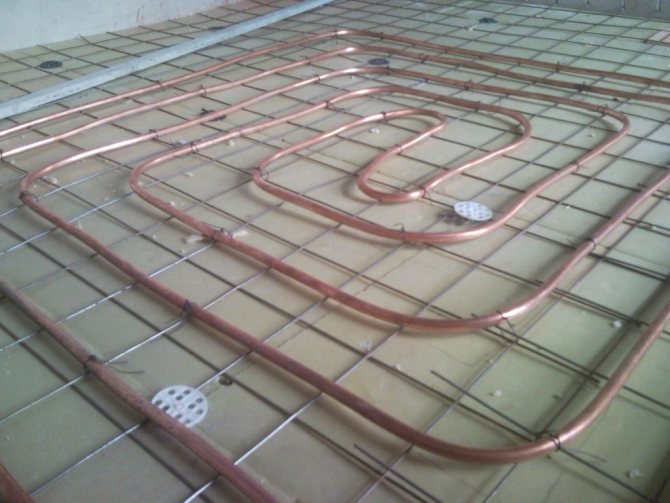
Copper pipes have many advantages
Advice! It is best to purchase XLPE pipes - this is the best value for money.
pipes for underfloor heating
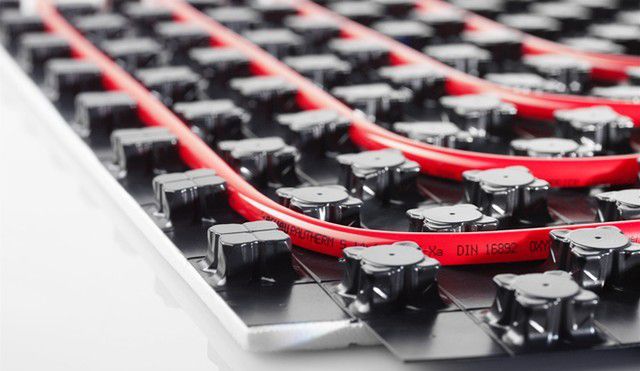
The recommended pipe diameter for underfloor heating is 16-20 mm. In this case, the material must withstand heating up to +95 degrees and pressure up to 10 bar.
KAN-therm pipes for underfloor heating
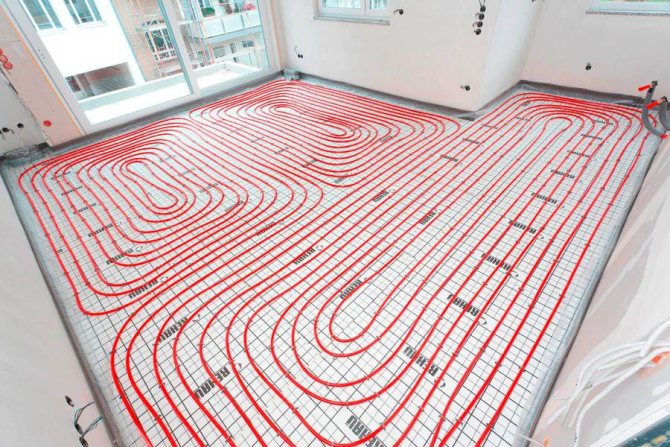
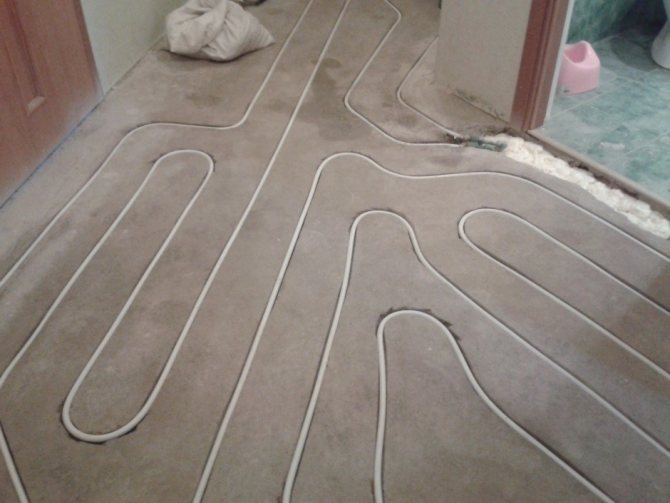
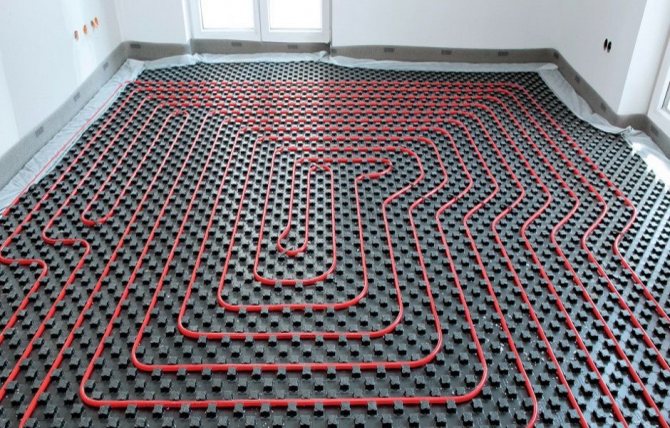
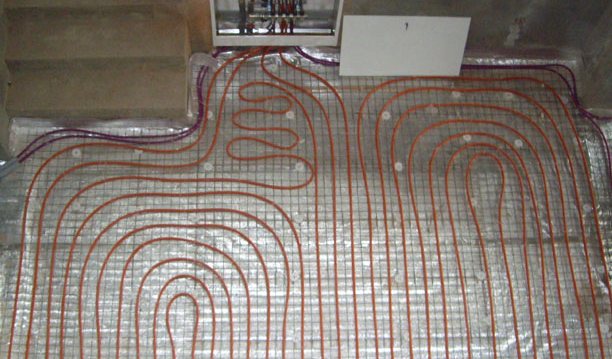
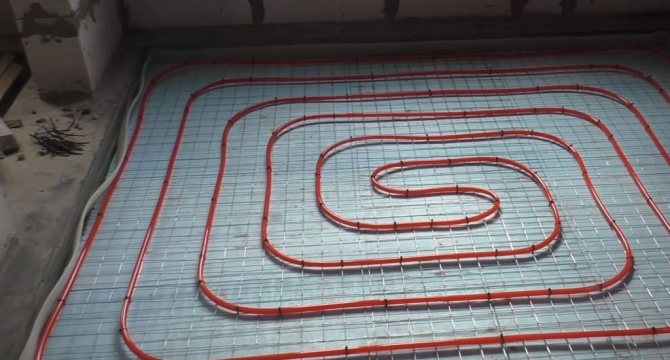
Pipe-laying patterns are different, but the most commonly used are snake, double snake and snail spiral. The first is simple to perform, but as it passes through the circuit, the coolant has time to cool down significantly. In this case, the installation is carried out from the cold zone to the warm one - for example, from the window to the wall. The spiral and double snake are more difficult to install, but more efficient in terms of heating.

How to make a water heat-insulated floor - installation schemes
Styling tips
- The contour should always start only from the coldest wall - from the external load-bearing or equipped with a window.
- If the room does not have a common wall with the street, then the system can be laid from the edges of the room to its center.
- A snake will provide a gradual heating of the floor.
The step of laying the pipe system is usually about 10-30 cm: where the heat loss is large, the step should be 15 cm, and where they are normal or minimal - 30 cm.
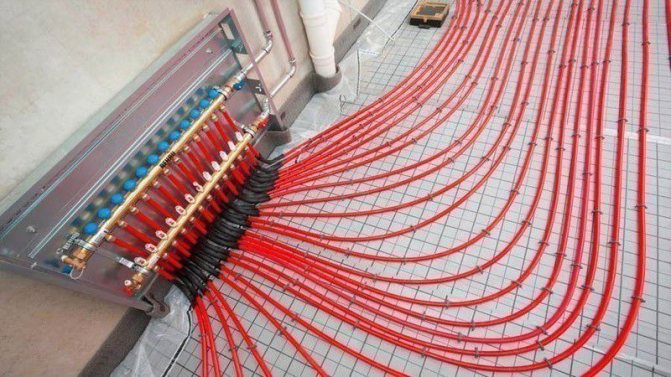
Sequence of installation of a warm water floor
The number of pipes will have to be calculated individually for each room. This takes into account the dimensions of the room, the pitch between the pipes, the boiler power, the pipe cross-section and a lot of other small nuances.

Pipe laying
Advice! The easiest, fastest and most accurate way is to calculate the number of pipes using special computer programs.
If an error is made in the calculations, then various problems may subsequently arise:
- poor water circulation;
- heat zebra effect - alternation of warm and cold areas on the floor;
- heat leakage.
Warm floor
Floor heating pipe contour length calculator
Go to calculations
Welding machine for propylene pipes (soldering iron)
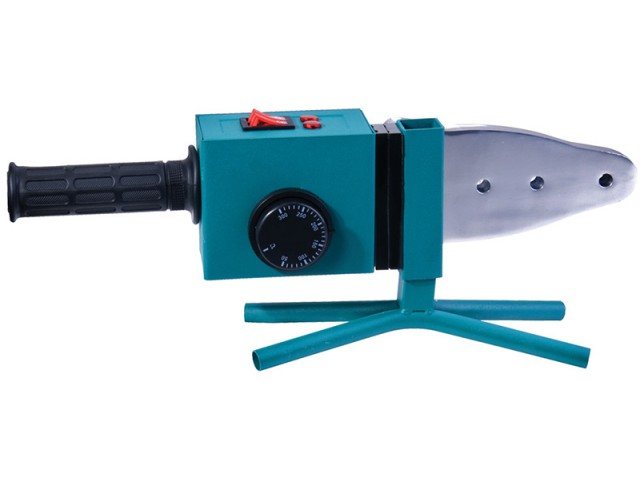
The underfloor heating project includes a piping made of polypropylene pipes. Their connection into a single system is carried out using a special soldering iron. Its operation is quite simple:
- Connect the soldering iron to the mains.
- Wait a while for it to heat up completely.
- Insert the pipe to be connected into the soldering iron, wait 3-5 seconds, pull it out of the soldering iron and immediately connect it to a bend or any other element.
- Wait for complete cooling and strong connection of the elements.
Among the countries that manufacture pipe soldering irons, the most popular are:
- Czech Republic.
- Turkey.
- China.
When choosing, you should also take into account the power of the soldering iron:
- For pipes with a diameter of 90-100 mm, a soldering iron with a power of 1.5-2 kW is used.
- For pipes with a diameter of 16-63 mm, a 680 W soldering iron is used.
- For pipes with a diameter of 16-75 mm, a soldering iron with a power of 850 W is used.
- For pipes with a diameter of 125 mm and above, 1200 W soldering irons are used.
Underfloor heating fasteners
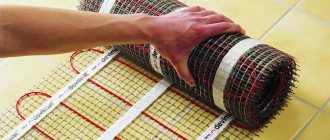
If underfloor heating, operating on the basis of electricity, is quite simple to install - cable or roll heaters are simply fixed with ordinary tape under the floor covering level - then the system of fastening a warm floor on water is more complicated.
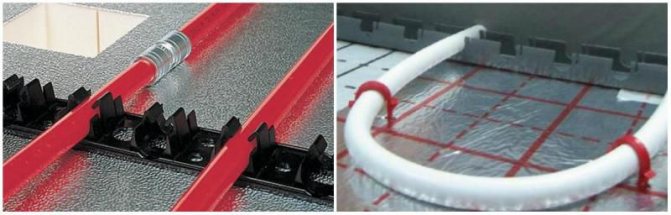
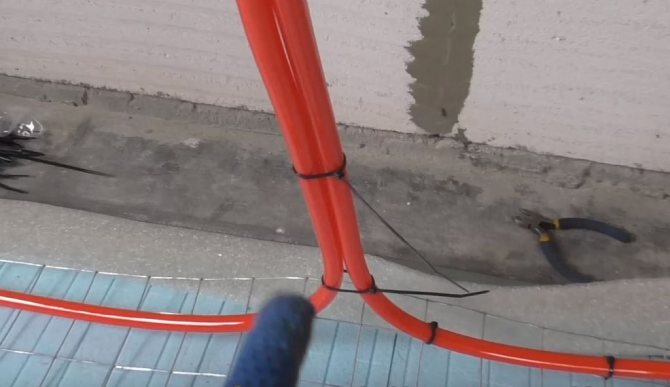
Methods of fastening pipes for underfloor heating
The coolant system can be fixed:
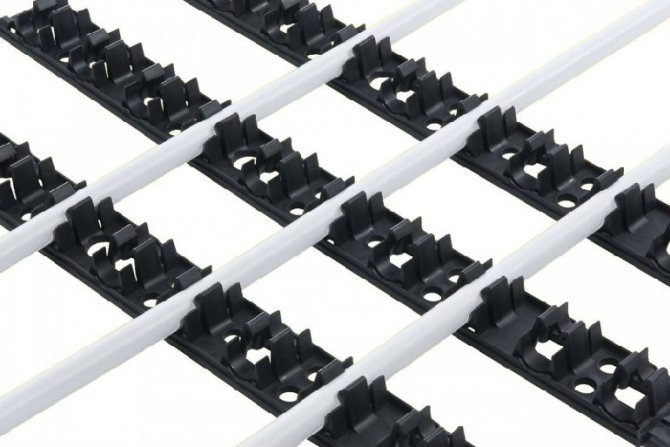
- using a grid, to which the pipes are attached with wire or clamps. The step between the rods is 5 cm;
Fastening pipes with a mounting mesh and plastic clamps
- with clamps, which are used together with the thermal insulation layer. The clamps are mounted on the subfloor according to a previously developed pipe laying scheme;
- mounting tape, polymer or metal... In the first case, there are special grips, in the second, there are petals that bend back and then wrap around the pipe;
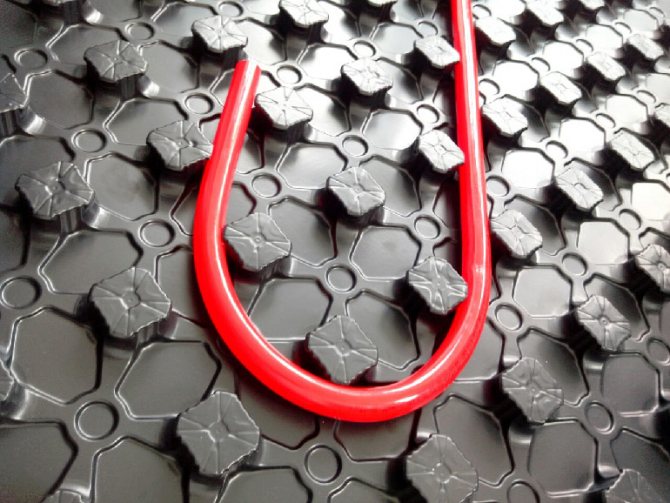
- in expanded polystyrene plates or underfloor heating matsin which the retainers are already formed. The most expensive fastening method. But this method allows you to combine the thermal insulation layer with the fastening system.

The cheapest option is a reinforcing mesh, and the most expensive is expanded polystyrene.
Installation of the underfloor heating pipe system (without screed)
Rack type of installation of a water underfloor heating
Pipe cutter
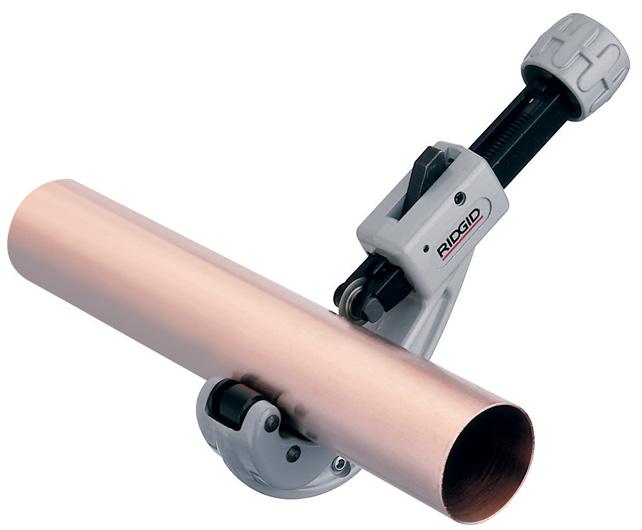
The pipe cutter is used if it is necessary to dismantle the heating system or shorten the pipes during installation, as well as when replacing a section of the pipes. It can be used to cut pipes made of steel, copper or metal-plastic.
Pipe cutters can be of two types:
- Telescopic.
- With ratchet mechanism. They resemble scissors and are quite easy to use.
Heat insulation for underfloor heating
Thermal insulation is an important element when installing a warm floor. It will allow you to avoid heat loss and increase the efficiency of the system. It is laid on the floor itself, and a damper tape is mounted along the walls, which will compensate for the thermal expansion of the screed, and reduce heat loss.
Thermal insulation for underfloor heating pipes
Advice! It is advisable to lay a heat-reflecting layer as well - thanks to it, the heat directed downward will be reflected and returned upward.
The thickness of the insulating layer will mainly depend on how well the subfloor is insulated. For example, if there is a heated room below the floor, then a layer thickness of only 1-2 cm will suffice.If the housing is located on the ground floor or above an unheated room, then the thermal insulation layer should be at least 5-10 cm, especially in the northern regions of the country.
Screed device for underfloor heating
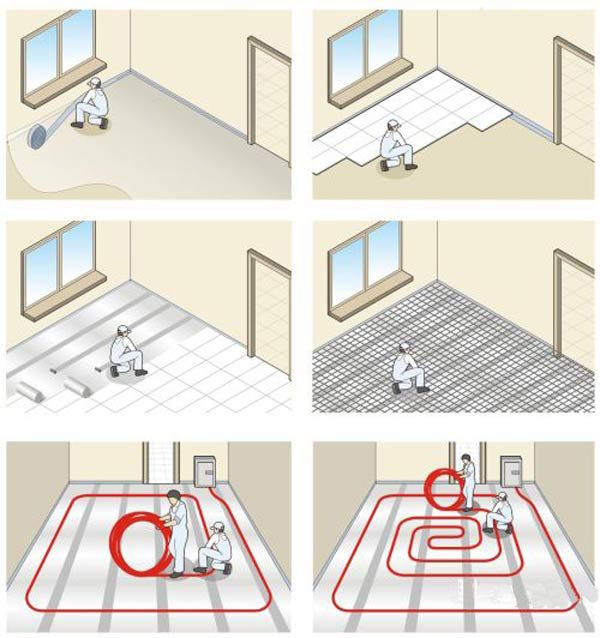
How to make a water heat-insulated floor
Making a simple water-heated floor in a small room is quite simple, even without the help of specialists. The technology for laying a water floor is as follows.
Step 1. The base is being prepared - a thin layer of sand is poured onto the rough floor, rammed and leveled.
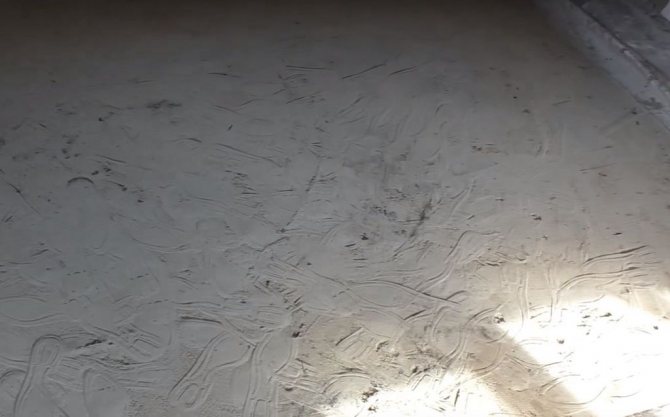
Preparation of the base
Step 2. A layer of waterproofing material is laid - for example, a polyethylene construction film.
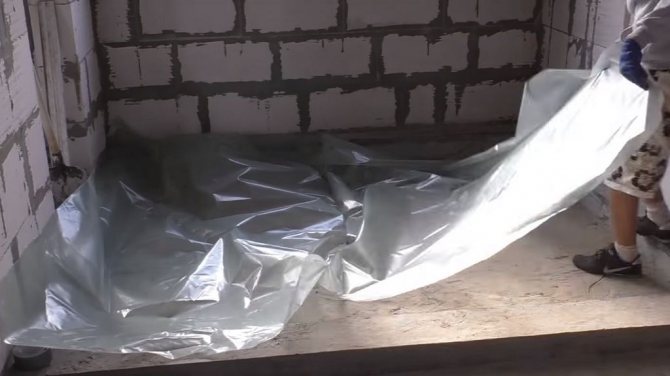
Laying plastic wrap
Step 3. A heat-insulating layer is laid on top - expanded polystyrene with a thickness of 5 cm. If necessary, the material is cut to the required size.
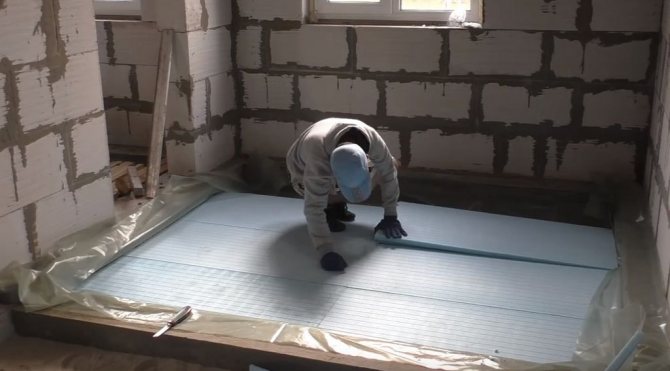
Styrofoam laying
Step 4. A damper tape is attached around the perimeter of the room.
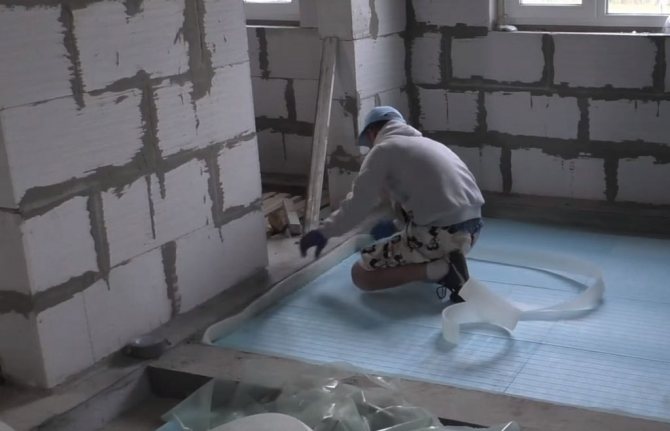
Attaching the damper tape
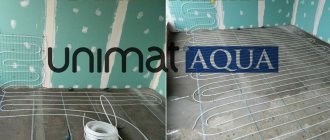
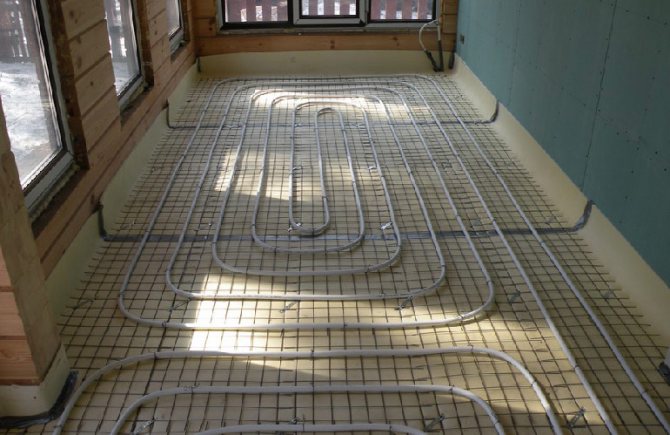
Step 5. Reinforcing mesh is laid.
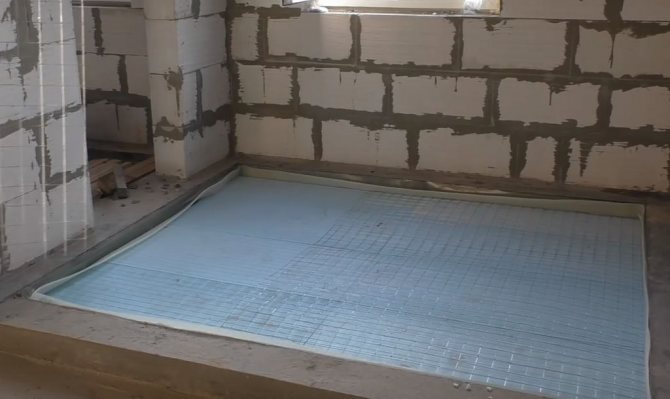
Reinforcing mesh laying
Step 6. According to the chosen scheme, a pipe is laid along which water - a heat carrier - will run.
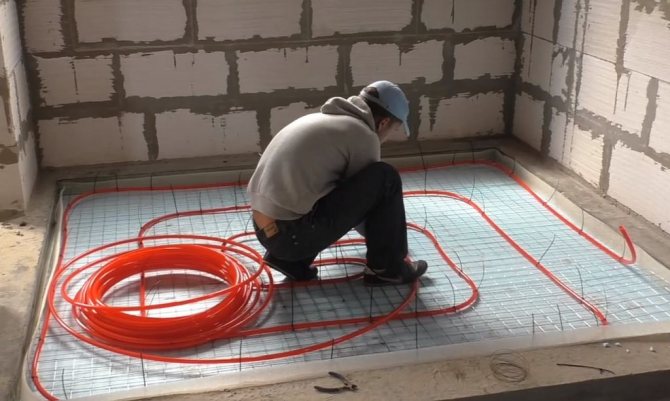
Laying water floor heating pipes
All is ready
Step 7. The pipe is fastened with plastic clamps.
Plastic clamps
Step 8. The withdrawal of supply and "return" from the system is made.
Withdrawal of supply and "return" from the system
Step 9. Next, work is carried out on the laying of the cement screed and its leveling.
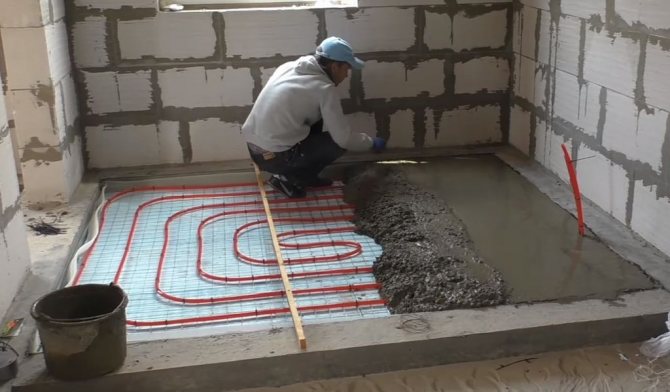
Cement screed device
Attention! It is worth remembering that the layer of concrete above the underfloor heating system should be at least 3 cm. In this case, the screed should be poured after filling the system with water.
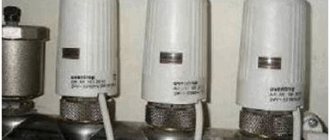
A thermostatic column for underfloor heating is installed on the "return", which will regulate the temperature of the water in it ("return"). The work is completed by connecting the system to heating. It will be possible to use the warm floor after it has been laid in a wet way only after the concrete has dried well. The approximate period is 28-30 days.
Video - Laying a warm water floor
The main elements of the system
Warm water floor is a whole complex of equipment. It includes:
- Warm water or heat carrier source;
- Circulating pump for pumping;
- Distribution manifold;
- Controller or thermostat;
- Emergency system for draining water and bleeding air from the warm floor;
- Pipes and fittings;
- Thermal insulation (pie);
- Fittings (taps, valves, couplings, etc.).
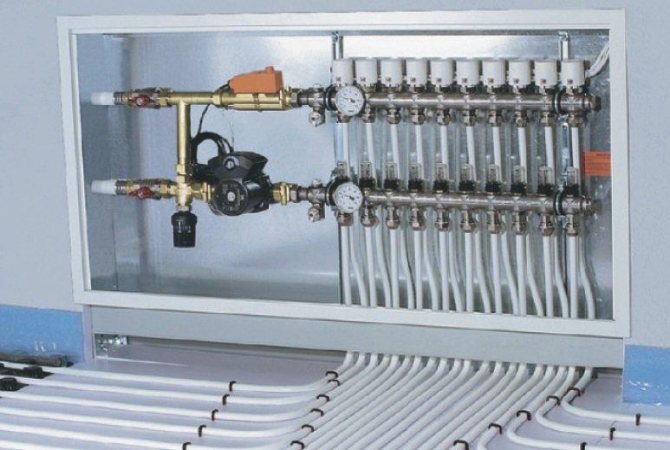
Distribution manifold (comb) for a warm water floor.
The following can be used as a source of warm water:
- A gas boiler;
- Central heating system, central heating system;
- Electric water heater;
- Heat pump;
- Solid fuel boiler;
- Indirect heating boiler;
- Solar collectors.