In modern private construction, the concrete pouring of the coating plays the role of not only the base, but also often takes on the functions of an element in heating systems. In the latter case, the correct technology and adherence to the recommendations at each stage of the work will ensure the efficiency and, as a result, the economy of heating.
The procedure for organizing a concrete screed consists of several stages, the most important of which will be discussed below.
- 2 What is a damper tape and expansion joint for?
- 3 What should be the composition of the mortar for underfloor heating screed?
- 4 What is the recommended screed thickness for a warm water floor?
- 5 How is the underfloor heating laid in a concrete screed?
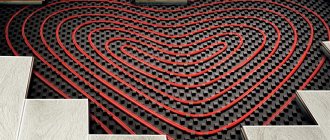
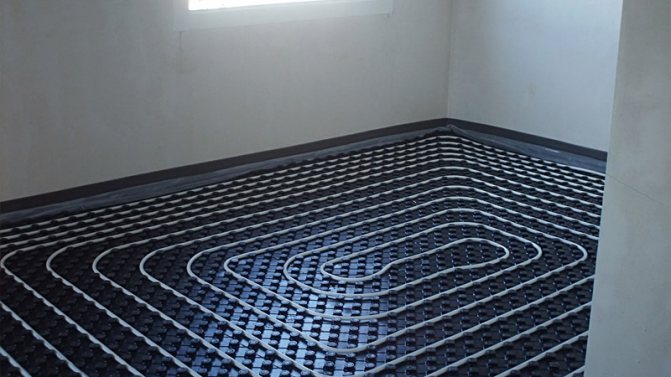
Warm water floor device
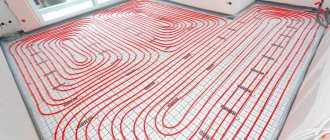
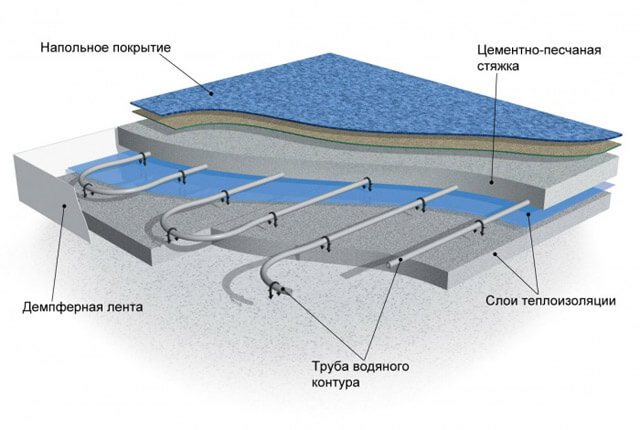
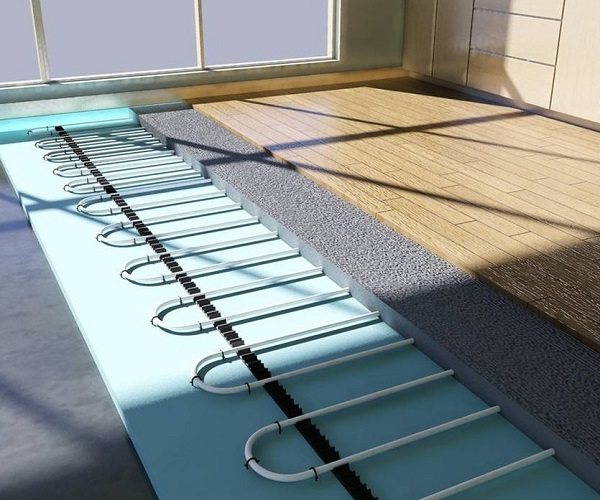
The "warm floor" system assumes the presence of several layers, laid in a certain sequence. If we look at the pie of the system from the bottom up, we can see the following order:
- First, the rough base is equipped.
- This is followed by a waterproofing layer.
- Then a layer of thermal insulation is laid.
- Heating elements.
- Concrete screed.
- Finishing floor covering.
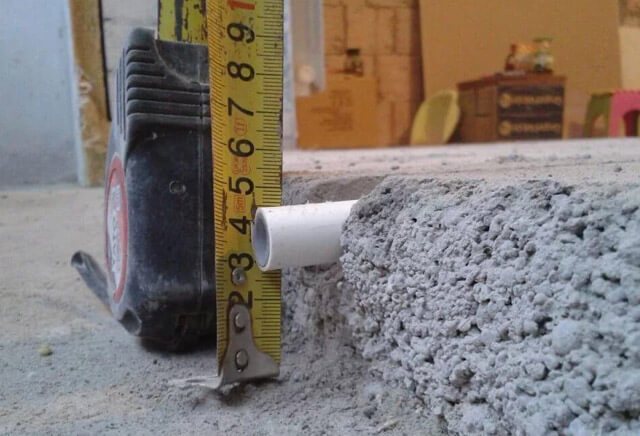
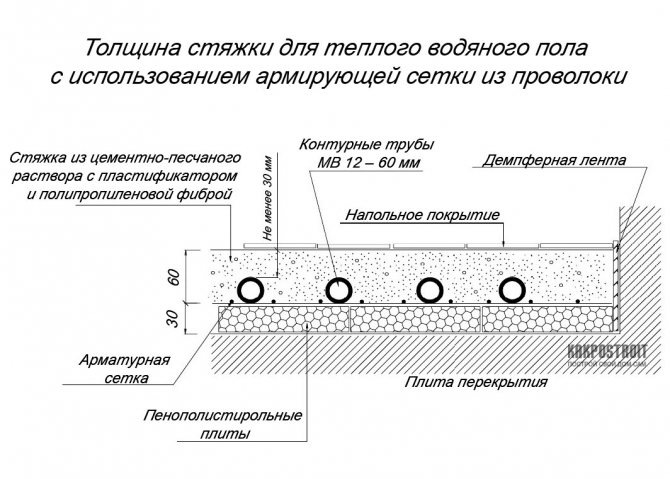
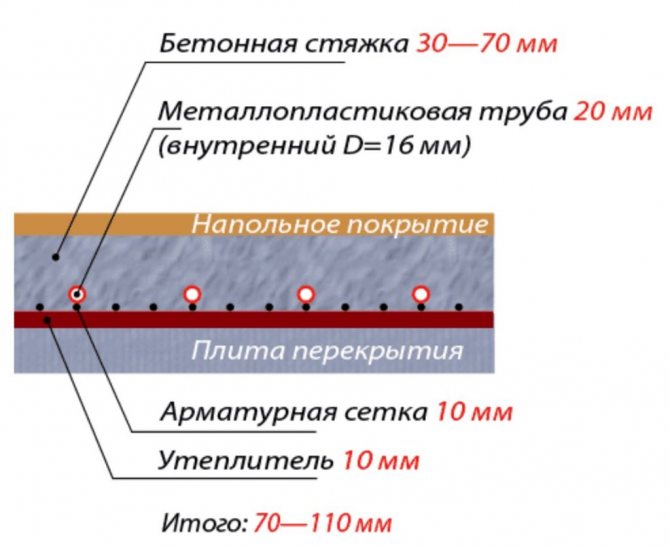
When determining the minimum thickness of the screed over the underfloor heating pipe, it is best to take the Sanitary Standards and Rules as a basis. It is in this document that it is indicated that when using a metal-cement composition, the thickness of the screed over the heating pipes should not exceed 2 centimeters. The minimum thickness of the classic cement mortar above the pipe communications, which are located inside the floor, must be at least 4 cm.
Modern craftsmen make screed from self-leveling mortars, which are characterized by increased strength. The use of such materials allows you to make a screed of minimum thickness, slightly covering pipe communications. However, in this case, it is recommended to use tiles as a finishing floor covering.
As for the electric underfloor heating, here are completely different calculations. The fact is that the strength of the heating cable is much higher than that of the water floor tubes. Consequently, the top layer of the screed is more likely to transfer heat than to protect it from mechanical stress and damage.
Minimum thickness
Underfloor heating screed thickness
- The presence of an existing subfloor;
- And the so-called rough screed (allowing further work on a flat surface).
A thin layer is unacceptable in technical rooms, such as a garage, and rooms with more intensive loads, for example, a kitchen, bathroom, hallway.
Sometimes developers offer to level the floor level differences, due to the thickness. Consequences - non-uniform heating. This was the case for my colleague. Level differences in one of the rooms reached 13 cm (!). He did not agree, and the builders "solved" the problem by adding crushed stone, sand, expanded clay, and also a jackhammer.
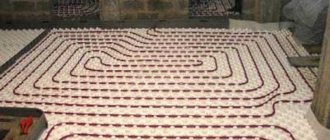
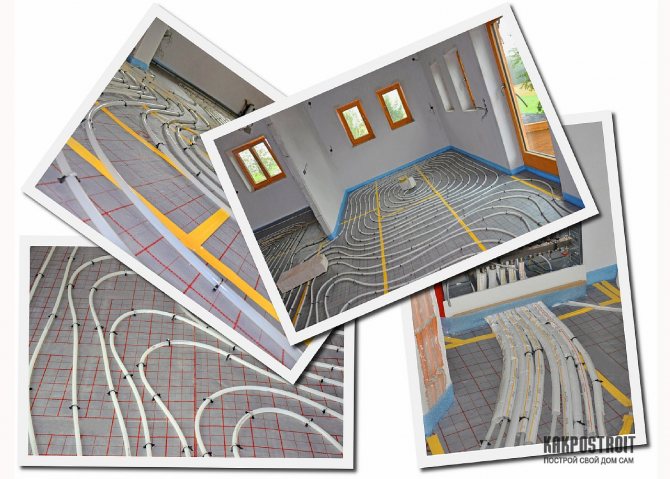
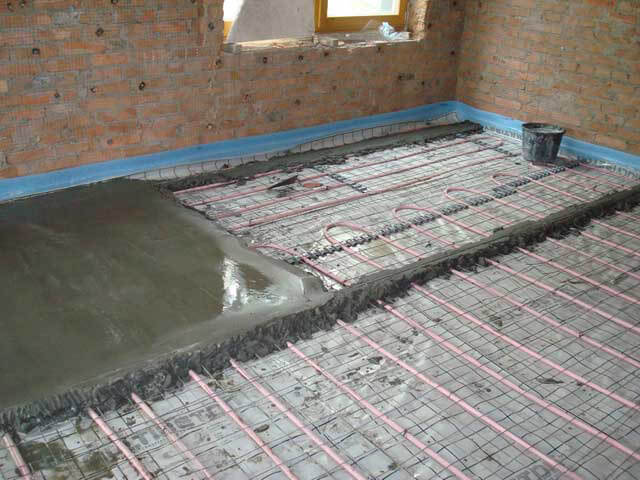
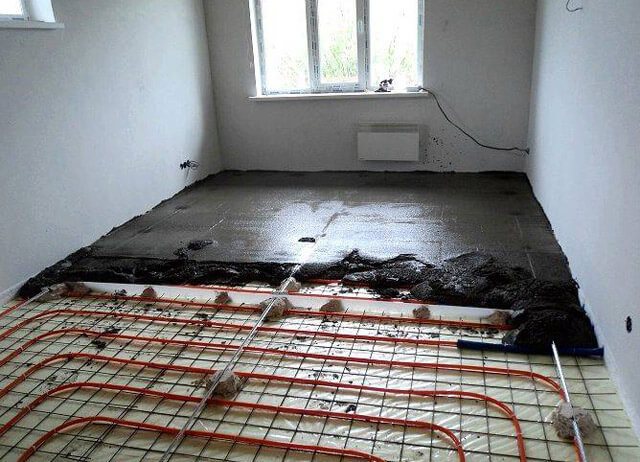
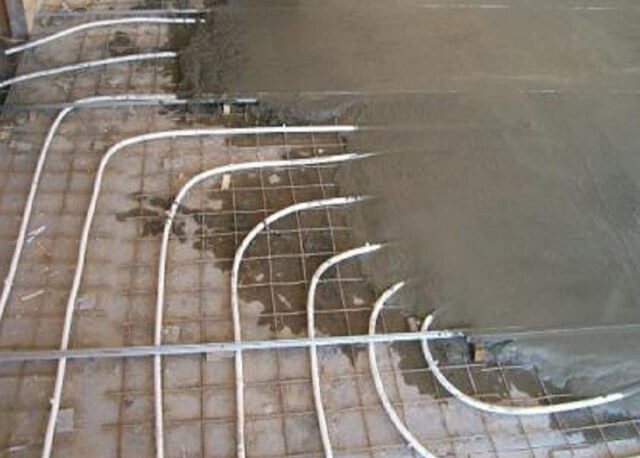
We lay the pipes
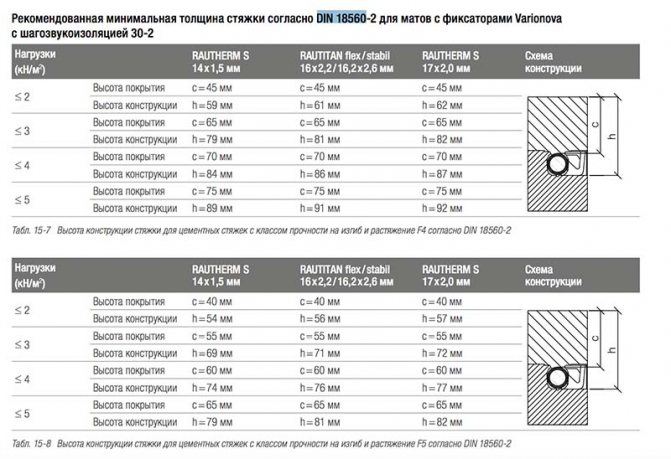
The exact definition of the figure, what is necessary to make the maximum floor thickness for the screed, is not given by a single regulatory building document. However, there are standards that allow you to optimally calculate the heat distribution. So, in residential premises, concrete coatings, under which water communications are laid, must withstand a static load of 2 kN / m².
This implies that the screed over the pipes must be at least 45 mm. When using reinforcement such as wire mesh with 100 x 100 mm mesh and 3 mm diameter, the thickness of the screed can be reduced by 10 - 15 mm.
Based on them, SNiP 3.04.01-87 believes that a layer of 55 - 65 mm will be optimal for a standard water floor (this indicator also takes into account the floor covering).
Experts recommend adhering to the following ratio, in which the thickness of the solution depends on the diameter of the water pipe:
- For MV 12 pipe - 60 mm;
- For MV 17 pipe - 65 mm.
Taking into account possible loads for housing, it is not recommended to exceed 100 mm. In non-residential premises, for example, cafe-restaurants, car dealerships, fitness centers, and the like - no more than 200 mm. And a thickness of 300 mm is used in industrial premises, hangars, etc.
The inevitable thickening of the screed can be justified in several cases:
- If the foundation of the building is at the same time the floor. In this case, for example, a 150 mm mono-brace will be an element of the overall supporting structure;
- When installing a warm floor in a room with an increased load (the same utility block or garage).
- When arranging the floor on heaving and problem soils.
Underfloor heating scheme
https://www.youtube.com/watch?v=7vkTW3SQ8R4
A thick screed, in addition to additional capital costs, promises some more incidents. These include: longer warm-up times and higher energy costs.
That's all for now. Hope you find the information helpful. Yes, I will add: some companies offer on their websites "calculators for calculating the thickness of the screed", however, often manufacturers of pipes for underfloor heating (Valtec, Herz, Stamar, etc.) recommend different thickness parameters.
Read, ask, subscribe to the blog. Send links to friends and acquaintances. Good luck and optimal screed thickness for your warm floor!
Quote of Wisdom: Don't lose your sense of humor. Humor is to a person what scent is to a rose.
The desire to create maximum comfort in the house leads to non-standard solutions in the installation of heating. Traditional radiators are giving way to underfloor heating systems. The most economical and efficient in operation is the construction of a water floor, consisting of a closed loop of pipes with hot water.
Even temperature distribution, more free space in the room, safety - these are some of the advantages of the new product. Several factors affect the duration and reliability of the system's functioning: high-quality pipe material, adherence to installation technology and the thickness of the screed made for a water-heated floor. Ceramic tiles are often used as a topcoat, which is characterized by its durability and ability to retain heat.
Pipes and elements of the water circuit are filled with a screed. There are two ways to prepare it:
- mortar based on cement and sand;
- special dry mix of factory production.
Which of the fillings is better, each consumer decides for himself, based on the characteristics of the room and his own preferences. The main advantage of the special mixture is the short drying time. Using such a composition, it becomes possible to glue ceramic tiles faster and start using a water-heated floor.
Today, a water heat-insulated floor is one of the most popular types of heating systems used in various premises.
Due to its reliability and ability to create a cozy microclimate in the room, maintaining the required temperature, this type of heating has lured many people "to its side".
When installing a heating flooring, there are certain nuances that should be emphasized, one of which is the thickness of the screed for a water-heated floor.
Water underfloor heating is a rather complicated heating system that requires some attention, especially during installation.
A heated cover of this type has a layered structure, the observance of which is necessary during construction work if you want to get a good result.
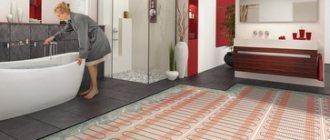
Tile conducts heat well from a heated screed
For a warm floor and its installation, the following materials are often used:
- rough floor slab;
- waterproofing cover;
- a layer of thermal insulation materials;
- reinforcing mesh made of metal or fiberglass;
- specialized heating pipes for a warm water floor;
- screed for a water-heated floor;
- floor finish (tiles and tiles from other materials).
The rough screed under the water circuit must be extremely flat
To organize a quality warm cover, you need to reliably create each layer of the cake. A rough screed for a water subfloor (or floor slab) should be leveled as much as possible, since the quality and evenness of subsequent layers, including the finishing one, depends on this process.
Correctly organized heat and waterproofing layers help to create high-quality heating (without heating the floor) and protect the surface from moisture from the outside.
The thickness of the screed depends on the thickness of the pipe
The finishing screed for underfloor heating has an important purpose. If it is not done properly, malfunctions may occur with the heating system, as a result of which an accident may occur (pipe breakage) and the finishing tile will collapse.
Do-it-yourself water heating in a private house (video)
Preparatory work and calculation of materials
Laying schemes for a water-heated floor
The choice of thermal insulation and fasteners for a water-heated floor
Selection of recipes, preparation and pouring of concrete
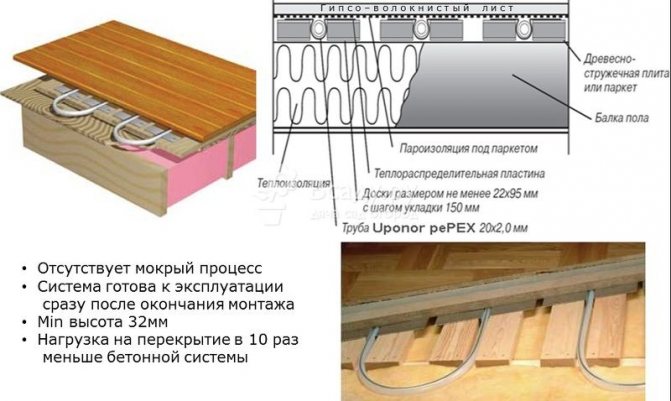
Lightweight underfloor heating for wooden floors

Do-it-yourself water heating in a private house
There is no need to talk about the comfort of using warm floors, this type of heating is very popular in private houses, as it is efficient and has a high efficiency. Despite the fact that this type of work is not much more difficult than others related to the arrangement of the maximum convenience and comfort of their own home, few know how to make a warm floor from heating with their own hands.
Consider the theoretical and practical issues related to the independent calculation and arrangement of water floor heating in small residential or office-type rooms.
Preparatory work and calculation of materials
Such important work as installing a warm floor with your own hands should begin with the preparation of materials and planning. Strictly speaking, an accurate calculation can only be made by specialists who have information on the level of heat leakage in a given room. But for individual needs, approximate calculations are often used that satisfy the requirements.
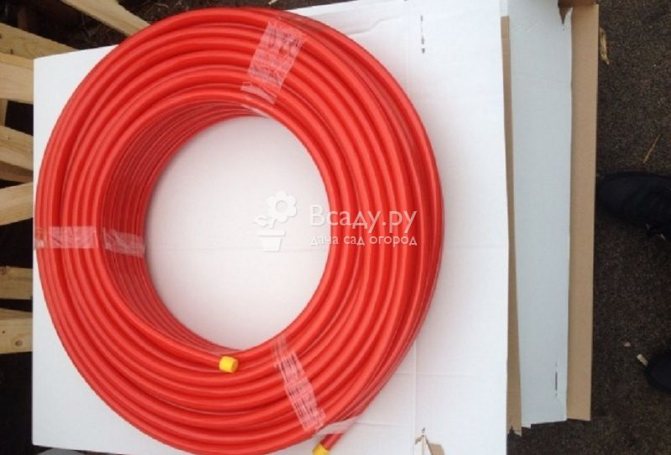
Underfloor heating pipes
First you need to draw a pipe layout plan. The scheme drawn on paper in a cage, the warm floor on which can be calculated based on the quadrature of the room, will be clearer and clearest of all. Each cell will correspond to a step - the distance between the pipes.
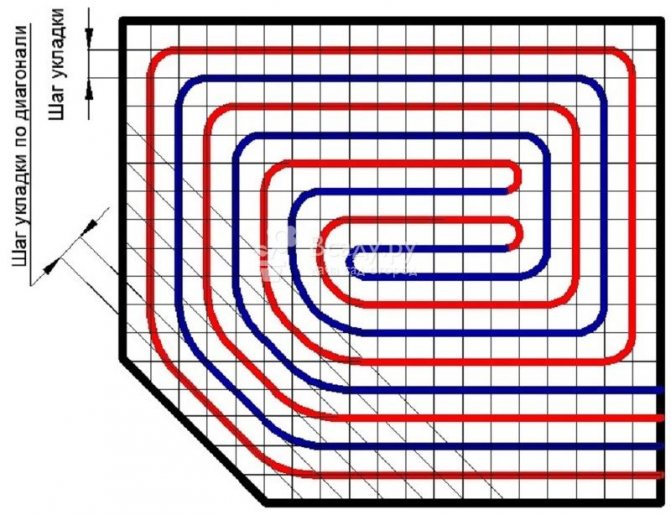
Calculation scheme for a water-heated floor
For a temperate zone:
- With good insulation of the house and windows, the distance between adjacent pipe turns can be 15-20 cm;
- If the walls are not insulated, 10-15 cm.
- In spacious rooms, where some of the walls are cold, and some are warm, they take a variable step: near cold walls, the distance between adjacent turns of pipes is small, and as they approach warm walls, it increases.
What kind of flooring is suitable for a warm floor
A big mistake is made by those who plan to lay parquet or thick wooden flooring on a warm floor. Wood conducts heat poorly and will prevent the room from heating up. The efficiency of such heating may be even lower than that of a radiator, and heating costs are too high.
The ideal covering for a warm floor is stone, ceramic or porcelain stoneware tiles.When heated, it will perfectly keep warm, and this is the best option for a kitchen or bathroom. Children are very fond of playing in rooms where the floor is warm, and walking barefoot there is more pleasant than on wooden parquet.
A slightly worse option for flooring, but more suitable for a guest room or bedroom, is linoleum and laminate. These materials transmit heat well, and will not reduce the efficiency of water heating. In this case, the laminate should be chosen with a minimum thickness, and linoleum - without an insulating substrate.
Important!
Many plastics can give off harmful fumes when heated. Therefore, floor coverings with chemical components must necessarily have a manufacturer's mark about the possibility of their use in residential premises on a warm floor.
Underfloor heating base
If we are talking about a house with concrete floors, then the most affordable common option is a water-heated concrete screed. The same method is used for the first (basement) floors of private cottages, if the base of the floor is on a sand cushion, which is located directly on the ground.
In houses with wooden floors, this option is not applicable. Wooden floor beams simply cannot withstand the enormous weight of a concrete screed, no matter how thin it may be. In this case, a lightweight version of the warm floor is used, which will be discussed in a separate section.
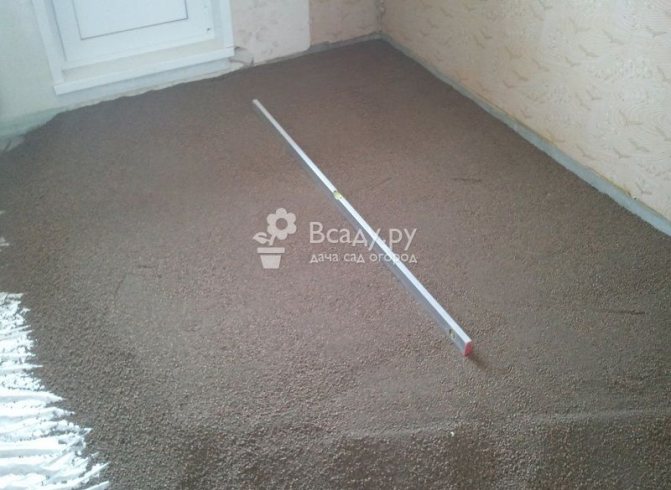
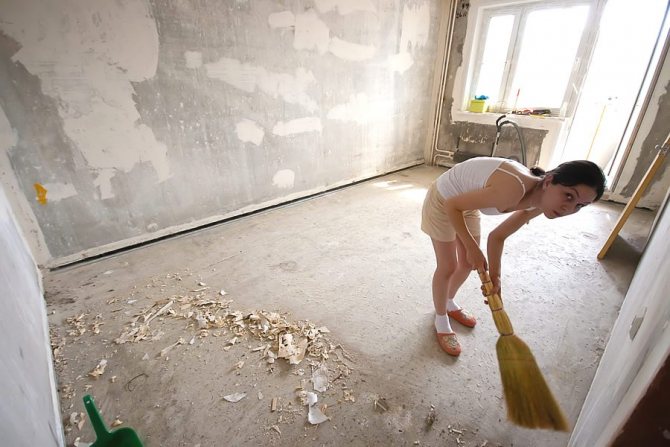
Leveling the base before making a warm floor
Do-it-yourself installation of a warm floor begins with the preparation of the base. The basis for creating a warm floor must be flat, without protrusions and depressions. The maximum allowable drop is 5 mm. If the depth of surface defects reaches 1-2 cm, then you will have to fill in and level a thin layer of granite screening (fine crushed stone) with a grain size of up to 5 mm. On top of the leveling layer, you will have to lay a film and walk on wooden boards when installing thermal insulation. Otherwise, the leveling layer will itself become a source of unevenness.
Laying schemes for a water-heated floor
The most common schemes for laying a water floor are snail and spiral. The snail warms up the entire floor area evenly. But with a spiral scheme, you can provide a greater level of heating in the coldest area of the room. To do this, the first branches of the pipe through which hot water is supplied are laid there. The exact length of the pipe is determined from the finished drawing.
Underfloor heating water do-it-yourself scheme
Important!
For underfloor heating, only a single piece of pipe is used! If the area of the room is very large, several heating circuits are planned. The length of the pipe of each circuit should not exceed 100 m. Otherwise, too much pressure will be required for the normal flow rate of the coolant. In terms of area, this corresponds to 15 sq.m.
Do-it-yourself water floor is best done from a 16 mm diameter metal-plastic pipe. It bends easily with a fairly small radius, and it is much more convenient to work with it than with a cross-linked polyethylene pipe. It is undesirable to use a pipe with a diameter of 20 mm. A large diameter will require an increase in the thickness of the concrete, and this has a negative effect on the efficiency of the heating system.
Usually pipe consumption per 1 sq. M. area is:
- 10 m at a step of 10 cm;
- 6.75 m at 15 cm steps.
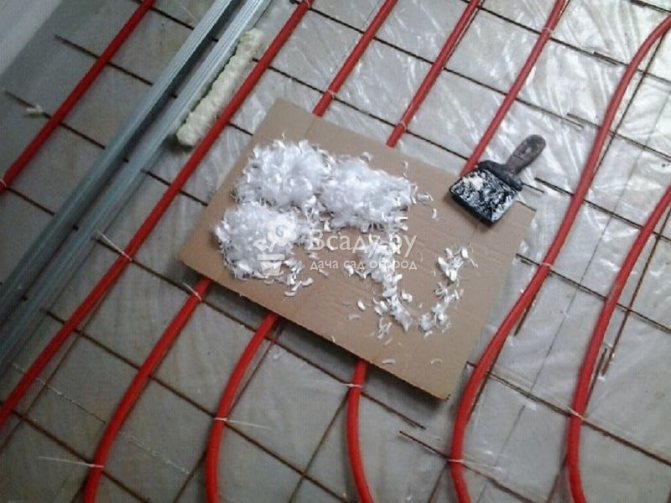
The choice of thermal insulation and fasteners for a water-heated floor
In order for the heat not to go down, a layer of dense foam is laid on the base. The density of the insulation is chosen at least 25, and better - 35 kg / cubic meter. Lighter polystyrene foam will simply crumple under the weight of the concrete layer.
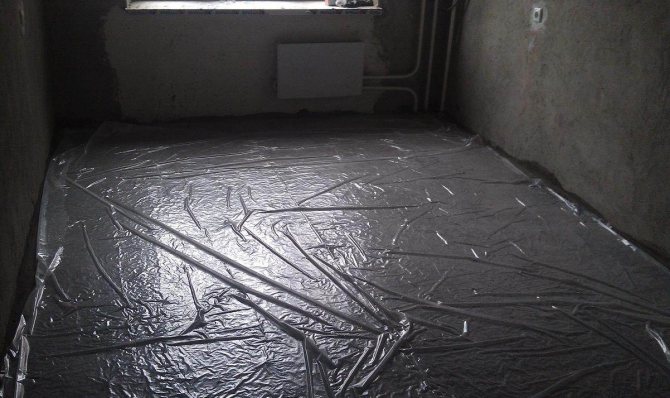
Insulation and heat reflector
The optimal insulation thickness is 5 cm. When laying on the ground or if you need increased protection from the cold, when an unheated room is located below the level, the thickness of the thermal insulation can be increased to 10 cm.To reduce heat losses, it is recommended to lay a heat-reflecting screen made of metallized film over the insulation. This could be:
- Penofol (metallized expanded polyethylene);
- Reflective foam screen glued behind the heatsinks;
- Plain aluminum food foil.
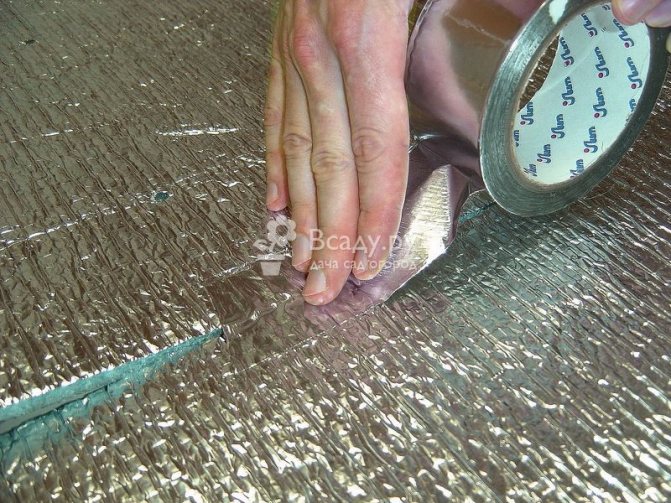
Do-it-yourself warm floor - sealing the joints of thermal insulation
The metallized layer is quickly destroyed by the aggressive action of concrete, so the screen itself also needs protection. This protection is provided by plastic sheeting, which is used for greenhouses and greenhouses. The film thickness should be 75-100 microns.
In addition, it provides the necessary moisture for the maturing concrete screed throughout the entire period of its hardening. Pieces of the film must be overlapped, and the junction must be sealed with adhesive tape.
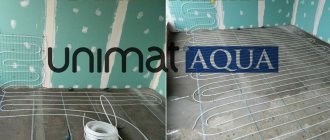
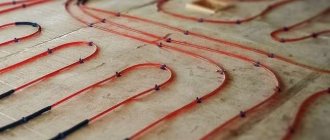
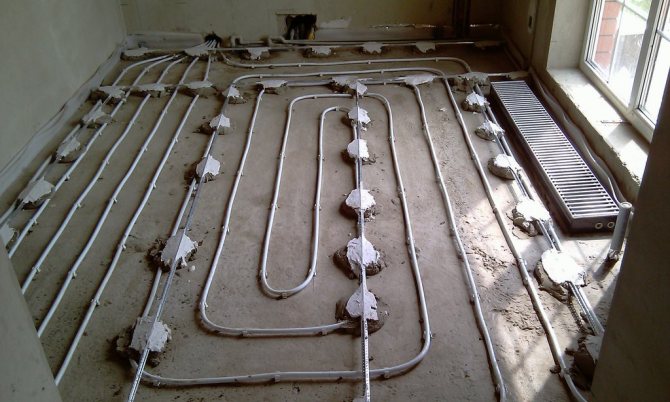
Fasteners for hot water pipes
Pipe fasteners are installed on the thermal insulation. Its purpose is to fix the adjacent branches of the pipe and place it on the floor in strict accordance with the preliminary plan. Fasteners hold the pipe until the concrete screed is hard enough. The use of fasteners facilitates the installation of the floor and ensures that the pipe is correctly positioned in the concrete pad.
Fasteners can be special metal strips, metal welded mesh, plastic brackets that pin the pipe to the foam base.
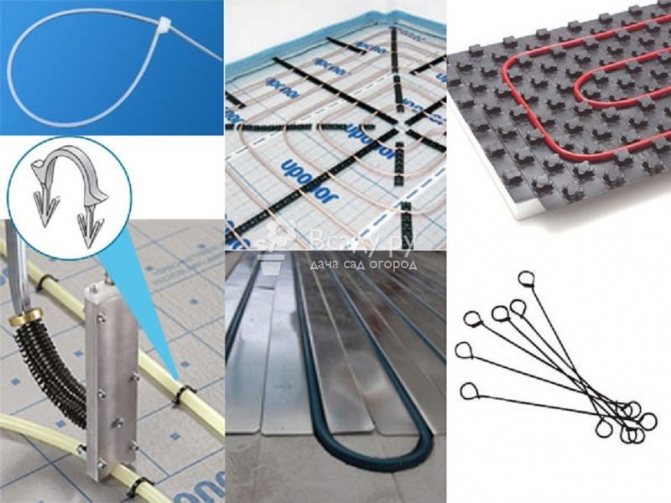
Various types of fixings for warm water floors
- Metal strips are used when the concrete pad is thicker. They raise the pipe slightly relative to the heat insulator, so that it is closer to the upper surface of the concrete pad. The pipe simply snaps into the curly grooves of the strips.
- The metal mesh not only anchors the pipe, but also reinforces the concrete pad layer. The pipe is tied to the mesh with pieces of wire or plastic ties. Fastener consumption is 2 pcs. per running meter. Additional fasteners can be used in places of curvatures.
- Plastic brackets are installed manually. They pin the pipe to the expanded polystyrene as it is laid. DIY semi-industrial warm floors are made using a special stapler. But its acquisition is justified only with intensive professional use.
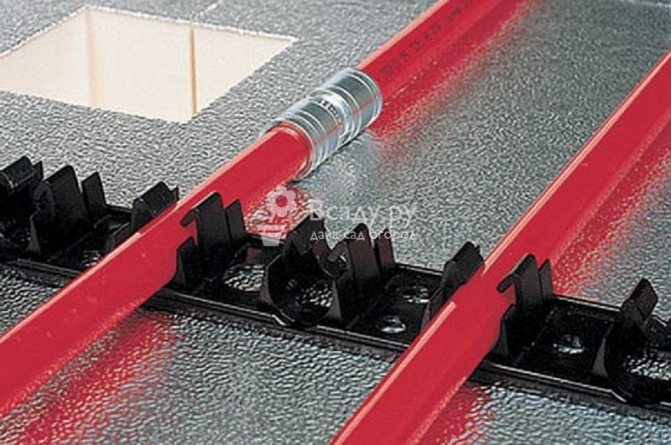
Laying a water-heated floor on plastic fasteners
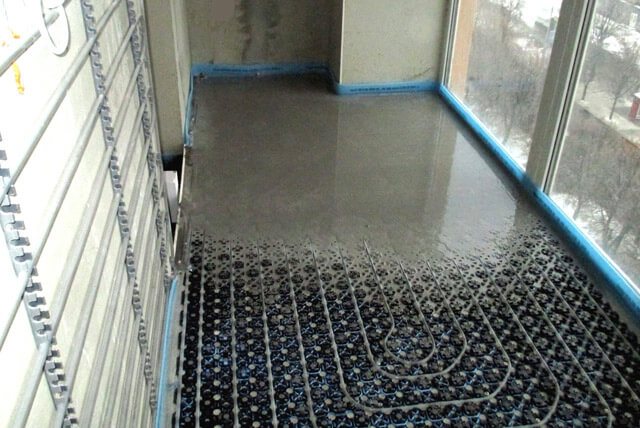
In recent years, manufacturers of underfloor heating systems have begun to offer another very convenient solution. We are talking about special sheets of dense polystyrene foam with a profiled surface. Typically, the surface of such sheets is represented by intersections of grooves or rows of protruding elements, between which heating pipes can be easily laid.
The surface of the sheets is smooth, extruded, all pores are closed and no additional waterproofing film is required for it. Having a special thermal cutter, grooves in polystyrene foam can be cut independently. But to carry out this work, you need at least minimal experience.
Important!
The reinforced-plastic pipe is supplied in coils. When laying, the coil is rolled along the path of the pipe placement. Do not pull the pipe out of a lying coil, as this will cause it to twist and may lead to delamination of the inner layers.
Selection of recipes, preparation and pouring of concrete
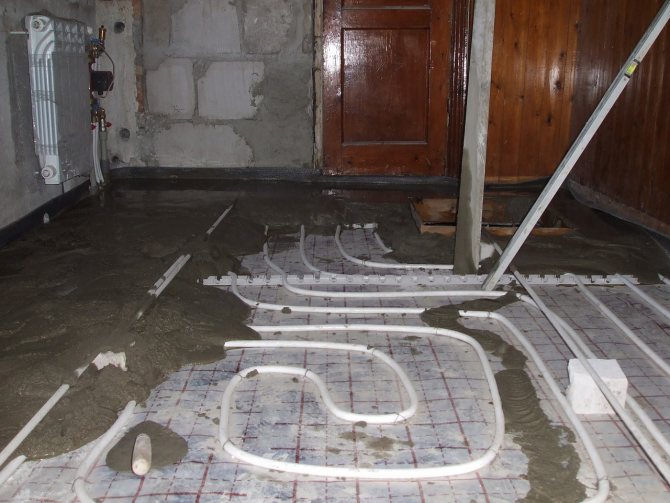
Pouring concrete into the pipes is only possible after they have been completely laid, connected to the collectors and filled with water at a pressure of 4 bar. Before pouring, it is required to withstand the pipe under this pressure for a couple of days. If a leak is found, it is immediately eliminated. If the heating system itself has not yet been installed, instead of water, air is pumped into the pipes using a compressor and the pressure is fixed with ball valves.
Immediately after pumping, the pressure may decrease slightly due to the straightening of the pipes.During the pouring and hardening of the concrete, the pressure is monitored using a connected pressure gauge.
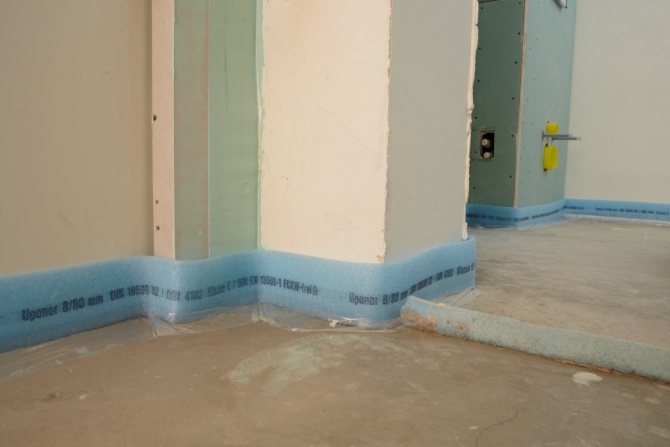
To compensate for thermal expansion along all walls, we attach a damper tape. The thermal expansion of the concrete pad is 0.5 mm per linear meter, with a temperature increase of 40 degrees. If the heating is only 20 degrees, that expansion will accordingly be half as much. We multiply the expansion by the length of the longest section of the concrete floor and compare this value with the thickness of the damper tape.
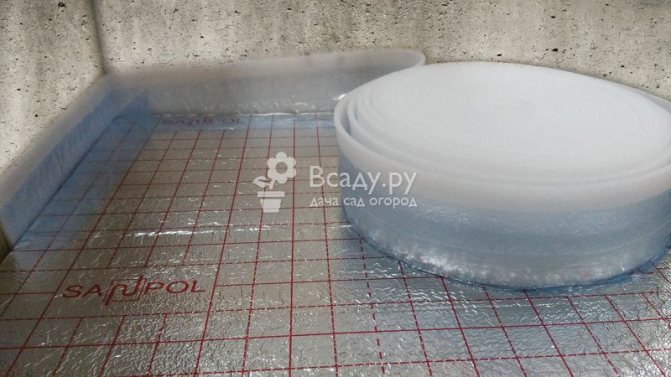
Laying a damper tape for a warm floor
For ordinary apartments, as a rule, it is sufficient to lay the tape only along the walls and at the door sill. In addition, the damper tape also plays the role of thermal insulation of the walls from the warm floor. This method removes cold bridges that cause unnecessary heat leakage.
Additionally, in some cases, expansion joints are made:
- if the length of any of the sides of the room is more than 8 meters;
- the width and length of the room differ by more than two times;
- the floor area exceeds 30 sq. m .;
- the shape of the room has several bends.
For extended warm floors, an expansion joint with a damper tape is installed every 10 m. So that the movement of concrete cushions in these places does not break the pipe, a rigid plastic corrugation (preferable) or a pipe of a larger diameter is put on it. The entry of the protective pipe into the concrete cushions is at least 0.5 m on each side.
Important!
It is recommended to place each circuit on its own site and avoid multiple intersections of pipes and expansion joints.
If, according to the layout, an accumulation of warm pipes occurs in one place (for example, near a collector), then a heat insulator sleeve must be put on some of the pipes. This will help avoid localized overheating and retain heat for the desired areas of the floor.
How to make a water-heated floor: concreting
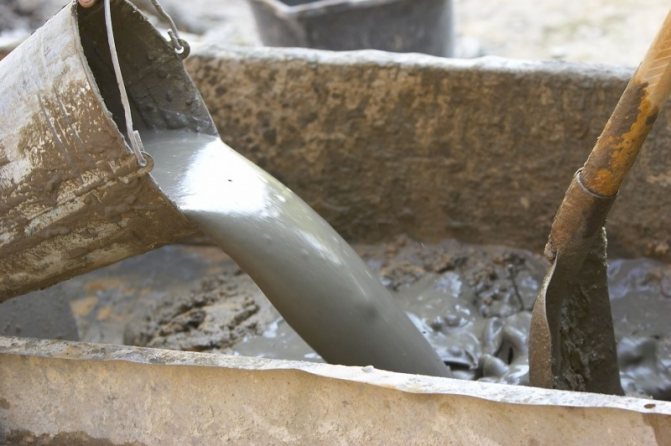
If the concrete for pouring is not brought in, but is prepared on site, then the following components will be required:
- cement grade 300 or 400 - 1 part by weight;
- washed river sand - 1.9 parts by weight;
- crushed stone 5-20 mm in size - 3.7 wt.
This is the composition of heavy concrete. Its weight reaches 2.5 tons per 1 cubic meter. finished material.
Many people prefer to give up sand in concrete for a warm floor. This is due to its poor thermal conductivity. Therefore, in practice, cement-gravel mixtures are also used. Its composition:
- granite crushed stone 5-20 mm - 2 buckets;
- cement - 1 bucket;
- fine granite screening up to 5 mm - 4 buckets;
- water - 7 liters (you can add another 1 liter if the solution is very thick).
Granite conducts heat well, and such concrete has a much lower thermal resistance. It is also recommended to introduce a reinforcing fiber, which is a small plastic fiber, into the composition.
Reinforcing fiber for warm water floor
Important!
As part of any self-leveling floor, there must be a plasticizer. The exact amount depends on the specific brand and purpose of this drug. The plasticizer should not be any, namely for a warm floor!
If the pipe was attached to strips or staples, a reinforcing mesh is laid on top of it. The height of the concrete screed is chosen from 5 to 10 cm. In this case, it is necessary to provide at least 3 cm of concrete above the pipe. A smaller layer is fraught with cracking. A too thick concrete pad increases heat transfer losses.
With the right choice of concrete and normal temperature, it begins to set after 4 hours. To maintain normal humidity, cover it with a waterproof film, and when the surface dries, sprinkle it with water. After 12 hours, the hardened concrete can support the weight of a person. But its full maturation occurs only after 28 days. All this time, you need to take care of humidity and maintain high pressure in the laid pipes. Only after the expiry of the specified period can the first thermal test of this floor be carried out.
Important!
Both during the first test and afterwards, you must not quickly heat the water-heated floor to a high temperature!
Flooring
Tiles and other floor coverings can be glued to the finished concrete base. In this case, an adhesive intended for warm floors is used. If the tile falls on the expansion joint, then one part of it must be glued, and the other must be placed on silicone. Silicone glue absorbs thermal movements of the substrate, and the tiles will not crack from overvoltage.
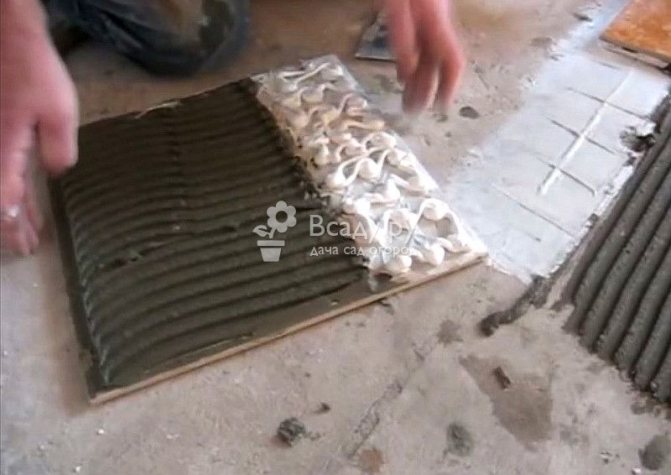
The method of laying tiles on warm floors in the place of the expansion gap
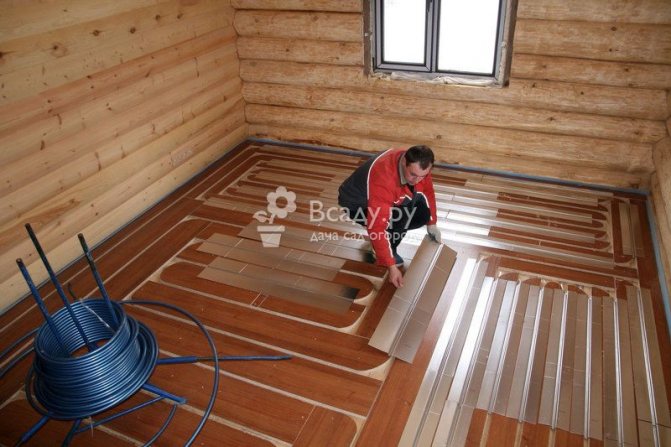
Lightweight underfloor heating for wooden floors
As mentioned earlier, for wooden floors, a light warm floor is equipped without a concrete cushion. In this case, the sequence of work may differ slightly depending on the condition of the old floor and the structure of the floor.
So that the heat does not go down - insulation is laid under the pipes. It can be placed between the floor joists, and then it is better to use mineral wool, or it can be laid on an old solid subfloor - here you will need expanded polystyrene with a density of 25-35 kg / m3. To prevent condensation from forming, a vapor barrier membrane is placed under the mineral wool. The first rough floor is stuffed on top of the logs.
DIY lightweight water floor
Just as for a concrete floor, it is advisable to lay a heat-reflecting screen made of foil or foam foam on the insulation. All joints and seams must be sealed with tape.
Logs are laid directly on the expanded polystyrene, to which the boards of the subfloor are nailed. There should be about 2 cm gaps between the boards for laying the pipe. Similar gaps must be provided at the ends of the subfloor boards. Otherwise, you will have to choose transverse grooves for the pipe, and this can lead to breakage of the boards.
In order for the heat to be evenly distributed over the floor, the pipe is laid not just in grooves, but in special metal gutters designed for this purpose. The metal transfers heat over its entire surface and evenly heats the finished finish. Recommendations for its choice have already been given above - it can be a laminate with a permit to work with heating or a rigid polymer coating. Thick parquet and parquet board are the least suitable for warm floors.
Laying scheme for a water floor in a wooden house
Compared to concrete floor heating, a lightweight construction is made much faster and costs much less. Another advantage is the ability to repair water pipes in the event of an accident. Problems with tubes in a concrete floor can only be eliminated by completely replacing it.
The main disadvantage of a wooden underfloor heating is a significantly lower heat output.
Advice
It is possible to feed underfloor heating from heating of apartment buildings only with the permission of the heat supplier. All recommendations remain valid, although, on our own, we advise you to install a heat-resistant water filter at the pipe inlet.
Outcome
Competently arranged warmth in your own home is another step towards comfortable and convenient living conditions for the whole family. But, even if you are not able to perform these works and are forced to invite masters, the knowledge gained will allow you to take an active part in this process.
Influence of screed height on system performance
There are no instructions in SNiP regarding the maximum thickness of the screed over a water-heated floor, however, it makes no sense to exceed the optimal thickness values when arranging a warm floor in a private house. This will cause the following factors:
- Large consumption of building materials, as a result of which the arrangement of a warm floor will cost much more.
- The inertia of the surface heating process will increase.
- The usable living space will decrease significantly.
We suggest that you familiarize yourself with: How to install floor joists

In most cases, the optimal thickness value is exceeded if it is necessary to make the surface as flat as possible or when arranging a warm floor at the same level in adjacent rooms. Although it would be more correct to do this at the stage of creating a rough base. Due to the different thickness of the upper screed, the floor surface will warm up unevenly.
Due to the fact that the screed is created independently of other structures, energy consumption will not increase due to uneven heating of the floor. But this factor can affect the inertia of the floating screed heating. In general, the screed will transfer the amount of heat that the heating elements will give it.
You should pay attention to one more fact: when equipping a screed for a warm water floor in living quarters, it is best to create a uniform layer of optimal thickness. But in places where there is a significant load on the floor surface, to protect the heating pipes of the warm water floor, you can increase the layer of the finishing screed. Such premises include a garage or various technical buildings.
Before starting the installation, it is worth figuring out what thickness of the screed is considered optimal. This indicator depends on:
- heat capacity of the floor;
- uniformity of heating;
- lifetime.
A thin layer heats up quickly, starting to warm the room, but soon the concrete coating begins to crack from the high temperature. This is especially noticeable in the locations of the pipes. Heating above normal deteriorates the finish floor covering. Excessive centimeters above the water circuit will require more energy for heating.
In addition to the accumulation and distribution of heat, the screed performs a protective function in relation to pipes with hot water. Insufficient coverage of the circuit will lead to high loads and shorten its life. Protection of the water system is especially important if the installation of heavy furniture is planned in the room.
The minimum thickness of the screed must exceed 6.5 cm, it is recommended for tiles that are not afraid of overheating. The optimal amount of pipe filling is 10 cm. This parameter is provided for underfloor heating systems in residential premises. For industrial buildings or warehouses, the maximum concrete thickness can be up to 20 cm.
The size of the layer depends on the diameter of the pipes, if we calculate from the surface of the contour, then the indicator, excluding the heat-insulating cake, will be 2-5 cm. The installation technology allows excluding the metal mesh from the cake under the contour and replacing it with fiber in the composition of the solution. In this case, the thickness of the screed over the pipes of the water-heated floor increases, the minimum mark is 4.5 cm. Compliance with the recommended values will ensure uniform heating and safe use of the warm floor.
What affects the thickness of the screed
First of all, we will consider with you everything that affects the thickness of the heating cake. Moreover, because how correctly to determine the thickness, it directly depends:
- The operational life of the entire system.
- How evenly the floor will warm up.
- Heat capacity of the floor.
It is clear that the thin base heats up very quickly. However, there is also a significant disadvantage here. The thin surface of the warm floor heats up very quickly and because of this, it can begin to crack.
This will usually be seen where the underfloor heating heating circuit is laid. Moreover, in this case, the floor cladding will warm up above its norm. For this reason, some coatings can deteriorate as a result. If it is very thick, then much more heat energy will be required. As a result, it will have a big impact on utility bills. Moreover, because of this, problems may arise in adjusting all warm floors, because the base will hold a high temperature for a long time.
It is important to understand that the underfloor heating screed plays a role not only as a transmitter of thermal energy. The underfloor heating screed serves as a means of protection against mechanical damage to the heating elements. So, if it is too thin, then at a point strong load it may not withstand, which will lead to damage to the heating circuit. On the other hand, you should not fill it with a very thick one for the reason that you will be installing heavy furniture.
As can be seen from the above, the thickness of the screed on a water-heated floor plays an important role. For this reason, it is important to choose the right one. According to existing regulations, the minimum thickness can be in the region of 65 mm. This thickness will be sufficient only if tiles are laid further on the warm floor. This cladding material will also contain a high load, for this reason there will be no damage to the heating circuit. As for the optimal thickness, it is 100 mm. For industrial or warehouse premises, a screed thickness of up to 200 mm on a warm water floor is allowed.
So, what influences the choice of this or that thickness of the screed for underfloor heating? First of all, it determines the diameter of the pipe. We will consider all these indicators below.
Thermal insulation of the base
Before installing the heating system, it is necessary to insulate the base. The thermal insulation layer will protect the water circuit from heat loss going into the basement or foundation of the house. Used as insulation:
- Styrofoam;
- extruded polystyrene foam;
- foil-coated substrate.
The listed materials are distinguished by their high strength to mechanical stress, resistance to moisture and temperature extremes. The thickness of the insulation is 30-50 mm, it is laid on a layer of waterproofing polyethylene film. The canvas is laid with an overlap on a clean, dry base, it will become a protection against wetting for the insulation. Insulation boards are stacked end-to-end, the joints are coated with glue or blown out with foam, the excess of which is cut off.
Penofol or a similar reflective insulation sheet is placed on top. The layer of aluminum foil is directed upward, this will reflect the bulk of the heat back towards the room. The joints of the foil insulation are glued with special tape. Penofol will protect the insulation from the aggressive effects of concrete.
Explicit merits
The first and most important advantage of the underfloor heating water system is uniform heating of the room.
- Using it as an additional or main source of heat, you can significantly save on heating your home.
- The system helps to completely eliminate the use of bulky radiators, which do not fit very well into the concept of modern interiors.
- This type of heating does not dry the air in the room, does not burn oxygen.
- During the operation of the system, there is no large temperature difference between cold and heated air, therefore, turbulence processes are excluded. This means that the air currents will not raise dust from the floor, creating difficulties for allergy sufferers and people suffering from lung diseases.
- The presence of a thermostat allows you to regulate and independently control heating modes.
- Unlike electrical systems for underfloor heating, water does not create electromagnetic radiation. It is easy to install it yourself, without resorting to the expensive help of professional craftsmen.
Screed tasks for underfloor heating
Floor screed
First, to protect the water pipes from damage;
Secondly, for uniform heat transfer on the floor surface;
Thirdly, for heat and sound insulation from the side of the lower floor levels.
Let's start by listing all the "classic pie ingredients."
Down up:
- On the base of the floor - concrete screed;
- Waterproofing (if necessary, based on the proximity of groundwater);
- Insulation.It is needed to prevent (reduce) heat loss to the ground, an unheated sub-floor or a neighbor's ceiling below. Usually it is expanded polystyrene with a density of 40 kg / m³ and above or a basalt slab of special "floor" brands. Insulation thickness - requires calculation based on a number of conditions;
- Dense polyethylene film, in two layers;
- A water pipe laid on a reinforcing mesh and fastened to it with clamps. In those places of the pipes where the expansion joints pass, they put on a corrugation;
- Concrete screed, for example, is a great and affordable option;
- Substrate. Its material depends on what the finish will be (for tiles, laminate, parquet, etc.);
- Finish coating.
This is a classic pie. Depending on the specific situation, the "filling" and technology changes.
What determines the thickness of the screed: From the design features of the room and the customer's intentions, of which the main ones are:
- a) characteristics of the floor (soil, floor slab, etc.);
- b) materials of the finishing (floor) coating;
- c) expected surface loads;
- d) the temperature of the coolant and the required air temperature in the room.
To figure out how to make a screed for a warm floor, let's define more precisely its tasks. First of all, remember that screeds are fundamentally divided into tied and floating. The floating screed is not connected either with the base of the floor or with the walls of the room. If, conditionally, you look at a floating screed, then this is a separate, more often, concrete slab in the room performing its tasks.
The tasks of a floating floor heating screed include:
- Retention of pipes or cable underfloor heating;
- Be a heat exchanger between the underfloor heating system and the room, ensuring uniform heating of the floor surface;
- Take on the power load of the operation of the room.
It is for the solution of these problems that specific requirements for the device of underfloor heating screed are directed.
Concept and necessity
A screed is a layer of mortar that is applied on top of the surface. But with regards to the warm floor, then the screed plays different functions each time, depending on the selected layer.
The first layer is carried out on the rough base. It is mainly used to create a flat surface for the subsequent laying of materials. In principle, this layer is suitable for all surfaces that have even minor effects. Instead of a rough layer for insulation, a floor slab or soil prepared according to all the rules can be used.
The second layer is poured over the thermal insulation layer. It will be designed for laying the underfloor heating cable on it. If everything is done according to the instructions and technology, then the installation of the cable floor will be much faster. As a result, the result will please everyone.
All that remains is to “close” the underfloor heating by filling in the underfloor heating. It will contribute to an even distribution of heat on the floor itself, as well as inside the room. This layer of pouring the underfloor heating screed will subsequently serve as a surface for the flooring of the selected floor covering.
The device of the final layer of the underfloor heating screed can be arranged only if the functionality of the entire system has been checked. The pressure in it must be kept at the required level. Otherwise, you will have to remove the screed and see what problems there are in the operation of the warm floor.
Only these points will already indicate how to properly fill in the warm floor so that it can warm the air in the room from the base to the ceiling. If you move away from technology and try to do everything at your discretion, then over time you will have to dismantle the surface and possibly even elements of the warm floor, electric or water.
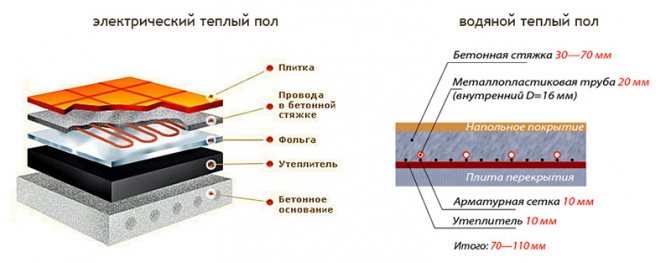
Requirements for the underfloor heating screed
Here is the time to remember about the types of warm floors. Basically, there are two types of underfloor heating: water and electric.In a water-heated floor, heat is transferred to the screed from the water circulating through the system. In an electric underfloor heating, heat is obtained from heating special heating cables laid in the floor.
Note: Speaking of underfloor heating screed, we mean only water underfloor heating and cable electric underfloor heating. Zip closure of electric warm mats is not required. Also, the screed is not required for TP (underfloor heating) flooring systems used in wooden houses and in houses with log floors.
Preparation for pouring underfloor heating
When the rough screed is mounted, you can start installing the underfloor heating. To do this, you should choose an electric or water option, which will practically not have any differences in the subsequent execution of the pouring. But not everyone knows how to fill in a warm floor. For this, the established technology should be followed evenly.
When the underfloor heating system is installed. You should check its performance. For this, it is exposed even within 1.5-2.0 atmospheres. It should remain in the process of pouring the screed. But the system should not warm up above 25 degrees.
The purpose of the screed
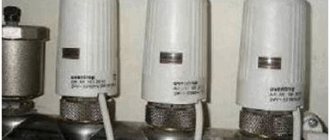
A damper tape is installed along the perimeter of the room in which the water-heated floor is installed. This element will allow the concrete base to expand safely.
The elastic strip compresses under load, and then restores its shape. If the damper tape is neglected, the screed can damage the pipes of the heating system or the floor covering (tiles, laminate) when the temperature changes. This will result in complex and expensive repairs with material replacement.
The screed of a warm water floor is designed to perform the following functions:
- Protection of heating elements from mechanical stress.
- Heat transfer and even distribution over the surface.
To complete the first task, it is necessary to make a sufficiently thick screed, and for effective heating, a minimum screed for a water-heated floor is required. In other words, to perform both functions, you need to choose the best option.
When determining the thickness of the screed over a water-heated floor pipe, several factors should be taken into account:
- What material will be used as a finishing floor covering (laminate, parquet or tile).
- Diameter of heating tubes.
- For what purpose is the underfloor heating installed (main or additional heating).
- The value of the expected load on the screed.
Cement-sand composition - features of use
The very name of the mixture suggests that the composition includes cement and sand. For pouring heated water floors, plasticizing additives are also included to increase flow. Thanks to this property, the solution easily fills all voids and smooths out irregularities. A distinctive feature is self-leveling.
In this regard, we can highlight some of the nuances of use:
- there is no need to purchase devices for leveling the surface;
- the concreting process consists in pouring a solution, which is evenly distributed under the action of its own weight;
- the set of strength occurs quickly, which makes it possible to shorten the time frame for the construction activities.
Cement-sand mixtures can be prepared independently, but it is better to use ready-made composites available in hardware stores. They are formulated to ensure the required characteristics.
When performing a screed for a water-heated floor system, an ordinary mortar made from sand, cement and water is most often used
Self-leveling composition on a sand-cement basis has a set of advantages:
- smooths out unevenness of the base;
- forms a layer of uniform thickness;
- perceives the load 5–8 hours after distribution over the surface;
- does not require the use of special equipment;
- provides flatness of the substrate without the need for special processing.
Along with the advantages, there are also weaknesses:
- insufficiently high strength;
- reduced level of sound insulation;
- low thermal insulation properties.
Despite the main disadvantage - the problematic smoothing of drops exceeding 50 mm, the self-leveling composition is popular when pouring a water floor heating system.
Option 2. DSP
Wet concrete underfloor heating screed is made using floating floor technology, based on a solution of cement, sand, crushed stone and water. For the independent preparation of the solution, it is necessary to make a solution of B22.5 (M300) with the obligatory (!) Addition of crushed stone or gravel of fractions of 5-15 mm to the solution.
The classic M300 concrete mortar (B22.5 concrete) is made on the basis of M400 cement. The proportions of concrete (Cement: Sand: Crushed stone) - 1: 1.9: 3.7.
We offer you to familiarize yourself with: Warm pool in the country
It is important to note that this concrete grade belongs to heavy concrete and is difficult to install. The load of such a screed per 1 m2 of flooring will be 125 kg, with a screed thickness of 50 mm. And this is without taking into account the weight of the "pie" of the warm floor.
All this reveals the disadvantages of the "concrete" option:
- When placing concrete, damage to pipes (cables) of the underfloor heating is possible;
- Failure to tamp, may lead to the formation of air bubbles;
- The difficulty of leveling concrete will require an additional layer of leveling screed.
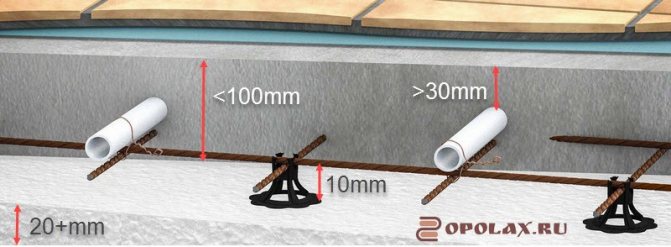
The floating concrete screed (6) must be reinforced with a mesh (2), welded in the nodes, with cells of 10 by 10 cm. The reinforcing mesh not only holds the screed itself together, preventing it from cracking during drying and the operation of the warm floor, but also serves as a base for fastening ( 4) pipes (5) water floor and electric floor cable. It is important (!) To ensure the rise of the mesh (3) by 10 mm from the insulation (film) (1).
The concrete screed must be insulated from the walls with a damper. This is a special tape or any dense insulation no thicker than 1 cm.
A cement-sand screed of a warm floor is made using the floating floor technology, based on a solution of cement, sand and water with the addition of a plasticizer and fiber, or based on ready-made dry mixes.
Important! Plasticizer and / or fiber are mandatory in underfloor heating screed.
- If you do TP in the house, cement M200 is enough to prepare the DSP solution. The sand needs to be clean. Sand / cement ratio, 3/1 (three sands - one cement).
- If the underfloor heating is done in the garage, then the cement grade is taken higher from M300 to M500, optimally M400.
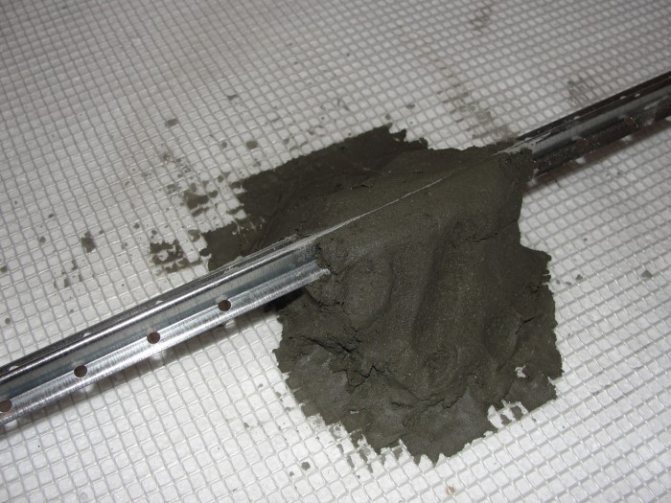
An indispensable element in the solution of CPC TP is the fibers of the reinforcing fiber and plasticizer. Fiber is added in a volume of 900 gr. per cube of solution. Fiber plays a reinforcing role.
Important! A plasticizer (this is not a fiber) is added to any type of DSP underfloor heating. It (plasticizer) compensates for the thermal expansion of the warm floor, protecting the DSP from cracking.
The screed DSP TP is separated from the base of the floor. Why a layer of polyethylene with a thickness of 200 microns or more is laid on the base. For better heat transfer, a layer of heat insulator with a thickness of 20 mm or more is placed under the screed. Important! The foil backing is not insulation.
Important! For trouble-free operation of underfloor heating, the underfloor heating screed should be laid only on a flat, solid base. Unevenness in the substrate can lead to the formation of air pockets, which can shrink under load. If the base of the floor is uneven, under the underfloor heating screed, you need to make an additional leveling connected screed.
The DSP screed will be separated from the walls of the room, for which a damper tape or strips of any solid insulating material 5-10 mm are fixed around the perimeter of the room.
The floating screed DSP is necessarily reinforced with a mesh with cells of 10 by 10 cm. The reinforcing mesh not only holds the screed itself together, preventing it from cracking during drying and underfloor heating, but also serves as a base for fastening the pipes of the water floor and the cable for the electric floor.It is important to ensure that the mesh is lifted 10 mm from the film.
The thickness of the screed layer, in the case of a cement-sand screed without fiber with a reinforcing mesh, cannot be less than 10 cm. It is this layer that will ensure the creation of a durable floating slab. In this case, the thickness of the screed must ensure that the pipes (cable) are covered with a layer of at least 30 mm, otherwise there will be strip heating of the floor.
There are many manufacturers producing ready-made mixtures (leveling agents), including those suitable for the installation of underfloor heating screeds. A solution from such a mixture is made by adding water in the proportion indicated on the package. The roving is laid on the beacons or without them, depending on the brand and manufacturer.
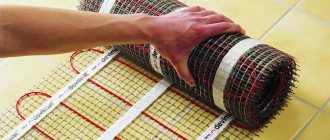
To simplify the work on the installation of underfloor heating, firms began to produce special plates of noteworthy designs. On the one hand, these plates are ready-made channels for laying cables or pipes for underfloor heating, on the other hand, they take on part of the operational load and create a layer of heat insulator.
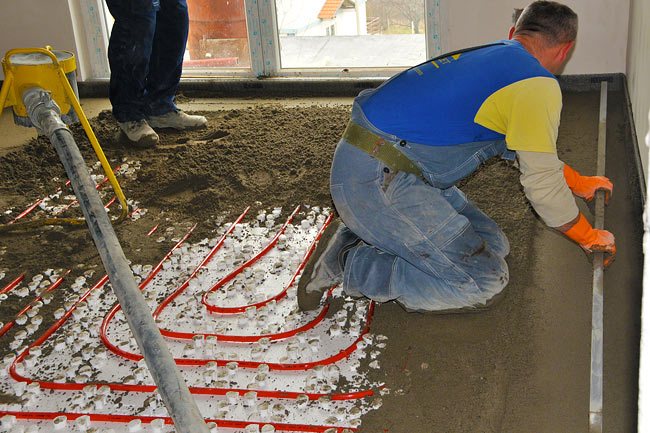
In this version of a warm floor, a semi-dry screed is usually made, based on cement-binder mixtures with the addition of plasticizers. The best quality of such a screed can be achieved by using ready-made mixtures of levelers for underfloor heating or by purchasing ready-made semi-dry mixtures of factory production.
- Semi-dry screed does not require reinforcement and dries much faster than wet screeds.
- Semi-dry screed is installed with a damper tape.
- The thickness of the screed must ensure that the pipes (cables) of the warm floor are covered with a layer of 40-60 mm.
Minuses
- However, a semi-dry screed, porous and in the construction of a warm floor will significantly increase its inertia;
- In addition, a semi-dry screed requires serious professional skills, which makes it difficult to recommend it for independent use.
A mixture of cement, sand and water is the most common filling option. To create a reliable base, M300 cement and sifted sand are taken. The addition of a plasticizer will improve the physical characteristics of the concrete screed under the tiles. It is especially important to use it for filling with a small thickness (up to 3 cm).
The preparatory stage includes removing debris from the base and waterproofing it. As a material, bituminous mastic, roofing felt or a thick plastic film are suitable.
The next step is thermal insulation, its technology is described above. Laying the mortar starts from the corner of the room. The mixture is distributed by the rule according to the level of the pre-exposed beacons. The surface is carefully leveled to create a smooth base for the floor covering: tiles, laminate, linoleum.
The final finishing of the floor begins after 1-1.5 months, this period is necessary for the concrete to dry. During this time, the surface of the base remains under the plastic wrap to prevent rapid water loss. If necessary, the concrete is periodically moistened.
Such an indicator as heat capacity perfectly combines tiles and a warm water floor system. Durable, beautiful and easy to care for, the material is able to maintain a comfortable temperature for a long time. Ceramic tiles will not be spoiled by temperature fluctuations, humidity, with high-quality gluing, they will last a long time.
A special mixture is diluted with water, the volume of which is indicated in the instructions. When choosing a material, preference is given to a composition with modifiers that ensure the strength and ductility of the screed. The solution is considered ready for use when no liquid is released during compression, and the composition forms a lump. The "semi-dry" mixture is laid on a clean base covered with polyethylene or roofing material waterproofing.
The solution is sequentially laid along the floor zones and leveled with a rule. After 1-2 hours, the surface is sanded with a machine with trowels. This process simultaneously levels and compacts the mortar. It is easier to lay tiles on a smooth base.The minimum amount of water in the composition allows you to start finishing the floor in 4-5 days. Among the advantages of dry mix:
- the strength of the created base;
- fast drying - after 12 hours you can move along the screed;
- ease of preparation and pouring according to the manufacturer's instructions;
- the dried mixture does not shrink, no cracks appear on its surface;
- the special consistency of the composition forms a structure with better thermal insulation performance than concrete.
- Do not neglect thermal insulation when creating a cake under the base, a layer of insulation will protect against energy losses.
- Before pouring the concrete screed, a test run of the water underfloor heating system is carried out. You need to be confident in the quality installation of the system.
- For the manufacture of concrete screed, only high-quality cement is used, without signs of long-term storage. The durability and strength of the prepared solution depends on this.
- The recommended thickness of the pour is 10 cm, but individual changes are permissible due to the diameter of the pipes and the characteristics of the base.
If the installation of a contour of a water-heated floor requires knowledge and skill, then the implementation of a screed under a tile is available to everyone. By taking on the work yourself, you can save money, the main thing is not to disrupt the technological sequence of the process.
The exact sequence of actions depends on what kind of screed for a certain warm water floor is chosen in the end. Nevertheless, the following expert advice will come in handy when reproducing specific technological processes with your own hands.
We suggest that you familiarize yourself with: How to make a pool from polypropylene with your own hands - Polypropylene for pools - Infopolymer
Before pouring a rough screed of a water-heated floor, it is necessary to install power cables and other engineering lines. The walls and ceiling are leveled with plaster mortar. If you carry out the work in the reverse order, you will have to wait until the screed hardens. Next, you will need to clean it from new contaminants.
When forming these building structures, the perpendicularity of the corners is controlled to ensure the tightness of the joints with the insulation plates. On a well-created surface, differences of more than 5-6 mm in height are not permissible for one contour. This will prevent air jams from forming.
When choosing boards made of expanded polystyrene with sufficient density, special precautions are not required. With this, the products will withstand the weight of an adult without deformation and damage. However, you should check the cleanliness of the shoes, remove potentially dangerous dirt from the sole and from the surface. It is better to install ladders from boards for movement. It should not be forgotten that when pouring building mixtures, heavy loads will have to be moved.
Installation procedure
In order for the floor heating system to serve for a long time, not to stop functioning, it is important to perform all actions strictly according to the plan below.
Measurement of the base level
There are no special requirements for the distance of the water-heated floor over the ground from the concrete base. The only thing you need to take into account the location of the doors and the zero level of the surface relative to them. At the design stage, it is necessary to control the height difference between the porch and the floor inside the building. If everything is thought out and done correctly, the floor surface, taking into account the finishing layer, will be flush with the threshold of the front door.
Soil preparation
The ground where the screed will be made needs to be cleaned and leveled. To avoid flooding by groundwater, it is necessary to take into account their depth, to install a drainage structure.
Before laying out warm water floors on the ground with your own hands, you need to create layers of sand and crushed stone (0.3 m in depth) on the surface. After falling asleep, moisturize and tamp.
Laying a layer of bedding
Its thickness is 4-5 cm, it is formed by pouring underfloor heating screed over the ground from cement mortar and sand mixture over previously laid layers. It is recommended to use concrete B7.5 and B10. This layer acts as a floor level regulator.
To prevent the mixture from spreading, the area must be limited with planks. Before proceeding with further actions, it is necessary to wait for the complete hardening of the screed, constantly moisturizing it. As an alternative to slurry, profiled membrane fabrics can be used. This will shorten the work time.
Waterproofing
This layer is necessary to protect the system from the negative effects of water. Polyethylene is used as a material. Step-by-step installation process:
- Unwind the roll around the room.
- Cut off the excess with a knife.
- Lay the polyethylene overlap.
- Glue the joints with construction tape.
Polyester is also used for the waterproofing layer. However, such material is more expensive.
Heat insulating
This layer protects the floor from freezing and heat leakage. In addition, the laid out thermal insulation will direct the heat flow into the building, and not outside. It will turn out to achieve uniform heating of the entire floor and save about 20% of energy.
Can be laid out from:
- expanded polystyrene;
- extruded material;
- polystyrene foam with aluminum coating.
Each material has styling features, which are described in the instructions attached to them.
Installation of a cement base
To carry out the work, you need to install strips of 5 cm * 2 m to mark the area. Step - 1 m, thanks to this, the solution can be poured in strips. In the center of the room is 1 sq. m of mesh 3 cm thick. The joints with the walls are glued with mounting tape.
We select pipes
For underfloor heating on the ground in a log house, you cannot use metal-plastic polyethylene pipes connected by press fittings and PPR lines. The first type is not very reliable, and the second one does not conduct heat well, expands under the influence of high temperature.
It is necessary to pick up temporary fasteners for the highways. For small rooms, you can use a reinforcing mesh to which pipes will be tied with wire. For a large area, a special substrate or rack system is used. They are mounted on the base of the surface, while the lines have not yet been laid, they are fixed in the guides.
There are 2 types of pipes recommended for underfloor heating: copper and polyethylene. The first type is not cheap. It is very easy to install, you only need a torch and flux. The bending of the highways is made according to a template, their bending is almost impossible.
Polyethylene pipes are a more budgetary option. The material is not prone to breakage, but a crimping tool is required for installation. Polyethylene products have different densities. For a pie underfloor heating on the ground, it should be from 70% and above. A protective oxygen film is needed inside the lines, because the material has a low resistance to diffuse gas penetration.
We mount the floor
At this stage, you need to follow the rules:
- Along the perimeter of the highway, they are placed more densely, the distance from the wall is 15 cm. In the middle of the room, they are stacked less often. This is to prevent excessive heating.
- The distance between the pipes is at least 30 cm.
- The length of the pipeline is not more than 100 m, because the key indicators of the coolant circulation will decrease.
Pipe laying schemes:
- Bifilar (spiral). The supply and return lines alternate, this ensures uniform heating. Contours are easy to lay thanks to a 90-degree angle between adjacent zones. To supply the coolant, a low-power pump is installed.
- Meander (zigzag). This scheme is less preferable because the liquid cools down as it passes through the pipeline. This causes the floors to be heated unevenly. This type of installation is suitable for rooms with a linear slope because the coolant will move faster and will not have time to lose its thermal properties.
Warm floors can be laid out with a combination of these two schemes. It looks like this:
Pressing the floor system
This is a test of the functioning of the heating system. The pipelines are filled, air is discharged through the drain valves, the air outlets are closed.
If reinforced-plastic pipes were chosen, they are tested with cold liquid. Polyethylene is checked by increasing the pressure by 2 times. Repeat twice and analyze the indicator during testing and after its decrease. The difference should be immaterial. The pipeline is also checked for leaks.
A high temperature tolerance test is performed. For this, the degree rises to + 85 ° for half an hour. Next, the joints are checked.
Pouring a cement-sand screed
The mortar is made from cement and sand (1 to 3). For 1 kg of concrete, 1 g of fiber is added to improve the strength characteristics.
Filling the screed does not differ from the installation of the base. However, it will be possible to lay the topcoat in about 4 weeks. the solution hardens for a long time. After that, you can turn on the heating system.
Design features
- ensuring the protection of pipes from possible damage;
- promoting an even distribution of heat over the floor;
- creation of a sound barrier and strengthening of thermal insulation.
Common screed patterns
When arranging for heating an already familiar water floor, it must be borne in mind that the thickness of the screed depends on the following factors:
- variety;
- thermal conductivity;
- strength;
- lifetime.
Underfloor heating base and pie
The value of thermal conductivity is determined in the need to ensure rapid heating of the plate after turning on the water circuit. Strength and durability is ensured if at the design stage the thickness of the screed was calculated correctly.
In different conditions, the screed performed over a water-heated floor can be of several varieties:
- wet - from cement-sand mortar;
- semi-dry - with a reduced content of water in the solution;
- dry - with a complete lack of water.
The classic version of the KNAUF dry screed
If the layer is thin, then it objectively warms up faster, ensuring that after the start of operation of the water circuit, heat spread in the room without a long wait. At the same time, in such conditions, it is more likely that cracks appear in the screed, which negatively affect the uniformity of floor heating.
Laying scheme for layers for a water-heated floor
An excessively thick layer has good heat capacity, so it retains heat longer, allowing it to be distributed along the plane of the floor, but it takes longer to warm up. There is also a large load, which has a negative effect and can cause the screed to rupture. To avoid this phenomenon, it is recommended to arrange expansion joints.
When making a decision to level the floor with a screed, it is necessary to understand that the thickness of the layer to be equipped with a wet, semi-dry or dry method will be different, therefore, uniform heating cannot be achieved.
Two parameters are important in the thickness of the screed. The first is the total thickness of the screed, which is usually left outside the brackets. The second parameter is the thickness of the screed layer above the pipes. First, about the first.
The total thickness of the underfloor heating screed, namely the screed, and not the entire structure of the underfloor heating, should be as follows:
- If the underfloor heating is installed over an unheated room, basement, or ground, the minimum screed thickness is 85 mm. This normative value is very controversial (more on this below);
- If the transformer substation is made on a concrete slab, the total minimum thickness consists of 10 mm of the screed under the pipe (cable), the diameter of the pipe (cable) and the admissible technological thickness of the screed above the pipe.
- It is recommended NOT to make the maximum screed thickness more than 100 mm, due to the high inertia of the system. Thick screeds will heat up for a long time and spend heat not to warm up the room, but to warm up the screed itself.
Note: if you want to raise the overall floor level, you do not need to do this with a heated floor screed. You must first make a leveling screed, and then mount the warm floor, and not try to solve all problems in one screed.
I'll tell you about strength right away. The following rule works here: the thicker the underlying insulation in the TP structure, the greater the thickness of the screed over the pipes should be. For the climate of the middle zone, a sufficient thickness of the insulation is 2, maximum 3 cm.
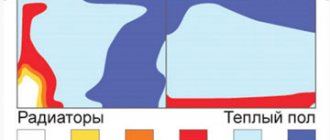
To answer the question about the relationship between the thickness of the screed over the pipes and uniform heating, let's look at the thermal diagram of a warm floor.
As you can see, the heat from the pipes rises along the screed along a kind of cones. Optimum floor heating will be if these cones "run out" on the screed surface. If the screed is made thinner, then not so much the screed will heat up, but the finishing coating, which is bad. If the screed over the pipes (cable) is made thicker, then the heat will not reach the screed surface.
As you can see, it is the thickness of the screed above the pipes that is the most important technological parameter of the TP screed. The load on the floor in living quarters is moderate and the load on the floor does not affect the thickness parameter.
When installing a warm floor on a concrete base, with a layer of insulation no more than 20 mm, the thickness of the screed above the pipes should be:
- Not less than 30 mm for wet mortar with the addition of plasticizer and fiber;
- Not less than 50 mm for wet mortar (concrete or CPM mixture);
- Not less than 45 mm for a semi-dry machine made mortar.
Minimum thickness
In this example, several practical issues should be noted:
- An ideal foundation in domestic construction is a rarity. Therefore, it is necessary to eliminate cracks and other defects in floor slabs. The creation of a screed with a thickness of 4-6 cm will help to solve the problem.
- Fastening of screed pipes for a water-heated floor can be done in different ways. Depending on the option chosen, the cost of the project, the speed of implementation and the complexity of the work will change.
- One layer of thermal insulation is sufficient, but modern materials must be used to obtain good results.
- Experts recommend maintaining the surface temperature of the underfloor heating screed between 28 ° C and 30 ° C. But to fulfill this condition, it is necessary to take into account: the step of laying the pipeline, the type of the main screed, the type of finish coating.
From this information, it can be concluded that the thickness of the screed over a water-heated floor depends on many different factors. It cannot be considered separately. It is necessary to coordinate with other technical parameters of the heating system project.
Parquet laying
Existing disadvantages
Before installing the water system, experts recommend that you familiarize yourself with the shortcomings that it possesses. Such knowledge will help to avoid the most common mistakes:
- Firstly, the process of assembling a warm floor is a very laborious and time-consuming set of measures that requires high initial costs.
- Secondly, for its installation, it is necessary to fill the floors with concrete. The pipeline through which the coolant will forcibly ply must be sunk in a cement-sand screed. In the event of its failure, it will be difficult to repair individual sections. We'll have to turn off the system, completely dismantle the flooring and hammer in the concrete screed. And this is very difficult.
Undoubtedly, the system has many more advantages than disadvantages. Today, new technologies have emerged to help bypass them.
Note! If you correctly assemble the system, then water heated floors will help you forget about the discomfort in the house associated with poor-quality heating for many years.
conclusions
The article discusses several options for screed floor heating:
- Screed TP in a room with increased load. It is made with B22.5 concrete, possibly on soil with a thickness of 85 mm, with obligatory mesh reinforcement.Concrete floor heating system.
- The TP screed in the house (apartment) is made with a cement-sand mixture reinforced with mesh or plastic fiber on an insulating substrate 2-3 cm with the obligatory addition of a plasticizer.
- The semi-dry screed technology is NOT recommended for independent use, excluding small rooms (bathroom, toilet) due to the complexity of technological processes in the manufacture of mortar and its installation.
Screed materials
The screed will meet the requirements and perform well if the grout is properly mixed. But you must first purchase the required materials for it. You can also purchase ready-made dry mixes and dilute them with water in accordance with the instructions that are attached to them by the manufacturer. But a screed made of dry mixes is more expensive than concrete.
Ready mix for screed
If you do the cement mortar yourself you will need:
- 50 kg of cement from M400 and above;
- 200 kg of sand, fraction 0.8 mm;
- water 5 buckets of 10 liters, you can pour in a little less so that the solution does not turn out to be very liquid, and if necessary, add the required amount of liquid;
- plasticizer (liquid soap) for the elasticity of the screed, it is recommended to add 150 grams of plasticizer;
- expanded polystyrene plates to create an insulating layer;
- metal profile 20x40 is used as beacons.
When we make a classic cement-sand mortar, first pour water into the concrete mixer. Its amount is calculated by the amount of cement. If 3 buckets of cement are used, then add 3 buckets of water. In order not to get a liquid solution, we leave a little water. Pour out the rest of the water after pouring all the ingredients into the concrete mixer.
For the underfloor heating system, experts recommend using a floating screed. She settles down on a heat-insulating layer.
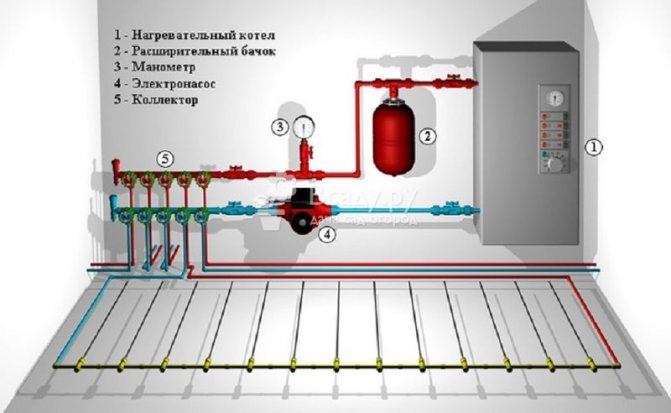
Water system design methods
There are three ways to lay the system:
- on the ground;
- on a concrete slab (base);
- on the wooden floor.
Laying on a wooden floor is least often used. Usually it is ripped off, a screed is poured under it and then a system is created. But there are also less costly options, when the insulation and pipes are located directly on the finished floor, and from above they are poured with self-leveling mixtures or a screed. The main disadvantage of this solution is a significant thickening of the flooring and a decrease in the useful volume of the floor.
Laying pipes in special shapes on a wooden floor
Most often, the installation of a warm floor in a private house occurs on the ground. First, the top layer is removed, then a pillow of clean sand (up to 10 centimeters) is poured onto it, compacted with crushed stone (7-10 cm of fine fraction), a waterproofing material (roofing material or a special membrane) is spread. A rough screed is arranged on top, on which insulation and pipes are placed.
If the house has concrete slabs or a screed is poured, then the process is greatly facilitated - you just have to level the base and seal all large cracks with a sand-cement mixture.
Materials used to create the fill
Two types of screed are used to fill the base of the heated water coating:
- On the basis of a concrete solution, which is mixed on its own from cement;
- From ready-made mixtures, by adding liquid to the desired consistency. In this case, all proportions are indicated on the package.
Water floor heating layers