Without running water and sewerage, no house can be considered cozy and comfortable to live in. But the supply and drainage of water is needed not only for the house, greenhouse, garden, vegetable garden, industrial structures also need to lay pipes. Therefore, today great importance is attached to the quality of the routes being laid.
Find out the cost of heating
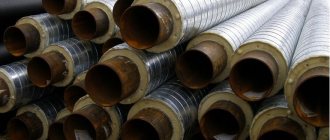
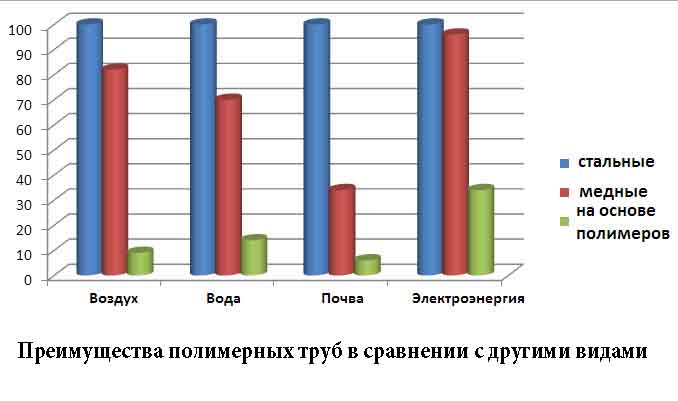
Polypropylene pipes meet all the parameters that are necessary when laying a pipeline underground.
Repair of heating systems
Steel and cast iron pipes are no longer the best options, they are prone to corrosion, easily destroyed under the influence of various external conditions, although they differ in mechanical strength. Nowadays, laying a pipeline in the ground has strict requirements, including:
Water supply systems
- simplicity and reliability;
- resistance to mechanical stress;
- chemical inertness;
- simple operation;
- no need for frequent repairs or replacement of damaged elements.
These requirements are met by pipes made of polypropylene, which are used in various fields, maintaining operability and efficiency under any conditions.
- Heating repair
- Cottage heating
- House heating
- Water supply at home
- Dacha water supply
Features of the choice of thermal insulation for pipes
Thermal insulation is used both for centralized heating mains and internal heating networks in order to reduce heat loss. When choosing thermal insulation, it is necessary to take into account the diameter of the pipes, the temperature of the coolant and the operating conditions. The type of insulator that will be used depends on the diameter of the pipes. It can be rigid molded cylinders, semi-cylinders, and soft mats in rolls.
Insulation of heating pipes of small diameter can be performed using cylinders, half-cylinders (equipped with grooves that create a convenient and quick installation on pipes), also using segments made of polymer or mineral wool heat-insulating materials. They have a very high thermal resistance. In addition, they have a low degree of water absorption, resistance to mechanical damage and a strict geometric size. Consider the areas of application of the most popular materials for thermal insulation.
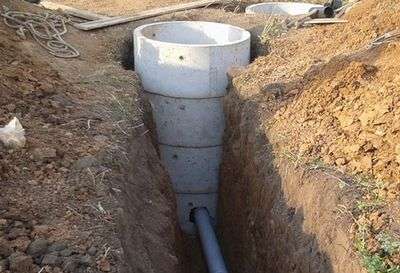
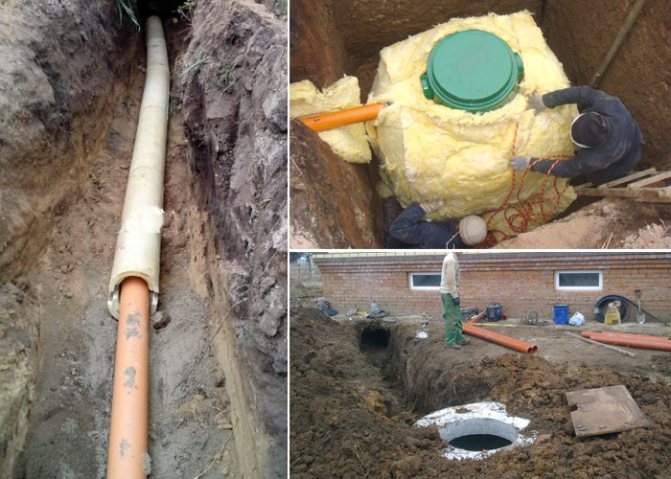
Backfilling the ditch
Ditch filling is started after checking the heating system in operation - if the pressure test of the circuit reveals flaws in its tightness, they will need to be removed.
Backfilling of the ditch is a serious stage of work, the uniformity of the distribution of loads and the durability of the pipeline section into the ground depend on the accuracy of its execution.
Ditch filling begins with laying soft plastic soil on both sides of the pipe (in the sinuses). This is done in the same way along the entire length of the pipeline, not allowing its displacement on the sides. The soil laid on both sides is carefully compacted, after which the pipeline is backfilled with a protection layer of at least 15 cm from the same material along the entire length and width of the ditch in accordance with the requirements of SNiP. The compaction of this layer is performed to a small extent - this is a necessary requirement for the formation of a strong protective vault from the ground above the pipe, which rests mainly on the sinuses on both sides of the pipe.
After the completion of the compaction of the protection layer, the ditch is completely covered with soil removed during excavation, removing large stones from it. Backfilling must be done equally along the entire length of the ditch, preventing the formation of pipe sections with a significant difference in the vertical load from the soil.
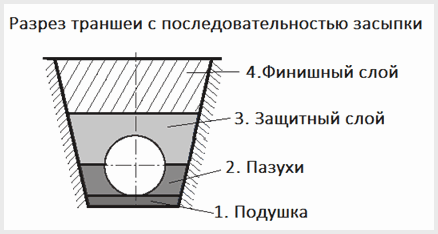
An equally growing load from the backfill will be taken mainly by the protective soil vault above the pipe, and the final value of the compressive force for the pipe is not terrible - it is designed for it.
If the ditch is filled with separate sections, then the difference in the vertical load on the filled and open sections of the pipeline will lead to the appearance of tensile forces, which the pipe resists worse.
Which pipe is better to use for underground water supply
When arranging an underground water supply system, metal, polyethylene (HDPE), plastic pipes are used. Before determining which pipe is best to use for underground water supply, you need to study the characteristics and technologies. The durability of underground communications depends primarily on the completeness of knowledge of this aspect.
Basic requirements for pipes for water supply in the ground
To arrange a reliable and efficient pipeline, all structural elements must have a smooth surface, without cracks, chips and roughness. Also, a water pipe for laying in the ground, regardless of the material, must meet the following criteria:
- the standard service life at permissible loads should be 50 years or more. The material must be resistant to chemical attack, corrosion and rust;
- all products must be manufactured in compliance with technical norms and GOST standards. To withstand changes in temperature, pressure and other external influences;
- depending on the type of water supply, the material must have properties characteristic of the transported liquid;
For example, to supply cold water, the system should not freeze at negative temperatures in the winter season.
And for transporting hot water, pipes must have additional reinforcement or be resistant to high temperatures.
If you want to pass drinking water through pipes, then you need to select environmentally friendly materials. To avoid the ingress of foreign objects or uncharacteristic odors into the system.
Varieties of water pipes
On the market for construction and plumbing products, there are pipes made of various materials that give them different properties. Consider their advantages and disadvantages, which will tell you which pipe is perfect for water supply of a private house underground.
Metal pipes are significantly inferior to their modern counterparts and are gradually being pushed out of the market. Steel and cast iron are not resistant to corrosion, have more weight, more complex pipe-laying technology, even with the use of special equipment. An exception can be made for copper pipes, but their use will cost several times more than using polymer materials.
Reinforced-plastic products have a number of advantages over steel ones, but they are also rarely used for external communications. Due to the limited production diameter and the cost of the entire plumbing structure.
Plastic pipes are an excellent alternative to the above materials. They are assembled as a constructor using special connecting fittings, have less weight and cost. Also, plastic is very flexible, which greatly simplifies the process of laying and installation. There are 3 types of material from which plastic pipes are made:
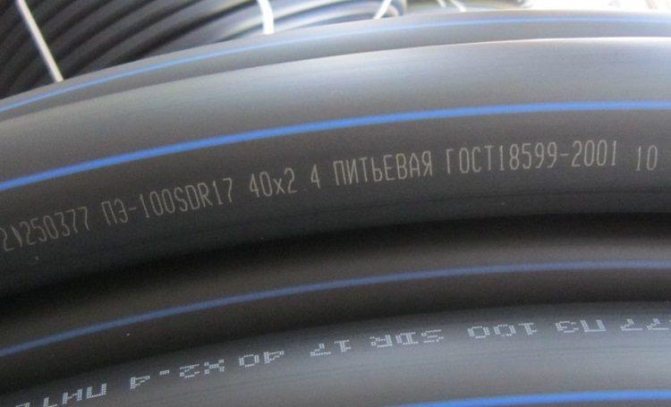
- Polypropylene (PPR) - used in high pressure systems, has a high flow capacity, and is suitable for transporting water up to 90 degrees (burial depth up to 2 meters);
- Polyethylene (HDPE) - are considered the most flexible, but with lower pressure up to 10 bar. They are used when transporting cold and warm water. And they require additional thermal insulation. Since they cannot withstand frost below minus five;
- Polyvinyl chloride (PVC) - used only for cold water, not higher than 40 degrees. And they are usually laid closer to the surface, in warm regions.
Features of the choice of water pipes for laying in the ground
When choosing the material from which the plumbing of centralized water supply systems will be mounted, one must take into account: the length of the mainline, the features of the soil, the depth of burying, and the characteristics of the transported liquid. When challenging, you need to make a project and a work plan, taking into account the listed indicators.
It is recommended to lay pipes to a depth of 1 to 1.5 meters, depending on the level of soil freezing.
If your region has sandy or loose soil, but you do not know to what depth the top layer of the earth freezes, you can dig trenches at a level of 1.6-1.7 meters and lay PPR or HDPE pipes.
The soft soil does not create additional pressure, and the deeper level will keep your system free from freezing. In warm regions, PVC pipes can be laid shallow from the ground surface.
For colder regions, it is necessary to purchase pipes with high frost resistance or use thermal insulation along the entire length of the pipeline. Because deep burying makes the system practically unrepairable. And it will be quite difficult to find an area where the water has frozen and a traffic jam has formed.
Popular option
It is impossible to give an unambiguous answer which pipes are better suited for laying a water supply system in the ground. Everything will depend on the above criteria. Polymeric materials certainly have advantages over their metal counterparts.
But for example, when diverting with stony or hard soil, it may not be possible to dig a deep trench or use plastic pipes, because the soil will create high pressure on the plumbing elements.
Then metal pipes are laid, and plastic pipes of a smaller diameter are passed inside. This technology provides protection from frost and relieves pressure on the ground. If we consider private housing, then the most popular option is the PN 10 pressure pipe PN 10.
Since it is suitable for most regions of Russia, it has the lowest cost, highest efficiency and ease of assembly.
Frequent mistakes in laying water pipes in the ground
The system can fail due to low-quality materials, which are not made according to GOST, but are much cheaper than their counterparts. With improper installation and application.
A poor-quality connection of structural elements, an incorrect section or depth of trenches can negatively affect the performance of the entire water supply system. Also, while saving on heat-insulating material, it can lead to interruptions in the supply of water to the house.
Any pipe for water supply in the ground must have thermal insulation, regardless of the region of residence.
Conclusion
To make the right choice and save the budget, the material for draining water into the house is selected based on: the type of water supply, the length of the highway and the budget. Any drainage structure, laid in compliance with all norms and requirements, will turn out to be of high quality, will last for many years without additional costs for repair and maintenance.
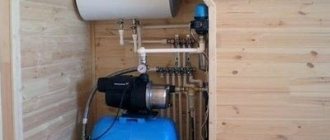
Installation of heating underground
In some cases, it is required to lay heating pipes in the ground, for example, at some distance from the boiler room to the heated room. Before laying heating pipes underground, you will have to solve two problems at once:
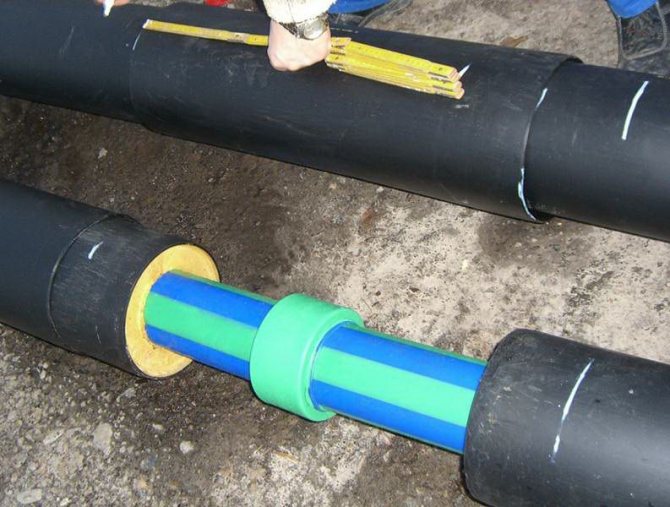
On a pipe laid with a floor with earth, the soil layer and everything that is on the surface presses. Therefore, in order to protect the system, sleeves are used. In this capacity, a PVC sewer pipe with a diameter of 110 mm is perfect.
Before laying the heating pipes underground in the sleeve, they need to be insulated, despite the fact that the system is laid below the level of soil freezing. At the same time, heat loss is still significant. For insulation, mineral wool or foam covers are used. In addition, pipes are produced that have a foam insulation layer and a protective plastic sheath. They are specially designed for underground installation.
When organizing an individual water supply at home with a water intake from a well or well, it is necessary to take measures for the normal operation of the water supply system in the winter in order to prevent water from freezing in the pipe. Therefore, the question of how to insulate a water pipe in the ground with your own hands is relevant for all users of their own water supply line. In order to insulate a pressure water pipe underground, it is necessary to calculate and select the most optimal insulation option and correctly install it in compliance with the technology.
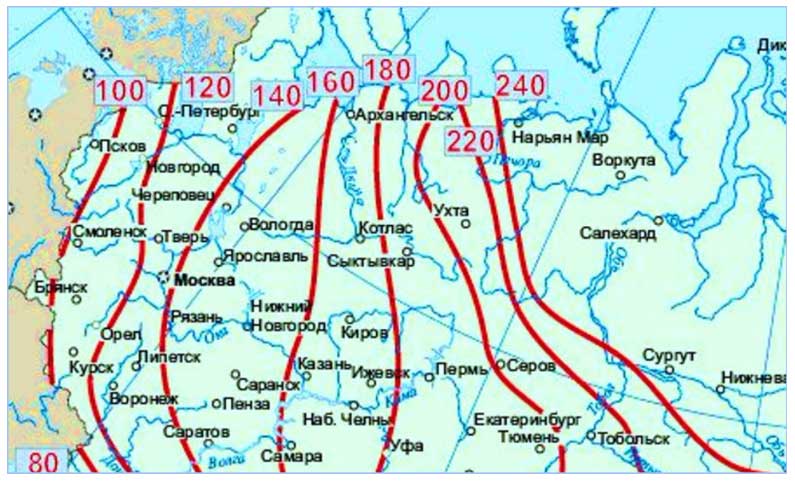
Fig. 1 Map of soil freezing levels
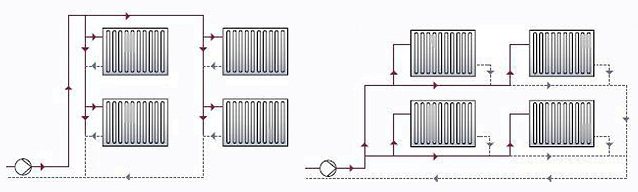
Internal routing of heating pipes
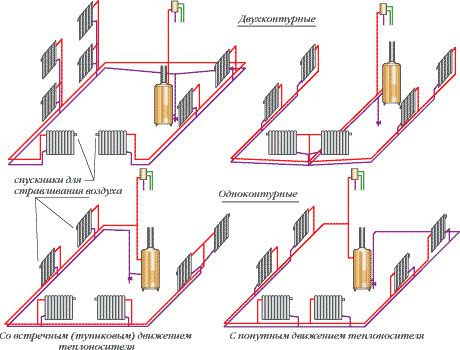
Types of internal piping in a one-story house
Most often, open installation of pipelines is performed. This is the best and most economical way, but first you should install all the components of the system - radiators, batteries, boiler. Only then can the installation of highways be done. For better sealing of joints, gaskets for radiators should be used. They can be rubber (for low temperature systems), paranitic (high temperature) or plastic.
What are the best ways to lay heating pipes in a one-story building? It depends on the characteristics of the future system.
Underfloor heating installation
Underfloor heating pipes
The main rule for laying heating pipelines under the floor covering is the maintainability of the system. This means that, regardless of the material of manufacture of the floor or pipes, it is necessary to provide free access to certain nodes of the line.
These include branching, collector mounting locations, corner elements. For this, inspection hatches should be installed. Their size should ensure the repair and maintenance of systems, especially if heating pipes are laid in a wooden house. What else do you need to consider when installing this type of installation?
- Heat loss... If the installation is carried out in a cement screed, it is recommended to use protective materials with a high heat transfer resistance. These include expanded polyethylene, expanded polystyrene, etc .;
- If heating pipes are laid in a plastic floor, it is taken into account difference in thermal expansion of materials manufacture of the line. For this, compensation loops should be installed;
- If the installation is carried out directly into the insulation, you need take into account its operational parameters... In particular, the maximum possible exposure temperature.
| Material | Maximum exposure temperature, ° С |
| Foamed polyethylene | 80 |
| Expanded polystyrene | 90 |
| Styrofoam | 60 |
| Basalt (mineral) wool | 700 |
Installation of pipe fittings is carried out in the places of turns, branching. On straight sections, the installation interval of fasteners depends on the material of manufacture of the pipes. SNiP for laying heating pipelines does not regulate this. But to ensure the reliability of the system and reduce noise, it is recommended to fasten steel lines on straight sections every 300 mm, and for plastic ones - every 200.
If the diagonal method of laying heating pipelines in a one-story building under the floor is used, furniture must not be installed in the place where the pipeline passes. This will lead not only to its damage, but also to excessive thermal effect on the floor screed.
Heating laying under skirting boards
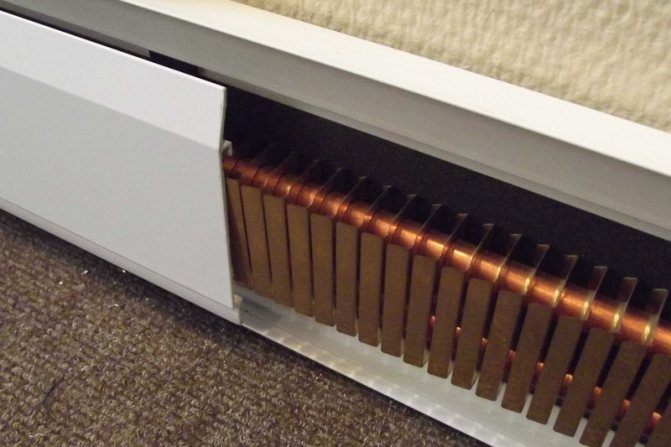
Skirting heating
For laying heating pipes in skirting boards, you must first purchase the appropriate consumables. The best option is to buy special skirting boards with installed pipes and heat exchange plates.
Considering the material of manufacture, the cost of such plinth convectors is quite high - from 700 rubles / r.m. Therefore, most often they make the laying of heating batteries in the wall, and then install the plinth.
The features of such an organization of the system are:
- It is not allowed to make strobes in the load-bearing wall. Alternative - installation of pipes under the floor;
- The skirting board material should not change its properties under the influence of temperature;
- Regardless of the method of laying heating pipelines in a one-story building, the minimum distance between pipes (direct and return) should be 15 cm.
After installation, the joints are pressed first, the tightness is checked during the first test run, and only then the decorative plinth is installed.
When laying heating pipes in baseboards, you need to calculate the number of swivel nodes. As far as possible, it is necessary to avoid the installation of unnecessary corners, since because of them, the hydrodynamic resistance increases during the movement of the coolant.
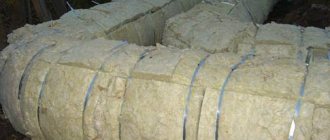
Mineral wool
Insulating materials using mineral wool are highly effective thermal insulators. They are used in a wide variety of conditions. Mineral wool heat insulators can withstand temperatures up to 650 ° C without losing their heat insulating and mechanical properties. At the same time, they do not lose their shape and have a high chemical resistance to oil, solvent, acid, alkali. They are non-toxic, and due to a special impregnation, they have a very low degree of moisture absorption. (See also: Hot water floor heating)
Advice! Mineral wool is good for protecting the heating network pipeline and hot water pipeline in residential and public buildings, domestic premises, as well as pipelines, the surface of which is exposed to heating, for example, chimneys.
Types of mineral wool
Stone wool - made from alloys of basalt rocks. It was described above.
Installation of a chimney for a gas boiler
Installation of a chimney for a gas boiler begins with cutting an exhaust hole, the size of which depends on the diameter of the chimney pipe
Fiberglass
Glass wool has an average thickness of up to 3-4 microns and 1550-200 mm. Thermal insulation materials made of glass staple fiber have a low density and application temperature (up to 180 ° C). Such materials are recommended to be used for above-ground pipelines, for example, heating networks. Therefore, fiberglass is used in a more limited area. High-quality fiberglass is characterized by high vibration resistance, biological and chemical resistance, as well as a long service life. (See also: Polypropylene pipes for heating)
Egor Guest
It is more convenient to use ready-made insulation. We found polyethylene foam for pipes 13mm (this is the norm for hot water supply).
Then the finished pipe insulation was selected so that it was put on the first thermal insulation. There can be any number of such layers.
If there is an air gap between the first and second insulation, this is good
It is important to glue the seams of the last layer of insulation with reinforced tape
You can wrap with roll insulation, but it is easier to wrap not in two layers of 5 mm, but in one layer of 1 cm.
The foil inside will not work. she needs a gap, in my opinion, 20mm. It can be oriented outward or simply wrap the last layer with foil tape (this is done when installing air conditioners).
Insulation of heating pipes is a mandatory stage in the installation of the entire system.This is especially true for pipe sections located outside the residential area (for example, outdoors) and most exposed to adverse weather conditions.
The insulation material serves as a protective layer that maintains a given temperature regime, prevents the formation of condensation and slows down the metal corrosion process.
Timely insulation of heating pipes can significantly reduce the percentage of heat loss and protect pipes from deformation in the face of sudden changes in weather conditions.
Heat loss on the way from the boiler to the radiators can vary between 5-15%. Accordingly, in order to achieve the optimal temperature in the house, the owners have to significantly increase the power of the boiler and pay the costs out of their own pockets.
Insulated pipes for heating allow you to forget about this problem for a long time.
In this case, the coolant circulating through the pipes cools down much more slowly, does not change its temperature and does not crystallize at the lowest temperatures.
Features of installation of "warm floor"
Reflective insulation under floor heating
After the materials from which the pipes are made have been determined, it remains to deal with the laying of heating pipes in a wooden house. At the same time, it is necessary to make a warm floor so that it has maximum efficiency and is reliable. Stages of laying heating pipes in a screed:
A water barrier is needed if moisture can seep from below. When placing heating pipes in panel houses under a layer of mortar, this is not necessary, but thermal insulation should be in any case. In this capacity, materials from expanded polystyrene are suitable. Reflective insulation will not be superfluous;
- laying of reinforcing mesh.
A metal mesh with a large mesh is suitable for this. In addition to the fact that it will distribute the load, it will also serve as a markup for laying heating pipes in the floor;
- system wiring.
There are two schemes for the hidden laying of heating pipes - a "snake" and "snail". In the "snake" scheme, the contour passes from one wall to another, while the direction of movement of the coolant changes by 180 degrees. In the "snail" scheme, the contour is laid out in a spiral from the walls to the center of the room, while there are no sharp turns;
If the warm floor is the main heating, then the distance between the pipes should be 20 cm. If this type of heating is auxiliary, then a distance of 30 cm is allowed, but no more.
- fixing the contour.
In order to secure the contour, you can use plastic clips, or ordinary disposable clamps. In the case of clips, they can be pre-fixed to the floor and wired along them. It is easier to use plastic clamps with which the contour is attached to the reinforcing mesh;
- gluing a damper tape.
The damper tape is made of polyester foam. It is glued to the wall along the entire perimeter of the room. Its bottom edge should be in contact with the floor. During operation, the screed increases and decreases in volume, so it is necessary to leave a gap to the wall so that the warm floor does not crack;
Warm floor in a wooden house
There should be approximately 3 cm of solution above the circuit. In total, the screed can be from 3 to 7 cm thick, while the recommended thickness should not be less than 5 cm. Too thin a layer will not be strong enough and may crack. Any covering can be laid on top of the screed.
In wooden houses, heating pipes are sometimes laid under the floor, while the technique is slightly different from wiring under the screed. An air buffer is created between the subfloor and the finish. For this, lags are laid along the perimeter. In the logs, grooves are cut in which the contour will pass.The depth of the grooves should be slightly larger than the diameter of the pipes, so that from the system to the topcoat it is about a centimeter. In this case, you also need to take care of insulation. Especially carefully you need to sew up the logs so that you do not accidentally break through the contour with a nail or self-tapping screw.
Vertical pipeline laying
Schemes with a vertical arrangement of highways are very popular among residents of multi-storey cottages.
This is due to the peculiarities of the functioning of such schemes:
- The coolant is heated in the boiler and rises up the line. After that, he goes down through all the available risers to the radiators;
- From these radiators, the coolant returns back to the boiler, while, in the case of two lines, the movement back is carried out already along horizontally located elements.
I must say that the supply branch is also horizontal. The scheme got its name - vertical or top - for the simple reason that the coolant comes from above, which can be seen in the image below:
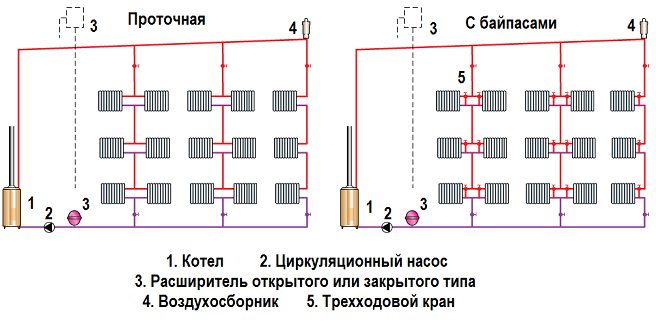
Consists of the following elements:
- Heating boiler;
- Circulation pump (as a rule, it is available, but it may not be);
- Expansion tank of open or closed type (if there is a pump, then a closed-type membrane tank is used, if there is no pump, that is, natural circulation, then the tank is of an open type);
- Vertical and horizontal branches;
- Batteries;
- Shaped elements.
Principle of operation
The principle of operation of all vertical structures is quite simple. From the heating element, the coolant enters the expansion tank. The movement takes place along the riser.
The expansion vessel should be located at the highest point. Such a container serves to normalize and create pressure.
Further from the tank, there is a branch that is called the feed, or in this case, the adjustable one. This line goes to each battery. Thus, from the expansion tank, the heated coolant enters the batteries through this line.
Here she gives up her warmth to the environment. At this time, denser cold water pushes heated water out of the boiler. This creates the movement of the coolant. Thus, slightly cooled water from the batteries enters the return line, which leads directly back to the boiler.
Today, almost all such schemes are equipped with a circulation pump, which forcibly forces water to move along the highways. This leads to faster heat transfer, and therefore increases the efficiency of the entire structure.
The big advantage of the upper location of the branches is the fact that such an arrangement allows heating multi-storey buildings.
In addition, no one forbids, as in the previous case, putting its own shut-off valve on each individual radiator. In this case, it is not necessary to cut in separate lines, since the design already provides for the parallel supply of all batteries with a coolant.
The technology of laying a water supply system from HDPE pipes in the ground: instructions
Greetings, dear readers.
The main headache for owners of private houses and suburban areas is the correct laying of a water supply system from HDPE pipes in the ground: technology, calculation, selection of materials. Today I will tell you how to bring water into the house so that in the future you do not have to redo the entire system.
Features of HDPE pipes
If you are planning to lay a cold water supply system at your house, I recommend using HDPE pipes. Low-pressure polyethylene pipes have a number of unique properties that are inaccessible to analogs made of metal or concrete.
Advantages and disadvantages
The main quality of HDPE for outdoor systems is ease of installation. Plumbing installation and assembly does not require special knowledge.In any hardware store you will find low pressure polyethylene pipes of various diameters, sizes and wall thicknesses. In addition, HDPE products have the following features:
- Polyethylene does not chemically react with water transported through the water supply system. That is, the liquid entering the house will not contain impurities.
- HDPE pipes are 7 times lighter than metal products. This facilitates transportation and installation. When laying a water supply system in a trench, it is not required to secure the network with additional supports.
- Smooth inner surface prevents blockages and build-up.
- HDPE products absorb noise, such pipes are convenient when installing a sewage system as risers.
- The cost of the product is lower, installation and transportation is cheaper than metal or concrete pipes.
- The service life of HDPE is up to 50 years.
Polyethylene pipes withstand high pressure, temperature changes and are resistant to cracking: if the water in the pipe freezes and increases in volume, this will not affect the integrity of the surface. The disadvantages of HDPE products include low resistance to high ambient temperatures. Therefore, it is advisable to use them for the installation of underground water supply pipelines.
Installation work rules
Before starting the installation of a pressure water pipe from polyethylene pipes, they prepare a project for laying the future network, carry out calculations. These actions cannot be neglected, otherwise there is a great risk that the water supply system will have to be redone. To prevent this from happening, adhere to the following rules:
- The depth of the trench depends on the freezing of the soil. It is calculated according to the formula from the normative collection SNiP 2.02.01-82. A hole in the ground is dug 0.5 m below the freezing depth.
- The water supply network is assembled on the surface of the earth, filled with water under pressure, that is, pressure testing is done to eliminate leakage at the joints.
A water supply system with fewer connections is considered a reliable design. But it is not always available to lay the HDPE pipe from the well directly to the house. The trench at the turning points is dug at right angles.
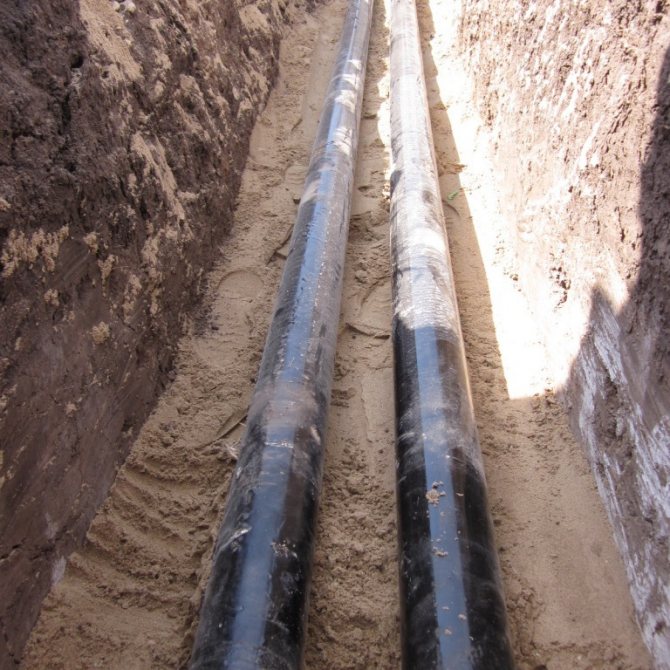
Methods for connecting HDPE pipes
In the finished project, a plan of the backbone network is presented: length, turns, connections. At the design stage, even before the purchase of materials, the method of securing the sections to each other is determined and a final list of equipment and materials is formed, the estimated cost of the gasket is calculated.
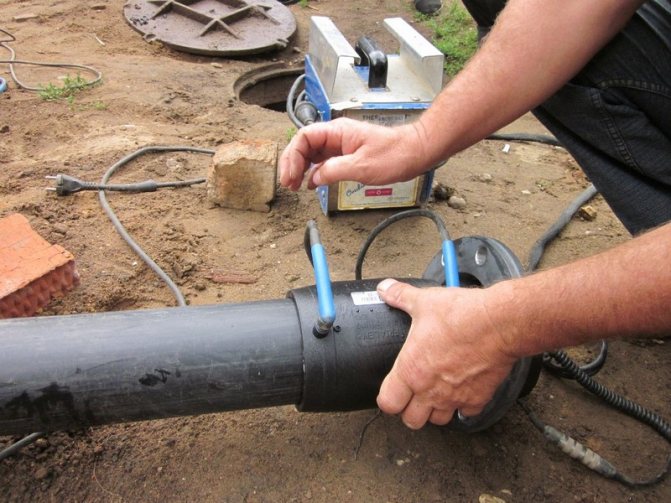
Butt welding
For a strong, reliable connection of HDPE, butt welding is used. The method is convenient and inexpensive, except for the cost of the welding machine. On average, the price of such equipment is from 180 thousand to 2 million rubles. If you do not have a goal of purchasing an apparatus for welding HDPE pipes, it is better to entrust the joining of sections to a specialized team.
If you are planning on laying the plumbing yourself, I will show you how to do it. The welding machine consists of the following elements:
- centralizer;
- hydraulic unit;
- welding mirror;
- trimmer.
The assembly consists of the following steps:
- Fix the HDPE pipes in the centralizer on both sides with fastening nuts.
- A memo with a formula is supplied with the welding machine, through which the pressure is calculated for a specific pipe diameter. Having learned the necessary parameters, install them in the hydraulic unit.
- Degrease the edges of the HDPE pipe with alcohol wipes.
- Align the joints with a crosscut so that there are no burrs.
- Heating the welding mirror, install it between the pipes. Apply pressure to the centralizer until the ends melt 1 centimeter. Release the pressure to zero and wait for the time indicated in the instructions.
- Remove the heating element, connect the pipes.
Within 7-10 minutes, the joint hardens, forming a strong connection.
Electrofusion
The electrofusion method is suitable for the repair of an existing HDPE water supply system. But it can also be used to weld a new system in tight spaces.You will need an electrofusion welding machine and couplings. The cost of couplings depends on the diameter, starts at 200 rubles.
Before starting work, try on the coupling to the pipe sections and make serifs with a white marker. From the point of the cut to the notch, the pipe is cleaned with a scraper from the protective oxidative coating and degreased.
The electric coupling is a sleeve with grooves for the contacts of the welding machine. A barcode is glued to the body of the coupling, which is read by a laser pointer supplied with the device. If for some reason the reading did not happen, then the data can be taken in the coupling passport. The barcode is needed for the machine to automatically select the welding mode.
Having connected the pipes in the coupling, the contacts are connected. The device is given the command "start". The current is supplied to the power grid located on the inside of the coupling. The pipe starts to melt. The process is considered completed when beacons appear on the surface of the sleeve and the device gives a signal.
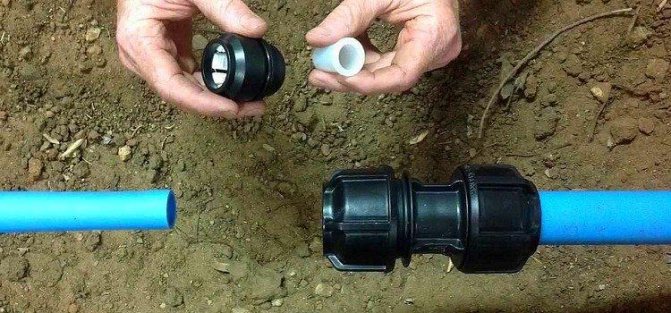
Compression fittings
Less reliable methods include connecting fittings. Leaks can form at the joints, therefore it is better to use this method for external water supply systems of small diameters.
A fitting is a fastener. Its components:
- clamping cover in blue;
- rubber seal;
- crimp ring in white;
- sleeve.
To connect the water supply from HDPE pipes with compression fittings, no additional equipment is required. Welding and electrofusion is allowed to connect only HDPE pipes of the same diameter, brand and wall thickness, and the variety in the fitting models allows you to assemble elements of different sections.
Unscrew the blue clamping nut from the fitting, put it on the pipe. Next, a white ring is attached. A cleaned and degreased pipe is inserted into the fitting, the ring and nut are tightened, and tightened tightly.
Socket connection
Before couplings and fittings were available in the construction markets, the socketing method was widely used in pipeline installation. The technology consists in the arrangement of pipes of different diameters: one pipe is inserted into another and the joint is sealed. For sealing, a rubberized sleeve is used, previously put on a wide cut of the pipe.
Which way is better
For underground water supply, it is better to use a butt welding method. This connection guarantees long-term operation of the system without leaks. The pipe welding process is fast, one person can handle the job.
Possible difficulties and problems during installation
Before digging a trench, find on the drawings of the technical documentation of the land plot the underlying communication networks: gas pipeline, telephone, heating, electrical cables.
If there is no such documentation, then contact the administration. They have equipment at their disposal that can find the existing engineering network at any depth.
This will allow you to not damage the other network during the process of digging a trench for the water supply.
If the water supply is from a well on the site, no permits are required.
But if you are connecting to an existing network or laying a pipe through a neighboring section, you will need an official written permission from the local authority.
Otherwise, you can create an emergency, which threatens with litigation in court. It is necessary to agree with neighbors in advance and get approval for earthworks.
Soil can be a problem: hard, soft, waterlogged, rocky or wobbly. Plumbing in such conditions will be more expensive, since additional protection and fastening of the entire system will be required.
Step-by-step instructions for self-laying
When the plan and estimate are ready, the material is purchased and the connection method is selected, you can start laying HDPE in the ground.
Step 1
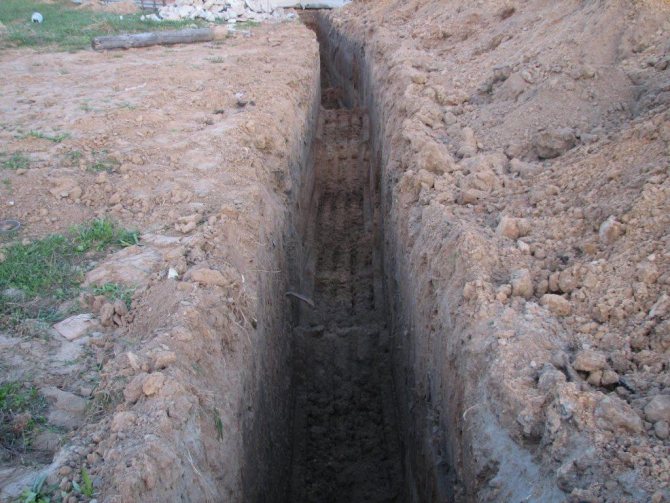
At the first stage, a trench is dug according to a previously developed scheme.The shape of the excavation depends on the type of soil and the depth of the groundwater. Simple and less labor intensive - rectangular shape. This option should be chosen when the depth of the trench is not more than 1.5 meters, since this method does not provide for strengthening the walls.
The popular shape is trapezoidal. It is allowed for laying a water supply system from HDPE to a depth of 1.5 meters and below, which is relevant for most of Russia. In this case, it is not required to additionally strengthen the walls.
In places where groundwater is close, it is recommended to choose a mixed form with reinforcement. The width is determined based on the data from the SNiP 2.04.02-84 collection. On average, it varies from 0.5 to 0.8 meters.
If the water supply route is in a place that is difficult to access for equipment or the length is short - 5–10 meters, you can dig a trench by hand. In other cases, it is better to contact an excavator, especially if the water source is outside the site and cuts into the existing water supply system.
Pegs are driven along the track on both sides of the future trench, and the rope is pulled. Subsequently, this will become a guideline for excavation. The land is dumped.
Step 2
The next step is HDPE pipes are assembled into an integral water supply system. Pressurized water is supplied to check the tightness. If the water supply system turns out to be long and it is inconvenient to mount it on the surface, the pipe sections are laid directly into the trench. In this case, it is better to weld with the coupling method. Next, it is necessary to insulate the pipeline along its entire length.
Before laying, the bottom of the trench is covered with a layer of sand of 15 centimeters. You should also cover the laid HDPE pipe with sand, this will facilitate access to the system in case of an emergency.
Step 3
The last step is an insert into the house, shut-off valves are installed. The soil from the dump is poured back into the trench, leveled.
Why do you need thermal insulation of water pipes
Even if you are sure that the water supply system is laid to a depth below freezing of the ground, you should not neglect thermal insulation. In harsh, snowless winters, the water in the HDPE pipe freezes, leading to congestion.
For thermal insulation, mineral wool, expanded polystyrene and rubber are used. It is easy to wind the HDPE water pipe: the insulation is wrapped around the pipe and fixed with construction tape.
Burying pipes
The first method of deep burying pipes is the oldest and most proven, but it can not always provide the required level of protection. The bottom line is that the pipeline is laid just below the depth of soil freezing, which is due to the climatic features of a particular area. In the layer of earth below the freezing level, the temperature is practically constant.
At first glance, it may seem that with minimal financial costs it is possible to protect pipes from cold weather, but in fact, not everything is simple because it is not always possible to achieve the desired depth. There can be a lot of good reasons for this - from the significant labor intensity of the work to the characteristics of the soils.
In some cases, deepening even 1 meter can be problematic. If you need to go deeper even more, then the complexity of the work will become an order of magnitude higher.
When choosing a method of insulation, do not forget about one more important point. If a sewage system breaks down, even if not due to cold weather, its repair will be quite expensive, since to detect a defect, you will first have to dig out the pipe, and then bury it again
Features of laying a water supply system underground
Comfortable living in a house or apartment largely depends on the correct installation and normal operation of life support systems.
If in a multi-storey building, service functions are assigned to employees of special services, then in a private building, the homeowner is responsible for everything.
Correct laying of water supply and sewerage systems will save the owners from working on heating frozen elements and cleaning the drainage system due to an incorrectly selected slope.
Underground plumbing
articles:
- 1
Which pipes are suitable for burial? - 2
Laying water pipes in the ground - 2.1
How to determine the depth of the water pipes? - 2.2
Laying of polypropylene pipes - 2.3
Steel water pipe laying - 3
Features of laying pipes for hot water supply - 3.1
What about insulation?
Which pipes are suitable for burial?
In order to determine which pipe is best for underground water supply, it is necessary to have data on the structure of the soil and the length of the water pass. In most cases, the choice of system material depends on these parameters. In addition, the depth of soil freezing in a given region influences the choice of the elements of the water conduit.
Most often, low pressure polyethylene pipes are used. An underground water supply system made of this material has rather high strength characteristics. It is durable, non-corrosive and rated for 10 bar pressure.
Some homeowners prefer polypropylene pipes. Their installation is simple, because the connection is made by means of threaded fittings. Such elements can be used for supplying and distributing hot water.
If the developer prefers metal pipes, then it is better to use galvanized or stainless steel.
You need to know that metal is susceptible to corrosion, which reduces the service life, and long-term use affects the quality of drinking water.
Laying water pipes in the ground
For the correct laying of the system elements, it is necessary to prepare a project or a water conduit diagram indicating the installation locations of the fittings and possible branches. Then the data is transferred to the field and, if necessary, corrected. After that, they start digging a trench. Its depth should be at least 1.4-1.5 m, and its width should be about 0.6 m.
The laying of a water supply system from polypropylene pipes in the ground begins from a water source (well, well, etc.) or a place of tie-in into the main network, to the house. The assembly of the elements of the conduit is carried out on the surface, and then they are laid on a sand cushion in a trench.
During installation, sharp turns and bends of the pipes must be avoided. If it is supposed to cross the sewer system, then the water supply must pass 0.2 m above it.
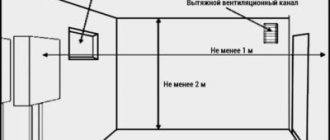
It is not allowed to lay the water pump at a distance of less than 0.75 m from electrical and telephone cables and 2 m from the drainage system.
After the positive results of the system density tests, the ditch is filled up. The layer of soil in direct contact with the water pump should not contain large stones and construction debris.
How to determine the depth of laying water pipes?
The depth of the water supply depends on the freezing of the soil, its structure, the proximity of groundwater and other factors.
This data can be requested from the nearest organization engaged in such work, or obtained independently by drilling several control wells along the proposed trench. In many regions, the depth of soil freezing does not exceed 1.6 m.
If for some reason it is impossible to reach such a depth, then the laying of the water pipe in the trench should be carried out with preliminary insulation.
The proximity of the location to the surface of groundwater negatively affects the material of the water conduit. In this case, the network is waterproofed or the depth of the trench is reduced, followed by the insulation of the system.
If the water conduit passes under areas where heavy loads are expected, then in such places it must be buried or additionally installed elements that protect the pipeline from destruction.
In the case of laying the system through open places devoid of vegetation in regions with a hot climate, then the depth of its occurrence should be at least 0.5 m.
Taking into account all these nuances, it is possible to determine exactly to what depth to bury the water pipes.
Laying of polypropylene pipes
The depth of laying water pipes made of polypropylene does not differ from elements made of other materials. Installation is carried out by soldering with a special soldering iron.
The optimum heating temperature of the working part is + 260 ... + 270 ° С. The quality of welding is influenced by the heating time of the seat. Overheating, as well as underheating, leads to a defective seam.
Re-welding is possible after removing the defective area.
It must be remembered that polypropylene systems are not flexible enough. Excessive bending can destroy the element. For the purpose of organizing a turn or branch, tees, corners and other fittings are used. To deflect the pipe for the water supply at an angle of 90 °, it is advisable to use 2 corners of 45 ° each. This reduces the hydraulic resistance of the system and protects against water hammer.
Steel water pipe laying
Due to the fact that metal pipes for underground water supply are a good conductor, they must be grounded. These works are carried out taking into account the requirements of the rules and regulations. Coming up with homebrew protection against stray currents is not only forbidden, but also dangerous. Often steel water pumps are connected as a ground loop.
Autonomous water pipelines in private households are not grounded at all. If you nevertheless decide to ground the pipes, then the grounding conductor is connected by welding. It is strictly forbidden to drain the water supply.
Installation of pipes is carried out using welding or squeegees. The latter is more practical, but the connector is the "thin" point of the system. In most cases, after a few years, a fistula forms on the squeegee thread. It is recommended to lay metal elements below the freezing point of the soil.
Features of laying pipes for hot water supply
It is desirable that pipes for laying water pipes in the ground, transporting hot water, have reinforcement. Regardless of the depth of installation, they must be insulated. This will prevent heat loss. Hot water pipes should not be rigidly fixed in the trench. Heating the elements leads to their expansion and displacement in the longitudinal direction.
A possible problem can be the laying of a hot water supply pipeline in a trench of a shallower depth than the freezing point of the soil. The issue is solved by using additional insulating materials.
Heating pipes with an electric cable
Obviously, it is possible to insulate sewer pipes by burying them to a sufficient depth only in the outer areas. However, there are other areas located both on the street and in rather poorly heated premises. For such areas, you can use a special heating electrical cable, laid along the most important nodes and connections. The result of the work performed will be constant heating, which protects the sewage system regardless of the weather.
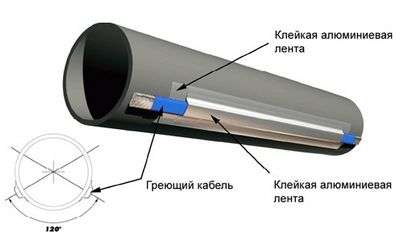
However, this method has a couple of disadvantages. First of all, electricity consumption increases, especially in the case of heating up rather long pipelines. Also, there is a dependence on the operation of electrical networks. Of course, in the event of a power outage, the generator will start working, however, this also costs a lot of money.
Do-it-yourself insulation of polypropylene pipes
To or to insulate the heating main with your own hands, various installation methods and types of insulation are used. will not be difficult even for an inexperienced person.The installation process is extremely simple, in addition, manufacturers provide various structural details that facilitate the work - grooves on hemispheres, notch on tubular insulation made of polyethylene foam and other options, and also offer a range of adhesives and adhesive tapes for joining.
You can insulate the water pipe underground in the country with glass wool. To do this, the water supply is wrapped with insulating material and fixed with adhesive tape, after which waterproofing is provided using roofing material or other materials. Some installers use insulated plastic pipes for sewage of the corresponding diameter as insulation.
You can also use other insulation for water pipes in the ground, for example, easy-to-install polystyrene foam or polyurethane foam shells. Such insulation for pipes in the ground provides for the use of special shaped elements to insulate tees, branches and turns.
Insulation for heating pipes on the street must be reliably protected from moisture and other influences, therefore roofing material is fixed on top of the insulation (mineral or basalt wool) using aluminum or galvanized wire. In a similar way, the heating pipes in the basement of the building are insulated.
WATCH THE VIDEO
Thermal insulation reduces heat loss, but does not raise the temperature of the water, therefore, it is easier to insulate the water pipe on the street and protect it from freezing with a heating electric cable. Thermal insulation of pipes is a responsible task.
If it is necessary to lay pipes outside buildings, it is best to place them in the ground. However, this option requires additional protection of the pipeline - from cold and moisture.
This is done to extend its service life, as well as to prevent freezing of the fluid flowing inside.
Content of the article
Why isolate
If the pipe is laid outside the building, it (and the environment flowing inside) can be adversely affected by moisture and low temperatures. In addition, some materials (polymeric) deteriorate faster and lose their quality when exposed to direct sunlight.
Also, the pipeline can be damaged by actions (intentional or unintentional human).
It is preferable to lay pipes in the ground for the following reasons:
- To prevent the negative factors mentioned above.
- In order not to create a communication network (which will take up space, interfere with the passage / driveway) on the surface.
When laying a line underground, the following hazards remain relevant:
- Possibility of freezing of the liquid flowing inside.
- The possibility of corrosion of the pipe itself is due to moisture.
The first factor is relevant in winter: the depth of soil freezing in most Russian regions reaches (and exceeds) 1 meter. That is, in order to prevent the flowing medium from freezing in frost, pipes should be laid in the ground deeper than this indicator.
This is often inconvenient: this complicates the further maintenance of the line (if it is necessary to check or repair it, you will have to dig a deep trench), and the cost and timing of excavation work during laying increases.
On the dangers of lack of isolation
Water supply and sewerage pipes are laid in the ground - both municipal (going from and to apartment buildings) and for private houses and various industrial buildings. It is necessary to use insulation in both cases - since water flows inside these lines.
Moreover, it freezes very quickly - in less than an hour, an ice plug forms inside.
Since the pipeline is laid in the ground, to eliminate it, you will have to dig a trench, look for a frozen place and warm it up. And all this - in the cold. Moreover, the sewerage or water supply will not work in the house (depending on which line "sits down").
In addition to the troubles that the sewerage or water supply system stops working in the house, if an ice plug occurs, there is also the likelihood that the pipe will burst. This happens because moisture expands when it freezes, that is, ice will take up more space than water. As a result, the pipe walls may not be able to withstand.
Eliminating this problem is even more difficult and less enjoyable than steaming a frozen area. In winter, in cold weather, you will not only have to dig a trench (and not a small one, but along the entire line of the pipe - to find the damaged part) - but also repair the pipe itself. This is often only possible by completely replacing the cracked segment.
Services for the installation of heating water supply
DESIGN PRESTIGE LLC 8 (495) 744-67-74
In addition to fast and high-quality repair of heating pipes, we provide professional installation of turnkey heating systems. On our page by topic heating > resant.ru/otoplenie-doma.html For communication, use the contact phone number of DESIGN PRESTIGE LLC 8(495) 744-67-74, which you can call around the clock. note Our company DESIGN PRESTIGE LLC is a part of the non-profit organization ANO INTERREGIONAL COLLEGE OF JUDICIAL EXPERTS. We also provide services for an independent construction technical expertise. Calculating the cost of heating Heating system repair cost Water supply installation cost Previous post Fittings for metal pipes and their varieties Next post Connection of HDPE pipes: split and one-piece method Plastic pipes for screed laying Naturally, modern warm floors are mounted from plastic, only it can be different and has different characteristics. Screed heating in a private house replaces traditional radiator systems. To select a material, you need to determine the selection criteria: The laying of heating pipes in a private house under the screed is carried out only in whole sections, without connections. Based on this, it turns out that the material should bend and the direction of the coolant flow should be changed without the use of fittings. Products made of single-layer polypropylene and polyvinyl chloride do not fall under this characteristic; heat resistance. All polymer pipes for heating external and hidden gaskets can withstand heating up to 95 degrees, moreover, as the temperature of the coolant rarely exceeds 80 degrees. In a warm floor, the water heats up to a maximum of 40 degrees; For laying heating pipes in the floor screed, only reinforced products are used, they are also called metal-plastic. Although the layer of reinforcement is not only metallic. Each material has a certain thermal elongation. This coefficient indicates how much the circuit is lengthened when it is heated by one degree. The value is determined for a plot of one meter. Reinforcement is needed in order to reduce this value; After laying the heating pipes in the floor screed, there will be no access to them. In the event of a leak, you will have to dismantle the floor - this is a sawing and laborious process. Manufacturers of polymer pipes give a 50-year guarantee for their products. Reinforced polymer pipes consist of five layers: Thermal linear expansion is the property of a material to increase in length when heated. The coefficient is indicated in mm / m. It shows how much the circuit will increase when it is heated by one degree. The coefficient value indicates the amount of elongation per meter. PEX pipe, aluminum reinforced We should immediately mention the types of reinforcement. This could be: Before laying heating pipes in a private house, you should make sure that they have a layer of reinforcement with aluminum foil or ethylene vinyl alcohol. Since one of the requirements when choosing a material is the elasticity of the contour. Products reinforced with glass fiber cannot be bent; fittings and couplings are used to change the direction of the coolant flow, which in our case is unacceptable. Let's look at the types of materials used for the production of metal-plastic pipes: polypropylene. Such products are marked with PPR / AL / PPR. Thermal linear expansion is 0.03 mm / m; cross-linked polyethylene. It differs from conventional low and high pressure polyethylene in that it undergoes an additional production step called crosslinking. On it, the number of bonds between molecules increases, thereby giving the product the necessary characteristics. It is marked PEX / AL / PEX and has a coefficient of thermal linear elongation of 0.024 mm / m, which is less than that of propylene. Separately, we will consider products made of cross-linked polyethylene reinforced with ethylene vinyl alcohol, since it is best to lay such heating pipes in the floor. They are labeled PEX / Evon / PEX. This method of reinforcement allows you to kill two birds with one stone. Firstly, it reduces the linear expansion of the material to 0.021 mm / m, and secondly, it creates a protective layer that reduces the air permeability of the pipe walls. This figure is 900 mg per 1 m 2 per day. The fact is that the presence of air in the system not only leads to cavitation processes (the appearance of noise, hydraulic shocks), but also provokes the development of aerobic bacteria. These are microorganisms that cannot exist without air. Their waste products settle on the inner walls, and the so-called siltation occurs, while the inner diameter of the pipe decreases. For polypropylene pipes with aluminum foil reinforcement, the air permeability of the walls is zero. One of the promising methods of laying polypropylene pipes is trenchless installation, which has the following advantages: The following methods are used today: Renovation is a technology in which an old pipe is destroyed simultaneously with the laying of a new one. Applies only when the bandwidth is no longer sufficient. With this method, you can lay polypropylene pipes only for small sections, the method works great if you need to lay under a house, a highway, a vegetable garden, etc. Polypropylene pipes for the installation of pipelines are used in many areas, ranging from simple communications for a country house and ending with a sewer or water supply network. Today, two methods of laying pipelines are used, but the most optimal is considered to be underground, which allows you not to touch the above-ground structures, not to spoil the landscape. Laying in the ground has many advantages, despite the need for excavation work. This allows you to keep them intact, out of the reach of ultraviolet rays, mechanical damage is also minimized. Share a useful article: Related articles: Featured articles A heating pipe buried in the soil is prone to the same influences as an external pipeline, plus factors due to deepening: Likewise, laying the pipeline into the soil should be carried out taking into account all the above factors and solving the problem of how to make heating pipes in the ground warmer. No modern private house is complete without a pipeline that is buried in the ground. Any water supply system requires special treatment. In this article, we will talk about how to lay a water pipe underground, and about the nuances that may arise during these works. Any type of water supply system, if it is laid in compliance with all norms and requirements, will turn out to be of high quality, and will serve the entire allotted service life with maximum efficiency. Any laying of water pipes begins with drawing up a project. The scheme must be well developed, otherwise the pipeline system will not be able to function properly. This does not mean that the project should become an engineering miracle - the main thing is that you can easily navigate in the finished scheme, so that if errors occur during the work process, you can easily figure it out and quickly solve them. The project must contain the following information: Remember that the water supply pipes must be laid over a pre-leveled area. Ignoring this nuance can lead to unexpected bad consequences in the near future. Of course, in order to properly lay pipes underground, it is worth considering many conditions, because any deviation from the norms can lead to malfunctions in the operation of the entire water supply system.For example, when deciding how much a pipe can be deepened into the ground, it is worth considering the material from which it is made. In addition, it will be necessary to study the individual characteristics of each type of pipe in order to understand in which cases it is advisable to use this or that type of product. As practice shows, a pipe for water supply of a private house under the ground of the type "PND PN10", made of polyethylene, is considered optimal. Products of this type are distinguished by the following qualities: When it comes to the above-ground part of the water supply system, here you need to give preference to products that are strong and reliable enough to successfully withstand temperature and pressure drops. In this case, the type of pipes described above is perfect, another advantage of which is the ease of installation using fitting fasteners. And to make it easier to decide which pipes for water supply in the ground are best suited in each specific case, you should pay attention to the existing ready-made water supply projects, proven by practice, and also take into account the requirements of technical standards. With this approach, you will get a low-cost and high-quality water supply system, moreover, laid without much effort. You can find out information on how deep a pipe for a water supply system should run in the ground from a special document - SNiP. All the subtleties and characteristics for pipes made of various materials are spelled out there, as well as it is described at what depth one or another type of product can be laid. In fact, this document contains a lot of various information, most of which will be for you, if not entirely interesting, then at least useful, because it will remove many related questions. According to the regulations, the minimum depth of laying any pipe is a distance of 1.5 meters, since, often, in winter, the soil freezes by about 1.4 meters. If such a depth is not observed, then you may encounter damage to the water supply lines, which will significantly complicate, if not make it completely impossible, the further operation of the system. It should be noted that the depth of freezing largely depends on the type of soil in a particular region. To find out exactly this indicator, it is worth consulting with specialists who will tell you all the necessary information that you need to know. Armed with information, you can avoid many of the potential problems associated with temperature extremes and freezing. However, if you do not have the opportunity to get professional advice, then just make the trench a little deeper. By laying pipes 1.6 meters from the surface, your plumbing will be protected from any surprises associated with severe winter frosts. Underground laying of communications, of course, largely depends on the type of soil in a particular place. And, often, a lot of difficulties arise with him during work, since the composition of the soil may simply not make it possible to deepen the pipes to the distance laid down in the SNiP. In particular, the ground can be very dense, rocky or waterlogged, so you simply cannot get to the desired depth. In this case, a lot of difficulties can arise in winter. There are technologies for laying a pipeline in the ground without trenching. Such methods are aimed at: Today, the industry uses the following trenchless methods: Sanitation - this is the replacement of old pipes with new ones, which, in turn, is done in two ways: by relining and by renovation. Relining It is based on broaching a new polymer pipe of a smaller diameter inside the working pipeline while preserving the old one as a protective shell. Renovation - installation of a new pipe to replace the worn-out with the destruction of the old one, the fragments of which will also protect the new line from external damage. Piercing (punching) - this is a connection of two pits dug to the required depth with a puncture made at a certain wall height. Of the listed methods, we will execute only the relining method in everyday life. A cable is inserted into one end of the old pipe and pushed until it exits the other end. Then a new whip is attached to the cable and pulled back. The applicability of this method depends on a number of factors: With a favorable combination of the above factors, the technical execution of the installation of a new pipe is not difficult. However, all this is applicable to broaching a new line without thermal insulation, and the condition of the insulation of the old pipe is unlikely to be satisfactory. Since it is not possible to insulate the heating pipes inside the old line, the method loses its attractiveness when applied to heating. Therefore, when installing heating pipelines with burial in the ground in private housing conditions, it is impossible to do without digging a trench or, at least, alternatively laying the pipe on the ground with backfill. Today, by design, all heating systems can be divided into many types and types - the classification is very diverse and has many parameters. Among others, the type of wiring is also distinguished. The layout can be horizontal or vertical. Depending on the type of installation chosen, the composition of the heating scheme may vary, but more on everything below. Work on laying polypropylene pipes underground begins with the development of the project. In this case, it is necessary to pay attention to the condition and type of soil, its looseness, the area of the territory where the pipe will be laid. After that, according to external conditions, a method of laying is selected, which can be traditional trenching and trenchless. The first method is used most often, for such a laying it is necessary to mark the territory, dig a trench of the appropriate length, width and depth. The simplest tools are needed for this: a line for marking, a shovel (if the pipe is laid for a short distance). After digging, the bottom is covered with sand, then it is compacted. The trenchless method is used when there are structures or paths on the site that cannot be damaged. There is a method that allows you to simultaneously lay pipes, removing old ones, but they all involve the use of additional construction equipment. +7 (495) 744-67-74 We will talk about this modern method below. The trenchless method is used when there are structures or paths on the site that cannot be damaged. DESIGN PRESTIGE LLC As already mentioned, pipe laying can be carried out in two ways - vertically or horizontally. In the first case, such a layout is called the top, and in the second, the bottom.Both can be used for the device. There are restrictions only for multi-storey buildings. Often, the second floor heating system consists only of a warm floor. So, all heating systems of a private house with lower wiring can be of two types:Heating from DESIGN PRESTIGE LLC Type: hot water here> /otoplenie-dachi.html
Engineering systems: heating water supply:
What pipes are suitable for underfloor heating
Trenchless laying methods
Factors affecting heating pipes in the ground
Rules for laying pipes for water supply in the ground - important details
Initial stage of work
Water pipe laying depth
Subtleties of underground laying of water supply lines
Technical standards for buried systems
The most common mistakes when laying underground pipes
Trenchless pipeline laying methods

Preparatory installation work
Bottom wiring diagrams