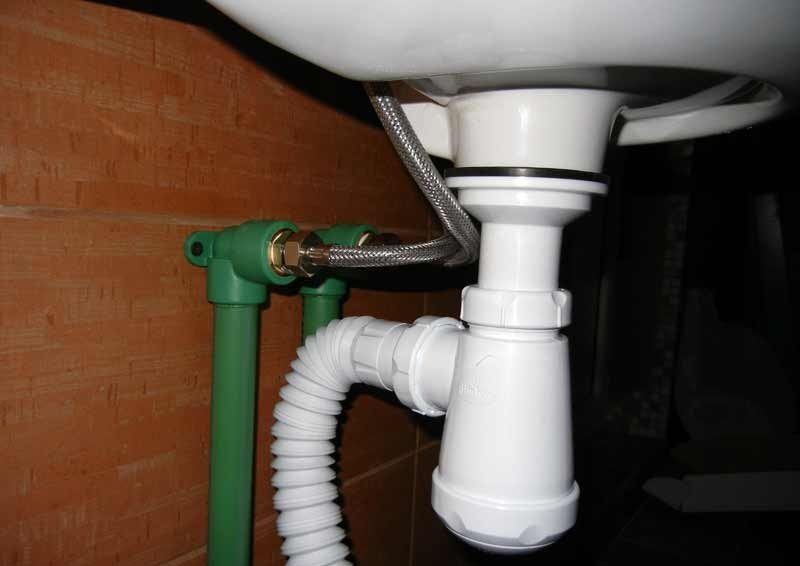

Kitchen sink drain
- Separation of siphons by device principle
- Drain fittings selection options Model quality
When installing a sink for the kitchen sink, you will have to work with the devices intended for this.
Siphon types: bottle siphon with a submerged tube, bottle siphon with two partitions and pipe.
They are called drain fittings, of which the siphon is an essential part. The siphon in the everyday sense is considered an integral structural element of sinks, washbasins and bathtubs, but it is an independent type of plumbing equipment. This equipment is intended not only for draining liquids, it also prevents unpleasant odors from the sewage system from entering the apartment's living quarters and serves to purify the water removed from the sink from all kinds of kitchen waste and food residues. In the case of a siphon, a permanent water block formed in it, called a water seal or a water seal, serves as protection against unpleasant odors in the case of a siphon.
Separation of siphons by device principle
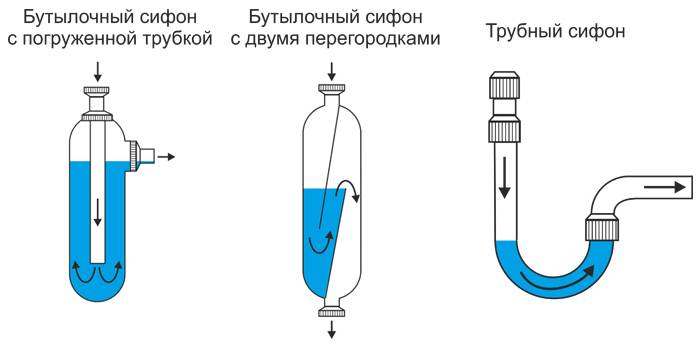
Separation of siphons according to the principle of the device.
According to the principle of a water seal, the siphon for a sink can be classified either as a bottle type, in which the water retaining layer is organized by cylinders inserted into each other, or to a double-turn one, in which the water seal is implemented using a pipe elbow of the device. The latter type of devices is now used quite rarely. Previously produced drain devices were mainly made from cast iron or steel, then from more technological and economical materials such as plastic. A modernized version of such devices of the two-turn type can be a corrugated plastic pipe, which, being very flexible, can be bent and fixed in the desired shape with the help of an appropriate tape. A device of this design can be used in a sink and washbasin. Mixed-type devices are also available, combining a bottle structure and a corrugated hose.
Today, a large number of models of such devices are made of plastic. Devices made of such material almost do not retain dirt and grease, do not rust, do not rot or corrode. Brass drains are also good. Covered with a chromium film, they are no less reliable and beautiful.
Sophisticated composite modern drainage fittings are manufactured using plastic, steel, brass, nickel or chrome.
Back to the table of contents
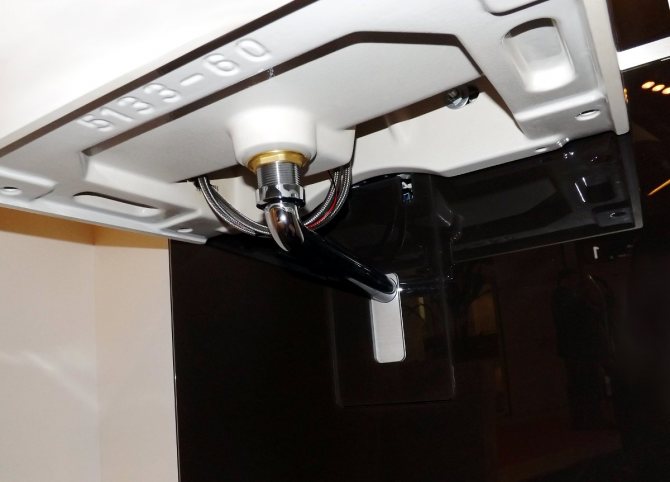
Detailed installation instructions
The bottom valve, which is included with the mixer, is installed in stages. To install it, you will need the simplest tools and plumbing sealant, which is used to seal the seams when installing plumbing. All work can be done independently.
The only caveat: in the standard set, all tools with sharp edges that can damage the sink coating. It is advisable to prepare gaskets in advance and press metal elements through them to protect the plumbing.
Stage 1 - preparatory work
The lever and hoses are led out through the hole down under the sink. Mixers are usually equipped with flexible pipes. If the model comes with rigid hoses, you will have to bend them yourself.
It is important to do the work very carefully so as not to damage the walls of the pipes, otherwise they will quickly rot and leak.
It is highly undesirable to file the products, because chips can easily enter the crane mechanism. During operation, problems will arise that will lead to premature abrasion and wear of parts.
If it is impossible to do without cutting the rigid pipes, after the end of the work, all structural elements must be thoroughly rinsed with a powerful jet of running water.
The valve is secured with a clamping nut. If in doubt about the reliability of the installation, a sealant can be used as an additional fixing method.
Stage 2 - assembly and connection of parts
Using nuts with rubber gaskets, the hoses are connected to the supply pipes. It is necessary to follow the shape of the bend. If it turns out to be in the shape of the letter U, everything is fine: the water will flow freely.
But the S-shaped bend is undesirable. Extra obstacles will create conditions for an uneven increase in pressure in the system, which within a year or two will lead to leaks at the joints.
The check valve is placed in the sink drain and the spokes are collected. They are laid crosswise using a special plastic connector.
The clamp itself is twisted with a screwdriver. The result is a simple but reliable cruciform design.
Step 3 - installing the lever and siphon
The spoke must be connected to the lever and attached to the ear of the device, as shown in the diagram below.
It remains only to bring the corrugation from below and fix the siphon. It is important that the plug tightly covers the drain hole, so they immediately check the build quality of the system.
It is necessary to open the tap and observe how the plumbing works for 3-5 minutes.
If the water goes well into the drain and the joints remain dry, everything is in order. If signs of leaks appear, tighten the nuts.
If even after this the joints are wet, you will have to completely disassemble the system and redo the work, since the installation is clearly wrong. Sealing tape can remedy the situation, but not for long.
Step 4 - check the plug for leaks
The work can be considered completed if the siphon does not leak and the shut-off valve tightly closes the drain hole. They check it like this: lower the plug, collect the maximum amount of water in the sink and leave it for half an hour or an hour.
The indicator of the correct operation of the device is a constant level. Better not to rely on your own eye and mark the sink with a marker.
If after an hour the water remains at the same level, the shut-off valve is ideally installed. Minor changes are a reason to check the tight fit of the lid to the bottom of the sink.
Drain fittings selection options
Back to the table of contents
Model quality
Drain fittings diagram.
One of the important parameters that one pays attention to when choosing a valve model is its quality, which leads to trouble-free operation. With the usual characteristics of the sink in the kitchen, it is quite easy to select a drain device.... But if the sink is made according to a special order, it would be logical to decide whether to purchase a siphon in the same place where the sink was bought. In addition, when choosing a model, you should check its overall dimensions so that there are no difficulties during installation and operation.
The performance of the selected device will depend on how it is arranged, on the pressure of water from the mixer and additional kitchen equipment (washing machines, dishwashers) connected to the device. The larger the volume of the drained water, the larger the cross-section of the outlets and the device should be.
When choosing fittings, it is imperative to evaluate the quality of the model, its completeness, the reliability of the supplied gaskets, nuts and screws.Choosing a suitable drain fittings for yourself in the absence of sufficient funds for its purchase, you can choose a standard model made of white plastic.
As a rule, most consumers choose models made of plastic and rubber, since they are cheaper, easier to install and more stable in operation.
Sizes of fittings nozzles The next step is to select fittings according to the dimensions corresponding to the existing plumbing. In terms of its diameter, the device should be similar to the existing plumbing system in the kitchen. If the sink is installed in the kitchen, then it makes sense to choose a device with a large outlet pipe diameter (not 32 mm, but 40). In the kitchen, a lot of fatty and various food residues will pass through the drain fittings, over time, some of them, settling, will accumulate inside the device, which can cause it to clog.
The most in demand today are light, easy-to-install and easy-to-use plastic bottle drainage devices. Such devices include everything necessary for normal service, including rubber gaskets and seals. Their design can include additional pipes for supplying water from a dishwasher and / or washing machine, as well as for a kitchen with two sinks - two outlets.
Back to the table of contents
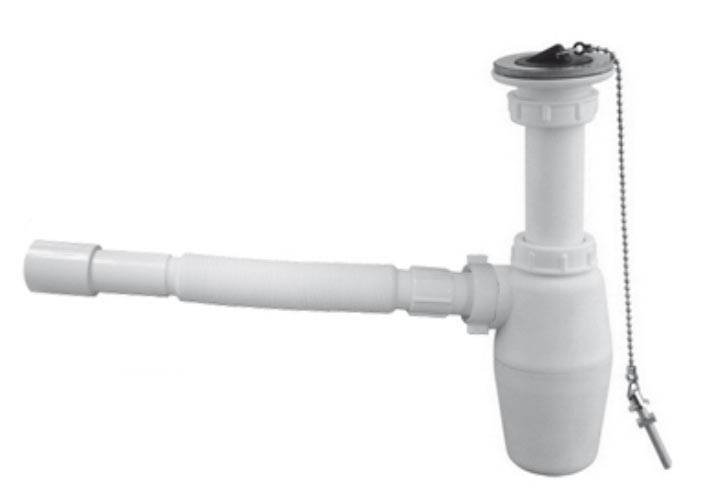
Bottle siphon
The scheme of the bottle-type siphon.
A device of this type structurally resembles a stylized bottle (flask) made of hard plastic or metal.
If, for example, we consider a model that has the ability to ensure the overflow of water from a clogged sink into the drain and can receive additional water flow from a dishwasher or washing machine, then it will consist of the following parts:
- release;
- overflow;
- branch for connecting a drain pipe from other water sources;
- flask;
- outlet branch pipe;
- gasket;
- connecting nuts and screws.
The design of the bottle draining device has the following obvious advantages:
- quite easy to mount;
- convenient in operation, as it is simply disassembled for cleaning and opens access to the sewer pipe;
- like other types of such devices, it implements the operation of a water seal.
It can be used both in the washbasin and in the sink. A device of this design is cleaned quickly - just remove the bottom of the flask.
Although the design of drain devices is very simple, manufacturers do not stop improving it, increasing quality and reliability. This process is associated with fashion trends in the design of sanitary equipment. For example, the emerging model of a sink on a pedestal required the placement of a drain device in a narrow cavity of the pedestal, and this, in turn, entailed corresponding changes in the size and design of such devices.
Bottle siphons made of stainless steel are considered more durable and reliable in operation. But their installation on site is more difficult due to the fact that the steel branch pipe, if necessary, cannot be easily shortened. Accordingly, the use of metal for the manufacture of fittings seriously complicates its installation and disassembly, therefore plastic models are more in demand.
Diagram of the bottle-type siphon device.
A fairly large number of manufacturers of plumbing fixtures for gaskets in devices use polyvinyl chloride (PVC), the service life of which is relatively short, moreover, it does not have very high sealing properties. And in many countries of the world, this material is prohibited for use in everyday life. It is better if the manufacturer in the devices uses gaskets made of environmentally friendly, high-quality rubber, which has a longer service life than PVC products. Rubber perfectly seals all joints and is highly recyclable.If the siphon is disassembled, the used rubber gasket retains its working properties and does not need to be replaced with a new gasket.
In the manufacture of plastic parts, some plumbing manufacturers use a specially formulated antibacterial component that inhibits the growth of bacteria on the surface of the plastic and in the environment in contact with it. It also prevents the formation of mucus on the product, the appearance of an unpleasant odor, and increases the life of the polymer.
Manufacturing companies have a variety of patents for their products. When choosing products, you should familiarize yourself with this information. It will not be superfluous to find out, for example, that the patented drain design of the model proposed for implementation has minimal resistance to flowing water and increases resistance to clogging.
Drain fittings made by domestic manufacturers are neither beautiful nor quality, but much cheaper than imported ones. However, if you already have expensive sinks and appropriate mixers for them, you should also purchase high-quality drainage devices. They will work for a long time without leaking or clogging. It is not worth saving here. It is better to buy high-quality siphons from well-known firms and companies, so as not to later solve unpleasant issues of repairing the purchased fittings. The market offers many different devices, different models at different prices and with different quality. Advice from professionals and reviews from experienced friends will help you make the best choice.
Back to the table of contents
Varieties of the bottom valve
According to the control method, the drain valve for the sink can be of one of the following types:
- Mechanical... Not associated with mixer. Not used very often. His system called Push Open or "Click-Clack" is based on the action of a spring to open or close a valve. Begins to function by clicking (pressing) on the cover of the device. It is considered not very hygienic due to the fact that you have to drain the water into a siphon, placing your hands in a bowl for washing with dirty water. However, this device looks aesthetically pleasing.
- Auto... Associated with a mixer. Most often used. The valve is controlled by a small lever. The system itself consists of small metal rods, the active part of which is located under the sink, and a lever is placed in the valve body (behind, on the side or on top), which a person acts on to start the valve.
And it should also be noted that there are similar headsets in stores with and without overflow. The "drain-overflow" system was designed to prevent water overflow due to a sharp increase in its pressure or a forgotten open tap. The presence of such a function will protect the room from flooding. This system is a small hole at the top of the sink where excess water flows out. To avoid a flood, care should be taken to ensure that there is no blockage in it.
There are also valves without overflow. There are cases when an extra hole only interferes with the appearance of the sink. Moreover, the "drain-overflow" system is not used in sinks mounted in the countertop, or in bowls for washing, which are made of glass or stone of natural origin. Some replacement for the anti-overflow system was the use of small grooves that are located around the perimeter of the wash bowl itself. When there is too much water, it begins to pour into these grooves.
Features of installing a siphon
Siphon installation diagram.
If you purchased the necessary device and decided to install it yourself, without involving outside specialists, do not forget that:
- since the connection of such devices to the sink and sewer pipe for any model is done as standard, the installation features usually depend on the design of the product itself;
- It is recommended to assemble the model without deviating from the corresponding instructions.
The sequence of operations for connecting a drain device to the sink in the kitchen:
- place the device under the sink, try on the upcoming connections;
- if there is a plug on the outlet, connect it;
- assemble the flask of the device in accordance with the attached instructions;
- connect the outlet pipe connected to the drain with the flask of the device;
- check the quality of the installed gaskets, the presence of stripped threads and broken connecting nuts;
- join the drainage pipe with the outlet pipe, fix and seal the connection;
- serve water for a short time, checking the tightness of the entire device and its connections.
After checking the device in different conditions for detecting leaks, it can be considered completely ready for continuous operation.
General information
A siphon is a bent pipe that is located under the sink. This design can be seen in every kitchen. This raises the question - why is it needed, what function does it perform?
First, through this elbow, waste water entered the sewer. And secondly, the water seal prevents unpleasant odors from the sewage system. If you remove it, then in an hour the room will be filled with a specific unpleasant odor.
Types of siphons
As mentioned above, the design of a sink siphon can vary greatly depending on its type.
Structures are of the following types:
- Pipe - is a pipe bent by a knee. Most often they are found in Soviet times, when the drain was made from cast iron pipes. This design takes up a lot of space, besides, it can only be cleaned from large debris.
- Siphon-corrugated - resembles the previous design, but the pipe in this case is soft, with folds. The zigzag bend is secured with a plastic clip. Its difference from other types is mobility, which allows you to move the sink over short distances. As a rule, the price for such a product is lower than for other types of structures, however, corrugated is not the most practical type. The disadvantage of this design is the embossed surface, which is quickly clogged with fat. Therefore, such a product is not the most practical.
- Bottle - The design gets its name from the shape that resembles a bottle and is by far the most common type of knee for a sink. The product has a flask that acts as a sump. If you accidentally drop a chain or other object into the drain hole, it can be easily reached by unscrewing the sump lid. Typically, the pouring pipe is located inside the flask, thereby forming a water seal. Such a structure, if necessary, is easy to untwist and clean.
In the photo - specialized siphons
In addition to the above-described designs, there are still other, specialized products that are much less common. For example, if a sink has two bowls, then a double design is used.
There are also siphons with a drain pipe for connecting a washing machine. There are also designs with an auto drain and an overflow hole that allow you to draw water into the sink and, if necessary, drain it by pressing one button.
Convenient economy with a bottom valve
These are small locking devices that are installed in the drain holes of sinks to retain water. They were originally intended for water supply systems in which hot and cold water is drawn from different taps. This is the way to equip bathrooms in some European countries.
We have this function performed by different types of mixers, so the shut-off valves for sinks have found other uses. They are used if you need to wash, shave, hand wash children's clothes or linen.
The devices eliminate the need to pour running water or draw it into a basin. It is enough just to lower the valve - and in just a minute the sink will be dialed.
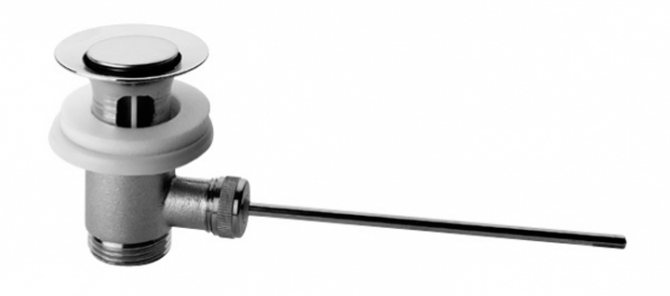
There are two main types of valves:
- With mixer... Devices are included. Their installation is provided by the model of the plumbing fixture. To control the operation of such a bottom valve, a small lever is used, which is located behind the tap or to the side of it.
- Push Open... These models are sold separately from faucets. They are less popular than the first type. Often they are bought by people who are already accustomed to using a locking product, but the old one is worn out and needs to be replaced.
The devices would hardly be widely used in the post-Soviet space if they were not included in the package of some mixer models. The benefits of using them quickly became apparent, and now sink shut-off valves are in demand among customers.
Another plus: for installation, you do not need to make any fundamental changes to the water supply or sewerage systems.
Designs can be with or without overflow. Outwardly, they differ little, but the difference in functions is noticeable.
Valves of the first type are safe: if the water pressure suddenly increases or the owner moves away for a minute, excess liquid will drain into the sewer, and not onto the floor.
If the fixture does not overflow, the slightest carelessness can turn into trouble.
Replacing the siphon
Bottle design
So, have you noticed that the siphon is leaking under the sink, or you just bought a sink without a siphon. In this case, you will have to do the installation of the new structure with your own hands.
Advice! When buying a siphon, you need to check its complete set, since sometimes you can miss the gaskets, or instead of one conical one, you see two flat ones.
Before you put the siphon on the sink, you must dismantle the old knee:
- To do this, using a slotted screwdriver, you need to unscrew the screw that connects the iron mesh of the sink with the outlet pipe.
- Then you should pull the corrugation out of the sewer pipe, and then remove the old knee.
- After dismantling the old structure, wipe the sink with a damp cloth.
Advice! When installing branch pipes, horizontal sections (regardless of soft or rigid structure) should be minimal in order to exclude sagging during operation.
Diagram - how to assemble a siphon for a bottle-type sink
Then you need to assemble a new siphon, as a rule, there is an instruction on the package that clearly shows the order of performing the work.
However, if something is not clear to you, read the following plan:
- First of all, you need to insert the gasket into the groove of the sump, and then screw it down from the bottom of the siphon.
- Then put on the branch pipe one by one:
- coupling plastic nut;
- a tapered gasket (usually blue), which should be located a few centimeters from the edge of the nozzle.
- The prepared branch pipe must be inserted into the body of the flask, as a result of which the structure will take the shape of a bottle. In this case, the nut should be tightened by hand, and not with a tool, otherwise it may burst.
- Next, put a coupling nut with a gasket on the outlet pipe and screw it to the siphon. A tapered gasket is put on the opposite end of the pipe, after which the pipe is inserted into the sewer outlet.
- Then the metal mesh must be laid in the sink drain hole, after laying the gasket. After that, a long metal screw is inserted into the mesh and the branch pipe is screwed in so that there are no distortions.
Pipe structure installation diagram
Note! The pipe must not touch the bottom of the sump, otherwise water will not pass through it.
After replacing the siphon under the sink, it remains only to check the structure for leaks. To do this, you need to open the water all the way and carefully look so that there is no leak.
If water does not drip anywhere, then the installation is done with high quality. If a leak was found during the check, then this place must be sealed. You can eliminate the gap with silicone sealant.
Corrugated siphon
Installing a corrugated siphon on a sink is even easier than the previous type, as it has even fewer parts. In fact, its main element is a corrugated pipe, which creates a water seal and acts as drain pipes.
Assembled corrugated siphon
Therefore, the installation is reduced to connecting one end of the pipe to the bathroom sink. and the second - to the sewer outlet. For this, union nuts and sealing washers are used. The pipe bend must be secured with a plastic clamp.
Advice! If the pipe does not match the drain diameter, then a transition sleeve can be used. It should be borne in mind that a connection with a pipe of the calculated diameter is always more reliable than using a cuff.
We've covered how to install a siphon on a sink. Now, knowing the basic principle, it will not be difficult to carry out the installation according to the instructions presented. The main thing is to ensure that all connections are made tightly in order to avoid possible leaks.
More information on this topic can be obtained from the video in this "width =" 640 "height =" 480 "frameborder =" 0 "allowfullscreen =" allowfullscreen ">
We've covered how to install a siphon on a sink. Now, knowing the basic principle, it will not be difficult to carry out the installation according to the instructions provided. The main thing is to ensure that all connections are made tightly in order to avoid possible leaks.
You can get more information on this topic from the video in this article.
Highlights of hydraulic seal installation
Choosing the right odor trap is only half the battle. You need to know how to install it correctly. Complete with a siphon, instructions must be attached, which must be clearly followed. In this case, you need to be aware of the following main points:
- according to the figure in the instructions, first of all, we place all the gaskets correctly. It is important to check the threads for all kinds of defects;
- the side on which the thick gasket is located must be firmly pressed against the sink drain. For strength, this place can be treated with hermetic glue;
- a mesh with a screw and a gasket is inserted into the drain hole. All pipes along their entire length should be checked for cracks or other damage;
- the pipe is inserted into the drain socket of the siphon. The black gasket is for the top of the branch pipe, and the white one is for its bottom;
- an elastic seal is inserted into the sewer pipe, and a siphon bell is placed over the seal;
- when the installation of the inlet pipe is completed, you can remove the remnants of the sealed glue;
- an outlet, on which a plastic nut and a seal are previously put on, adjust the height of the water seal;
- using a corrugated pipe or a rigid system, the entire structure is connected. It is worth carefully turning on the water and checking the structure for leaks;
if the odor seal is plastic, then the pipes should be at a certain angle, and they should not sag.
Purpose and design
The sink drain consists of a curved siphon and a drain pipe. The curved siphon design provides two important functions:
- protection of the room from the sewer odor penetrating through the drain hole from the sewer pipe;
- protection of the drain pipe from clogging by solid particles entering through the hole in the sink.
Sink drains: copper, bronze, steel
How does a siphon drain work?
When water is flushed through the hole, the waste liquid does not immediately go directly into the internal sewer pipe. It descends into the siphon, makes a bend, rises up (along the bent knee) and then moves down into the common drain.With this pattern of movement, water remains in the lower part of the bent knee. This is the so-called water trap, which does not let the odors of the effluent into the living space.
Siphon drain device diagram
In the bend of the knee siphon, there are also hard, heavy particles or small objects that can accidentally be poured into the sink. To remove them, the knee part of the pipe is removed and cleaned, and then reinstalled in place.
Conclusions and useful video on the topic
Bottom plugs are not often used so far, so it can be difficult to select, install and replace them. We offer videos to help prevent problems.
A detailed video tutorial on installing the bottom valve:
AlcaPlast click-clack system devices:
Video review of the Nicoll SAS L2264 model:
Review of the valve of the Italian brand Webert:
Each of the foot valve buyers has their own goals. Some people find it convenient to wash in a sink filled with warm water, while others prefer to wash or wash small things. Conveniences about convenience also differ significantly.
To eliminate a mistake, before buying, you need to clearly understand how the device will be used. If you need to install a new plug instead of a worn one, you should choose the same model.
Do you have something to add, or have questions about choosing a bottom valve for a washbasin or a sink? You can leave comments on the publication, participate in discussions and share your own experience of using such devices. The contact form is in the lower block.
Europeans are incredibly creative when it comes to economy. One such device is a bottom valve, which allows you to use much less water and not overpay to utility providers. The product has an ingeniously simple design, and at the same time it is very practical and easy to use.
Although the device first appeared in England, our compatriots also highly appreciated it and are using it more and more often.
We offer you to understand the design and operation of the plugs, their advantages and disadvantages. The answers to these questions are detailed in the article. In addition, we have provided tips for choosing a bottom valve and prepared step-by-step instructions for installing it.
Types of drain devices under the sink
The modern market offers an enviable variety of designs and materials for making plums. Among the most demanded materials are plastic and metal. Constructive forms are made in the following basic versions:
- pipe;
- corrugated (usually a plastic hose);
- bottle;
- "dry".
Let us dwell in more detail on the differences in the structure and functioning of the listed types of plums.
Pipe siphon
The pipe siphon is a curved pipe. Most often, such a structure is made of metal. This is a traditional old style sink called a "knee". In a modern version, its design has acquired a decent appearance: a shiny stainless surface of bronze or brass, convenient connectors for disassembly and assembly, low weight (unlike the old-style cast-iron elbows). The pipe bend can be made in the "U" shape or in the "S" shape. The curved part is the lowest point of the structure, this ensures that dirt, waste, and foreign particles settle in it.
Photo: pipe siphon
If it is necessary to arrange a drain from two holes (for example, two bowls of a kitchen sink), the pipe elbow is placed as low as possible, closer to the sewer pipe. Above the knee, a structure is assembled from connecting pipes and adapters that collect two drain streams into one before the bend of the pipe siphon.
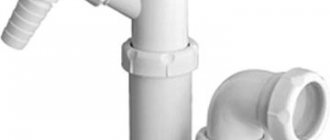
Corrugated siphon
A corrugated siphon is a type of curved pipe. The difference is that the bent part is not made in the form of a solid pipe, but in the form of a movable corrugated hose.It is the corrugation that ensures its mobility and the possibility of simplified installation to the drain pipe. These structures are made of plastic. The curved position of the corrugation is supported by a clamp. If necessary, the connecting clamp can be moved, making the bend more pronounced or less curved.
Photo: corrugated siphon
Corrugation folds have not only advantages, but also disadvantages. Dirt and food deposits quickly accumulate in their cavities (if it is a kitchen sink). It is difficult to clean them. In addition, the corrugation material becomes brittle over time and leaks. The characteristics of the plastic used do not allow boiling water to be drained into such a sink.
Bottle siphon
The bottle siphon is the most popular kitchen sink waste design. Its external shape resembles a bottle. Inside the siphon of the device, water moves downward - upward along a curved path, which is formed by the double wall of the device. The drains move down the middle of the inner pipe and sink to the bottom of the siphon. Then they rise along the gap between the inner and outer walls of the drain device. Then they are discharged into the sewer through the side opening of the siphon.
Photo: bottle siphon
If it is necessary to connect several drains to one siphon, a transition element is installed in front of it. The main drain is drained into such an adapter from above (from the bowl), and an emergency drain (overflow) from the same sink or drain from another plumbing device (washing machine, dishwasher) can be poured in from the side.
Bottle designs are made of both plastic (more affordable price solutions) and metal (more expensive, prestigious and durable siphons).
"Dry" siphon
"Dry" siphons are one of the modern inventions of plumbing. The name "dry" is due to the fact that there is no constant standing of water in them. The role of the water seal is performed by rubber gaskets, which are located inside the siphon and block the passage of sewage odors. When draining the effluents, the rubber opens under water pressure and lets the flow through, after which it closes the free lumen of the pipe again. The rubber element is called "dry" water seal.
Photo: dry sink siphon
The absence of water in the check valve makes it possible to install such structures in country or country houses, where the heating does not work constantly. In winter frost conditions, the water trap will freeze and deform the siphon pipe. Therefore, a dry check valve is the best type of drain.
The "dry" design is more compact, it does not have a curved part, therefore, its installation saves space under the sink.
Dry plum siphons are installed in the following cases:
- no room for a curved siphon;
- cold room, periodically not heated;
- a hot room where the water seal often dries up;
- drainage of air conditioners (outdoor location);
- objects where shaking and vibration are present (for example, delivery vans).
The direction of installation of "dry" drain can be both vertical and horizontal. In the case of a horizontal arrangement, an angle adapter is mounted between the drain and the sink.
Convenient economy with a bottom valve
These are small locking devices that are installed in the drain holes of sinks to retain water. They were originally intended for water supply systems in which hot and cold water is drawn from different taps. This is the way to equip bathrooms in some European countries.
We have this function performed by different types of mixers, so the shut-off valves for sinks have found other uses. They are used if you need to wash, shave, hand wash children's clothes or linen.
The devices eliminate the need to pour running water or draw it into a basin. It is enough just to lower the valve - and in just a minute the sink will be dialed.
There are two main types of valves:
- With mixer... Devices are included. Their installation is provided by the model of the plumbing fixture. To control the operation of such a bottom valve, a small lever is used, which is located behind the tap or to the side of it.
- Push Open... These models are sold separately from faucets. They are less popular than the first type. Often they are bought by people who are already accustomed to using a locking product, but the old one is worn out and needs to be replaced.
The devices would hardly be widely used in the post-Soviet space if they were not included in the package of some mixer models. The benefits of using them quickly became apparent, and now sink shut-off valves are in demand among customers.
Another plus: for installation, you do not need to make any fundamental changes to the water supply or sewerage systems.
Designs can be with or without overflow. Outwardly, they differ little, but the difference in functions is noticeable.
Valves of the first type are safe: if the water pressure suddenly increases or the owner moves away for a minute, excess liquid will drain into the sewer, and not onto the floor.
If the fixture does not overflow, the slightest carelessness can turn into trouble.
Siphon for bathroom, washbasin or kitchen
In addition, you can save space under the sink by using a special siphon in a box. To place the box in the wall, make a hole for its size. The appearance of the sink drain will be masked in the wall, only a thin pipe will be extended to the installed box.
Drainage with double air intake
Each drain design is characterized by preferential use.
A bathroom siphon is most often a curved pipe. A compulsory addition to it is a corrugated hose for connecting the drain from the overflow (emergency drain located in the upper part of the bath in case of overfilling of the tank with water). Most bath drains have a plug for the drain hole.
The shower tray siphon (ladder) has a low height (from 8 to 20 cm). Bottle drain structures are installed under the washbasins. The hidden design in the box is used for washing machines or dishwashers. In the kitchen, it is advisable to install a branched drain.
santex1.ru
Sink waste design
The sink drain device itself looks like a curved tube, which includes a siphon and, in fact, the drain pipe itself. When the tap is turned on and the water in the sink is drained, it first enters the siphon, then passes through the curved pipe, and only then enters the general water drain. To protect the siphon from clogging, special metal protective nets were invented, which are installed in the sink and prevent the drain from getting small debris and hair.
Due to its bend, the siphon performs the main tasks: the water does not leave all at once, but lingers a little, forming a shutter, which does not allow unpleasant odors from the sewer to penetrate into the room.
The drain is usually completed with a body, an outlet, collars, a cover plate, a rubber stopper, as well as nuts and fasteners. Experts recommend purchasing a drain with an overflow. In this design, a corrugated pipe is added, which connects to the siphon a little higher. Such a drain is less prone to clogging.
Device
Before performing installation work, you must familiarize yourself with the structure of the drainage system:
General design
Schematic sink drain
| Designation in the figure | Name |
| 1 | Entrance lattice |
| 2 | Rubber gasket |
| 3 | Additional branch |
| 4 | Fixing screw |
| 5 | Drainer |
| 6 | Siphon |
| 7 | Tightening nut |
| 8 | Cone type gasket |
| 9 | Drainage to the sewer |
| 10 | Sewer hose connection nut |
| 13 | Siphon cover |
| 14 | Rubber gasket |
| 1s, 3v, 12a, 12b | Sealing gaskets |
Also, depending on the design of the sink itself, the system can be supplemented by connecting the overflow to an additional outlet, indicated in the figure as "3". This addition eliminates the possibility of flooding the room in which the washbasin is installed.

Waste structure complete with overflow system
Tip: An overflow is most useful when you use a plastic stopper in your sink to close the drain hole. Indeed, in such cases, inattention can lead to overflow of the reservoir, and, consequently, flooding of the room.

Overflow hole reliably controls the permissible water level in the sink
The drain height of the sink is usually 530 mm, which is enough to accommodate the siphon and guarantee sufficient head.
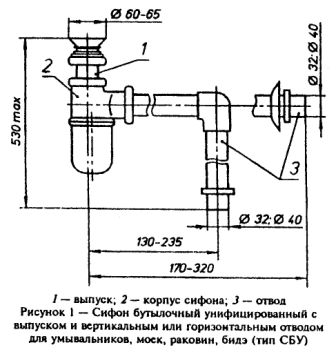
Dimensions of drain system components
Types of siphons
Depending on which appliance the drain will be connected to, they can be divided into siphons for the sink, for the shower cabin and siphons for the bathroom. The first option, in turn, is divided into several more types, different in structure. The shower trap is installed at the bottom or in the floor. The bathroom drain is equipped with an overflow to avoid flooding.
Siphons for sinks differ in their design and can be:
- Pipe. This type of drain is installed in bathroom sinks, as if installed in the kitchen, it will be subject to frequent clogging. Outwardly, this is a pipe, when bent, a water barrier is created. To clean such a siphon, its lower knee is removed. The main advantages of this type of drain are its compactness, aesthetic appearance, and quick access for cleaning.
The disadvantage of this type of siphon is the not very deep water seal, which in the future, when evaporating, can give off unpleasant odors. This can happen when the sink is not used for a long time: water accumulates, stagnates and perspiration forms. Also, the disadvantage can be considered a complicated installation, and the impossibility of using it in the kitchen. Therefore, such siphons have lost their popularity today, giving way to the next type of drain.
- Corrugated. This drain is an improved type of pipe drain. A flexible corrugated plastic pipe is connected to the main structure. On the one hand, the drain is connected to the drain hole in the sink, and on the other, to the sewer pipe. The corrugation bends well enough and accepts any bends, which is beneficial for sinks installed outside the box. The slope of the pipe to create a water seal is formed manually. Such a siphon is distinguished by its low cost and ease of installation. Due to the absence of connections on the pipe, the risk of water leakage is reduced to zero. Due to its ability to stretch, this type of drain allows you to move the sink, while not disconnecting it from the water outlet. It is very convenient for renovation. The corrugated siphon is suitable for sinks with a small space for a drain.
The disadvantages of a siphon with a corrugation can be called the difficulty that arises when cleaning from debris. Due to the presence of small folds, a large amount of grease and dirt will settle in the pipe. To clean the pipe, you will have to remove it completely, or use chemicals.
- Bottled. They are the most popular among consumers today. In their shape, such siphons resemble a bottle, which is why they got their name. Such a device is installed directly under the sink and in the structure contains a flask, as well as a sump, where all waste flows. From the inside, the flask is equipped with a bendable tube; therefore, there is almost always water in the flask.
If it becomes necessary to install several drains to one siphon, then a special adapter is installed for this. This transition element receives the main water drain, and from the side, an emergency drain is poured, for example, connected to a washing machine.
The advantages of this type of siphon include ease of cleaning. To do this, you just need to unscrew the lower part of the flask and clean it. Another plus: if a small thing was accidentally dropped into the sink, it will not go straight into the sewer pipe, but will linger in the sump, and later it can be removed from there. The bottle siphon has the ability to connect other plumbing fixtures: dishwasher, washing machine, and some models are equipped with additional functions.
The disadvantage of the bottle drain is a more complicated installation than in the case of a corrugated siphon, as well as the real estate of the sink without replacing the device itself.
- Dry siphons. Such sinks are a modern invention in the plumbing fixtures market. Dry draining is popular due to the impossibility of accumulating water, since it contains rubberized gaskets instead of a water seal. They act as a barrier and prevent the appearance of odors from the sewer. When the water runs down, the rubber bands open the hole, when the water turns off, the rubber bands close the water drainage passage again.
This design of the siphon allows the device to be mounted in country houses, where the owners leave for a long time and the room is unheated. Due to the absence of a water seal, the water will not freeze during frost and will not cause deformation of the drain pipe.
The advantage is also the absence of curved elements that take up some space, the dry siphon has a straight shape and will fit even under the smallest sink. Installation of such a drain can be both vertical and horizontal.
Description of bottle siphons
A siphon, or a water seal, is a pipe through which water is drained from plumbing and enters the sewer. A water lock is created in the water seal, and due to this, the stinking odors of the sewage system do not get into the apartment. Due to the shape of the siphons, they can be easily cleaned. Hydraulic locks are subdivided into the following types:
- corrugated (plastic);
- bottle;
- pipe;
- dry.
The most common are bottle siphons. They are called so because of their shape. For living quarters, installing such a water seal is the most practical option.
It includes a sump, where all waste from the sink flows, and a flask. There is usually a corrugated pipe inside the flask, due to which water constantly remains in the bottle siphon. This water creates a water lock in the system.
Also, siphons differ in the material from which they are made:
- Metal appliances. Metal siphons are distinguished by their durability, especially in brass and bronze models. Metal siphons are not afraid of mechanical damage, but over time they can corrode and oxidize. A good and high-quality metal drain must be covered with chrome on the inside: this will prevent the appearance of dirt and clogging on the pipes. The downside of metal siphons is the difficulty of shortening the pipe - this requires a special tool and some time.
- Plastic siphons. They are the most popular devices today. Plastic has a low cost and is also resistant to corrosion. Due to the short service life of plastic products, such siphons are equipped with special rubber seals in the connecting nodes. This move adds additional tightness to the plastic siphon. Metal siphon
Modern manufacturers make plastic siphons, coated with a special antibacterial substance from the inside, which prevents dirt from settling on the pipe.
Plastic products are lightweight, resistant to chemicals, simple in design and easy to install.
What to look for when choosing a siphon?
It is necessary to choose a sink siphon taking into account the following factors:
- Siphons are usually sold complete with sinks, but if the equipment is different, measure the diameter of the sink neck. The diameters at the sink and washbasin are usually different;
- Take care of the capacity of the siphon. Decide in advance whether other plumbing fixtures will be connected to the siphon. When connecting additional devices, the water flow must be increased. This is done by increasing the number of outlets into the sewer pipe;
- Determine how conveniently the sewer pipe is located. If it is too low, it will become necessary to raise it. In this case, it is better to purchase a corrugated siphon;
- Calculate how much free space there is under the sink, the dimensions of the future siphon will depend on this;
- When choosing a drain, carefully inspect it for chips, punctures and other types of defects. Also check the quality of the rubber gaskets - you may have to purchase more reliable parts;
- Perhaps the aesthetic side of the future siphon will be important, so get the siphon that will visually also fit the bathroom.
How to choose the right siphon
To choose the correct and necessary siphon, you also need to know its technical characteristics. To buy the right siphon, you need to consider the following factors:
- the siphon must fit under the sink. If the house has plumbing with a standard drain, then the water seal will also be standard. When a sink is made under an individual order, then the siphon must also be included with it in a set of exactly the same exclusive;
- the main technical characteristic of the hydraulic seal is its throughput. You need to choose siphons based on how many additional devices are connected. In addition to plumbing, a dishwasher or washing machine is usually connected to the water seal. The second criterion that affects the capacity of the siphon is the water pressure supplied from the mixer. If a lot of equipment is connected, then it is not recommended to buy a flat siphon with small sections. It is necessary to purchase such a water seal that would be completely suitable for plumbing and additional appliances, the wrong choice can lead to excessive water ingress into it.
How the siphon works
The procedure for self-installation of a bottle siphon
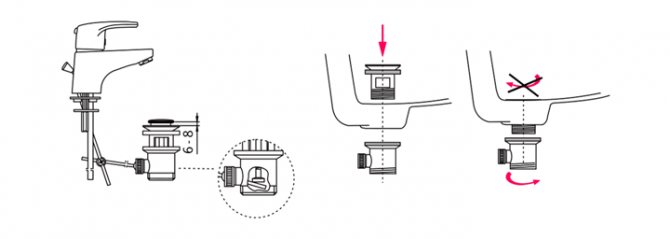
Due to the special popularity of the bottle-type siphon, it is worth considering the scheme for its installation. Self-assembly and installation of the siphon does not imply any problems, so a beginner can also cope with this task. Most often, the kit includes assembly instructions that must be followed. The main installation steps include:
- The first step is to connect the siphon to the sink drain. To do this, attach a protective mesh for the sink from the outside, place a rubber gasket on the outlet pipe and press it firmly against the drain hole from the inside of the sink. Use a screwdriver to tighten the connecting screw into the branch pipe nut. Please note that the protective grid must be sunk into the sink bowl and not protrude from it. This will help prevent water from collecting in the sink.
- The second stage involves the collection of the main part of the siphon. A plastic nut and a cone-shaped gasket are put on the end of the branch pipe, after which it is inserted into the flask and the nut is tightened. Next, the upper part of the flask is twisted, while it is connected using rubber gaskets.
- At the last stage, the siphon is connected to the sewer pipe. This is done using a corrugated tube or rigid assembly. It is important that the inlet diameter of the sewer pipe matches the connected pipe, otherwise you will have to use a rubber cuff for tightness.
After the siphon is installed, check the build quality. To do this, turn on the water to full pressure and put paper under the sink so that drops are visible.
Siphon assembly
sdelalremont.ru
Detailed installation instructions
The bottom valve, which is included with the mixer, is installed in stages. To install it, you will need the simplest tools and plumbing sealant, which is used to seal the seams when installing plumbing. All work can be done independently.
The only caveat: in the standard set, all tools with sharp edges that can damage the sink coating. It is advisable to prepare gaskets in advance and press metal elements through them to protect the plumbing.
Stage 1 - preparatory work
The lever and hoses are led out through the hole down under the sink. Mixers are usually equipped with flexible pipes. If the model comes with rigid hoses, you will have to bend them yourself.
It is important to do the work very carefully so as not to damage the walls of the pipes, otherwise they will quickly rot and leak.
It is highly undesirable to file the products, because chips can easily enter the crane mechanism. During operation, problems will arise that will lead to premature abrasion and wear of parts.
If it is impossible to do without cutting the rigid pipes, after the end of the work, all structural elements must be thoroughly rinsed with a powerful jet of running water.
The valve is secured with a clamping nut. If in doubt about the reliability of the installation, a sealant can be used as an additional fixing method.
Stage 2 - assembly and connection of parts
Using nuts with rubber gaskets, the hoses are connected to the supply pipes. It is necessary to follow the shape of the bend. If it turns out to be in the shape of the letter U, everything is fine: the water will flow freely.
But the S-shaped bend is undesirable. Extra obstacles will create conditions for an uneven increase in pressure in the system, which within a year or two will lead to leaks at the joints.
The check valve is placed in the sink drain and the spokes are collected. They are laid crosswise using a special plastic connector.
The clamp itself is twisted with a screwdriver. The result is a simple but reliable cruciform design.
Step 3 - installing the lever and siphon
The spoke must be connected to the lever and attached to the ear of the device, as shown in the diagram below.
It remains only to bring the corrugation from below and fix the siphon. It is important that the plug tightly covers the drain hole, so they immediately check the build quality of the system.
It is necessary to open the tap and observe how the plumbing works for 3-5 minutes.
If the water goes well into the drain and the joints remain dry, everything is in order. If signs of leaks appear, tighten the nuts.
If even after this the joints are wet, you will have to completely disassemble the system and redo the work, since the installation is clearly wrong. Sealing tape can remedy the situation, but not for long.
Step 4 - check the plug for leaks
The work can be considered completed if the siphon does not leak and the shut-off valve tightly closes the drain hole. They check it like this: lower the plug, collect the maximum amount of water in the sink and leave it for half an hour or an hour.
The indicator of the correct operation of the device is a constant level. Better not to rely on your own eye and mark the sink with a marker.