How to protect the walls of a bath from the heat of the stove - technologies and materials
When planning the construction of a bath, it is important to remember to create safety inside the premises. First of all, this concerns fire safety. By melting a bath, the stove can be heated up to 300-400 ° C, which is significantly higher than the combustion temperature of wood, from which a bath is most often built.
All the heat from the stove is released into the room, but the main heat is absorbed by the nearby walls, which leads to their charring and fire. It is extremely important to avoid such consequences, therefore in this article we will tell you in detail how to isolate the stove in the bath from the wall.
Fire protection
Another most important question that should be carefully thought over at the same time as how to determine the correct location of the stove in a wooden house is how to protect it from fire. Proper and careful handling of heating devices is not always enough.
Fire is an unpredictable and uncontrollable element. And if by some accident he broke free, then it is already very difficult to stop him. That is why you should initially consider security measures.
- Firstly, this issue should also be dealt with at the design stage. Different types of wood used in the construction of residential buildings have different flammability classes. Of course, you need to choose the safest one.
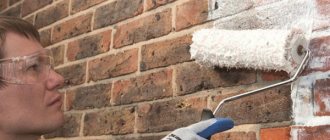
- In addition, the walls, especially in the immediate vicinity of the stove, can be treated with special substances. The so-called flame retardants are not expensive, but they can be of great benefit. I must say right away that they will not make the wall completely impervious to fire. But they will significantly reduce the flammability threshold and slow down the combustion process itself.
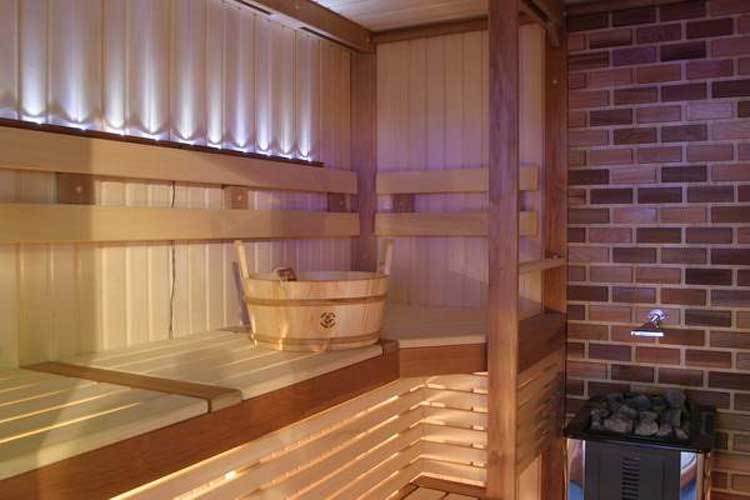
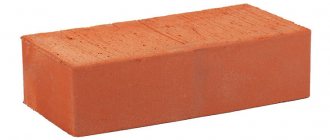
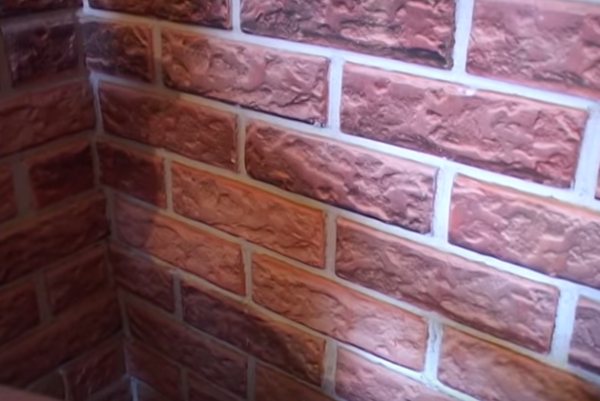
- It will not be superfluous to cover the walls and floor near the stove with special fire-fighting finishing materials. Asbestos, cement or gypsum plaster, facing bricks are great for this purpose, turning the stove zone into not only a safe, but also a beautiful space.
- But the use of vinyl and polymer finishing materials in these places is not only not recommended, but also considered dangerous. They have a very unpleasant property to emit very toxic chemicals during combustion, which leads to severe poisoning and even death.
Do you need protection in your bath
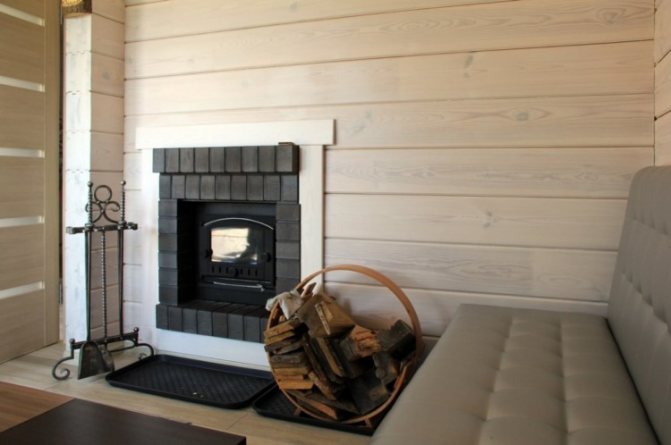
Protection of the walls of the bath from the heat of the stove is not always required. For example, you can provide a distance between the wall and the stove to achieve fire safety without additional protection. The fact is that at some distance the infrared rays emitted by the oven begin to scatter, which significantly reduces their impact on the nearest surfaces.
The distance from the stove to the wall in the bath varies depending on the type of stove:
- 0.32 m and more - the distance for a stone furnace with a quarter brick masonry;
- 0.7 m and more - the required distance between the wall and the metal furnace lined with fireclay or brick from the inside;
- 1 m or more is a safe distance for a metal unlined furnace.
At first glance, it seems that creating such a distance is much easier than installing additional protection, but this is fundamentally wrong. Maintaining a safe distance is advisable only in large steam rooms, but in small private baths, the stove, including indents, will occupy most of the room, so it will be much easier to use insulation.

When is protection needed at all?
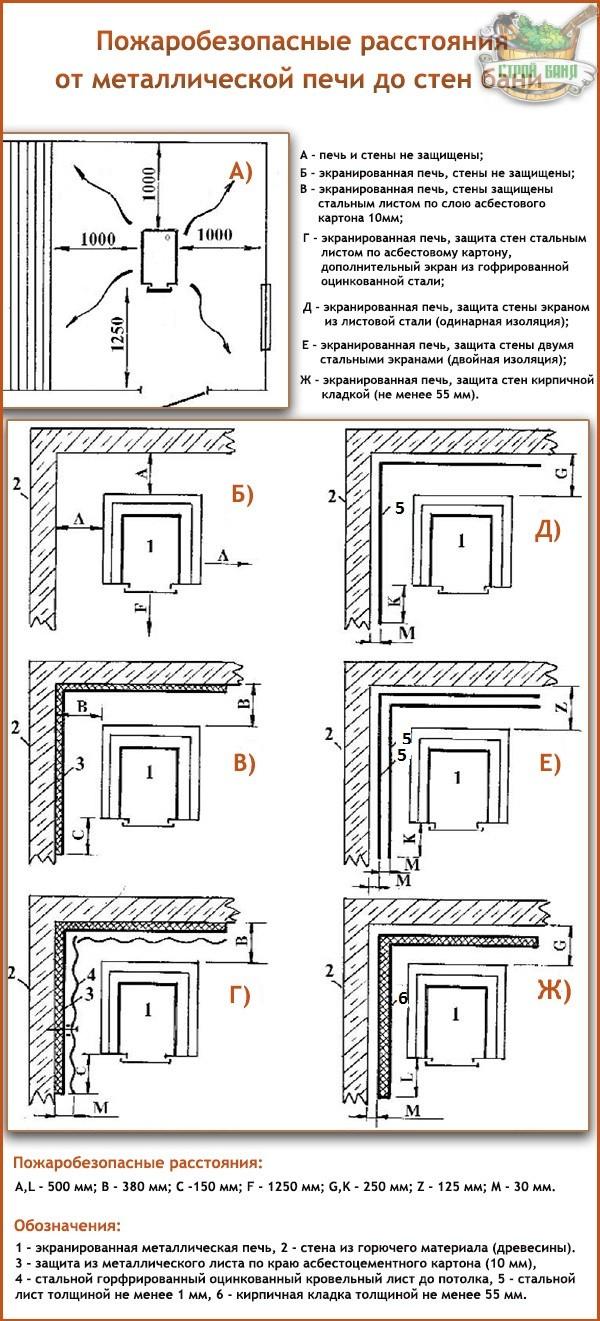
The need to install protective skins and screens does not always arise.If a fireproof distance is maintained between the stove and the nearest flammable surface, additional protection is not needed. At this distance, the infrared rays are scattered, weaken and the amount that the wooden wall receives can no longer lead to its damage.
It is believed that the safe distance from the wall to the brick kiln (quarter-brick masonry) is at least 0.32 m, from the wall to the metal kiln (not lined) - not less than 1 m. decreases to 0.7 m.
Thus, compliance with fire-prevention distances is more possible in large saunas, where the issue of saving space is not relevant. In family steam rooms, where every centimeter of space counts, installing a stove 0.3-1 m from the nearest walls is impractical. In this case, the established safety distances must be reduced by means of screens and skins.
Metal protective screens
On the construction market, the most common metal protective screens made of steel or cast iron. Many manufacturers of iron furnaces provide for thermal insulation of their products, providing them with special casings.

The choice of protective screens is quite simple, because depending on the insulated side of the oven, you can purchase a front or side panel. Installation of such screens will also not cause difficulties, because the manufacturer provides special legs that are easy to attach to the floor.
Next, it's worth talking about the installation rules. The panels themselves are installed at a distance of 1-5 cm from the stove, however, a distance is also required to the adjacent wall. The protective screens reduce the radiated temperature to 80-100 ° C, which allows them to be installed 50 cm from a parallel wall.
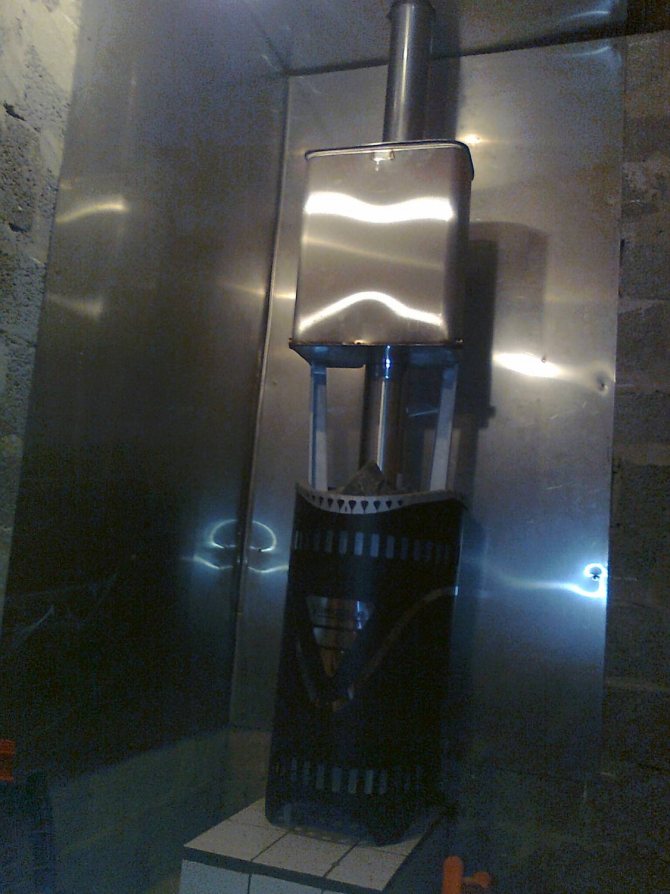
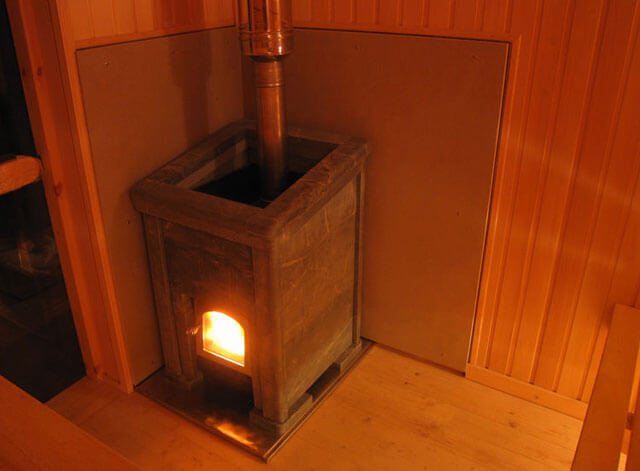
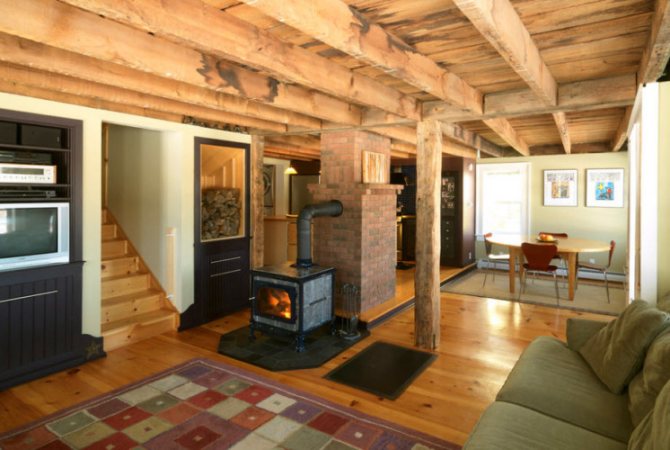
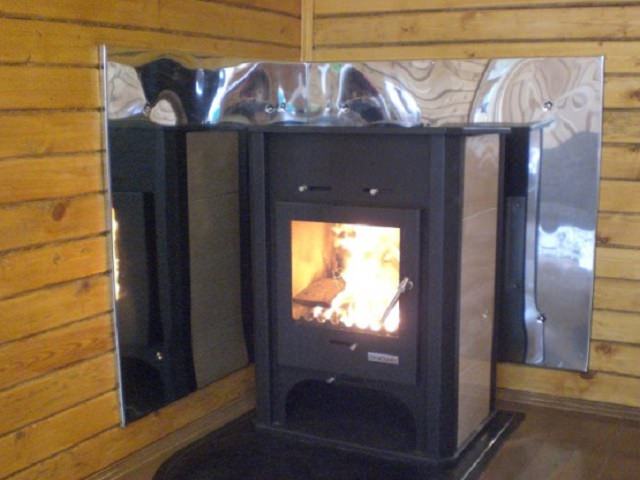
Iron stove in the house
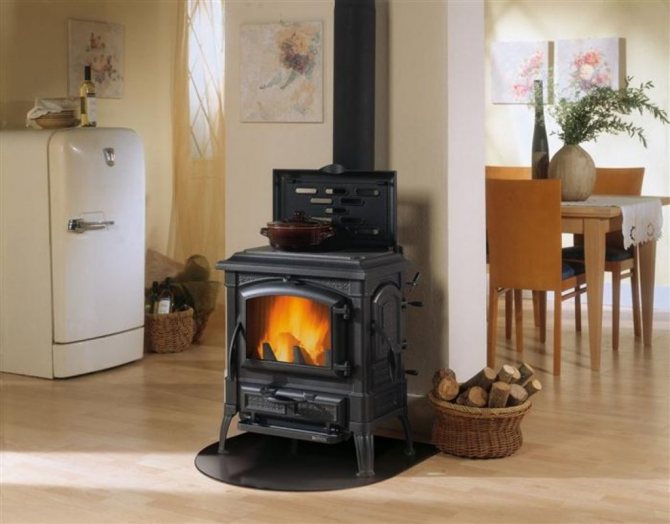
Iron stove
Sweet, kind, full of heat, red-hot "potbelly stove". True, modern stylish options for iron wood stoves no longer fit this name, but its functions have not changed.
Installing an iron stove in a house is much easier than building a brick one, however, its safety requirements are somewhat increased.
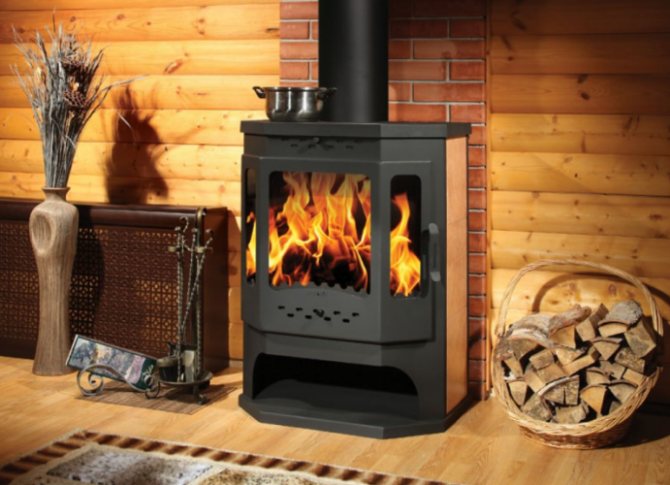
- Fire safety. The temperature of the walls of an iron wood stove is several times higher than that of a brick stove. Therefore, care must be taken when handling it.
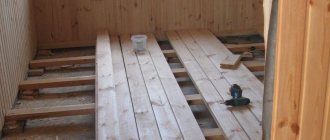
- It is also necessary to protect the floor and walls from overheating, near which it is installed.
- The calculation of the installation site is carried out taking into account the location of the windows and doors in the room. But no closer than 50 cm from the wall, even if it is impregnated with a fire retardant and finished with non-combustible materials.
- It is also necessary to equip a place around the stove where firewood, tools and other elements necessary for proper operation will be added.
Such a stove alone cannot heat a multi-room house, of course, therefore it is used in most cases in small or temporary houses. Although, if you install it in a utility room and connect it to a water heating system, then even a two-story house will be warm.
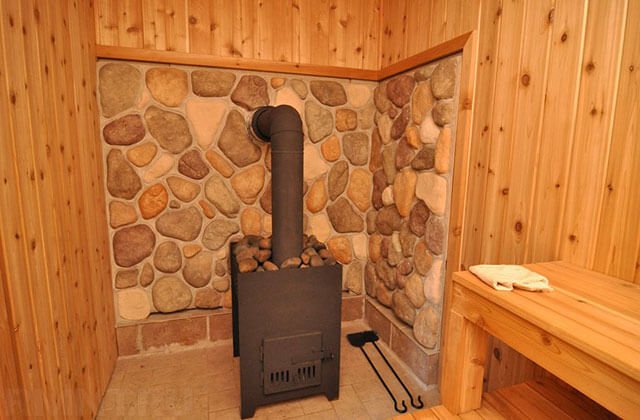
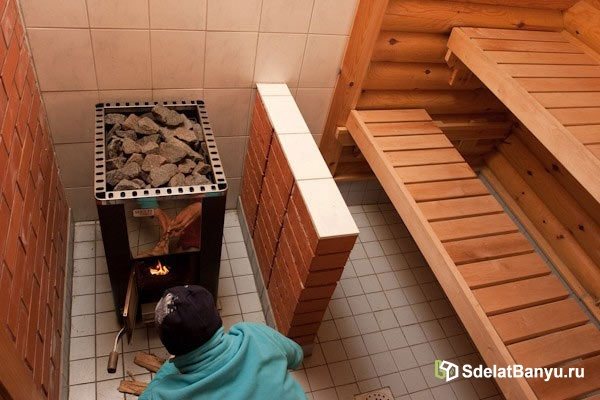
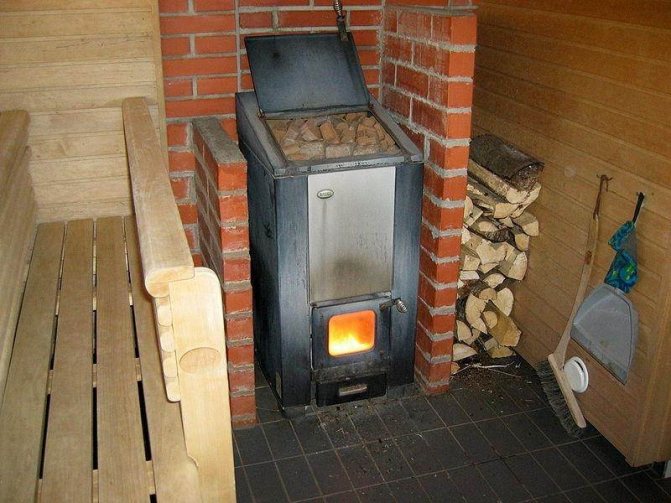
Brick screens
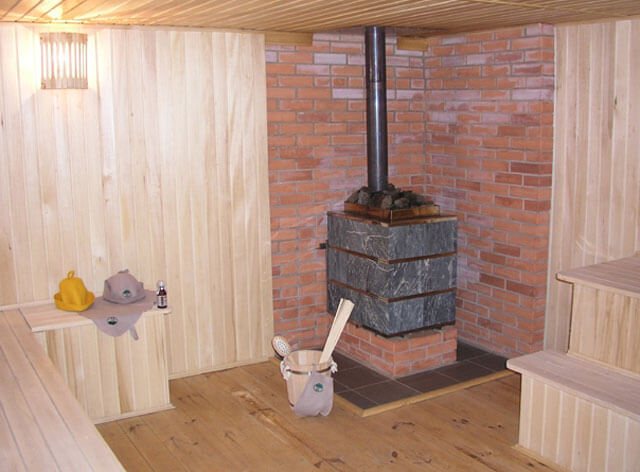
The fencing of the stove in the steam room can also be made of bricks. A brick screen can be installed on all sides of the metal oven, forming a protective sheathing. Also, such a screen can only be installed between the flammable surface and the oven, representing a protective wall.
Having decided to lay such protection, use solid fireclay bricks, for which you can use clay or cement mortar. Usually, masonry in half a brick (120 mm) is used, however, due to a lack of material, a masonry of a quarter brick (60 mm) is suitable. When using the last installation method, remember that the thermal insulation properties of such a screen are reduced, so the distance to the wall should be increased.
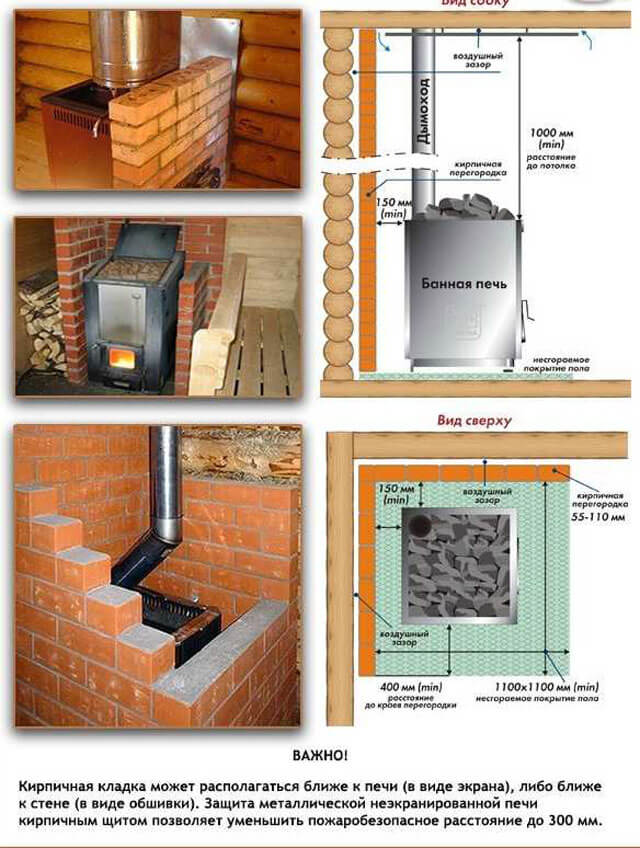
Such finishing of the iron stove in the bath is also carried out in compliance with some rules:
- In the lower part of the shield, it is necessary to provide special openings that will ensure air convection between the furnace wall and the brick;
- The height of the brick wall should exceed the height of the oven by 20 cm, but often it is led to the very ceiling;
- Observe the distance between the oven and brick screens of 5-15 cm;
- There should also be a distance of 5-15 cm between the flammable surface, for example, a wall and a brick protection.
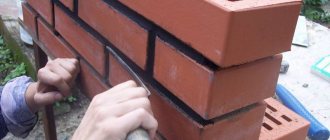
Facing a brick screen - step by step instructions
You can refine and make the appearance of any brickwork more aesthetic with the help of a refractory and durable natural material.
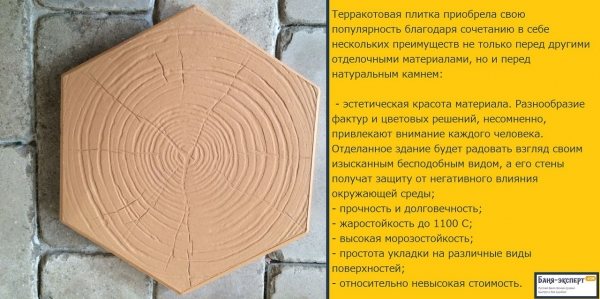
Terracotta for cladding
Terracotta tiles, also called terracotta tiles for short, are highly heat-resistant ceramic products made from kaolin clay, fired at about 1000 degrees. This wonderful material is absolutely non-flammable, it does not change its properties even from high (up to 1300 degrees) and low (up to -25 degrees) temperatures, does not change its beautiful appearance from the action of water or sunlight.
Terracotta or clinker
To finish the brick protective fence, you will need Terracotta heat-resistant materials: glue, paste, as well as finishing grout, which will be used to fill the joints.
Glue
Paste
Grout
You will also need a sheet of drywall (choose GKL 9.5 mm) for spacers of the plates, which must first be cut into small squares.
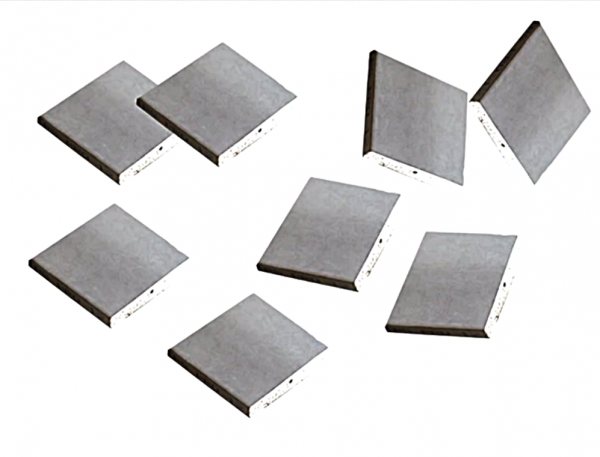
GKL squares
Tools. We stock up on the following accessories:

Impact drill - mixer
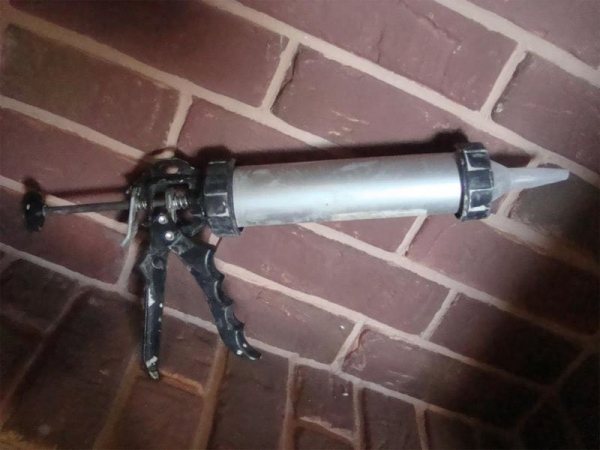
Spray gun with grout tube
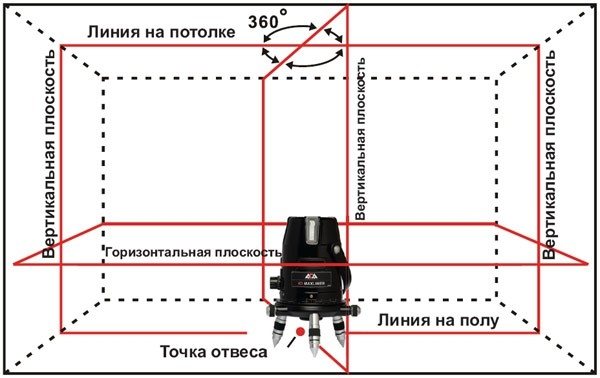
Projection laser
In advance, you need to dilute in a bucket with water and mix with a mixer a convenient and very reliable in terms of fire safety reinforced adhesive mixture "Terracotta".
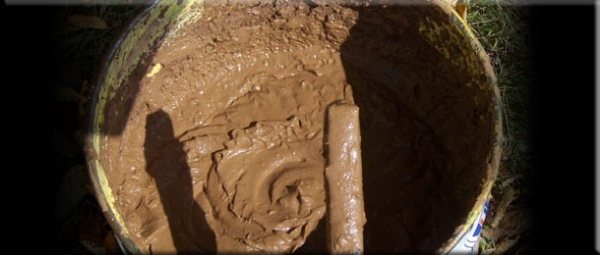
Beat the solution with a mixer, which must be prepared no later than 15 minutes before starting work
Initially, the bricks for the screen are laid around the stove in a classic dressing, carefully removing excess mortar.
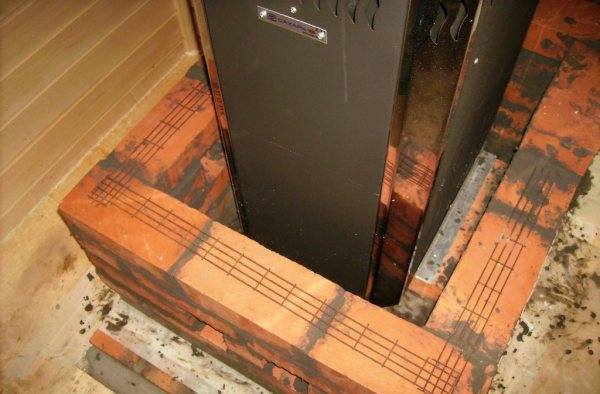
Brick screen masonry with row reinforcement
Attention! After finishing the laying of the rough wall, it is imperative to wait 24 hours for the masonry to dry and gain initial strength.
Prices for glue Terracotta
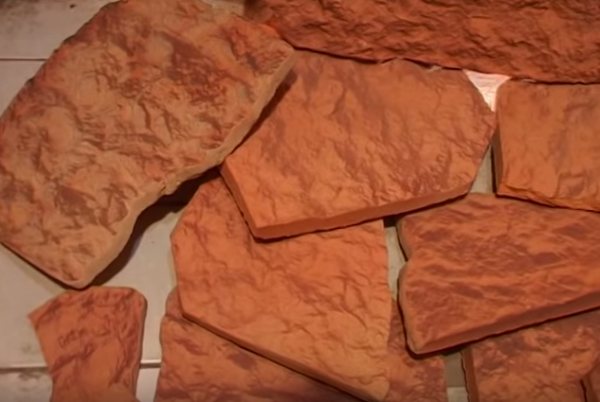
terracotta
Terracotta flagstone "Classic" is an amazing stone in its unique beauty. It looks very rich and massive.
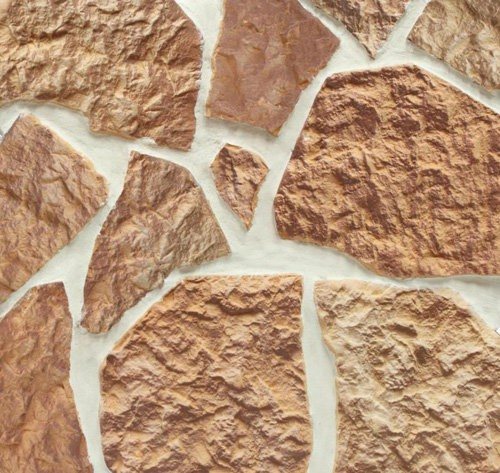
Plitnyak, straight classic
It can be easily sawn with a diamond wheel or split with a hammer and then, spread on it with a thick layer of Terracotta mastic, stick it on the brickwork. Terracotta flagstones are heavier than terracotta tiles, but significantly lighter than natural stone.
When facing with flagstone, cut plasterboard squares are used as an inter-tile distance and a fixer for tile movement. The rough chipped edge of the limestone will not allow for a 10mm gap everywhere, and this will further give the stone veneer a natural feel.
Laying terracotta tiles
Having brought the process of stylizing the wall like a wild stone to perfection, you can proceed to tiling. It is necessary to lay rectangular terracotta tiles on the brick, starting with the laying of corner elements, thanks to which the decorative cladding will look like the classic stove masonry.
Corner elements must be glued from bottom to top, while the horizontal lines of the corners must be checked only in level.
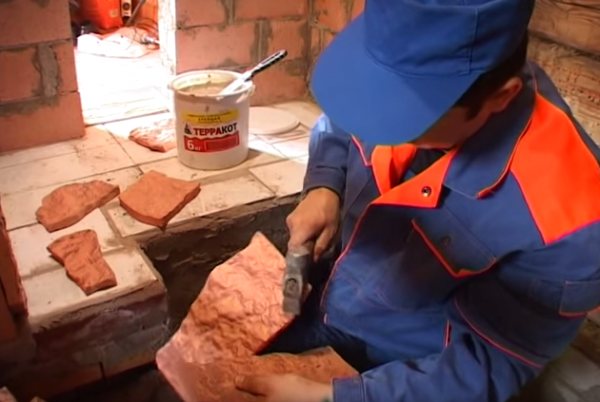
Breaking tiles with a hammer
Attention! For gluing and setting of Terracotta mastic it is necessary that at least 10 hours or more have passed.
After the mastic dries, you need to remove the squares inserted as fixers from the drywall and start first filling, and then joining the joints between the plates.

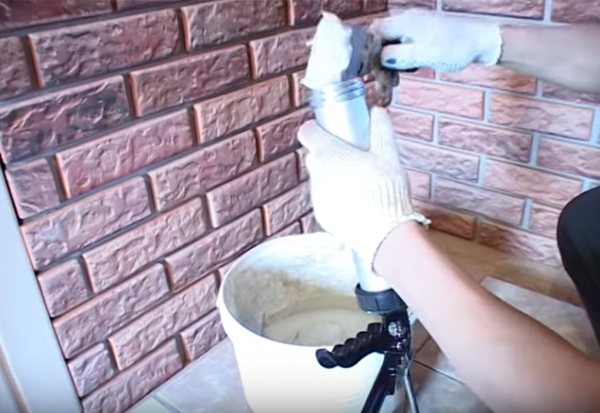
Mixing grout
This work will require a heat-resistant wide-joint grout, which is a unique white compound designed to fill the joints between slabs of different decorative surfaces that may be exposed to high temperatures.
The grout must be poured with water and stirred with a mixer to obtain a homogeneous solution, similar in consistency to thick sour cream.
Filling the tube with grout
Attention! The time to use the grout solution is about 1 hour.
It is necessary to fill the tile joints with a construction gun, the nose of the nozzle of which must be cut obliquely so that an oblong hole is formed.
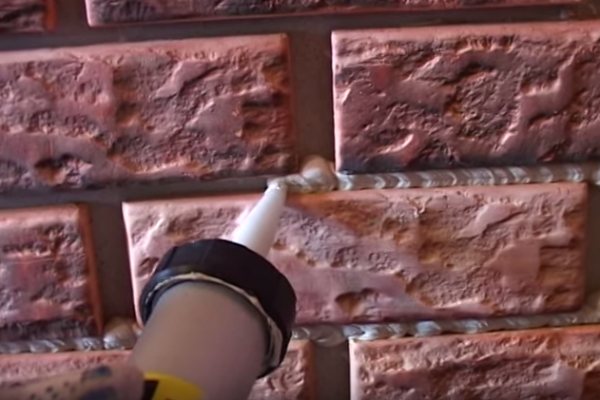
Grout filling
The pistol tube is filled with the prepared grout solution using a narrow spatula.
Then, carefully, inserting the nozzle, it follows, smoothly and with low intensity, moving the construction gun along the length of the joints, squeeze out the grout and fill the joints so that the level of the filled grout is aligned with the level of the tile. It is possible to fill the joints between the slabs vertically or horizontally.
Type of grout-filled joints
Attention! Special grout for joints should not get on the front surface of the finish. If it so happened that the mixture still got on the decorative facing, then you should not immediately remove the composition, but you must wait at least 2 hours until it hardens a little and then you can easily remove the contaminating fragment. The dried mixture must not be removed tangentially from the boards or smeared.
After completing all the work on filling the joints, the grout will “mature”, acquiring molded pliability or slight crumbling after 2 hours. After this time, you can confidently proceed to the final part - the process of distributing the hardened grout and its alignment in the tile joints - decorative jointing, the purpose of which is to give the decorated surface an attractive look.
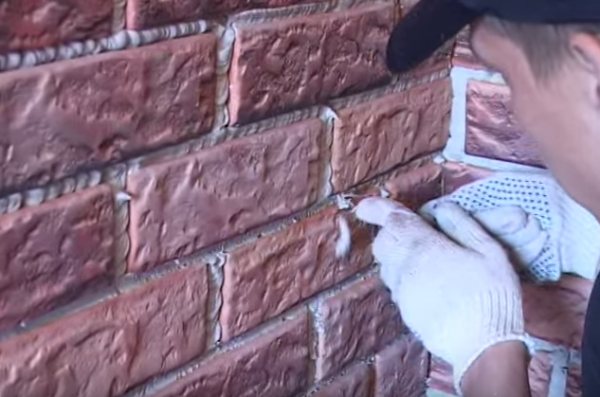
Sewing seams
To begin with, from the seams, using a simple flat screwdriver, transversely deepened into the seam, it is necessary to remove the excess amount of grout slowly maintaining a constant depth. To remove excess grout mass, you can also use a small diameter metal ring, with which you can evenly remove the grout like shavings.

Distribution and leveling of the composition with a tool - grout
The remaining grout in the joint can be gently spread by light pressure with a gloved finger, giving the grout the appearance of a flat surface without indentations or roughness.
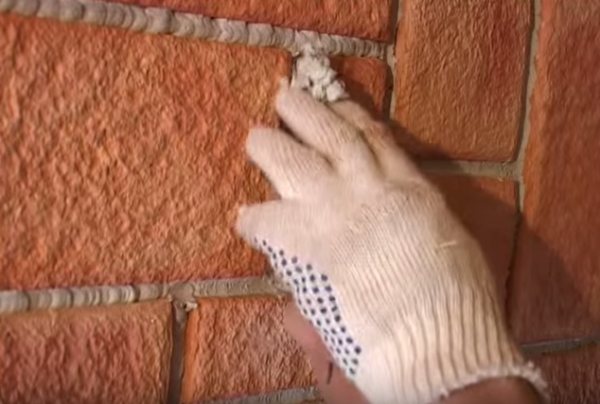
Leveling grout by hand
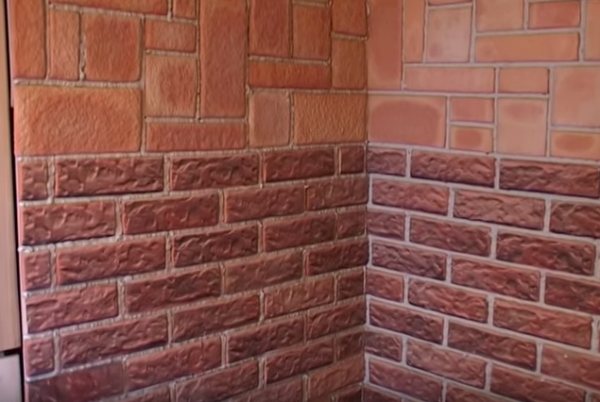
The work on facing the thermal shield of the brick walls has been completed.
Joints after jointing
The first heating of the stove in the bath can be started only 24 hours after all the necessary work has been carried out with grouting between the tiles.
Video - Heat-resistant screens for sauna stoves. Part 1
Video - Heat-resistant screens for sauna stoves. Part 2
Video - Installing a bath stove with a protective screen
Video - Protecting the walls of the bath with terracotta tiles
Non-combustible wall cladding
The second option for protecting walls from fire is special claddings, which are made from non-combustible materials. The working element of this protection, reflecting IR rays hazardous to combustible surfaces, is a reflective material, for example, stainless steel.
There are also options for decorative finishes that preserve the aesthetic purity of your bath.One of the advantages of this method is that protecting the walls in the bath from the stove will not only avoid a fire, but also keep the heat inside the room.
Reflective wall cladding
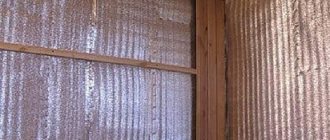
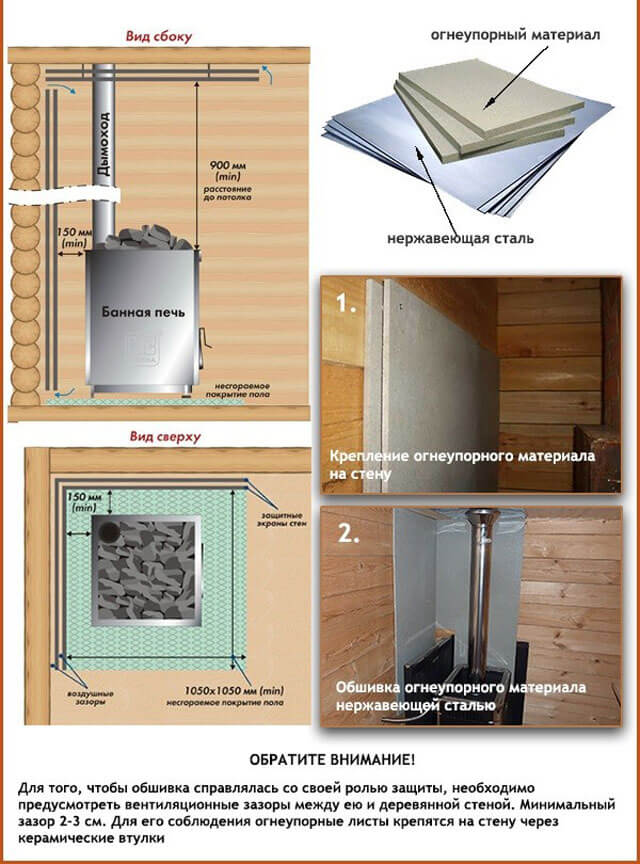
You can assemble this version of the protective sheathing yourself. To do this, you will need a non-combustible thermal insulation material, which will be discussed in more detail below, as well as a stainless steel sheet.
Stainless steel can be replaced with a cheaper option - galvanized, however, when heated, it can emit harmful substances, so we strongly do not recommend using it. Before starting work, fix the insulation on the wall, then cover it with a metal sheet.
To make such thermal insulation for the sauna stove as productive as possible, polish the metal surface. This will allow the IR rays to be better reflected back to the steam room, moreover, the reflected rays will be better perceived by a person.
You can use the following materials as thermal insulation:
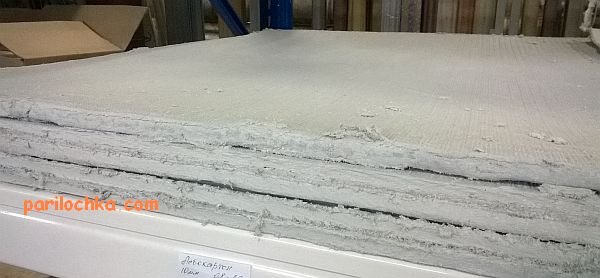
- Basalt wool absolutely safe for a bath. It retains heat well, in addition, it is highly hygroscopic and does not burn at all;
- Basalt cardboard - a good option for a bath. It is a thin sheet of basalt fiber that retains heat well and does not burn;
- Asbestos cardboard - strong and durable heat insulator, which is also suitable for a bath;
- Minerite for a bath Is also great stuff. Non-combustible plates are specially made for shielding hot surfaces in baths and saunas;
Before sheathe the wall near the stove in the bath, familiarize yourself with the correct technology for its construction. The most important thing is the order of installation and the observance of the clearances.

The ideal design has the following structure:
- Wall;
- Ventilation gap of 2-3 cm;
- Insulation 1-2 cm;
- Stainless steel sheet.
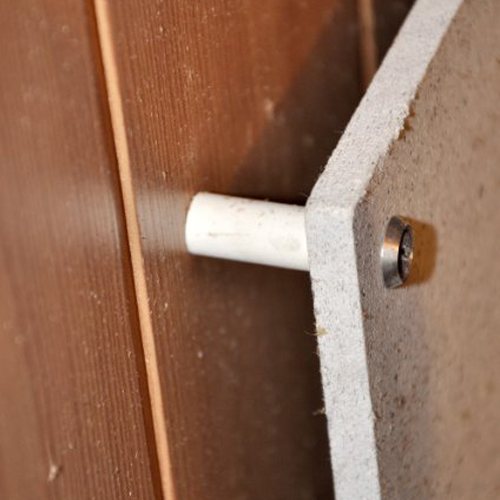
Remember that the total distance from the wall to the stove should be more than 38 cm. For fastening, use ceramic bushings to help form ventilation gaps. If the distance between the wall and the stove is minimal, then it is necessary to use two layers of minerite slabs, between which a gap must also be left.
Sheathing with cladding
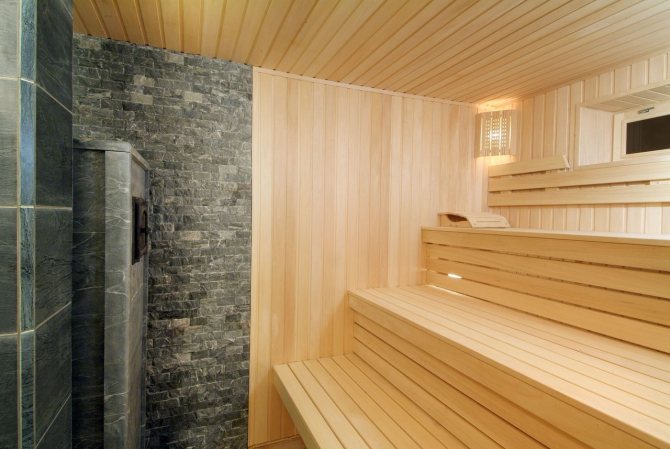
This option is practically no different from the previous one, however, if you do not know how to decorate the wall behind the stove in the steam room so as to preserve the beauty of the room while creating a safe environment, then this option is undoubtedly for you. Protect the walls with heat-resistant decorative materials laid over thermal insulation.
The decoration around the stove in the bath can be done with the following materials:
- Clinker tiles made of baked clay. It is characterized by high strength, heat resistance and durability. One of the advantages of this option is also a rich color palette, which includes not only black and white tones, but also blue or green colors;
- Terracotta tiles also made of clay, however, it is inferior to the previous version in terms of density and the number of possible color solutions;
- Talcochlorite is a good option for bath cladding, made of rocks of green and grayish shades. Possesses good heat resistance and strength;
- Tiles - ordinary ceramic tiles, characterized by good heat resistance and pattern on their surface;
- Porcelain stoneware - heat-resistant tiles imitating natural stone or wood.
How to provide thermal protection for the walls of the bath - a protective screen and sheathing
A feature of modern sauna stoves is their heating temperature, which can reach 400 degrees. An important indicator of the efficiency of the furnace is the instantaneous heating of the body and maximum heat output.
The entire heating process is accompanied by the release of infrared radiation, which is distributed on the surfaces adjacent to the oven. Under the influence of high temperature conditions, the wooden structure of the bath can be charred or ignited.
That is why it is so important to ensure reliable insulation of wooden surfaces from the heat of the stove. A protective shield and refractory sheathing are suitable for this.
When is thermal protection required?
The urgent need to install additional protective elements arises in cases of non-observance of the fire-safe distance between the furnace and the adjacent surfaces.
At an unsafe distance, infrared radiation emitted during kindling of sauna stoves hits the walls and is not scattered. This leads to damage to wood surfaces or a fire hazard in general.
The safe distance between the wall and the heating structure depends on the material from which it is made:
So the distance from the wall to the stove:
- from brick - is 35 cm;
- made of metal (without interior decoration) - 100 cm;
- made of metal (with interior decoration made of bricks or fireclay tiles) - up to 70 cm.
In small rooms, where it is not possible to maintain a safe distance from the wall to the stove, it is more rational to install a protective screen or sheathing.

What to consider when choosing a place for the stove
House design
The first and indisputable requirement when choosing the location of the stove is the complete design of the house. That is, the location of the stove in the house should be planned simultaneously with the walls. In this case, it will not work out so that it will be unbearably hot in one room, and frost in the other. And it is much easier to fill the foundation for it before the floors are laid.
But there are other rules to follow.
- Under no circumstances should the foundation for the furnace be connected to a common foundation. The house will shrink over time, and the smallest thing that will happen is that the stove will be covered with cracks, from which streams of smoke will constantly curl, making it impossible and even dangerous to be in the room. Well, at most, it will simply skew and a very large repair will be required.
- The place should be chosen in such a way that the chimney is located in the immediate vicinity of the internal main wall. It will be possible to support the pipe on the ceiling beam.
- Be sure to take into account the layout of the house. Number of rooms and windows. The need to heat the second floor, if any. And the material from which the house is built.
- Next, the approximate heat loss of the entire structure is calculated. From here, the heat transfer of all surfaces of the stove is calculated.
- The design of the oven itself must also be thought out in advance.
- And the last thing. If the house is too large and one heating device is not enough, you should calculate how many stoves will need to be put in general and in what places.
Many years and even centuries of experience show that building too many chimneys means spending an increased amount of firewood. You shouldn't make a separate stove for each room. The ideal location is called so because with a minimum of space, as large an area as possible is heated.
And one more important fact. The stove, no matter what kind of fuel it is heated, is a device around which a certain amount of garbage, dirt, ash, soot and other dirty substances always accumulates. Therefore, it is better to make the firebox hole in the room that is closest to the front door. Then you don't have to carry firewood, buckets and bags of ash across the house. Believe me, after these voyages, the rooms will definitely have to be cleaned.
Protective thermal shields
As the main protection of the walls of the bath, heat-resistant screens are used - special insulation shields to close the side surfaces of the stove and reduce the intensity of the spread of infrared radiation in the room.
Screens are divided into two categories: metal and brick.
Metallic
Protective shield made of steel or cast iron sheets. It is mounted around the perimeter of the sauna stove, while maintaining small technological gaps (3-5 cm) between the screen and the outer walls of the heating structure to provide additional air convection.
Depending on the features of the walls of the bath and the type of stove, metal screens can be front and side. Some models of metal stoves are produced with an additional protective casing, which is installed when installing the firebox.
Installation of metal screens is carried out using adjustable feet, bolted to the floor covering. In addition, the legs allow for clearance at the bottom of the structure for additional ventilation. To increase the service life, the screens are covered with a refractory paint layer.
- decrease in the intensity of infrared rays;
- improvement of air convection between the walls of the oven and the screen;
- reduction of the overall heating temperature of the outer walls of the heating structure.
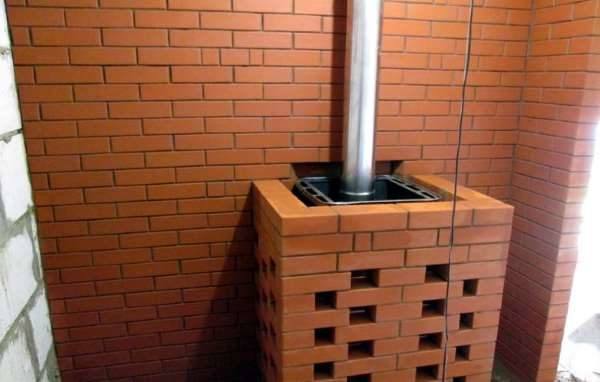
Brick
A protective brick screen is designed to enclose the walls of the sauna stove.
The laying is done in ½ brick around the perimeter, observing the technological gaps of 6 cm. The lower part of the structure is equipped with additional air ducts at a distance of 2.5 cm from each other.
For arranging a brick screen for furnaces, heat-resistant fireclay bricks without voids are used. As a joint mixture - a thick solution of cement or clay.
The finished walls of the screen should be 22–25 cm higher than the wall of the heating structure.
- low thermal conductivity of the material from which the screen is made;
- resistance to high humidity and high temperatures;
- long-term accumulation of heat in the room;
- receiving mild heat from the oven.
Brick masonry screen
It will close all sides of the metal furnace, then it is in the casing, and the bricks make up the sheathing for it. You can make a second brick wall, near the wooden wall, which will be located near the stove. This masonry is made of refractory bricks, and the layers are coated with a mortar of cement and clay. Experts advise to do brickwork in half a brick (12 cm), and a quarter of a brick (6 cm) is allowed. It is worth considering that with such a laying, the thermal insulation will be reduced by almost half.
A gap must be left at the bottom of the shield so that air can penetrate between the masonry and the stove. Brickwork can be made up to the ceiling, but this is not necessary, the main thing is that it should be 20 centimeters longer from the upper surface of the stove. The brickwork around the stove is not done closely, it is necessary to leave a gap from five to fifteen centimeters. We leave the same distances from the bricks to the wall (from 5 to 15 cm).
Protective wall cladding
For the arrangement of thermal protection of the bath walls, special sheathing made of refractory materials is provided. They prevent overheating of surfaces and reduce the likelihood of a fire in the room.
Important! The height of the sheathing should exceed the height of the walls of the heating structure by 120 cm. The distance between the walls of the bath and the sheathing is at least 3 cm. Technological gaps are provided at the top and bottom of the sheathing to ensure air convection.
Sheathing-reflectors
This option for protecting the walls of the bath consists of metal sheets and a heat-resistant layer of thermal insulation. First, a heat-insulating layer is attached, a sheet of metal with a polished surface is mounted on top of it.
It is non-combustible insulation that effectively reflects thermal energy from wooden surfaces, reducing their heating.
Important! The sheet reflector produces a softer heat that is easily perceived by the human body.
The following is used as a heat-insulating layer:
- Basalt wool. Environmentally friendly and safe material with high thermal insulation, hygroscopic and fireproof properties.
- Basalt fiber board. A material with good sound and heat insulation properties. In addition, it is resistant to fire and decay.
- Asbestos cardboard boards. Material with wear resistance, impact resistance and fire resistance.
- Minerite panels. A popular refractory material that provides structures with reliable protection against overheating and possible ignition.
Ceramic bushings that are resistant to heat are used for fastening such cladding. If there is a minimum safe distance from the walls of the bath to the casing, a double layer of thermal insulation is installed.
Cladding with cladding surface
If it is necessary to comply with the general style of the room, decorative trim can be used for protective sheathing.
The most common finishing materials for thermal sheathing:
- Terracotta (tiles). A hard-wearing material made from natural clay rock by firing. Differs in high wear resistance, durability, practicality and resistance to high temperatures. Terracotta is matt and glazed.
- Clinker (tile). The refractory material is made from clay and has a high density. Outwardly, it resembles a brick for cladding.
- Tiles (tiles). Modern material, the front surface of which is represented by a textured pattern, ornament or texture.
- Talcochlorite. Pure rock with a characteristic shade of gray or green. The material is characterized by impact resistance, wear resistance, heat resistance, durability and low hygroscopicity.
- Porcelain stoneware slabs. Impact-resistant and heat-resistant facing material. The textured surface of the tile allows you to imitate other natural materials - stone, wood, brick.
Installation of refractory lining in the steam room is carried out on a thermal insulating base using special heat-resistant solutions. The finished cladding has the following appearance: wooden surface - technological gap (3 cm) - refractory base - facing tiles.
How to protect the walls of the bath from the heat of the stove?
When the bath is heated, the surface of the stove can heat up to 400 degrees Celsius. It begins to emit infrared radiation, which is why it itself becomes a source of heating. The heat is quickly distributed throughout the bath, immediately hitting the walls located near the stove. If the wall surfaces are made of wood, then under the influence of high temperature they begin to char, which can even lead to their fire. To avoid igniting the walls, it is necessary to create protective screens and sheathing made of non-combustible materials in the bath.
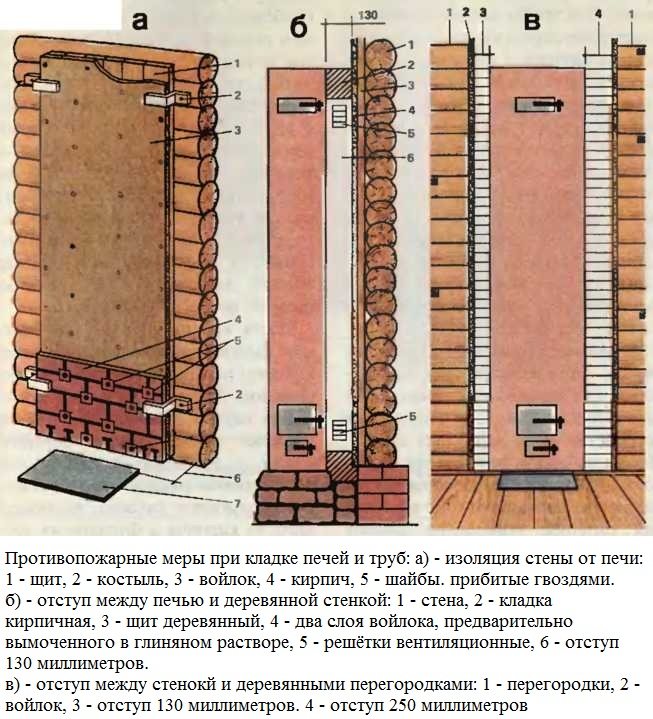
Safety measures when laying brick ovens

The quality of the brickwork directly affects the fire safety of the stove during its operation. If the work is done with poor quality, then the stove will sink to a sufficiently high height, which will lead to multiple occurrences of chips, cracks and chipping of the mortar from the masonry joints. Fire and hot gases entering the room through them can cause a fire. The likelihood of a fire also increases significantly in those cases when soot is removed from the smoke channels untimely, or the rules for performing the furnace are violated.
The structural elements of the room in which the stove is laid out, in cases where they are made of wood or other combustible materials, are placed on a certain distance from the oven... In this case, the minimum value of the specified distance is set by the relevant regulatory documents. If there are reasons that prevent the observance of this distance, then the following requirements are fulfilled. All structural elements of the room, which are closer to the walls of the furnace than required by fire safety rules, are insulated with special materials (asbestos sheets, or sheets of technical felt, previously soaked in clay solution).
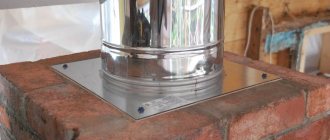
In those places where the chimney of the heating device passes through the floors or the roof, a special cutting (fluffing) is performed.
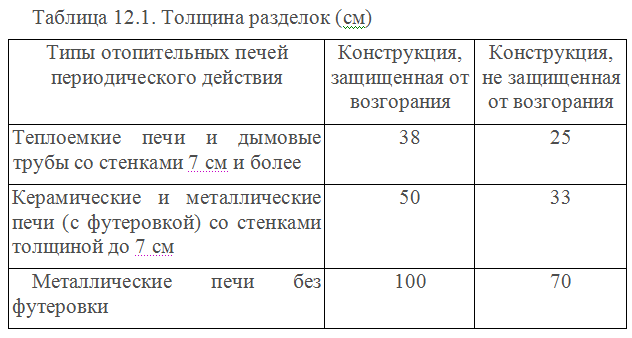
The standards for the thickness of the masonry, depending on the distance "smoke - combustible base" are given in table 1.
If, according to the project, the stove will be laid out between combustible wooden partitions (interior walls), then the minimum distance from them
to the furnace wall should be 130 millimeters... Additionally, it is necessary to insulate the wall from the side of the groove. Between the partition and the "smoke" the minimum allowed distance 250 mm... In cases where there is no possibility of performing high-quality thermal insulation, this distance increase to 380 millimeters... As one of the possible options, a situation can be considered when the indentations from the stove to the walls are covered with brickwork from the sides.
In this case, the wall, made of wood, is closed by a brick wall, laid out in a quarter of a brick on felt, previously impregnated with clay mortar (the so-called "cold quarter"). Openings with ventilation grilles are made between the walls of the furnace and the cold quarter from the bottom and top, which ensure air circulation in this spatial volume. The required height and width of the cold quarter projections must exceed 250 millimeters.
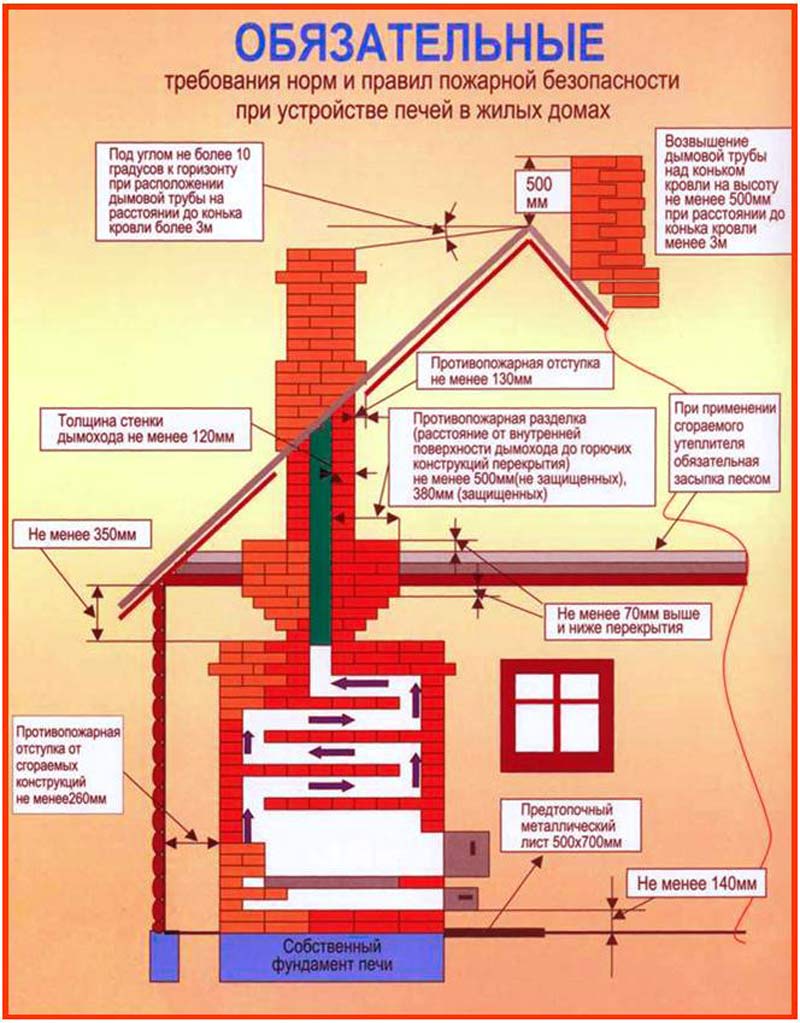
Do not forget that it is strictly forbidden to perform vertical ligation of the "cold quarter" with the masonry of the oven or pipe itself. The ash pan of the furnace must not be connected to the underground. Wooden ceilings located above the place of installation of the stove are insulated with a double layer of technical felt, pre-soaked in clay solution. It is possible to apply plaster to the felt, followed by upholstering this place with roofing iron. In this case, the zone of such isolation should minimum by 150 mm go beyond the outer dimensions of the oven from all four sides. Floors made of combustible materials in front of the firebox are also subject to mandatory insulation, which, most often, is made of a double layer of technical felt soaked in a clay solution and then sheathed with a sheet of roofing iron. The standard sheet size is 500 * 700. The plinth located near the stove is upholstered with tin, or covered with it.
When cutting, it is necessary to take into account many additional factors: the slump of the furnace, the pipe, the building itself. It should be remembered that stone and wooden structures shrink differently. If the former demonstrate negligible values, then wooden structures can sag up to 150 millimeters... Walls may rise slightly during caulking work. With the subsidence of the walls, respectively, the floors resting on them also subside. This can lead to cracks, and as a result, to a fire. In cases where the expected subsidence of the walls can exceed the draft of the pipes (both top-mounted and root pipes), the cutting is done so that it has a free path inside the room. If the pipes or stove show a draft, the value of which exceeds the calculated draft of the ceiling and walls, fluffing should be done with a margin upward (towards the attic).
During construction, attics are often covered with light materials with low thermal conductivity, which are quite flammable (hay, dry leaves, sawdust, peat, etc.). From above, all this is covered with slag, earth or sand. The thickness of the top layer must be at least 20 millimeters. In such cases, the cutting should be raised above the backfill layer by at least 70 millimeters, and along its perimeter, backfill should be made of non-combustible materials, the thickness of which should be 100 or more millimeters. The distance from the wooden lathing (rafters) to the outer surface of the brick pipe must be at least 130 millimeters. And between the pipe and the combustible roof - 260 millimeters. The remaining gaps should be covered with sheets of roofing iron or asbestos cement.
Furnaces and pipes should be periodically inspected to detect possible defects that have appeared and promptly eliminate the latter.
Protective screens around or near the oven
Shields are insulation shields that cover the side surfaces of the furnace to reduce the intensity of heat radiation. They are divided into two types: metal and brick.
Metal screens (cast iron or steel sheets). Such shields are installed around the stove at a distance of 1-5 cm from the walls of the firebox. Front and side models are available. They allow you to reduce the temperature of external metal surfaces to 100 degrees Celsius and thereby reduce the fireproof distance to 50 cm. Moreover, the total distance from the firebox to the wall will be from 51 to 55 cm. As for the installation, the metal screens are easily attached to the floor using bolts.
Brick screens. They can cover all the side surfaces of the oven, thus representing its outer skin. In another case, this shield is a wall that separates the oven and the flammable surface. The use of brick screens can reduce the distance from the stove to the wooden wall to 22-42 cm.
For the laying of the protective screen, solid fireclay bricks are used. Clay or cement mortar acts as a binder. It is preferable to lay in half a brick (thickness 120 mm). Moreover, small holes must be left in the lower part of the shield to ensure air convection between the stove and the brick wall. The walls of the shield must end at least 20 cm above the top surface of the oven. In some cases, the masonry can extend all the way to the ceiling. The brick screen should not be installed too close to the walls of the oven. The optimal distance in this case should be 5-15 cm.
Installing a stove in a bath with a remote firebox: fire safety rules
Regardless of what type of oven is installed, there are a number of requirements that must be met. In particular, we are talking about how surfaces heated to high temperatures (up to several hundred degrees) did not come into contact with combustible materials in any way.
The main source of danger in the bath is the stove.... Both the floor and the ceiling must be protected from it. The walls, by the way, do not need to be protected if the oven is placed at a sufficient distance from them.
And even if you are busy installing the stove in a bath with a remote firebox, the first thing to do is protect its foundation... In this case, it does not matter - you put it on the foundation or directly on the wooden floor - in any case, you need to lay it under the stove refractory sheet (asbestos or basalt cardboard, for example), on top of which to put Metal sheet.
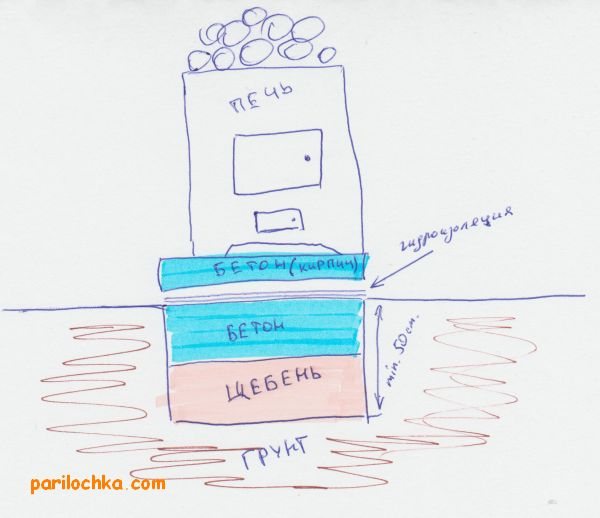
Base scheme for a massive furnace (see details about furnace foundations).
Asbestos cardboard for placing under a not very heavy oven (see more about installing ovens).
Another universal point of fire protection is correct routing of the chimney through the ceiling and roof slabs.
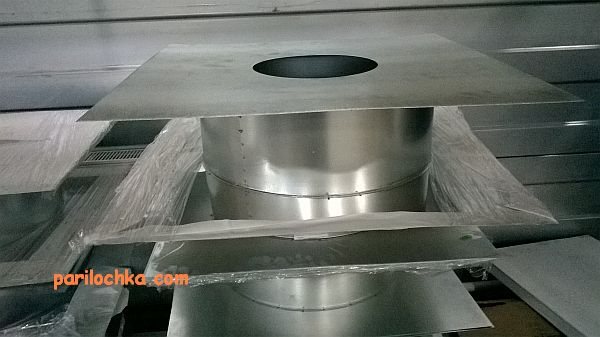
Ceiling passage box
The walls remain. Since in this case we are talking about installing a furnace with a remote firebox, the main "problem" will be passage of the fuel line directly through the wall, and the distance between the wall and the stove will be minimal - about 5 cm on average. And this means that one lining of the wall with refractories will not do here.
Related article: What is the thickness of the insulation for external walls
Therefore, we will analyze two options: installation of the stove in a bath with a remote firebox, when the walls combustible (i.e. wooden) and non-combustible (brick, block concrete). The material is also a criterion for dividing furnaces into separate types; in accordance with this classification, metal and brick furnaces are distinguished. Some experts classify cast-iron stoves in a separate category. In addition, there are other types of ovens:
Protective non-combustible wall cladding
Wall surfaces that are adjacent to the hot oven walls are susceptible to self-ignition.To prevent them from overheating, sheathing is used, consisting of non-combustible and heat-insulating materials. They are classified into two main types: reflective and cladding.
Reflective sheathing. They consist of a combination of metal sheets and non-hot thermal insulation. Thermal insulation is attached to the wooden surface, which is covered from above with a stainless steel sheet. Sometimes galvanized steel is used for these purposes, but when heated, it can release substances harmful to human health. It is preferable that the metal sheet of the screen be polished. The mirrored surface reflects heat rays from the wooden surface, preventing it from heating up.
The following materials can be fixed as thermal insulation under the stainless steel sheet:
- Basalt cardboard. It is a thin sheet of basalt fiber. Such cardboard is used as a fireproof, heat and sound insulating material.
- Minerite. Such non-combustible sheets are made specifically for shielding fireplaces, stoves and easily flammable surfaces in saunas and baths.
- Basalt wool. This material is absolutely safe when used in a bath and is not subject to fire. Basalt wool has high thermal insulation characteristics and increased hygroscopicity.
- Asbestos cardboard. It is a sheet refractory heat insulator. Asbestos cardboard provides reliable protection of flammable surfaces from ignition.
A common example of cladding is the following combination: wall - ventilation gap - insulation - stainless steel sheet. Moreover, the distance from the wooden wall to the stove should be from 38 cm. To fix the sheathing to the wall surface, ceramic bushings are used. They do not heat up and form ventilation gaps between the wall and the insulation.
If the distance between the stove and the wooden wall is minimal, then the cladding is made of 2 layers of refractory insulation. The sheets are fixed through ceramic bushings with a gap of 2-3 cm. Moreover, the top sheet is covered with stainless steel.
Sheathing with cladding. Of course, the stainless steel cladding perfectly protects the wooden walls from heat and fire. However, it can spoil the appearance of the bathhouse finish. Therefore, most often the cladding is masked with heat-resistant tiles. The most popular materials for wall cladding near the stove are:
- Talcochlorite. It is a green or gray rock. It has high strength, moisture resistance and fire resistance.
- Terracotta tiles. The material is made from baked clay. It is distinguished by a long service life, resistance to fire and mechanical stress. Terracotta tiles are not only matte, but also glazed. Its shades range from pastel yellow to brick red.
- Porcelain stoneware. It is a durable and heat-resistant tile that can imitate wood, brick or natural stone. The color range is presented in all natural shades.
- Clinker tiles. The material is made of clay and looks similar to facing bricks. Clinker tiles, in contrast to terracotta, are much denser. The range of colors covers almost all possible shades.
- Tiles. This is a type of ceramic tile. Usually tiles are embossed on the front surface in the form of an ornament or pattern.
Fastening refractory tiles directly to walls will not provide a thermal insulation effect, as they will heat up, which can lead to spontaneous combustion. Therefore, such material is used as an element to create the following structure: wall - ventilation gap - flame-resistant sheet material - tiles. Moreover, the distance from the tile to the walls of the stove should be 15-20 cm.
It is best to use fire-resistant panels MSL (glass-magnesium sheet) as a refractory element in the cladding. This material in the form of slabs is made on the basis of fiberglass and magnesia binder. LSU surpasses most building materials in fire safety. It does not burn at temperatures up to 1200 degrees. The glass-magnesium sheet does not deform even with constant exposure to moisture, which is especially important when used in baths.
In addition, LSU is resistant to mold and chemical attack, even with caustic alkalis and various acids. This material is highly durable - it does not crack or crumble. It does not contain components hazardous to human health. And the operational life of glass-magnesium sheets is at least 15 years.
Sheathing and cladding
The cladding is excellent against fire, but what about the appearance, what about the finish. The cladding will help to decorate the premises in the desired style. Refractory sheathing is glued with tiles, heat-resistant glue is used, and only special heat-resistant tiles.
You can use, for example, such tiles as: terracotta, clinker, tiles, porcelain stoneware, soapstone. They are heat-resistant, very durable, it is easy to choose a certain shade with them, they are durable. You can choose imitation of stone, wood and even brick. Such a tile can have a pattern or ornament on the front side. Waterproof rock tiles.
You cannot mount this tile directly on the wall., it will heat up, and then the protection of the walls from the stove in your bath will not work. It is used as part of the entire component: wall, ventilation gap (2 cm), fire-resistant sheet and tiles. The distance from the tile to the stove is twenty cm.
The fire-resistant material used in the cladding is: fire-resistant drywall, it is with fiberglass additives. Minerite, it looks like a slab, it, in turn, is cement-fibrous, of course it does not burn, does not rot, easily transfers moisture and dampness. Glass-magnesium sheet, takes the form of a plate. Made of binder and fiberglass. Also, it will not be damaged by water and temperature drops. The casing, which has a ventilation gap, absorbs little heat, and therefore the wall behind it does not overheat or catch fire. Another plus is that tiles can be glued to the cladding, thereby creating your own style in the steam room.
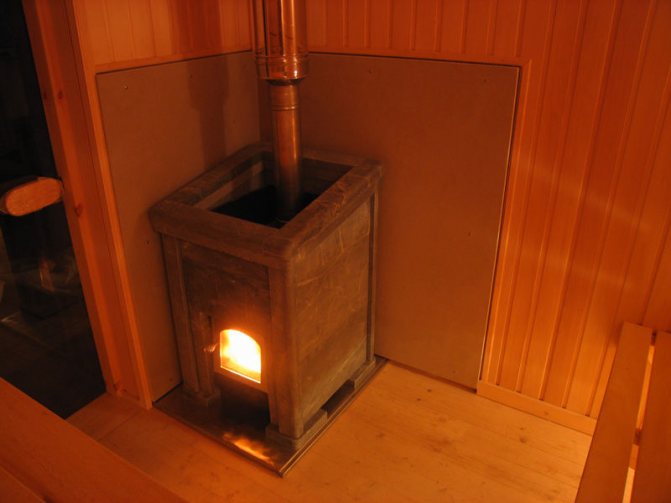
Protecting a wooden wall from the heat of the oven
Wooden baths require especially careful observance of fire safety rules during their arrangement. The source of a fire can be anything, an unextinguished cigarette, coals falling out of the furnace, an uncleaned chimney, but the main source of threat is the stove itself.
The surface of the stove heats up to 300 ° - 400 °, the heat falls on the wooden walls, which leads to their excessive heating and charring. Stopping the process of burning wood surfaces is extremely difficult; the best way to avoid a fire is to prevent it. There are two really effective ways to insulate the surface of wooden walls from the heat of a sauna stove - protecting equipment in the form of a screen or erecting special sheathing made of non-combustible materials.
When is it required?
Sometimes there is no need to protect walls. If the stove is located at a safe distance from the wall from the point of view of fire safety, the arrangement of protective screens and other measures can be neglected. The distance from the walls, which is required to weaken the heat from the source, is different:
- A stove laid out in a quarter of a brick should be located no closer than 35-40 cm from the wall;
- A metal furnace without lining should be placed one meter away and no closer;
- Metal with a lined crucible can be installed 70-75cm from the wall.
However, not every steam room has the ability to meet these requirements, due to the small area. The layout of the steam rooms with an area of 6-8m² hardly contains the necessary set of items for the vaping procedure.Therefore, the need to insulate the walls with special cladding is relevant.
Application of protective screens
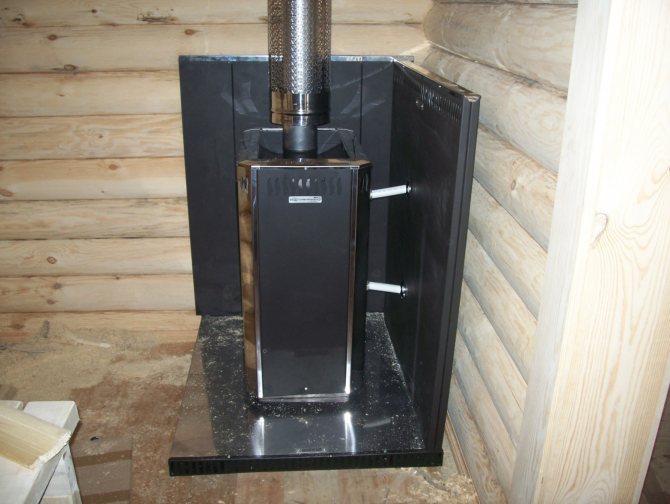
The screens are brick or metal shields that protect the walls from intense heat radiation. Such protection is used when installing metal stoves.
- Metal screens are made from steel or cast iron sheets, these
the heat source is surrounded by casings with a distance of 3-5 cm.
Advice! When purchasing a metal stove for a bath, you should give preference to a model equipped with a metal casing. Its cost is not much higher, but the issues of wall insulation are removed.
Additional frontal or frontal shielding, which is located on the walls, depending on the location of the oven, will not interfere. Protection guarantees the wood from overheating, reducing the temperature by 100 degrees or more, and provides an opportunity to save space in the steam room. The oven protected by a casing can be installed at a distance of 50-55cm from the wall.

Installation of screens is simple. The casing, equipped with legs, is attached to the floor by side or front screens - with galvanized nails or self-tapping screws.
- Brick screens are masonry, which is used to sew up a stove with
on all sides, the same casing, only made of bricks. Another way is to lay a half-brick between the firebox and the wall of full-bodied fireclay bricks laid on a mortar of clay with cement. The width of the wall should be 120mm, although there is an opinion that it is permissible to put 60mm in a quarter of a brick, however, it should be remembered that in this case the thermal insulation indicator is reduced by exactly half. It is recommended to raise the masonry in height 20-30 cm above the surface of the firebox, but if you raise it to the ceiling, it will not be worse.
The screen should be located at a distance of 10-15cm from the wall, 5-15cm from the stove, that is, space saving is 30-40cm
Important! Functional holes for heat transfer should be made in the lower part of the masonry.
The protective screens are effective, they reduce the temperature to the level acceptable when using high-temperature fuel units. The same function is performed by wall cladding made of non-combustible materials.
Types of protection against overheating of the bath walls
Protective screens
The easiest and one of the most effective ways to protect the wall from overheating is to install a solid screen. It is built from metal or brick. The metal ones are planes framing the furnace in the form of a casing (or installed only near the wall facing the wall of the bath) at a distance of about 5 cm. The air gap reduces heat transfer from the furnace, and the metal absorbs infrared radiation. The screen, of course, also heats up, but its temperature is 3-4 times lower than the heating level of the furnace.
The temperature of 80 - 100 0С is also quite high, but it allows you to reduce the distance from the wall to 0.3 - 0.5 m. Even in a small bath, this is quite satisfying. Metal shields can be fixed both directly to the furnace and to the floor using threaded connections. They can be easily assembled and removed if necessary.
The brick screen is also very effective, it absorbs heat even better than metal and installs without any problems. The small height and thickness of half a brick allows you to do without a bulky foundation. If there is a desire to save money, then the screen can be built by installing a brick on an edge. Usually, when using fireclay refractory bricks, a quarter (60 mm) thickness is sufficient. But in this case, the screen must be installed at a greater distance from the firebox, which makes the structure more bulky. Usually the screen is at a distance of 10-15 cm from the oven, the same distance from the wall.
Important: Bricklaying is done on mortar - a special mortar for chamotte. If not, then it is allowed to use a cement-sand mortar based on cement grade 300 or 400.
At the bottom of the brick screen, ventilation holes are left around the entire perimeter.This enhances the convection of air inside the structure and lowers the temperature of the screen - it is freely blown with air and heat is carried away into the atmosphere of the bath.
Heat-resistant wall cladding
The second way to protect wooden walls from overheating and fire is cladding with heat-resistant materials. Typically, metal sheets are used on top of a layer of refractory thermal insulation. Typically, heat-resistant stainless steel is used as the outer metal shield. It has excellent infrared reflectivity and does not emit toxic substances when heated, such as galvanized.
Important: It is best to use mineral wool or pressed basalt fibers as an insulating layer. Materials containing asbestos are also quite effective, but they are being phased out in many countries due to the toxicity of asbestos. You can also use special screens, manufactured industrially and sold under the name "Minerite".
The design of the protective sheathing is multi-layered and requires certain proportions. The insulation is installed not close to the wall, but at a distance of up to 5 cm, an air gap is required. The outer metal surface should be no closer than 40 cm from the stove, and fastening to the wall is carried out using ceramic bushings, which exclude intense heat transfer to the wall and charring it at the attachment points. As in the case of the screen, at the bottom, almost near the floor, a series of ventilation holes must be made through the entire casing. The height of the cladding is 10 cm below the ceiling level.
Protective lining
Heat-resistant cladding option. Only instead of a polished metal sheet, a different facing material is used. As an external finish on top of the heat-insulating layer, the following can be used:
- heat-resistant drywall;
- minerite;
- glass sheet.
Usually, the finish covers not only the wall near the stove, but most of the surface of the steam room, allowing it to be decorated in a uniform style. But other options are also possible.
All protection options are equally effective and their choice depends only on the general configuration of the steam room and bath equipment. As a rule, the type of thermal protection is determined at the design stage.
Bath wall cladding with non-combustible insulating materials
To prevent the walls from overheating, you can use materials with increased thermal insulation properties and inertness to high temperatures. Two types of materials are used:
- reflective;
- refractory with lining.
The first type includes wall sheathing materials, consisting of thermal insulation with refractory properties and a metal sheet in the form of a sheet.
Wall insulation with reflective sheathing

A protective cake with reflective materials is done like this. First, the thermal insulation is fixed with the help of ceramic bushings directly to the wooden walls, then it is sewn up with a sheet of stainless steel.
Advice! It is better not to use galvanized metal, since when heated, it is possible to release heavy metals harmful to the human body.
Stainless steel with a polished surface reflects the heat flow inside the steam room, reduces heat loss. In this case, reflected heat is more beneficial than direct heat. For thermal insulation use:
- basalt cardboard or cotton wool, the only material with increased hygroscopicity, non-combustible, environmentally friendly;
- asbestos cardboard, which reliably protects against the emergence of a flame, characterized by long service life;
- minerite, a man-made material made specifically for this purpose.
The protective sheathing assumes the presence of ventilation gaps of 2 cm from the wall to the insulation, 2 cm from the insulation to the steel sheet.If it is necessary to install the stove as close to the wall as possible, make a double cladding of non-combustible insulation, with the help of ceramic bushings, they maintain gaps of 2-3 cm and sewn up with a steel sheet.