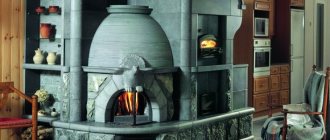
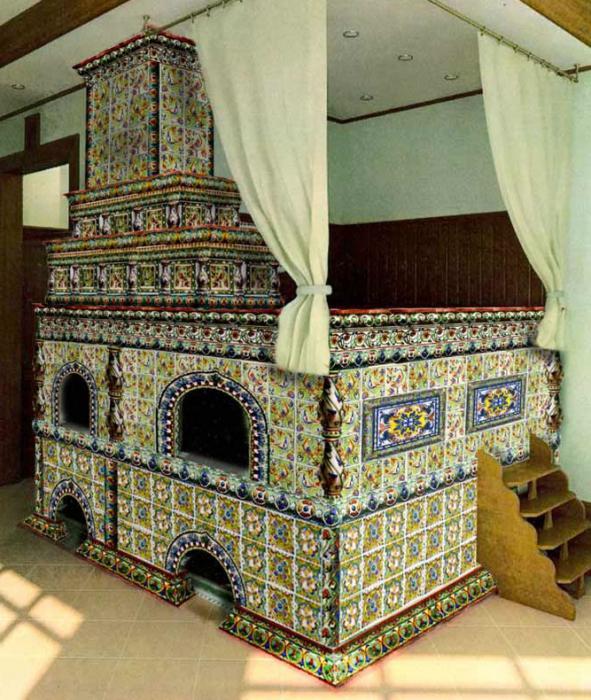
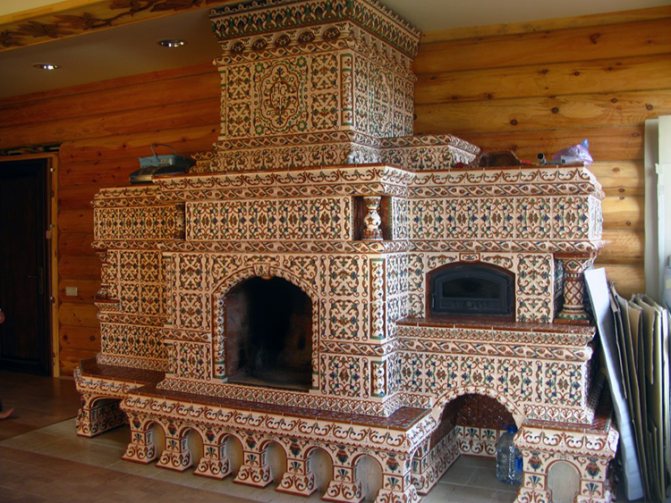
Tiles for decorating stoves and fireplaces became widespread half a thousand years ago, and have long become an integral part of Slavic culture. Tiled stoves are traditionally distinguished by multi-colored patterns, intricate motifs and ornaments, as well as painting in the form of various subjects.
The shape of stove tiles and the technology of their processing have been improved over the centuries. The modern variety of patterns and reliefs allows you to perform cladding in various styles - and create a unique atmosphere of coziness and comfort in the room.
Types of tiles
Stove tiles can vary in appearance. In this regard, tiles are classified into:
- plain smooth;
- plain embossed;
- painted smooth;
- painted relief;
- stucco.
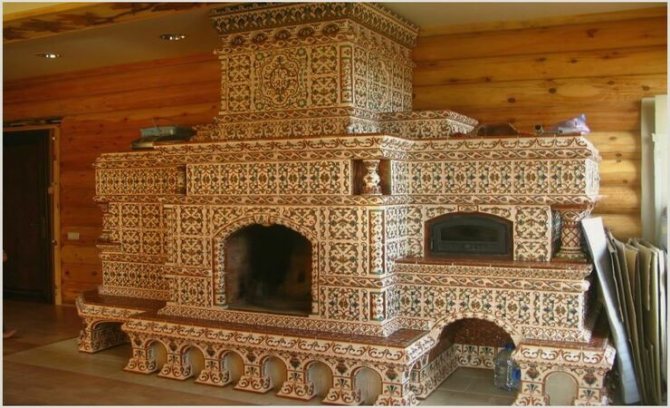
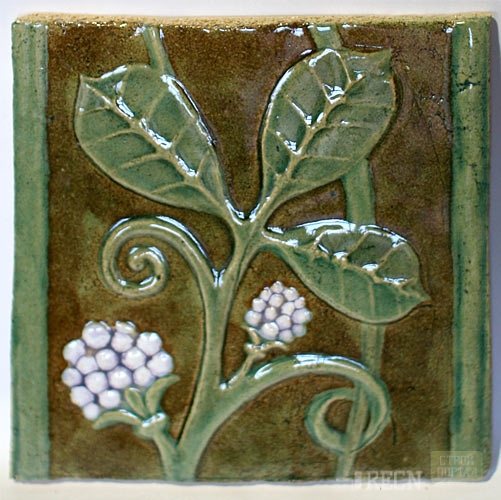
All of these varieties are very beautiful and are considered almost the highest quality type of ceramics. All sorts of patterns and whole pictures with a well-defined storyline - this is how stoves and walls can be decorated using materials such as tiles. You can see a photo of the structures finished with it on the page. Nowadays, interest in this type of decoration has increased greatly. And therefore, workshops began to be created, specializing in the manufacture of just such a cladding for stoves and walls. Most often they sell standard types of such tiles. However, if you wish, you can also order an exclusive kit designed for a given specific stove or interior.

Making a template and form for tiles
When making tiles, you first need to build a template. For this, a clay layer is taken, having a thickness of about 3 cm, on which the desired pattern is applied. Tiles are both smooth and embossed. The first ones involve drawing patterns on the tiles, the second ones - painting the stove tiles.
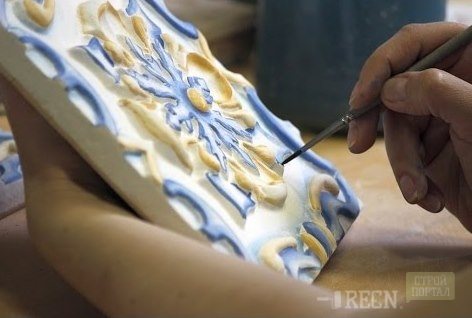
Taking this into account, templates are formed, the complete manufacturing process of which can be viewed in the video. The parameters and shape of the tiles are selected taking into account the dimensions of the furnace. Simple drawings can be formed by hand, as shown in the photo. The creation of complex patterns on the tiles is carried out using a special tool (stack).
When making tiles for the stove, stacks of various types are used:
- knives - contribute to the formation of patterns;
- grooves - when applying stripes;
- loops help remove excess clay.
These tools are purchased or made independently from wood using a loop wire.
When forming patterns for tiles for fireplaces, it should be remembered that the separation of stove tiles from templates should be carried out easily. Therefore, when creating a template at home, you need to try to exclude the formation of small details, respectively, right angles. Recommended profiles can be seen in the presented photo. Given the complexity of the work, tiles for the stove have a rather high cost, so not everyone can buy them.
The meaning of the word "tile"
The exact meaning of this name for this type of pottery is not known. However, it is assumed that it came from the word "cut". The fact is that in the manufacture of such cladding, wooden forms were once used. At the same time, the beauty of the tiles directly depended on the skill of the woodcarver. The more skillful the master was, the more original and attractive the finished material turned out.
Perhaps the meaning of the word "tile" has somewhat different roots. Some researchers draw a parallel between it and the word "sample".The fact is that the latter was very common in Russia precisely during the heyday of tile art.
We make ceramic tiles
The basis for the manufacture of the tile is pottery clay, into which various substances with refractory properties are added: chamotte, koalin, etc. We must carefully fill our mold with clay. Movements should be with pressure so that voids do not form. After a few hours, when the clay dries up, carefully remove the tile from the mold.
Please note that clay gives up some of its moisture to the form, and therefore itself decreases in size. Therefore, be prepared for the fact that the size of the plasticine mold and the finished tile will be different. So, if you need tiles of a certain size, make the clay mold a little larger.
Features of the design and installation of tiles
So, what is a tile, we found out. This is the name of a facing material made of clay. Next, let's see what are the features of the installation of this type of finish. Facing with this material is done in a completely different way from tiles. Most often, tiles are used to decorate stoves. If you just put them on a solution or glue, due to the effect of high temperatures during the fire, they will soon disappear. The concrete mix is not used for the same reason, even when laying the stoves. It is replaced with a clay solution.
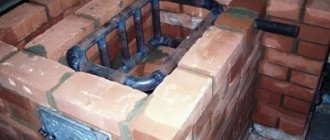
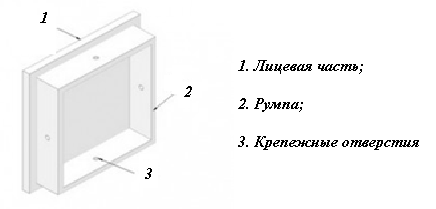
The installation of tiles is performed not on the finished stove, but immediately - already in the process of laying it. In the manufacture of tiles, holes are drilled in the segments of the rump opposite in height, into which a metal rod is inserted. Next, the box from the seamy side is filled with clay mortar, into which small brick rubble is pressed. When laying the stove in this solution, a hole is selected to the metal rod. Further, a wire is overlapped around it, the ends of which are laid between the bricks during the laying process. Traditionally, no seams are left between the tiles. The result is a beautiful yet highly durable finish.
Tiles: decorativeness and functionality
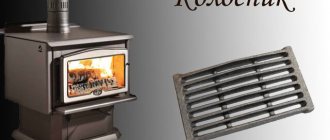
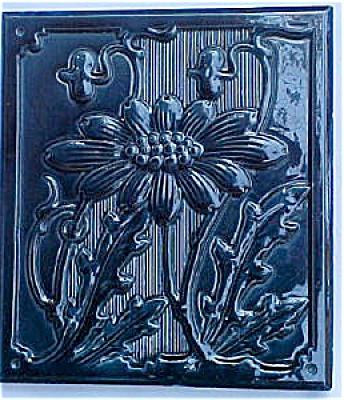
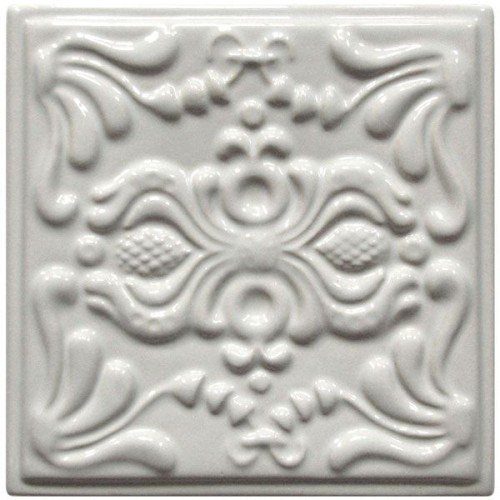
The tiles are box-shaped ceramic tiles with a glazed glossy (majolica) or rough (terracotta) surface, embossed or smooth. Unlike ordinary ceramic tiles, these products have a three-dimensional shape - on the back side they have a so-called rumpa - a box-shaped protrusion equipped with holes for fastening to the furnace using a wire, the ends of which are embedded in the seams between the bricks during laying. Neither glue nor mastic is used with traditional oven cladding. As a result, “air cushions” are formed between the surface of the stove and the tiles - they accumulate heat, distribute it over the entire area and maintain long-term heat transfer. At the same time, it is impossible to burn yourself on the lined stove surface.
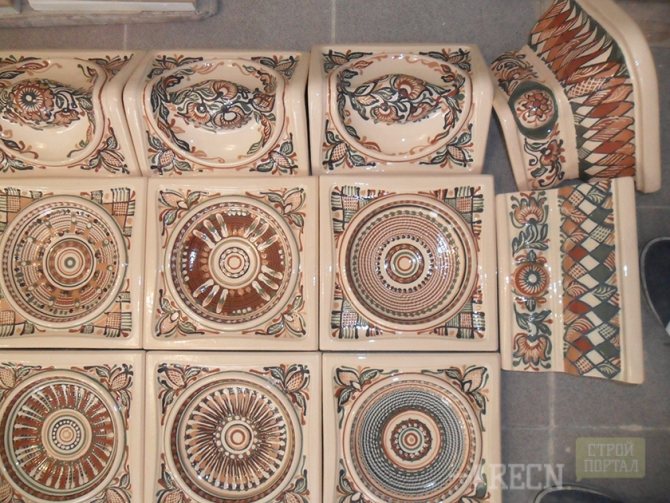
Depending on the place and method of application, the following types of tiles are distinguished:
- flat - they are installed on a flat surface;
- cornice and basement - respectively, for facing the portals above the cornices and the lower row from the floor - the base of the furnace;
- corner - for facing oven corners;
- shaped - they decorate convex corners.
The history of tiles in Russia
Thus, you now know what a tile is and what are the features of its installation. Now let's make a small excursion into the past and see when exactly this type of decoration appeared in Russia. The history of the manufacture of this type of facing material is inextricably linked with the history of the development of the art of laying stoves. Once upon a time in Russia, huts were heated "in black" with the help of the simplest designs - heaters. However, later, more modern stoves began to appear - with a chimney. Of course, the Russian love of decorating household items also touched this important element of the hut.Clay tiles, intended for finishing floors and buildings, began to be produced in Russia as early as the 10-11th century. Then she was mainly decorated with churches and temples.
The stove tile itself appeared a little later - in the 16th century. At that time, it was an ordinary clay tile with a relief pattern. The plots of the drawing on such a finish could be very different. Glazed tiles (analogous to modern glaze) began to be processed in the 17th century. In any case, the oldest of all found tiles dates from this century. Its second half can be safely called the golden age of tile art. It was precisely starting from the 17th century. and until the 19th, decorating stoves with this type of cladding becomes traditional. The plots of Israeli paintings, as well as the motives of the patterns, are becoming more and more complicated. The colors become unusually bright and colorful. Stoves of large churches, houses of wealthy citizens, palaces are decorated with tiles.
Until the 18th century, it was customary to cover with such tiles, including the facades of buildings from the outside. However, by the end of this century, this fashion faded away. Tiles began to be used only for interior decoration.

Tile painting stage
After firing, the utensil can be left in its natural color or painted. Before painting, the product is covered with natural linseed oil and dried for 1-2 days. Painting is done in two ways.
1) Cold painting method - usually used for homemade tiles. This is the least labor-intensive option that does not require additional firing. Regular oil paints are suitable for cold painting, and oil varnish for the final coat.
2) Engobing - painting with colored engobes. Engobe is a decorative coating made of liquid clay. To create an engobe, take different types of clay or tint white clay with coloring pigments.
This drawing technique is divided into two subspecies:
- applying clay with the consistency of thick sour cream;
- dipping the tile into water and then into a white engobe. After incomplete drying of the white background, a pattern is applied to it with colored engobes.
The use of this type of cladding in the USSR
Unfortunately, after the revolution, the art of making tiles in our country practically fell into decay. However, it was not completely forgotten. They continued to decorate the stoves with tiles. In particular, this type of finish was popular in Ukraine. Such cladding was used even for decoration of one of the Moscow metro stations - Borovitskaya. Tiles were also delivered to other countries of the socialist camp - Czechoslovakia, the GDR, etc.
How to make tiles with your own hands
A master class on making tiles will be of interest to those who decide to get down to business on their own. The work is not difficult, but painstaking and very exciting. Knowing the nuances of each operation will help you avoid disappointment and get a quality product.
Preparation for work includes: purchase of plaster putty for making molds and special clay for the product. From tools you will need knives or stacks and a muffle kiln for firing. There will be no superfluous step-by-step instructions that will allow you to make a tile in accordance with the traditions of Russian masters.
Preparing clay for tiles
Making a tile for a stove on your own is technologically not as difficult as it might seem at first glance. However, this work takes a lot of time and includes several stages:
- First you need to dig up good red clay without impurities.
- Then it is placed in a wooden box, thoroughly crushed and sifted through a fine sieve.
- Next, the resulting dust is diluted with water and left to settle.
- After a while, the lightened light water is drained off, and the liquid clay is scooped out in such a way that the lowest dense layer remains at the bottom.
- It is left to dry a little. After it acquires the consistency and flexibility of plasticine, you can start making the tile itself.
Glazing tiles
Tiles for stoves or fireplaces have a smooth surface that lends itself to easy maintenance. This is possible only with the help of glazing, in which the tiles are poured or dipped in glaze, as shown in the photo. For greater convenience, the tiles should be held by the tiller or laid on a support made of thick wire.
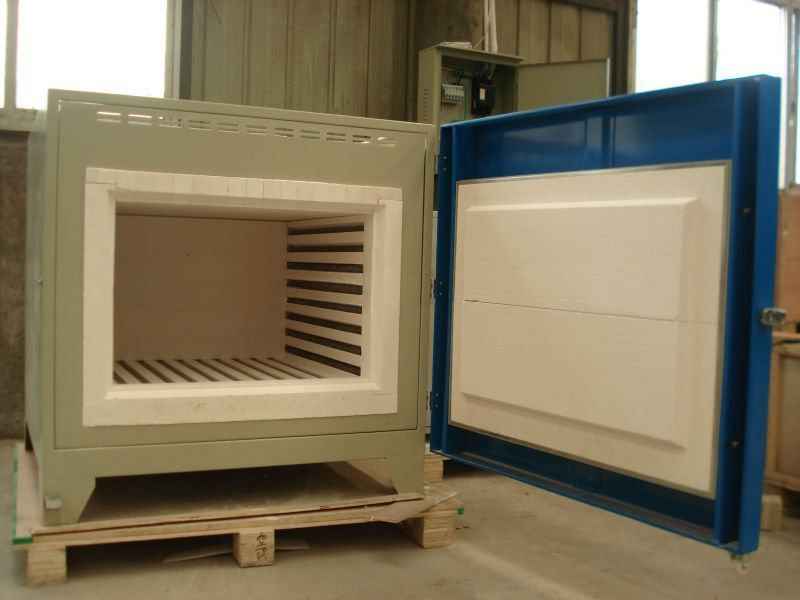
Glazed tiles are also subjected to glazing as well as painted tiles. The glaze thickness must be at least 1 mm. Having allowed the glaze to dry, the tiles are sent back to the ovens. The firing procedure is carried out in muffle furnaces at lower temperatures for three days.
Pouring out the tiles
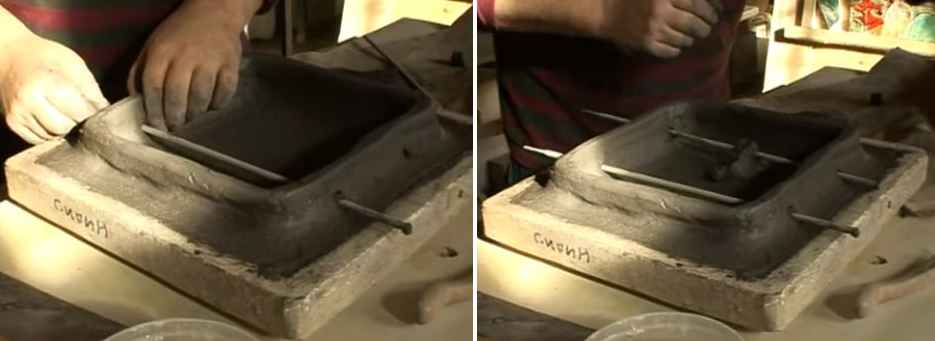
Next, they begin to manufacture the tiles themselves. The tile for the stove is made as follows:
- The finished form is filled with clay solution.
- Notches are made along the edges of the workpiece.
- Four long rectangular blocks are molded from clay.
- The sticks are glued along the edges of the workpiece. In this case, it turns out something like a box.
- In the two extreme segments of the frame, holes are made in the middle for the fastening pin.
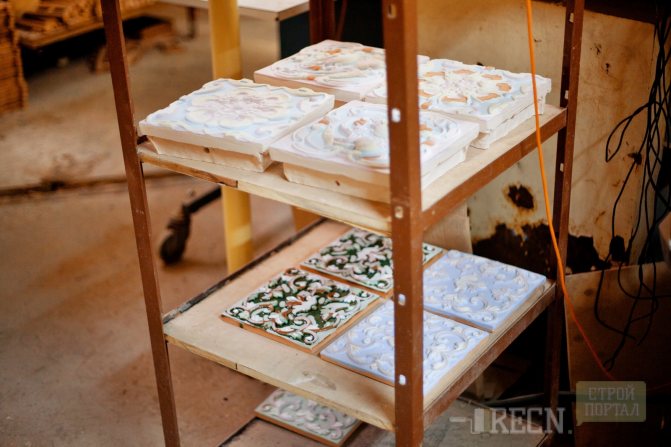
After the clay has dried, the tiles are removed from the mold.
What is a tile?
Stove tiles (tile) are a special type of ceramic tile that has a box shape. The reverse side of the tile is shaped like an inverted box.
It is attached to the surface thanks to the pins mounted in it. Such a surface is called a rump. Thanks to this structure, an air cushion is formed between the oven and the cladding material.
In addition to their aesthetic value, tiles are a fairly functional material. Let's consider their main advantages:
- Practicality. This facing material is not whimsical to use and does not require special care. It is enough to wipe it with a damp cloth. The tiles do not absorb the smoky smell, so the air in the room remains clean.
- Heat transfer. Due to the fact that the material for making the tile is clay, it retains heat for a long time. When the tile heats up, it expands. The same happens when heating a brick. The expansion of these two materials has the same coefficient. This indicates a high level of heat transfer.
- Safety. If you touch a red-hot brick, you can get burned. This will not happen if your stove or fireplace is decorated with tiles. You can safely touch them.
- Environmental friendliness. For the manufacture of such tiles, clay is used without various impurities of other components.
- Long term of use. The tile covering will reliably serve you for more than one decade.
Firing and painting
The workpieces obtained in this way are placed in a muffle furnace. The tile should be "cooked" in it for four hours at temperatures up to 950 grams. Next, the oven is turned off, wait for it to cool down and take out the tiles. After they have cooled down, you can start painting. The tiles are painted with either oil paints or engobes. The latter type is represented by clays of different compositions, which take on different shades at high temperatures. After the drawing is applied, the tile is covered with a special glaze. After waiting for the latter to dry, the tiles are again placed in the oven and fired again.
How to make tiles yourself
The process of making tiles is quite lengthy and laborious, with many nuances.Despite this, you can try to make unique tiles for the stove with your own hands. The resulting products are used to decorate hearths, fireplaces and stoves, and are also used to decorate modern residential interiors in the form of panels and artistic wall inserts.
Preparatory work
For the manufacture of stove tiles, it is necessary to properly prepare the clay. It is most convenient to carry out such work in summer or early autumn. Clay in small lumps is laid out on a wooden flooring and dried in the sun. After that, the lumps are poured into a container and evenly broken until the lumps disappear with a rammer, sieved until foliage and grass, pebbles, etc. are removed. Next, the clay is poured abundantly with water, mixed and the water is drained along with debris and large grains of sand. For high-quality cleaning, you can use a wooden tub, a spacious metal or plastic container with several side holes at different levels with tubes inserted into them, closed with plugs. After washing the clay with water, the plugs are sequentially pulled from the holes from top to bottom, as a result of which the water is gradually drained. After the performed manipulations, settled liquid clay will remain at the exit. It must be scooped out into a wide container and exposed to the sun so that excess water evaporates. The mass must be mixed periodically, and when it acquires a homogeneous consistency of thick dough, knead it thoroughly with your hands to give the mass plasticity.
Making a workpiece and a plaster mold
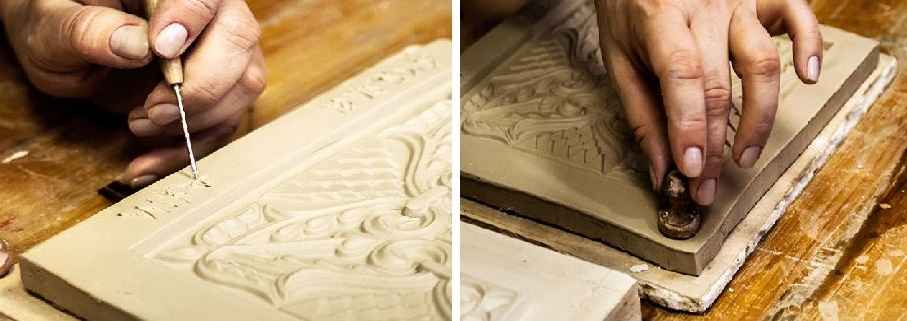
The most common tiles are rectangular, square, as well as round and oval. Take a lump of clay, shape a flattened cake, and then use a knife to cut a square or other shape out of it. Carefully align the top edges of the model with a metal or plywood rule.
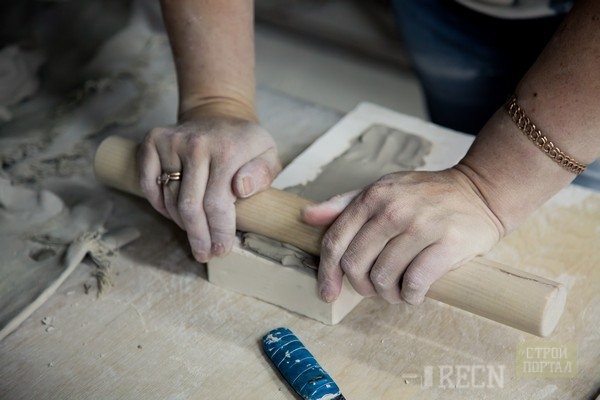
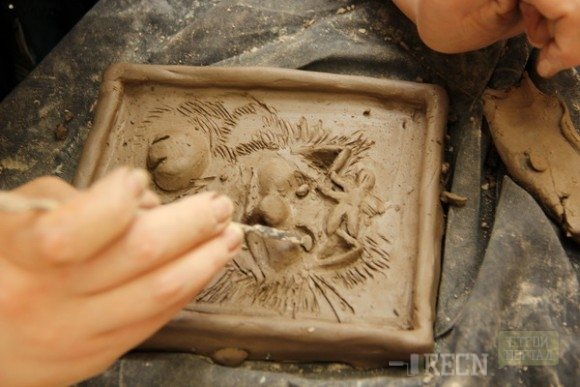
The embossed pattern on the surface of the model is sculpted with fingers, and also sculpted wooden stacks of various shapes are used to obtain a certain texture of grooves, stacks with wire loops to cut off excess material.
A sketch of the pattern is applied to the surface of the model using the tip of the stack, then clay rollers are laid along the perimeter of the tile to the height of the relief. The space between them is filled with the details of the pattern. It is important to plan the surface relief of the tile so that when the impression is taken, the plaster mold can easily be detached from the model. Use stacks to form the recesses of the pattern and give definition to the relief of the sample. After sculpting, lightly smooth the patterned surface with a damp cloth.
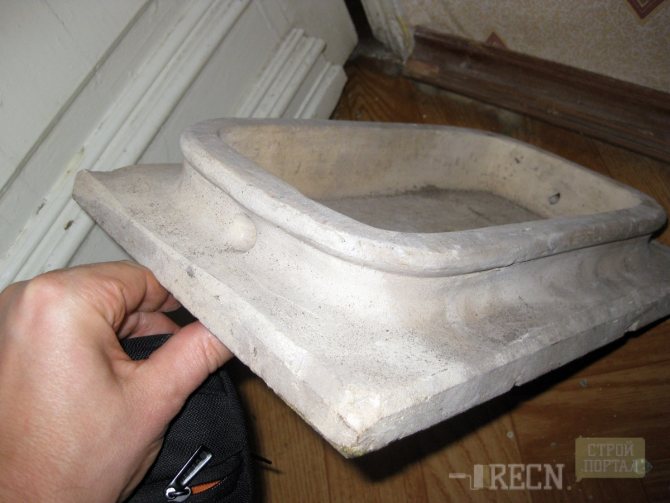
The manufactured model is placed in a wooden frame (formwork) and filled with plaster mortar. It is made at the rate of 7 parts of gypsum per 10 parts of water, pouring water into the container first, and then gradually adding and mixing gypsum in it. Gypsum mortar in a few minutes after production loses its plasticity and quickly hardens, so it must be used immediately after preparation. The clay sample is moistened with water using a spray gun and poured with a thin layer of gypsum - so that the solution completely covers all the details of the pattern, and then to the top of the formwork. After the gypsum has hardened (after about 15 minutes), the formwork is removed and the mold with the sample is left for several hours to dry. The dried clay mass will easily separate from the gypsum. The resulting form must be rinsed and dried. In this form, you can make about two hundred tiles.
Shaping and firing tiles
It is necessary to fill the entire surface of the mold with soft clay, carefully pressing it into the relief until it is completely filled, and then level the surface using a straightener. A rumpa is laid on top - four bars molded from clay and folded into a rectangle, holes must be drilled into them for fastening to brickwork. When the tile dries slightly, it is removed from the mold.Clay that has dried to a loss of plasticity, but not completely hardened (this condition is called leather-hard) is burnished - polished to a soft shine using a metal spoon or a glass bubble, a rounded pebble. If there is a relief, you can add shine to the protruding parts of the pattern. Then the tile is left to dry for several days - the drying period depends on the weight of the product, temperature and humidity of the air.
After drying, the tiles are placed in a muffle furnace and fired at a temperature of about 900 ° C for three to four hours. In this case, the tiles are laid out compactly, shifting them to avoid sticking with pieces of brick. Fired tiles (called terracotta) are left in a closed oven to cool gradually.
How to paint tiles
The following methods are used to paint stove tiles:
- Cold painting - using ordinary oil paints. The tiles are preliminarily covered with natural linseed oil, dried for a day and then painted, allowed to dry and opened with oil varnish. This method does not require further kiln firing.
- Painting with engobes - different types of clay are used for this. There are two ways of this painting:
- clay diluted to the consistency of sour cream - it gives different shades when painting, from white to dark gray, as well as red and brown tones. It should be borne in mind that under the influence of firing, the tones of engobe painting can change;
- the tile is dipped in water and then covered with a thin layer of white engobe. Next, the tile is left to dry a little (not until the applied layer has finally set) and painted with heat-resistant gouache paints - you can use brushes, a rubber bulb, a funnel or a horn with a plastic tube or straw inserted at the end. If the subsequent application of glaze to the tile is not planned, then it is recommended to add 10-30% of crushed glass to the engobe to increase the strength. He is pushed in protective gloves and goggles in a thick-walled metal container with a metal pestle, while the pestle and mortar are packed in a plastic bag to prevent spraying of glass fragments. After crushing, the glass is sieved through a sieve or nylon stocking. The painted tiles are re-fired.
Glazing tiles
At home, you can make a glaze by mixing a brewed starch paste of a liquid consistency with crushed glass (to the consistency of thin sour cream). Fired and painted with engobes or terracotta tiles are glazed. They are dipped in the glaze, left to dry, and then sent to the oven for firing and further final solidification. Under the influence of high temperatures, the glue will dry out and be absorbed into the pores of the clay; subsequently, a thin glazing layer will remain on the surface of the tiles.
Second way
You can make a tile with your own hands in another way. This is a simple technology that does not require firing equipment. However, tiles made by this method can only be used for wall cladding. She cannot finish the stoves. In this case, instead of clay, an ordinary putty mixture is taken, which can be purchased at any building materials store. It is diluted with water, guided by the instructions on the package. However, you need to add it a little more. The finished mixture should have a consistency of 15% sour cream. It is thoroughly mixed until all lumps disappear and left to stand for a while.
You can take silicone molds for tiles, designed for baking cookies. The putty mixture is poured into them in such a way that no voids remain. Next, a rectangle of a size comparable to the shape is cut out of the painting reinforcing mesh. It must be gently pressed into the mixture. Tiles reinforced in this way will be stronger.Next, the top layer of the mixture is removed with a straightener, carefully aligning the seamy part of the workpiece. After the mixture has set, the tiles can be removed from the mold. Sometimes, ugly sagging remains on the workpieces obtained in this way. You can remove them with ordinary coarse sandpaper.
Tiles manufacturing technology
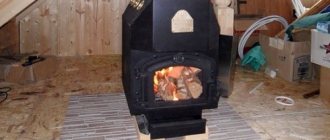
Traditionally, stove tiles were cast using molds from wood, a tiller was attached to them by hand or on a potter's wheel, and then painted with salts and metal oxides. Modern technologies allow you to leave the surface of fireplaces not too hot - in this case, ordinary ceramic tiles can be used for facing their surfaces. For stoves, the main task of which is to retain heat for a long time and to heat the room, the use of ceramic tiles with a tiller remains appropriate, as well as for stoves or fireplaces. Tiled stoves can hold heat for up to five days.
Modern production of tiles for the stove combines old traditions and technological developments of the present. Tile models were traditionally made by hand and replicated, repeating each sample. Such production requires kilns for firing, laboratories for the preparation of glazes. Various methods of painting tiles are used - graphing, combining a matte surface and glossy processing, adding stained glass inserts, aging effect, metal spraying, etc.
The process of making a set of tiles consists of the following stages:
- molds are made of gypsum - for this, the dimensions of the tile are preliminarily calculated, after which the workpiece is cast, the individual elements of the model's relief are marked and made, and the assembly is carried out. Then the model is several times covered with a special lubricant, the formwork is installed and the master mold is removed (the model is filled with plaster). The form is finalized and cleaned, dried;
- prepare the clay - clean it from various impurities and oxides and leave it to "mature" to give optimal plasticity, and then mix thoroughly until any air bubbles are removed;
- the clay is laid out in molds, punched in the direction from the center to the edges, evenly spreading, and left to dry. The plaster mold draws moisture from the clay mass - as a result, it dries up, shrinks and easily leaves the walls. At this stage, the molded products are removed from the molds and sent to a drying chamber with a certain humidity regime and gradual heating;
- further, to grout irregularities, impart color and increase moisture resistance, engobing with firing in electric furnaces with a gradually increasing temperature is used to eliminate the appearance of distortions and cracks. After that, the tiles of the tiles become hard. Their shape is checked, the ends are processed;
- the tiles are covered on top with decorative clays or enamel (glazed) in various ways and painted;
- after glazing, the last firing is carried out, as a result of which the paints acquire their final shade, the glaze fuses and forms a strong film. Overglaze paint can be applied to the finished tile.
Painting putty tiles
Paints for drawing on tiles made in this way are selected based on the purpose of the tile. If, for example, it will be installed behind a kitchen stove, it is better to choose a heat-resistant one. In all other cases, acrylic dye can be used. Then the tiles can subsequently be washed and cleaned.
We hope we have fully disclosed the topic of the article and answered the question of what a tile is. You now also know how to make such a finish with your own hands. That's all. We wish you good luck in this interesting endeavor!
Price for finished tiles
| Name | Dimensions (edit) | Price |
| Tiles "Epic" | 205 x 205 mm, 155 x 300 mm | RUB 1800-2000 |
| Series "Walk" | 205 x 205 mm | RUB 1500-1650 |
| Series "Panels" | 155 x 155 mm | RUB 750-850 |
| Series "Rainbow" | 205 x 205 mm | RUB 950-1100 |
| "Openwork" reliefs | 205 x 205 mm | RUB 940-1180 |
Facing with tiles helps to extend the operating period of the stove or fireplace. However, the prices for finished tiles are fabulous today, so not everyone can afford the luxury of buying them and finishing the stove or fireplace. Thanks to watching the video and getting acquainted with the photos presented by our master class, everyone will be able to make tiles for the stove with their own hands at home.
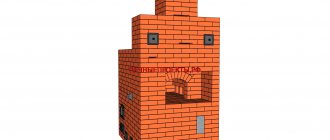
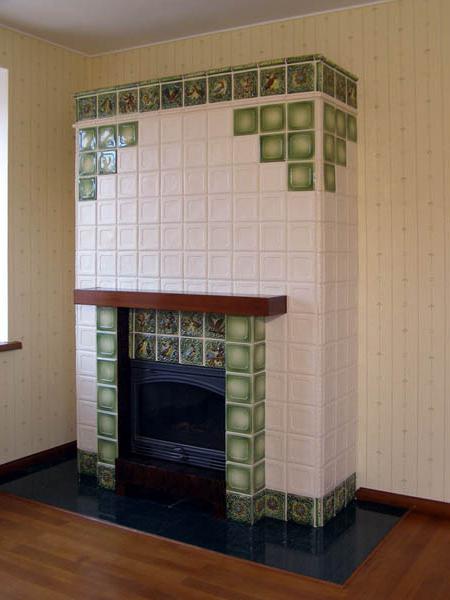
Tiled stoves
A tiled stove must be planned before it is erected. The work begins with a sketch:
- A pattern is drawn.
- Dimensions are removed.
- The number of tiles and all the necessary elements are counted.
When ordering tiles, additionally purchase 1 piece of each type of tiles. Even if no tiles are damaged during the masonry process, it will be safer if spare parts are stored in case they are damaged in the future.
Tiled stove
- The finished set of tiles is laid out on the floor. Each element is numbered on the back.
- The simultaneous installation of the first row of ceramics (base) and brickwork begins. The basement elements are filled with mortar in the same way as all tiles, but the metal rod is not inserted. If the base is not too even, the first row can be installed on the mortar (just make sure that the mortar does not get between the tiles). The second row and above - only dry.
- A triple bundle of wire is screwed onto the crutch and (its ends will be embedded in the masonry).
- The crutches are also connected with a wire.
- After the first row of tiles has been exposed, the brickwork begins. Each brick is tightly pressed against the tile. In the right places, the wire is closed and bent.
- Often the tiles are additionally fastened with staples.
Tile masonry is sometimes made with seams up to 10 mm. But a canvas with horizontal seams of 1 mm or less looks much better, as was done in the old days.