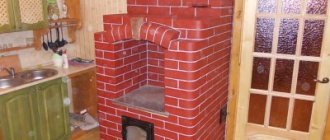
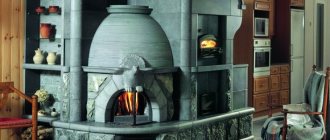
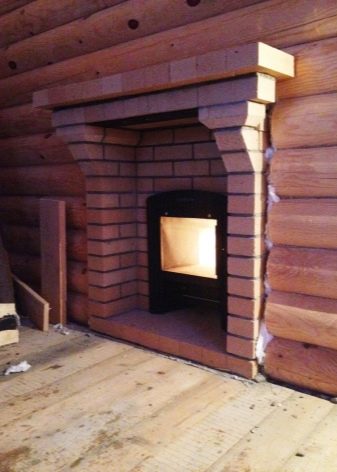
A stove with a remote firebox can be brick, metal factory or metal homemade. We will focus on the cheapest and fastest option - a stove with a remote firebox will be made of metal and lined with bricks.
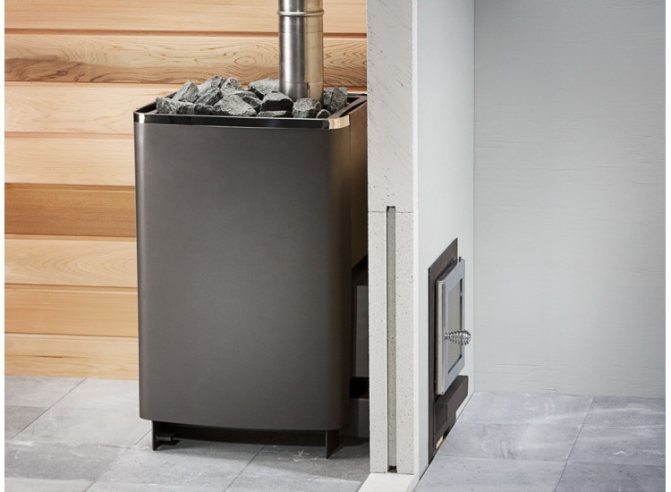
Installing the stove in a bath with a remote firebox
Why did we choose this option?
- At a cost, our option is several orders of magnitude cheaper than all the others.
- Does not require a large amount of construction work.
- According to its performance indicators, it satisfies even the most demanding users.
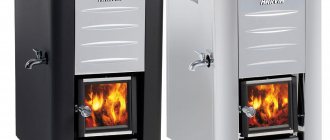
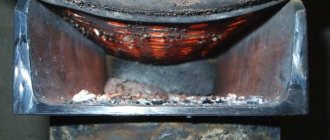
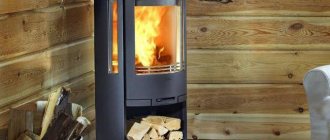
It is not necessary to brick the factory metal stove, it has reliable protection against getting burns, this simplifies the work, but worsens the comfort of being in the bath. The fact is that the stove cools down very quickly, you need to constantly add firewood. The firewood burned up in full force - it is too hot in the steam room, the fire began to die out - it is getting cool. A homemade metal stove can be bricked - not only increases the safety of use, but also significantly stabilizes the temperature indicators.
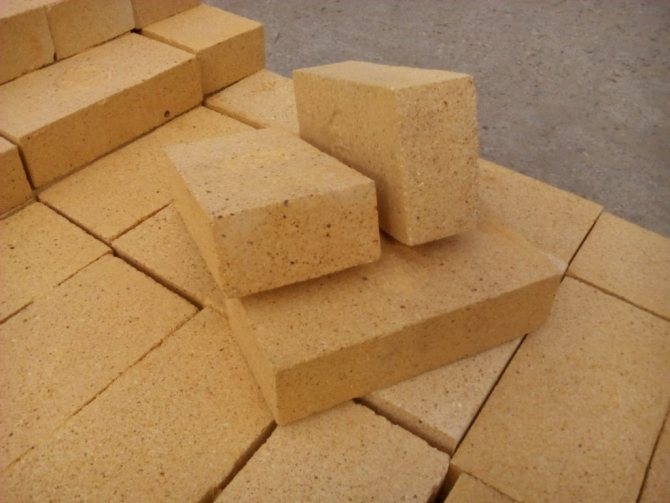
Another important point. On many sites, it is recommended to use fireclay bricks during furnace work. It is right. But only on one condition - only "heavy" fireclay is used. The fact is that there is also "light" fireclay. It also withstands significant temperatures, but has one feature - it does not let heat through. Such "light" chamotte is used in smelting furnaces, where minimal heat transfer is required: at very high temperatures inside the furnace, the temperature of the outer walls rises insignificantly.
Can you imagine how the stove will be heated in a bath made of "light" fireclay? This type of bricks can be used during the construction of chimneys - no additional thermal insulation is required. It is very simple to distinguish between two types of fireclay bricks: the first is heavier than ordinary red in weight, the second is much easier.

Varieties of fireclay bricks
In our version, you can get by with an ordinary red brick, it is much cheaper and in all operational and fire-fighting characteristics it fully complies with the existing state regulations.
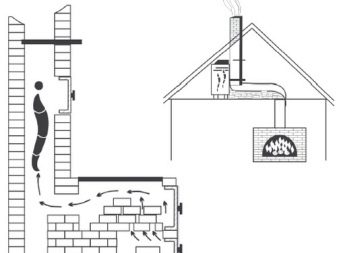
A few more "introductory" data. The portable firebox can be both outside the bathhouse and in the dressing room (rest room). For a personal bath, the second option is preferable: the rest room is heated at the same time and there is an opportunity to throw firewood on your own at any time. It is recommended to make a firebox on the street in cases where strangers often wash in the bath and it is not always possible to enter the recreation room.
A Few Practical Tips for Choosing a Remote Fireplace Metal Furnace Project
You should briefly dwell on this issue, knowing some of the details will allow you to avoid troubles during its operation.
| Advice | Photo | Description |
| Heating water. |
Heat exchanger-register for the furnace, internal
Heat exchanger tank per pipe
Very important! Not all stones are suitable for the heater, some may emit carbon monoxide when heated. There are quite a few such stones, but there is one universal advice - never take stones with streaks or splashes of white!
Video - How to make a metal stove for a bath with a remote firebox with your own hands
Foundation
There are two options here.
The first one - the floors of the bath are already laid
The option, let's say right away, is not very pleasant. How to solve the problem? First, you need to approximately calculate the total weight of the stove along with the brickwork.

The weight of the furnace can be found in the manufacturer's passport or catalog.
The weight of one red solid brick is ≈ 3.5 kg, the masonry will be half a brick. There is no longer a need, such a thickness will provide both normal heat transfer and sufficient structural stability.

Red brick weight
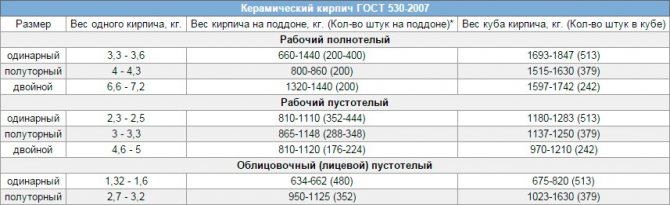
Pallet weight with brick
There are recommendations to do the brickwork in a quarter (to put the brick on the edge), but we would not recommend it. First of all, a solid experience is required for laying on the edge. Second, the stability of the structure is unsatisfactory.
For reference. The dimensions of a standard single brick are 250 × 120 × 65 mm. For one cubic meter of masonry, approximately 520 pieces are needed with a mortar thickness of about one centimeter. To facilitate the calculations, you need to remember that for 1 m2 of masonry in a half-brick, ≈ 53 bricks are needed. Take with a margin, there will inevitably be waste.
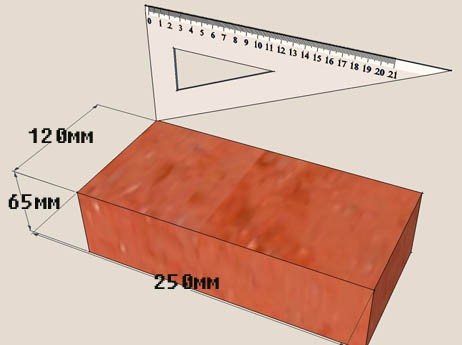
Standard sizes of solid bricks
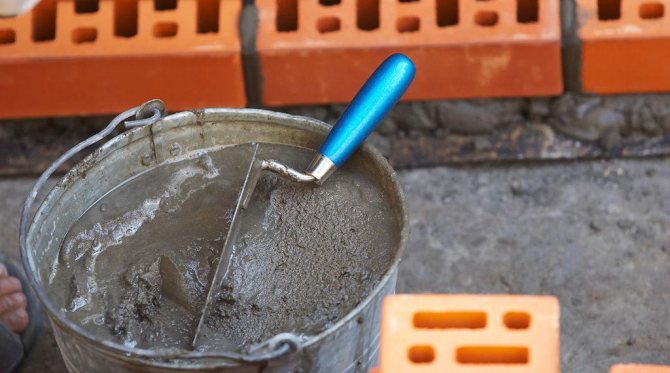
Very important. Most "experts" advise using a clay solution when laying a stove, "long and tedious" talk about the types of clay and other intricacies of preparing such a solution. Please read this information carefully and only use it when laying stoves in your home. In the bath, the clay will "flow" over time and wash out, you will have to make unscheduled repairs and close up ugly seams. Conclusion - use only cement-sand mortar for laying stoves in a steam room; to minimize the risks of cracking, slightly reduce its thickness.
Find the location of the floor beam, you can find it by the floor nails. As a rule, during the construction of a bath, a timber is used under the floor covering with a size of at least 100 × 100 mm, it can withstand up to 500 kg of weight. This is quite enough for a small metal oven; there is no need to reinforce the timber.
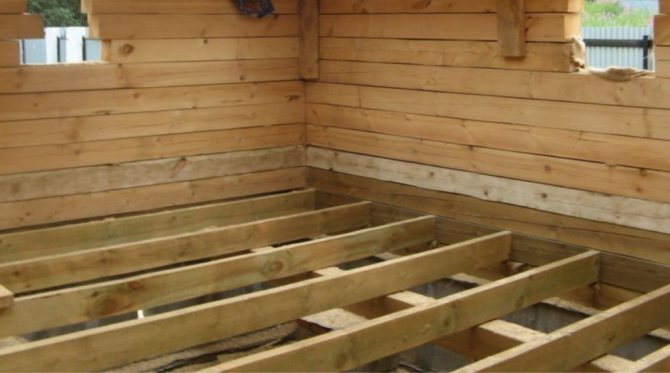
Photo of floor beams
Put a sheet of metal under the perimeter of the furnace, it is desirable to make thermal protection, strictly adhere to the rules of SNiP III – G.11–62.

It is not recommended to use asbestos sheets as a heat-insulating material, today there are harmless materials made of pressed mineral wool in the sale.
Mineral wool prices
For brickwork, you need to make waterproofing (for fireclay - no need, it is not afraid of moisture). For waterproofing, it is better to take two layers of ordinary transparent plastic film - this is much more beautiful than black roofing felt. The protruding film must then be carefully cut around the perimeter of the masonry. Do not be afraid that such a stove base raises doubts about its reliability. If the chimneys were brick - yes, even a slight "wobble" of the stove can cause big problems. In our version, the chimneys will be made of metal pipes. At the junctions and at the places where they exit to the outside, the structure is "floating", capable of compensating for small fluctuations.
Types of chimneys for a bath
Second option. The floors have not yet been laid
The best option is to make a stable foundation for the stove. And the presence of a foundation significantly expands the possible options for stoves, both in weight and in design features. How to make a foundation?
Portal for the stove to the bath: what are there?
Variants are possible both in the manufacturing method and in the material that you choose. In this, portals are similar to stoves, which are made of bricks and metal, cast iron. So you can independently develop and implement the design of the portal, or you can take advantage of the offers that are implemented through stores, including through online stores.
The material that is suitable for the design of the portal must be fireproof, it can be:
- a rock;
- ceramic tile;
- tiles;
- ordinary brick.
And a little more detail about each.
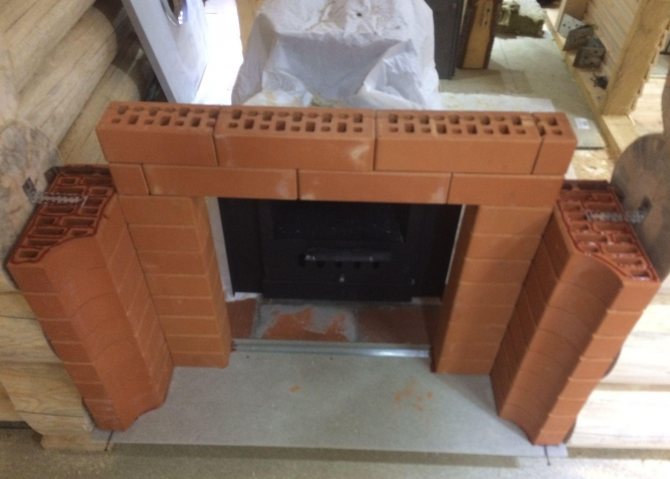
Brick
It can be anything, because the high temperatures are extinguished by the wall, most likely it will be a finishing or even clinker tile that imitates a brick. The main thing is to match the color and texture (smooth or torn). You can also buy in stores decorative details from the same brick.
Note! When laying, the joints should not be completely filled from the front side, let them remain empty by 7 millimeters - you will then fill this space with grout.
Advice! After removing the remaining mortar and grout from the surface of the brick, you can give it a shine by walking over it with a solution of hydrochloric or sulfuric acid.
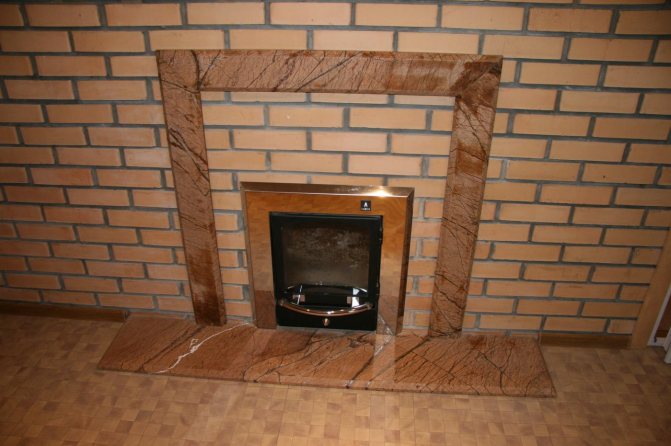
A natural stone

Marble
In the rest room, it is permissible to use not only volcanic or metamorphic rocks for finishing the portal, but also sedimentary (which are not suitable inside the steam room)... The latter include:
- sandstone;
- shell rock;
- marble;
- travertine.
But if the rock structure is porous, it should not be laid around the doorbecause the soot will simply eat into the stone, and you will not get rid of it. So this material is suitable only for elements located on the sides or high above the firebox (shelf, for example).
In addition, you have at your disposal poreless volcanic or metamorphic rocks:
- coil (aka serpentinite);
- talcomagnesite;
- granite;
- slate.
Another possible use of stone is not laying slabs or tiles from it, but untreated pebblesfixed with glue on a vertical surface.
Ceramic tile
The choice is huge, it all depends on the taste of the owner or designer. And if you advise, then only the following:
Advice! Do not cover the portal with large tiles. Better to take the usual one.
The advantages of this type of cladding include undemanding care and the fact that ceramic tiles do not absorb soot.
Tiles
Photo source: Wikipedia
This is a special type of tile that has there is a cavity on the back side.
Tiles are usually richly decorated with reliefs, which can be hand-painted. There are also smooth tiles, plain or with drawings (not necessarily made by hand). Anyway this type of tile is expensivebut looks very attractive.
Well, it's unlikely that we will be able to somehow capture the stylistic diversity available with all these materials, but you should take into account the design of the bath itself.
Of course, someone thought over stylistic unity, someone simply relied on the utilitarianism of things and materials. In the first case, it will be easier to choose the right design, because the choice is limited by style. In the second case, we advise you to choose a portal design that is also simple and utilitarian, that is, without decorations that do not find "support" in the rest of the environment.
Advice! Take a photo of the bath, after which you yourself or with the help of the store's in-house designers or the manufacturer, select portal options for it.
Furnace installation
You have already decided where the firebox will go. This does not have a particular effect on the technology of construction work, but it does affect the comfort of using the bath.
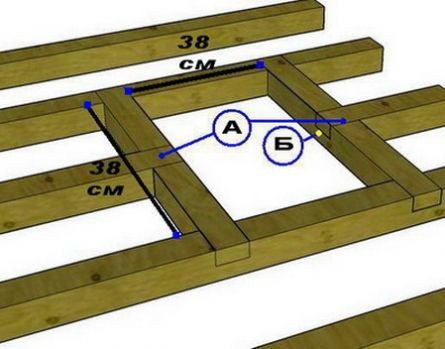
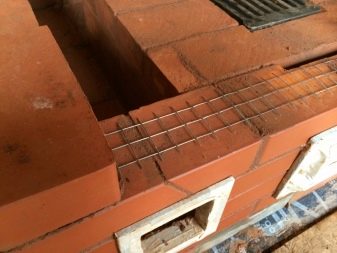
Step 1. Mark the firebox outlet. Cut a hole for the firebox. The hole should be 20-30 centimeters more along the perimeter than the firebox.
Opening scheme for a furnace with a remote firebox
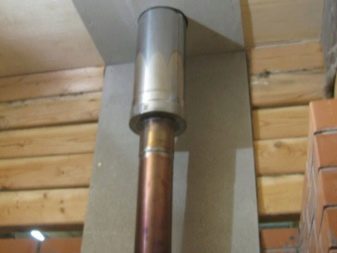
Step 2. Solve the chimney issue. We recommend that you do not take it out on the roof for several reasons. First, there is no need to do quite complex and time-consuming work to ensure fire safety on the ceiling and roof. Secondly, any additional "holes" in the roof significantly increase the likelihood of leaks in these places.Thirdly, it is much more expensive and more complicated, it requires the use of various additional elements for roofing, depending on the specific material. We recommend bringing the chimney through the wall - quickly, cheaply and reliably.
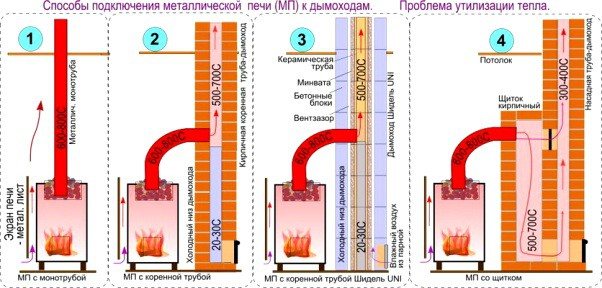
Options for connecting a chimney to a sauna stove
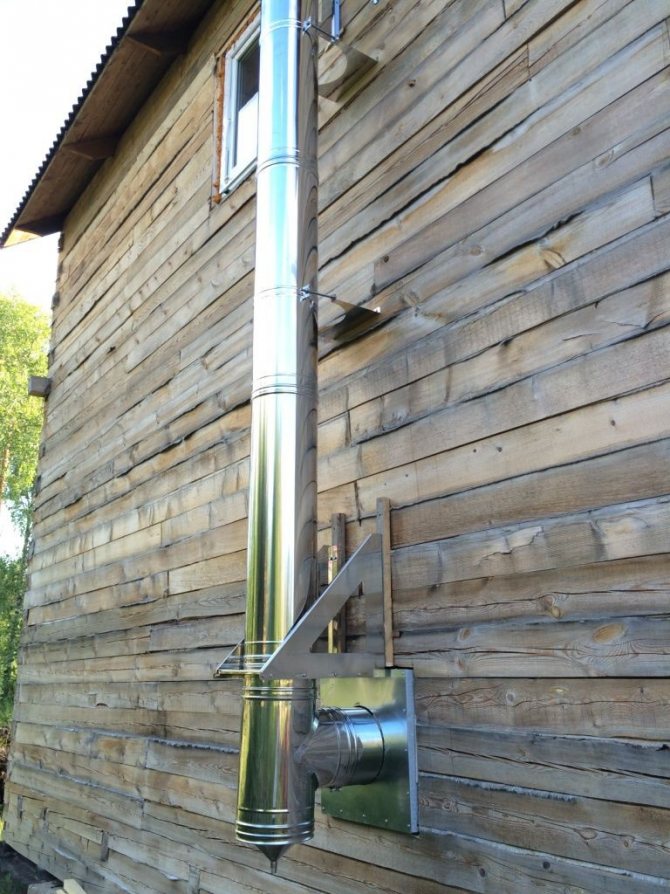
Exterior view with mounted chimney
Step 3. Make holes in the wall or ceiling and roof (depending on the way the gases are discharged). And in this case, the holes should be oversized.
Chimney duct size
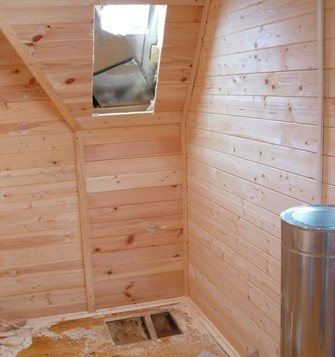
Holes in the roof and in the ceiling are cut for the installation of the chimney pipe
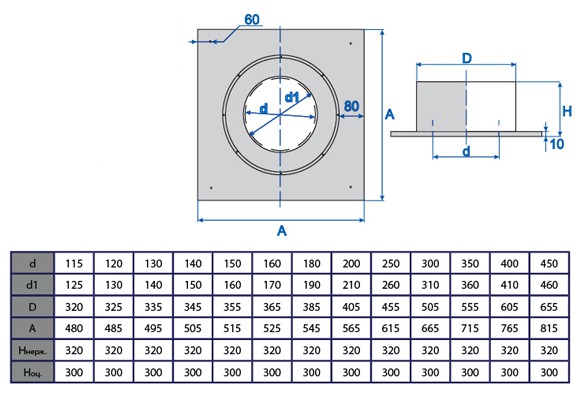
Dimensions of the ceiling cut-out for the chimney
Step 4. Temporarily install the stove in its place, check the position of the remote firebox and chimneys. If necessary, correct the position of the holes, make precise markings. Collect all the elements of the stove and chimney. Assemble the gas exhaust pipes, adjust their dimensions, determine the methods of fixation and thermal insulation. We will talk about installing pipes a little later. This is a very important and rather complex topic.
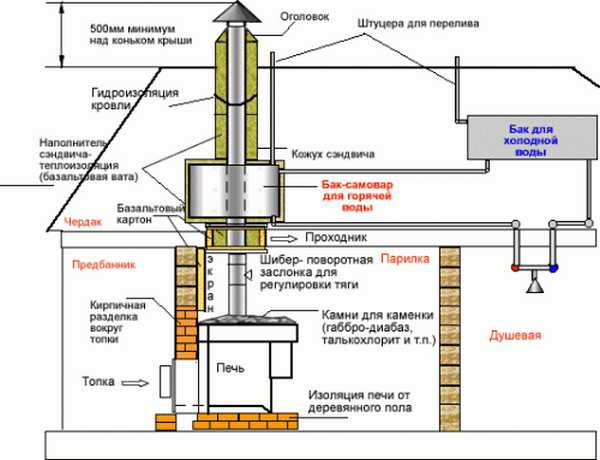
Sauna stove installation diagram
"Fitting" work has been completed successfully - you can proceed to the capital installation of the furnace with a remote firebox.
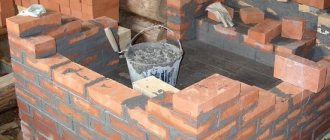
Installation and construction works
Some useful knowledge to simplify fire safety work. The ignition temperature of the phosphoric head of the match is + 200 ° C, the temperature of spontaneous combustion of wood, depending on its moisture content, ranges from 350 ° C to 450 ° C. Why do we remind this? There is always high humidity in the bath, do not be too afraid of overheating of the walls and spontaneous ignition of a log house or floorboards. But do not neglect the elementary rules of fire safety, all work must be done wisely. They need to be done slowly and very carefully.
Let's start with a remote firebox. It is better to fill the gap between the firebox and the wall with red brick. Brick on both sides can be plastered or sheathed with sheet metal. If there is a remote firebox in the bathhouse, nail a sheet of galvanized (or any other) iron about 40 × 40 cm in size to the floor. If you wish, you can put asbestos under it, but we do not recommend doing this. First, asbestos releases carcinogenic substances and is banned for use in all developed countries. Secondly, even without asbestos (or other insulating material), the probability of a floor fire under the iron sheet is zero.
Types by manufacturing method
The most common brick and metal installation method
The portal for the oven in the bath is made depending on several parameters:
- room design;
- ability to work with material;
- owner preferences and value.
Mostly brick or metal is used. They are readily available.
When applied, you do not have to install massive heat-reflecting screens. These materials look beautiful and can be processed at home.
Made of metal
Metal products are used independently and to create a structure when attaching light materials - wood, drywall and the like. A number of advantages of decorative metal finishes:
- withstands high temperatures;
- fire resistance;
- easy to clean with detergents;
- forged inserts go well with brick and stone.
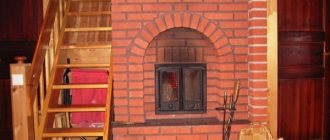
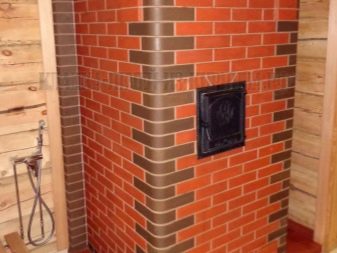
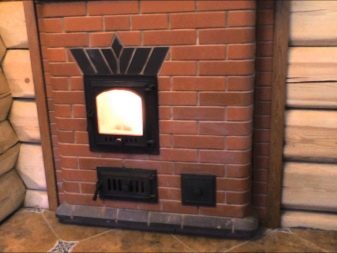
Brick
Red brick portal with heat-resistant glass in the door
The brick portal for the sauna stove will easily fit into the interior of the sauna room. For lovers of the classic style, the red brick option is suitable. It is thermally stable and tolerates high humidity. In some cases, the use of clinker material is recommended.
The main thing is that the structure of the material fits the interior. Most often they use finishing bricks with a smooth surface. The U-shaped finish serves for decades inside the bathhouse, in the recreation room, on the street.
If the construction of the portal is combined with the installation of a brick screen, the bath unit immediately falls into its regular place. Brick is a versatile material for installation.
Chimney
This is more complex work, we will consider both options for exhausting gases - through the wall and through the roof.
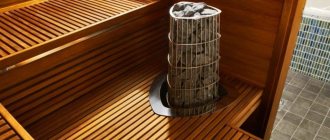
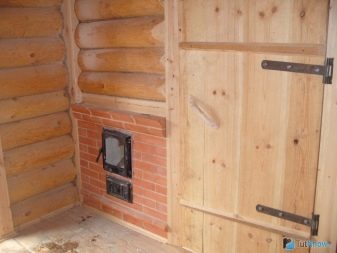
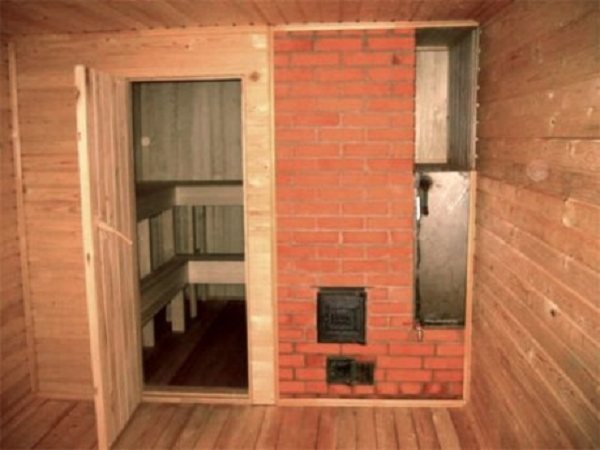
In order for the bath to meet all expectations, it must have a good stove. It should perform the functions of a heating element, provide safe and soft heat, and also provide heat to several rooms at once. In addition, the oven must guarantee safe use.
All of the above requirements are met by a brick oven with a firebox from the dressing room.
Features: pros and cons
The design of a stove with a firebox in the dressing room is more complex than the design of a conventional stove. The firebox can be removable or included in a one-piece structure.
Despite the complexity of the implementation of such a project, it is worth paying attention to its following advantages:
- two rooms are warmed up at once: a dressing room and a steam room. This creates additional convenience when preparing for bathing events and staying in the dressing room after them;
- garbage along with firewood will not be brought into the steam room, which will ensure ease of cleaning, since dust will not turn into dirt in a damp room;
- it is convenient to organize a place for drying firewood near the firebox, which is impossible in a steam room;
- in the steam room, you can install brick protection, which will prevent burns;
- the steam room will keep clean air, not contaminated with smoke from burning wood when you open the door directly in the steam room;
- saving space in the steam room due to the absence of a firebox door;
- during the heating of the bath, it will not be necessary to constantly go out and go into the steam room in order to throw up firewood, which will not allow the room to cool down every time the door is opened.
Along with all the advantages of a remote firebox, such disadvantages can be noted, such as:
- the complexity of the installation, especially for a beginner in this business. To implement such a project, it is better to seek advice from specialists;
- to maintain the temperature in the steam room, you will have to leave it for less heated air.
The firebox can be placed not only in the dressing room. Sometimes she is taken out of the room.... This is realized if the dressing room is too small or if the bath is used for commercial gain. With such a firebox arrangement, the bath attendant does not need to enter the room to the guests, he can keep the temperature in the steam room from the street.
The advantages of this option include protection against the spread of dirt in the premises.
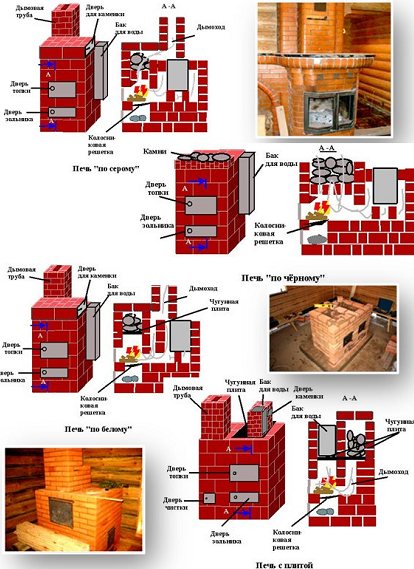
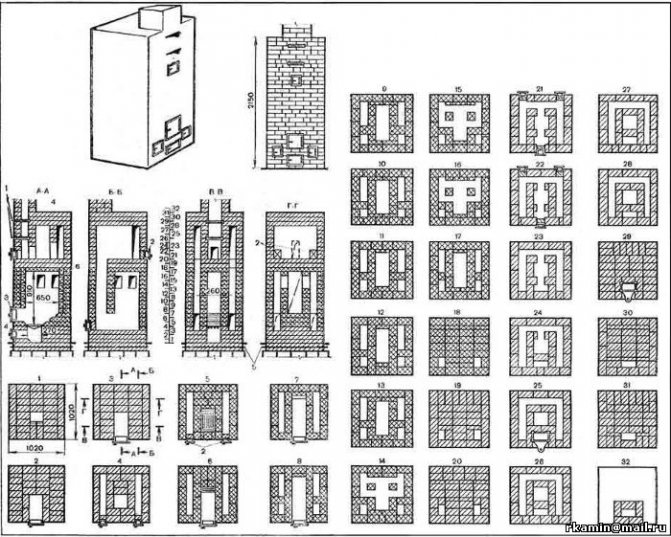
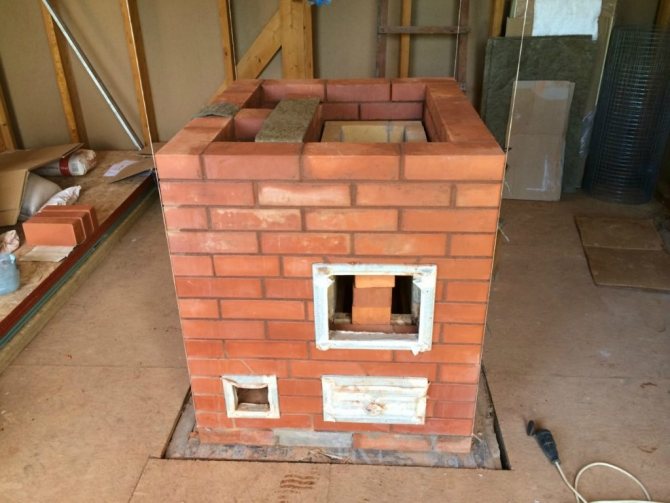
Brick stove baths with a firebox in the dressing room
Installing a brick oven in a bath is much more difficult due to its large mass and dimensions. In addition, the outlet of the combustion products must have a minimum resistance. Unlike a hot metal furnace, a brick one heats up and, accordingly, goes into a stable combustion mode no earlier than an hour later. Up to this point, even with the maximum open blower, the wood burns relatively slowly, with a lot of smoke and unburned gases popping out through the firebox door. Sometimes you even have to ventilate the bathhouse.
If the furnace of a brick stove goes into the steam room, then after two or three unsuccessful attempts to light a fire in a strong wind or damp weather, the steam room of the bath will need to be ventilated or even rinsed with hot water. After the vault warms up, the brick oven gains traction and confidently accumulates heat. In this mode, a large amount of air is sucked out of the room through the brick firebox, cooling both the dressing room and the changing room. Therefore, after warming up the brickwork, the door to the steam room of the bath should be tightly closed.
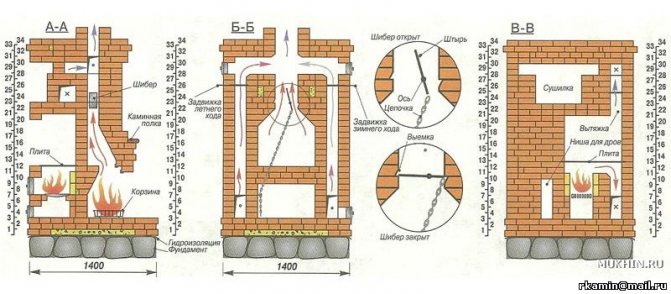
The foundation for a brick oven
With great diligence, a brick firebox can easily warm up both the foundation and the drainage, but in severe frosts, poor thermal insulation of the foundation can lead to settling of the furnace. Therefore, it is better to make the foundation in a full-fledged version, without linking with the foundation of the bath itself.A concrete pillow for brickwork is cast at the level of the bath floor, but the side walls must be treated with mastic, on top of which a layer of thermal insulation made of mineral wool is placed and covered with cladding.
When laying sheets of waterproofing under the base of the body, the edge of the materials is tucked down and coated with clay so that the lining layer is at least 1-1.5 cm.At the level of the floor beams and plank covering, between the brick wall of the furnace and the edges of the boards, a blind area is made without fail made of non-combustible material. A sheet of asbestos and metal is laid on top of the blind area.
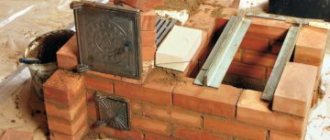
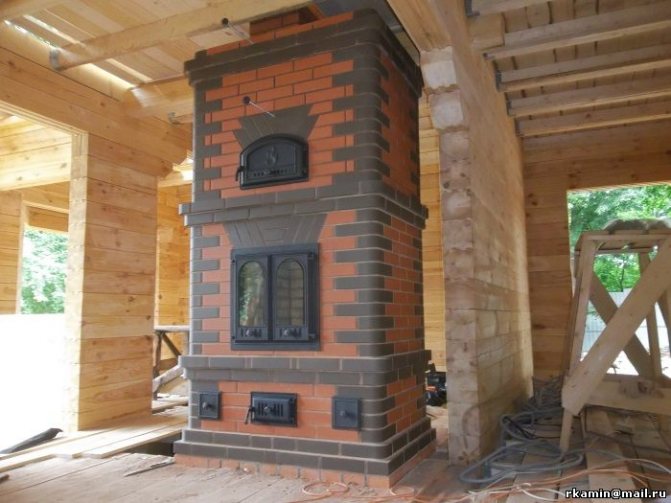
Installation of a brick oven with a firebox in the dressing room
Most often, a brick stove in a bathhouse is folded so that one of the stove walls serves as a partition between the dressing room or relaxation room and the steam room. If the room is made of stone or made of non-combustible materials, the task is simplified. In this case, the space between the body and the walls is insulated with mineral wool or special sandwiches based on silicon fiber or asbestos.
Often, the firebox is supplemented with a large cast-iron stove, which is hung on a vertical wall from the side of the dressing room. The stove allows you to quickly heat the bath room. During installation, the slab is attached to the wall on a masonry mortar with a slight slope towards the steam room. In addition, a 0.5-1 cm thermal gap is left around the slab with a soft refractory material embedment.
The situation with the thermal insulation of a brick structure is complicated if the bathhouse is built from a wooden bar. Fire safety standards require to ensure:
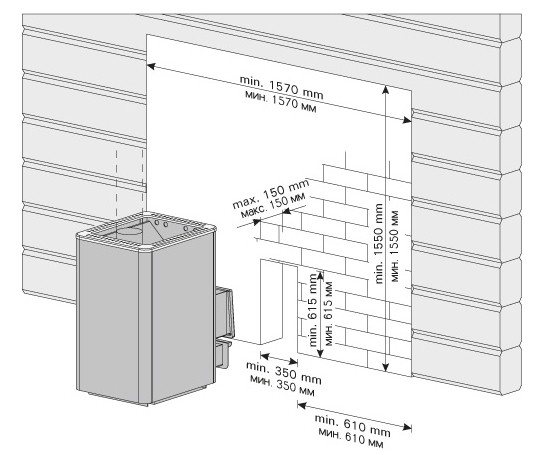
- The distance from the upper hot brick surface to the ceiling or wooden walls must be at least 1.3 m;
- The loading window of the firebox in the dressing room must be at least 1.2 m away from the nearest wooden wall of the bath;
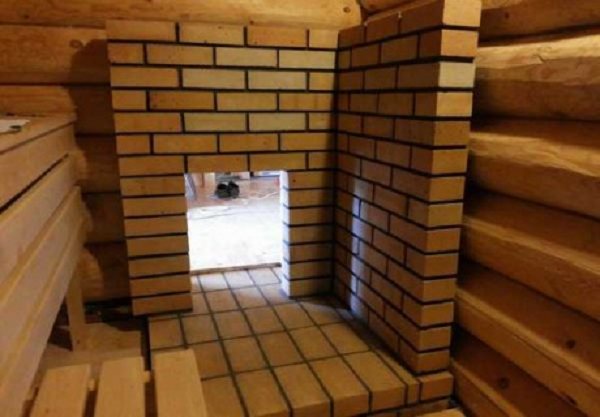
- The firebox in the form of a tunnel passing through the wooden wall of the bath into the utility room, rest room or dressing room must have an insert made of non-combustible and heat-resistant material of at least 500 mm along the entire length of the tunnel;
- The floor under the door of the brick oven is covered with a non-combustible and heat-resistant material, most often sheet steel, 40x80 cm in size.
Between the brick surface of the walls of the firebox and the wooden walls or partitions of the bath, fire insulation or cutting must be performed. In fact, it is a layer of bricks on clay, laid with a gap or on an asbestos sheet against a brick wall. Thus, a kind of cover made of ceramic material is formed, which sharply reduces heat fluxes to the wooden structures of the walls of the bath. In addition, cutting is able to stop an open flame or the flow of hot gases through cracks or in the event of a collapse of a part of the brickwork.
In a similar way, it is necessary to close the chimney with non-combustible thermal insulation made of mineral wool or silicate; over the material, a strapping of basalt cardboard or sheet metal is made. The most vulnerable from the point of view of fire safety is the place where the chimney exits through the ceiling and roof of the bath. In this case, the ceiling beams are embroidered with a box and finished with bricks, similar to wooden walls.
Sometimes in a stone stove for a bath, a cast-iron firebox with a remote loading window is arranged. This option involves loading fuel from the dressing room and, if properly installed, gives certain advantages over a conventional brick one:
- The furnace in the bath is kindled much faster due to the rapid heating of cast iron and a smoke tooth;
- It is much more convenient to clean and maintain such a furnace;
- The absence of cracks and cracks in the firebox gives a good quality of firewood combustion with minimal leakage of combustion products into the bath or steam room.
Important! Installing a cast-iron firebox in brickwork will require a highly qualified stove-maker, even experienced craftsmen do not always follow the technology correctly, as a result, cast iron often bursts due to the lack of thermal gaps.
Installing a brick oven for a bath on a wooden base
In small-sized steam rooms of a bath, a small-sized brick stove with a firebox inside the dressing room can be used. If the stove has no more than 5 bricks in a row and no more than 10 rows, such a structure can be placed directly on a previously prepared floor, without using a concrete foundation. Sometimes the floor boards have to be opened and in the row of logs and beams, additional jumpers from the board of 40-50 mm are installed. The weight of the structure should not exceed 500-600 kg for the old floor and 700 for the new one, just laid.
A brick pillow made of ordinary ordinary material is laid out under the oven. In such cases, the masonry mortar for the base and side screens is prepared on clay with the addition of asbestos fiber. The shielding of the body in the steam room is carried out for all side walls lined with wood, with the exception of the front wall.
Safety requirements
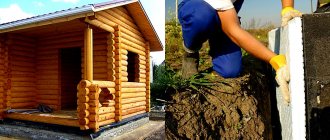
The material for the construction of a bath is most often initially hazardous for the outbreak of fires. To avoid fires, you need to follow the safety rules even at the planning stage of the construction site. The first time after construction, a wooden bathhouse will shrink, therefore, before installing the stove, it is necessary to make sure that the structure has settled sufficiently and will not crack.
Since the walls of the furnace unit in the bath heat up to high temperatures, which is fraught with harm to health in the form of burns, you must strictly follow the fire safety rules when installing the furnace. Installation rules are spelled out in SNiP 41-01-2003 (chapter 6.6).
- Install a solid foundation under the base of the oven. It will be adjacent to the wall between the dressing room and the steam room. It must be covered with heat-resistant material. In case of damage to the foundation, the stove can crack or lurch, and this is dangerous by a fire in a wooden building.
- From the oven door to the walls of the bath, the distance should be at least half a meter. If the stove is in a corner, then all surfaces to which it is adjacent must be insulated with a heat-resistant material.
Fire safety standards
The firebox is fenced with natural stone from wooden products
During combustion, the surface temperature of the furnace reaches 400 degrees or more. For safe operation, all flammable elements are removed far away. 20-25 cm is not enough. Wooden surfaces will catch fire when exposed to infrared radiation from a heated oven. This is actual in a steam room, where the temperature above 100 degrees constantly dries the wood.
We suggest that you familiarize yourself with the Chimney for a bath. 10 tips before buying.
The heat-insulating screen is made of bricks or basalt cardboard covered with galvanized coating. In some cases, talc chloride becomes an insulating material. It conducts heat well, so non-combustible materials are used as the basis for it.
The sauna is ready when the water immediately evaporates when it hits the stove
Bath heating tactics are constantly being improved taking into account the experience of generations. Rules for the preparation and heating of the premises:
- the room is put in order, the floors are washed, the leaves left over from the brooms are swept out;
- garbage is carefully swept out in the immediate vicinity of the stove;
- before the stove is flooded, the room is ventilated for about 30 minutes;
- with the help of a scoop, the ash chamber and grates are freed;
- the oven is inspected for damage;
- the open heater is rinsed;
- tanks are filled with water;
- traction is checked;
- with the help of kindling from natural materials, the stove is melted;
- firewood is thrown up as it burns out.
Combustible materials must be shielded from the oven
Lining walls require careful protection when located near a heating zone.Distances from ovens are considered safe:
- brick - at least 32 cm;
- metal - at least 1 m;
- lined iron - 0.7 m.
Such distances are only possible in large steam rooms. In private baths, compliance with these parameters is an unjustified luxury. Paired rooms in the places adjacent to the furnace are finished with protective screens or special materials.
The smallest fire-prevention distance, according to SNiP, from the stove to the combustible material of the wall is 0.38 m. The height of the non-combustible screen must not be lower than the upper edge of the stove.
However, it is better to add a dozen centimeters and not regret the omission. The distance on the sides of the remote fuel channel is increased to 0.5 m. Upwards, they are extended at least to the entire height of the wall.
Walls protected with 1200 degree stone wool
The combustible and brick walls are not connected to each other, leaving a gap of 2-3 cm, which is filled with a non-combustible material - heat-resistant mineral wool or basalt cardboard. The joints between the wall are masked by decorative panels.
Heat-resistant drywall is also used for decorative finishing. Treatment with fire-resistant compounds increases the duration of resistance to an open flame up to 20-30 minutes. Therefore, when using it, it is also important to observe fire breaks.

When making a portal, you cannot stack bricks right next to the firebox. A thermal break of 2.5-3 cm is required. The gap is filled with non-combustible basalt or stone wool. The use of binders is prohibited - already at a temperature of 600 degrees they collapse and spill out. It is dangerous to use glass wool - it can withstand temperatures up to 350 degrees, and then it melts.
Using a reflective screen protector will reduce the heating of the sauna walls. Some of the infrared radiation will be reflected back into the steam room. The metal screen is installed with a gap of 2-3 cm to the floor for ventilation. It is forbidden to install a brick screen close to the firebox - air exchange is disrupted, and the masonry becomes unusable.
DIY installation
To independently install a brick oven for a bath with a firebox from the dressing room, you should perform the following preparatory work:
- it is better to think over the place for mounting the stove at the stage of building the premises;
- before starting work, the foundation for the furnace is equipped. For this, a foundation pit is pulled out. Its bottom is covered with crushed stone, then sand and covered with waterproofing material. The foundation is strengthened with pieces of reinforcement and poured with concrete;
- a platform for the oven is laid with bricks;
- in the area of the firebox door, a metal sheet is attached to the floor;
- the structure of the furnace, passing through the opening in the wooden wall, is lined with brickwork;
- before laying the oven, the bricks are immersed in water so that the pores of the material are filled with moisture;
- insulating material is laid between the furnace metal and the brick.
After the preparatory work, you should proceed directly to the construction of the furnace:
- The first stage is laying out the oven itself with bricks. Brick, which is used to lay the walls of the house, will not work. For a sauna stove, you need one that has increased heat resistance. It must be in perfect shape, without cracks and chips.
- First, each row is laid out without using a solution. This is done in order to find the ideal bricks in shape and size. The laying of any of the rows begins with a corner brick.
- The first row is laid out from the corners around the perimeter. First, the mortar is applied, then a number of pre-selected bricks are laid. Before laying, each brick is dipped in water for 20 seconds. The seam thickness should be no more than 5 mm.
- The second row is laid out with an offset. The seams in the second row should be in the middle of the first. The following rows are laid out similarly.
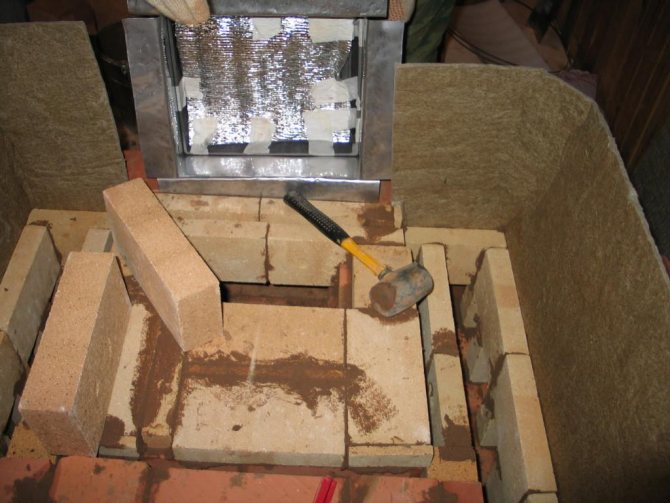
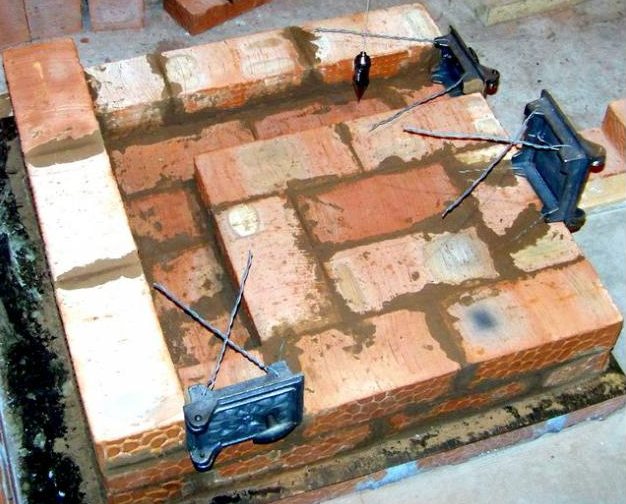
- A blower door is installed at the level of the fourth row. It must be fixed with galvanized wire. On the side of the steam room, the stove is lined with a stone screen to protect it from burns.
- The second stage is to install the combustion door. It is fixed with galvanized wire twisted several times.
- Next, a stone chamber is being built. The size is calculated based on the number of stones. Finally, it is finished with steel sheets.
- After the furnace of the required height has been erected, a steel sheet is placed on top, on which a hole has been previously cut.

Chimney installation
The final step is to connect the chimney to the stove. This can be done in several ways, using brick, metal or ceramics. Installation can be external and internal. Correct installation of the chimney will not only save the room from soot and soot, but also save health from the harmful effects of fuel combustion products.
A brick chimney is the safest in terms of fire safety, but its construction is a complex process. It is used to remove smoke from two or more ovens. The ceramic chimney is heavy and expensive. However, it has good characteristics: it is resistant to corrosion, does not overheat, with a smooth surface inside, which prevents the accumulation of soot on the walls. This variety is not very popular.
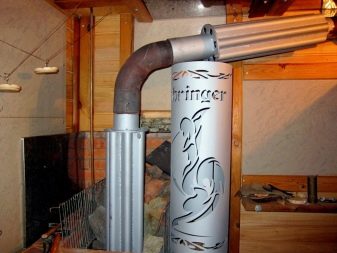
It is not difficult to install a metal chimney, it is affordable at a price. Of the shortcomings, rapid heating is noted, and this is fraught with ignition. In addition, condensation forms when hot air passes through the outdoor half of the pipe. therefore thermal insulation material is used in modern metal pipes... The advantage of this type of outlet pipe is the absence of edges, which makes it possible for the smoke to escape freely outside.
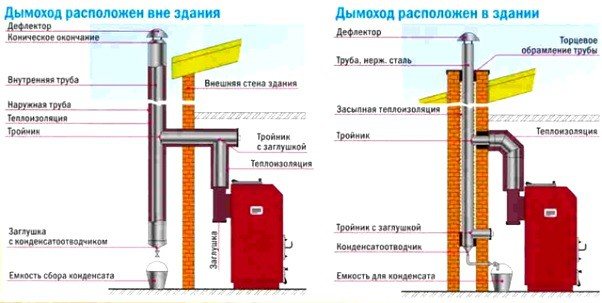
The external chimney is a pipe that goes out from the wall and rises along it to the roof. It will not be difficult to install such a chimney both at the construction stage and in an already finished bath. The advantages are safety, ease of maintenance. The downside is the need to insulate the pipe so that condensation does not collect inside when the temperature drops.
Installation of the pipe to the side of the wall is carried out using a bend or elbow. The chimney section passing through the brickwork of the wall is sealed with a metal box filled with heat-resistant material. The pipe is fixed vertically along the wall using holders. A protective fungus is installed on the top.
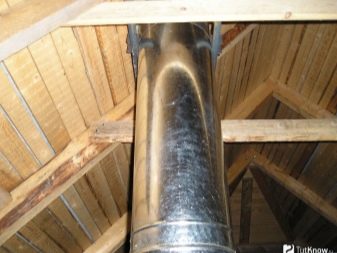
The indoor version of the chimney is a pipe extending from the sauna heater to the ceiling through the attic and the roof. The advantage of this method is the preservation of heat in the bathhouse and attic for longer. Of the minuses is the complexity of installation through the roof.
A chimney is assembled from several parts, any higher part is put on the lower one, and then it is well fastened with clamps. Before fixing the elements, the joints are lubricated with a heat-resistant sealant... The pipe is then passed through the ceiling and roof.
Places of passage of the pipe from the inside and outside are protected by an under-roof sheet and a roof cut. Heat-resistant insulation is laid around the pipe.
After laying the roof, waterproofing is carried out so that water does not get into the joints. A protective umbrella is installed on top of the pipe.
Chimney installations
To complete this task you need:
- Metal pipe;
- Pipeline elbows - 2-3 pieces;
- Chainsaw;
- Chisel;
- Boer;
- Black sealant.
Before starting work, the foreman determines the distance between the stove and the wall in which a hole will be made for the smoke to escape. Next, he creates an opening of the desired size and removes the metal bridges in the hole using a drill and chisel. The next step is to flatten the hole - it should have a 10 cm indent on each side of the chimney and be square. A saw is used to achieve this result.
Having coped with this task, the master creates from a metal pipe segments of the desired size with allowances for the connection in the socket.The length of these structures is determined by the distance from the stove to the wall. As for the socket itself, it must be installed from the side of the entrance (to prevent a decrease in thrust due to eddies).
Further, the inner part of the chimney is assembled from vertical and horizontal pipe sections, as well as a rotary elbow. All elements are held together with black sealant, their length is calculated in such a way that the 10 cm pipe edge comes out. At the end of this process, the master:
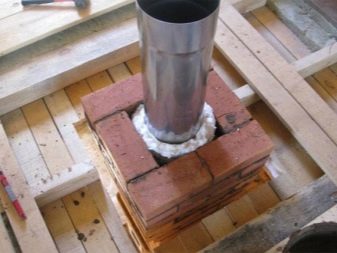
- Places stones or fragments of bricks in the hole made for the chimney;
- Insulates walls with sheet steel and eliminates gaps with glass wool or rock wool;
- Provides the transition of the outer pipe to the vertical position by means of a swivel elbow.
At the final stage of work, the foreman checks the tightness of the chimney joints with water. If leaks are found in the stove pipe, it eliminates the blemishes.
Features of the installation and operation of the chimney
When performing the above work, you need to pay attention to the following nuances:
- The pipes are fastened to the wall using brackets;
- The furnace is started up only after it has been inspected by a qualified specialist;
- Sauna chimneys are not equipped with gates, since their premature closure can lead to poisoning of vacationers with foul gas.
Tips & Tricks
Experts recommend adhering to the following rules:
- first of all, when installing the oven in a bath, it is necessary to act in accordance with the rules of SNiP. This will ensure operational safety and extend the service life of the heating element;
- you should not save on materials, especially on heat-resistant insulation;
- when choosing a place for a bath, it is better to give preference to a free-standing structure. If the bath is an extension to another building, then you need to take care of the insulation of the adjoining wall;
- when choosing a brick, you need to pay attention to its heat-resistant and moisture-resistant properties. If finances do not allow you to purchase an expensive brick that meets these requirements, you can cover a more affordable brick with a special compound;
- the pit for the foundation must be dug out larger than the size of the furnace. The base of the stove should be 10 cm larger than the perimeter of the heater on all sides;
- bricks with small defects can be used in the masonry of the stove, but at the same time it is impossible to lay the damaged brick inside the smoke channel and to the outside of the stove, and it is also necessary to trim the chipped edges and corners so that too thick joints do not turn out during the laying;
- when installing the stove into the wall of the bath, you must follow the characteristics of the unit described in the attached instructions. If the stove is made independently, then you need to take the average power values;
- the ideal chimney should be 2 m high without knees and slopes. This will provide normal traction;
- After installation, the oven should be heated several times in a gentle mode for half an hour to check its correct operation and dry. It is necessary to dry the oven so that cracks do not appear during operation;
- for several days, the stove door, as well as the windows and doors of the bathhouse, should be kept open, creating a draft in the room. The absence of condensation on the damper will be a sign that the furnace is ready;
- despite the observance of fire safety rules and the use of a high-quality stove, you need to remember about fire extinguishing means. They must be available at all times;
- the most common fire source is the ceiling. Therefore, one should not forget about its protection. It must be covered with a metal sheet;
- in the bath, it should be as safe as possible, even in case of poor health of visitors. The oven must be shielded with a protective screen.