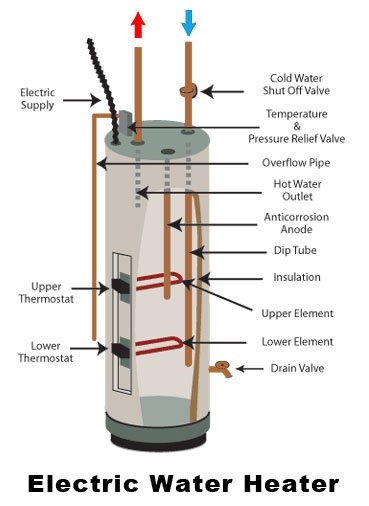
The water heater does not heat in the event of a malfunction of the elements
The water heater stops heating the water, in most cases due to the fact that some elements are faulty. The most common cause of breakdown is due to:
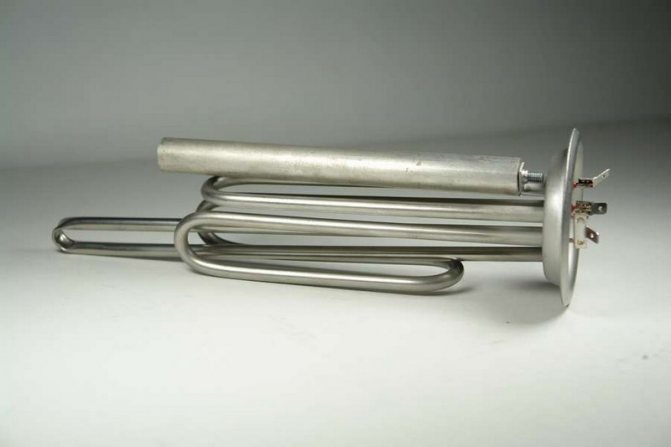
Namely because of the tubular heater, which breaks down with prolonged use without maintenance and general wear.
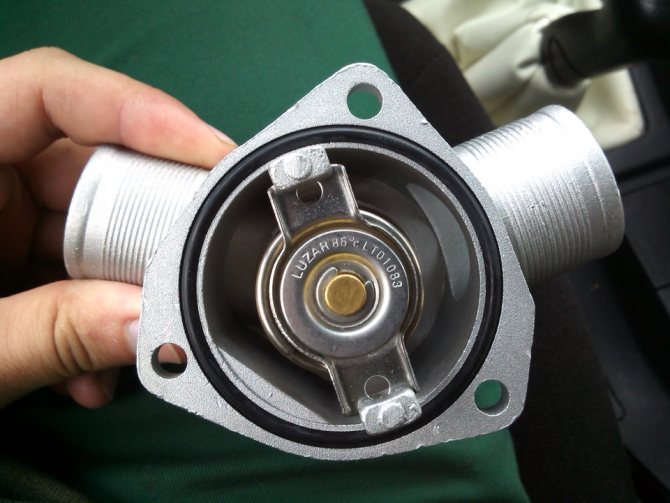
Anode
A rod that is made of a non-corrosive type of steel, on the surface of which there is a magnesium coating. This device attracts salts to itself, which is why the heating element does not fail for a long time.
Note! When the anode breaks due to wear, the water heater may stop heating the water for the reason that corrosion forms. The metal bar should be replaced annually.
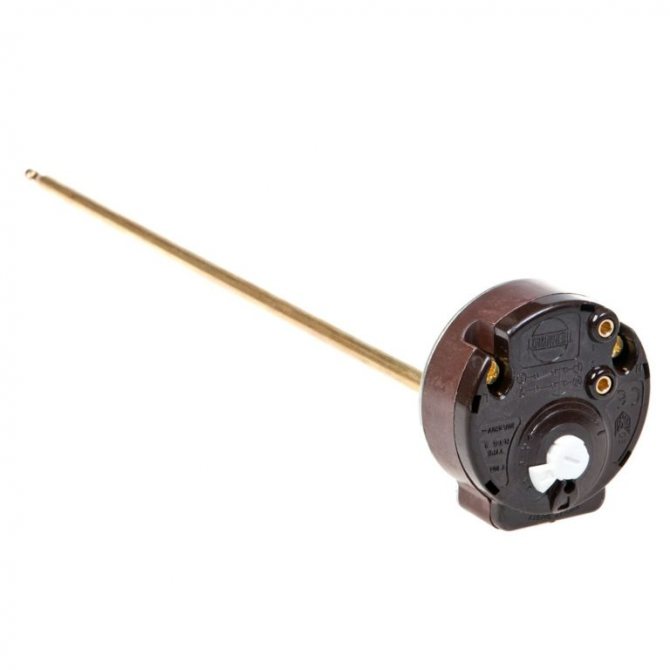
Thermostat
A component that controls the heating of a liquid to a certain degree. Its task is to determine the temperature of the water and compare it with the one that was set by the user, as well as enable or disable the relay.
Insulation gaskets
Sealing elements of the storage device and flange connector, the main task of which is to protect the owner from electric shock.
Causes of malfunction
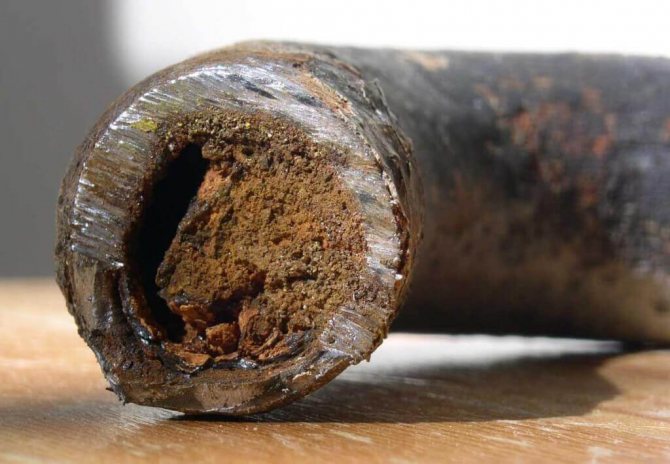
Often, the boiler does not heat the water and the light does not light up due to scale deposits, faulty thermal protection, cessation of the liquid supply as a result of a breakdown of the safety valve. The boiler often breaks down due to limestone, a malfunction of the electronic module or setting the equipment to maximum power.
Note! To establish the exact reason why the water heater does not heat up, a thorough visual examination of the device is necessary. It is best to entrust this to professional craftsmen.
Poor water quality
In response to the question why the water heater does not heat the water to the required temperature, it can be pointed out that boilers most often break down due to the fact that the water contains heavy metals, hydrogen sulfide and other chemical components.
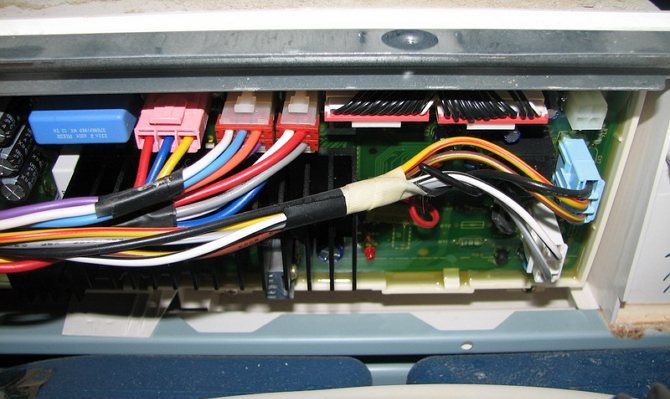
Damage to electrical wiring
The equipment may be malfunctioning due to damaged electrical wiring. Before starting, you must make sure that all wires and cables are intact.
Errors during installation
It is important to trust the boiler installation only to professional craftsmen. Otherwise, there is a risk of damaging the ceramic surface of the boiler or installing it incorrectly.
Incorrect use of the device
Often, the water in the water heater does not heat up due to the installation of a higher power, non-compliance with the technical manual for the device. Therefore, before turning on the device, you must read the instructions.
Malfunction symptoms
A faulty water heater will make unpleasant sounds during operation or not turn on at all.
Often, when a leak from the cables speaks of a malfunction of the equipment, the appearance of error codes on the dashboard.
Panel light is on
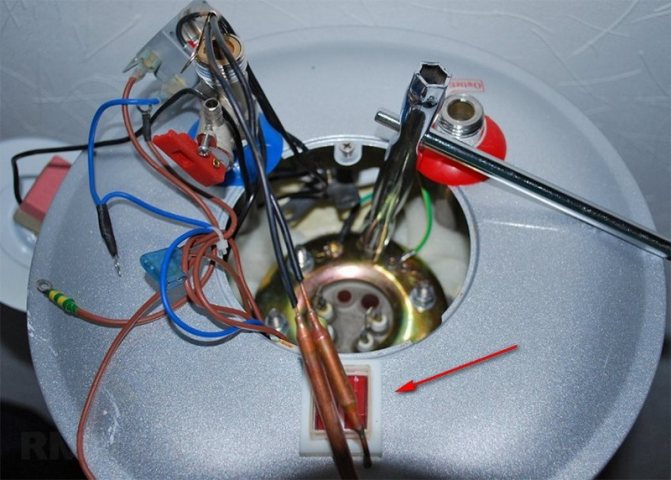
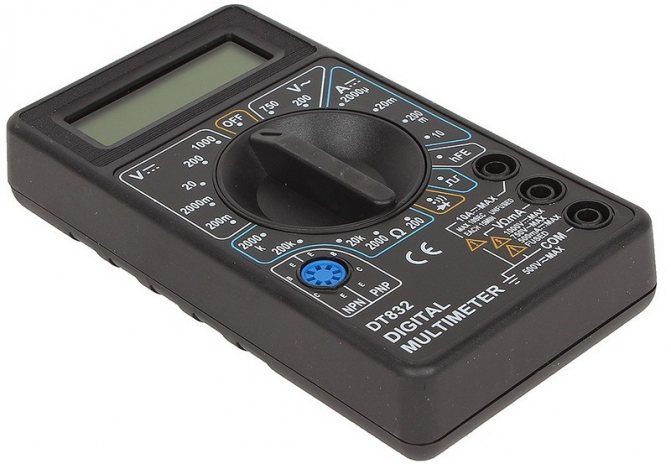
In the absence of water heating by a water heater, but the presence of the indicator lamps, there is a breakdown of the heating element. To check that the heating element is not working properly, you must use a multimeter to adjust the resistance determination and connect to the heating device. Zero can light up and appear on the indicator due to a short circuit and a break in the system.
Note! Another evidence that the heating element does not work is that the automation is triggered, which turns off the device immediately after it turns on. This indicates the combustion of the tubular electric heater.
The determination of such a malfunction is easy.The thermal protection button sinks in when the device is turned off. If the heater turns on after that, it is necessary to descale or replace a new heating element.
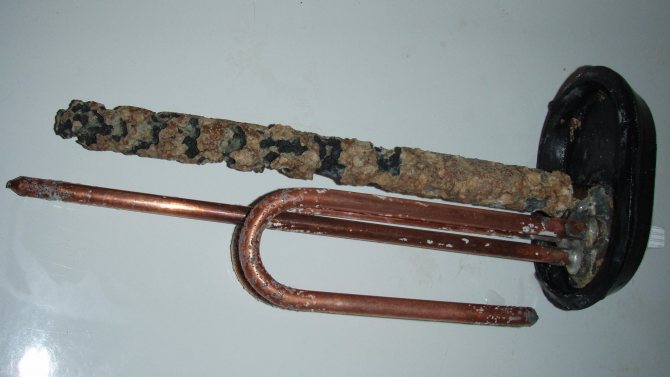
Lime deposits form on the heating element due to the fact that the anode is faulty - the magnesium rod, which is responsible for the destruction and prevention of scale formation.
Panel light is off
If the light on the dashboard does not light up, you need to take a tester or multimeter and see if there is a voltage supply to the thermostat. For this, the tester is connected to the boiler. If there is voltage, then it is necessary to try to restart the system. If the device shows zero phase or surges, then the thermostat must be replaced.
The boiler does not warm up to the maximum
Often many people meet with the fact that the boiler does not heat the water up to the maximum volume and the lamp does not light up. In this case, it may be:
- the heating element is faulty or not operational;
- The heating element has deposits in the form of scale;
- the safety valve is faulty;
- the electronic board does not work.
In case of suspicion of one of the above malfunctions, it is necessary to remove the water from the water heater and disassemble it. Then check all the elements with a multimeter, a tester and a voltage indicator.
Most often, the reason for the lack of maximum heating of the boiler is in the heating element. This problem is relevant for older boilers. In them, the service life of heating elements is limited. They work no more than 4 years. When there is prolonged operation on the heating element, a thick layer of deposits appears in the heating element, which reduces the heat output. The element may be closed with a break. The item may also be burned. Then there will be a need to purchase and install a new heating element. Often the reason is improper installation and operation of the boiler installation.
Ways to solve problems
It is necessary to solve the problem with a non-working boiler, depending on the reasons that led to the equipment breakdown.
Replacing the heating element
Replacing the heating element should be carried out by a competent and experienced craftsman or by the user himself, in accordance with the instructions given to the equipment. It is worth noting that despite the fact that all boilers are different in appearance and design features, the heating element is replaced in the same way.
To work, you need to take:
- pliers;
- indicator screwdriver, flat and Phillips;
- wrench in a set.
Note! Regardless of what led to the need to replace the heating element, it is necessary to perform the following steps step by step:
- Turn off the boiler and turn off the water;
- Put the hot water tap in the closed position;
- Drain all liquid from the heating element;
- Remove the cover with an indicator screwdriver and make sure that there are no voltage terminals;
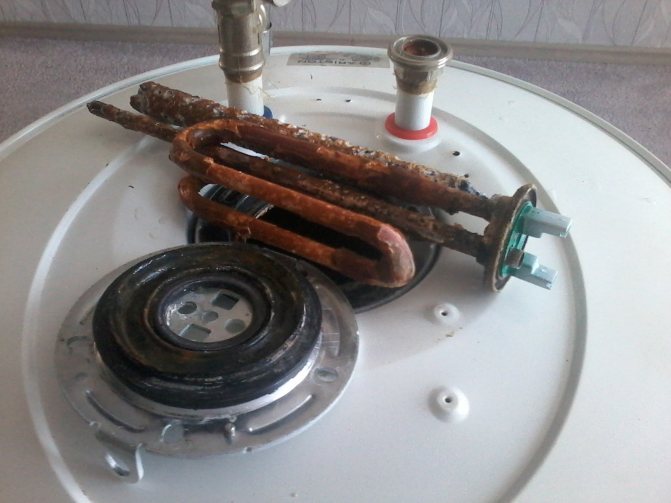
- Place the boiler on the floor, unscrew the nuts and disconnect the wires. It is better to photograph the process of disconnecting all parts in order to insert all the wires back in the same order.
- Replace the heating element and put everything in place, acting in the reverse order, making sure that no water gets on the contacts.
It is worth noting that, along with the replacement of the tank, it is often necessary to change the magnesium anode, gaskets and insulation, if it has dents with breaks.
Heating element cleaning
To clean the heating element covered with scale, it is necessary to take citric acid and maintain it in a water-citric solution for several days. Remove limescale residues with dirt with a stiff brush.
Replacing the thermostat
If it is necessary to replace the thermostat, first remove the retaining ring, remove the thermostatic sensors, remove the control block, install a new thermostat with the retaining ring and assemble the water heater.
Note! Immediately after the thermostat is changed, the water heater cannot be used.It is necessary to look for leaks in the connections, open the hot water tap and drain the accumulated air. Only then can a test run be carried out with a gradual increase in the heating temperature.
Fork heats up
If the plug heats up slightly during operation of the boiler, the matter may be in the power of the heating device. However, with strong heating, it may be a poor-quality extension cord or tee. To maintain safe operation, it is necessary to use an extension cord with a large cross-section of wires.
Sometimes it might be about the outlet. With prolonged and repeated use, the socket with the plug loosens. This causes the temperature of the plug to rise. It is recommended to continuously check that the socket is firmly seated in the socket. If the plug falls out of the socket, the appliance must be replaced.
If only the plug heats up and the cable adjacent to it heats up slightly, then the problem may be that the contact of the internal wires is poor. In the plug, troubleshooting is simple by tightening the terminals. If it is non-separable, it is necessary to replace such a plug.
Note! The cord heats up due to insufficient wire cross-section in the extension cord, breakdown in the heating element or heater connections. Often times, this can cause the wire to catch fire. To prevent fire and explosion, reliable insulation of the wiring and replacement of defective heating elements is necessary.
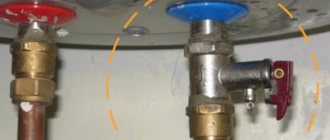
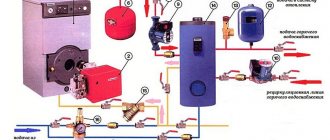
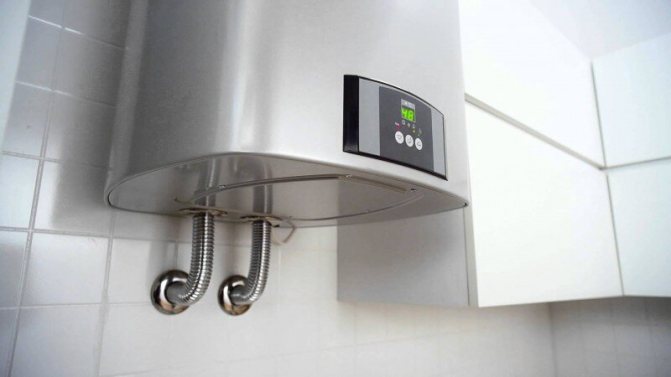
Malfunctions of electric water heaters
(Click to go to gas water heater problem)
(click to enlarge)
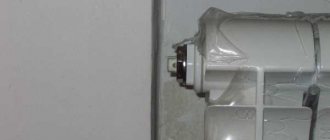
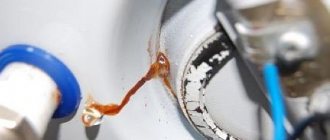
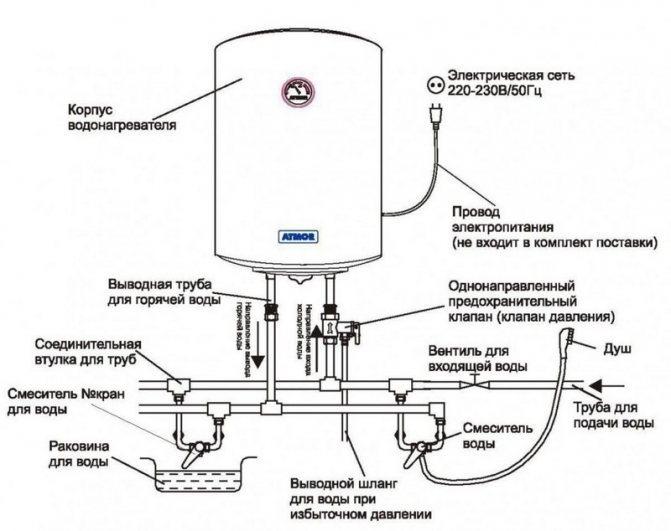
Water leaks from above
If you think there is a leak at the top of an electric water heater, this could be one of several things. Cold inlet or hot outlet pipe may be loose, T&P valve may fail, or inlet valve may be leaking. Everything is easy to fix. For more information, see Water heater leaking from above.
Water leaks from the bottom
An electric water heater that leaks from the bottom is usually due to normal condensation, a leaking electrical heating element gasket, or a small amount of water is discharged through the overflow pipe because the T&P valve opens to release excess pressure in the tank. In some cases, the actual tank is leaking, and the only problem is replacing the water heater. For more information, see Water heater leaking from below.
No hot water
The water in an electric water heater is heated by two heating elements (in most cases). The most common reason for absolutely no hot water is that the switch has not tripped and you must check the fuse first. If this is not the reason, then the heating elements may be defective and need to be replaced. Finally, it could be a problem with the limit / reset switch on the thermostat. Maybe tripped because the water is too hot or just faulty and needs to be replaced.
Not Enough Hot Water
This is most likely due to a problem with the thermostat. It can be as simple as adjusting the desired thermostat water temperature for a specific heating element. On electric models, the thermostat is usually hidden behind a removable panel on the side of the tank and a layer of insulation. Unlike gas models, the electric thermostat is factory installed and not intended to be changed, but sometimes it has to be done. During the colder winter months, you may need to raise the temperature slightly so the hot water cools faster through the cold pipes running through your home's plumbing.
Other possible reasons for not having enough hot water are a faulty thermostat, a faulty element, protruding wires, or simply a water tank that is too small for your needs. See “what size water heater is needed” for more information.
The water is too hot
Again, this is probably due to the thermostat (s) where the temperature is too high. Just access the thermostat and adjust as needed. This may also be required when moving from cold to warm seasons. For our recommended temperature values, see here.
If you cannot lower the water temperature low enough, you need to replace the thermostat or there may be some type of release wiring (it is recommended to call the pro if later).
Water takes too long to warm up
This is one of the downsides to electric water heaters. On average, the recovery time (the time it takes to heat the entire volume of water) for an electric model is twice that of a comparable model. That said, If it takes longer than usual for hot water to recover, there may be a problem with the heating elements (including sediment build-up on them) or the thermostat and those parts may need to be replaced. If your family is keen to use more hot water than a few years ago, you might want to consider investing in a new model with a larger tank volume or installing an item-to-use water heater that you use most often near the water source (read: soul). You may need to do some research on a flow-through versus tank water heater comparison.
Low hot water pressure
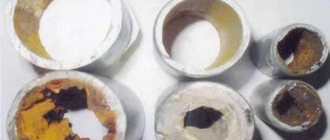
More often than not, these reports have a low head of hot water, there is an old house with 1/2-inch diameter galvanized pipes that go in and out of the water heater. Since the water pressure will be automatically limited, the only solution is to install modern 3/4 inch pipes, which allows more water to flow through. Calcium deposits and rust inside pipes or sink aerators can also contribute to the low head of hot water as the water heater leaks.
The water heater is noisy
If you hear clicks, hiss, popping, banging, or other strange sounds from the water heater, this is most often due to limescale on the heating elements or too much sediment in the bottom of the tank. Other reasons include noises, a leak somewhere, too much pressure inside the tank, or noisy pipes because the normal expands / contracts. When your water heater is noisy, it is often harmless, but cleaning the boiler is necessary.
Dirty or rusty colored water
Rusty hot water is often a sign of corrosion in the anode itself or even the tank. If left untreated, the water heater will likely need to be replaced after the corrosion becomes severe enough for the tank to develop a leak. If the water is not rusty, but dirty or discolored, it may be due to limescale on the heating elements or sediment making its way into the hot water outlet.
Smelly Hot Water
Most likely smelly and smelly hot water due to bacteria in the tank. Homes that use well water as a water source are more susceptible to their water, giving off an unpleasant odor. Periodic flushing of the water heater helps, but you may need to do a full tank cleaning. A quick fix may be to raise the temperature of the thermometer to 140 degrees to kill any remaining bacteria.
For more information on troubleshooting electric water heater, see the video below:
Self repair
If during the diagnostics it turned out that the current goes to the boiler installation, it is necessary to disconnect the device from the network and find the thermal safety button on the thermostat, drowning it until it clicks. If after that, the boiler began to work well by itself, after a while it is necessary to remove the formed scale and see how the water heater works from the inside, it is possible to replace the magnesium anode.
As for the thermostat malfunction, it is easy to replace it yourself. As for the repair, it cannot be done in many water heaters, since electronic-type thermostats are used in domestic and foreign boilers. Repair is available in Ariston and Tee-Tech water heaters.
Recommendations
Many users recommend that, in the absence of water heating by a boiler, immediately contact a service center or call a master at home to correctly diagnose and fix the breakdown.
In the event of a faulty heating coil, users are advised to replace the element rather than trying to fix the problem by winding nichrome wire. It is necessary to understand what is the specificity of flow-through devices. During manufacture, the spiral is coated with ceramics at the factory to prevent scale build-up. Some models have a non-removable heating element and in order to dismantle it, it is necessary to break open the copper sheath, and then solder or weld it.
Note! If the water pressure is too low, users say that the water flow sensor does not give a signal to the heating coil and this breakdown is most often found in Atmora and Termeks. In this case, you need competent help from an electrician.
If the radiator is clogged, you must first check its condition, then rinse the element with a descaling agent. If there is a severe blockage, the radiator should be soaked for a while. Some users advise doing this for up to 10 hours.
In general, a water heater of any type and production does not heat water for various reasons. Most often this happens due to damage to the heating element, the formation of scale and improper operation of the equipment. In some cases, it is recommended to contact professionals. Basically, all breakdowns can be repaired by yourself.
Damaged electrical wiring, faulty heating element can lead to improper operation of the boiler. To find out why it does not function, you need to carefully examine it. The heating element does not work for the following reasons: a lot of scale has accumulated on its surface, the thermal protection button does not turn on; the heater may not heat up the water due to a faulty safety valve. It is necessary to find out all the reasons why the water heater does not heat the water, but the indicator is on or off.
The iron turns on, but does not heat
If the iron turns on (the indicator is on), but does not heat up, then the current is supplied to the device. The cause of the breakdown may be a burned out heating element or thermostat. To determine the malfunction, you need to examine both elements.
We check the health of the heating element
Typically, heating indicators are connected to the terminals of the heating element. Therefore, if the light continues to burn, and the sole remains cold, the cause of the malfunction may be a burned out heating element. The element is usually tightly mounted in the sole and cannot be replaced.
To check the heater, you need to check its contacts with a multimeter. If there is no resistance, it can be concluded that the part is defective.
We check the health of the thermostat
If the iron does not heat up and the light is on, the problem may lie in a faulty thermostat. To get to this unit, the device must be completely disassembled.
Having removed the case, it is necessary to visually assess the condition of the contacts and connections for breaks and oxidation. If external damage is visible, it must be cleaned with fine-grained emery paper.If not, determine the performance of the part by measuring the resistance, or by checking the voltage with a screwdriver with an indicator, sequentially pressing it to the contacts. Since the iron must be plugged in to check with a screwdriver, extreme care must be taken when measuring.
As a rule, in models of well-known manufacturers, a thermal fuse is built into the break of the contacts of the heating element on one side, and the thermostat is built into the break on the other. For example, if your Philips iron does not turn on, one of the listed items may be defective. In this case, there will be no resistance between the contacts of the heating element. Accordingly, to find the true cause of the malfunction, it is necessary to ring each section, starting with a fuse (the probability of detecting a burned-out thermostat with a working protective element is extremely low).
Common causes of breakage
Often the reason for the malfunctioning of the heating element can be a non-working electronic module. Do not try to repair it yourself. A breakdown of the unit can be caused by the actuation of the emergency fairings. Due to scale deposits on the heating element, the fairings start to turn on in random order.
You can check the operation of the water heater using an incandescent lamp. It must be connected to a heating element. After connection, the electrical circuit must be connected to a power source. The heating element is functioning correctly if the lamp is on. Another way is to use a multimeter. On it, you need to turn on the resistance measurement mode, connect it to the heating element. When the circuit is closed, the indicator will show zero. If the chain is open, the indicator will be infinity.
The water heater does not heat the water, but the lamp does not light up
There are situations in which the heater does not heat the water to the required temperature, the lamp does not burn. The reasons for the breakdown may be:
- idle heating element;
- a lot of scale deposits have appeared on the heating element;
- the safety valve does not work;
- the electronic board does not work.
IMPORTANT! ThTo solve these problems, you need to drain the water, disassemble the boiler. Check the correct operation on it with a multimeter, voltage indicator, tester. If the indicators indicate incorrect operation of its elements, replace them or eliminate the causes of their breakdown.
The boiler does not heat, but the lamp is on
The causes of this problem are various breakdowns.
The handle is in the "minimum" mode, for this reason the tank does not warm up to the required temperature. To solve such a malfunction, you can turn the knob along the clockwise movement of the hand. The thermostat came on. To get out of this situation, turning on the thermal protection button will help. It is located in different places on different models. The valve is not closed. You need to put your palm to the riser. If it is warm to the touch, and cold water comes out of the tap, then the valve is not working. It needs to be closed or bought and replaced with a new one. Heats up for a long time. Do not drain the water right away, it will be right to wait until it heats up.
Options for solving the problem of a malfunction of the heating element
Cleaning with one liter of water, 50 grams of citric acid. The apparatus is immersed in a solution prepared from these substances for two days. After that, they take it out and clean off the scale. Replacing the heating element on different models of boilers is the same. To produce it you need:
- Close the tap;
- clean the heater;
- for safety reasons, you need to de-energize the boiler;
- remove the protective cover;
- with a special screwdriver find out if there is voltage;
- take a photo of the connection diagram;
- remove the heating element from the mounts (if necessary, put a rag);
- wait until the attachment point is completely dry (contacts should not have moisture);
- look at the anode, find out if it is working properly;
- check the rubber gasket for wear;
- after the heating element has been replaced, install all the parts back.
Having done all these steps, you need to make sure that there are no leaks. The air in the boiler must be released, and then the unit must be plugged in.
To what temperature the cooler heats the water
The operating principle of the cooler heating system is practically the same for different models. The design of such a system includes:
- storage tank for heating water (volume from 0.6 to 3 liters) with thermal insulation protection;
- heating device (can be assembled with a heating tank or is a separate unit). The power of the heater, depending on the model, is in the range of 400–1200 W;
- control board;
- 2 temperature sensors (the response temperature of the lower controller is from 70 ° C to 86 ° C, and the upper controller is from 93 ° C to 96 ° C).
When the heating system is turned on, the dispenser heats the water in the cooler accumulator until the upper temperature sensor is triggered. The temperature of the liquid is brought up to the temperature required for making coffee or tea. When the heating system is turned off, the water cools down. When its temperature drops to 70 ° C, the lower temperature sensor will work and the heating equipment will turn on. The device operates cyclically. He heats up the water for a couple of minutes and then turns off for 10 or 20 minutes.
If you open the hot water tap, then instead of the flowing out volume, liquid from the bottle will flow into the reservoir. This will lead to a gradual decrease in the temperature inside the heating vessel. When the temperature indicator reaches the set value, the lower sensor will work and the cooler will quickly heat up the incoming water.
It should be noted that the operation of the heating element without an installed water bottle contributes to its burnout. Such damage is not covered by the manufacturer's warranty. During the diagnosis of broken equipment, the workers of the cooler service center can easily determine the cause of the malfunction, so always turn on the dispenser only after installing the bottle of water.
In order for the water cooler to work as long as possible without serious breakdowns and expensive repairs, it is necessary to observe the equipment maintenance schedule and the frequency of its prevention.
Recommended articles on this topic:
- Types of water coolers: models, functions, photos
- Water cooler for office: types and selection criteria
- How to drink water correctly: nuances and tips
As noted above, the temperature sensors in the heating tank are triggered when the water heats up to a temperature of 92 to 96 ° C (depending on the model of the device).
Here you need to provide the following help:
- Based on information from a school physics course, many people know that water begins to boil at 100 ° C.
- The actual temperature of the water poured from a boiling kettle ranges from 90 to 95 ° C.
The range of leading manufacturers includes water dispensers with a turbo heating function. Whereas conventional models are equipped with heating elements ranging from 420 to 600 W, systems with a turbo heater use systems from 700 W. The last variant of coolers is necessarily equipped with a liquid crystal monitor, which displays the temperature of the water in the heating accumulator. In addition to the LCD display, such devices have a button for manually activating the turbo mode for heating water.
Traditional coolers heat up from 4 to 6 liters of water per hour. This capacity is quite enough to provide hot water for an office with a small number of employees.
If a lot of people work in the room, then it is not at all necessary to buy several dispensers. For such cases, manufacturers produce floor-standing coolers equipped with large heating tanks. Such drives have heating elements with a power of more than 1200 watts.
Powerful dispensers have the same appearance as standard models.Most of the body assembly parts fit both standard models and coolers with increased performance (for models with turbo heating, performance rates exceed 12 l / h).
Why the water heater does not heat the water to the maximum
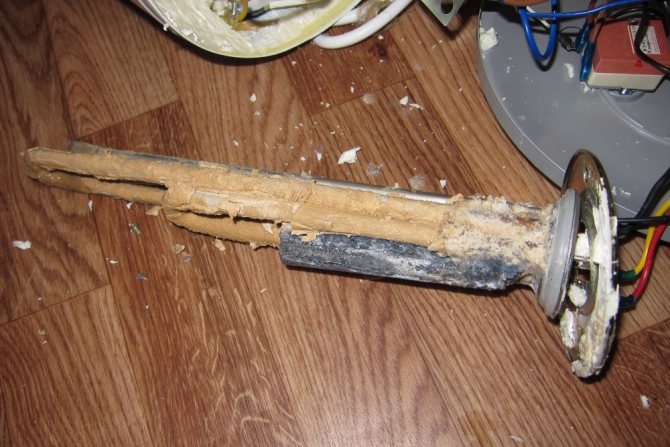
One of the common reasons why the boiler does not function correctly is the faulty operation of the heating element. This problem is typical of ancient models. Typically, the life of the heating element is four years. Over time, deposits form on it. They interfere with the normal operation of the device.
If you do not take any measures to replace it, clean it, this can lead to failure of the heating element. The heater may not work properly due to a breakdown of the thermostat and therefore do not heat hot water.
Electric water heaters fail just as often as other household appliances. This is due to poor water quality, damage to electrical wiring, failure of the heating element, error during installation or improper use of equipment. Typical problems can be corrected by yourself, without the involvement of specialists.
The lack of hot water negatively affects the usual way of life. If the water heater does not heat the water, while a light is on on it, you should worry about its early restoration.
If the listed elements do not work properly (or if they fail), electric water heaters will not perform their main functions:
- Heating element - often fails due to prolonged use.
- Anode - rod made of non-corroding steel with a magnesium surface coating. It attracts all the salts in the water. With active use of the water heater it is recommended to replace the anode at least once a year.
- Thermostat - an internal element that controls water heating. In automatic mode, the element compares the current temperature with the one set by the user and turns on / off the heating relay.
- Insulation gaskets - gaskets between the connecting elements of the pipes and the water heater.
Elimination of breakage
If the diagnostics showed that the current flows to the boiler, you should disconnect the device from the mains and find the thermal protection button on the thermostat. It should be drowned until it clicks. If after this procedure the boiler starts to work normally - in the near future it is necessary to carry out preventive maintenance of the water heater - to clean the heating element from the formed scale and / or replace the anode.
A defective thermostat is easy to replace with your own hands. It is practically impossible to repair it on your own (electronic thermostats with a complex device are used in water heaters Polaris, Atlantic, etc.). Only thermostats, which are equipped with Ti-Tech and Ariston water heaters, can be repaired at home.
The most common cause of thermostat failure is high humidity. When buying a new thermostat, there are a few things to consider:
- thermostat type, mounting method and installation dimensions;
- main functions;
- the amount of current for which the part is designed.
A damaged heating element can be replaced independently. Heaters from Real, Ariston and other brands are very easy to disassemble - they can be easily cleaned at home.
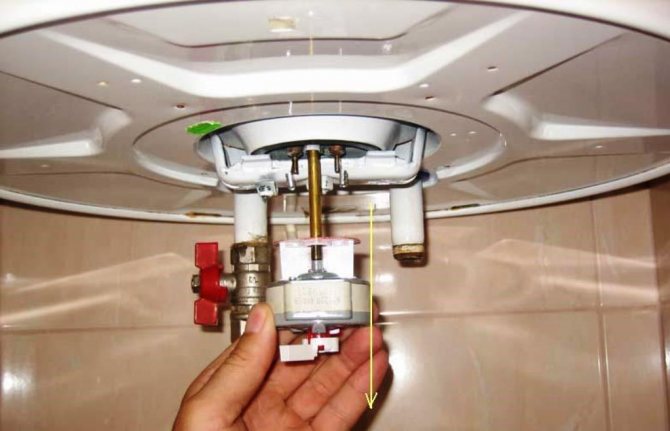
To replace the tubular electric heater, it is necessary to turn off the water supply to the boiler... This can be done by turning off the tap or turning off the water directly from the riser.
The next step is to drain the water from the heater and disconnect it from the mains.... After that, using a screwdriver, the protective cover is removed from the boiler. In some cases, the heater will need to be removed from the wall to replace parts.
Next, you should disconnect the wires, having previously photographed the entire circuit - this will facilitate the process of connecting the boiler. Now you can unscrew the nuts that secure the heating element. When replacing the heating element, pay attention to the fact that the contacts must remain dry.
Together with the heating element, most often the anode also needs to be replaced, which protects it from corrosion. It is imperative to check the integrity of the rubber gasket located between the tank and the heating element. If dents or tears are found, it should be replaced.
To install a new tubular heater, follow the above steps in reverse order. Before turning on the water heater, you should check it for leaks. Only after the device has been checked for leaks can it be plugged into the network.
Power outages and poor water quality can make even the most reliable water heater unusable. If you follow the rules of its operation and carry out a preventive inspection in a timely manner, it will serve without breakdowns for many years.
Electric water heaters fail just as often as other household appliances. This is due to poor water quality, damage to electrical wiring, failure of the heating element, error during installation or improper use of equipment. Typical problems can be corrected by yourself, without the involvement of specialists.
Determine the cause of the malfunction
Typical causes of malfunctioning instantaneous water heaters and boilers include:
- poor water quality;
- error during installation of the device;
- damage to electrical wiring;
- improper operation.
The failure of the heating element is associated with the appearance of scale accumulating on the surface of the tank or due to a malfunction of the thermal protection button and safety valve.
Another common reason why the water heater does not heat the water is a faulty electronic module of the device. It is strictly forbidden to replace it yourself., especially if the equipment is under warranty service. Contact our master for qualified help.
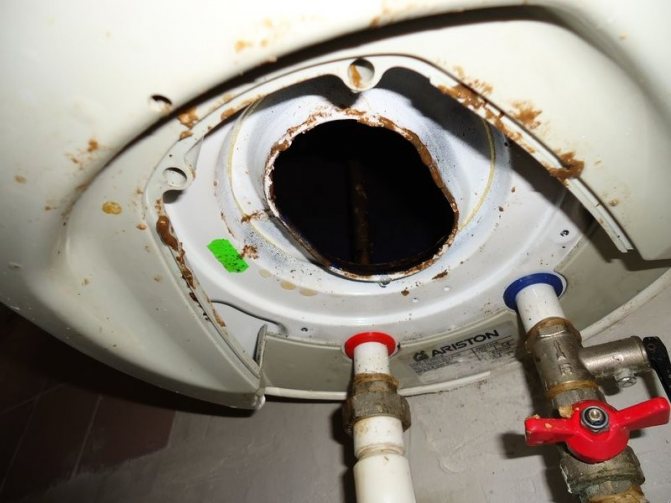
A careful visual inspection of the boiler is required to determine the cause of the malfunction. Be sure to pay attention to the light bulb, which lights up when the device is in operation (when heating). If it is off, try increasing the heating temperature. There may be 2 situations:
- The lamp came on (or indicator).
If the water heater does not heat the water, but the indicator lamps on the panel are on, this indicates a failure and the need to replace the heating element. A multimeter will help make sure of this., which is connected to the device and is adjusted to a certain resistance indicator. If you see zero on the indicator, the problem is in the circuit. You see the symbol of infinity - there is an electricity cut in the circuit.
It may also happen that when the device is turned on, the automation immediately turns it off. This is another indicator of failure of the tubular electric heater.... Use a little trick to check! Lock the thermal protection button with your finger and turn on the water heater. If it starts to work, then you can return it to its full state by descaling. Do not forget to check the condition of the anode.
Prevention of cooler breakdown in water heating mode
The quality of bottled drinking water is regulated by the SanPiN of Russia. According to sanitary and epidemiological standards, such water is subject to mineralization. For water of the first category, the inclusion of useful minerals up to 1000 mg / l is provided, and for products of the highest category from 200 to 500 mg / l.
During the operation of the dispenser, a sediment from some of the minerals and salts present in the water is formed inside the heating tank, on the check valve, on taps and on other elements. These deposits impair the performance of the dispenser.
With an increase in scale on the walls of the heating cylinder, the temperature sensors give more and more incorrect data on the water temperature. At the same time, the cooler does not heat the water so quickly and efficiently (the power consumption of the device increases).
Statistics collected in service centers show that coolers can last up to 4 years without periodic maintenance, cleaning and maintenance. After that, consumers have to change the storage capacity.
Regular maintenance of the device allows not only to remove scale from the cooler parts, but also contributes to a higher quality of consumed water.
Experts recommend sanitizing dispensers at least once every six months.
This frequency is provided by the manufacturer for a fully functional cooler. If your dispenser does not heat up the water as quickly or it begins to change its taste, do not wait until the next preventive maintenance date is due. Timely care of the cooler will prevent its breakdown, which, as you know, happens unexpectedly and at the most inopportune moment.
To clean the dispenser yourself, you need to prepare:
- damp cloth;
- detergent composition;
- a washcloth for washing dishes;
- Phillips screwdriver.
Before starting work, you need to turn off the cooler from the outlet and remove the bottle of water. Wash all surfaces of the apparatus with a sponge with a detergent composition. It is especially necessary to clean the needle on which the bottle is being put on, and the elements adjacent to it. After that, it is necessary to wash the pan of the device, rinse it under a stream of water and wipe it well. Now you can assemble and prepare the cooler for work. Do not forget to install the bottle and fill the containers with water before plugging the machine into an electrical outlet. If the dispenser is working properly, the cause of the malfunction was due to dirt.
The boiler does not heat up the water, the lamp is on
When the indicator light is on and there is no water heating, the problem is solved in 2 ways:
- Perhaps the temperature control knob is set to a minimum value and the water in the tank simply cannot warm up to the desired temperature. In this case, simply increase the minimum heating level (by turning the knob clockwise).
- The thermostat may have turned on. In this case, simply turn on the thermal protection button. Please note that on water heaters Thermex, Baxi, Ariston and others the button can be located in different places of the case.
The cooler does not heat the water, what to do: step-by-step repair
Disassembly sequence:
- On the rear wall of the cooler case, use a Phillips screwdriver to unscrew the self-tapping screws. A heating accumulator with temperature sensors is located in the upper part of the device body.
- A drain plug is rigidly fixed on the right side of the body (water is drained through it). On the left there is another hole with a plug for draining water from the cooling system.
- Using an open-end wrench no. 15, remove the rubber seal. Then use a Phillips screwdriver to unscrew the 4 screws.
- We cut off the clamps from the branch pipe, dismantle the heating tank and all pipes.
- Disconnect the power wires, thermal sensors and ground wires with six screws.
- There should be white thermal grease on the seats of the heating accumulator, if it is absent, then you need to apply such a composition before installing the tank.
- We assemble the device in the reverse order.
When the device is assembled, you need to install the bottle and completely fill the system with water. Now we check how it flows, and, if everything is fine, we connect the cooler to the mains. Illuminated indicator lights will indicate the elimination of the malfunction.
The water heater does not heat, the lamp does not light up
Another typical situation - the boiler does not heat the water to the required temperature, while the indication lamp does not light up. This indicates the following problems:
- the presence of scale on the heating element;
- malfunction of the control board (electronic component);
- heating element malfunctions;
- failure of the safety valve.

To verify this, water is completely drained from the tank, the device is disassembled. All internal electronic components must be checked using a multimeter, tester and voltage indicator. If these devices are not at home or you do not know how to use them, call the wizard.
Reasons and diagnostics why the water heater does not heat.
There can be several reasons for the incorrect operation of the boiler - from damage to the electrical wiring to a malfunction of the heating element.
To establish the cause of the breakdown, a thorough inspection of the water heater should be performed. So, first of all, you should pay attention to whether the light is on, signaling the operation of the boiler. If the light is off, use a tester to check if whether 220 V is supplied to the "ends" of the thermostat.
If 220 V is supplied with the thermal protection button turned on, disconnect the water heater from the network and remove the thermostat. The part should be ringed on the input-output for phase and "line" 0, while checking, rotating the thermostat knob. If the part does not turn on in phase or line 0, it should be replaced.
In the event that the light is on, but the boiler does not heat the water, or it heats up very weakly, then the reason is the breakdown of the heating element. In this case, it is necessary to drain the water from the water heater and replace the broken part.
The heating element can break down for two reasons:
- due to the formation of a large amount of scale on its surface and an inoperative thermal protection button;
- due to lack of water in the heater due to a faulty safety valve.
A common reason that the heater does not heat the water is a malfunction of the electronic module. It is not recommended to repair or replace such a part on your own. Also, the cause of such a breakdown may be the actuation of emergency cut-off devices. They can be triggered due to the formation of a large amount of scale on the heating element or when the boiler is turned on to the maximum temperature.
The boiler does not heat the water well
Poor heating of water in the boiler in 90% of cases is caused by the state of the heating element. The service life of this element is no more than 4 years. Over time, scale appears on its surface, which reduces heat transfer. Sometimes an open or short circuit occurs. This can only be determined with a multimeter. In this case, be sure to pay attention to the condition of the thermostat.!
The average boiler heating time is 2 to 4 hours, depending on the volume of the tank. If it heats up to half the set temperature, then there are functional problems with the equipment.
Characteristics and recommendations
If the boiler stops working, then in this case you should check the boiler for serviceability, and only then take any steps, call a master or prepare for repair.
- The water in the boiler is heated by heating elements, according to the principle of operation, it is similar to an electric kettle. This part is replaced as needed, that is, when it is out of order. It is believed that four years is the average service life of the heating element (opinion of some experts).
- The first sign that it is necessary to replace this piece of equipment is the activation of automatic protection when the boiler is turned on, it simply turns off the device. This will tell you that the water heater, or rather its element, has burned out.
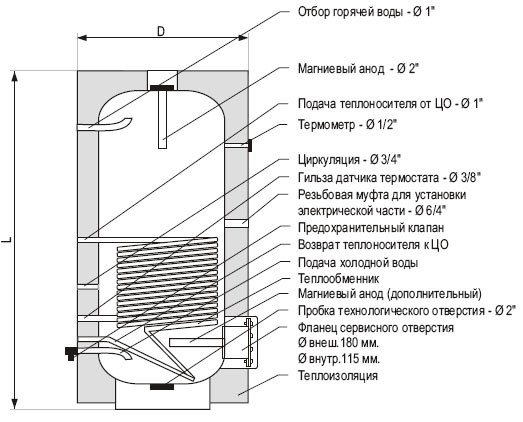
Diagram of an indirect heating boiler.
Here are two more ways by which you can check the heating element for serviceability, to be sure for sure that the device needs to be replaced. These manipulations will let you understand why the device does not work or why it does not work well.
For the first method, you will need a test lamp and some knowledge. You will need this in order to properly assemble the lamp and the heating element into a single electrical circuit.
Having assembled the circuit, connect it to the power source, if the light comes on, it means that the heating element is working properly and the problem should not be looked for here.
You can also use a multimeter to check, with it you can ring the device.
The multimeter is configured to measure resistance and is connected to the device.
If the fault lies in the short circuit, the indicator will show zero, in case of a break it will show "infinity".
If the boiler stopped working precisely because of a malfunction, you will have to call the master or handle this work with your own hands. When deciding to replace an element yourself, you should first prepare everything you need.
Troubleshooting
Replacement of heating elements
Replacement of heating elements for water heaters Ariston, Electrolux, Termeks and others is similar, despite the design differences and the different appearance of the devices. In work you will need:
- wrenches (with caps);
- pliers;
- plus and minus screwdrivers;
- screwdriver with voltage indicator.
The sequence of actions is as follows:
- Close the water in the riser, drain the inside from the boiler.
- Disconnect the power to the appliance from the mains.
- Remove the decorative cover that gives access to the electronic components and check the absence of voltage with an indicator screwdriver.
- Remove the terminals and disconnect the wires (in this case, be sure to remember the diagram of their connection). It will not be superfluous to photograph the connection diagram.
Do not allow moisture to get on the terminals, contacts and the electronic board of the device in order to avoid a short circuit and damage.
- After removing the cover and disconnecting the wires, take out the heating element.
- Check its condition, clean the anode from deposits.
The installation of a new element is carried out in the reverse order, while remember the rules of your own safety in order to avoid electric shock.
Replacing the thermostat
Proceed as follows to replace the thermostat:
- Remove the retaining ring (pressure) near the heating element.
- Remove the sensor adjustment unit and the thermostat itself.
- Install a new item.
- Secure it with a pressure ring.
- Check the condition (position) of the safety valve.
Please note that it is not recommended to start using the device immediately after replacing the thermostat! Check the correct flow of cold water inside, check if the connecting piece hiss. Then the hot tap is opened in order to release the air that has accumulated inside the boiler. Only then can a test run be carried out..
The plug heats up when the water heater is running
Fork heating (slight) - allowed during operation. But if it gets too hot, you need:
- Visually check the condition of the tees and extension cords to which the device is connected. Try to choose an extension cord with a large wire size for fire safety purposes.
- Check the condition of the outlet so that the water heater plug is firmly seated in the sockets. In some cases, when the plug or socket is loose, the adjacent part of the wire may become warm.
An incorrectly selected extension cord can cause a fire in a house or apartment, since water heaters are powerful and energy-intensive devices (1.2-2.6 kW).
Flow-type water heater does not heat water
By the number of instantaneous water heaters, suppliers sell an order of magnitude less than storage electric ones. This is due to increased power consumption. Typical reasons why instantaneous water heaters do not heat water:
- Faulty coil... Optimal is to replace the element. Winding nichrome thread will help solve the problem for just a few days. This increases the fire hazard.
Weak water pressure... The water sensor through the electronic unit does not send a signal for heating to the spiral. A common instrument problem.
Clogged radiator... Disconnect the device from the mains and disassemble it.If the radiator is heavily clogged, place it in a lemon solution for several hours.
If you plan to leave the water heater off for a long time (for example, during a long absence from home), try to completely drain the water from the tank and hoses. This will eliminate the likelihood of limescale and deposits on the surface, and will also increase the service life of the device. When turned on, self-diagnostic devices will help to check the status and readiness for operation (show error codes E2, E3 or all indicators flash).
The iron does not turn on
If the iron does not turn on and does not heat up, the probable cause of the malfunction is the wear of the cord and the failure of the fuse.
Cord wear
Sometimes the defect can be seen visually - the cable winding is worn out, twisted, the wires are visible through the weaving, their insulation is broken.
To exclude or eliminate this malfunction, you should:
- Reach the contacts by unscrewing the mounting bolts and removing the back panel.
- Cut off the damaged area (if the defect is visible visually and the length of the cord allows). Having cleaned the contacts, you need to connect the rest of the cable back and check if the sole has started to warm up.
- If there is no external damage, ring the cord with a multimeter, and if there is no resistance, replace it with a new one.
If the cable is working properly, it is necessary to remove the case to get to the sole and key nodes of the device.
Thermal fuse blown
If the cord is in order, the cause of the malfunction may be a broken thermal fuse. This element is built into the circuit and serves to protect the device. If the surface temperature of the heating element exceeds the permissible value, the fuse will burn out. The element is placed next to the thermostat, often hidden by a layer of insulation.
To check the performance of the thermal fuse, it is necessary to measure its resistance. If the value shown by the ohmmeter is zero, the element is faulty.