
Greenhouse heating methods
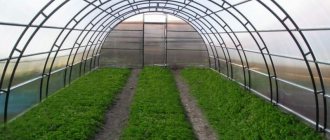
It is advisable to install heating systems in year-round greenhouses or in early spring planting of vegetables, herbs and flowers.
Effective ways to heat greenhouses include:
- stove heating, including with air and water circuits;
- water heating based on solid fuel, gas or electric boiler;
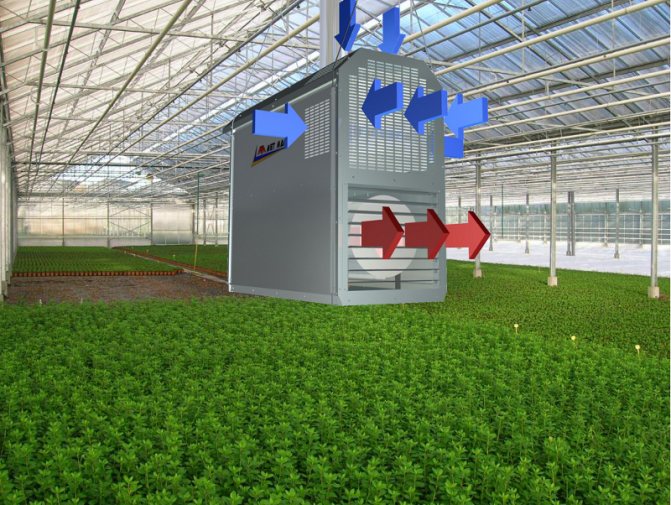
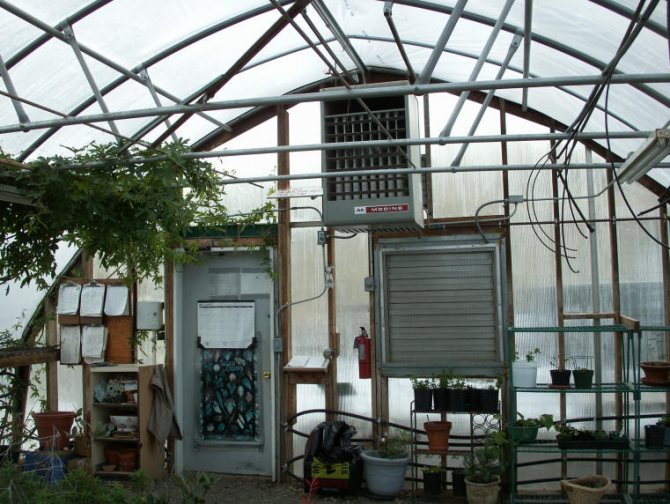
- heating with a gas cannon;
- electric heating with convectors or infrared heaters;
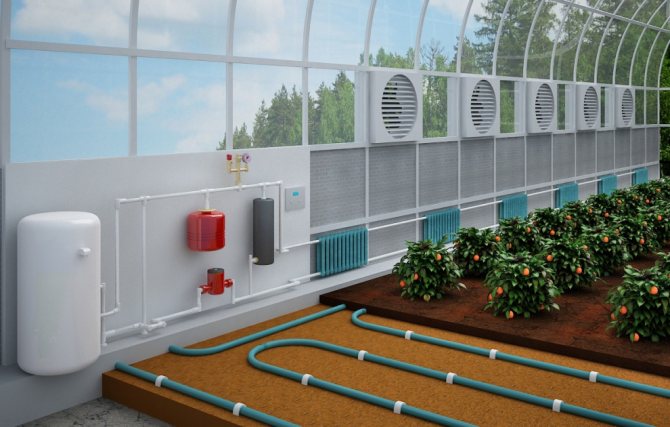
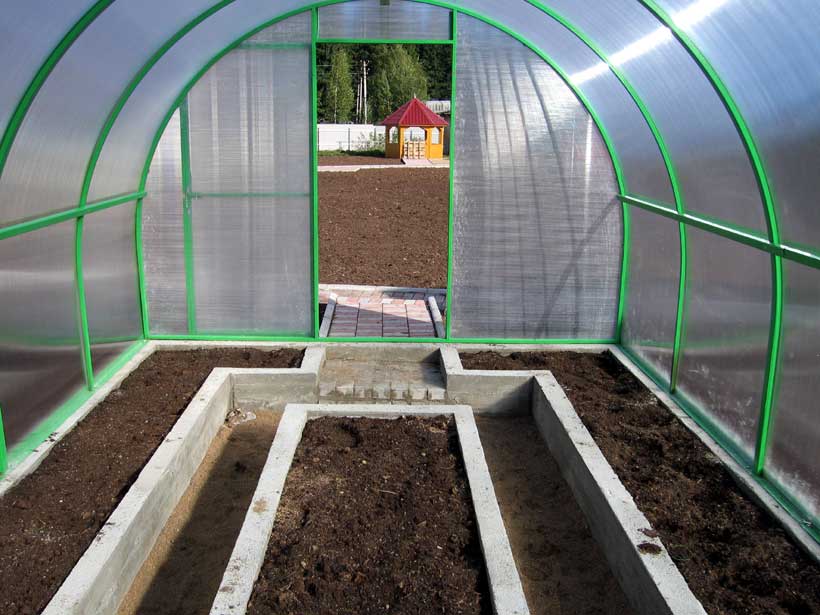
- heating the soil with a heating cable or water heating pipes.
The methods can be combined, for example, by installing a stove heating as the main source of heating and a heating cable as an additional one.
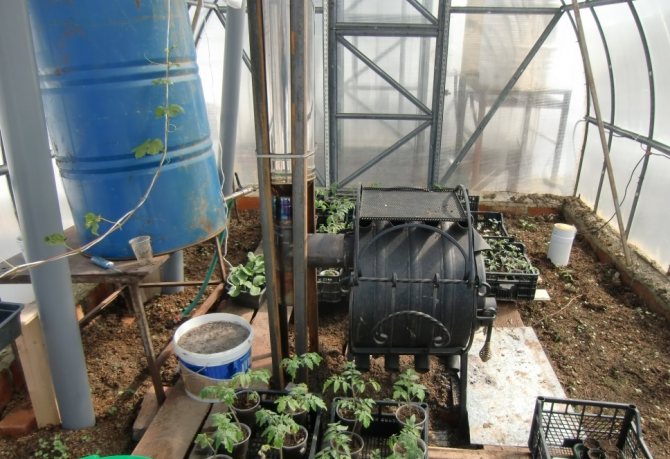
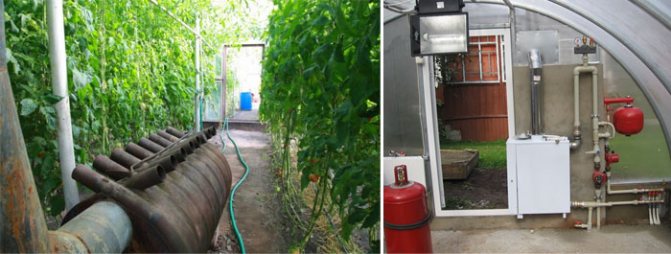
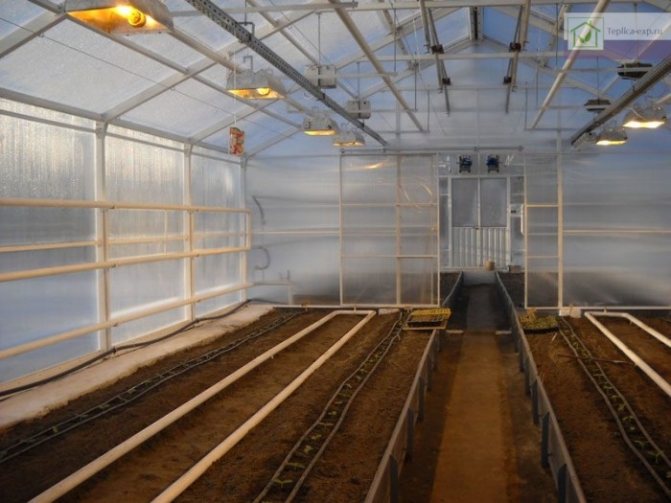
Oven in the greenhouse
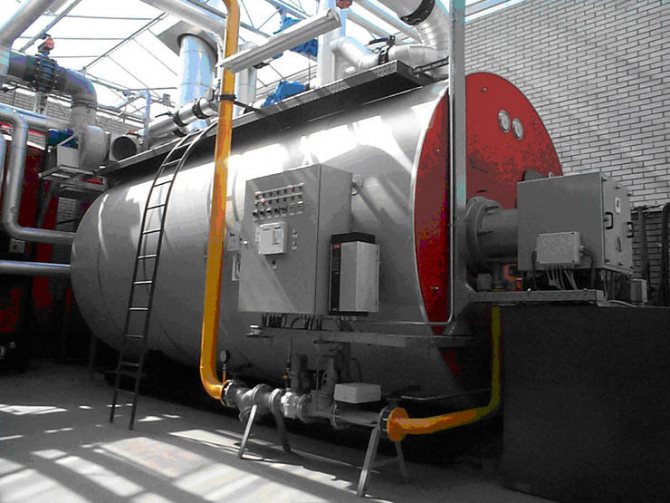
When installing a boiler and installing a water heating system, soil heating is also done with water, connecting the pipes with a separate circuit.

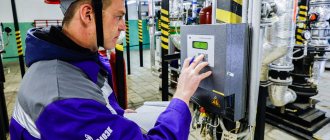
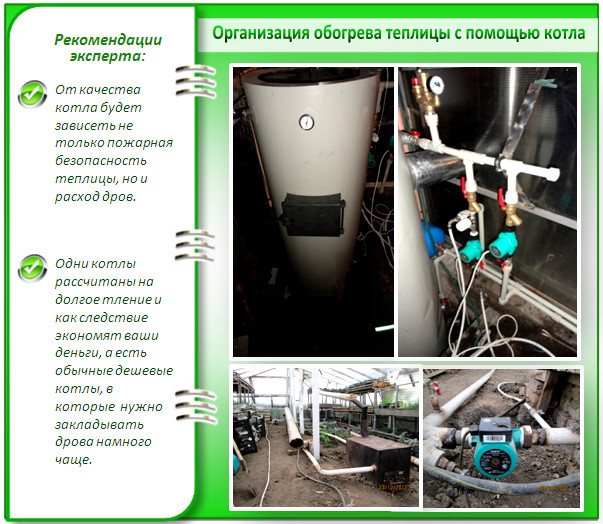
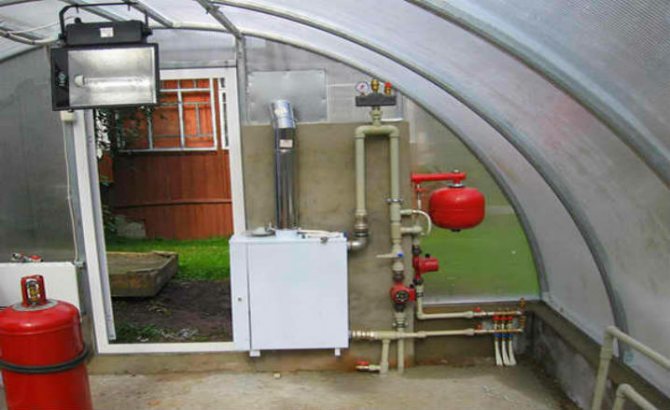
Greenhouse boiler
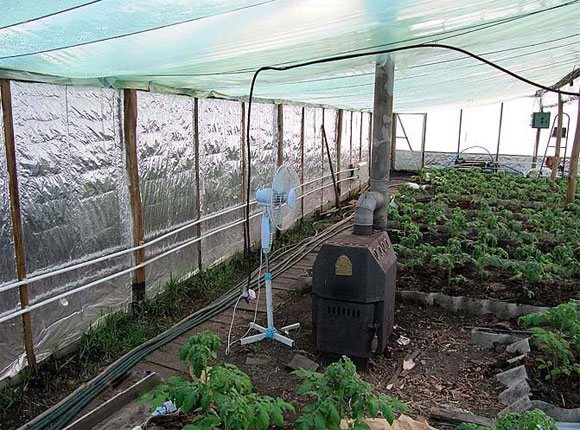
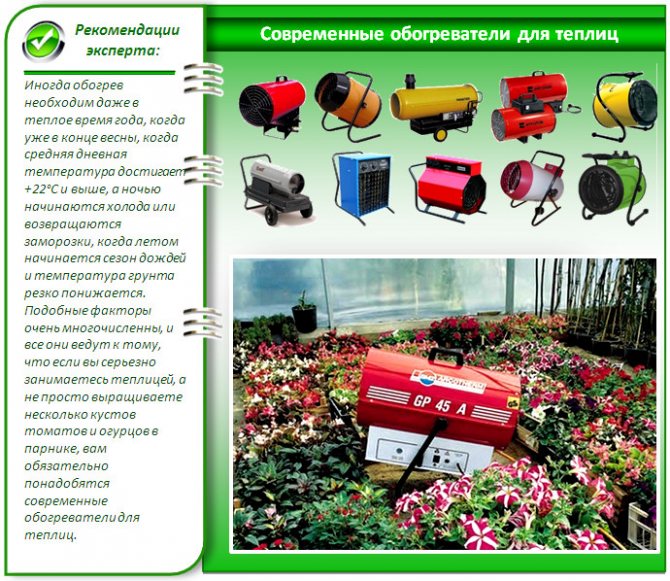
Heating by gas cannons is quite effective - the room heats up quickly, and the gas consumption is low. The gun takes up little space and is quite safe to use.

Heating a winter greenhouse with a gas cannon
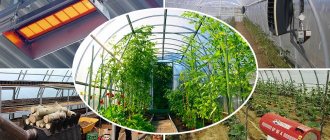
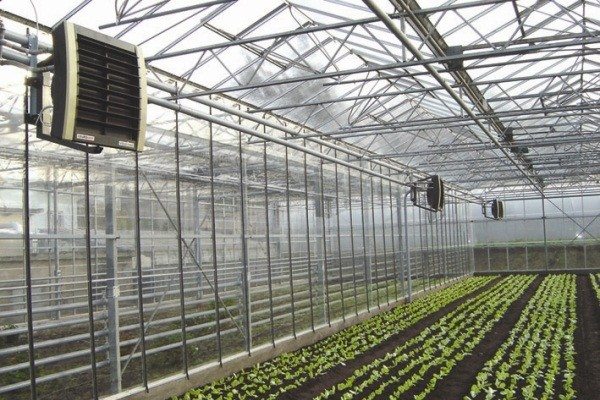
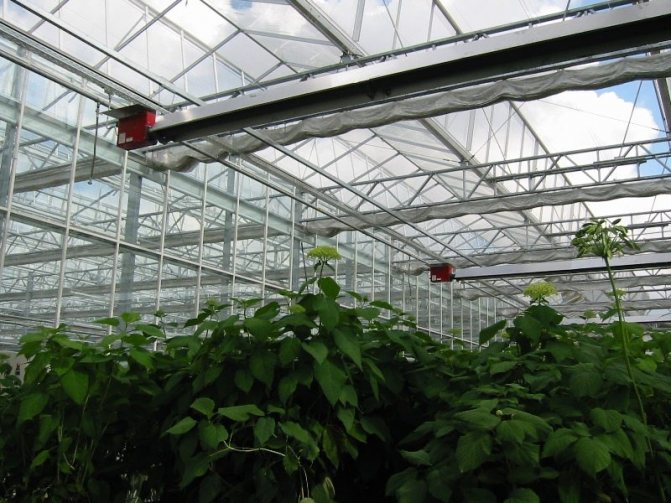
When using electric heating as the main one, it is recommended to use infrared heaters - they heat the soil and the plants themselves, without overdrying the air. Convectors heat the air, while in the lower part of the greenhouse - in the root zone - the temperature remains low, and at the top - excessively high. For this reason, convectors are usually used only for temporary heating.
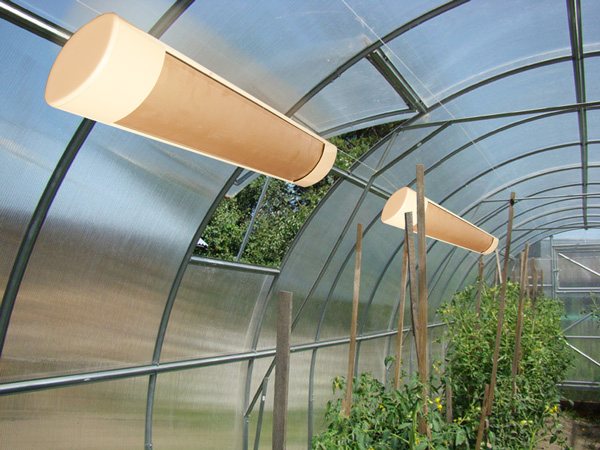
Infrared heaters in the greenhouse
Heat gun prices
heat guns
Heating methods for agrotechnical structures
Heating is equipped in greenhouses for year-round use or for early spring planting of crops and flowers.
The following types are considered the most effective heating methods:
- stove heating with a water circuit, air type;
- heated line from an electric, gas or solid fuel boiler;
- the use of gas-type heat guns;
- convector or infrared circuits with mains supply.
Heating with gas cannons is considered effective. The air heats up quickly, the fuel consumption is low, the unit itself is placed compactly and, with the right choice, is absolutely safe to use. If the greenhouse is equipped with electric heaters, experts recommend using infrared devices. Infrared rays heat the soil and plants without overdrying the air.
To save heating costs in winter - solid fuel heat generators are an advantageous solution. With their help, it is possible to heat industrial and farm greenhouses with an area of up to 1000 sq. M. They are also used for summer cottages, designing the system in such a way that heating occurs in the living room and the greenhouse installation at the same time. When installing such heat generators, it is important to observe all the necessary safety rules.
Fuel is used depending on the type of heat generator; the best option is considered to be universal models that are suitable for logs, pellets, coal and others.
Our company will help in the design and installation of the best heating method in winter for an industrial, farm or other facility.
When deciding how to heat the greenhouse, you need to remember that most of the thermal energy enters this structure in a natural way - from the sun's rays passing through polyethylene, polycarbonate or glass.
Thus, for example, heating of greenhouses (small in area) is organized.Only a small heater can be installed there, which is turned on on particularly cold or cloudy days.

Most often, solar energy is sufficient to heat a greenhouse.
However, large indoor plants for growing plants necessarily require additional heating. Let us consider in more detail how heating in a greenhouse can be arranged with our own hands.
This type of energy carrier is quite widespread, efficient, but not always economical. To avoid excessive waste, you need to choose the right heat source.
There are the following varieties:
- Radiators. A fairly effective way to maintain the air temperature required for plants. Great for small greenhouses, when only short-term heating is needed (otherwise this option will not be economical).
If it is planned to grow crops not only in early spring, but also in winter, it is advisable to purchase fan heaters complete with radiators. They allow you to quickly raise the temperature and prevent the formation of condensation on the walls of the structure.
In the photo - electric heating radiators installed in the greenhouse
Choose modern models of electric radiators and fan heaters, using which you can accurately control the amount of heat produced. In addition, their special shaped heat exchangers heat up the air more evenly and, thanks to convection, organize its circulation throughout the entire space of the greenhouse.
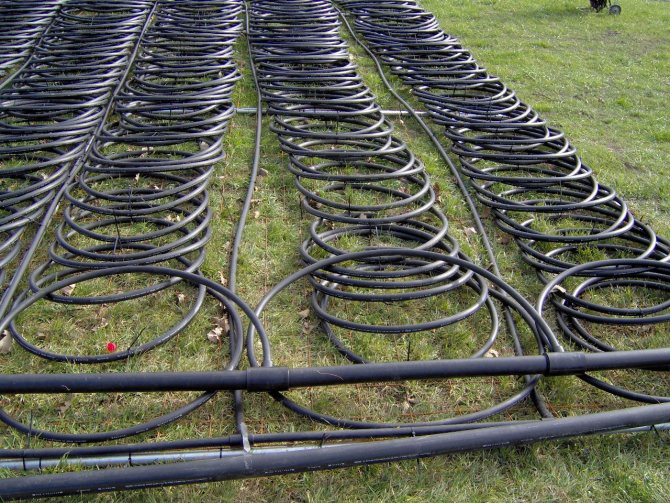
- Cable heating. This method is similar to the well-known "warm floor" system, which is installed in dwellings. For its arrangement, special electrical cables are used.
Their installation is carried out as follows:
- part of the fertile soil layer is removed;
- at the bottom of the resulting pit, a heat-insulating material is laid, which will prevent unproductive heat consumption and protect the electrical cable from mechanical damage;
- after that, a layer of fine-grained sand is poured;
- a cable is laid on the sand;
- from above, backfilling of previously removed soil is performed.
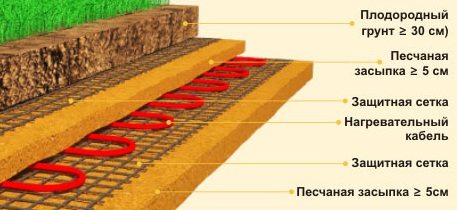
Layout of cables for heating agricultural buildings in covered ground
The advantages of such a solution are obvious:
- economical energy consumption;
- the ability to accurately regulate the temperature thanks to thermostats;
- uniform distribution of heat energy over the entire area of the greenhouse;
- small time and money costs for equipment installation.
- Infrared emitters. This is one of the newer heating methods that is often used in greenhouses covered with polycarbonate sheets.
The arrangement of such a system is as simple as possible: it is enough to buy and install a certain number of heating devices in the right places.
- There are many advantages to this method of heating air in a greenhouse:
- improved germination of seeds sown in the ground;
- the ability to organize zones of intense and weaker heating within the same room (for example, separately for seedlings and already planted plants);
- long service life of the purchased wires;
- economical consumption of electricity.
Infrared emitter for heating plants
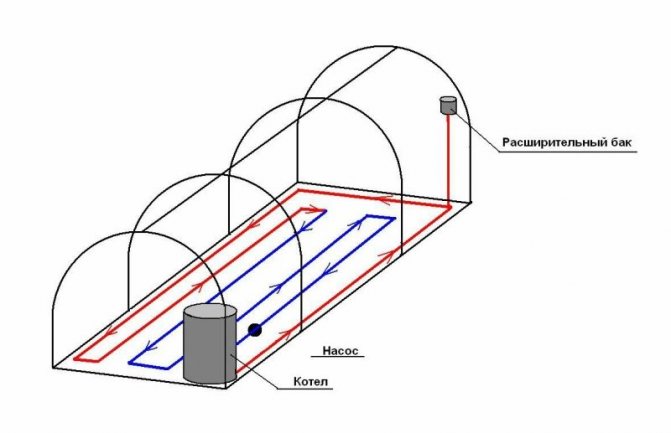
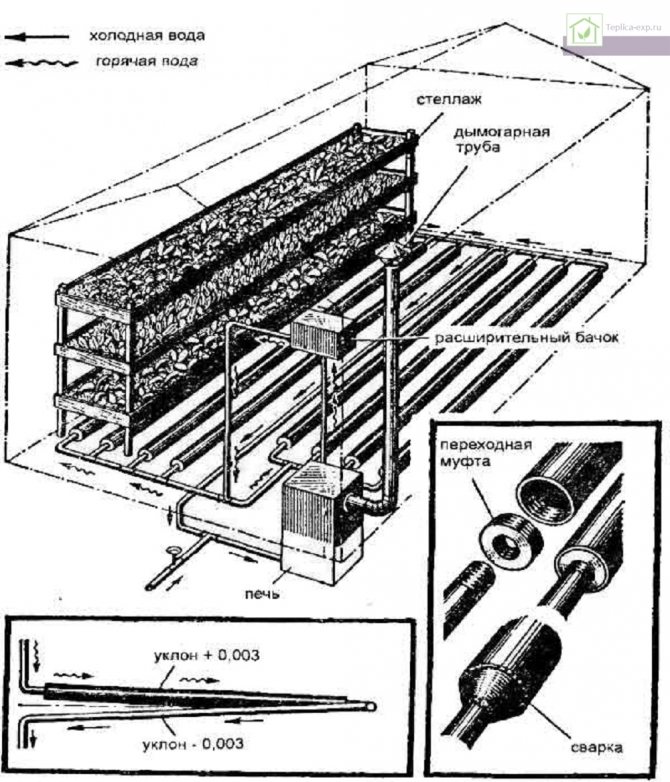
- Heating with a liquid heat carrier. Do-it-yourself water heating of a greenhouse is quite difficult to assemble, but its efficiency is worth the effort. The liquid can be heated both with the help of a special boiler (for example, induction), and in a boiler. It is only important to correctly arrange the heating batteries and organize circulation, for which a water pump mounted on the return pipeline is perfect.
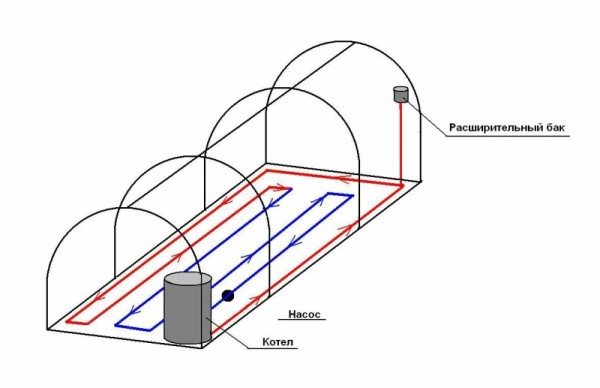
Greenhouse water heating arrangement scheme
This type of energy carrier is the most economical.But it requires a connection to the main gas network, and this procedure has many obstacles that not everyone can go through. This is, first of all, about obtaining all the necessary permits for the installation of gas equipment.
We suggest that you familiarize yourself with the black horse what color
Bureaucratic red tape can be avoided by using liquefied gas. However, with its help it is impossible to heat the greenhouse throughout the year, as it requires too frequent replacement of cylinders (or the installation of a personal gas holder).
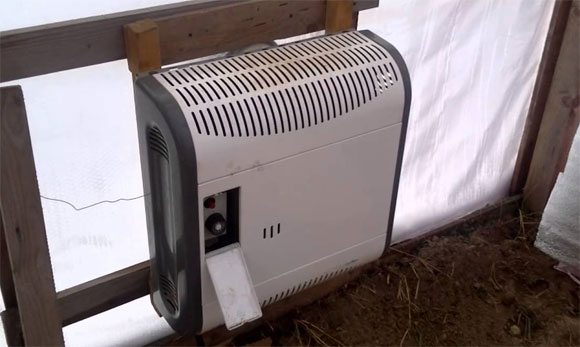
To heat the greenhouse, a convector operating on liquefied gas can be used
Remember that the use of gas equipment involves the arrangement of supply and exhaust ventilation, which provides fresh air access to the agrotechnical structure and the removal of combustion products that can be dangerous.
Greenhouse stoves using wood, fuel pallets, pellets or coal are very common for heating individual greenhouses as well as large farm buildings. Such systems are especially popular in suburban areas where people do not lack firewood.
Wood fired boiler used to heat the greenhouse
Solid fuel boilers do not require permits before installation and are easier to install. They differ in a slightly lower efficiency than the previously considered devices, as well as in the complexity of control. Agree, it is difficult to regulate the temperature in a greenhouse that is heated with wood.
Also, such ovens require constant human attention. On dark, cold winter nights, you will have to periodically throw firewood into the furnace, otherwise the death of such an expected harvest cannot be avoided.
The advantage of the described method is the possibility of self-assembly of heating equipment. With some locksmith or construction skills, you can design a heating stove yourself.
From the school course in biology, everyone knows that the waste products of animals (as well as humans), as well as the remains of wood and other plants, generate heat when rotting. Moreover, this process, which is caused by the vital activity of bacteria and other microorganisms feeding on decomposing organic matter, continues for a fairly long period of time.
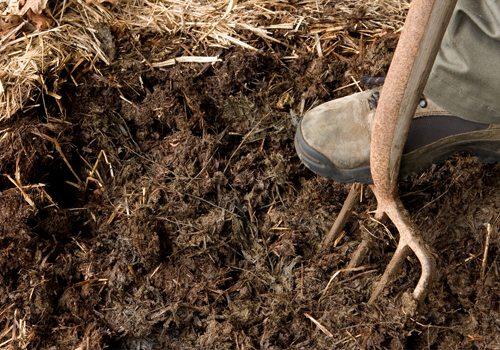
Manure is an environmentally friendly greenhouse fuel
Therefore, it is advisable to heat a small greenhouse in this way. One organic bookmark is enough for 3-4 months of heating, which is quite enough to help the plants survive the frost.
It is necessary to bookmark "fossil fuel" as follows:
- Manure, peat or organic matter that has accumulated in your compost heap must be thoroughly dried, formed into briquettes and folded for storage. 7 days before laying in a greenhouse or greenhouse, humus must be re-moistened and loosened.
The appearance of steam will indicate the beginning of the process of vital activity of microorganisms. This will serve as a signal to put "fuel" in the greenhouse.
- The thickness of the layer to be laid depends on the area of the greenhouse and the number of days left before the onset of stable heat. As a rule, 30-60 cm is enough. If you add chopped straw to the manure, the heating duration can be extended, but the temperature of the heated soil itself will decrease.
- From above, soil is poured onto the manure, which is necessary for the growth of plants.
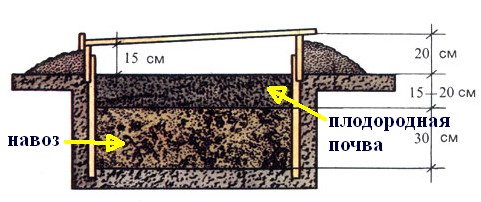
Scheme of laying manure for heating the greenhouse
Greenhouse stove heating
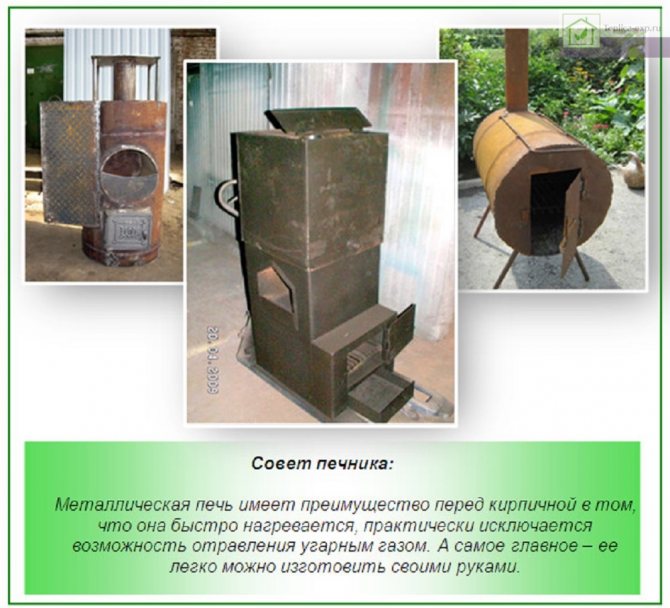
Greenhouse stoves can be made of metal or brick. The second option is preferable - the brick heats up longer, but at the same time it retains heat perfectly and cools down for a long time, and the temperature in the greenhouse remains stable.When heated with a brick oven, the air does not dry out, the humidity remains within the permissible norm.
Stove heating in a greenhouse
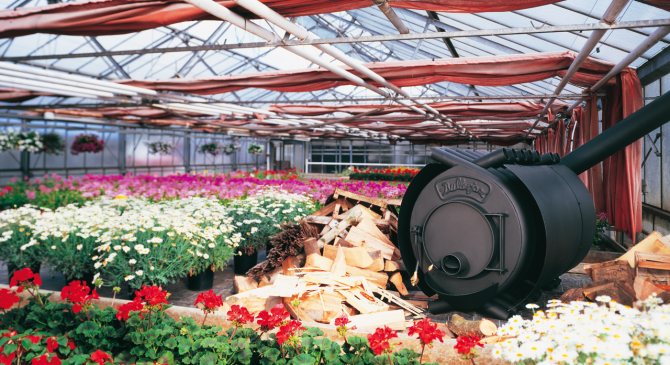
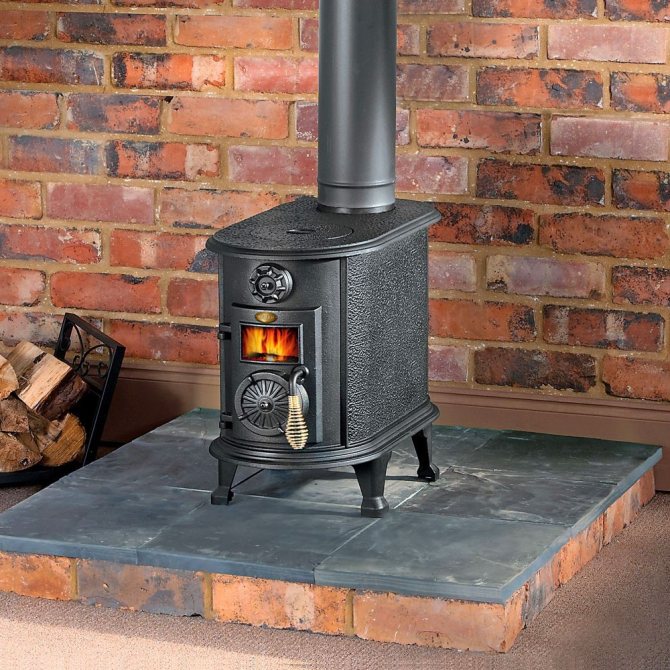
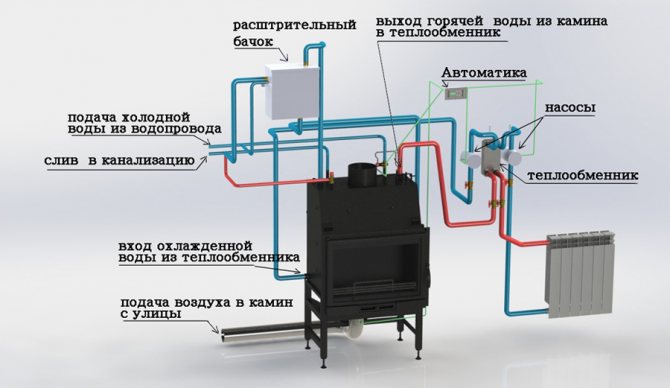
Metal stoves warm up quickly, but have a low heat capacity and heat only as long as the wood is burning. In this case, the walls of the devices are very hot and dry the air. For this reason, metal furnaces are often equipped with a water circuit with registers or radiators - the heated water in them cools down gradually, smoothing out the temperature drops.
Metal ovens for greenhouses
It is recommended to use metal stoves for heating greenhouses for spring-summer use, for this role they are better suited than brick ones, due to the following features:
- metal stoves are mobile, they can be installed for several cold months, and removed in summer;
- they do not require the arrangement of the foundation and do not take up much space;
- choosing a suitable model, you can connect a water circuit;
- the price of metal stoves is not too high;
- installation and installation can be done by hand, even without the skills of laying stoves.
Benefits of metal furnaces
Disadvantages of metal ovens:
- the heating process cannot be automated; the stove will have to be heated manually;
- metal stoves dry the air, therefore it is necessary to install containers with water in the greenhouse to humidify the air.
You can install the stove both in the greenhouse itself, and in the vestibule or utility room, bringing an air or water circuit into the greenhouse. The chimney from a metal stove can be placed in the greenhouse space, setting it at an angle of at least 15 degrees - this will provide additional heating. In this case, an uninsulated metal pipe is used. To pass through the roof or wall of the greenhouse, it is necessary to use special heat-insulated boxes.
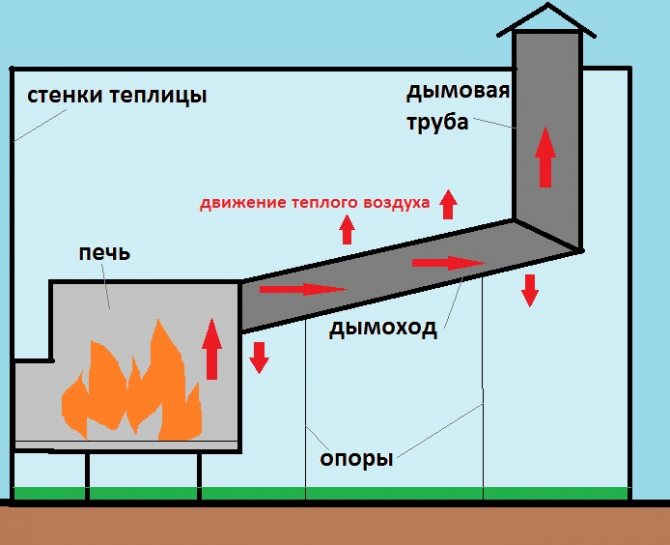
Long chimney creates additional heating
Note! When installing the oven, it is important to take care of its stability! If the stove overturns, it can cause a fire or damage to the greenhouse!
Heating a greenhouse with a metal stove
An overview of popular and inexpensive models of metal furnaces is given in table 1.
Table 1. Furnaces for heating industrial greenhouses.
| Models, illustrations | Short description |
| Vesuvius-mini stove-potbelly stove | Compact and inexpensive oven with the most simple design. A thermal power of 4 kW allows you to heat a greenhouse with a volume of up to 80 m3, that is, an area of 25-30 m2. The furnace body is made of steel, firewood is used as fuel. The stove surface can be used as a stove, for example to heat water for irrigation or humidification. |
| Stove "Cinderella" | Small stove made of heat-resistant steel, equipped with side convectors that distribute warm air. Power 6 kW, designed for greenhouses up to 60 m2. There is a viewing window with glass in the door of the firebox, which allows you to control the process of burning firewood. On the upper surface there is a burner on which you can heat water. Fuel - wood or burning trash. |
| Oven "Teplodar Pechurka plus" | A 5 kW stove for heating greenhouses with an area of up to 50 m2. Equipped with a casing with convection holes for uniform heat dissipation. There is a hotplate on the surface. Fuel is wood. Differs in stability, small size and weight. |
| Oven "Normal" | Power 6 kW, greenhouse area - 60-80 m2. The sides of the oven are protected by casings, so they do not heat up to temperatures dangerous for plants. The housings are equipped with convection openings. The door is firmly locked, which eliminates smoke. A convenient ash box allows you to collect it and use it as fertilizer. |
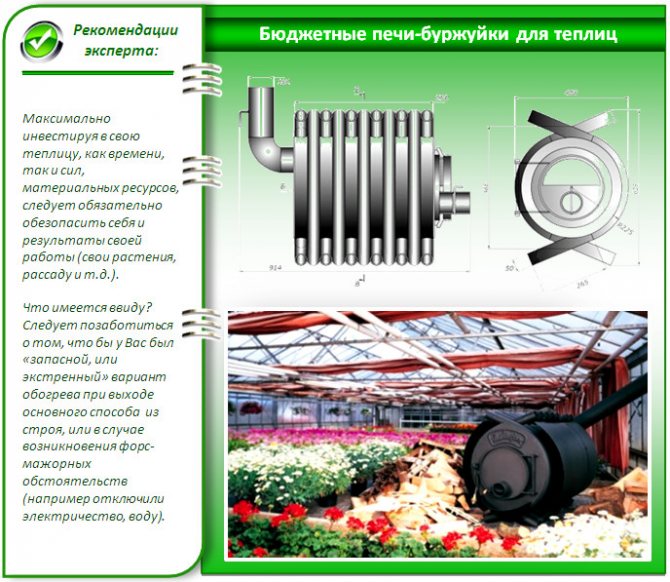
| Stove-buleryan "Klondike NV-100" | Power 6 kW, area up to 60 m2. The furnace is designed as a gas generator and has two combustion chambers. In the first, firewood is burned, in the second, flue gases are burned out.The walls of the furnace are formed by hollow pipes. Cold air enters there from below, heats up when the furnace is fired and exits through the top. Thanks to the constant air exchange, the stove does not overheat. Air ducts can be connected to the pipes, and the oven itself can be installed in an adjacent room. The furnace has a long burning mode - up to 10 hours. |
| Furnace with a water circuit "Breneran AQUATEN" | A 6 kW stove for heating a greenhouse up to 60 m2, equipped with a water jacket located around the walls of the firebox. It is connected to the hot water heating system. The furnace operates as a gas generator, equipped with a long burning mode. It has a compact size and high efficiency. Any firewood, woodworking waste, branches, cardboard can be used as fuel. Easy to maintain and safe. |
Note! The choice of stoves for greenhouses is very large; when choosing, you need to pay attention to thermal power and functionality.
Installing a metal oven in a greenhouse
Step 1. A solid base is prepared from paving slabs, bricks or densely rammed earth. It is better to place the stove in the center of the greenhouse so that the heating is more even. Furnaces with an air or water circuit are placed in any convenient place, observing the fire-prevention distances indicated in the passport.

Brick greenhouse base
Step 2. Install the stove on the prepared surface, check whether it will be convenient to load firewood and remove ash. If there is a main wall, the stove is installed with the back wall to it.
Installation of a stove
Step 3. Connect the chimney of the required diameter to the chimney using a heat-resistant sealant. The chimney must be installed in accordance with the diagram. Narrowing of the chimney is not allowed.

Chimney installation through the wall
Step 4. If necessary, connect a water or air circuit.
Connecting the water circuit to the oven
Note! Furnaces with a water heat exchanger must not be fired without a filled heating system, as this will damage it.
Greenhouse brick ovens
Brick heating stoves are usually used in year-round greenhouses. A brick oven can effectively heat the greenhouse even in the frosty winter months due to their increased heat capacity. Any heating stove is suitable for a greenhouse, the main thing is that the heat output corresponds to the area. Below is the technology for laying a simple brick oven.
Brick oven for greenhouse
To build a brick oven you will need:
- solid ceramic bricks - 220 pcs.;
- fireclay bricks - 80 pcs.;
- clay masonry mortar - 80 l;
- chamotte masonry mortar - 30 l;
- concrete for the foundation - 0.25 m3;
- finished cast iron products - grate, furnace, blower and cleaning doors, smoke valve;
- trimming roofing material or glass insulation.
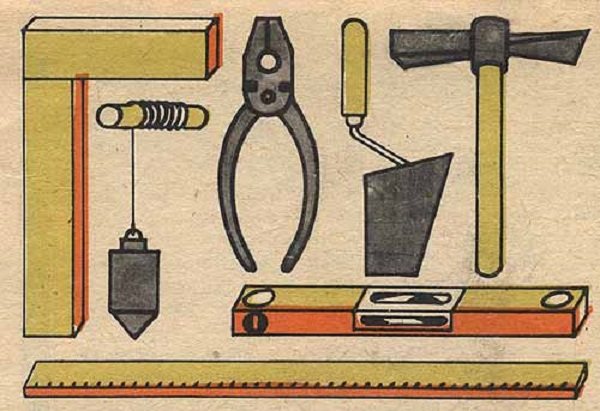
Furnace tools
A cutaway drawing of the furnace is shown in the figure. The height of the stove to the chimney is 215 cm, the structure can be placed in almost any greenhouse of standard sizes. The horizontal dimensions of the furnace are 51x77 cm.
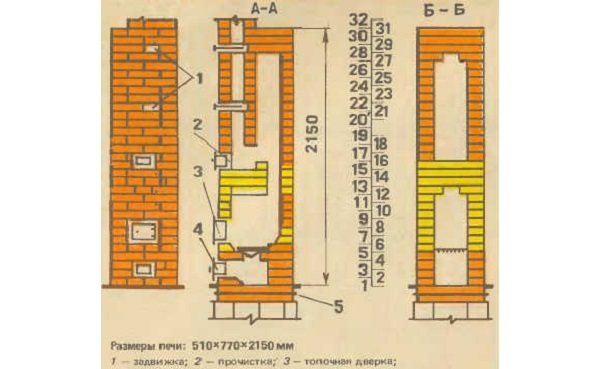
Scheme and dimensions of a brick oven for a greenhouse
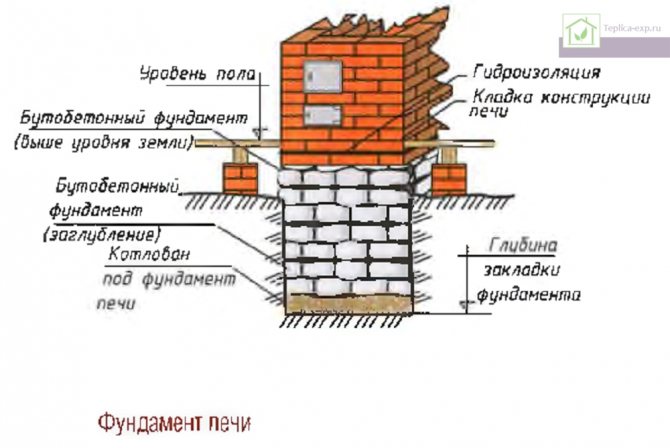
Step 1. Arrangement of the foundation. A solid foundation is required for any brick oven. It is made of reinforced concrete with a thickness of at least 20-30 cm. Under the foundation, soil is removed from an area of 70x100 cm to a depth of 35-40 cm. The bottom is leveled using coarse sand with a layer of 20 cm, and formwork from boards is installed around the perimeter. Reinforcement rods Ø12 mm are laid in the form of two rows of lattice with a step of 20 cm. The concrete is mixed and poured into the prepared foundation pit. Dry the foundation for at least three weeks, moistening the surface from time to time.
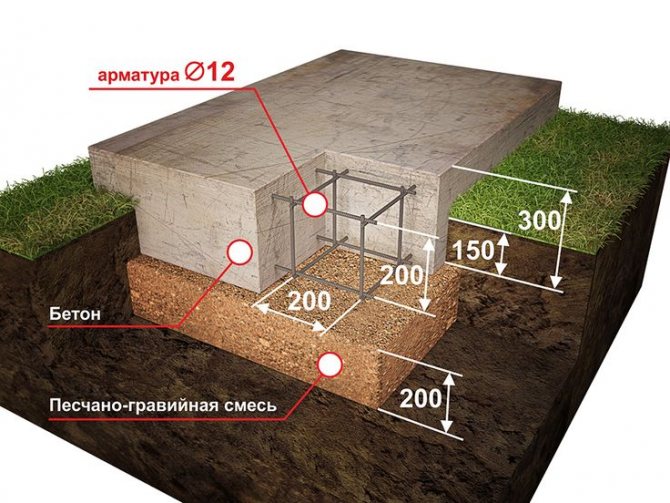
The foundation for a kirich stove
Step 2. Ash pan and firebox masonry. Start laying the stove according to the scheme. The first 4 rows are laid out of red brick on clay masonry mortar. Install the ash pan door, securing it in the masonry with a wire.
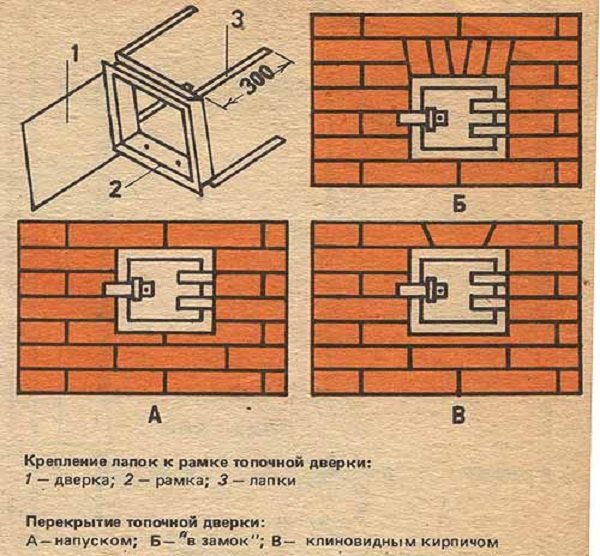
Fastening the legs to the frame of the combustion door: 1 - door; 2 - frame; 3 - legs. Overlapping the furnace door: A - overlap; B - "into the castle"; B - wedge-shaped brick

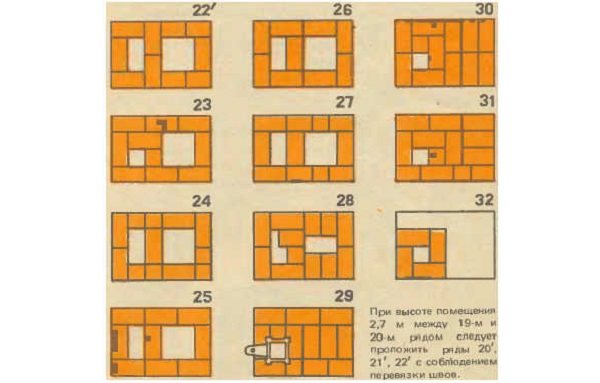
DIY brick oven in a greenhouse
Rows 5 to 12 are laid out of fireclay bricks on a refractory mortar. In the 5th row, a grate is laid. In the 6, 7 and 8 rows, a combustion door is installed. Rows 9 to 12 form the arch of the firebox.
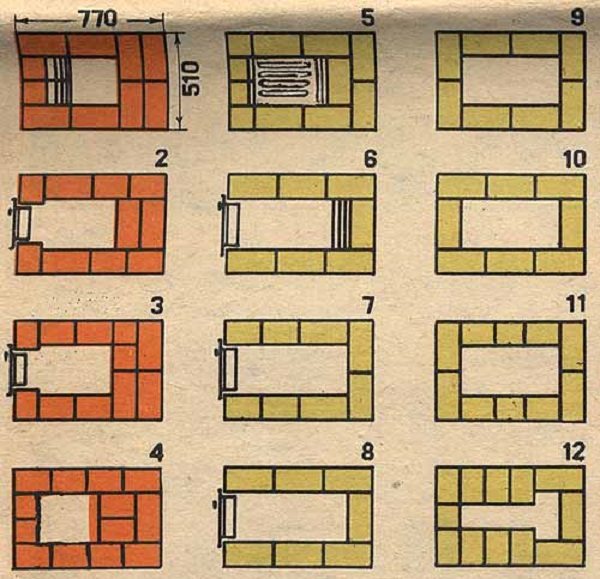
Ordering the masonry of the stove from 1 to 12 rows
Step 3. Rows 13 to 15 are also laid from fireclay bricks on a refractory mortar. Rows 13 and 14 overlap the arch of the firebox, in 15, a cleaning door is installed. From the 16th row, the masonry is again carried out with red bricks. In the 16th row, the installation of the cleaning door is continued. Rows 17 to 21 form smoke channels. The first smoke damper is placed in the 22nd row.
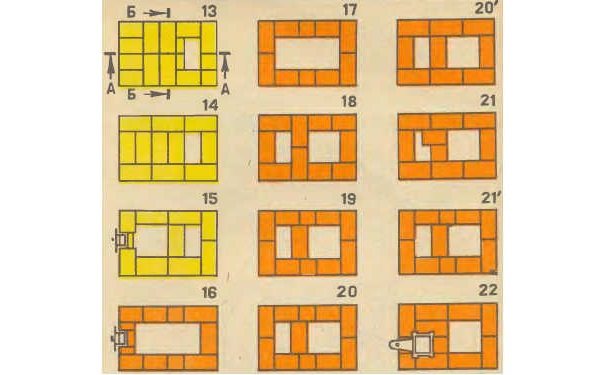
Ordering the masonry of the stove from 13 to 22 rows
Step 4. Rows 23 to 27 continue the smoke ducts. In the 28th row, the narrowing of the channel is laid out, in the 29th, the second smoke damper is installed. Rows 30 and 31 form the roof of the furnace. Starting from row 32, a chimney of the required height is laid out of 4 bricks with a bandage.
Ordering the masonry of the stove from 23 to 31 rows
The process of laying the stove is shown in detail in the video.
Brick prices
brick
Video - Laying a small heating stove
Note! For greenhouses of low height, you can build a stove with horizontally located smoke channels.
Greenhouse with horizontal chimney
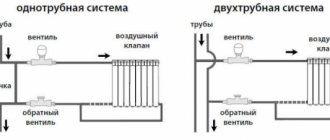
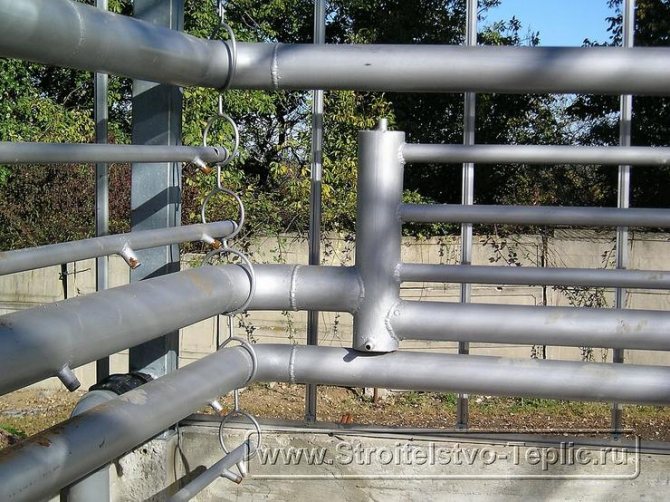
Greenhouse water heating
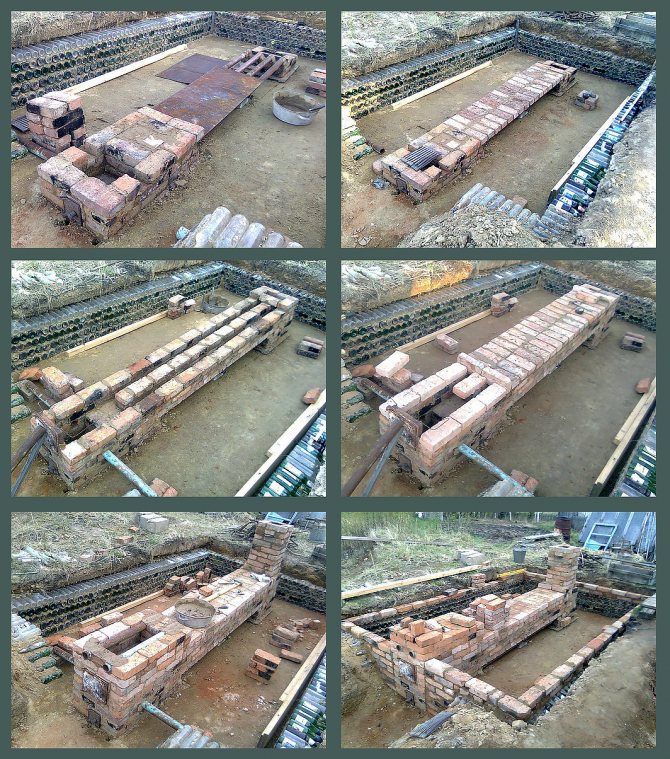
Water heating in a greenhouse can be done in two ways: by connecting the greenhouse to the heating system of the house or by installing a separate boiler. The connection to the general system is carried out in a separate circuit so that it can be disconnected and the water drained.
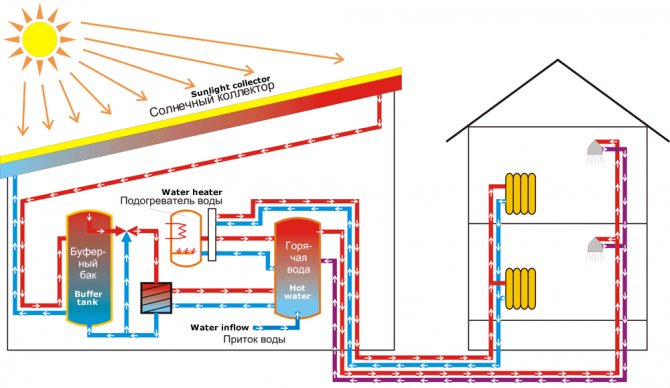
Scheme of water heating of a greenhouse with connection to a common system (for example, using a solar collector)
In the case of installing a separate heating system, a boiler is installed in the greenhouse.
Greenhouse water heating
Depending on the most available and cheapest fuel, it can be a boiler:
- gas;
- solid fuel;
- electric;
- universal.
A gas boiler is considered the most economical and convenient to use. It maintains the set mode automatically, while heating the greenhouse is inexpensive. To remove combustion products from gas boilers, a coaxial chimney is used, the surface of which practically does not heat up.
Solid fuel boilers, depending on the modification, can operate on wood, coal and pellets. This fuel is also inexpensive, but the level of automation of most solid fuel boilers is low, they require constant monitoring and loading.
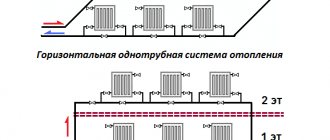
Greenhouse heating scheme using water heating
Electric boilers are characterized by a high level of automation, they can maintain the temperature in day and night mode. They are compact, quiet and completely safe. They have only one drawback - the high price of electricity.
How to choose a greenhouse boiler
The choice of a greenhouse boiler depends primarily on its size and the type of crops grown. If there is gas on the site, it is more profitable and more convenient to heat a greenhouse of any area using a gas boiler. In non-gasified areas, you have to choose between other types of boilers.
In a year-round greenhouse with an area of more than 50 m2 with available firewood, it is better to install a solid fuel boiler. In this case, the cost of its installation and installation of the chimney will pay off in 1-3 years.
Heating the greenhouse with a boiler
In a small greenhouse with periodic use, it is impractical to install a solid fuel boiler. It is easier to install a low-power electric boiler - it does not require a specially designated place and installation of a chimney, and the cost of energy in this case will be low.
Heating polycarbonate greenhouses in winter
Winter polycarbonate greenhouses have long ceased to be a rarity: modern technologies allow you to create the necessary microclimate in them and grow herbs, vegetables and even berries to your table or for sale. Read more here.
Calculation of the number of radiators
To ensure a favorable microclimate in the greenhouse, it is necessary to first determine the required number of radiators. Calculation for greenhouses less than 3 meters high can be carried out according to a simplified scheme - by area.
The area is determined by the formula:
S = a * b,
where S is the area of the greenhouse, m2; a and b - length and width of the greenhouse, m.
The estimated thermal power of the greenhouse is determined by the formula:
P = S * 120,
where P is the calculated thermal power, W; S - greenhouse area, m2.
Calculation of the number of radiator sections:
n = P: p,
where n is the number of radiator sections of the selected type; p is the thermal power of one section of the radiator indicated in the data sheet, W.
The resulting number of sections is evenly distributed over the greenhouse, distributing them over several radiators.
Note! For greenhouses, it is better to choose radiators of a minimum height - this way the root space and soil will fully warm up.
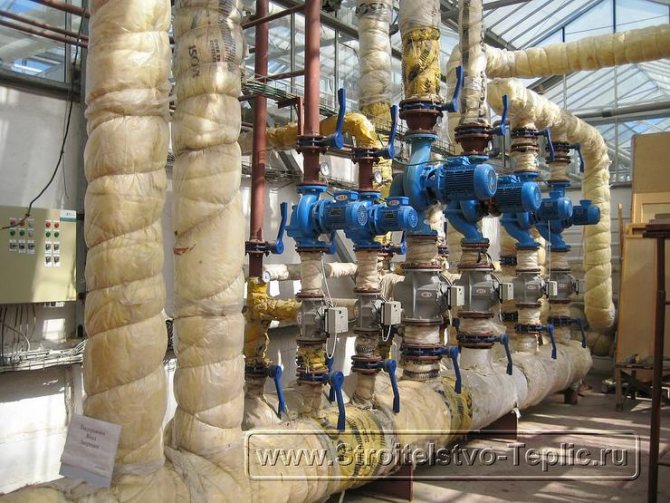
Installation of hot water heating system
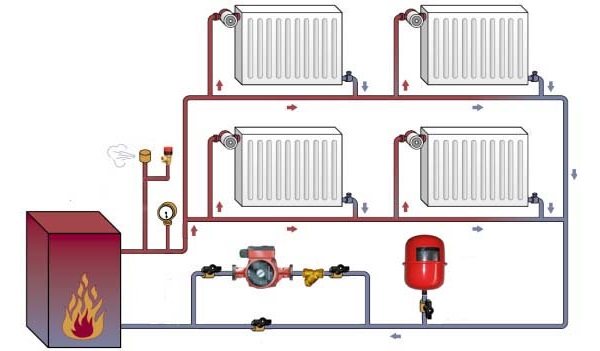
Regardless of the type of boiler chosen, the greenhouse water heating system is mounted according to the same scheme.
In addition to the boiler, the system includes:
- pipes and radiators;
- circulation pump;
- expansion tank;
- security group;
- coarse filter;
- balancing valve
- in the case of heating several circuits - a manifold unit.
For solid fuel boilers and high capacity greenhouses, it is recommended to install a heat accumulator as well. The heating circuit connection diagram is shown in the figure.
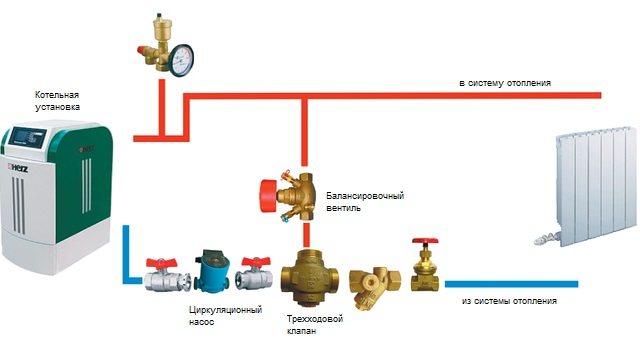
Boiler connection diagram
Step 1. Boiler installation. To install a solid fuel boiler, it is better to equip a vestibule or boiler room. Gas and electric boilers are located directly in the greenhouse.
Installing a boiler in a greenhouse
Depending on the type, the unit is installed on the floor or suspended from the main wall. For floor installations, you must prepare a solid horizontal base - a concrete foundation or paving slabs laid on a sand cushion.
Step 2. Chimney connection. This step is performed for solid fuel or gas boilers. For solid fuel boilers, a stainless steel sandwich chimney is used. It is taken out through the roof or wall in accordance with the diagram.
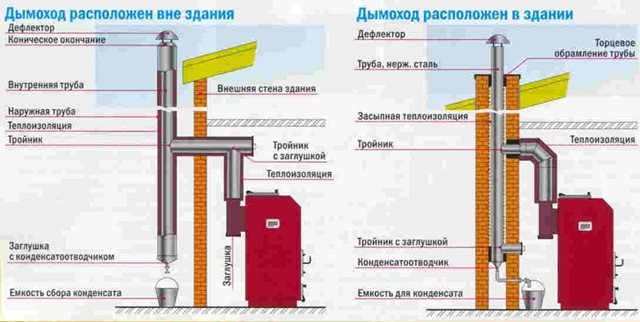
Chimney to boiler connection diagram
For gas boilers, a coaxial chimney is used. It is taken out directly through the wall at the place where the boiler is installed. Due to the complete combustion of gas in the boilers, the output is water vapor and carbon dioxide with a small content of other elements, so the smoke from gas boilers is not dangerous for the walls of the greenhouse and the respiratory organs of people.
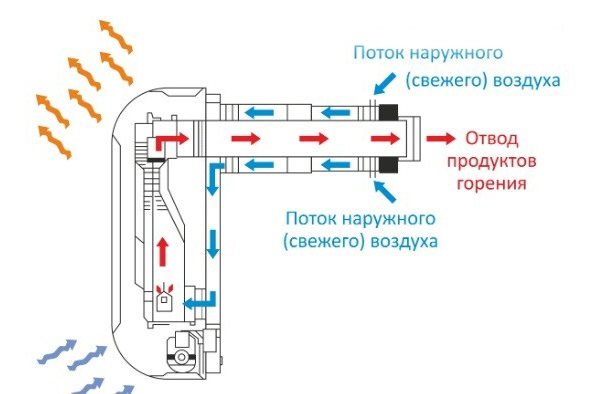
Connecting a gas boiler to a coaxial chimney
Step 3. Connecting radiators to the heating system. Radiators are mounted on the walls, evenly distributing them over the greenhouse. An air valve is installed on each radiator - a Mayevsky faucet, as well as valves with which you can shut off the flow of water into the radiator. Radiators are mounted according to the selected scheme. For the heating system, pipes Ø20-Ø25 mm are used.
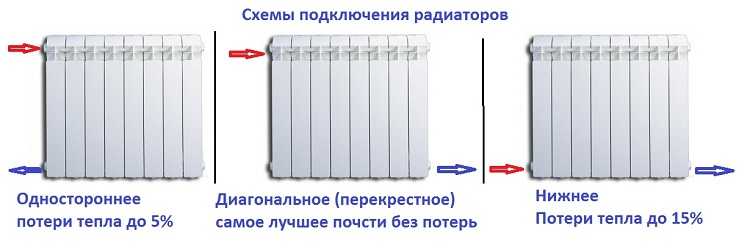
Radiator connection diagram
Step 4. Expansion tank installation. For a forced circulation system, an expansion tank of a closed membrane type is usually used. It does not have strict requirements for the installation site. The diaphragm expansion tank is a sealed cylinder, the inner space of which is divided by a polymer membrane. One part of the tank is filled with air, the other with coolant. With excessive heating and expansion of the coolant, the membrane bends, and the air in the other chamber is compressed. This equalizes the pressure in the system.
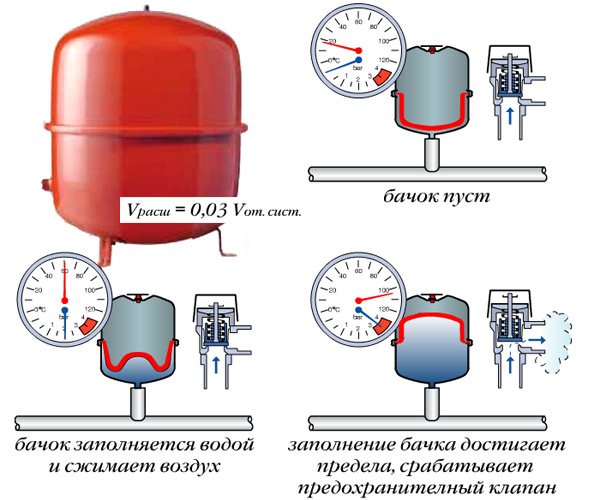
Expansion tank
The tank is installed in the system anywhere, usually immediately after leaving the boiler or in front of the circulation pump.The connection is made from the bottom through the valve.
Expansion vessel connection
Step 5. Installation of a security group. The safety group consists of a pressure gauge, a safety valve and an air vent, which are located on a steel manifold equipped with a coupling for connection to the system. Connect the safety group immediately after the boiler in a place with maximum temperature and pressure.
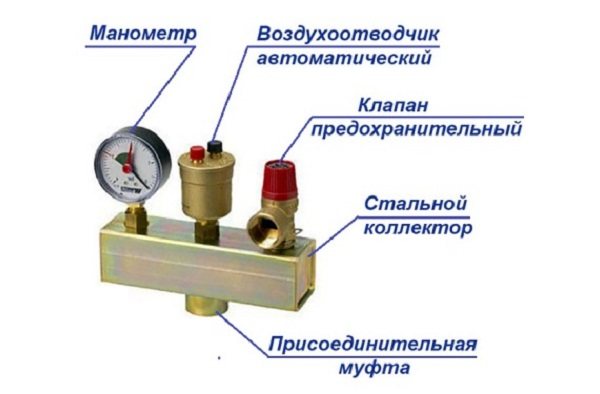
Security group
Step 6. Installation of the circulation pump. A circulation pump is required to maintain a stable pressure in the system. It is installed on the return pipe before entering the boiler. A coarse filter must be installed in front of the pump.
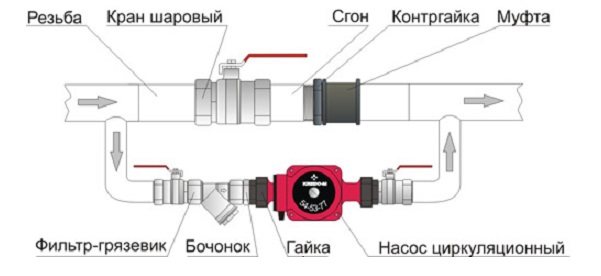
Circulation pump installation diagram
Step 7. Air pressure testing. It is carried out to identify defects in equipment and installation. After the installation is completed, a special compressor is connected to the system, all valves and taps of Mayevsky are closed, then the pressure specified in the passport is applied to the boiler and radiators. After stabilizing the pressure, all joints and nodes are inspected, they are checked with soap foam: they are applied with a sponge to the joints and make sure that there are no bubbles.
Compressor for pressure testing of heating systems
After successful pressure testing, the boiler and the system are filled with a coolant, and a test run of the boiler is carried out. Air is vented using Mayevsky taps and the system is balanced using balancing taps on radiators.
Note! Gas and electric boilers with a high level of automation can be equipped with a circulation pump, expansion tank and safety devices. Before installing the system, carefully read the instructions for the boiler.
Circulation pump prices
circulation pump
Greenhouse electric heating
For heating greenhouses, infrared heaters are usually used: they heat the soil and create a feeling of warmth, while objectively the temperature in the greenhouse can be moderate, and the cost of electricity is low. In some cases, other types of heaters are also used.
Greenhouse heaters
The calculation of the required number of infrared heaters is performed according to a simplified scheme: for every 10 m2 of the greenhouse, 1 kW of heater power is required. For example, a 30 m2 greenhouse requires heaters with a total output of 3 kW. This power is evenly distributed over several devices.
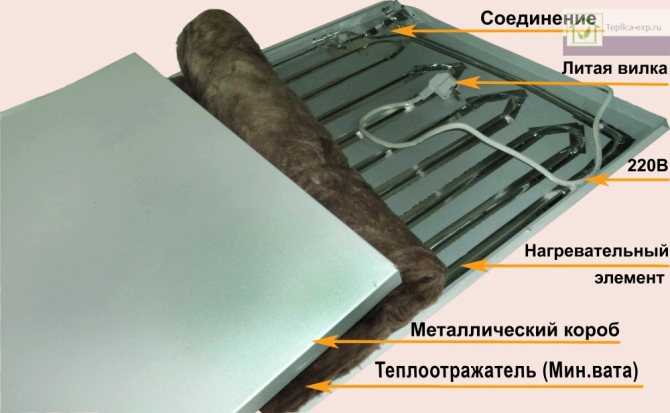
IR tape device for greenhouse heating
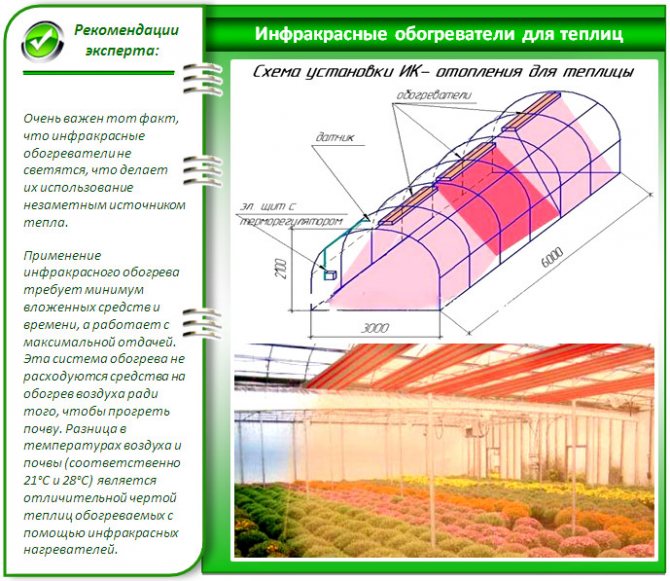
Greenhouse infrared heaters
Infrared heaters are suspended from the greenhouse frame on brackets and connected to the electrical network. If necessary, you can automate heating by connecting temperature sensors located at a height of 80-100 cm. No light from heaters should fall on the sensors, otherwise measurement errors may occur.
Is it possible to heat the greenhouse with candles and bottles
When deciding how to heat a polycarbonate greenhouse in spring, many owners use unconventional methods, for example, using bottles.
Often in the spring there is a situation when a cold snap sets in. What if the heating has not started yet, and the plants have already been planted? For such cases, there are emergency ways to raise the temperature. Among them, there is a fairly simple method, which uses plastic bottles filled with water. They are placed throughout the room, while the caps on the bottles are not twisted. During the day, bottled water is heated by the sun's rays, and at night heat transfer occurs, accompanied by evaporation of moisture.
The method of heating with candles is quite interesting (Figure 10). Arcs are installed on the plant bed, which are covered with dense material, for example, spunbond. A lighted candle is installed inside such a cover, protected by a cap made of metal cans, located at a height sufficient for burning. The hood is required to protect against open flames and to accumulate heat.Heated metal walls give off heat to the environment.
Do-it-yourself emergency greenhouse heating methods are shown in the video.