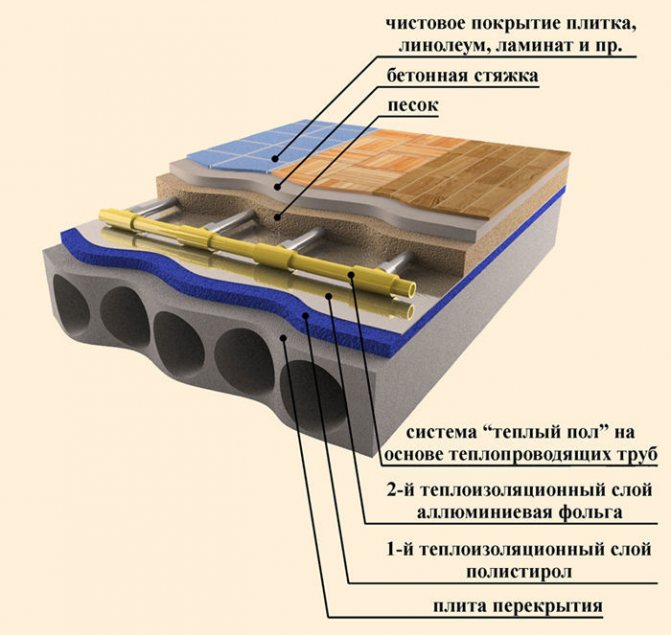
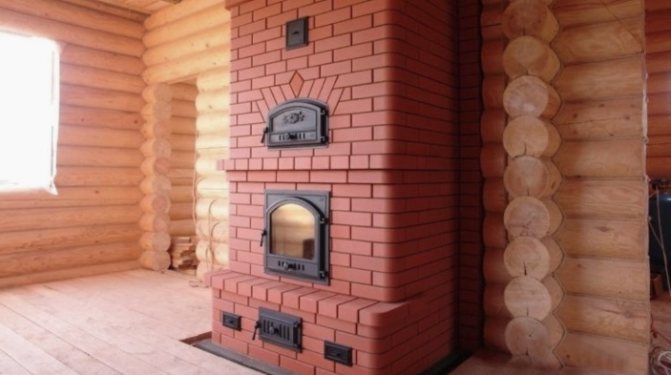
Technologies for laying underfloor heating do not stand still. Serious companies specializing in the production of materials for construction are improving methods, materials, heating elements. One of the well-known companies is the German company Knauf, which produces several types of such a floor.
Warm floor Knauf Therm
Is water heating of a wooden floor possible?
In fact, no matter what skeptics say, arranging a warm water floor in a wooden house from a bar is not only a possible, but also a reasonable solution to the heating issue. Of course, you will have to take into account certain nuances associated with the peculiarity of the operation of a wooden house.
So, for example, it is forbidden to heat floors over 30 degrees. A wooden surface under the influence of high temperatures is easily deformed, turns into dust. Therefore, a warm water floor on a wooden base must not be connected to the central heating circuit, but a separate heat source must be used for this purpose.
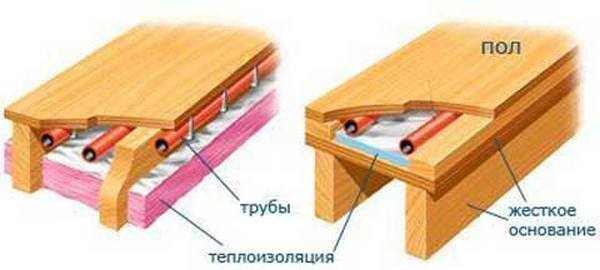
A warm water floor cake in a wooden country house severely limits the use of a concrete screed. The heating system will have to be laid dry, which also creates certain inconveniences.
When choosing a floor covering, it should be borne in mind that some popular finishing materials: laminate, parquet board - when heated above 25 ° C, they begin to emit toxic fumes of formaldehyde.
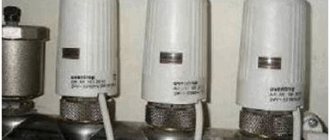
Most manufacturers of heating equipment take into account the need for the simultaneous use of two heating circuits with different heating intensities, providing customers with boilers with the ability to connect heating radiators and underfloor heating.

The essence of the technology "dry screed" on a warm water floor
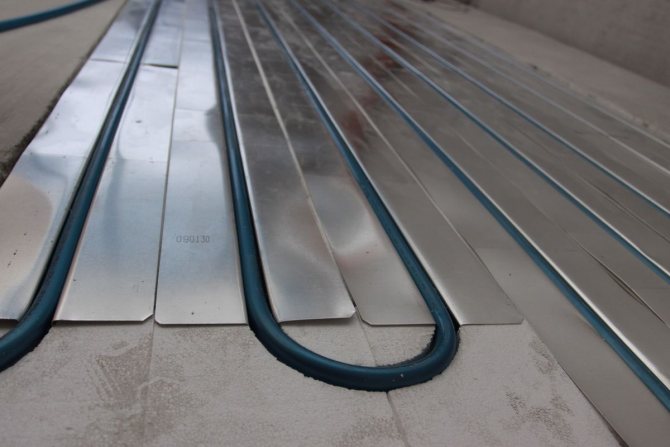
The name itself contains the essence of the technology. "Dry" means light, a system equipped with no added water or plasticizers. A water heat-insulated floor is traditionally a rather massive and bulky structure.
For reference: when using a wet screed, the thickness of the cake is on average 50-70 mm (ideal). However, in practice, cake thicknesses of 100 mm or more are often achieved.
As a result of the installation of a wet screed, the floor level rises significantly. Not every living space has a sufficient margin of ceiling height to level the lost centimeters. In addition, the load on the floors of the building is significantly increased. The weight of 1 m2 of warm floors with a concrete screed is 200-300 kg. How much will the entire structure weigh, for example, in a room of 15 sq. m.? It is not difficult to calculate. Are city apartments designed for such a reconstruction, will a wooden structure withstand such a load? The answer in this case is obvious, use "dry" technology for laying heating floors.
A dry screed for your warm water floor can be made in two versions:
- wooden;
- polystyrene.
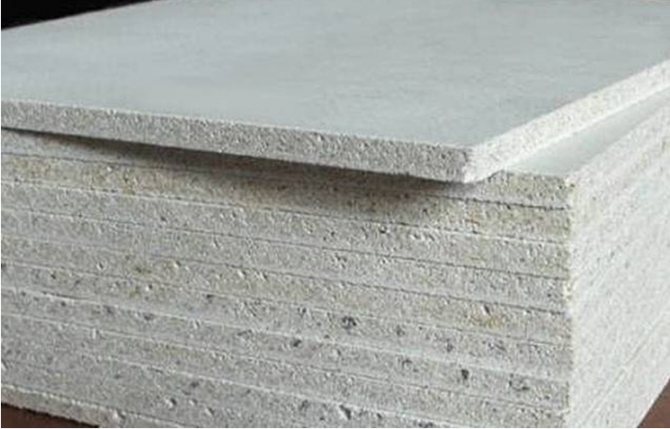
Depending on the materials used, the name and method of installation are determined. Unlike a concrete cake, the main support in this case is strips or boards made of OSB, gypsum fiber board and chipboard. Any other tile-shaped material can be used. For a polystyrene system, the support layer is made of polystyrene boards. Already on this base, the insulating layers are laid, in which there are grooves for installing the pipes of the water circuit. The topcoat in this case will not be a monolithic concrete slab, but a type-setting structure made of GVL sheets.
At first glance, everything is simple and clear.Before proceeding directly with the installation of a dry screed under the water heating circuits of the heating system, study the pros and cons of this technology.
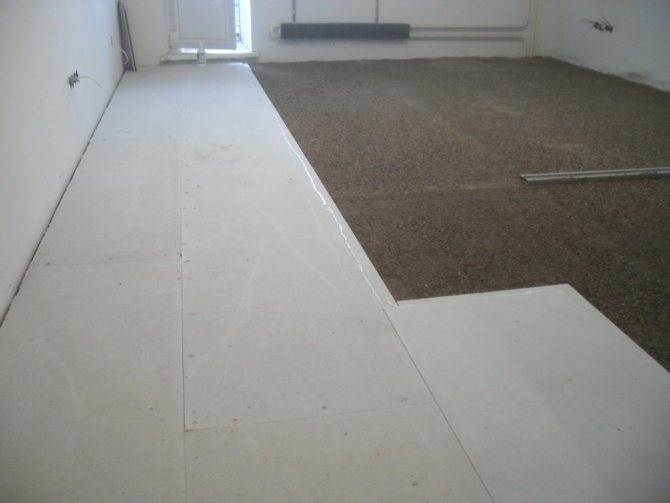
Water heat-insulated floor under tiles on the first floor
A water-heated floor without a layer of concrete is installed in rooms where pouring a concrete screed is difficult or impossible, for example:
- in houses with wooden beams;
- in low rooms;
- indoors, delivery of concrete wherever possible.
The advantages of underfloor heating without screed are:
- Lightweight construction.
- The small thickness of the structure does not significantly change the height of the used room.
- The possibility of fixing the floor covering immediately after the installation of the warm floor, since there is no need to wait for the complete hardening of the concrete.
- Minimum sub-floor requirements. It can be either a concrete or a wooden base.
The underfloor heating system without pouring concrete involves laying heating pipes on a polystyrene or wooden base with special grooves. Under them, a waterproofing film and a layer of insulation - penoplex - are spread on the rough floor.
Metal heat-distribution plates are placed in the grooves, and pipes are placed in them. On top of the pipes, they are covered with a moisture-insulating substrate and a floor covering is laid: parquet, laminate, tiles or special carpet. In conclusion, we can say that a water-heated floor is an effective and fire-safe heating system for a wooden house.
When installing a water underfloor heating system, maximum protection against moisture ingress on wood surfaces must be created. It is impossible to connect such a system to the central heating pipe, for its operation it is necessary to have an autonomous heat generator.
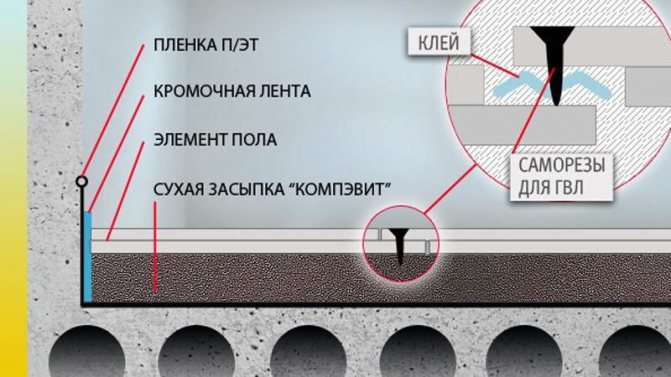
Waterproofing layer. The material depends on the method of installation of the system: if the installation is carried out on the ground floor and the screed is supposed to be poured, you can use dense polyethylene or roofing material. If the screed is dry, it is better to use a special waterproofing membrane.
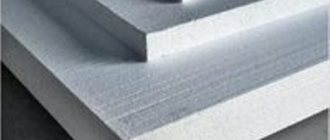
- Insulation. As it can be used polystyrene or expanded polystyrene.
- Metal heat distribution plates with pipe channels.
- Underfloor heating pipes.
- Solid base for tiles. Usually these are sheets of moisture-resistant plywood or drywall, a better option is GVL-plates.
The thickness of a warm water floor under a tile in a wooden house can be different and depends on the insulation layer, base, pipe diameter and type of screed. The height of the dry screed can start from 35 mm, which makes it a better choice for rooms with low ceilings, while the minimum is 80 mm for concrete.
A water-heated floor in a wooden house under a tile on the ground floor can be made with a concrete screed. When properly filled, it does not bond to the base and does not adversely affect seasonal changes in the wood. Many experts do not support this idea and are inclined to believe that it is better to use a dry screed, but, nevertheless, this technology continues to exist and is often used.
Even in a wooden house, a concrete floor has several advantages. It is more durable, does not deform and does not creak over time, and withstands a greater load. You can easily lay any decorative coating on it, in particular, tiles. A concrete screed transmits heat much better than a dry one, so it is not necessary to warm up the water to a high temperature: already at a temperature of 40 degrees, you can feel a pleasant warmth.
Water heat-insulated floor under tiles with a screed for the first floor
A water heat-insulated floor in a wooden house under a tile with a concrete screed is mounted according to the following scheme:
- Preparatory stage. Old floors are removed, the base is prepared (cleaning and smoothing).
- Waterproofing is laid on the surface. The outer edges are laid on the walls, and the inner ones are overlapped and fastened with mounting tape.
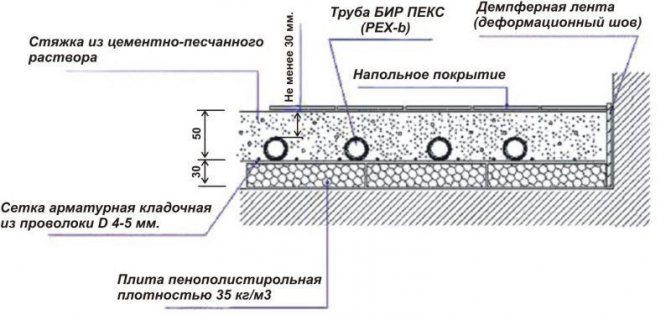
- A damper tape is mounted along the perimeter at a height of two centimeters from the screed surface, which compensates for expansion during heating.
- Foam or polystyrene mats are placed on the waterproofing. On the upper floors of buildings, where there is a heated room below, a layer of insulation 4 mm thick will be sufficient, on the first it should be made thicker - 8-10 cm.
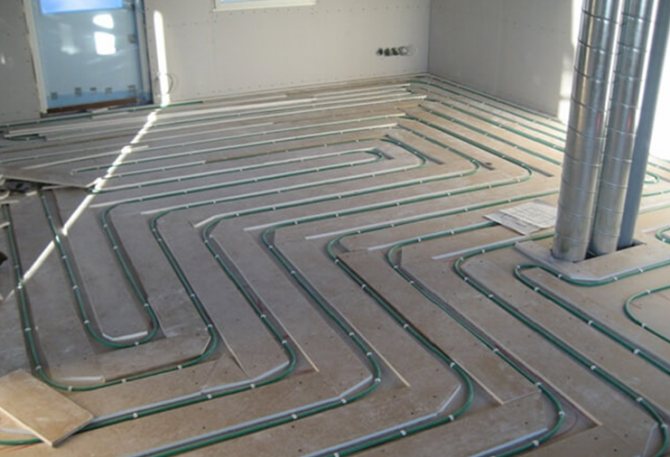
- Heat-distributing plates are laid over the entire surface of the insulation, which are attached to the channels of the mats. Underfloor heating pipes are laid in their grooves.
- The ends of the pipes are connected to the heating system and checked for operability and tightness.
- If the warm floor is ready for use, a concrete screed is poured, the thickness of which should be 3-7 cm.
- At the end of the work, you must wait for complete drying, which occurs by 25-28 days.
- When the screed is dry, the tiles are laid.
If the base of the floor is wooden logs, or the installation is carried out on the second or third floor, the use of a concrete screed is impossible, since it will put an unacceptable load on the structure. In this case, the laying method is used.
A dry screed is less effective as it conducts heat much worse. To increase its efficiency, a minimum step is made between the pipes, and therefore cold and warm spots will not form on the tile. Another more complex and expensive solution to the problem is the installation of deflectors, which will help to raise heat up.
Water heat-insulated floor without screed.
One of the main advantages of a dry screed is a high installation speed and almost complete absence of dirt. If, when using concrete, it is necessary to wait up to a month until the coating is completely dry, then in this case you can start finishing work immediately after the underfloor heating structure is ready. The duration of work in a medium-sized room usually does not exceed two days.
Before proceeding with the installation of a warm floor and dry screed, it is necessary to assess the quality of the base.
- If there are gaps between the floor boards, it is necessary to eliminate them with heat insulating materials.
- If the floors are not insulated, this issue also needs to be resolved. Alternatively, you can install a raised floor with a layer of mineral wool, protected by a waterproofing film.
- The floor on wooden logs assumes that the distance between them does not exceed 60 cm, so if they are located at a farther distance, this point must be corrected.
A water-heated floor in a wooden house without a screed for tiles can be made using several different technologies:
- Polystyrene system.
- Finnish technology.
- Wooden system.

Each of them has its own characteristics and advantages. Let's consider them in more detail.
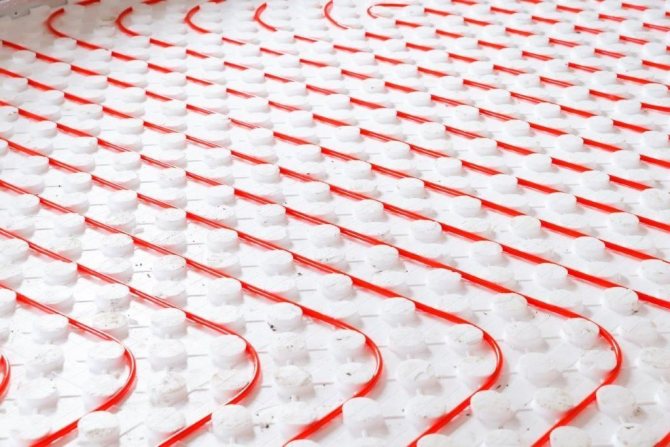
The technology of laying a warm floor with polystyrene allows you to create the lightest dry screed, which is important if the structure of the house does not imply serious loads on the floors. This material has a number of advantages:
- Has zero water absorption, does not allow steam and water to pass through.
- It is characterized by high sound-absorbing properties.
- Has a long service life and affordable cost.
- Easy to assemble.
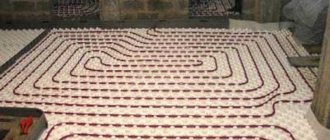
Warm water floor on polystyrene
In this technology, polystyrene plates are the basis on which heat-distributing plates and floor heating pipes are laid. If the installation is carried out on the ground floor, the layer of material must be at least 8 cm, on the upper floors there will be enough thickness of 5 cm. A rigid substrate is mounted on top of the structure, on which the tiles are subsequently laid.
Tip: It is best to use polystyrene mats with projections (bosses) into which it is convenient to insert metal plates. If you use ordinary sheets, you will first have to prepare special grooves in them.
Finnish technology
Warm water floors in a wooden house without a screed are often installed using Finnish technology, which involves the use of gypsum fiber sheets. This material is more durable, resistant to damage and deformation than conventional drywall, and at the same time is characterized by increased thermal conductivity.
Underfloor heating according to Finnish technology with GVL modules
The simplest and most convenient way to make a dry screed from gypsum fiber board is as follows: the surface is prepared for work, waterproofing and insulation are laid on it. The slabs are attached to the logs, and a path for the passage of pipes with water is applied to their surface. Then the material is sawn along the drawn contours and fixed on the base.
Wood system
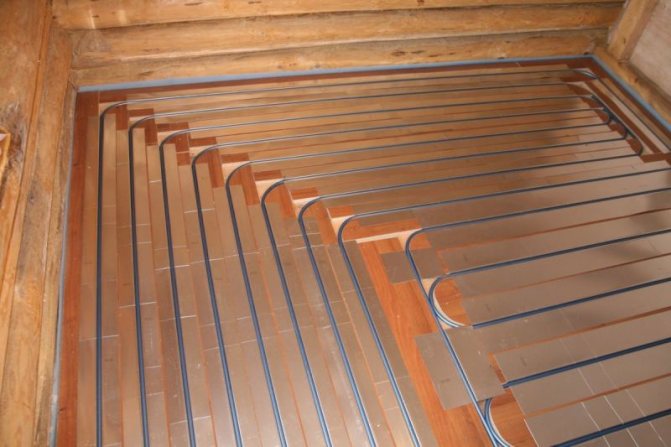
In the modular method, ready-made modules from wood-based panels are used, in which grooves are prepared for laying pipes. They are mounted directly on the logs with a pitch of 60 cm, between which a waterproofing layer and insulation were previously laid. The gap between the modules, which compensates for thermal expansion, should be 2 cm. They are fastened to each other using a conventional snap lock.
The rack system assumes the use of ordinary boards or slats, it requires preliminary preparation of the subfloor. Installation is carried out at a distance sufficient to leave a little free space when laying the pipes.
Wooden heat-insulated floor.

Metal plates are laid on the prepared system, into the grooves of which the pipes for the warm floor are inserted. On top of the system, a solid substrate of plasterboard, chipboard or plywood is installed, which are carefully fixed, and the joints between them are putty. Only after that they start laying the tiles.

Options for the device system underfloor heating on wooden logs
The installation of a water-heated system in wooden houses is carried out either on logs or on a rough base. Often, underfloor heating is laid on wooden floors using Finnish technology. We call this method the dry screed method: instead of the solution in which the system is placed, GVL plates are used here.
Before laying a warm floor on wooden logs, it is worth checking them for damage.
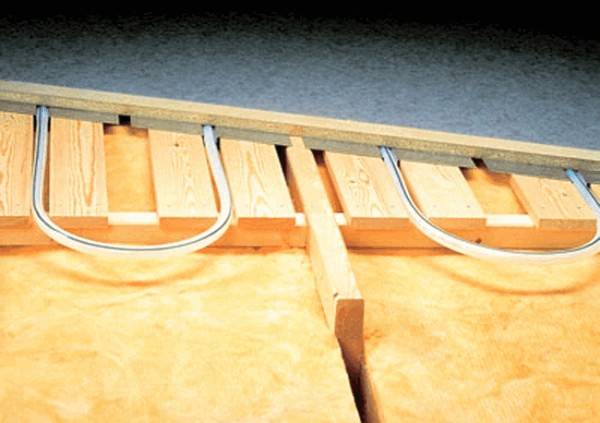
There are several options for installing a warm floor on wood:
- Pipes are laid in factory plates (for example, reflective, with grooves for the pipeline), which are mounted on top of the log. Insulation and topcoat are laid on top.
- Pipes are laid directly on the logs in the cuts arranged according to the laying pattern. The gaps between the lags are filled with insulation, plywood and a topcoat are placed on top. The disadvantage of this technology is an air gap between plywood and pipes, which impairs thermal conductivity.
- Pipes are placed on insulation (polystyrene) between the logs. The space between the elements is filled with either dry sand or gypsum.
- The pipes are laid on slabs with bosses, which are laid flush with the joists on the raised floor. In the logs, slots are made for laying the system along the entire perimeter without interruption. A reflective hard material (such as metal sheets) and a topcoat are laid on top.
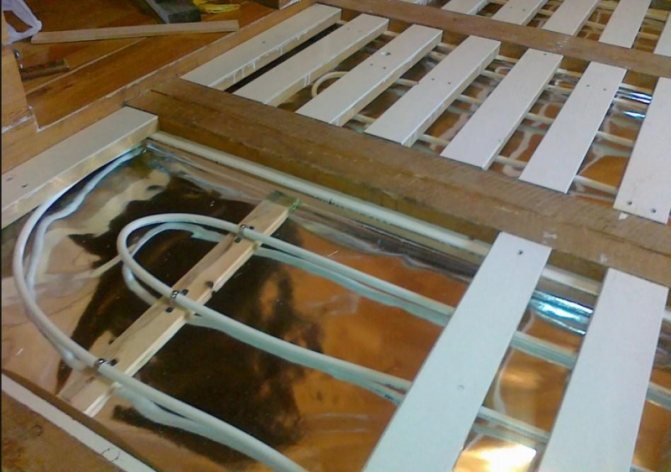
- Insulation is placed between the logs, and plywood is placed on it. Slats with rounded corners are cut from chipboard sheets, which are stacked on plywood. The pipes are laid in the grooves between the plywood slats.
- This method is similar to the previous version, only instead of plywood slats, a board 5 cm thick and width equal to the pitch of the pipe is used. Foil is placed in the groove under the pipe to retain heat.
Based on the proposed options, you can create your own way of laying a water-heated system on wooden beams, which will meet your wishes, financial capabilities and skills. The main thing is that the principle of the floor remains unchanged.
Related article: How to make a gazebo roof with your own hands: device technology
Mounting options
There are several options for arranging underfloor heating in a wooden house. The choice of installation method is chosen depending on the technical characteristics of the building.
Common installation methods are:
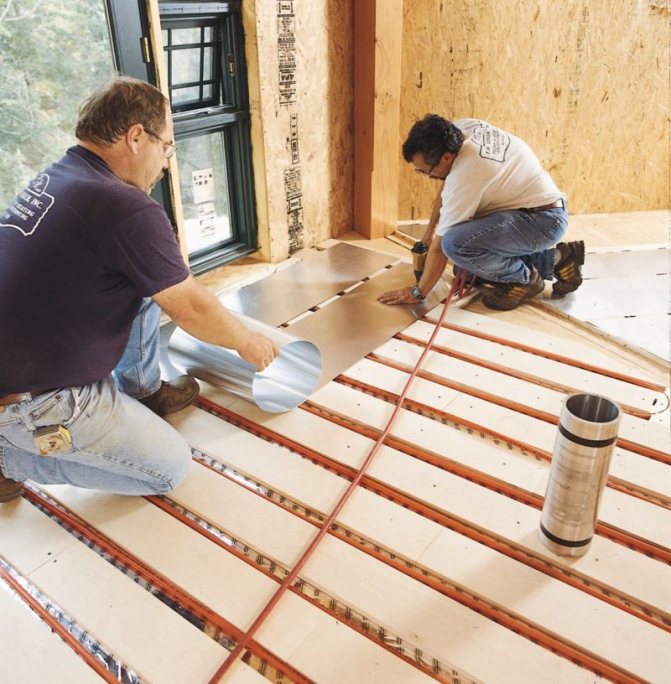
- Mats represent ready-made structures with grooves for laying the water circuit. The mats can be laid on a flat base of the floor. For this, the surface is preliminarily trimmed using plywood or QSB boards. The modular floor does not require the use of cement mixes. On top of the polypropylene pipes, the DSP is closed, the floor covering is laid.
- Installation of warm concrete water floors on top of wooden structures. Before installation, ensure maximum insulation of wooden elements from moisture. All work is carried out exclusively with ready-made compounds with a short drying period.
- Milling a wooden floor for pipes of the underfloor heating system. With the help of machine cutters, recesses are cut out for the passage of the pipeline. The wooden base begins to function as mats. As a result, flooring component costs are reduced. The disadvantage of milling is the laboriousness of the process. But with the presence of a specialized tool, the installation time can be minimized.
Other methods can be used to lay water-heated floors on a wooden floor. There is the following way. In a wooden frame, a pipeline is simply laid under the logs. The plank floor is disassembled, the water circuit is laid, after which the flooring is laid back.
To maximally protect the tree from moisture ingress, the water circuit is laid in a special corrugation. The corrugation protects against the effects of water even in the event of leaks.
Wooden water floors are often used in the construction of panel houses or timber houses. They are mounted directly on the joists or on the subfloor, which rests on them.
These systems have significant design differences. In the first, ready-made modules are used, in which there are channels for plates and pipes.
The second option involves the placement of system elements between boards or fragments of chipboards.
Most often, tiles or porcelain stoneware act as a finishing coating when installing a warm floor. These building materials are durable and long-lasting, and do not emit harmful substances when heated. Less often, the installation of the system is carried out under a special laminate, linoleum and some types of carpet, which have a corresponding mark from the manufacturer.
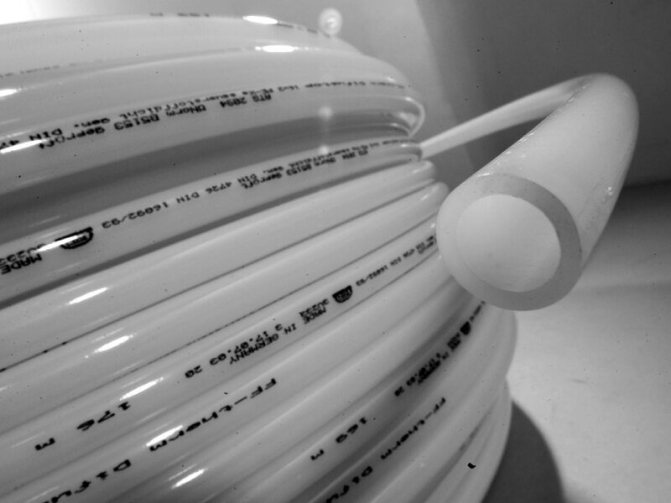
For the construction of a warm water floor, 3 types of pipes can be used:
- Cross-linked polyethylene pipes (PEX and PERT). Highest quality materials. PEX pipes have a high crosslinking density and have the best "memory effect". This means that after stretching, the pipe gradually returns to its original position. They are not afraid of liquid freezing and are suitable for repair.
- Metal-plastic pipes are considered the best option. They have a budget price, are easy to install and perfectly keep their shape.
- Copper is the most expensive option; when used in a screed, they must be covered with a protective layer to avoid alkaline exposure.
For the underfloor heating system, 3 main pipe sizes are used - 16 x 2, 17 x 2 and 20 x 2 mm. The most famous pipe manufacturers are Rehau, Tece, KAN and Valtek.
The length of the pipe loop 16 mm should not exceed 100 m.The optimal pipe spacing should be 15 cm when using good thermal insulation. At this step, the consumption of pipes will be about 6.7 m per 1 m² of the room. For an accurate design of a water floor system, it is necessary to contact a heating engineer.
The first stage is heat calculation and drawing up a floor diagram. You can calculate heat loss and hydraulics using a network calculator. As a result, you will have the recommended pipe section and laying step.
The second stage is the dismantling of the coating. If necessary, dismantle the log.
In general, there are two installation options: a water heat-insulated floor on a wooden floor over the flooring and with pipes laying between the joists.
- Level the subfloor: fill up the cracks, check the horizontal position of the plane. The slope should be no more than 0.2 percent, i.e. a drop of 4 meters is not more than 8 millimeters.
- Lay in waterproofing. The layer must be airtight - either a continuous film, or the joints of the strips are glued with a waterproofing tape.
- Lay wooden logs.
- Place insulation between them. The recommended layer is at least 10 centimeters, but this depends on the thermal conductivity of the material and the heat calculation data.
- Lay pipes on the insulation. The pitch between the turns depends on the width of the intervals between the lags. Optimally - 20 centimeters. In places where the pipes turn in the logs, slots are made.
This is the simplest scheme for a warm water floor under a wooden floor, but not the most effective.
Second way
- Waterproofing, insulation.
- Aluminum foil reflective surface to the room. The joints of adjacent areas are glued with heat-insulating tape.
- Reinforcement mesh to strengthen the structure.
- Lags and pipes.
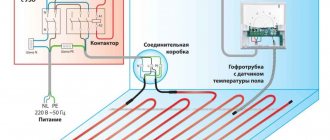
- A temperature sensor in a corrugated casing is placed under the floor covering. The signal from it will go to the thermostat.
- The thermostat is installed at a low height from the floor, placed in a strobe or mounted overhead in a plastic box.
Most often, logs are placed on the edge. When using reflective plates, horizontal laying of the beams is preferable.
The plate is shaped like the Greek letter Ω. It is placed with its wings on adjacent logs with the convex part down, in the space between the logs. A pipe is located in the resulting channel.
The plates perform a heat-reflecting function, provide convenient laying and fixation of the pipe.
Fourth way
- Dismantle the floor boards.
- To trim, adjust in thickness so that the base is even.
- Turn around the edge: cut one centimeter on both sides so that there is a gap of 2 centimeters between the adjacent ones (pipe laying channel).
- In places where pipes turn, it is recommended to round the boards. If you do not have the ability and desire to tinker with the boards, you can purchase chipboard boards with already milled grooves.
- Lay a waterproofing film on the logs. The film is laid with sagging: a place for insulation is left between the lags.
- Install insulation plates in the intervals between the lags, tightly against the back.
- Install vapor barrier.
- Lay moisture resistant plywood and treated boards.
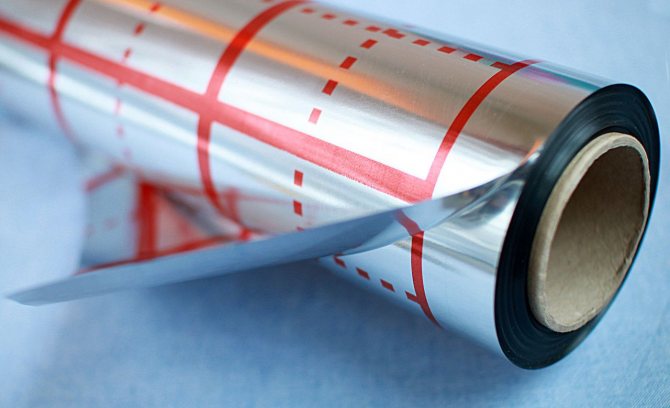
- Place a 50 µm reflective foil. You can use aluminum stainless steel boxes instead of foil (pipes are removed from them). The foil is attached to the flooring with a stapler.
- Lay pipes. At all bends and in a straight line after one meter, they are fixed with metal plates: the plate overlaps the pipe and is attached to adjacent boards.
- Connect the floor to a common pipeline and test for a couple of days. If there are flaws in the installation, it is better to identify them immediately, so that later you do not have to dismantle the coating.
- Lay the covering in accordance with the instructions for it.
Information for those who are interested in electric underfloor heating under the laminate.
Do you want to know everything about the supporting - columnar foundation, its pros and cons?
The whole process of installing a warm wooden floor can be conditionally divided into the following stages:
- Drafting a project.
- Preparatory work.
- Assembly and subsequent testing of the heating pipeline.
- Finishing works (laying of fine floor coverings).
Project
Before starting any work, you need to draw up a detailed project and perform all the necessary calculations. It is possible to do this on your own, having studied significant amounts of information, you can order an individual project or choose a suitable one from those developed earlier.
The project includes:
- Detailed drawing (diagram).
- Calculation of heat losses for each room.
- Calculation of the amount of heat that should be supplied to each room.
- Resistance of the heating system pipeline.
- Calculation of the step of laying the pipeline, depending on the heat loss of each room.
- The number of consumables that may be needed in the course of work.
After the project has been drawn up and all the necessary calculations have been completed, you can proceed to the next stage.
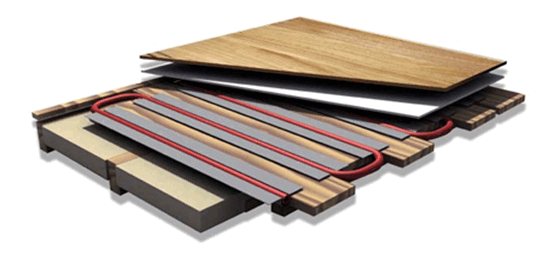
Wood floor cake
Includes all the necessary work up to pipe laying. You should start with the placement of the lag. The distance between them should not exceed 60 cm.
Before mounting, wooden logs must be treated with antifungal and antiseptic solutions. To exclude the possibility of the appearance of a wood bug, it is unacceptable to leave fragments of bark on any wooden products.
Between the lags, an insulating material (mineral wool, polystyrene, foam insulation, etc.) must be laid on the vapor barrier film. The thickness of the insulation depends on the height of the log, but, in general, does not exceed 100 mm.
The next step is the laying of the subfloor, the function of which, on the one hand, is to ensure an even distribution of the load on the logs, to reduce their deformation (if they are used as overlapping). On the other hand, it will eliminate possible deformation of the finished floor, providing the necessary rigidity.
The subfloor is usually made from some kind of sheet material or from planed boards. The thickness of this floor depends on the distance between the joists, the installation methods and the material used for subsequent layers.
Further actions completely depend on which type of warm floor is chosen.
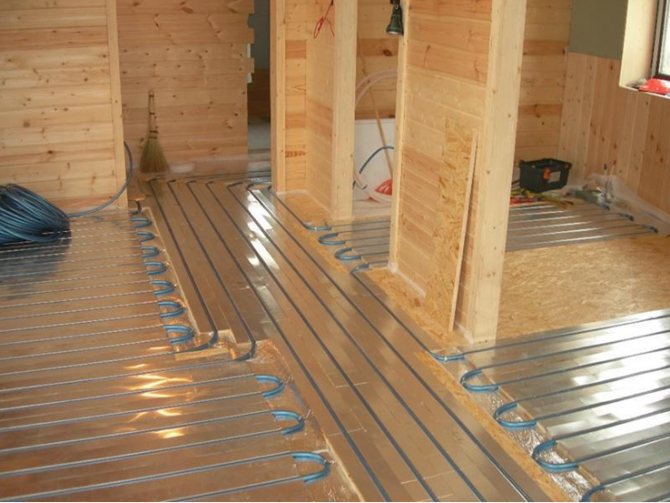
Modular option
- Modules are mounted on the subfloor, this is usually done with screws or nails, sometimes glue is additionally used.
- Metal plates are inserted into the slots of the modules for heat reflection, if this is provided for by the design of the module (instead of plates, special foil is sometimes used).
- When everything is ready, the heat-conducting water circuit is laid.
- According to the project, slats of the required width and thickness are prepared. The thickness of the lath depends on the pipes to be used. The most suitable outer pipe thickness for residential premises is 16 mm. The slats should be several millimeters thicker than the pipe, so that there are no unnecessary difficulties during installation. The width of the board ranges from 100 to 200 mm and depends on the amount of heat required in each particular room, or its area.
- The slats prepared accordingly are screwed to the subfloor, guided by a pre-developed project.
- Heat-reflecting plates or foil are placed in the grooves obtained after mounting the rails.
- Next, you can do the wiring of the thermal circuits.
What is the difference
Foundation Swedish or Finnish slab Are foreign technologies developed for local soils or climatic zones. We have a "Russian" slab foundation, the structural feature of which is a thick slab and massive ribs. The most important thing in any type of foundation is strength and durability, therefore the purpose of the “Russian” foundation is in a large strength reserve.
Finnish slab (slab foundation) Is the development of Finnish engineers. And much of this European country is considered to be effective and thoughtful. In comparison with the "Russian", the Finnish slab is slightly thinner, but with a remarkable insulation.This type of slab foundation was calculated in advance not just for a harsh climate, but for a floor heating system. This "modernized technology" is the norm for the Baltic countries. The Finnish slab is also called the cold contour.
For your information! A thick layer of insulation is laid on such plates, from 15 cm or more.
This is why it was invented: a thick layer cuts off the cold difference between the slab on the ground and the warm floor. There is also a reinforced screed, in which the floor heating system is made. Interestingly, the Finnish slab must be poured in one go. So the construction process goes much faster.
It's important to know! It is the Finnish type of slabs that is the most expensive foundation of the presented ones, since without a reinforced screed it makes no sense.
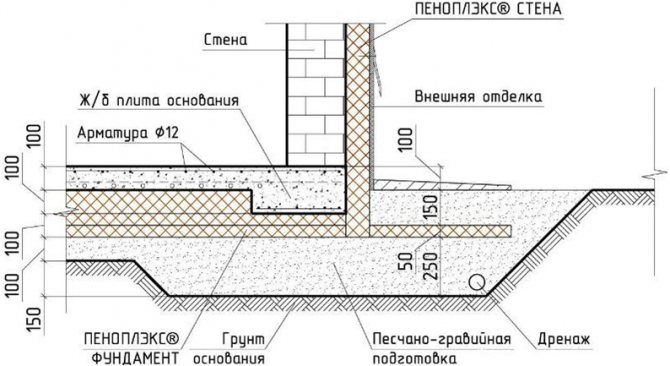
Swedish type of foundation or slab came naturally from the country of the same name. In practice this is the same Finnish technology, but with a few differences... In Swedish slabs, it is not customary to make a screed, and the underfloor heating system (its pipes) is located directly in the slab. This approach makes the slabs thinner and cheaper. But in terms of energy saving, such a system is inferior to Finnish technology. The Swedish plates are poured in the same way as the Finnish ones in one go. Which is much more economical in terms of construction, but not profitable in terms of insulation, or rather, heat consumption in the future.
Air way of laying pipes for underfloor heating
Possible pipe contours
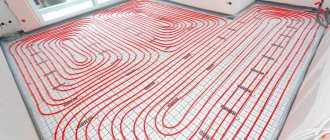
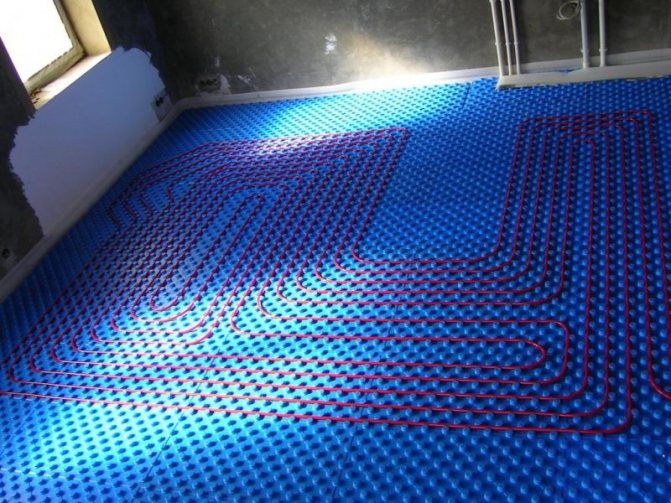
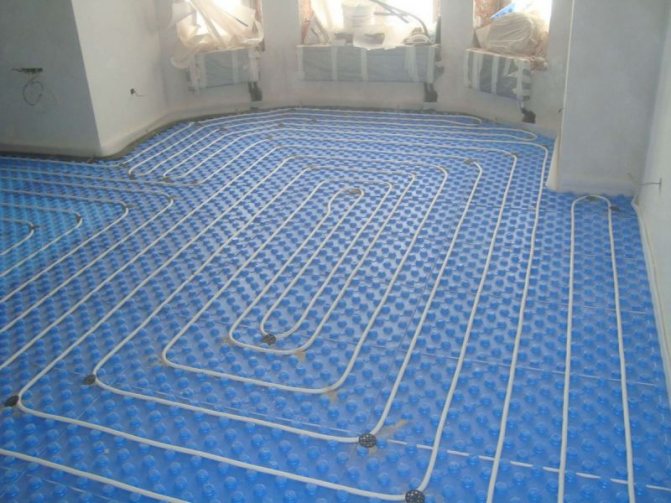
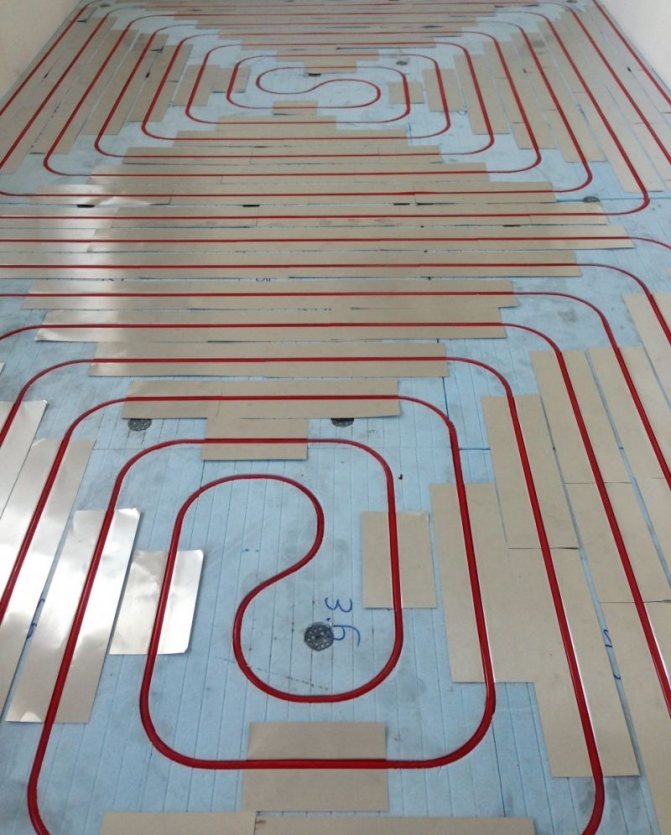
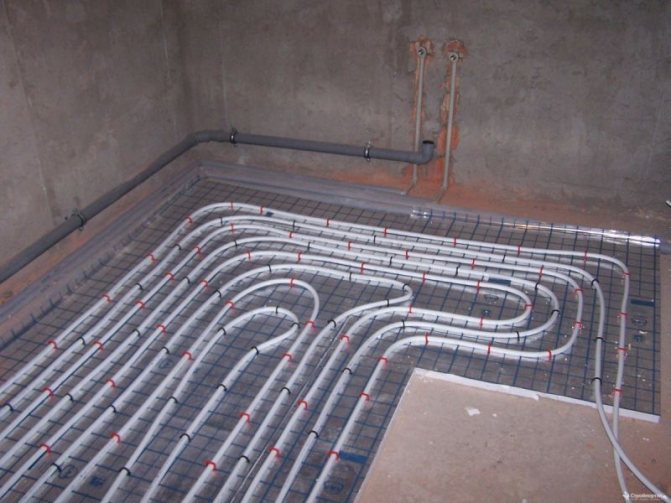
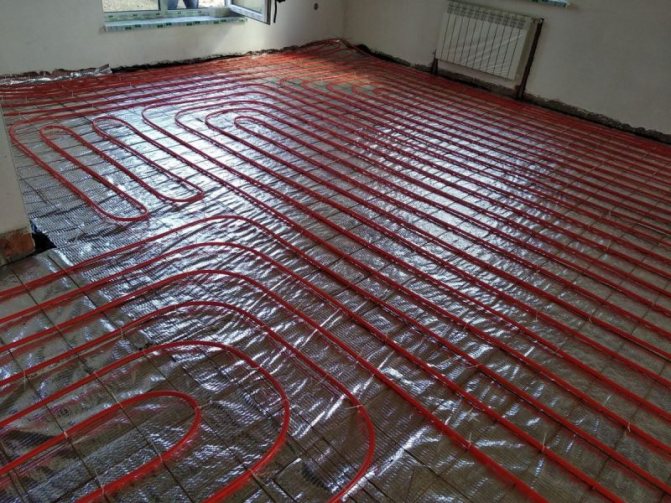
There are three most common pipe laying methods, of which the optimal one is selected depending on the size and design features of the premises. It:
- "Spiral".
- "Snake".
- "Double snake".
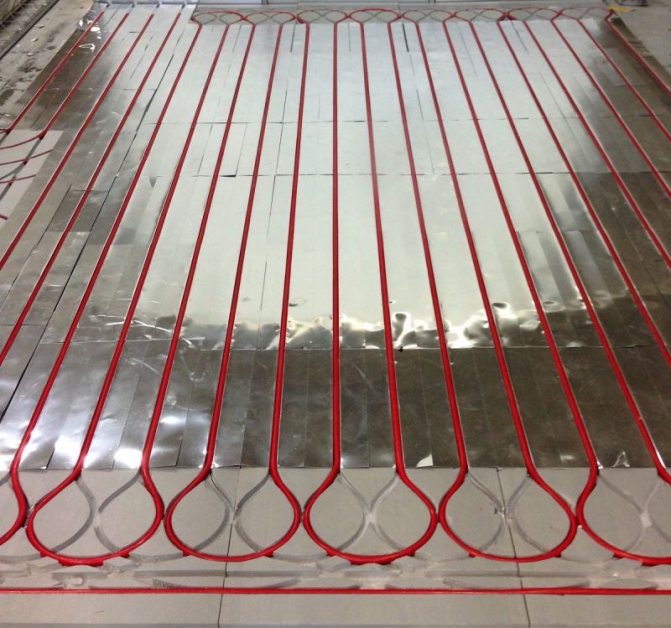
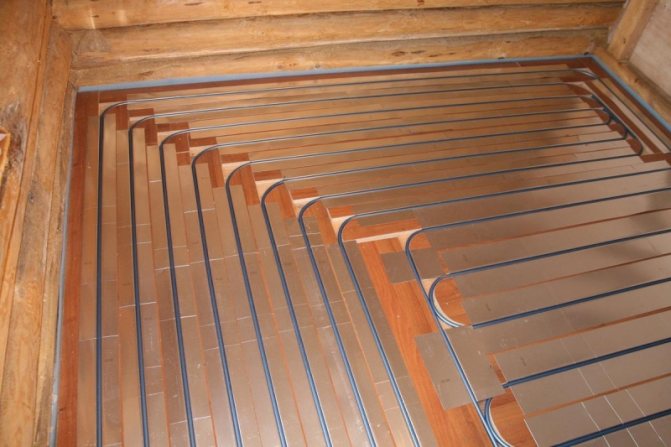
"Snake" is popular due to the fact that it is the most economical in terms of material consumption. However, it has a drawback: when using a circuit of this type in different areas of the room, the temperature may differ due to the cooling of the water. Therefore, it is recommended to use it only in rooms with a small area, where the coolant will not have time to cool down during its movement. This installation has another drawback - the complexity of installation, during which it is necessary to bend by 180 degrees.
The "double snake" assumes a smaller temperature difference in different zones, but at the same time, the difficulties with laying due to the angle of rotation of the pipes remain the same.
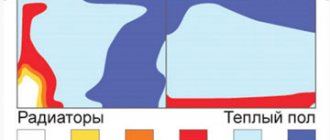
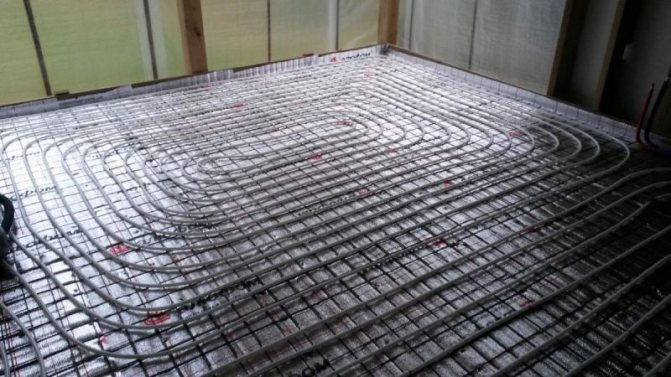
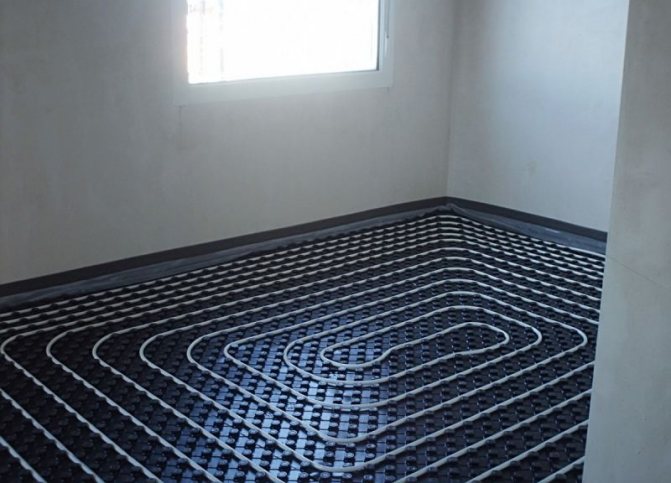
For rooms with a large area, it is recommended to select the "spiral" contour. Pipes are laid out with a description of the perimeter of the room, starting from the walls and gradually approaching the center, and then in the opposite direction. In such a circuit, heat is distributed evenly and there are no cold zones on the floor. Due to the slight bending of the pipes, this installation method is the least labor-intensive.
“Recently we made repairs in a wooden house. We decided to install a water floor heating system. The height of the ceilings is 3 meters, the pipe was taken 16, in a step of 15 cm. The contour was mounted with a snail with a concrete screed.
Insulated with penoplex base. A month later, the tiles were laid. Radiators were not installed. It's winter now, and we walk barefoot on the floor. The tiles are at a pleasant temperature for the feet, the room is generally warmer than it used to be. "
“I have 75 square meters of timber floors in my house. Insulation cake: 100x200 beams, 40 board, waterproofing, a foam layer with grooves, polyethylene pipes, dry screed with reinforcing mesh. We made the floors without pouring concrete, since the house has wooden floors and low ceilings.
The pipes were laid in the grooves of the foam boards. The flooring is 40 squares of laminate, the rest is tiles (kitchen, bath). Already 4 years without problems and cracks. The temperature suits me, I did not regret the choice.
The selection of material for the finishing coat depends on the method of laying the previous layers and should be carried out even at the design stage.
Traditional types of flooring:
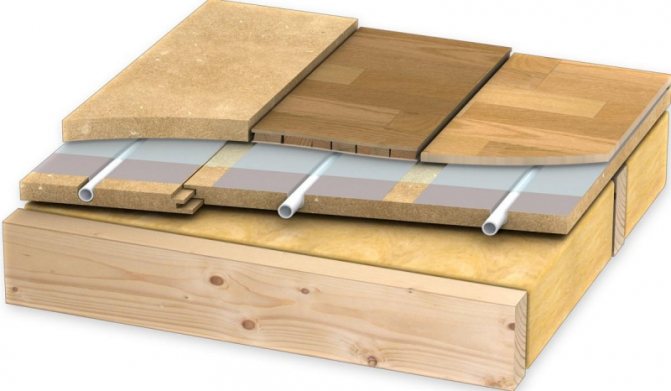
- Wooden plank. Can be attached directly to the surface in which the pipes are laid.The thickness of the board should not exceed 22 mm. There is an opinion that a foam polyethylene backing can be placed under the board to compensate for possible unevenness of the base, but it should be remembered that the heat transfer of the floor will decrease.
- Floor tiles. These materials must be settled on an intermediate layer of sheet metal panels (QSB, DSP). This is necessary to evenly distribute heat and pressure over these coatings. The advantages of these coatings are good heat dissipation.
- Linoleum, carpet. The installation process is similar to that of tiles, the difference in temperature conditions, which should not exceed 25˚.
- Laminate floors, parquet. The installation of these coatings is the same as for laying a wooden board. The difference is that these materials cannot be heated more than 25˚.
A solution adequate in simplicity and cost, based on the available materials available in response to the inventions of Western "firms", could appear only in Russia.
Unlike reinforced concrete slabs, prefabricated wooden floors with heat and sound insulation filling (4) between the load-bearing beams (3) are themselves a good heat insulator, which means that the problem of heat leakage downward is completely eliminated. Either plywood (6) or the popular OSB board (OSB) can be laid directly on the floor beams. No special discoveries are expected here. But then it gets more interesting.
The role of the main heat sink and at the same time heat distribution element of the floor will be played by ordinary aluminum foil (8), which is used in baths and saunas. And since such a serious task is entrusted to her, it is worth looking for thicker foil. Vapor barrier (2) and waterproofing (5).
As the main element of the underfloor heating, it is best to take a corrugated stainless steel pipe (9). It has the best thermal conductivity of all pipes used in such water heating systems. In addition, the corrugated pipe is not afraid of local overheating, which is possible with not very accurate laying, or movements of the floor structure itself.
The pipe is laid with a predetermined spacing between the inserts (7) made of plywood or the same OSB. It is important to ensure full adherence of the foil (8) to the pipe, for which it is squeezed by hand right on the spot. The height of the plywood inserts, in order to prevent lateral squeezing of the pipe, can be equal to or slightly more than its thickness.
In this case, a standard corrugated stainless steel pipe is used, used in water floor heating systems. Necessarily without a polyethylene cover. A pipe with a diameter of 16 millimeters is 50 meters long in a bay, and a 20 millimeter one is 30 meters long. Based on the condition that 3.8-4 linear meters of pipe are required per 1 m2 of floor heating, it is possible to calculate the area that one circuit can occupy.
The speed of installation of the described system is an advantage of this method. The finishing floor (10) can be laid and the system can be put into operation immediately after the installation of the pipe. Laminate, linoleum or carpet can be used as flooring. If you plan to use a laminate as a flooring, it is laid directly on top of the resulting structure.
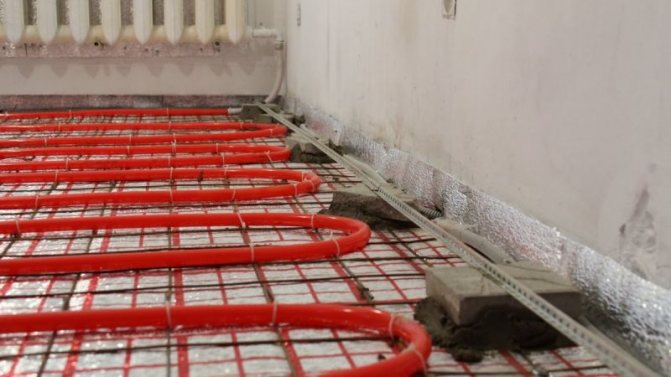
For this, foil is also used, which is laid under the screed in a continuous layer with an overlap of strips, gluing the joints with special tape. To give the monolithic structure additional strength, a welded mesh is used, which will also help to distribute heat.
Before pouring the screed, the pipes must be filled with water so that they take their natural position. It will not be possible to start laying the flooring and start up the system until after a month. Small areas of the floor can be tiled, however, the choice of glue must be approached more carefully, since the overlap will "walk" under the influence of temperature changes.
How to make water floors in a wooden house
The device of a warm water floor on a wooden floor with your own hands is practically no different from the structures used in other buildings. The exception is the special safety measures required to protect wooden surfaces from moisture ingress.
Practice has shown that the best option would be to use polypropylene pipes.
Installation work is carried out as follows:
- Floor design - laying the heating system begins with drawing up a diagram. A hydraulic calculation is performed, the efficiency of the water circuit is calculated, and a decision is made to ensure an increase in the efficiency of heat transfer. Floor projects are developed individually, or ready-made solutions are selected.
- The base is being prepared - the floor is leveled with plywood. Soft insulation can be placed under the layer on the rough ground. Correctly make reliable waterproofing. Traditionally, roll fusing materials are used for this, but for best results, you can also apply a special waterproofing mastic in several layers.
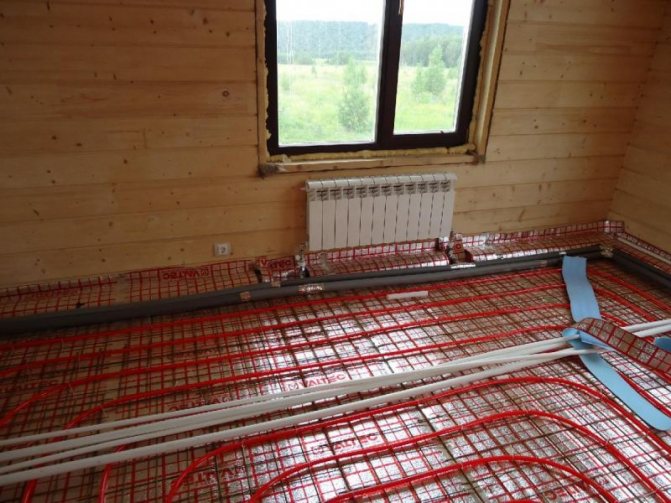
- Further actions depend on the choice of the heating system cake. If you plan to pour a concrete screed, then a reinforcing layer must be laid. A water circuit is attached to the mesh from above with clamps. The entire structure is filled with mortar. Pouring of laid pipes is carried out exclusively with solutions intended for work with warm floors.
- In the case of choosing special mats, installation on a wooden floor is carried out as follows. Polystyrene systems are laid on the leveled surface. The mats have ready-made recesses and latches for pipe mounting, or grooves into which heat-reflecting plates are inserted. A water contour spreads over it.
- Floor covering - the effectiveness of floor heating largely depends on the correct choice of finishing material. A sheet of DSP or plywood is laid on the mats. The rest of the work is carried out depending on the choice of flooring.
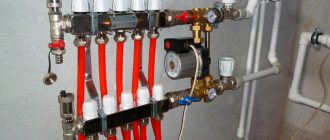
The maximum length of the water circuit should not exceed 70 m. If this is not enough for the heated area, so-called zones for laying water floors are created. To ensure an even supply to each heating circuit, a water collector is installed.

Laying the floor covering
The choice of material is limited both by subsequent operation and by the method of manufacturing the heating system.
Traditionally, the following types of flooring are used:
- Ceramic tiles - the advantage of ceramics is the rapid heating of the surface and high heat transfer. The use is limited to the hallway, bathroom, kitchen and non-residential areas. When choosing ceramic tiles, heated floors must be screed or covered with cement-bonded particleboards.
- Laminate and parquet boards - there are two types of installation of hot water heating on wooden floors: on mats or prepared grooves. Laminate or parquet can be laid regardless of the installation method. The only drawback of the floor covering is the impossibility of heating the surface above 25 ° C.
- Ordinary board - you can also lay a water-heated floor on wooden beams with your own hands, laying the boards over the water contour. The solution does not require serious material investments. This method is chosen if it is not possible to reduce the distance to the ceiling. Subsequently, it is possible to additionally cover linoleum or laminate.
Subject to the step-by-step installation plan, there are no problems with laying on wooden joists. To avoid further difficulties during operation, it is extremely important to make high-quality floor insulation and waterproofing of the room.
What tool is required for installation
To install the water circuit you will need:
- Roulette.
- Plastic pipes and fittings.
- A set of locksmith and construction tools.
- Screwdriver.
- Milling machine.
Installation of a concrete water underfloor heating on wooden floors will additionally require:
- Perforator.
- Rules.
- Angle grinder for cutting reinforcement.
- Construction level.
A set of cutters and drills and a powerful drill are useful for working with wooden surfaces.
Wood
Most often, the installation of a dry underfloor heating with wooden substrates is used in houses with the most environmentally friendly conditions.
The installation process is as follows:
- The floor must be completely cleaned and any irregularities must be smoothed out. If there are protrusions more than 2 mm, you need to work out the surface with hard sandpaper.
- Place two layers of polyethylene sheets on the floor. This creates a long-term and reliable moisture barrier.
- At floor level, a damper tape must be laid along the walls.
- Wooden planks are laid out. You can put them not close, but the gap should not exceed 2 cm.
- The heating plates are positioned so that the recess for the heating circuit falls into the groove between the boards.
- The heating circuit is laid out.
What mistakes should be avoided during installation
The design features on a wooden base are that any violations and changes in the phased installation of heating will lead to operational problems. Condensation and leaks are critical.
The pipe-laying system does not allow the following violations:
- Exceeding the maximum length of the circuit - the pipe should not be more than 70 m in length. The circuit should be located below the boiler, so that the natural circulation of the coolant is ensured, in the absence of a circulation pump.
- Lack of waterproofing - organizing wooden floors with water heating on their own often leads to the desire to save on consumables. It should be remembered that good insulation of wooden surfaces from moisture is essential in a wooden house. It is best not to limit yourself to simple measures, but to use additional means of protection: impregnations and a protective corrugation for the pipe.
- The choice of finishing material - even before choosing a method for installing underfloor heating, you should consider what kind of material the surface will be faced with. The maximum heating temperature and the stages of work depend on this.
Underfloor heating for a wooden house is a smart solution. Provided that the recommendations for installation are followed, possible difficulties in the process of future operation can be avoided.