Warm floors have long won the palm of floor radiators and bulky heating systems. The main difficulty in laying coatings lies in a correctly drawn up project for the location of pipes and an optimally selected step.
Step of laying a water-heated floor
- 5.1 Video - Underfloor heating "Valtek". Installation instructions
- 6.1 Video - The step of laying a water-heated floor
The choice of a heating system as a guarantee of comfort
Despite the growing popularity of such designs, most residents of private houses are in no hurry to abandon traditional radiators. Meanwhile, the operation of the underfloor heating system has undeniable advantages. To evaluate them, you need to understand the features of both heating methods.
Of course, alternative heating is not without its drawbacks. But there are very few of them, and they are as follows:
Installation of radiator heating requires careful calculation. The efficiency of such heating depends on many factors, one of which is the height of the radiators above the floor level. It should also be borne in mind that the installation of radiators is carried out in such a way that a certain distance remains between the window sill and the battery, as well as between the wall and the heating device. Therefore, it is very important to choose the correct size of the radiators, otherwise they will have to be changed.
How to count the number of contours
Taking into account the requirements, laying one contour of the warm floor is possible only in a small room. If the area of the room is larger, it must be divided into several sections, adhering to a 1: 2 ratio. That is, the width of the section should be half the length. You can calculate the number of plots in a room using the following data;
- at a step of 15 cm, the area of the site should be no more than 12 m²;
- at a step of 20 cm - no more than 16 m²;
- with a step of 25 cm, the recommended land area is no more than 20 m²;
- at a step of 30 cm - no more than 24 m².
Table heat consumption of water underfloor heating
If the length of the inlet section is more than 15 m, then it is recommended to add another 2 m² to these values.
Warm floor: what is taken into account when calculating
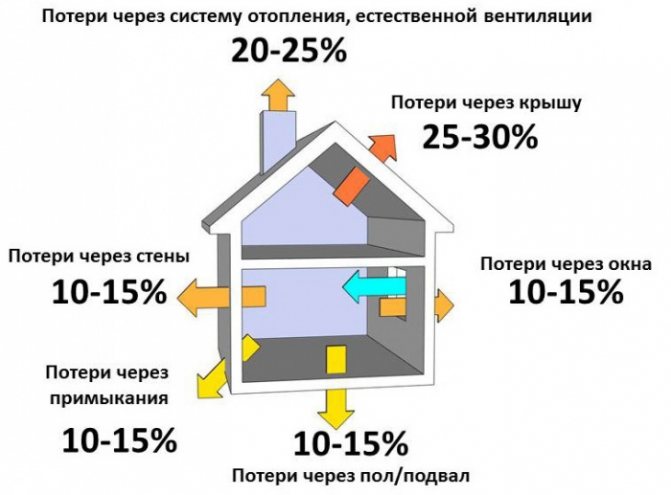
To organize the efficient operation of heating, it is necessary to correctly calculate the distance between the pipes of the underfloor heating - the step of laying the pipe. This indicator depends on the coefficient of thermal conductivity of the material from which it is made, and its diameter, as well as the place of laying and possible heat loss. An incorrect calculation will lead either to overheating of the surface or to discomfort associated with temperature changes.
Calculation of water floor heating, materials
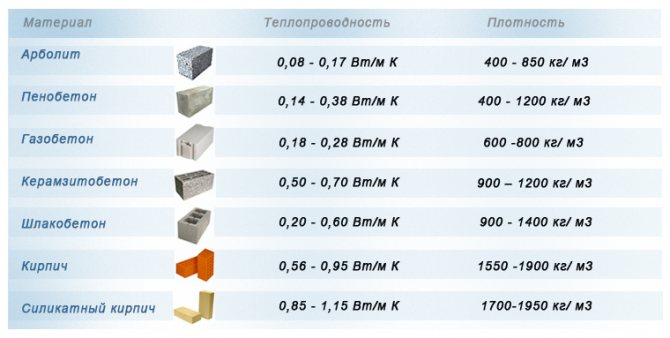
Coefficient of thermal conductivity
Determining the distance between the loops of the contour must begin with the selection of the main consumable. To do this, you need to determine which pipes conduct heat best and are traditionally used to organize a warm water floor, arranging them in descending order.
The step between pipes made of materials with a high thermal conductivity is always larger. Copper and steel corrugated pipes conduct heat best. However, they are used very rarely in the arrangement of a water-heated floor due to their high cost. And worst of all, polypropylene conducts heat, which is rarely used due to its poor elasticity.
The most popular materials are cross-linked polyethylene and metal-reinforced plastic.
Pipe diameter
The smaller the diameter of the main element of the system, the less need to make the distance between the loops in the contour.When using a pipe with a larger diameter, the laying step in the contour increases accordingly.
Underfloor heating pipes
Heat loss and location
The step between the loops in the water floor heating circuit can be constant or variable. A constant step is usually observed in industrial premises and in rooms that have strict air temperature requirements, for example, in bathrooms.
- In large industrial premises, as well as swimming pools and water parks, the distance between the hinges should be 20 cm (provided that a consumable with a diameter of 20 mm is used).
- In bathrooms, the laying step should be 15 cm.
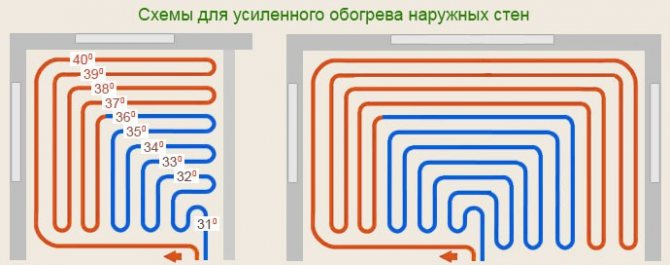
- In all other cases, a variable step is used. The minimum distance between the turns is observed along the walls in contact with the street, since it is in these places that the greatest heat loss is observed. As the distance from the outer walls increases, the laying step increases.
- In general, the optimal laying step size is determined based on the calculated heat loss power.
- If the heat loss is less than 50 W / m², the installation spacing in the contour can be 30 cm.
- If the heat load exceeds 80 W / m², then the minimum step is observed.


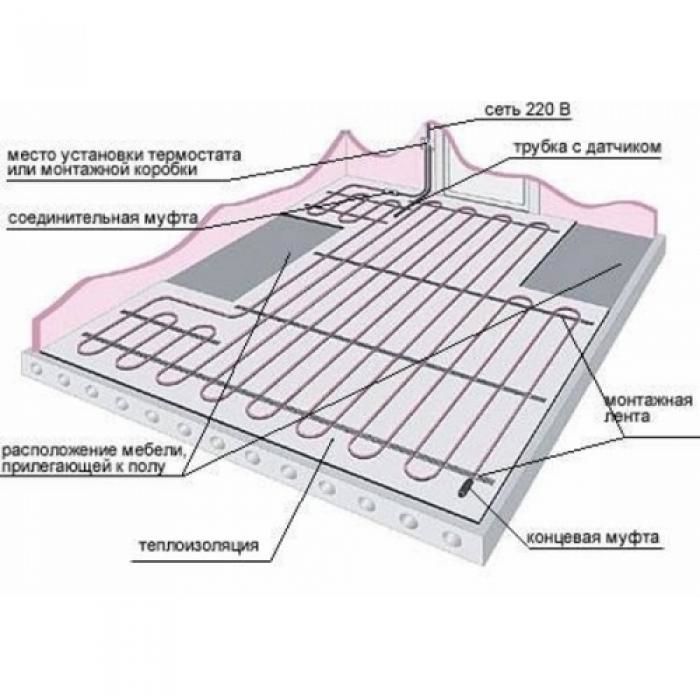
Methods for installing the underfloor heating system
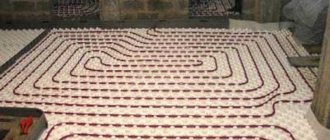
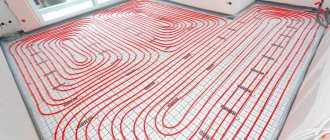
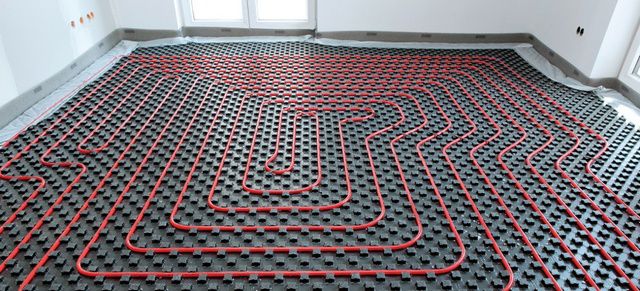
For the correct functioning of this heating system, a clear sequence of layers of the so-called “cake” of the warm floor is important.
The thermal circuit is laid on a previously heat-insulated and waterproofed surface, and from above it is poured or covered with a cement screed, on top of which the finishing floor covering is laid. The above layers - the cake shell - are required in both cases. They protect the system from external influences and increase its efficiency.
Warm floors are an excellent solution for the improvement of your home. The floor temperature directly depends on the length of the floor heating pipes hidden in the screed. The pipe in the floor is laid in loops. In fact, from the number of loops and their length, the total length of the pipe is added. It is clear that the longer the pipe in the same volume, the warmer the floor. In this article, we will talk about the restrictions on the length of one contour of the warm floor.
Approximate design characteristics for pipes with a diameter of 16 and 20 mm are: 80-100 and 100-120 meters, respectively. These data are approximate for approximate calculations. Let's take a closer look at the process of installing and pouring underfloor heating.
The consequences of exceeding the length
Let's figure out what consequences an increase in the length of the underfloor heating pipe can lead to. One of the reasons is an increase in hydraulic resistance, which will create an additional load on the hydraulic pump, as a result of which it may fail or simply cannot cope with the task assigned to it. Resistance calculation consists of many parameters. Conditions, styling parameters. The material of the pipes used. There are three main ones: loop length, number of bends and heat load on it
.
It is worth noting that the heat load increases with increasing loop. The flow rate and hydraulic resistance also increase. There are restrictions on the flow rate. It should not exceed 0.5 m / s. If we exceed this value, various noise effects may occur in the piping system. The main parameter, for the sake of which this calculation is done, also increases. The hydraulic resistance of our system. There are also restrictions on it. They are 30-40 kP per loop.
The next reason is that with an increase in the length of the underfloor heating pipe, the pressure on the pipe walls increases, causing this section to elongate when heated. The pipe in the screed has nowhere to go. And it will begin to taper at the weakest point. The restriction can cause blockage of the flow in the heating medium.Pipes made from different materials have different expansion coefficients. For example, polymer pipes have a very high coefficient of expansion. All these parameters must be taken into account when installing a warm floor.
Therefore, it is necessary to fill the underfloor heating screed with pressed pipes. It is better to pressurize with air at a pressure of about 4 bar. Thus, when you fill the system with water and start heating it, the pipe in the screed will be where it will expand.
Optimal pipe length
Considering all of the above reasons, taking into account the corrections for the linear expansion of the pipe material, we take as a basis the maximum length of the underfloor heating pipes per circuit:
What is the optimal length of the underfloor heating pipe?
Let's find out the optimal length of the underfloor heating pipe and what the consequences can be if the circuit is longer. Everything in our article
Combined heating
Each heating method has its own advantages and disadvantages. The use of radiators is more effective in places where cold air traditionally circulates (for example, under windows). In this case, they create a thermal curtain, but provided that a distance of 10 cm is observed between them and the window sill, and the height of the radiator above the floor is 12 cm.
And alternative heating is more expedient to use in places where, for some reason, the installation of radiators is impossible. These areas include utility rooms, toilets and bathrooms, as well as hallways and corridors.
If the system of a warm water floor is planned to be used as an additional source of heat, during its installation it is necessary to take into account some of the features associated with the operation of radiators.
Installation of a warm water floor is most often done by pouring a concrete screed, which increases the thickness of the floor by several centimeters. In order for the height of the radiators from the level of the finishing coating to be the optimal parameter, their contours should be installed after the installation of underfloor heating.
How to calculate pipe flow
To determine how much consumables will be required to organize a heating system in each individual room, it is necessary to calculate using the following formula:
L = S / N * 1.1, which means the following:
- L indicates the length of the pipe;
- S is an indicator that determines the area of the room;
- N is the distance between the loops of the system;
- 1.1 is a coefficient equal to 10%, and indicates the additional flow of the pipe for turns.
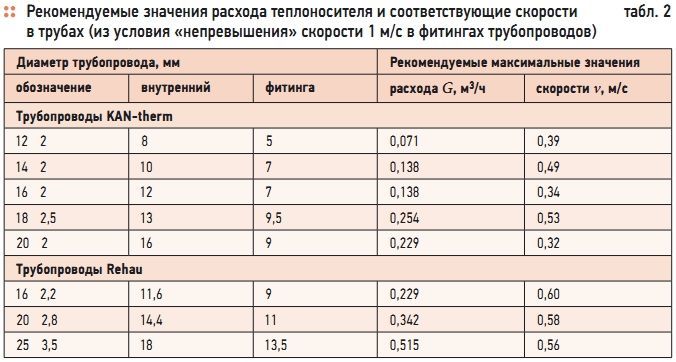
Recommended values of the flow rate of the heating agent and the corresponding velocities in the pipes
Since both ends of the circuit are connected to a collector located on the wall, the length of the supply section should also be included in the calculation - the segment that goes from the collector to the distribution of the water heated floor.
The calculation of the useful area of the room should be made, adhering to certain rules:
- If you plan to install massive furniture in the room, then you do not need to lay a pipe under it. Otherwise, it will not be possible to calculate the optimal energy consumption. In addition, heating will not affect the furniture itself in the best way.
- The distance from the contour to the walls and interior partitions should be 30 cm.
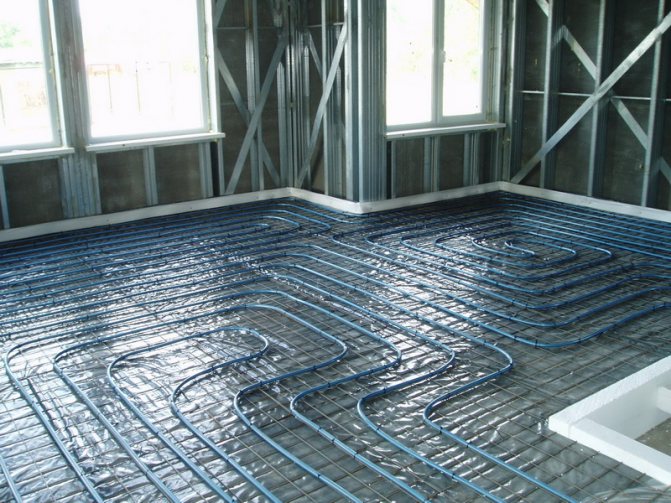
Installation of a water heated floor
After it was possible to calculate the usable area, you can make the basic calculation, taking into account other requirements. To understand how much material is required, you can use an illustrative example, which is considered a room with a usable area of 18 m2, a 5 m long supply section (if we take into account that both ends will be connected to it, it will turn out to be 10 m), as well as a laying step equal to 15 cm or 0.15 m.
Total: 18 / 0.15 * 1.1 + 10 = 142 m.
An increase in the distance between the hinges leads to a reduction in the amount of consumables during the installation of a water-heated floor.In general, the calculation of this indicator is made according to the plan, which is drawn up at the initial stage of work.
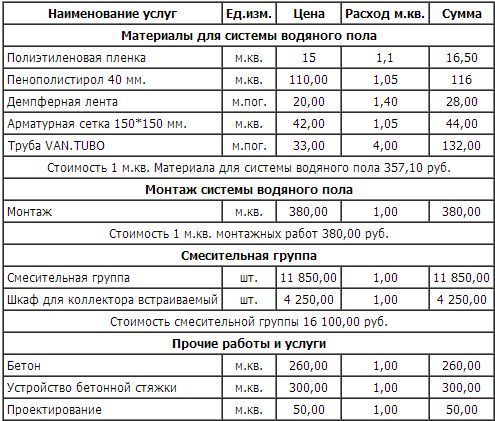
Calculation of the cost of underfloor heating
The pipe consumption for 1 m² is calculated based on the distance between the loops.
- With a distance of 10 cm, this parameter will be 10 m p .;
- If this indicator increases to 15 cm, the amount of consumable material decreases to 6.7 m p .;
- 20 cm - 5 m p.;
- 25 cm - 4 m p.;
- With a maximum distance of 30 cm - 3.4 m p.
Video: Simple Secrets of Pipe Laying
Secrets of joint pain treatment from our regular reader.
Hello!
My name is Gennady Alekseevich. I am a stove-maker with over 20 years of experience. I am engaged in both the repair and construction of Russian stoves and fireplaces. I always do the work very efficiently and carefully, which negatively affects the condition of the joints. With age, the pains started getting stronger, up to the point where I could no longer work. Having tried a lot of both medicinal and traditional methods of treatment, I realized how serious my disease is, since there was no positive effect. Until I came across one tool, which I want to tell you about.
It is a unique blend of the rarest and most powerful natural healing substances. This tool has proven its effectiveness not only for patients, but also for science, which has recognized it as an effective drug. Joint and back pain go away in 10-15 days, studies have shown. The main thing is to clearly follow the instructions in the methodology. You can order the product in its original packaging, with a quality guarantee, at
One of the key components of a warm water floor are pipes, the efficiency and practicality of the built-in heating being organized largely depends on the correct choice and correct layout.
How to choose pipes for a water-heated floor? How to calculate the footage of a pipe? We will talk about this in the article.
Having caught fire with the idea of the main or additional heating of a room or dwelling as a whole, it is worth choosing pipes under the most responsibly. The idea that it is quite possible to get by with leftovers and scraps, cheaper material, should be immediately swept aside.
The level of comfort in the home, the efficiency of the system, its durability and reliability ultimately depend on the quality, parameters and correct calculation of the components.
Not every option is able to satisfy a number of requirements due to the very specifics, as well as the operation of the selected heating system:
The durability of the heated floor system, usually laid under the screed, should be commensurate with the service life of the building itself, at least until its overhaul. Despite the fact that today there are methods for installing circuits without, the screed is preferable, since it provides more reliable protection to pipes from damage, as well as softer, more uniform heating, distribution and heat transfer.
In order to reduce the hydraulic resistance of the system, increase the efficiency of its operation, experts recommend adhering to the relationship between the pipe diameter for a warm water floor and the length of the circuit:
- 16 mm
- the maximum pipe length for a warm water floor (for 1 circuit) within 60-70 m; - 20 mm
- up to 80-90 m; - 25 mm
- up to 100-120 m.
The greater the distance between the pipes of the water-heated floor, or the step in each circuit, the larger the diameter of the pipes is chosen.
In calculating how many pipes a warm water floor will require, it is necessary to determine the number of circuits. There is a rule according to which the area heated by the circuit should not exceed 20 square meters. If the area of the room is larger, several contours should be organized.
What pipes to use for a warm water floor?
In the construction market, the following types of pipes for a warm water floor are available to the consumer, characterized by their advantages and disadvantages:
Fundamental rules
HENCO metal-plastic pipes will serve well for your floor
Special requirements are imposed on pipes used in the installation of water heating systems. First of all, they should be distinguished by their durability, and their material should not undergo corrosion and destruction at temperature and pressure drops. In addition, they must be resistant to chemicals and microorganisms. Their service life must be at least 50 years.
Each circuit of a water-heated floor system must consist of a single section, since leaks may occur at the joints. For this reason, all consumables must be sealed. Leaks can also form in places of bends, which is characteristic of materials with low elasticity.
- metal-plastic;
- cross-linked polyethylene;
- copper;
- polypropylene;
- become.
Underfloor heating pipe
In accordance with the standards for underfloor heating, it is forbidden to use cast iron when installing them. Copper and steel are considered the best, but they are unpopular due to their high cost. Polypropylene is just as unpopular as copper. However, its unpopularity is not due to its high cost, but to its large bending radius, which makes it possible to lay pipes with a minimum pitch of 32 cm, which in most cases is not enough.
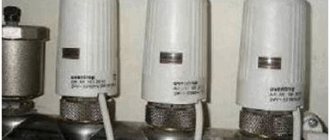
Equipment for warm water floor
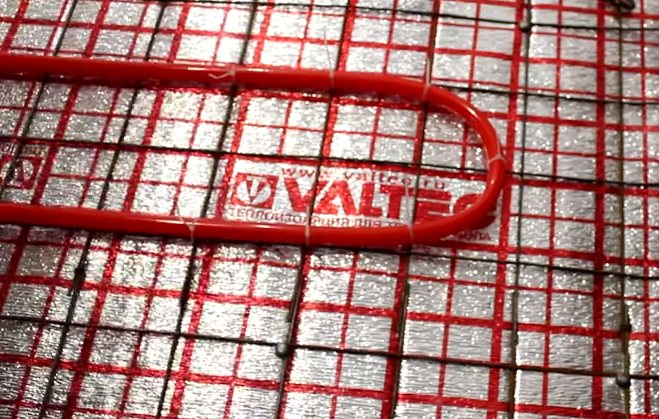
Therefore, the most popular today are metal-plastic and cross-linked polyethylene. Moreover, the latter has higher characteristics. The only drawback of cross-linked polyethylene is poor elasticity: during installation, such pipes must be rigidly fixed on the reinforcing mesh. If this requirement is not observed during operation, they may bend.
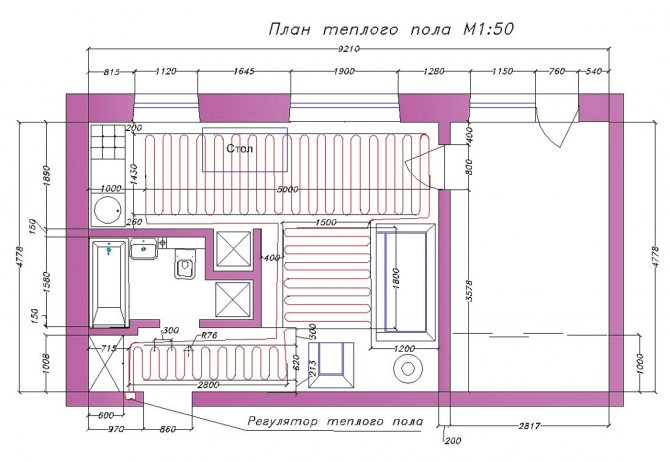
Calculation before laying
It is necessary to decide on. There are 2 main options - snake and snail (spiral). Further, on graph paper, taking into account the size of the room on a scale, a diagram of the layout of the contours is drawn up. The calculations will most likely have to be done several times. Therefore, in the calculation of pipes for a warm floor, an online calculator can provide invaluable help.
The diagram should include the location of the furniture. It is impractical to arrange built-in heating under large heavy furniture.
The distance from the wall to the first thread is 20 cm or more. It is possible to determine what is the distance between the pipes of a water-heated floor (step) based on the size of the diameter, as well as the required heat transfer, taking into account the total heat loss of the room and the purpose of the system (additional, main).
In order to avoid uneven heating and cold zones, the pipe pitch for a warm water floor should not exceed 35 cm. 16 mm diameter is enough for normal heating up to 15 cm of the surface in both directions.
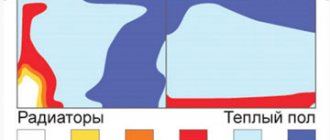
Comparison of underfloor heating with radiators
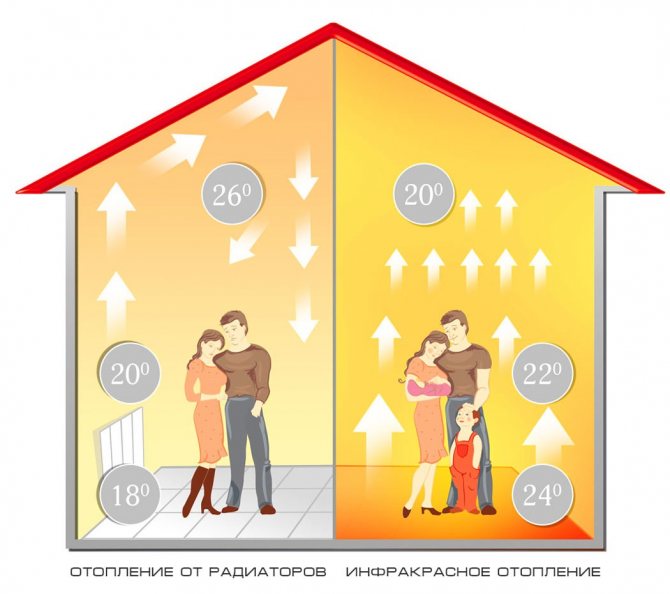
If we compare the already familiar radiator heating system with a warm floor, then in the case of the first, hot air streams rush first upward when heated, and then only go down. Therefore, with radiators, quite often we feel a cold floor.
The installed underfloor heating works on a different principle. Floor heating pipes first heat the screed, then the screed radiates heat evenly from bottom to top. The higher, the less intense heating.
Therefore, in terms of heat distribution, warm floors look much more advantageous. In terms of economy, both systems are plus or minus the same.
Very often they like to mention that underfloor heating is more economical than other systems. This is a big misconception. The task of any heating system is to compensate for the heat loss at home. And heat loss is always unchanged. Therefore, resources must be spent equally. Underfloor heating can indeed be much more economical.If you use advanced solutions for low temperature systems.
The main parameters affecting the determination of the pipe layout pitch
The distance between the underfloor heating pipes is determined based on the following parameters, which are the main ones:
- room area;
- the type and diameter of pipes used in the heating system;
Determining the area of the room
Area = width * length.
Experts recommend reducing the figure obtained by the area occupied by large furniture. Heating the floor under the furniture is not advisable, as it can lead to deformation, and reducing the area will save money required for arranging the floor.
Taking into account the results obtained, it is possible to determine the most optimal step for laying the turns of the pipeline.
Influence of the species
The pitch of the pipes of a water-heated floor is also determined based on the material of the product, or rather on the coefficient of its thermal conductivity, and the pipe.
Copper and corrugated stainless pipes have the highest coefficient value. Further, the decrease of the considered parameter occurs according to the following scheme:
- polyethylene;
- polypropylene.
That is, the lowest heat transfer coefficient is possessed by polypropylene pipes, which are recommended to be used for organizing the heating system only in exceptional cases.
The higher the heat transfer coefficient, the greater the distance the pipes can be laid and vice versa. Thus, the smaller the diameter of the pipes used, the smaller the laying step should be.
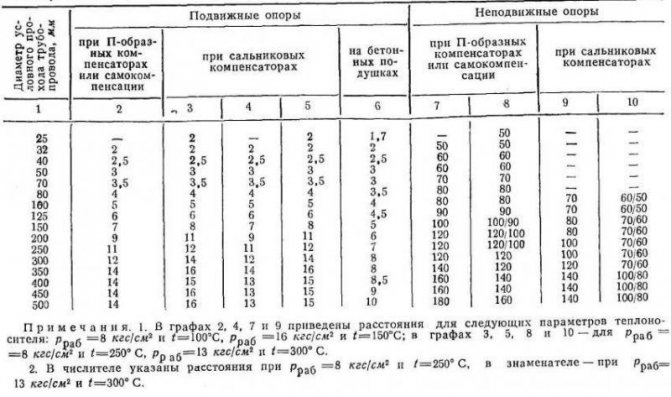
The relationship between the step and the temperature of the coolant is presented in the table.
With a certain diameter of pipes, the laying step should be the higher, the higher the average temperature of the coolant in the system.
The most popular are pipes with a diameter of 16 mm. In this case, the laying step is 250 mm - 300 mm in a living room, 100 mm - 150 mm in a bathroom and 300 mm - 350 mm in rooms for other purposes.
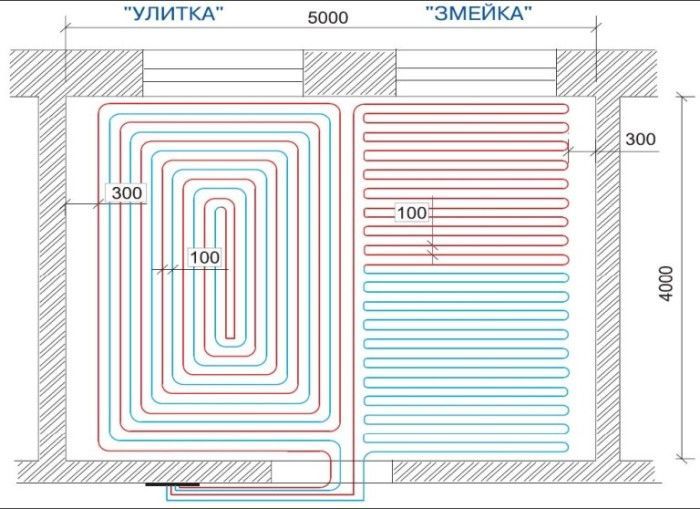
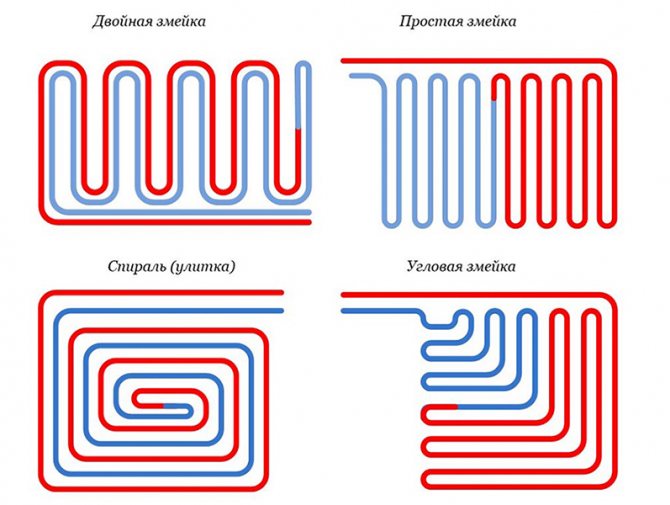
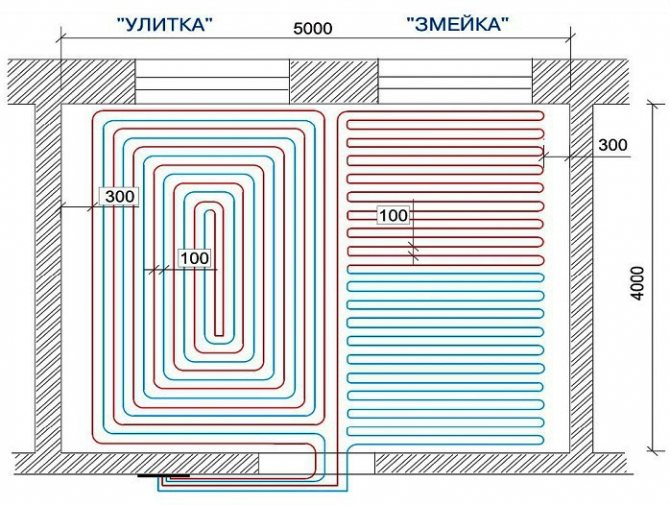
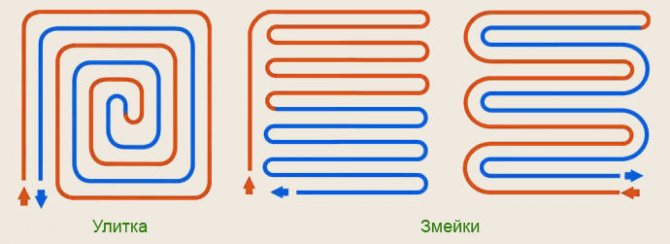
Choosing a way to lay out the contours
There are several ways to stack consumables:
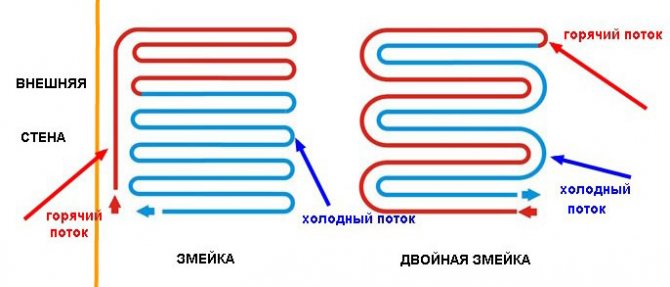
- snake;
- snail.
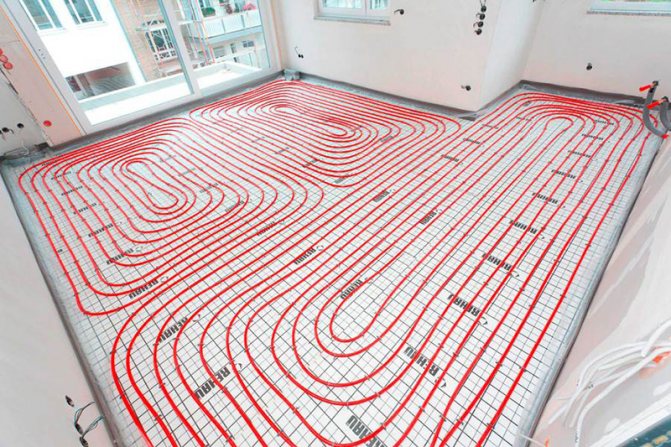
Laying schemes for a water-heated floor
For effective floor heating in large rooms that have a regular rectangular or square shape, the ideal option would be to lay the contour with a snail or spiral.
For small rooms or rooms with an irregular shape, snake laying is the best option.
Extra options
Among the additional parameters that affect the distance between the pipes of a warm water floor, one can single out:
- the customer's wishes about the average temperature in the heated room;
- method of laying the pipeline.
Indoor temperature
The comfortable temperature for living in various rooms has been determined by experts.
The data from the table are determined for central Russia, where the temperature in the cold season rarely drops below 30 ° C. For the northern regions, the presented indicators are recommended to be increased by 2 ° C - 4 ° C.
Any customer can increase or decrease the temperature in the heating system at will. To do this, when installing the floor, it is enough to reduce or increase the pipe laying spacing, respectively.
Another formula for calculating the length of the pipe for a water-heated floor
Remember! The length of each contour is calculated separately. There can be several circuits in one room.
Shk x (Dk / U) U x 2 x (Dk / Z) Kx2
Where all values are given in meters:
- Шк - room width
- Dk - room length
- Y - laying step
- K is the distance from the collector or manifold cabinet to the entry point
We recommend adding at least 5% to the result obtained. For simplicity, you can simply multiply it by 1.05. This is the safety factor. Part of the pipe will go under the fittings, somewhere you can make a mistake. Different pipe bending angles can also slightly increase the flow rate.
5m x (4m / 0.2m) 0.2m x 2 x (4m / 3) 5m x 2 = 110.53 m
We add 5% of the stock to the resulting figure and we get 116.06 m. You can cut it down and purchase 116 running meters of pipes for a warm floor.
READ MORE: DIY painting a wooden floor step by step instructions
Some craftsmen and equipment manufacturers use a formula that takes into account only the area of \ u200b \ u200bthe room. It works well for square areas. But the formula uses a large multiplier. This simplifies the calculations, but can lead to an increase in the remainder of the unused pipe.
P / U x 1.1 Kx2
Where all values are given in meters, and area - in square meters:
- П - area of the room
- Y - laying step
- K is the distance from the collector or manifold cabinet to the entry point
20 m2 / 0.2 mx 1.1 5m x2 = 120 m. As you can see, the difference with a more accurate calculation was only 4 meters.
Please consult the seller before purchasing materials. Read the installation guidelines and operating instructions.
Calculation rules and styling options
The material consumption and thermal efficiency of the finished system directly depend on the chosen method of installation.
There are three ways of placing pipes: snake, snail and combined.
Snake
The method is distinguished by simplicity of calculations and ease of installation, which makes it very popular. This scheme is best suited for industrial buildings, premises with low heat loss and facilities that require year-round heating.
We recommend that you familiarize yourself with: How to determine the required chimney height relative to the roof ridge?
Note! The value of the maximum temperature in the room is regulated by SNiP, and is + 25 ° С for objects with constant presence of people and + 32 ° С - with periodic ones.
The main disadvantage of this installation method is the tangible temperature difference in different areas of the floor. In addition, pipes are often bent at sufficiently large angles, which makes it difficult to implement projects with a small pitch. The use of a steel spring will help to partially solve this problem, which is tensioned over the place of the future bend, and prevents the formation of a kink.
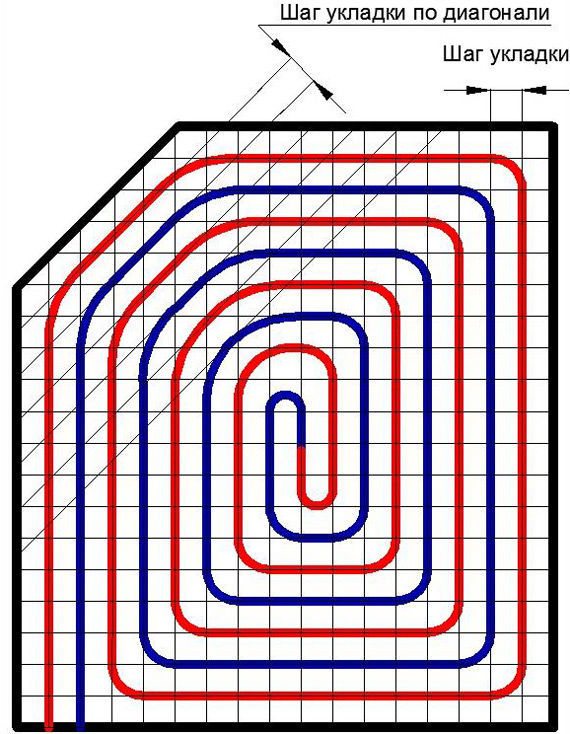
Snail
There is also the designation "spiral" or "shell". In such a scheme, the temperature field is distributed over the floor surface more evenly, since the pipes of the direct and reverse circuit are laid alternately.
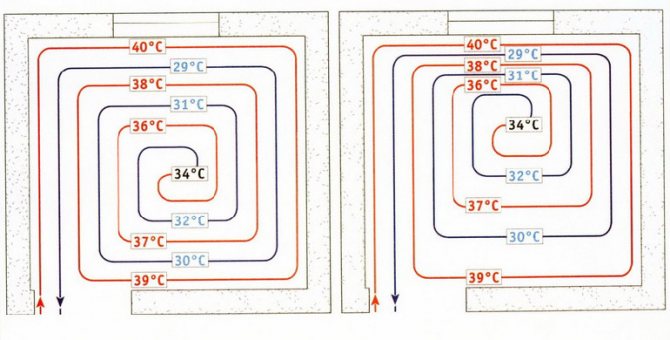
The pipes are placed in parallel and mounted from the walls towards the center. In the middle of the room, the supply line ends with a loop that turns into a return circuit, which, on the contrary, goes from the center to the collector.
The advantages of this styling method:
- Uniform heating of the room.
- Absence of sharp bends and, as a result, low hydraulic resistance.
- Reduced consumption of pipe material.
This method is considered the most time consuming in design and for practical implementation.
Combined method
As a rule, this installation method is chosen for large rooms, the floor surface of which is divided into separate zones. At the same time, for each zone, the optimal way of placing the pipes is selected: in the area of windows, doors and around the perimeter - with a snake, in the center of the room - with a spiral.
Pipes are laid using a flat or concrete method:
- In the first case, ready-made slats or modular panels are used, equipped with grooves and posts for convenient fixing of pipes. After the pipes have been laid, the structure is covered with gypsum fiber boards and flooring. Despite the convenience and speed of installation, this method has not yet become widespread.
- Installation in a concrete screed will take much longer. It will take at least 28 days to dry and strengthen the concrete layer alone (depending on the thickness of the layer).
We recommend that you familiarize yourself with: Ventilation and rectangular air ducts
The screed laying procedure is performed in the following sequence:
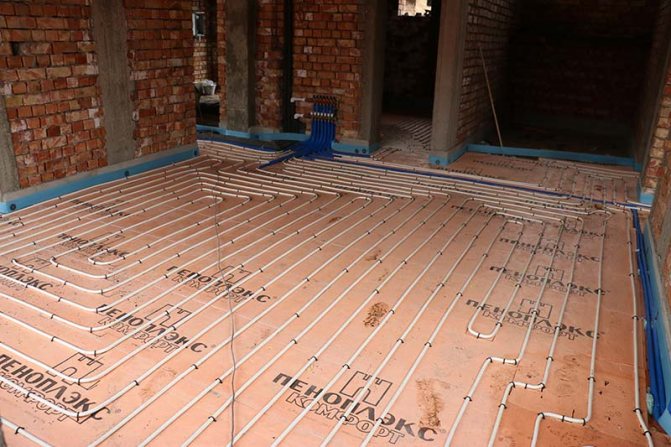
- Waterproofing layer.Fits into the lower part of the structure, prevents the formation of condensation.
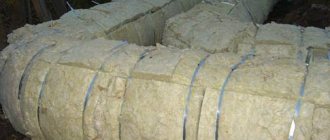
- Thermal insulation. Any sheet thermal insulation material will do. Its task is to prevent heat leakage downward, and the thickness of the layer is determined in accordance with the external climatic conditions.
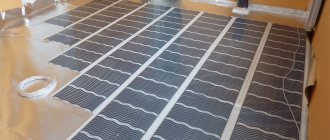
- Foil film. It redirects the maximum amount of warm air to the room, saving on heating agent consumption.
- Reinforcing mesh. Provides the screed with the necessary strength.
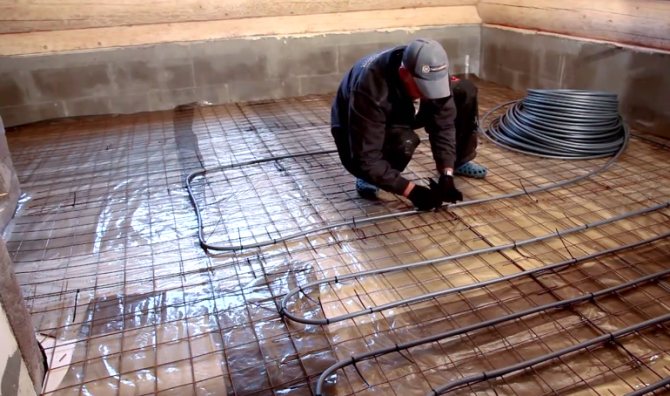
- Installation of the pipeline. One or more circuits through which the coolant circulates.
- Control tests. A coolant is supplied to the mounted system.
- Screed. Filling the finished pipeline with a cement-sand mixture. The layer thickness usually does not exceed 35-50 mm.
- Flooring. The best indicators of heat transfer are shown by ceramic tiles.