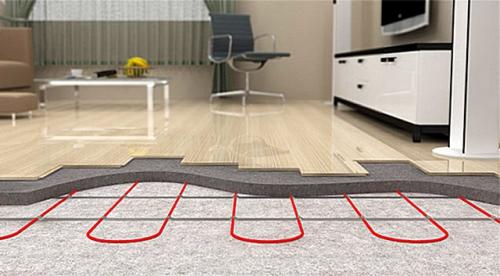
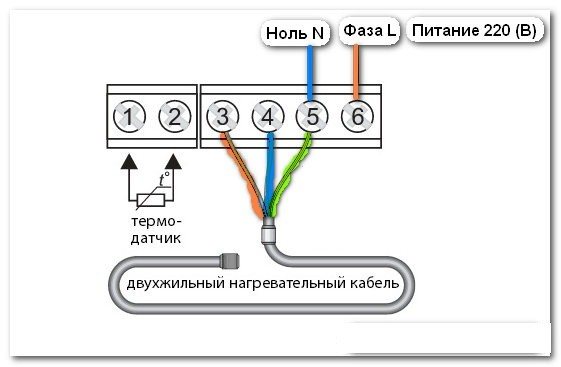
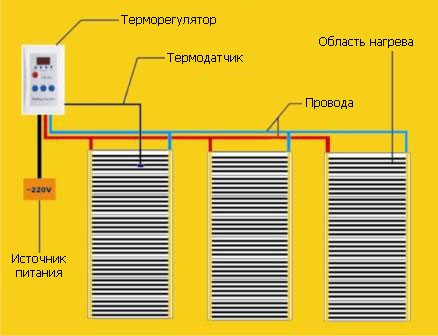
The underfloor heating is connected to the thermostat using a PV-3 cable with a cross section of 2.5 mm². One end of the cable is connected to the corresponding contact of the thermostat, and the other is connected to the copper bus using special connectors.
In our online store you can purchase a ready-made kit for connecting film heated floors.
The connector must be inserted between the copper bus and the insulation of the film underfloor heating so that one plate is in contact with the copper bus. Further, both connector plates are tightly pressed against each other, and an electrical wire is inserted into the counterpart.
It is recommended to use a special tool or pliers for crimping.
All connections or soldering points and open sections of the copper bus are insulated with butyl rubber tape. The cut points of the continuous film floor are insulated with polymer tape.
When several heating elements are connected at the same time to one thermostat, a parallel connection is used.
For convenience, it is recommended to use a junction box. The wires coming from the warm floor are connected in parallel using a distribution block, by twisting or soldering, i.e. phases with phases, zeros with zeros. There are only two wires coming out of the junction box to the corresponding contacts of the thermostat (zero and phase). This method allows you to accurately lead the wires to the thermostat and, if necessary, easily detect the malfunction of the heating elements.
If the total power of the underfloor heating exceeds the maximum load power of the thermostat, it is necessary to distribute the heating elements between several thermostats. For example, if the maximum load power of the thermostat is 3520 W, and you connect 2 foils of a meter width, 10 meters long and 220 W / m², then the total power of such a floor will be 4400 W, which exceeds the maximum power of the thermostat and is unacceptable. In this situation, it is necessary to use two thermostats.
heating-film.ru
Types of thermostats
Without a thermostat, it is impossible to regulate the heating temperature of the room.
The sensor can be installed indoors or outdoors
The temperature sensor for underfloor heating can be mounted indoors or outdoors. Cannot be installed in rooms with high humidity.
If a warm floor is used as the main heating device, then it is better to choose thermostats that regulate the degree of heating of the air in the room.
But if there is a covering on the floor that is afraid of overheating, then you need to use a floor heating sensor.
For a heating system that is used as the main one, it is best to use devices with the ability to connect two sensors.
Installation of a floor heating controller. What is “warm floor” thermoregulation for?
Just a few words about the importance of a high-quality, correctly working electric "warm floor" control system.
Such a heating system cannot be simply plugged into the network and operated according to the principle “the warmer, the better”. The surface heating temperature is always strictly limited, and usually does not exceed a maximum of +27 degrees in residential premises. It can be somewhat higher in bathrooms and showers, in corridors or hallways, but also within + 30 ÷ 33 degrees. And why?
- Firstly, the level of comfortable perception of the heat coming from below for the feet of a person is just within the range of up to 25 ÷ 27 degrees.At higher temperatures, especially above the normal temperature of the human body, it begins to "bake" clearly. And the feeling of pleasant warmth is replaced by obvious discomfort.

The warm floor will be pleasant for sensations only at a heating level up to 25 ÷ 27 degrees. At higher temperatures, a feeling of discomfort occurs.
- Secondly, excessively strong heating has a negative effect on the finish floor covering. Even those of its varieties, which are designed for operation in combination with a heating system, have upper limits of permissible temperatures. Otherwise, deformation processes may begin due to excessive linear expansion. Drying, seam divergence, breakage of locking joints and other unpleasant phenomena are observed.
For "warm floors", coverings are used for which such a possibility of application is stipulated. But they also do not tolerate excessive heat.
- Finally, the issue of rational use of expensive electrical energy was and remains extremely important. In a well-distant "warm floor" system, with high-quality thermal insulation of the floor and the entire room as a whole, the heating elements work for a very limited time. An example is shown in the diagram below.
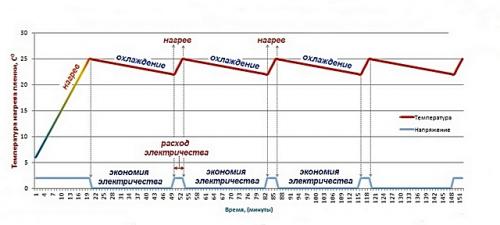
The maximum energy consumption occurs during the phase of starting the system and heating the floor to the set temperature. In the future, only short-term switch-ons follow to maintain the required level of heating of the floor surface.
Moreover, the total consumption, even in such a continuous mode of operation, is very insignificant. Savings are also achieved by fine-tuning the modes. That is, heating will be carried out exactly when it is really needed.
All these control functions of the electric "warm floor" are taken over by a special device - a thermostat.
Principle of operation
The thermostat maintains the set heating parameters
The thermostat for underfloor heating is an electrical device that requires connection to a heating system, a temperature sensor and an electrical network.
Works on the principle:
- takes from the temperature sensor the parameters of the floor or air heating temperature;
- compares with the data set in the settings;
- when the set temperature is exceeded, it turns off the heating system;
- if the temperature is lower than the set one, switches on the system.
The temperature reading is influenced by the type of floor covering.
But what to look for when choosing a device
Consider which thermostat to choose for a warm floor.
Almost all sensors are suitable for regulating the operation of any kind of heating elements: cable and infrared underfloor heating.
You can choose the heating element system and sensor from different manufacturers.
Criterias of choice:
- You need to buy a temperature regulator for installing a warm floor with a margin of 10-20% of the power specified in the instructions. In rooms with a large area, heating elements are laid in separate blocks, each of which is connected to its own sensor.
Look for a comfortable regulator - The complete set with heating elements often comes with a simpler regulator, which does not always meet the requirements of the owners. You can purchase an electronic thermostat with the characteristics most suitable for you, for example, sensors that monitor the floor and air temperature separately or at the same time.
- Pay attention to the number of channels: one device controls only one room or several rooms; one housing contains two single-channel sensors.
For small rooms, it is better to choose a simpler mechanical or electronic model. When choosing, it is recommended to consult with specialists who will tell you which regulator for a warm floor is better to buy.
Installation of the underfloor heating regulator height. Features of installing thermostats
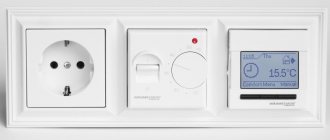
- Possibility of mounting in a frame with switches or sockets. Some models of temperature controllers may be located in a frame with sockets and switches. If this nuance is important, it is advisable to check with the seller with which fittings for electrical wiring this or that regulator is compatible.
- Close proximity to the heated area. Install the device closer to the heating area. This reduces the length of the sensor cable, which can be damaged. At what height should the underfloor heating thermostat be located in this case? Ideally, if it is 30-40 cm from the floor. This placement is not as convenient as what the manufacturer recommends (90 cm), but it significantly reduces the length of the wire. If children live in the apartment, the device must be installed higher. When using air sensors, it is worth referring to the supplier's advice regarding the height and placement of the thermostat. It is desirable that the device be located close to the place where the cable layout begins. In this case, you can draw up a stacking scheme in advance.
- Possibility of installation in rooms with high humidity. Experts do not recommend installing thermostats in the bathroom, as there is a risk of water entering the device. If another option is not possible, you can opt for devices that are protected from moisture penetration. Such models have a protection class of at least IP21. The second indicator shows the presence and degree of protection of the device from water.
- Connection to the electrical panel through a separate line. Sensors for the underfloor heating system with a power of 200-300 W can be powered from an outlet located nearby and protected by an RCD. For floors with high power, a separate line is required, therefore it is better to install devices for them closer to the switchboard.
- Installation of a temperature regulator on the loggia. When you plan to install a thermostat on a loggia, you need to take into account the rated power of the device, which is indicated in the instructions. In this case, it is advisable to choose the installation site closer to the doorway, since the temperature in this place will be higher in winter. When the temperature sensor for the loggia is inside the room, it is important that it has access to it when it is necessary to replace the sensor.
- Installation of the thermostat in a junction box, on a wall or in an electrical panel. Almost all thermostats are designed to be installed in a socket box. It itself can be located in the wall or installed on its surface. External installation, as a rule, is used when arranging the system on balconies and loggias.
Installation
Instructions for self-installation of the thermostat can be found on the Internet
It is best to have an electrician install the thermostat. If you decide to do the installation yourself, you need to carefully study the instructions that come with the device.
Often a connection diagram is sketched on the body of the device. The connection is the same, regardless of whether cable or infrared floor heating. For a water heating system, it is possible to connect a sensor, but it will regulate the heating temperature of the entire system.
Preparatory work
Install sensors near a power outlet
First, we prepare the place for installing the temperature controller. It is advisable that an outlet is located nearby, as this will facilitate the process of supplying electricity. The standard height for placing the device at a distance of 600 mm to 1 m from the floor.
Make a hole in the wall to match the size of the thermostat housing. Overhead sensors are available that are fixed on the wall, but they look less aesthetically pleasing.
Then we cut from the location of the box to the floor a hole for laying the cable.
Installing sensors
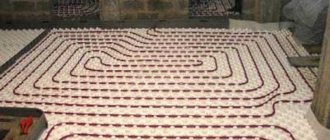
The operation of underfloor heating heating elements is controlled using floor or air temperature sensors. The corrugated pipe with the floor temperature sensor is closed with a plug to prevent the ingress of cement mortar. It is installed between heating elements at a distance of up to 1 m from the heating controller. For installation details, see this video:
The thermostat is purchased complete with a temperature sensor.
Thermostat connection
Connection is carried out in the same way for both cable and infrared underfloor heating. We connect the thermostat according to the diagram.
We find a cable with a phase of black or brown color, we check the voltage with a tester. The null cable is usually blue. The difference between it and the phase is 220 V. We connect the cables to the device.
Wire marking:
- L-phase of brown, black, white;
- N – zero in blue;
- The ground cable is usually green, yellow, or a combination of these shades.
Connection diagram:
- We connect a phase to socket No. 1.
- We connect a zero cable to contact No. 2.
- We connect the heating wire to contacts No. 3, 4.
- We lead zero to nest No. 3, and phase to No. 4.
- Through contacts No. 6, 7 we bring the temperature control sensor without observing the polarity.
Now you can connect the floor thermostat, we put it in a corrugated pipe to protect it from damage so that it adequately transfers heating data. We connect the cables of the temperature sensor to the thermostat.
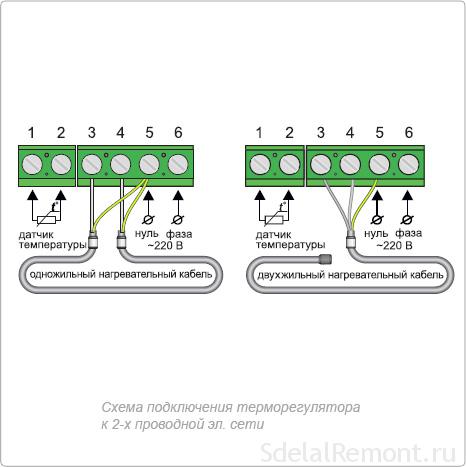
Single core heating cable connection
Two wires run under the insulation of a single-core cable. The first conducts current (white), the second performs the function of grounding (green). For more information on connecting cables, see this helpful video:
Single-core cable connection diagram:
- We supply a conductive wire to contacts No. 3, 4.
- We connect a grounding cable to contact No. 5.
At the design stage, when drawing up a layout for the heating elements, it must be taken into account that a single-core heating cable is connected to the thermostat from both ends.
Connecting a two-core heating cable
When connecting, you need a terminal for the grounding cable. If not included, you will need to purchase it separately.
Arrangement of two-core and single-core cables
Two conductive wires and one earthing wire run under the insulation of a two-core cable.
Two-core cable connection diagram:
- Connect the brown wire with a phase to contact No. 3.
- Connect the zero blue wire to socket No. 4.
- Connect the green ground wire to pin 5.
A two-wire cable is easier to connect as it does not require a connection at both ends.
Temperature control
Adjusting the floor temperature has its own characteristics, which depend on the type of underfloor heating construction installed in the house. It can be either a water heating system or an electric one. The latter type is a cable, which is laid under a floor covering, or special films equipped with a controller. This heating system is equipped with precise temperature controls. But the regulation of the water heating system is more difficult and expensive. A switch alone is not enough here: a whole range of valves and pumps are used. This heating system works in conjunction with radiators.
Heating system accessories
If both radiators and underfloor heating are used for heating, in this case it is necessary to set a comfortable temperature on the floor. It is necessary that the coolant that heats the floor has a temperature two times lower than that of batteries. Here the indicator will be 33-34 degrees. So how can you achieve the best result?
Attention! If you decide to install a water heated floor, but have never encountered such work, in this case it is better to seek help from professionals, because many pitfalls are noted during the installation of such a structure.
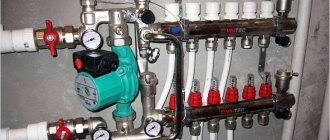
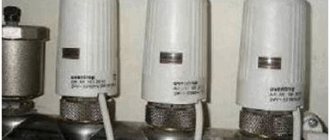
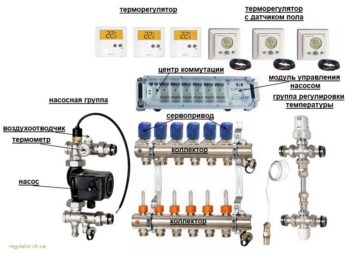
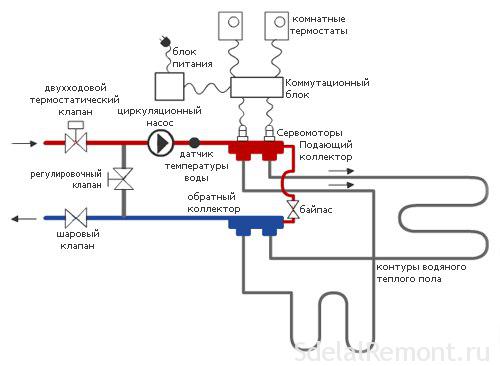
Several solutions are offered to increase or decrease the temperature of the water floor. One method is somewhat unconventional: when the installation of an overhead thermostat is performed directly on the return manifold, and the other is standard, the installation of an automatic pump-mixing group is performed. Let's take a closer look at both of these options.
The first method involves installing a thermostat on the return pipe. The thermostatic valve is designed in such a way that it quickly responds to changes in the temperature regime in the room, and when it is equipped with an immersion-type sensor, it also responds to changes in the temperature of the coolant that passes through the pipes. The thermostat is responsible for adjusting the installed valve, which regulates the flow of the coolant that passes through it and, therefore, the temperature. The main advantage of this method of regulation is the ease of installation and low price.
Thermostats
Second way. Here, a pump mixing group is responsible for temperature control, which works automatically. This includes a pump, valve and thermostat. The pump pumps water at the right pressure and speed. The valve regulates the temperature of the coolant (water) that flows inside the pipes. And the last element that supports the desired mode. Is a thermostat. These assemblies are of one design, which reduces installation time and simplifies the installation process.
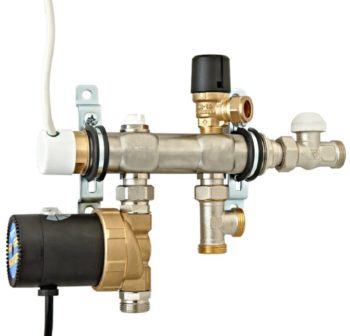
Mixing unit
System health check
We install the selected sensor with a thermostat into the case very carefully so as not to damage the component parts. We close the lid. We check the performance:
- We set the minimum heating temperature. You should hear a click when switching to the maximum floor heating temperature.
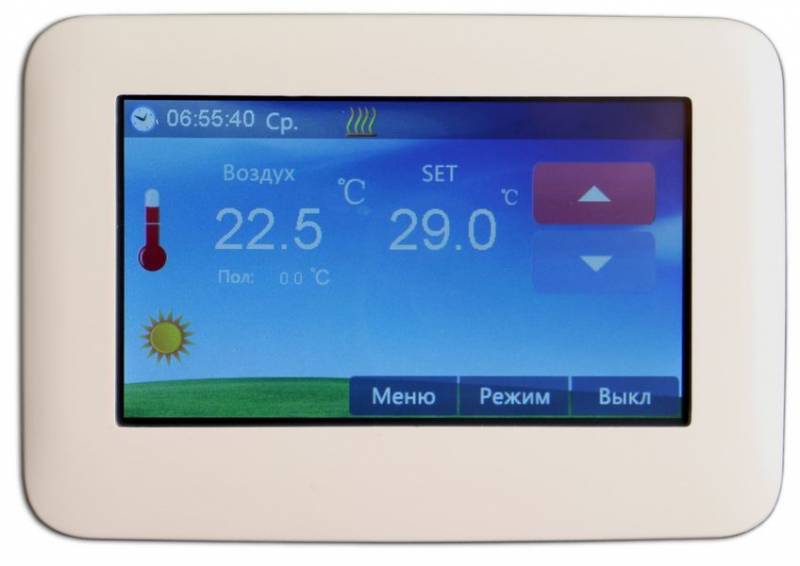
- On programmable underfloor heating with a thermostat, we set the time for turning on and off the system, set the temperature. During the day, we monitor the implementation of the specified program.
You can turn on the underfloor heating system only after the screed has completely dried.
Infrared floor heating is most often used for local heating. Cable electric and water floors are used as the main element of the heating system. When choosing heating elements and a sensor with a thermostat, you need to take into account the parameters of the heated room and the requirements for the functionality of the system.
dekormyhome.ru
Functions and advantages
Among all the possible functions of the thermostat operation, the most basic one can be distinguished - to maintain the temperature in the room at the required level. This is obtained by turning on or off the elements of underfloor heating. Thus, it further reduces energy consumption, since the power is switched on at regular intervals. If you use a thermostat for underfloor heating, heating costs are saved. Many will say that this device is worth a lot of money. This is true, especially when it comes to quality products. But it pays off within the first months of use. Everything will depend on the specific cost of the thermostat.
One more very important factor can also be attributed here, indicating a thermostat for a warm floor on the positive side. No overheating of the heaters will occur if the system is working correctly and without interruptions. This solution increases their useful life, and also prevents them from breaking at elevated temperatures.
The underfloor heating system can perfectly do without this device. In this case, everything should be done independently.Constantly monitor the temperature level, turn on the power and turn it off when a certain temperature is reached. This leads to a decrease to a minimum of a comfortable level, distraction from household chores and constant work, slightly increased energy consumption.
If you independently control the operation of the heated floor, very often burnout of the elements occurs due to the inopportune power off. It is not always possible to do this by the hour. Everyone can forget and there is no way to get rid of it. Therefore, it will be much more pleasant and easier to purchase a thermostat, install it according to the rules, and enjoy its work.
Varieties of devices
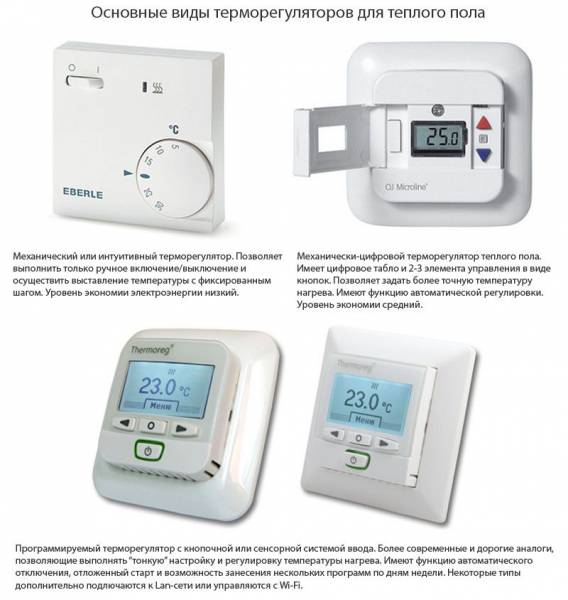
Manufacturers offer several types of regulators - mechanical and electronic, which in turn are:
- With power saving mode. Setting up a floor heating controller of this type reduces the supply of electricity during the absence of residents.
- With a timer. Temperature mode is regulated by time programming. The timer controls the intensity of heating during the specified period.
- With intelligent programming. Installation of a thermostat for a warm floor of the design in question implies automatic alternation of an economical mode with a heating one. The “smart” device calculates the time to “command” the heating elements.
- With limit sensor. The product is adjusted to the required temperature and regulates the heating process according to the specified values.
In terms of their available power, the products must correspond to the selected heating system. They should not exceed the values prescribed by the manufacturer in the instructions for use of the thermostat for underfloor heating. The maximum value is considered to be 3 kW.
The following devices are considered popular today: Nexans N-Comfort, ProfiTherm, Teplolux, mechanical Devireg and touch Castle. They are distinguished by democratic cost and high service life.
Features of thermostats of various types
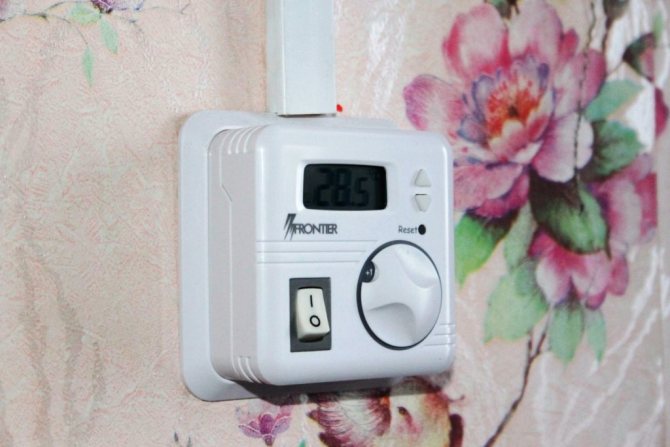
Mechanical type thermostat
- this is the simplest, but at the same time reliable execution - the simpler the mechanism, the less often it breaks down.
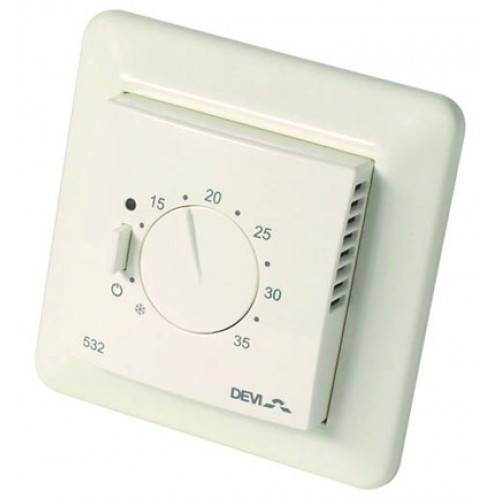
Mechanical thermostat from Devi
Has a limited number of functions and an affordable price. Due to the low economy, it is used for underfloor heating in small rooms, where only constant heating is sufficient. It makes no sense to dwell in detail.
Electronic thermostat
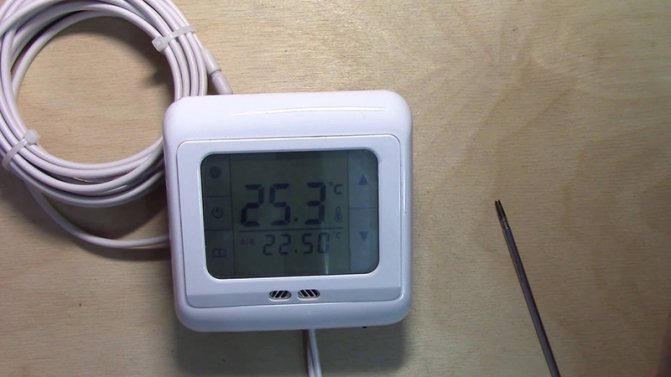
... The set of functions practically does not differ from the mechanical regulator, but there is a small addition - a display that shows the real temperature of the heated floor.
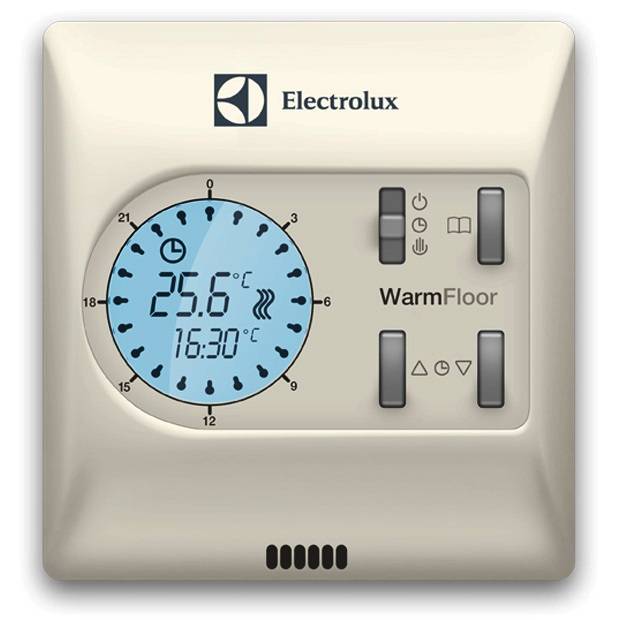
Example of an electronic thermostat
When saving on the purchase of a programmable regulator, it is relevant in kitchens where there is a prolonged contact of a person's feet with the surface of a warm floor
This is important, since maintaining a comfortable temperature for the feet (about 27 degrees) will help to avoid unwanted health effects. This type of regulator can also be attributed to the budget option.
Programmable thermostat
... Has a variety of functions. Its principle of operation (“plug and forget”) is very convenient. The regulator allows you to vary the floor temperature depending on the time frame (for example, at night and in the absence of people, there is no need for one hundred percent heating).
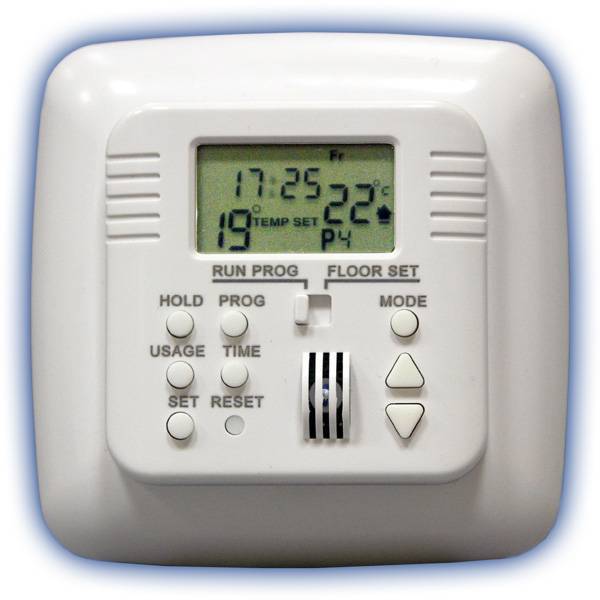
This model provides for customization by several parameters.
A programmable thermocontroller allows you to significantly save thermal energy, especially if large areas are involved for heating - living rooms, bedrooms, dining rooms, etc.
In addition, the described thermostat can control the temperature of the heating medium depending on changes in the air temperature in the room. This is necessary if the warm floor is the only source of heat flow in the room.But, at first glance, convenient regulation may be useless if the rules for installation and measurement of air temperature in a disadvantageous place are violated.
With such a configuration, a programmable-type thermostat is naturally much more expensive than the regulators described above, but it pays off quickly enough.
Programmable sensor-type thermostats
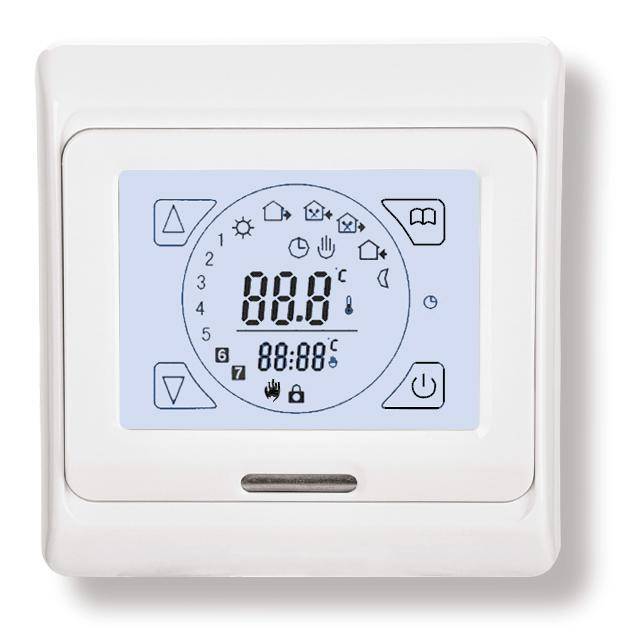
... Slightly different from conventional programmable ones. All the same set of functions, only with the addition of a touchscreen display on a liquid crystal basis (LCD display). They rather perform the function of a fashionable device than a practical necessity, which is reflected in their cost.
The touch-sensitive thermostat is a stylish thing, but expensive
In any version, the thermostat is very convenient for heating with a warm floor. If it is possible to apply this type of heating, then it makes no sense to save on regulator installation.
We will not consider the choice of a specific brand and manufacturer's company, you can familiarize yourself with them by following the appropriate links. We note only a universal rule: the maximum power of all thermostats must correspond to the effective power of the heating system. Failure to do so can lead to failure of the regulator or incorrect operation of the "warm floor" system as a whole.
How to assemble your own floor heating thermostat
If you have engineering skills, the installation of a floor heating thermostat can be done by hand. But it is important to remember that working with electricity requires the utmost seriousness and adherence to safety rules.
The design of a homemade device is extremely simple to perform:
- Housing for connection to shut-off valves or a heater,
- Sensor,
- Thermal reagent filled head
- Shutter valves.
At a certain temperature, the material in the head changes its properties and sets the heat carrier flap in motion. The products can be installed directly on the heater or in the boiler room and controlled by obtaining the temperature of the coolant passing through them.
How to install a thermostat for a warm floor: preparation
Before installing the product, it is necessary to study its parameters, the specifics of use and the installation technology recommended by the manufacturer. Experts recommend installing the control unit in close proximity to outlets.
The installation height of the underfloor heating thermostat should be from 60 cm to a meter and it must be quickly accessible. It is forbidden to decorate it, close it with curtains or move furniture.
Before carrying out any work on the thermostat, be sure to disconnect the power supply.
Connecting the thermostat to water heated floors
When using a water heated floor in operation, the thermostat is presented in the form of a device capable of controlling a servo drive. It regulates the supply of the heat carrier to the heating places. Their control can be not only manual, but also electronic. Here the sensor for the underfloor heating thermostat monitors the air temperature, not the floor temperature. Everything is connected with the high inertia of heating. The installation sequence is as follows:
- The height of the sensor is 1.0-1.2 meters from the floor level. It is even attached with a thermostat. At the same time, the wall itself, where the devices are fixed, should not be additionally heated by heating radiators.
- The sensor and thermostat power supply circuits are being installed.
- When an electrical version of the device is used, the necessary cable is laid.
- The radio-controlled sensor is configured in the desired mode.
- An external thermometer allows you to check the functionality of the entire system. The temperature is measured over several hours. During all this time, it should not deviate greatly from the average.

In the process of work, various materials for underfloor heating can be used, among which fittings for underfloor heating are distinguished. Disconnect the circuit breaker during installation for your own safety.
How to set up a thermostat for a warm floor
Electrical wires run to the junction box. The indicator detects a phase cable (black or brown), a cable with a working zero (blue), as well as a wire for grounding. The voltage between zero and phase should be 220 V.
Before installing the underfloor heating thermostat, a temperature sensor must be placed between it and the heating element and covered with a corrugated pipe that protects it from mechanical stress. The sensor wire is routed to the thermostat housing.
Experts strongly recommend following the instructions for the underfloor heating thermostat when connecting.
After the performed manipulations, the thermostat cover is installed in its place. Electricity is supplied to the device to check that it is installed correctly and is ready for use. It is necessary to set the desired temperature parameters and run the system for a day in test mode. Only after you make sure that there are no problems and that there is an uninterrupted supply of current to the device, you can start finishing.
Modern thermostats are electronic devices with a complex device, therefore, it would be more expedient to entrust the setting of the underfloor heating thermostat, after all, to qualified specialists. Errors made during installation and incorrectly selected modes can lead to failure of the entire system and damage the floor surface. For consultation, call the phone number listed on the website.
pol-hot.ru
Understand the power wires
Read the instructions for the power wires carefully.
First of all, you need to deal with the power wires that are connected to the installation box. According to Russian and international rules, the brown (black) wire must correspond to the phase, the blue (blue) working zero, and the yellow-green wire must not be used anywhere except for the purpose of protective grounding. However, it is imperative to make sure that the colors of the wires are in fact consistent with common practice. Using the indicator, you need to separate the phase wire, using a tester, check the voltage between zero and phase (should be 220 V).
The use of underfloor heating without a protective grounding device is prohibited. If grounding is not done in your house or apartment and you decide to install such a system, then you are at great risk.
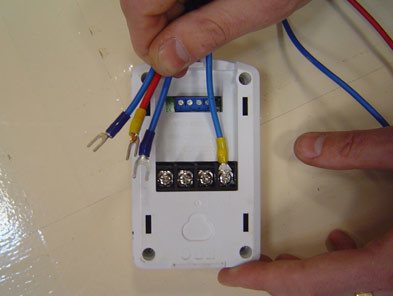
Bite off the heating cable wires and power wires so that they protrude from the installation box by about 4-5 cm, strip them. In this case, you must try not to damage the entire installation. For thermostats, where plug-in (screwless) wire fastening is used, the stripping length is indicated on the body. It is necessary to exclude the possibility of contact of stripped wires with each other. The braid of the heating cable and the protective earth wire must be connected to each other by soldering or a terminal.
Thermostat connection diagram.
Connect the wires to the device and be sure to check that they are connected correctly. The connection diagram can be found in the installation instructions and on the thermostat cover. Tighten the screws with a suitable slotted screwdriver. The phase wire of the power supply must be connected to the corresponding contact of the thermostat (usually it is indicated as L), and the neutral wire to the terminal (indicated by N). On some models of thermostats, one of the ends of the heating cable is connected to the second terminal (N). The temperature sensor must be connected to the terminals, which are usually designated as sensor. Make sure that the temperature sensor is located in the corrugated pipe and can be removed for replacement later.If the sensor has not yet been inserted into the pipe, you need to do this by checking the length of the sensor cable to the bend between the wall and the floor and the length to the heating zone where the tube ends, referring to the floor heating plan.
Installation of the thermostat: safety measures
Installation and connection diagram of the thermostat.
To avoid injury or damage to the electronic thermostat itself, carefully read and remember the following instructions.
Before starting the connection (disconnection) and installation (dismantling) of the device, it is necessary to disconnect the supply voltage, and also work in accordance with the "Rules for Electrical Installations". Do not connect the device to the network in a disassembled state. Do not expose the thermostat to extreme temperatures (below -5 and above +40 degrees).
Do not clean the thermostat with chemicals such as thinner and benzene. Do not store or use the device in dusty places. Do not attempt to repair or disassemble the device yourself. Do not exceed power and current limits. To protect against overvoltage caused by lightning discharges, lightning arresters must be used. It is impossible to connect the mains voltage of 220 V instead of the sensor, this will lead to the failure of the thermostat.
Briefly about the thermal sensor
The set includes a thermostat and a temperature sensor. The temperature sensor is installed using a plastic corrugated tube. The corrugated sensor is laid in the screed.
The new sensors have a programming function. Thanks to this function, the owner can adjust the temperature controller so that during his absence the warm floor will work in economic mode. At the same time, for a certain time before the arrival of the owners, the device switches to normal mode, thereby heating the room to the required temperature. Despite the fact that the cost of a programmable thermostat is more expensive than usual, it is better not to save on this, because it pays off in 2 seasons.
Installation of the underfloor heating regulator height from the floor.
But before carrying out the installation and connection, it is necessary to complete the preparatory construction work. First, grind the walls for laying the power cable from the panel to the junction box in which the thermostat will be mounted.
Subject to the installation of a warm floor in a bathroom or a bathroom, according to the rules, the thermostat should be in the next room, where there is no moisture and dampness. The installation height of the regulator is not less than 30 cm from the floor level.
After that, chase the wall down from the junction box, and drill a through hole into the bathroom. A cold end and a temperature sensor will be laid through it to connect to the thermostat.
Keep in mind that if you have made a sand screed very recently, then it should be given time to stand and set for 72 hours.
Using markers (chalk, pencil, colored tape) mark the areas where the heating mat will not fit. These areas include places where a bathtub, a toilet, various cabinets, a washing machine, etc. will be located.
In addition, it is imperative to take into account the indents from the walls (at least 5cm) and heating pipes or radiators (20cm). There will also be no warm floor in these places.
Before direct installation, determine the serviceability and integrity of all elements and the heating cable. To do this, you need to measure its resistance with a multimeter. Check the Ohm parameters on the package or label. It is usually attached to the cold end.
The measured resistance should correspond, or at least not differ much (up to 10%), from the data indicated there.
However, remember that with a tester, you are actually testing the integrity of the heating core, but not the insulation resistance.Most electricians, it is he who is considered the most important parameter, on the basis of which it is possible to give a confident guarantee of the performance of warm floors.
It often happens that the multimeter showed “everything is fine,” but the diffautomat in the dashboard knocks out for some reason. This indicates poor insulation and the presence of a leakage current. To measure the insulation resistance, it is necessary to use a megohmmeter with a voltage of at least 500 volts.
The insulation is ringed between the 220V working conductors and the grounding conductor (if any) or braided shield. The readings for a new cable, as electricians say, should "go to infinity" or be the maximum possible for a measuring device.
Choosing a location for the temperature controller
Before connecting the underfloor heating thermostat, select a suitable installation location. If you choose the right place in which the device should stand, this will contribute not only to ease of use, but also the entire heating system will be able to work correctly. Therefore, when choosing a place to install the thermostat on the wall, it is important to consider the following points:
- Placement should be near the outlet.
- The most optimal height on the wall is from 1-1.5 m.
- If the device is located near the door, then you need to install it as follows: when opening the door to the right, the device is mounted on the left, and vice versa.
- The sensor is not installed near window openings, the further the better.
Preparatory work
It is imperative that before connecting the temperature controller, you should pay attention to the instructions that come with it. Particularly noteworthy is the point that specifically refers to the installation of the sensor, and the procedure for carrying out this work, because these processes differ from manufacturer to manufacturer.
First you need to remove the front panel, carefully disassemble the control mechanism, on simple models it is in the form of a wheel. To remove it with a screwdriver, you need to pry the element, and then unscrew the screw that secures the front panel to the mechanism itself. Other models have special plastic latches that hold the bezel in place. To remove, it is enough to tighten the latches with a screwdriver, and it will snap off.
However, if it is not possible to remove the panel, then it should not be removed by mechanical force. After all, in this way you can easily break the latches, and to solve such a problem, you just have to buy a new regulator. To avoid this problem, you just need to carefully study the instructions and try to remove the panel again, but in the correct sequence.
The next step is to purchase accessories for installing a floor heating thermostat. The first thing you need to have is a corrugated pipe. Usually it comes with a sensor, but if the manufacturer does not provide such a kit, then you need to buy it separately. The ideal corrugation diameter is 16mm. In order to determine the required length of the corrugation, it is necessary to determine at what height the temperature regulator will be installed, and at what distance from the wall the temperature sensor will stand. Further, from the indicated height using a tape measure, you need to measure the length to the sensor, which will be in the floor.
You will also need the following accessories:
- fastening screws;
- screwdriver;
- mounting box (socket);
- indicator screwdriver, which can determine the presence of voltage in the network;
- level.
samelectrik.ru
Thermostat: where and how to place
First of all, before installing a warm floor, you need to determine the place to place the thermostat. Experts do not recommend installing it inside the bathroom, since the protective level of the device (IP 21) does not provide reliable, stable and long-term operation in conditions of excessive humidity. It is best to allocate space in the corridor or other adjoining room.As for the sensor that records the level of heating of the floor surface, it must certainly stand inside the bathing room.
When the location of the thermostat is selected, a neat hole must be made in the wall at the level of the intended installation and a corrugated tube must be brought out through it, into which the floor temperature sensor will subsequently be installed.
When installing a corrugated tube, it is necessary to observe the ratio of its bending radius to the horizontal level of the floor surface. It is extremely important that this figure is at least 5 centimeters, and the tube itself has no more than one bend. This will help carry out in-line repair work without opening the tiled covering. For example, in the event that the sensor suddenly begins to pound and requires replacement. It is recommended to close the end hole of the corrugated tube with a reliable and tight plug, which will protect the interior from the penetration of cement mortar or water, which can have a negative effect on the temperature sensor and even disable it.
Connection to electric underfloor heating
Before starting work on the installation of the thermostat, you should competently and correctly arrange the electric floor heating itself. For this, all the preparatory measures are carried out, a heating cable or infrared film is laid. After that, the selected floor screed is made, after which the floor covering or other finishing surface is laid. Only then can you begin to set up and connect a thermostat for a warm floor strictly according to the points:
- The location of the device in the room is determined. It must be necessarily connected to an electrical network with a voltage of 220V AC.
- The location of the underfloor heating temperature sensor is selected. Usually they choose a place close to the thermostat itself. In this case, there should not be any furniture located nearby. In a slightly different way, the sensor is fixed from the infrared floors - from the wrong side of the film, after which it is connected to the wiring that goes to the thermostat.
- Cable underfloor heating is filled with a screed. Therefore, it is worth worrying about the heat sensor, which is placed in the corrugated pipe. Concrete should not get into it, under any circumstances. Subsequently, the pipe is brought out to the wall, where the main device is installed. The regulator is installed only after the floor screed has been completed.
- In necessary cases, a magnetic starter is used if the power of the contacts of the heat regulation system is less than the power of the infrared floor or the heating cable used. Otherwise, a direct connection is used.
- During installation, the phasing should be strictly observed. For this, there are wire colors: brown, black or white wires are selected for the phase, the neutral wire remains blue. Otherwise, it is better to use an indicator screwdriver.
How many thermostats to use
Often, customers install underfloor heating at the same time in the bathhouse and toilet and are interested in whether it is possible to save money and connect both systems to one thermostatic device and if it makes sense to do so.
Let's say frankly that this can be done, but it is not recommended, especially in cases where heated floors are placed in rooms with polarly different temperature regimes. In this situation, the sensor will record the temperature level of only one room and, based on this data, will heat both the toilet and the bath. As a result, the client will inevitably face the fact that the floor will be too warm in one room, and too cold in the other. The heating temperature will depend entirely on the location of the sensor. If it is in a cool room, overheating will inevitably occur, and if it is in a hot room, it will be subcooled.
Connecting two systems to a single thermostat is considered correct and completely permissible only if approximately the same temperature regime is observed in both rooms. However, here too there are some nuances and requirements for the location of the thermostat. It would be most correct to put it in a room with the maximum heat loss and the lowest temperature at the floor surface. A special device called a pyrometer will help to determine these parameters.
In addition, consumers should take into account the fact that by placing a single thermostat for two rooms, they will lose the ability to turn off heating systems separately and will not be able to independently regulate the temperature level in the rooms. This will introduce a number of inconveniences in the operation process and entail additional consumption of electricity and, as a result, an increase in the volume of utility bills.
Views
There are many indicators by which a thermostat for a warm floor can be classified. This can be the type and type of sensor, indoor location, etc. The basic principle of all that is possible is the principle of action. According to it, devices are divided into the following:
- Electronic (digital). It is the same as in the principle of work with the electronic-mechanical version, but has the main difference - the way in which the temperature in the sensor is set. It does not use a wheel to change indicators, but there are touch devices and corresponding buttons. Additional information is displayed on the display, which can have various parameters.
- Electronic and mechanical. The work is the same on the principle of the iron. No specific temperature is specified here. But when the maximum temperature is reached, the thermostat turns off and turns on again when the system cools down. It will be enough to drop the air temperature by a few degrees for the work to resume and the power to be turned on. To raise the limit indicators or lower them, they are guided by their own intuition. When the room is hot, the wheel is directed in one direction, when it is cold - in the opposite direction. This device has its main advantages, which are that they have an acceptable cost, and besides, they are very easy to install and handle during operation.
- Programmable. These thermostats can even be called "smart". They are able not only to maintain the temperature, but also to enter a program to turn it on or off at a certain time, leave it in working order for a certain time, or turn it off, for example, at night. The possibilities will depend on the perfection of the device, the manufacturer and the cost.
The last version of the thermostat is not recommended for small premises. This is due to the fact that heating can be required at absolutely any moment and it happens instantly.

But this is only one of the classifications of the device. In addition, the following types of thermostats for underfloor heating can be distinguished:
- By power. The device will not be able to fully operate above the maximum permissible load. You should carefully study this item during purchase and before connecting. If necessary, they can be used in separate rooms to share the load. To prevent system overloads, a magnetic starter is additionally purchased, which creates a protective barrier in this direction.
- According to the installation option. When installing built-in thermostats, a hole is made in the wall. And overhead - a special box for installation is used, which is simply attached to the wall. A diagram is attached to each unit at the time of purchase. She should be guided during installation.
- System control with built-in or remote floor heating sensors.
- By the amount of functionality.
- In appearance, etc.