
Location of heating radiators
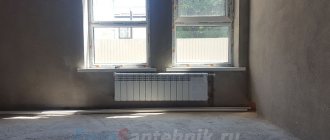
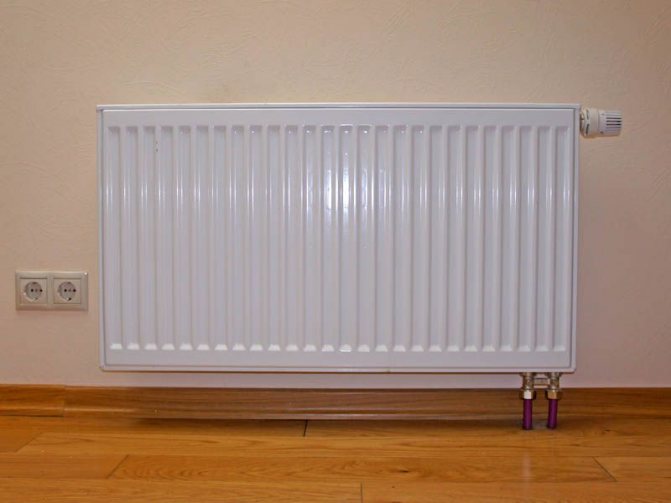
The radiator must be installed so that it works with 100% efficiency. The best installation option is under the window. The greatest heat loss in the house occurs through the windows. The location of the heating batteries under the window prevents heat loss and the appearance of condensation on the glass. For large windows, radiators with a height of 30 cm are used, or they are placed directly next to the window.
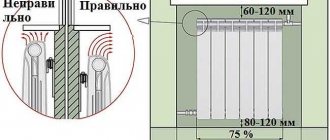
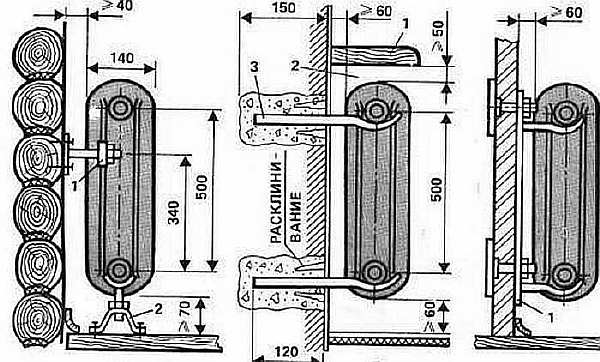
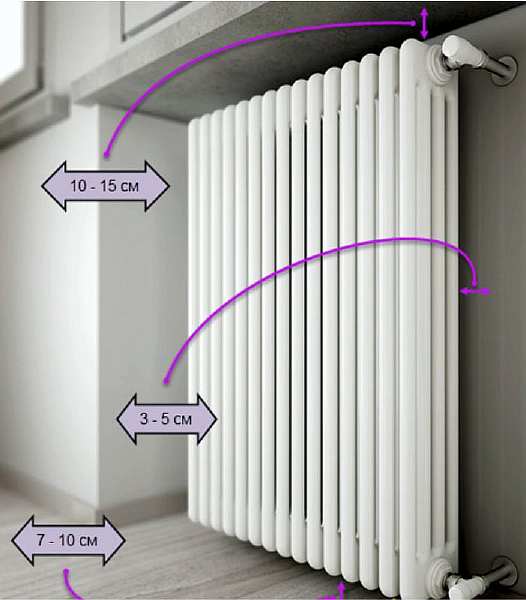
The recommended distance from the floor to the radiator is 5-10 cm, from the radiator to the window sill is 3-5 cm. From the wall to the back surface of the battery is 3-5 cm. wall and battery to a minimum (3 cm).
The radiator must be installed strictly at right angles, both horizontally and vertically - any deviation leads to air accumulation, which leads to corrosion of the radiator.

Installation rules for heating radiators in accordance with SNiP
SNiP 3.05.01-85 is a document according to which sections are installed for heating any room. It contains the following provisions:
- The batteries must be positioned so that the center of the window and the heating radiator is completely aligned. The permissible error is no more than 20 mm.
- The width of the heating battery itself, according to the rules, should not exceed 50% of the width of the window opening where the window sill is located in the living quarters. Batteries in schools, nursing homes, hospitals and kindergartens should occupy 75% of the skylight. This provision is regulated by clause 3.48 of SNiP 2.04.05-91 and clause 6.5.5 of SNiP 41-01-2003.
- When carrying out installation, it must be borne in mind that the distance from the floor surface to the lower point of the section should not be more than 12 cm.The gap between the top edge of the battery and the existing window sill is at least 5 cm.
- As for the distance that is provided from the wall to the radiator, it should be within 10-12 cm. Although the specified parameters can be changed, then it will be necessary to attach a special heat-shielding material between the wall and the radiator (mirror insulation or a shielding sheet made of aluminum foil ).
In the set of rules (SP 31.13330.2012) and norms, it is attested that more sections cannot be installed in U-shaped heating systems than were previously used. If a method of forced circulation of water directly in the heating system is provided, then with the number of 24 or more sections, it is necessary to use a versatile connection method.
See below for a helpful video on this topic.
Pipes in the heating system
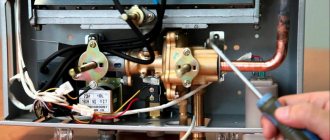
Advice for those who have central heating in their home. Typically, metal pipes are used for heating systems in apartment buildings.
If the riser pipe in the apartment is metal, you must not switch to polypropylene heating pipes!
In central heating, drops in coolant temperature and pressure often occur - apartment wiring and radiators will fail within a year.
Also, in no case use unreinforced polypropylene pipes - they are designed for operation for water supply and are destroyed at a coolant temperature of + 90 ° C.
Heating radiator fittings
In order for you to be comfortable during the heating season, you need to install thermostats on each radiator.So you can save money by shutting off the batteries in unused rooms and control the temperature in the house. You can purchase programmable thermostats - they will turn off / turn on the radiator, maintaining the required temperature.
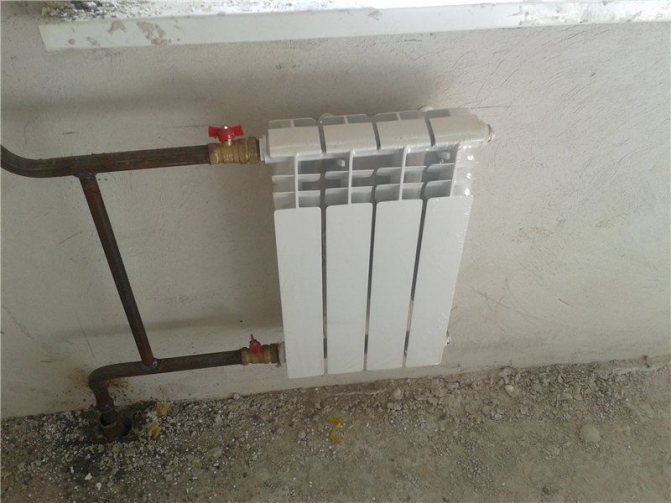
Installation of thermostats on each radiator is possible in a two-pipe heating system. In a one-pipe (in apartment buildings and high-rise buildings) system for thermoregulation, a jumper is installed in front of the battery - a bypass. A bypass is a pipe installed perpendicularly between supply and return. The bypass pipe must be of a smaller diameter than the pipes used in the distribution of the heating system.
Also, a Mayevsky valve is installed on the battery - a valve for venting air from the system. These elements simplify radiator control and repair.
Installation of technical pipelines and equipment
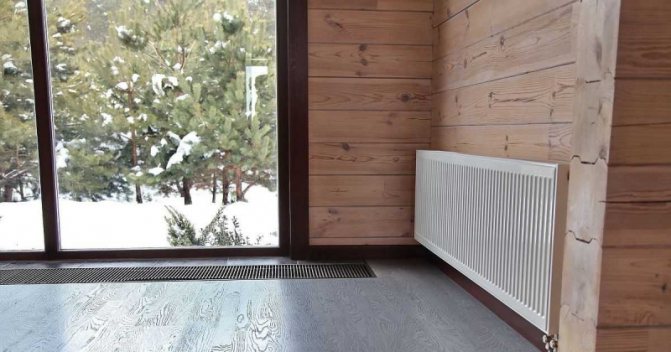
Recommendation. When installing the system, if the dimensions of the heating radiators in height and length allow them to be installed under the windows, then do just that. The battery under the window creates a kind of thermal curtain that restricts the movement of cold air flows from the side of the glass.
Heating installation
- At what height from the floor to install radiators is laid down when wiring the heating circuit, and it also depends on whether your circulation pump is embedded. If the system works without coercion, then, it is quite natural that there should be a slope along the pipes, which means that space must be left for the slope of the return pipe, if the system is two-pipe, or supply pipes, if it is one-pipe.
- In the "Leningrad" (one-pipe system for 3-4 radiators), the batteries are also located with a decrease, since in such cases a special outlet for the heater is not made - the circuit goes directly through them with the lower side connection.
- Different systems and installation mean that if you step back 10-15 cm from the floor, then the installation height of heating radiators according to SNiP 3.05.05-84 ("Technological equipment and pipelines") will be quite normal for any circuits... More precisely, the circuit itself should be mounted so that it is possible to comply with these parameters.
What are the contours
One-pipe connection diagram
By and large, there are two types of radiator circuits - one-pipe and two-pipe, and everything else is already a modification of the existing system, be it a mixed (warm floor - radiators) or collector heating system. In any of these cases, the instruction requires the use of either one or the other circuit, it is just that various additions are made there in the form of plumbing equipment in the form of three-way or four-way taps and combs.
If a one-pipe system is used, as in the upper schematic image, then the entire coolant is looped back in one pipe - it leaves the boiler for supply, and it also comes back, transporting already cooled water for heating.
On the way, radiators cut into it, and the type of connection here does not matter at all - under pillar, thermal or forced pressure, water, passing by the outlets, enters them and passes through the battery, returning back to the pipe.
The problem here is that the coolant, having passed through the heating device, already loses its previous temperature, therefore, further it goes already slightly cooled down, and the more devices in such a system, the colder they will be, moving away from the boiler.
Bypass connection
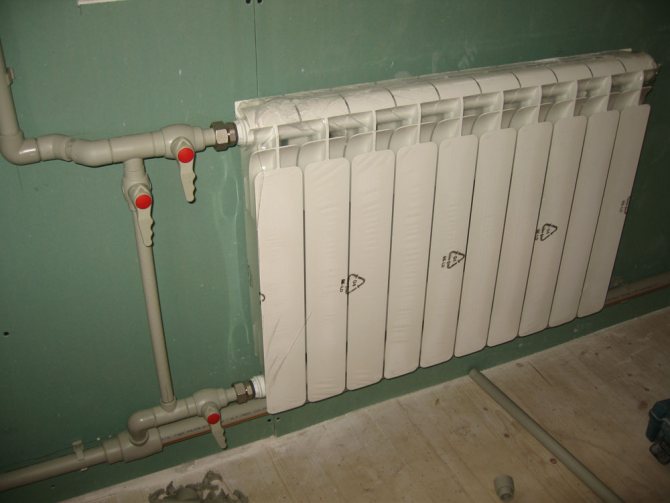
In order to be able to dismantle the radiator during the heating season without draining the water, a bypass is installed in front of it - this is a pipe that loops the system and is clearly visible in the top photo, and shut-off valves are placed in front of the battery itself.
In addition to helping with dismantling, the bypass also partially helps to maintain the temperature of the coolant, because water, passing through it, does not enter the radiator. But in multi-storey buildings this device is sometimes used incorrectly - they put a tap on it and shut it off, passing the entire flow through the radiator, therefore, those who live further get colder water.
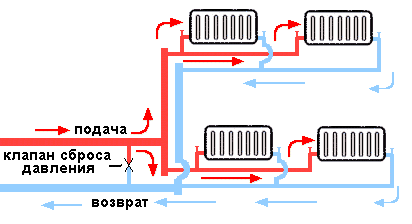
Two-pipe heating scheme
In a two-pipe system, there are no problems with cooling, more precisely, it is, but it depends only on the length of the pipe itself and, in general, it turns out so insignificant that they do not even pay attention to it - in centralized systems, the lines are protected by thermal insulation and there losses too are minimal.
The thing is that the hot coolant flows through the pipe to all radiators, but the cooled water that has passed through the battery does not return back, but is discharged into the return pipe, thus maintaining the initial temperature throughout the entire circuit, no matter how many points there are ...
But there is one nuance here - the price for installation and operation will be slightly higher, since, firstly, a second pipe is added and, secondly, you have to heat more water, and the parameters of the device do not matter, it may be the height of the heating radiators 250 mm or 1200 mm - it doesn't matter.
Note. If there is a need for joint connection of radiators and a warm floor system, then a two-pipe system is used, but a thermostatic three-way valve is installed in front of the water floor circuit, which redistributes the coolant depending on its temperature.
Installation rules
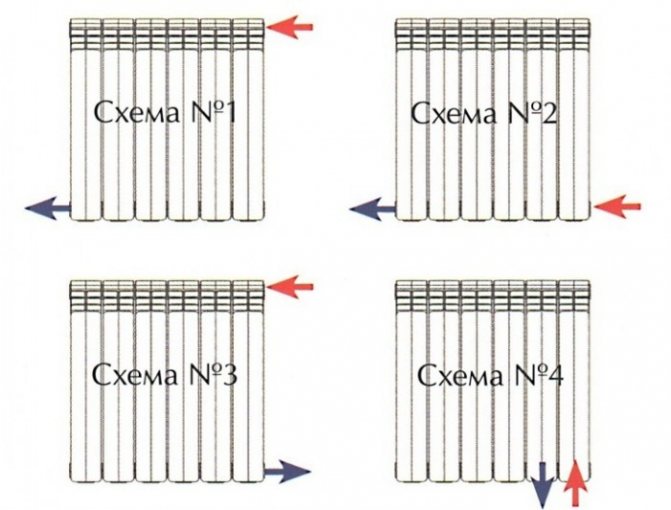
Connection options
All four radiator connection diagrams that you see in the upper image are applicable for both one-pipe and two-pipe heating systems - the method you will use depends more on the location of the circuit.
Nevertheless, in autonomous one-pipe heating systems, preference is given to either the bottom or bottom side connection, but this is simply due to the convenience of installation and nothing more. In addition, your choice may be influenced by the height of aluminum radiators (or from another metal) - as we already said, it all comes down to ergonomics.
Location under the window
If you have chosen heating radiators with a height of 800 mm, then in 99% of cases, they will not fit under the window, since you need to step back not only from the floor, but also from the window sill, at least 10 cm, therefore such heating devices are more often used as warm decorations on the walls.
Therefore, the most common height of bimetallic heating radiators is 600 mm - this way you will be able to maintain the distance both from the floor and to the window sill, although nothing prevents you from using devices with a height of 400 or 500 mm.
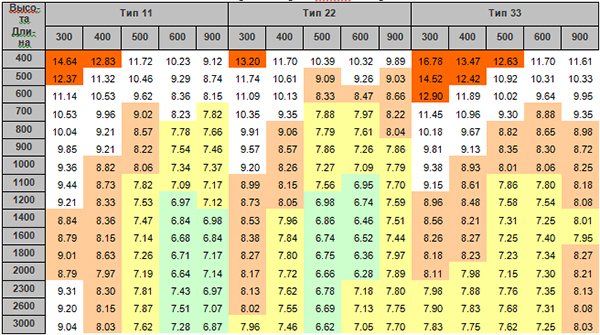
This table can be used to check the ratio of length and height.
In addition, when installing the heater under the window, you need to take into account not only at what height to hang the heating radiators, but also to retreat from the wall so that the gap is at least ¾ of the depth of the device - otherwise the heat transfer will be greatly underestimated.
And once again I would like to return to the height - if you succeed, then try to maintain 12 cm from the floor, but remember that if this distance is less than 10 cm or more than 15 cm, then again you will greatly underestimate the effect of heat transfer ..
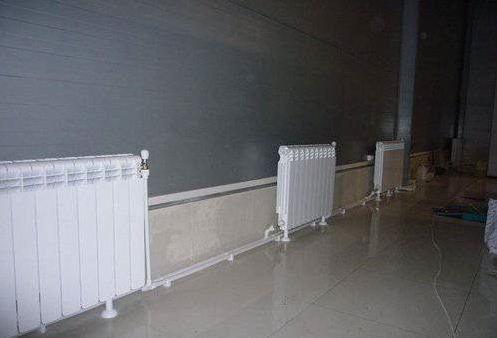
Floor standing installation
In the case when the installation does not take place under windows, for example, floor installation of devices, as in the top photo (here the height of the heating radiators is 400 mm), then at least 20 cm should be retreated from the wall.
Barriers for space heating
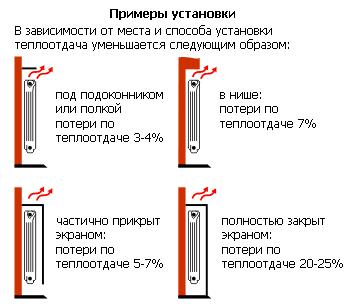
The effective heat transfer is also influenced by the barriers that we ourselves create.These include long curtains (70% heat loss), protruding window sills (10%) and decorative grilles. Blackout curtains to the floor prevent air circulation in the room - you simply heat the window and flowers on the windowsill. The same effect, but with lesser consequences, is created by a window sill that completely covers the top of the battery. The thick decorative screen (especially with the top panel) and the placement of the battery in the niche reduce the efficiency of the radiator by 20%.
The window sill plays not only an important role for the window, but can also have an impact when installing batteries, it should be taken into account when choosing curtains. We will consider all the features of choosing the correct height of the window sill from the floor and from the radiator. These installation dimensions are important for the heating system.
Features of installing radiators in an apartment
The considered rules for self-installation allow you to connect batteries in the conditions of autonomous and centralized heating systems.
Before replacing or installing batteries, it should be borne in mind that work must be carried out after obtaining permission from the operating or management company - the heating system is considered common property. A significant change in the characteristics of the network leads to an imbalance in the system.
Bypass installation
The installation of heating batteries in an apartment has one more feature. Vertical single-pipe wiring requires the installation of a bypass - a special jumper between the supply pipe and the return. In combination with ball valves, the bypass allows you to turn off the battery in case of an accident or other urgent need. At the same time, the system continues to function, as the heated water passes through the bypass.
A bypass is also required when installing a battery with a thermostat.
Product protrusion functions
The ledge of the sill can be different. There are practically invisible structures that do not stand out behind the window opening, there are also wide, powerful window sills on which you can sit. The structure is needed to retain heat in the house, it can serve as an additional support, for example, for installing flower pots.
The window sill should be chosen carefully, it should be suitable for the window structure, otherwise it may fail. Replacing a part without removing the glass unit is extremely problematic.
Primary requirements
The distance from the floor to the window sill may differ depending on the type of window. However, the GOST provides for the permissible coefficient at which heat is best retained in the room, and the indicator is 0.55 W / ° С × m². This means that in order to achieve the desired effect, you need to use a plate that will have a low thermal conductivity.
An important role is played by the distance of the radiator to the window sill: in that case, there is a SNiP, the main provisions of which require:
How do the gaps between the heating radiator and the wall affect
The designated set of rules for SNiP 2.04.05-91 is not just the approved parameters for installing a heating battery. Fixed numbers help reduce unexpected heating costs, for example in an apartment building.
The rationale for compliance with the standards is considered that the outer walls of residential buildings are in constant contact with the environment.
Depending on the outside air temperature, the building can cool down significantly. For example, most high-rise buildings are built of concrete, which, due to its physical characteristics, does not allow keeping warm inside the building.
It follows from this that if the heating battery is attached directly to the inner wall of the supporting structure, then most of the heat will be directed to it, and not to heating the air. By making a small distance from the wall to the radiator, a kind of air insulation is created, thereby reducing unnecessary costs.According to this principle, it is necessary to mount all devices in the room.
Height calculation
The distance between the radiator and the window sill must be at least 10 cm, regardless of what type of heater is used. The height of the battery itself must also be taken into account. Behind it is necessary to retreat 8 cm.The battery itself should rise 10 cm above the floor, that is, when installing the window sill from the floor according to SNIP, you will need to retreat 70-80 cm.
An important role is played by what the ledge of the windowsill will be.
: it may move away from the wall significantly or be invisible. If there is no radiator under the window, it is not necessary to comply with any requirements, but if heating is present, the protrusion must be strictly regulated. The task of the window sill is to redirect heat flows. Without it, they will rise up, and proper heating of the room will not occur, since some of the heat will evaporate and be distributed on the ceiling.
Poor convection can also be caused by a window sill that is too wide. It will not allow warm air to escape, as a result, condensation will begin to accumulate on the window, since the main air flows will go up, and some of them will get stuck under the window, heating the atmosphere. In this case, it is very important to calculate the distance from the window sill to the heating radiator, both in height and how much it is possible to make a protrusion. You can avoid the problem described above by using a slab that does not extend beyond the wall by more than 8 cm.
Advice:
when calculating the dimensions, you need to take into account the level of the wall with decoration.
The best option is a solution in which no more than 10% of warm air will be retained in the window niche. For this, the window sill should not protrude beyond the battery by more than 6 cm, but it should not be shorter than the heater. If the design solution of the room requires the installation of non-standard wide structures, ventilation holes must be provided in them. They must be large enough for proper air circulation.
Do you need a gap?
Some window owners believe that the sill goes deep under the window frame, but this is not the case. The distance between the window and the sill is about 10 mm. Otherwise, the structure may deform. The fact is that under the influence of warm air, the material from which the plate is made expands. A gap is left so that the structure can take the desired shape without being damaged. Visually, this technique is invisible.
How to position the curtain?
The distance of the sill curtain also plays a role. In order for the curtains to move without clinging, there were no traces left on them, and warm air could circulate freely, the distance should be at least 5 cm.
Conclusion: it is not always possible to apply the standard distance from the floor, radiator, curtains to the window sill, but you can find a way out by observing certain requirements.
The installation of heating devices in private houses in many cases is done by hand, but not all developers know what distance between the wall and the radiator is considered the most optimal. The heat output of the battery will actually depend on this indicator, therefore, in the course of work, close attention should be paid to this.
How to find batteries for your room
The heating system is a complex structure, therefore, as a whole, and its individual elements, such as heating radiators and pipes, require correct installation and appropriate selection of a product suitable for a particular room.
Regarding the radiator, there are recommendations for laying pipelines, the height of the radiators (observing the distance from the floor) and their correct location.
As a rule, radiators are installed in places of greatest heat loss.
As for the choice of the location for the installation of radiators, then, as a rule, these are the places with the greatest heat loss.In almost all houses or apartments, such places are windows and doors, regardless of the use of new technologies. It is not always possible to install a radiator above the door, so they are often mounted under windows.
So that the wall under the window does not become damp, and warm air is evenly distributed over the lower part of the room, and then rises up, it is necessary that the dimensions of the heating radiator make up 70-75% of the window in this room.
A small heater will not produce significant heat dissipation, and there will not be enough heating in the room.
Radiator installation rules
For heaters, not only is the size a reference requirement, but there are a number of other recommendations that should be followed both when choosing a heating element and when performing installation work.
These requirements include:
- the heating device must be installed strictly in the middle of the window, equally equidistant from the edges;
- the installation height of radiators from the floor should not exceed 15 cm, otherwise cold zones will form above the floor, and if the heater is lowered below 8-10 cm from the floor, then cleaning under such a device will be problematic;
- radiators should stand at a distance of 12-18 cm from the window sill; if the device is placed closer, then there may be a loss of heater power due to the influx of cold air from the window opening;
- the distance from the back of the device to the wall covering should be 3-7 cm, this is necessary for correct air convection.
It should be remembered that if the radiator is as close to the wall as possible, then the gap will be a "dust collector", and besides, the device during the heating period can not only spoil the outer wall decoration (wallpaper), but also destroy the wall structure - a plasterboard.
If the indent is correct
When the heating appliance is in close proximity to a wall, a significant part of the heat radiation is absorbed. Therefore, experts began to think about how far from the wall to hang the radiator in order to improve the efficiency of heating the room.
With an increase in the gap, heat loss decreases, since the side surface heats up less. However, too much indentation will necessarily affect the aesthetic characteristics.
Taking into account the above circumstances, it is recommended to leave a space within 3-5 cm.
- With such a distance, the heat output of heating devices is significantly improved.
- Such a gap makes it possible to clean behind the radiators in a comfortable environment.
- The space from 3 to 5 cm allows you to save usable space without disturbing the aesthetic perception of the structures.
- The radiator of the home heating system will work as efficiently as possible if there is a gap of at least 7 cm from the floor. Thanks to this gap, cleaning the lower part of the room is also easier.
- It is recommended to leave at least 10 cm of free space from the window sill to the appliance. Then the heat losses will be minimal, which means that it will be possible to save on heating the dwelling.
- If the walls of the building are made of materials with a small margin of safety, then it is advisable to install the batteries on the floor using special brackets.
- For maximum efficiency, use a diagonal circuit when connecting to a common system. With this option, the inlet pipeline is connected to the upper part, and the outlet pipeline to the lower one.
- It is not recommended to use decorative screens for heating devices if the level of heat loss of the building is very high. It is also necessary to avoid the device of hidden eyeliner.
- Reflective insulation should not be fixed with small staples or nails, so as not to violate the integrity of the canvas. It is best to use a variety of adhesives that have reliable adhesion to the surface.
- When installing brackets and hooks on a concrete base, anchor plugs must be used. The elements of the system can be mounted to walls and floors made of wood using self-tapping screws.
- If necessary, sections are built up before installation. In this case, a heatsink key is used to connect the modules. There is always a gasket between the component parts.
- Docking of radiators with polypropylene pipelines is carried out with preliminary installation of the coupling. Conductive elements are inserted into it and fixed by soldering.
Ensuring a comfortable temperature for people living in a private house or apartment in winter is a priority task for every owner. When organizing individual heating or heat supply in an apartment building, all elements are important, starting with what should be the distance from the floor to the heating radiator, and ending with the fluid pressure in the system. Before starting work, you should study the building codes and regulations (SNiP) concerning the organization of heat supply, and also find out at what distance experts recommend hanging the heater.
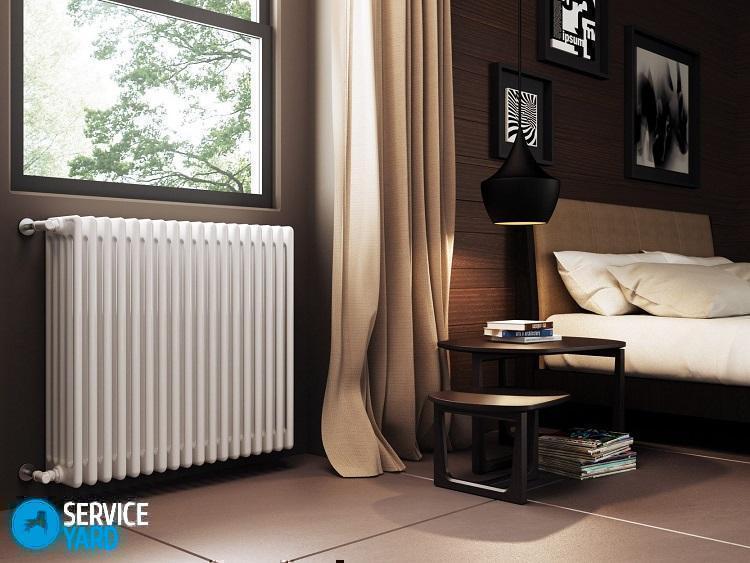
In the living room
Standards
SNiP standards are advisory in nature, but when replacing batteries in an apartment of an apartment building with a central heating system, their implementation is mandatory. This is due to the fact that when designing the house, all the conditions for its further maintenance were taken into account and, among other things, economical heat supply.
According to established standards in a brick or panel house, the following is provided:
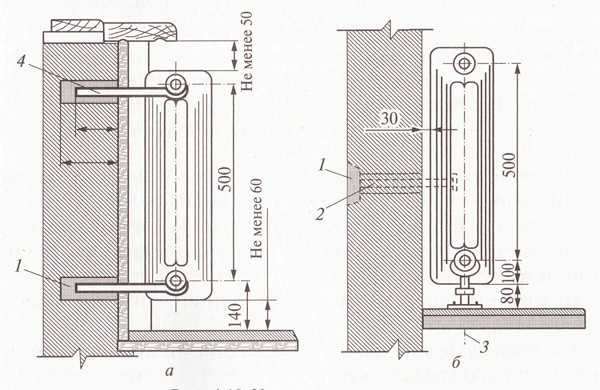
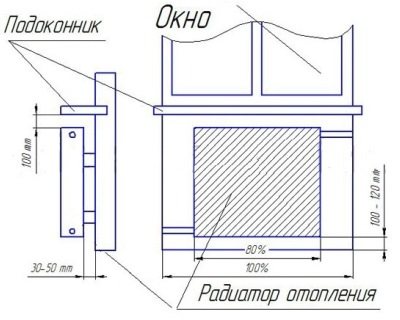
- The distance from the floor to the radiator or radiator should be within 80–140 mm. A lower installation height will make it impossible to carry out wet cleaning under the device, provoke the accumulation of dust undesirable for human health, a large installation will reduce the useful heating zone.
- The distance between the battery and the windowsills should be 100–120 mm. If the distance from the radiator to the window sill is reduced, then the conversion of air masses will decrease and the efficiency of the radiator will decrease.
- Installation of heating radiators from the wall by more than 30-50 mm is not recommended due to the fact that, as in the previous case, the conversion decreases, as well as provokes the accumulation of dirt with minimal possibilities for its elimination.
It is necessary to hang the radiator above the floor exactly in the center of the window opening.
This will ensure the creation of a heat shield in the area of the glass filling of the window, while maintaining the aesthetic appearance of the room.
How to find the required distance
Many construction work carried out in residential premises is regulated by rules and building codes (SNiPs). There is a SNiP and for the installation of heating batteries.
From it it is possible not only to determine what distance between the radiator and the wall needs to be performed, but also other parameters of its installation:
- position the device under the windows so that the batteries and the centers of the opening coincide;
- the width of the heater should not be more than 70% of the width of the window sill, if any;
- the distance to the floor should not be more than 12 cm, to the windowsill - 5 cm;
- the distance to the wall is within 2-5 cm.
There are a couple of parameters affecting the selection of the optimal clearance. Much more often it is affected by the material of the walls of the house and the size of the window sills. In some rooms, it is possible to notice an unsightly picture, while the batteries substantially maintain its limits.
Note! A large reduction in the gap between the devices of the systems and the heating wall is facilitated by additional surface treatment of vertical structures with special heat-reflecting materials, the price of which is available. These include foil insulation or aluminum foil screens.
Connection diagrams
Several schemes for connecting radiators into a single thermal system have been developed and are used. They are represented by the following types:
- the maximum heat output occurs with lateral connection, which involves mounting the input in the upper sector of the battery, the output is at the bottom on the same side;
- with a significant size of the heat sink, a diagonal connection is considered the best option, where water enters through the upper branch pipe, and is removed from the lower one, from the opposite side;
- when installing hot water supply pipes hidden under the floor surface, a circuit with a bottom connection, popularly called "Leningradka", is used.
Bottom wiring
If the heat supply pipes are placed in a rough screed, then significant heat losses should be expected due to contact with concrete and the ceiling of the lower floor.
Types of heating batteries
The efficiency of heating the room will depend not only on how far from the floor to hang the battery or heating radiator, but also on the connection diagram, material and device of the heating devices themselves. The following models are on the market today:
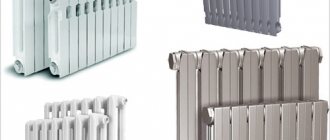
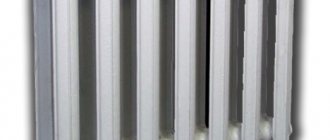
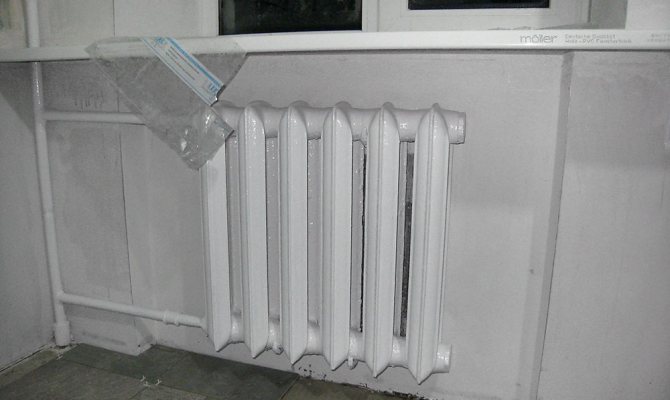
- Cast iron batteries. The adult generation probably knows them firsthand. During the Soviet Union, only these models were used in heating systems. Today they have a more presentable appearance. They are characterized by a high level of heat capacity, long-term heat release, lack of consequences during hydraulic shocks, and they also have an increased service life.
- Steel radiators. They have low heat transfer rates - heating occurs quickly, but they cool down no less quickly. The welded construction is sensitive to water hammer. There is no way to add sections yourself. At the same time, the weight of the product and the ease of installation attract many homeowners. The goods of the German trade mark "Kermi" are in special demand.
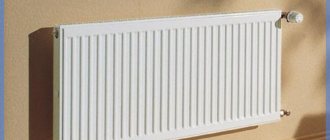
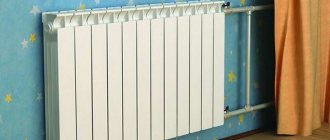
- Aluminum radiators. They are characterized by low weight, beautiful shape, and increased heat output. They are presented on the market in two versions, where in the first the structure consists of one monoblock, with a volume that provides different powers, in the second - a type-setting sectional.
- Bimetallic batteries. The innovative design of the placement of the heating collectors made it possible to achieve the level of heat transfer of aluminum models, as well as the strength and reliability of cast iron counterparts.
Minimum clearances
The purchased radiators must meet the GOST standards. Compliance is checked by reviewing the documents for the product in the store. Their absence may serve as a reason for refusing to purchase a product at this outlet.
Installation of radiators
Installation of all types of heating radiators is carried out using the same technology. The difference is represented only by the selected connection scheme and the need to purchase plugs of a larger diameter for cast-iron batteries than for other types, as well as to install an air vent on them, and not a Mayevsky crane.
In the bedroom
Tools and accessories
Installation of heating elements is accompanied by the use of the following:
- a set of locksmith tools;
- drill or hammer drill with a set of drills;
- hammer;
- screwdriver or screwdriver;
- accessories for measuring and marking;
- building level and corner.
Purchase the following components and accessories:
- Radiators with a set of brackets or holders.
- Mayevsky's cranes, which meet the requirements of GOST, are better than domestic or European production. Others can be difficult to attach to the radiator.
- Fasteners for fittings and pipes.
- Plugs, taking into account the installation of one Mayevsky crane per battery.
- Shut-off valves for prompt shutdown of a failed heating element from the system for replacement.
Under window
Installation of faucets with continuously variable heat regulation on each battery will significantly save energy consumption and create a comfortable atmosphere in rooms for different purposes. Cranes are either mechanical or electronic.
Premises preparation
Before starting the installation work, it is necessary to prepare the room. If you plan to connect according to the "Leningradka" scheme, you should dismantle the flooring in the rooms. In other cases, this is optional.
So that the furniture does not interfere with the dismantling of old heating elements and the installation of new radiators, it is removed to the center of the room. Prepare accessories for collecting water residues from removable batteries, as well as putting things in order at the place of their attachment.
DIY installation
After preparing the tool, accessories and premises, they begin to engage in installation. The works are performed in the following sequence:
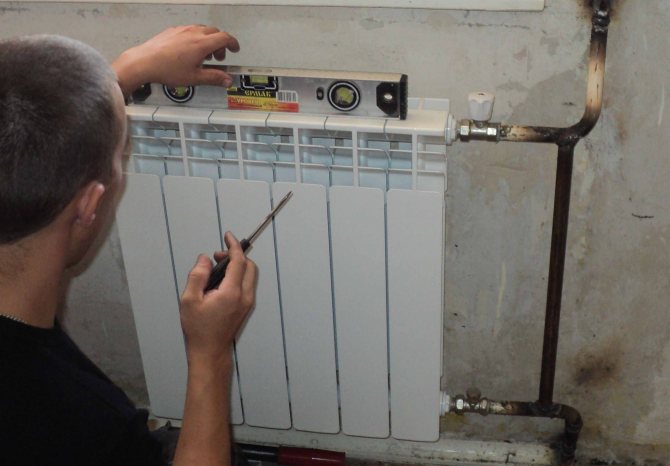
- Make a markup. To do this, use a building level and a tape measure. Measure the height of the heating element, add the distance of the radiator from the floor, make a mark on the wall. Using the level, draw a strictly horizontal line along the mark. The installation points of the holders retreat from this line and fix on the wall plane.
- Drills for dowels are made using an electric drill or hammer drill. Keeping the distance from the battery to the window sill, the holders are screwed in. Recheck the horizontal.
- Unpacking the radiator. The device is sold in a protective film. If the installation is carried out during the construction period, it is not recommended to remove it until the end of the work. Under circumstances when it is necessary, for example, to hang it in the kitchen instead of the old one, the film is removed before installation.
- Heating element layout. A mechanical or automatic air release device is being installed. It is screwed into a seat in one of the upper collectors, opposite the hot water input. Plugs are screwed onto unused outputs. If there is a difference in diameter, special adapters should be used.
- Ball valves are installed at the inlet and outlet. They provide the ability to dismantle an individual heating element without interrupting the operation of the entire system.
- After assembling all the components of the thermal element, it is carefully hung on the brackets. Check the accuracy of keeping the distances in accordance with the requirements of SNiP 2.04.05-91.
- Connect the inlet and outlet pipes. Their fixation depends on the type of connection used - threaded, by crimping or pressing.
Distance from the floor and wall in accordance with SNiP standards
At the first start-up of the battery, water is supplied under low pressure, ensuring smooth filling of the cavities.
Abrupt activation of the system can result in a water hammer that will damage the housing or destroy the inlet valves.