What is waterproofing
The main waterproofing zones of the shower stall
Waterproofing is understood as the protection of building structures from moisture ingress. Due to this, the service life is increased, the strength characteristics of the material are preserved. Water, not being able to get into the structure, bypassing ways reaches the holes leading to the sewer.
Before proceeding with waterproofing a shower without a tray, you will need to determine the wet areas. Most often they are called areas of special attention. It is in them that moisture usually penetrates. These include:
- very often during the shower, a lot of water gets on the floor;
- cockpit glass;
- areas between the floor and tiles;
- wall, or rather, its lower part;
- tiles next to the shower;
- risers and pipes, the surface of which collects condensate water vapor after using the shower;
- pipe tie-in points.
The zones listed above require their provision with waterproofing in order to avoid further unpleasant consequences after water gets into them.
How to waterproof your shower floor? - Builder's Journal
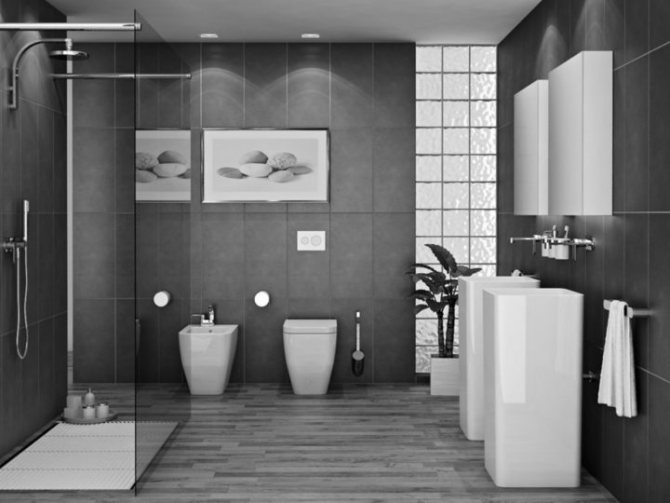
In the process of repairing a bathroom, a shower stall becomes a key element, which requires increased attention. Shower waterproofing is a necessary procedure to protect all surfaces from moisture penetration.
Thanks to the insulating layer, it is possible to prevent water from flowing down to the neighbors, destruction of the base of the device, the formation of fungi and dangerous microorganisms.
Moisture should be removed from the surface into the drain and not trapped in the field or between the porous material.
Where waterproofing is needed
First of all, you need to determine the areas that are most susceptible to moisture ingress, and, accordingly, are prone to destruction.
The most important areas:
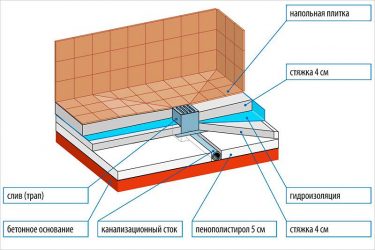
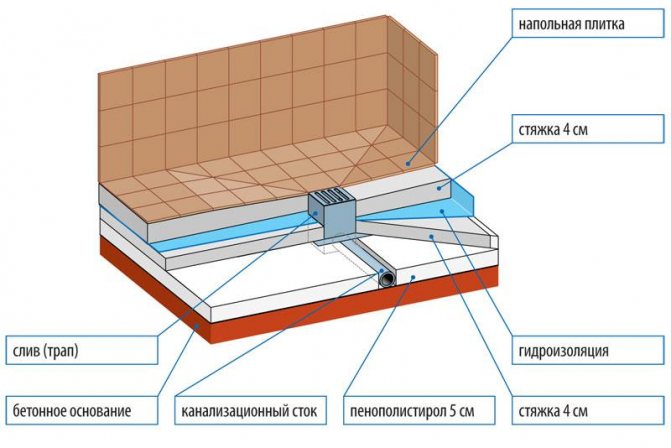
- Floor. In the case of using a pallet, the adjacent areas of the floor and the place under it are taken into account, and without the pallet, the entire surface is treated with waterproofing;
- The formed seams between the pallet, floor and wall;
- The wall, especially its lower part and places of active water ingress;
- Metal pipes and risers, on which condensation can form, falling on a horizontal surface;
- Joints between pipes, pallet and floor.
High-quality cab waterproofing implies taking into account each zone and preventing negative effects from moisture.
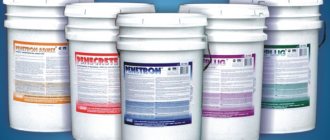
Material selection
Today, waterproofing under the shower can be of various types, since the choice of building materials is very large. For the most qualitative determination of a suitable material, it is necessary to carefully study the conditions of its use. It should be determined what lies at the base of the wall, for example, the tile withstands moisture well, but if it is improperly installed, water leaks into its gap.
Important! In simple cases, only one waterproofing material is used, but more often it is necessary to combine different types depending on the places of use.
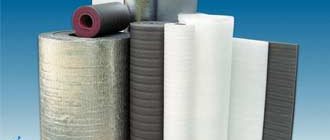
Insulation types:
- coating - these are wet materials that solidify and prevent moisture from entering;
- elastic - soft coating with easy application;
- penetrating - liquid insulation that penetrates into the surface and prevents moisture absorption;
- polymer-cement waterproofing is used as a base for the formation of a pallet or other covering;
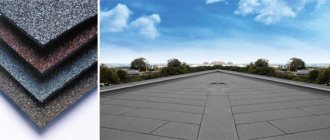
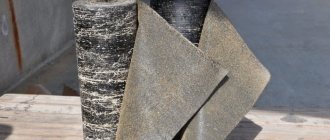
- roll is the oldest and most reliable insulation method.
The roll-to-roll technique involves the use of rolls of materials that are unrolled and stacked on top of a rigid base.Glass mat or bitumen with polymerization is mainly used.
Materials are guided, when special glue is used for fixing, and self-adhesive, which require the use of a gas burner for application.
The advantage of the technique is its low price, the disadvantage is a short period of use.
Today, a more practical technique is found - coating insulation, when mastic is used as waterproofing, mainly from bitumen with the addition of polymer or rubber. High indicators of elasticity, high-quality level of adhesion and long service life are the advantages of the technique. However, simple installation also contributes to the popularity of the technique.
Polymer-cement compositions are a mixture that has to be diluted with water, it is used to cover plaster walls.
It is often used when installing underfloor heating and to create a layer in "wet areas".
Waterproofing without a tile pallet often uses this method, since the elasticity and bulk allows quick installation.
It will be interesting: Choosing a large bathtub, taking into account the material and shape
Penetrating materials saturate the substrate and repel water from the material, creating a protective surface layer. When the mastic dries, the layer becomes more durable and waterproof. In practice, Ceresit CL 51, Grida HydroMEB Acryl and Knauf Flähendicht have proven themselves well.
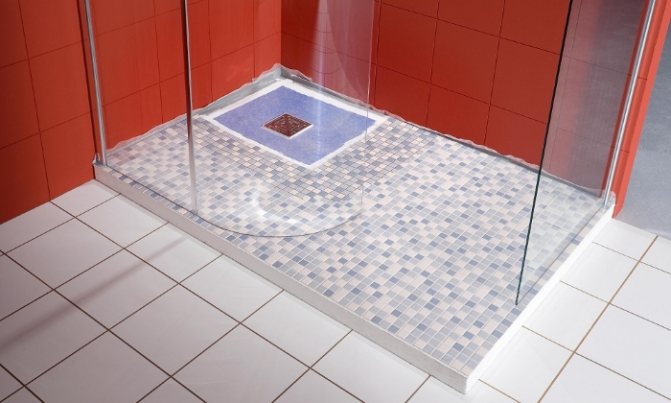
Waterproofing shower cubicle with tray
A tray is a bowl that collects and retains water in a shower stall. Thanks to the use of a pallet, it is possible to easily provide waterproofing and install a supply to the sewer. The use of this bowl is mandatory in an apartment building, since the other methods are extremely difficult to use.
Choosing materials
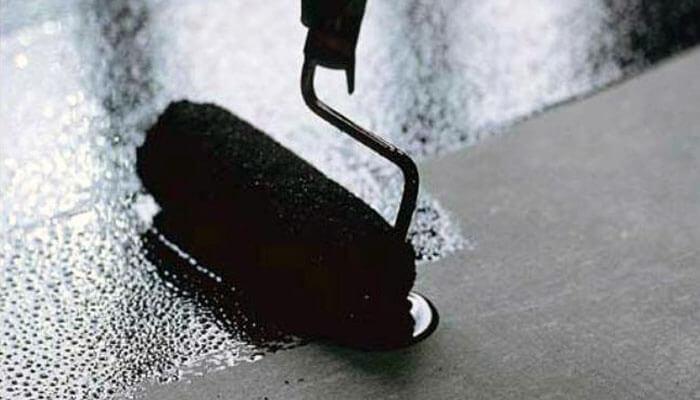
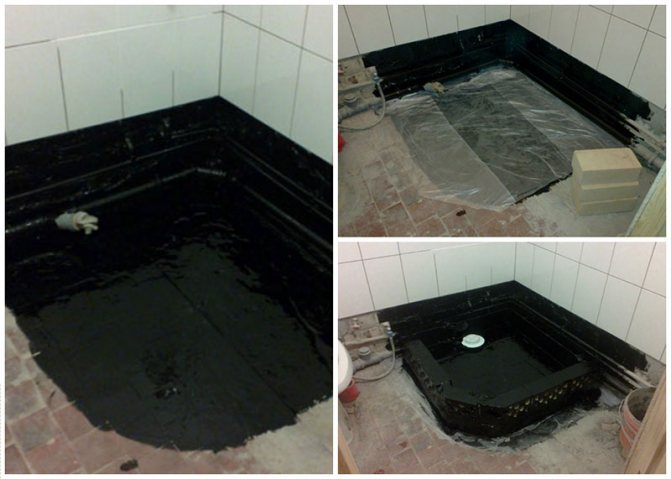
Bituminous coating waterproofing
The determination of the material for waterproofing a shower stall without a pallet depends on what the surfaces of the walls and floors in the room are made of. Also, the design is of no small importance. Most often, one type of material is suitable to provide waterproofing, only occasionally they resort to using the complex.
There are several groups of waterproofing materials:
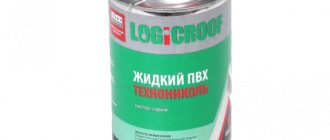
- Coating. One of the modern options, bituminous mastics are used. Sometimes this type is called liquid rubber and the main advantage is elasticity, which will allow the material to fit without any irregularities. In addition, bituminous mastic has good adhesion, due to which a long service life is achieved. Many workers put a cement screed on top of the mastic during moisture isolation with coating materials.
- Penetrating type. Most often they are made from various polymers. Due to their composition, they provide good protection. Also, the effect is achieved due to the deep penetration of the elements into the structure of the shower stall, thereby increasing the water resistance indicators.
- Roll. The process is carried out through the combined use of reinforced polyester and polymers. Sometimes the first material is replaced with bitumen fiberglass. The final version can be self-adhesive or weldable. In the first case, there is no need to use any tools or devices to ensure fasteners and work of the material. The second involves the use of a burner. Roll materials require responsible use and set certain requirements. For example, the unevenness of the roll should not be more than 2 mm when waterproofing a shower cabin without a pallet.
- Polymer-cement compositions. Sold as dry powder. For use, it must be diluted with water. Only walls or floors can be insulated with this mixture.It is not necessary to do the screed, since the material has a high degree of elasticity.
Sometimes elastic waterproofing materials are distinguished as a separate group.
Necessary materials
In order to carry out work on the construction of a floor for a shower stall, not only certain materials will be required, but also some skills and accuracy.
A room with high humidity requires a special approach to installation, since the slightest neglect threatens with a lot of trouble for residents and neighbors of the lower floors with constant operation of the cabin. To carry out the work, you will need the following tools:
- building level;
- roulette;
- water-based markers;
- trowel;
- container for diluting concrete solution;
- tile cutter (if mosaic tiling is supposed, then this item is skipped).
This is just a list of the necessary tools, without which work is not possible.
Also interesting: How to choose a warm floor in the bathroom: installation features
In addition, the building materials themselves will be required, which must be moisture resistant and suitable for the climatic conditions of the bathroom:
- waterproofing mastic (preferably bituminous);
- roofing material;
- siphon;
- plastic pipes required to connect the drain and sewer;
- expanded polystyrene sheets with a thickness of at least 50 mm;
- dry mixes for cement mortar (cement and sand without impurities);
- waterproofing tape;
- tile waterproof adhesive;
- tile grout;
- spatula and rubber sponges;
- silicone sealant.
The specific designation of the quantity in the list will not be given, since the projected structures of shower cabins are different for everyone, and the costs of materials will be calculated based on these features.
The only thing you need to know is the scheme for setting up the cement slurry. To do this, you need to take 4 parts of sand to 1 part of dry cement and dilute with water until a thick mixture is formed.
It takes at least 3-4 days to completely solidify the solution, but it must be prepared immediately before starting work.
Important!
A silicone sealant is required to seal seams and joints to provide waterproofing. In any case, you get a sealed and reliable design, but it is better to protect yourself and play it safe.
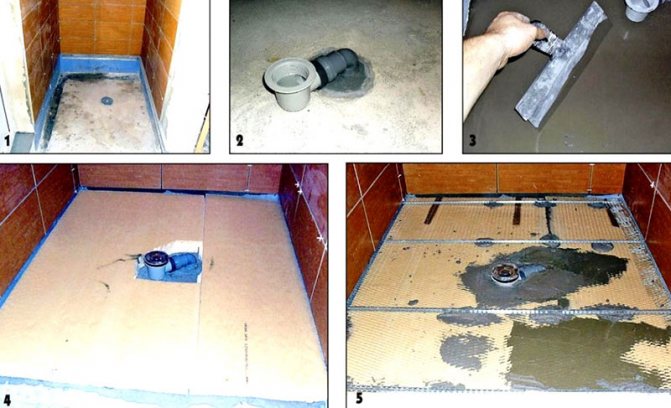
How is the floor waterproofing done?

Shower floor waterproofing
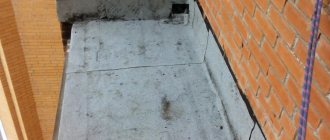
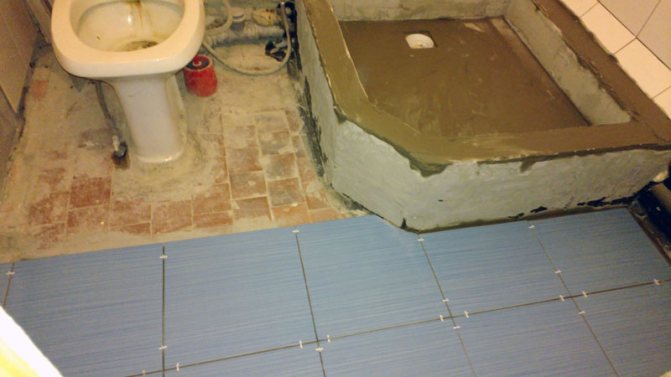
Any waterproofing of a shower stall should begin with the preparation of the surface of the structure. For example, if the floor is uneven, then you must first get rid of such a problem with a cement screed. Otherwise, the waterproofing material will not cope with the task assigned to it and the floor will begin to rot from the inside.
Surface preparation depends on what will be used to further waterproof the shower. If the floor, walls and shower room will be covered with a roll, it is not necessary to carry out a particularly thorough preparation of the surfaces.
But if bituminous mastic is used, then three main indicators of the floor should be taken into account for the process. It should be:
- clean;
- dry;
- even.
The last point requires special attention. The screed will need to be allowed to dry, and this will take a long time. The process is necessary in order for unnecessary moisture to evaporate. Only then can the leveled surface be cleaned, primed and then covered with mastic.
Liquid rubber is also applied on a flat floor. But in this case, there is no need to wait for the screed to dry. It will only be necessary to clean the floor surface from dust and prime it. If large cracks were not noticed, it is recommended to seal them with a special compound.
Only after the preparatory work has been completed, you can proceed to the next step.The process is not complicated and depends solely on the material chosen. The sequence of actions for each species will be as follows:
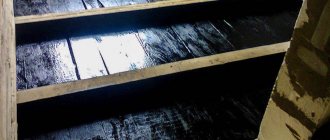
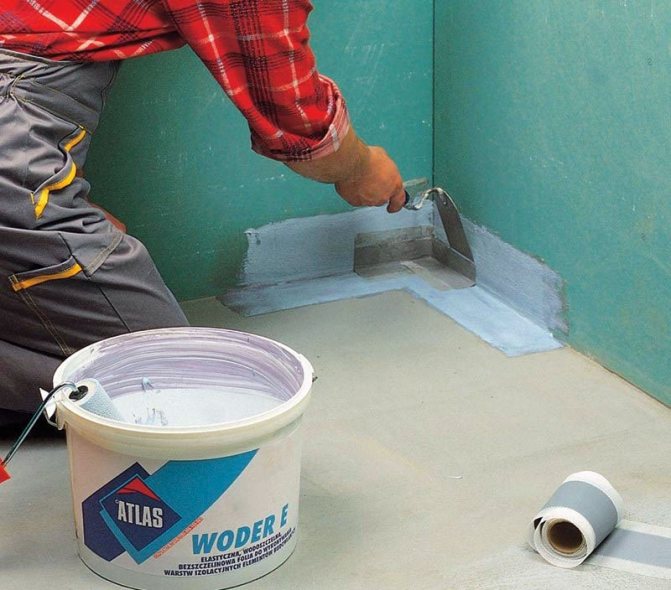
- Bituminous mastic. First, the mixture must be thoroughly mixed, and then pour a little kerosene into it. The joints between the wall and the floor are smeared with mastic, as well as the places from where the pipes exit. Apply by brush or roller. But only after this process, the tools can be thrown away, since they are unlikely to be washed. To achieve maximum effect, you need to coat the floor twice.
- Liquid rubber. There are two ways to apply this waterproofing material. The first involves the use of a brush, while applying the material carefully, smearing every centimeter. The second way is to use a sprayer designed just for this kind of action.
- Dry mix. To apply it, you need to stir it with water, only thoroughly, so that later you get a mass without lumps. The floor is slightly moistened before application. This is necessary to ensure strong adhesion of the material to the surface. After that, the mixture is applied to the prepared areas with a brush or spatula. The choice of tool depends on the thickness of the solution.
- Roll material. In this case, the strip of the required length is measured. The length is selected based on the size of the bathroom. While the segments are being prepared, you can smear the joints between the walls and the floor, as well as the pipe exit sections. This is done with mastic or liquid rubber. When everything is ready, you need to remove the protective film from the surface of the roll material and attach it to the area with the adhesive side, then carefully roll it with a roller.
During the execution of the work, you should pay attention to some points:
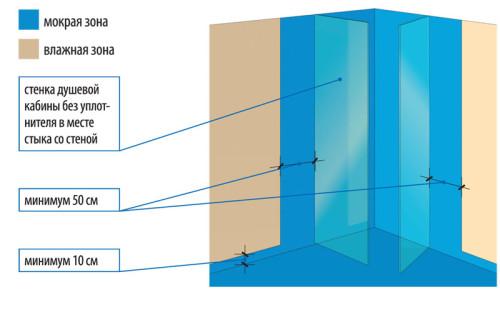
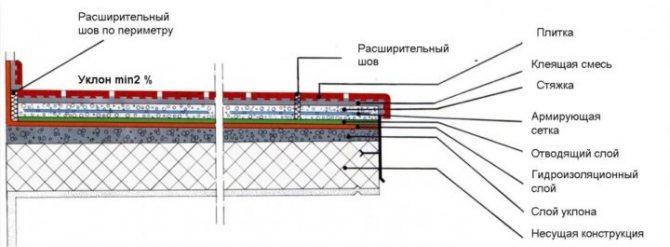
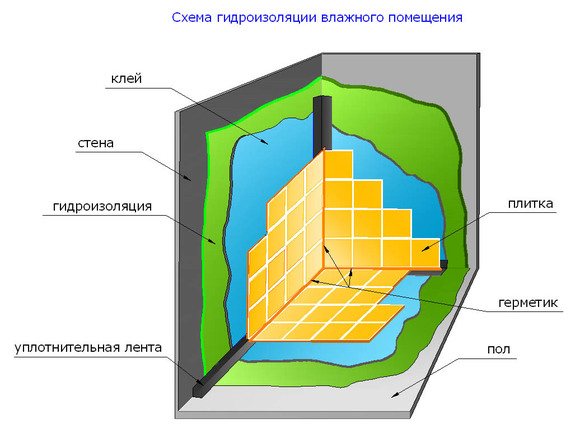
- It is necessary to isolate both the floor and the walls from the liquid. It is best to treat wall surfaces up to 15 cm from field level.
- It is important to provide a continuous and continuous layer of waterproofing on the shower floor. It is necessary that it be without cracks or voids.
- If there is a deviation of more than 20 mm, it is required to first install beacons next to it, and then repeat the filling of the floor with a cement screed.
- If there are seams or depressions in the structure, they must be sealed in advance.
A correctly executed process will avoid the occurrence of mold or mildew in the bathroom in an apartment or house. For this, it is necessary to select the right materials. Pasting and coating types are very popular.

Do-it-yourself shower waterproofing without a pallet: materials and work process
A shower room without a tray is a small corner in the bathroom or a separate room in which there is a water outlet and a drain located directly in the floor. When installing this type of shower, special attention must be paid to waterproofing.
What is waterproofing
Waterproofing in this case is the protection of a room or its elements from moisture penetration into other rooms. It contributes to the preservation of the shower and longevity. In addition, it prevents materials from rotting, the appearance of mold, fungus, which negatively affects the human body. Water seeping through the flooring can easily penetrate into other rooms. Those areas of the shower cabin that are constantly in contact with water must be especially carefully protected with waterproofing. They are considered to be areas of high humidity.
These include:
- A floor through which water can flow freely.
- Wall and floor joints.
- Areas of walls where water gets the most.
- Places of entry of communications.
- Areas located around the washbasin and bathtub, if available.
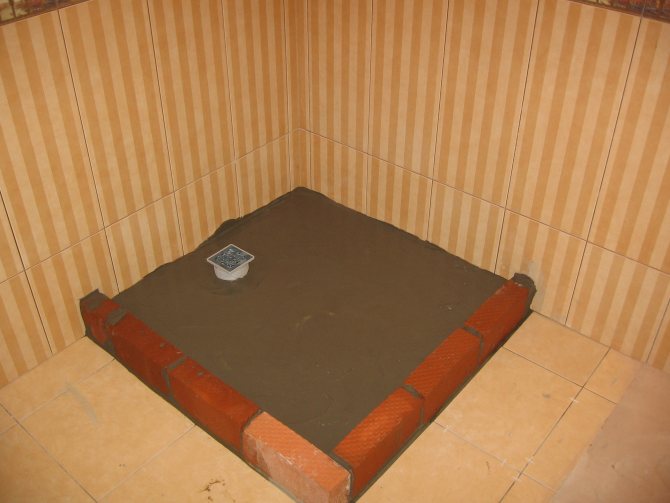
Shower waterproofing is a complex process that consists of several stages and requires mandatory adherence to technology.Everything should be done carefully, without mistakes. Otherwise, the cab watertightness will be of poor quality. It is important to pay attention to the drain structure, which must be built into the floor screed, and fill the rest of the base space with concrete mortar.
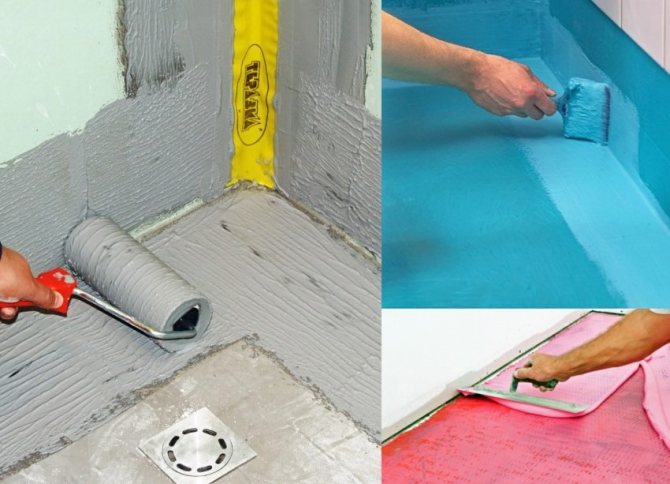
Waterproofing materials
Now on sale there is a large assortment of water-repellent coatings that perform their functions with high quality. The most effective way to make waterproofing is to use a combination of several materials, each of which is unique in its own way:
- Roll insulator is a proven and reliable water-repellent material that comes in rolls. It is made on the basis of polarized concrete and fiberglass, which have proven themselves in practice. Two insulators are used: self-adhesive and weld-on, which is applied with a certain heating.
- Lubricating sealant. This type of insulation involves the use of bitumen mastic with the addition of polymer or rubber. Both materials have excellent performance characteristics. Noteworthy is the polymer type of mastic, which can penetrate deeply into the surface of the shower floor.
- The cement-polymer material also does a good job of protecting cab floors. The cost of such waterproofing is relatively low, and the method of application does not cause difficulties. Popularity is justified by an affordable price. Thanks to polymer additives, it has a high level of adhesion to the surface, is characterized by elasticity and moisture resistance.
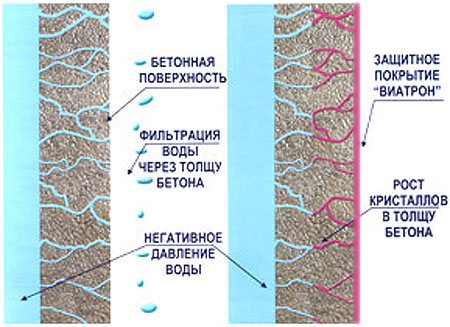
- Penetrating insulator is considered to be the most advanced and efficient material. It contains white (quartz) sand, Portland cement and various chemicals. Its active components, reacting with concrete, form insoluble crystalline structures, which serve as a high-quality sealant. The chemical reaction is very slow and lasts for several years. As a result, small cracks that form over time are effectively healed in the base structure.
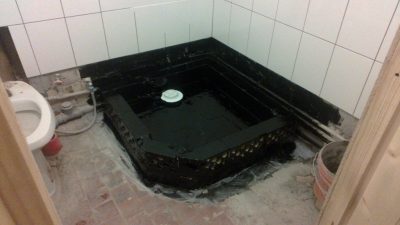
In order for the sealing to be of the highest quality, several materials are used at once, some of which are glued to the surface, others are spread in layers. For example, ceramic tiles are laid on top of the waterproofing coating. And bitumen insulators, since they are unstable to mechanical damage, are protected with a concrete screed.
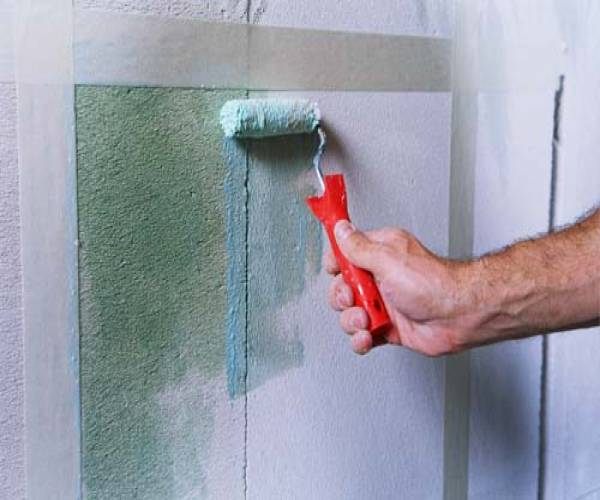
DIY penetrating waterproofing
The device of the built-in ladder in the absence of a pallet
Penetrating waterproofing is a material that has recently gained popularity in the construction market. The advantage is ease of use, and the technology of the device is considered to be the simplest. The sequence of actions is as follows:
- The mixture is diluted with some warm water.
- Stir until smooth.
- Using a brush, it is applied to a previously cleaned base.
In this case, more attention should be paid to the places of abutment of the pipes. Also, do not walk past the walls. First, they need to be cleaned of sagging, old paint and other various contaminants, after which cracks, potholes or other defects should be repaired with an insulating compound.
It will be enough to apply the coating waterproofing in one layer. But in places of increased danger, where moisture gets regularly, it is better to make an additional layer in order to avoid possible unpleasant consequences in the form of rotting of the floor surface, walls, corrosion of pipes.
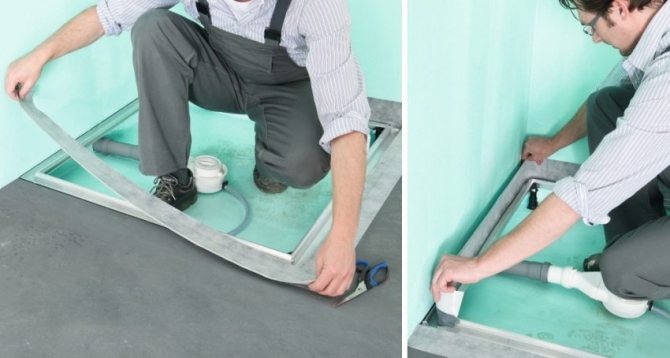
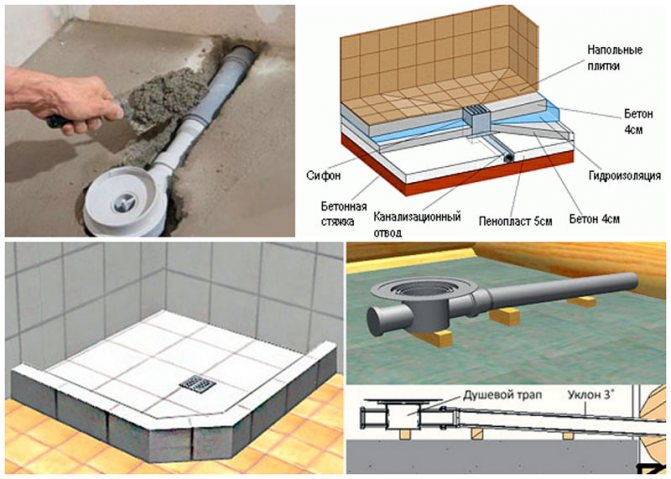
Installation of a drainage drain for waterproofing the floor of a shower cubicle without a pallet
How the ladder should be arranged
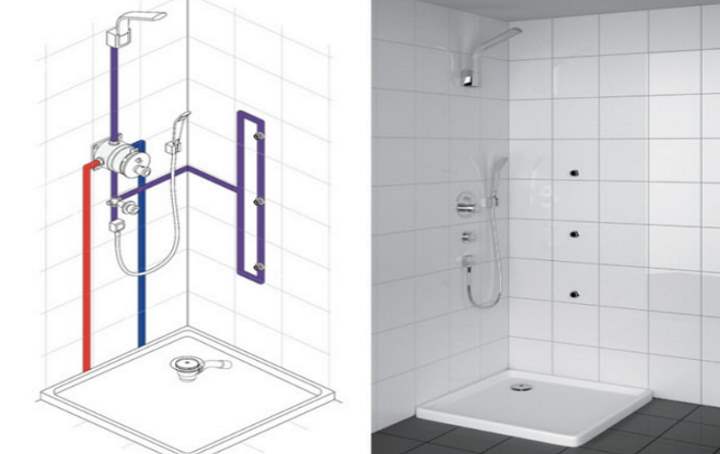
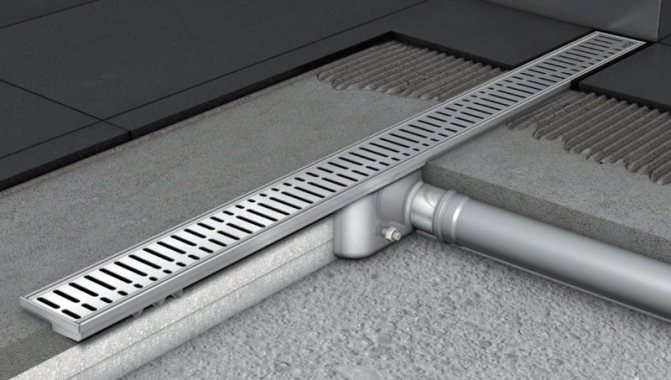
The device of the built-in ladder in the absence of a pallet (IMAGE 1) is made according to the diagram below. The ladder includes:
IMAGE 1 - The device of the built-in ladder in the absence of a pallet.
- Housing with oblique or vertical outlet.
- Decorative lattice.
- Locking siphon that prevents unpleasant odors from penetrating into the shower cabin from the sewer and through the decorative grill.
If the ladder is arranged in the center of the shower cubicle, as a classic option, then a slope to the center is built on each of the four sides, then the grate of the ladder is mounted with a size of 10x10 cm. The option is used when the outlet exits into the floor. The construction of the drainage ladder of the shower cabin is carried out taking into account the uniform inclination of the floor towards the drain, which should be at an angle not exceeding 3% so that there is no formation of puddles.
The drain can also be installed from the edge of the shower cubicle floor, which must be covered with special non-slip tiles. In this case, a linear grate of the ladder is used, and the floor is made with a slope of 2%. The installed grille can be hidden.
Insulation from water does not depend on the presence or absence of a pallet, representing a mandatory minimum. The floor in the shower room should be located just below the surface of the floor in other rooms. If this is not the case, then a high sill should be installed to separate the shower from the corridor in the hallway.
What waterproofing materials are used to insulate a shower cabin without a pallet
Most often used:
The scheme of the penetrating waterproofing of the shower.
- Penetrating waterproofing.
- Bituminous insulation.
- Polymer-cement moisture insulation.
- Painting waterproofing.
Consideration should be given to the characteristics of various materials depending on their types. A proven method of cutting off moisture is roll-up waterproofing. Materials based on fiberglass and polymerized bitumen, which are guided and self-adhesive, are used for waterproofing shower rooms. Directional insulators are glued using a gas burner, while self-adhesive insulators are simply installed. At a low cost, the roll insulator has a short lifespan.
The most effective waterproofing is carried out using several materials. In this case, some of them are glued to the surface, others are spread on it in layers. For example, a wet concrete slab serves as the basis for applying penetrating waterproofing and creating a moisture barrier. Very often they use a waterproofing sheet, laying it using tile adhesive. Then the tiles are laid. Bituminous materials are protected with a concrete screed, since they are not resistant to mechanical damage.

Scheme of bituminous waterproofing for a shower cabin.
The choice of material depends on its quality characteristics. The use of adhesive materials for waterproofing is the most popular in recent years. They are coatings in rolls made on the basis of bitumen and modified polymers. This ensures perfect waterproofing of the floor.
If the version of the material is completely self-adhesive, then it should be laid by pressing it to the surface and making additional gluing. Self-adhesive coatings spread gently over the surface without displacement or roughness. Such coatings are used only of high grades. If the grade is low, then it is possible to use rubber and polymer mastics with a bituminous additive. These lubricants are durable but expensive.
The quality of the adhesion can be improved by the addition of plasticizers in order to give the greatest elasticity. Spread the mixture over the surface using a notched trowel.
More durable is the use of coating waterproofing. It is made on the basis of bitumen-rubber and bitumen-polymer mastics. These compounds are called liquid rubber, having a high level of elasticity and adhesion. A cement screed will provide protection from external damage.
Scheme of polymer-cement waterproofing for a shower cabin.
Plastering the walls of a shower cabin without a pallet can be done with a coating waterproofing, which is a type of materials based on polymer-cement compositions. Dry mixtures are mixed with water, making a solution. They are highly elastic. In this case, no additional screed is required.
The next type is polymer mastics, which represent a more high-tech way of protecting against moisture. It is based on the effect of deeper impregnation of the base. The applied polymer mastics dry out to form a more durable layer. With high elasticity, it is able to pass water vapor.
The penetrating waterproofing contains finely ground quartz sand. The insulator is created on the basis of Portland cement and special chemicals. Contact with a damp surface is accompanied by a chemical reaction with concrete particles. In this case, the formation of insoluble crystalline compounds occurs, tightly sealing concrete pores.
The strength of the concrete base increases significantly, and the continuation of the reaction over the years is accompanied by the formation of new elements that protect microcracks in the pores of the concrete from moisture ingress. An increase in the strength of the base occurs due to crystalline formations, while the wall continues to breathe.
The paint contains water-repellent substances, which provides the shower stall with good waterproofing.
The choice of insulator depends on the type of substrate of the surface to be applied. Penetrating and polymer-cement compositions are most often used for concrete bases. Porous brick walls are treated with bitumen mastics and polymer-cement membranes.
Do-it-yourself methods for laying waterproofing of a shower cabin without a pallet.
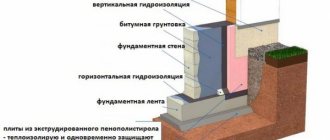
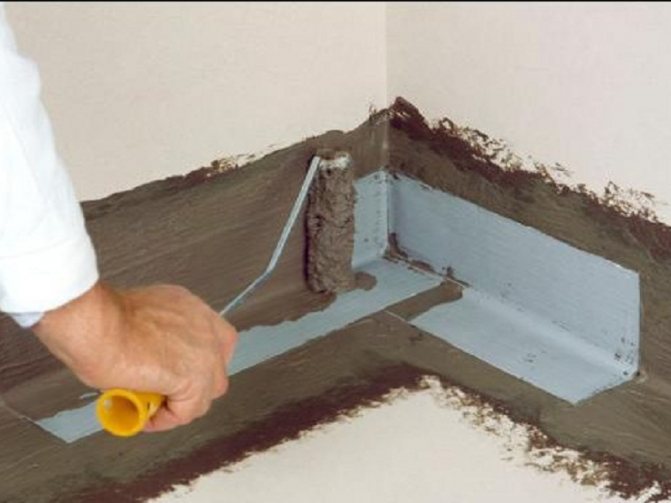
Carrying out work on the installation of waterproofing requires a special permit from the BTI, if all work is related to the laying of a concrete screed. Here it is necessary to follow the principle: to ensure the watertightness of the joints between the floor, walls and the drain in the shower.
The use of a waterproofing sheet, laid on the screed with glue, is the most suitable option. A layer of screed should pass from above and below the canvas, and floor tiles should be laid on top. This method is the simplest, however, for its high-quality application, you should familiarize yourself with the entire waterproofing process in advance.
When laying waterproofing with your own hands in the first way, several important points should be taken into account:
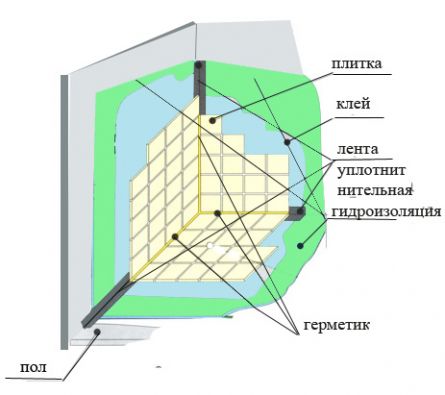
Diy waterproofing scheme in the shower.
- The installation of the drainage recess is done in a concrete screed by laying the entire drainage structure and pouring concrete.
- A little water is poured into the siphon and the quality of the drain is checked.
- The sealing sheet is laid with glue.
- A special elastic profile is used to seal all seams.
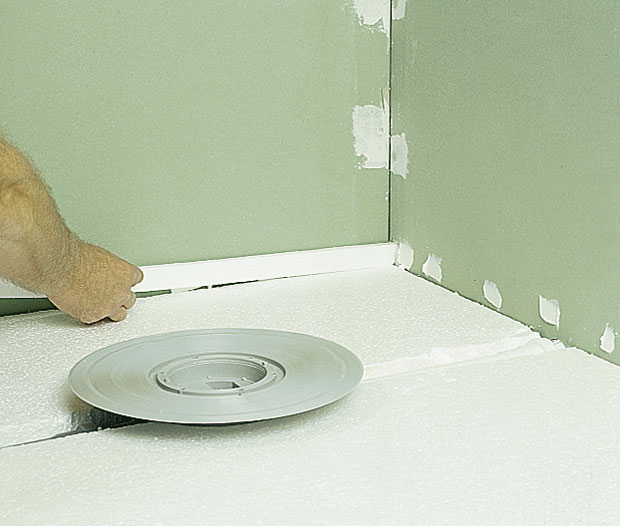
The second method involves laying out a layer of waterproofing (roofing material or polyethylene) on the floor, fixing it, followed by laying the coating. The insulator must have a special thickness and overlap by 15 cm. Taking into account the floor surface, reinforcement or screed is performed, and concrete is poured with mortar.
Shower constructions
Each owner of his house has the right to independently decide what kind of shower to build, choose a room, materials and construction technology. However, in order for the shower to work for a long time, we safely recommend observing the rules and regulations set out in the SNIP and other documents.
An equipped shower in a wooden house will bring comfort and delight to its owners for many years, with the correct fulfillment of the requirements in the following systems and elements of the room:

Sewerage;- Waterproofing walls, ceilings and floors;
- Lighting and electrical;
- Competent selection of plumbing;
- Finishing materials correctly selected for wooden premises;
- Shower ventilation.