- 1 Watch the video how to reinforce foam plastic with mesh
- 2 Technological features of foam reinforcement
- 3 Stages of reinforcement of expanded polystyrene
- 4 Tips / tricks for work
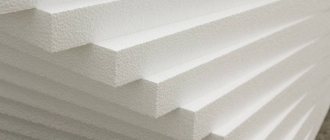
Expanded polystyrene is one of the most popular materials used to insulate various surfaces. Its loose structure provides for subsequent finishing, which each master makes at his own discretion.
But there are technological requirements, non-observance of which leads to rapid wear of the protective layer and the formation of deformations on the finishing surface. To prevent such incidents, it is worth familiarizing yourself with the reinforcement rules and recommendations for the use of building materials.
Selection of glue and tools for facade mesh
Reinforcing mesh is used to fix insulation materials such as polystyrene foam, expanded polystyrene, mineral wool, glass wool and others. They are attached to the outer wall, and a finishing decorative layer in the form of plaster, siding, corrugated board is mounted on it. In order for the entire structure to serve for a long time, the heaters are fixed with a reinforcing fabric along the entire wall. Therefore, the adhesive for the facade mesh must be of high quality.
Usually external walls are insulated, so the glue should have the following qualities:
- moisture resistance;
- vapor permeability (air permeability);
- frost resistance;
- thermal stability (resistance to temperature extremes);
- resistance to slipping;
- environmental friendliness.
To find the right glue, you need to know a thing or two about the plaster grid. It can be made of different materials: metal, plastic, fiberglass and fiberglass mesh or fiberglass mesh. The size of the cell is from 2 × 2 mm to 200 × 200 mm, it is a sufficiently strong material, therefore, it can ensure the strength of the entire structure.
Choosing a reinforcing adhesive for facade work
The high price of the product cannot guarantee the buyer the appropriate quality of the adhesive solution.
The glue for the reinforcing mesh must reliably fix the insulation on the wall, regardless of what materials it is made of: foam, polyurethane boards or mineral wool.
Rolling mesh on reinforcing glue
Its reliability is provided by several parameters:
- Frost resistance;
- Moisture resistance;
- Environmental friendliness;
- Adhesion (good adhesion to the facade);
- Low consumption.
The following types of facade glue are suitable for these parameters:
- Kreisel Styrlep 220. Universal reinforcing adhesive for facades insulated with foam plastic, extruded polystyrene foam, basalt wool or reinforcing mesh. Designed to cover the base layer, reinforced with fiberglass. Excellent for gluing expanded polystyrene boards on the bases of ordinary concrete, aerated concrete, concrete with a light aggregate, as well as cement-lime plasters. Suitable for indoor and outdoor use. The cost of a package weighing 25 kg: 289.9 rubles.
- Baumit Starcontact. It is an adhesive mixture in the form of a powder based on minerals. It is used to fix mineral wool, foam and other types of insulation. Designed for applying a layer with a reinforcing mesh in thermal insulation systems. Suitable for work in the cold. The cost of a package weighing 25 kg: 470 rubles.
- Ceresit CT 190 pro. Plaster-adhesive mortar, which is excellent for fixing thermal insulation boards based on mineral wool. It is also used for applying the first plaster layer and for thermal insulation of external walls and facades.Designed for cold operation. The cost of a package weighing 25 kg: 580 rubles.
Types of glue
Insulation glue is usually sold in a powdery state, and is diluted with water before use. Stirred by hand or using a drill with a construction mixer attachment. The quantitative ratio in each case is different, you must carefully read the instructions for use. It is necessary to prepare the glue before work, not in advance, the viability of the solutions is short-lived.
There are two types of glue for reinforcing mesh:
- universal;
- special (for a specific material).
When buying a universal glue, you can be inattentive, but when purchasing a special glue, you need to carefully look at the list of materials with which this adhesive can work.
About whether this composition can stick a reinforcing film should be written in the instructions. Glue for mesh on a synthetic basis, as well as on gypsum, cement is quite suitable for installing facade mesh.
Features of use
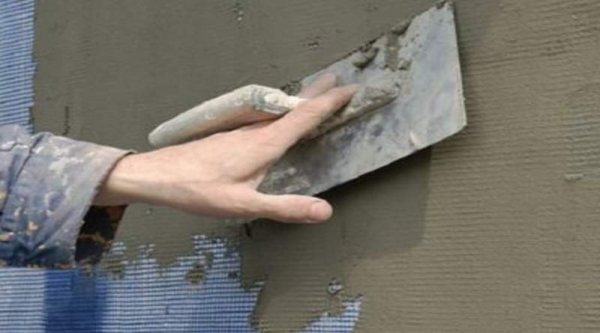
To prepare the adhesive for the Ceresit plastering facade mesh, pour the powder into a bucket of water. It is necessary to mix the mixture with an electric drill with a special nozzle for 10 minutes. This is necessary in order for the solution to acquire the desired consistency and eliminate all lumps. After that, the glue mixture must be left at rest for about 5 minutes, after which it must be mixed again. The glue must be prepared in such an amount that it can be used for 2 hours.
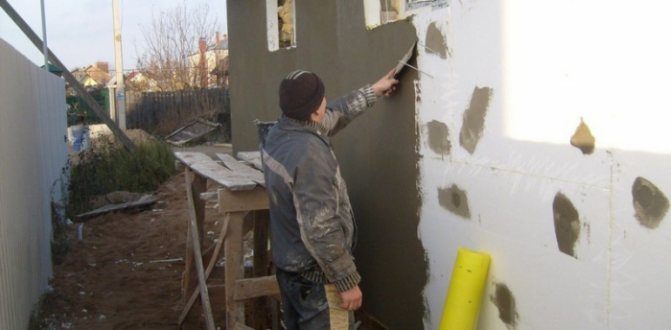
How to glue a reinforcing facade grille? The process looks like this:
- the surface is primed;
- the first layer of adhesive is applied with a spatula;
- the mixture is carefully leveled with a notched trowel;
- a plaster mesh is applied;
- another layer of adhesive mixture is applied;
- the structure is left at rest until completely dry.
Fully frost-resistant glue usually dries within 24 hours, although changes in time are possible depending on ambient temperature and humidity. The adhesive consumption is usually 4.5 to 6 kg / m2.
Glue tools
When applying the adhesive, use two spatulas: a wide facade trowel and an ordinary metal trowel. The facade trowel with a width of about / more than 20 cm is convenient for even distribution of the composition on the wall. Using a small metal tool, take the adhesive mass from the container and spread it over the area of a wide spatula. All pits, cracks disappear, the surface becomes perfectly flat.
It is especially convenient to work with two spatulas when processing corners; with strong pressure, the blade can move from its place and form waves. To exclude an error, you should hold with one tool, smooth with the other.
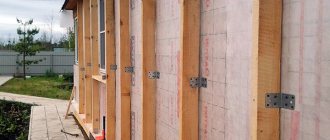
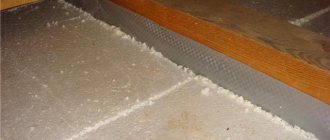
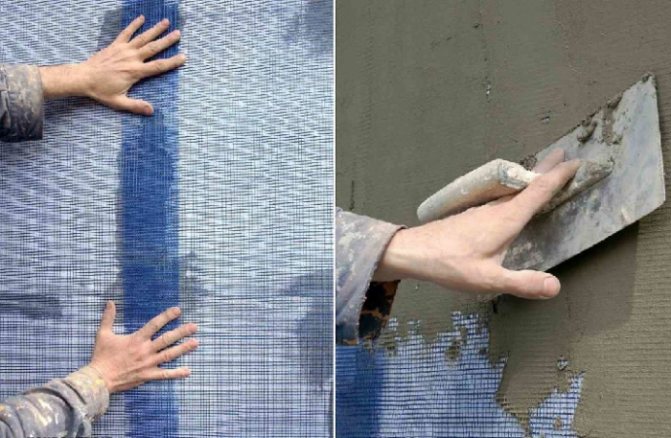
The procedure for installing a reinforced mesh on a heater
- clean the surface, remove everything that crumbles and does not adhere well; then prime it, this is necessary for high-quality adhesion of the adhesive;
- if the mesh is placed on soft insulation, then no primer is needed. The insulation is attached with self-tapping screws. The mesh fiber is also fixed with self-tapping screws. It will not work to glue the mesh for insulation from soft materials, fastening materials are needed;
- cut in advance the material for reinforcement. Allow the fabric to lie under the load to avoid roll-off during operation.
For your information: the mesh is mounted vertically, from top to bottom, so the cuts will correspond to the height of the wall.
- dilute the adhesive in the required proportions, stir well, bring to a mushy state. First, the composition must be applied to a small area under the ceiling or roof, leveled well, then put the mesh, fix it, and then drown in the glue, smoothing over the entire area;
- to lay the pieces of the reinforcing lattice overlapping, to glue it this way means to achieve special strength.
For your information: the glue should be diluted as much as the square meters you intend to mount. The composition dries, should not be left. Both the container and the finished glue will deteriorate. It gives a quality result within 2 - 2.5 hours. However, in the cold and in a sealed container, the glue is stored a little longer.
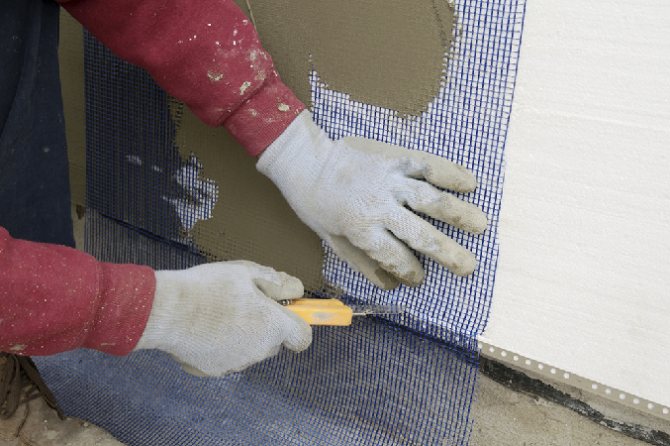
Installation of reinforcing cloth on plaster
To increase the mechanical strength of the plaster layer, a facade mesh is used, this will prevent the appearance of small cracks and guarantee a durable service.
Watch the video to find out more:
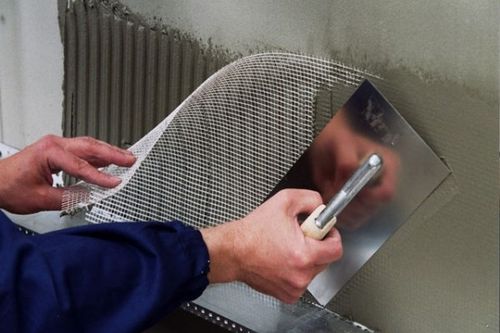
The first layer of glue on the wall should not be thin, since the reinforcing fabric is heated in it. After the upper part of the canvas is fixed, it is released to the ground, pressed in several places. Melting of the mesh in an adhesive composition begins with a large spatula. With a small spatula, hold the mesh from the side, from above, so that the canvas does not go obliquely.
Note: When installing the mesh, the temperature should not be lower than 5ᵒ.
If you need to glue the mesh indoors, then the next step after the daily drying will be sanding the wall. This dirty and time-consuming business must be done in special protective equipment: mask, goggles, gloves. It is made with a clamped grinding float.
Glue is a multifunctional building material, perfect for putty. After such processing, it is easy to plaster the wall, it is easy to install the topcoat.
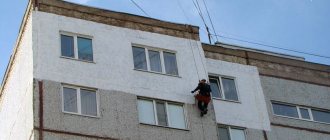
Foam plaster
No matter how wonderful and effective the foam insulation is, its durability under climatic attacks is relatively small, today experts estimate the period of degradation and disintegration of foam plastic at a maximum of 18 months. The best way to preserve your work and house insulation is to apply facade plaster on foam plastic. Such protection will allow you to preserve the foam insulation of the house, even if the finishing and plastering work was carried out with minimal experience and skills.
What is the best way to cover the foam from the sun
There are many commercials and advice from would-be experts that foam is not afraid of water and frost, does not react to air humidity, and its only drawback is solar ultraviolet light. In such "tips" it is suggested not to lay the plaster on the foam, but to close it with a screen made of painting mesh and a thin layer of reinforcing glue until better times.
This should not be done if it is planned to finish the facade of the house with polystyrene and plaster, then the whole complex of work must be completed in a maximum of one season, and best of all - in two to three weeks, no more. Polyfoam does not give an airtight layer without plaster, even when laid on good mineral glue and a primed surface of the walls of the house, it retains heat, but allows water vapor to pass through.
Features of reinforced foam
Reinforcement allows you to reduce the effect of direct sunlight on the foam, protect it from atmospheric precipitation, and also give an original finish to the facade of the building. With the correct reinforcement, there is no need to apply a primer and putty.
Isosiding is another name for reinforced foam. It consists of a whole block, obtained by cutting out a panel of a certain shape and then reinforcing it with putty.
After finishing the foam with a special composition, the product acquires new qualities:
- becomes waterproof;
- lack of flammability;
- the indicators for thermal insulation and sound insulation are increasing;
- elasticity, if necessary, it can bend during use.
The use of this product also has a positive effect on the costs incurred when finishing facades and interiors.The costs can be significantly lower, since it is more economical and, of course, more convenient to work with the putty on special equipment than on the foam attached to the wall.
The use of reinforced material eliminates the need for additional work.
Then you only need to clean the seams when joining the structures, and then paint the foam or apply a special composition by spraying.
Materials for facade plastering
Construction and finishing work are always costs, and sometimes considerable ones. It is quite difficult to count and purchase exactly according to the estimate several types of various plaster mixtures and adhesives, as experienced craftsmen do. Therefore, there is a certain temptation to simplify your life when laying facade plaster for foam insulation.
There are quite a lot of ready-made adhesives on the market. Well-known brands Ceresit, Kreisel, which is simpler - Stolit, Master produce both universal and specialized adhesive acrylic-cement compositions. The former are cheaper, but it is better not to use them. Therefore, for arranging a reinforcing layer for facade plaster for foam plastic, we choose the following materials:
- Special glue for arranging the reinforcing layer of plaster on polystyrene boards. No ceramic adhesives or styrofoam wall stickers, it's a completely different material;
- Fiberglass mesh with a density of 150-160 g / m2 for an alkaline environment. Such a facade mesh has a special protective coating that improves the adhesion of the fibers to the adhesive mass.
The glue itself for arranging the reinforcing layer due to additives is characterized by a pronounced alkaline reaction, this allows the glue mass to adhere well to facade walls lined with foam. Any other adhesive mass practically does not adhere or adheres very poorly to the surface of the pressed polystyrene balls.
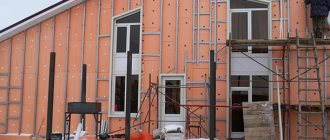
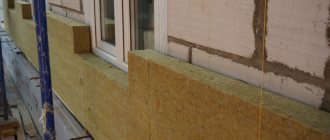
We glue the mesh on the foam plastic under the facade plaster precisely and correctly
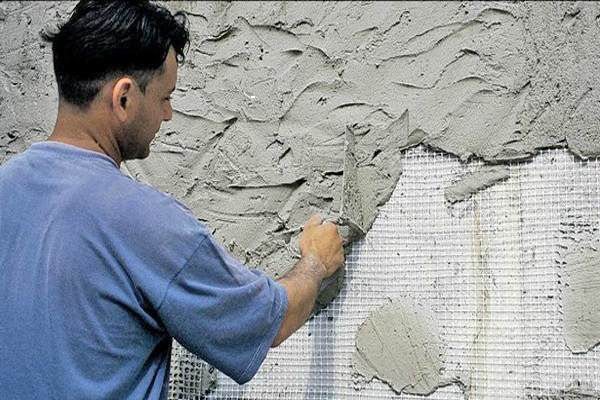
Immediately about the technique of laying the reinforcing mesh. In fact, facade plaster is obtained from three layers, the weight of the coating on the foam is quite large. Styrofoam can deform, and if the mesh is not laid correctly, cracks will appear on the plaster. Conversely, a well-laid reinforcing sandwich of glue and mesh is able to hold even the heaviest types of facade plasters on the foam surface.
The most common netting technique is as follows:
- From the general roll, separate mesh canvases are cut along the height of the front walls with a small margin of 5-7 cm;
- On the surface of the foam, an adhesive mass with a thickness of 3-4 mm is applied to a width slightly larger than the size of the canvas. The front surface is glued from top to bottom, half the height of the run is immediately applied;
- The canvas is laid on the glue layer applied to the foam and pressed into the thickness with a wide spatula. It is necessary to put pressure on the facade surface slightly, rather to stretch and level the canvas;
- The last stage is laying the glue mass on the laid mesh. To glue the second part of the canvas, it is enough to tuck the mesh, fix it on the foam with a pin and do all the same operations. The entire mesh must be hidden under the reinforcing adhesive base of the façade plaster.
The next sheet is laid with an overlap of at least 5 cm, after which it is covered with adhesive and carefully sanded - leveled with a wide spatula. Upon completion of laying the reinforcing plaster, the facade surface should look absolutely flat and flat, without protruding defects from the foam.
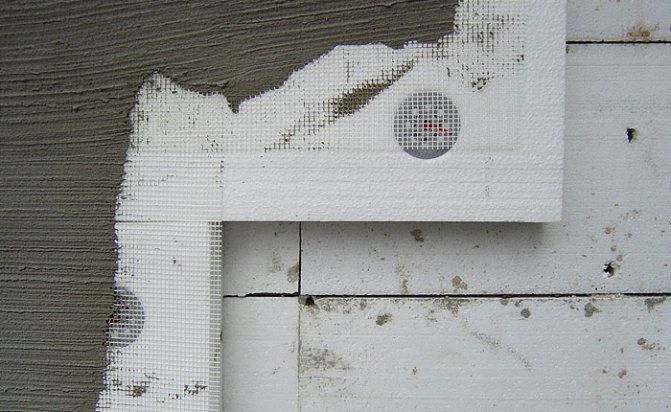
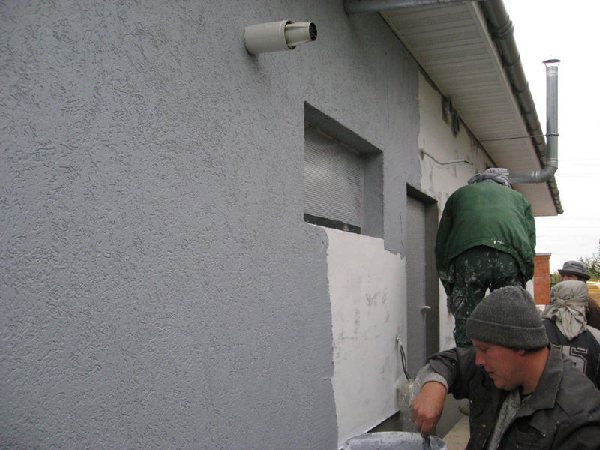
Finishing corners and slopes with a reinforcing layer
In any house, there are quite a few problem areas where facade plaster experiences additional loads, these are the corners and slopes of windows.In addition, the foam at the corners usually “plays” slightly, so the corner zones have to be strengthened, the easiest way to do this is by laying an additional layer of mesh or installing plastic perforated corners under the facade plaster.
The inner corners of the walls are always reinforced with an additional patch. To do this, a reinforcing mesh for plaster is always brought a little further than the corner line, about 7-10 cm.After grouting the canvas with a glue mass, an additional tape is cut out of the grid, applied to the corner and glued over the foam with a double layer of glue mass. So that no traces of the reinforcing tape remain on the reinforcing sublayer, which can spoil the decorative finish, the plaster is once again passed with a wide spatula.
It is extremely important to reinforce the plaster with foam on the window slopes. The technique of laying glue on the mesh is similar to the previous case, but there is a nuance - small sections of the canvas, especially under the plaster of horizontal slopes, must be fastened to the insulation with staples.
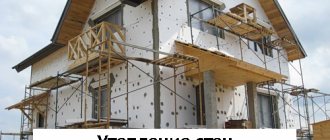
House warming: the order of work
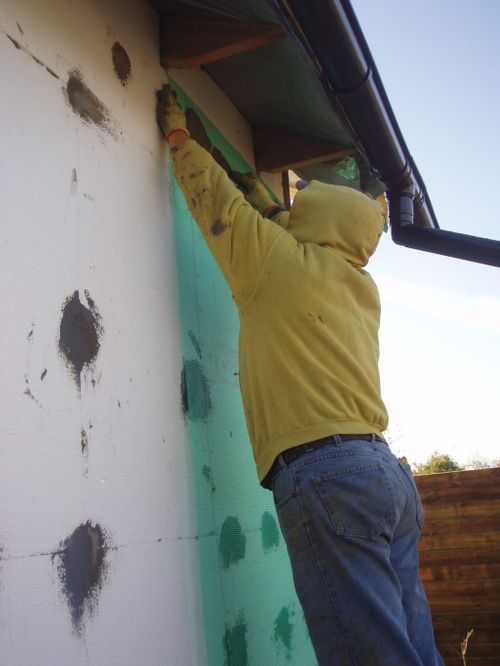
- Preparing the walls of the house for insulation.
- Installation of ebb tides and insulation of window slopes.
- Bonding insulation sheets to the wall.
- Insulation installation.
- Reinforcing mesh installation.
- Preparing the facade for finishing.
- Fine finishing of the facade.
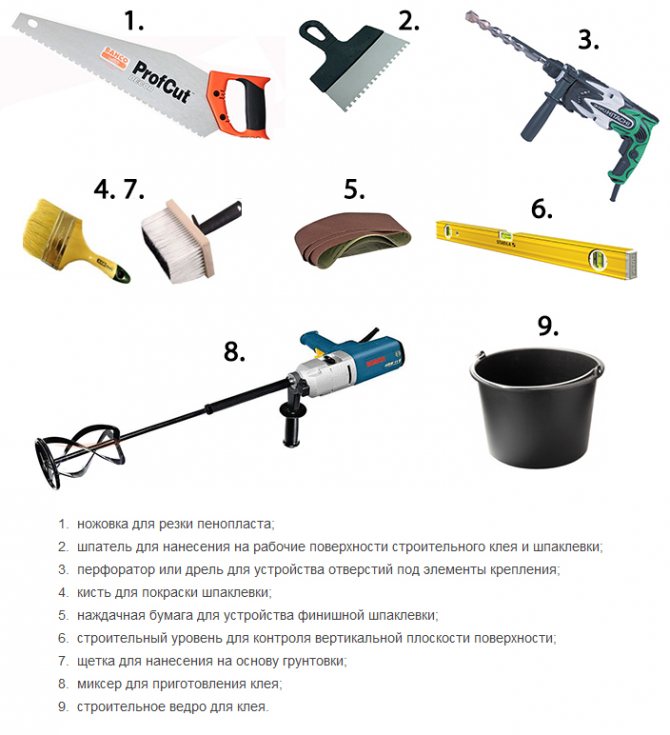
Tools required when working on warming a room.
Instruments:
- hammer drill or powerful impact drill;
- painting knife;
- a hammer;
- a set of spatulas;
- plumb line;
- level.
Materials:
- foam sheets with a density of 25 kg / m3 and a thickness of 40-50 mm and 20-30 mm - for insulation of slopes;
- fasteners: dowels with an umbrella head (fungi), plastic nails, self-tapping screws;
- assembly glue or adhesive cement for tiles;
- reinforced mesh with 5 mm cells;
- putty or decorative plaster for outdoor use;
- deep penetrating primer;
- polyurethane foam;
- basement profile.
Laying the leveling layer
The second step is to align the reinforcement layer with the laid mesh. This must be done, since the facade decor on foam without alignment will look very uneven. If the surface of the walls is primed for painting or a similar finish with a facade decor, then the house will lose its entire appearance. A couple of days are taken to dry the reinforced reinforcing sublayer.
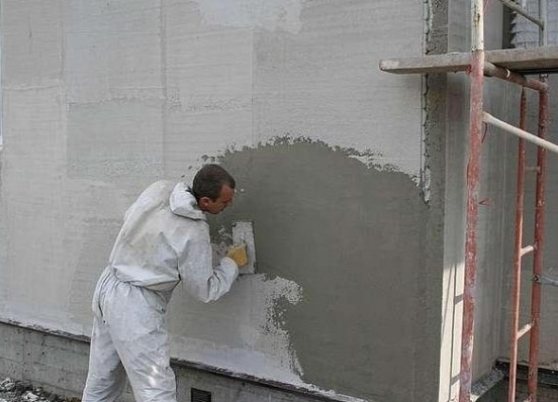
The first operation is to grout the surface of the reinforcing plaster with a liquid adhesive mass. Use a wide spatula to apply a leveling sub-layer of facade finish to the walls The glue is the same, but the consistency is liquid, so as not to load the insulation with the additional weight of the finish. After a day, the thin leveling sub-layer will dry, and you can proceed to the rough finish of the facade surface.
No matter how hard the masters try, all the same, small traces and even subtle contours from the foam and mesh remain on the leveling layer, which must be wiped off with sandpaper. Usually they use emery - "weaving", glued on a wooden block. It is impossible to postpone the grout, after a week - two rough plaster sublayer will become as hard as concrete. In addition, the risk of abrasive penetration of the finishing material to the insulation increases.
A detailed process for leveling facade plaster, laid with foam insulation, is shown in the video
Priming
Unlike classical plaster, the layer of soil for Penoplex plaster is 2-3 mm. Its task is to hide traces of reinforcement on the surface and prepare the wall for putty or finishing grinding.
The primer is applied to Penoplex after the first layer has set and the wall is roughly cleaned with an abrasive. Scraping is optional but helps to reduce the amount of adhesive used on the ground. At a temperature of 20 gr. and average humidity, the leveling primer is applied after 6-12 hours (the setting speed also depends on the absorption of the wall material).
The primer is applied with the same spatulas or polishers that were used to fasten the mesh. The consistency of the plaster is thicker than when the reinforcing layer is fixed.
Reinforcing mesh adhesive
Adhesive for the reinforcing mesh allows you to reinforce the facade layer with fiberglass mesh, to glue polystyrene foam plates in various insulation systems. The material interacts perfectly with a variety of concrete compositions and is not picky about the texture of the treated surface.
It is intended for adhesive fastening of a heat-insulating layer of expanded polystyrene plates, as well as for the subsequent installation of a base reinforced plaster layer with an alkali-resistant facade mesh over the insulation for external thermal insulation of buildings and structures for various purposes.
Reinforced, crack-resistant plaster-adhesive mixture for gluing thermal insulation boards and creating a reinforcing layer. For manual application.
Designed for adhesive fixing of heat-insulating layer made of mineral wool and expanded polystyrene boards.
OSNOVIT KAVERPLIX TS117 plaster-adhesive mixture is intended for installation of expanded polystyrene and mineral wool boards, creating a reinforced base plaster layer.
Adhesive for expanded polystyrene boards and reinforced protective layer devices
Adhesive for mineral fiber boards and reinforced protective layers.
Reinforced, crack-resistant plaster-adhesive mixture for gluing thermal insulation boards and creating a reinforcing layer.
Adhesive for fixing heat-insulating plates and the device of the base plaster layer of facade heat-insulating systems in low-rise construction.
Plaster and glue mixture for the installation of expanded polystyrene and mineral wool boards, creating a reinforced base plaster layer.
For the installation of all types of heat-insulating polystyrene foam and mineral wool boards inside and outside buildings.
Reinforced, crack-resistant plaster-adhesive mixture for gluing thermal insulation boards and creating a reinforcing layer. For machine application.
It is used when installing external thermal insulation systems for buildings (SNTI) for fastening heat-insulating materials made of various materials (expanded polystyrene, mineral wool and basalt fiber, etc.), as well as for applying a plaster layer reinforced with fiberglass mesh to their surface.
Adhesive mortar for installing a layer reinforced with a glass mesh on facade insulation boards made of expanded polystyrene, as well as for gluing expanded polystyrene boards to substrates.
Adhesive mortar for the installation of a layer reinforced with glass mesh on facade thermal insulation boards made of mineral wool, as well as for gluing these boards to substrates, prefabricated in the form of a dry mixture of binders, mineral fillers and modifying additives.
White reinforced plaster Osnovit Coverlix PC117 W is designed to create a reinforced base plaster layer.
Adhesive for fixing extruded polystyrene foam boards and base plastering layers.
White universal glue for gluing EPS and mineral wool boards and reinforced base layer.
A plaster-adhesive mixture for creating a reinforced base plaster layer of SFTK in a vandal-resistant zone: 1.5 m from the level of the base, as well as a reinforced layer of high quality.
Mineral dry mix for the preparation of glue - reinforcing mortar, for gluing expanded polystyrene and mineral wool boards.
Dry mix for gluing expanded polystyrene and mineral wool boards, as well as for a layer reinforced with glass mesh in thermal insulation systems.
A universal mineral dry mix for creating a base layer reinforced with fiberglass and for gluing expanded polystyrene and mineral wool boards, as well as a finishing putty layer on a smooth facade. For indoor and outdoor use.
Reinforcement glue can be purchased for gluing insulation boards to the following substrates:
- to ordinary concrete,
- to walls with ceramic, silicate, concrete elements,
- to concrete on lightweight aggregates,
- to aerated concrete.
The price is 175,000 rubles. for a machine with a working field width of 1000 mm.
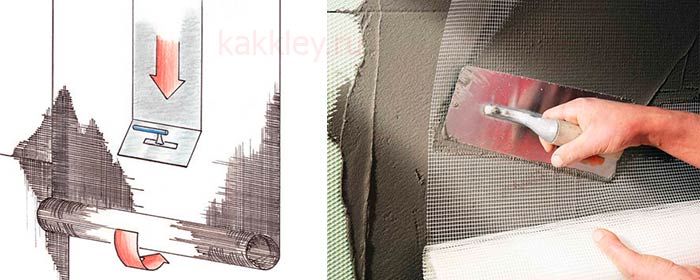
The SAP-04 machine (Foam Reinforcement Machine) is designed to apply a reinforcing (reinforcing) layer of acrylic or cement putty (plaster) on foam products: skirting boards, platbands, moldings, cornices, etc. This process is also called broaching: the workpiece is pulled through a container with putty through a matrix.
The main distinguishing features of our standard machine:
- Working field width 1000mm - the largest elements can be reinforced.
- Pushing tape with spikes - part slippage is excluded.
- Pressure rollers with inflatable chambers - minimum pressure on the part, minimal deformation of the part.
- Pressure rollers with variable pressure angle - can be adjusted to any part relief.
- Pick-up table without roller tables - the table cannot be stained.
- Control panel with adjustable speed and direction of the belt.
- Precise centering of the workpiece along the guide and side rods.
- Tank for putty with variable volume - only the part is reinforced.
- The container for the putty is removable - it takes a little time to clean the machine.
- The pick-up table is easy to dismantle - during downtime the area occupied by the machine is reduced by 60% - compactness.
- The machine operates on a 220V household network - no need for a three-phase network.
- Machine warranty 24 months.
- The SAP-04 machine is usually purchased complete with foam plastic cutting machines.
| To reinforce (strengthen) the foam, you can use any acrylic-based putty. Also for broaching, applying a reinforcing layer to foam, you can use cement-based compounds. The foam reinforcement putty is supplied (usually) in 50, 100, 200 liter drums. | |
| Foam coatings "MetaPlast" and "DIAPLAST" www.metaplast.pro, www.diaplast.ru e-mail, tel., +7 (909) 922 28 53 |
Machine SAP-04 consists of two parts:
Part 1. Loading and broaching table. The table is a metal frame with two shafts, on which a special vinyl tape with spikes is stretched. A gear motor is installed on the side of the machine. Travel speed and direction of travel are regulated by a frequency converter. Above the belt is a structure with pneumatic pressure rollers. The height and width of the broach are adjustable. The hopper of the machine has two removable walls - dies (not supplied). The side walls of the hopper are movable, which allows you to change the width of the working field to the required value. The matrix is fastened to the hopper with screw clamps. There is a technological tray next to the hopper for collecting excess plaster (putty). In the center of the machine, in the putty (plaster) container, there is a guide for centering the parts. Two rods are installed above the pushing belt for precise positioning of the workpiece.
Part 2. Receiving table. Designed to receive finished products. Consists of a stand and two tubes with adjustable installation width. Allows you to avoid getting putty on the back of the part. All putty (plaster) that can fall off the part just falls on the floor. This design allows you to avoid contamination of both the machine itself (everything is simply removed from the floor with a scoop), and completely eliminates the possibility of dirt getting on the back side of the reinforced part.
Additionally, the SAP-04 machine can be equipped with a module for unwinding a reinforcing mesh. Reinforcing mesh is used when reinforcing foam with cement-based compounds, with a layer up to 10 mm thick. The cost of the module for unwinding and pressing the reinforcing mesh is 75,000 rubles. The kit includes two shafts (for the bobbin and the pressure). The length of the machine with such a module is 300 mm longer than usual.
| Thin coating layer.Acrylic putty (plaster). Layer thickness 2-3mm. Additional reinforcement (reinforcement) with mesh is not required. Acrylic based coatings are more expensive. But it is also more durable. |
| Thick coating layer. Cement composition. Layer thickness 6-12mm. Additional reinforcement (reinforcement) of the layer with mesh is required. A cement-based coating is cheaper than acrylic, but less durable. |
Remote controller machine control includes the following functions:
1. Enable / Disable
2. Direction of the belt
3. Adjusting the belt speed
4. Emergency stop button
All that is required to get started is to connect the machine to the mains. There are no special conditions for the installation of this machine. Routine work of the SAP-04 machine: cleaning of all moving parts of the machine after each use, lubrication of the bearings - at least once a week.
Work machine SAP-04 is as follows:
1. A matrix is installed in the hopper (input with a gap of 1 mm from the part, output with a gap of 2 to 10 mm from the part.
2. A plug (probe) is inserted through the matrix, along which the rollers and the layer of putty (plaster) are adjusted.
3. Plaster is poured into the hopper.
4. The machine turns on. The quality is determined at the minimum speed. Additional adjustment is made.
5. Upon reaching the required quality of the coating, the speed increases to the optimum.
Dies for a machine for broaching (reinforcing) foam plastic can be made of:
- Waterproof or plain plywood. Can be cut with a jigsaw. The recommended thickness is at least 8mm.
- From plexiglass. Can be cut with a jigsaw. Recommended thickness is not less than 5mm.
- Of steel. Can be cut by laser cutting machine. Steel can be any. The recommended thickness is at least 3mm.
Set deliveries of the SAP-04 machine:
1. Disassembled machine.
2. Control panel.
3. Machine passport.
The wires for connecting the machine to the power supply are NOT included in the delivery set.
Technical characteristics of the SAP-04 machine
| Working area WxH | 0-1000 x 400 mm * |
| Performance | up to 20 m / min |
| Number of pinch rollers ** | 2 |
| Material hopper volume | 0-50L |
| Engine power | 1.1 kW |
| Supply voltage | 220 V |
| Dimensions of the assembled machine LxWxH | 3500 x 1150 x 1500mm *** |
| Weight no more | 170kg |
| * It is possible to manufacture the machine with any working field | |
| ** Can be purchased additionally | |
| *** When ordering a machine with a module for a reinforcing mesh, the length of the machine will increase by 300mm | |
| Additional equipment for the SAP-04 machine: | |
| You can order matrices for the SAP-04 machine from us. The cost of a set of matrices (2 pcs.) - 3000 rubles. Matrices are made of 3mm thick steel. The cost of preparing a file for making a matrix is 500 rubles. |
| You can order additional pressure rollers from us. If you have a large format part, we recommend ordering two more pressure rollers. The price of one video is 6000 rubles. |
Video work of the machine for broaching (reinforcing) foam SAP-04:
Machine warranty - 2 years.
View other videos on the operation of our equipment.
Installation supervision required? Click to view the conditions.
The price is 175,000 rubles.