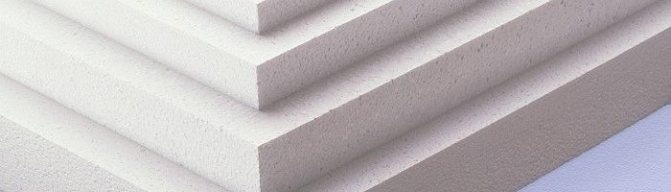
Expanded polystyrene is a modern insulation created by heat treatment with the addition of polymer granules to the expanding component in the extruder. "Extrusion" is a technological process in which a component is pressed into the foam mass at a high temperature to give it the desired properties.
As a result of this process, the new material compares favorably with conventional foam in a number of parameters:
- high strength,
- waterproofness,
- low vapor permeability,
- durability,
- environmental friendliness,
- fire safety.
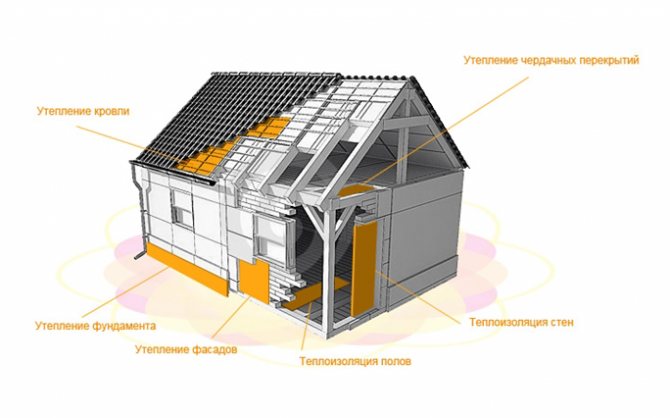
High thermal insulation qualities and durability have made expanded polystyrene practically indispensable for insulating buildings. More than 75% of the territory of our country is in harsh climatic conditions.
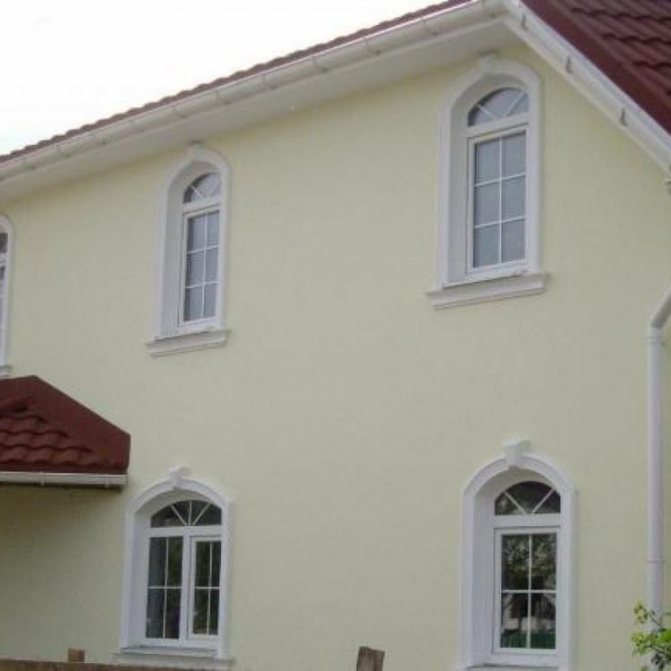
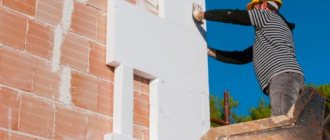
There are several ways to use polystyrene. How to properly putty the styrofoam on the outside wall? Laying styrofoam inside hollow walls. This method is applicable directly to construction. The method of wall insulation with polystyrene outside is widely used.
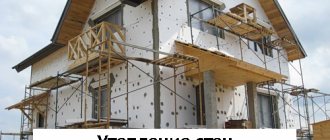
This is the most commonly used method, which is used both during construction and during the reconstruction of various objects, for the insulation of already built buildings.
What you need to know about this insulation option
We note right away that polystyrene is not the most popular solution for wooden buildings for a number of reasons:
| Low vapor permeability | As you know, for the best preservation of wood, it is necessary that moisture from the material can evaporate unhindered, but if the surface is covered with polystyrene, then the moisture has nowhere to go, and condensation can form inside the wood, therefore, it is necessary to install high-quality exhaust ventilation of a wooden house |
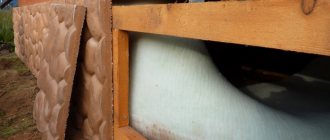
| Material stiffness | If you are using mineral wool, it can be inserted into a wooden batten and it will hold without any additional fastening. Styrofoam can also be positioned in a similar way, but in the process, the sheets can crumble |
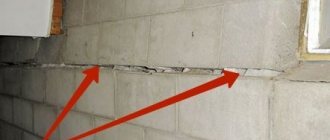
| The need to seal joints | After the fastening is completed, the cracks are necessarily sealed to exclude the penetration of cold, this complicates the process and makes it more laborious. Do not neglect this stage, since the result of the work largely depends on the isolation of the joints. |
Important! You should select high-quality foam, you should not save and purchase low-density materials, they are very fragile and can break even in the process. In addition, it is advisable to use insulation with flame retardant additives in the composition, it is much more resistant to fire.
Mounting types
We figured out whether it is possible to sheathe a wooden house with foam, and came to the conclusion that this option is advisable when installing a high-quality ventilation system. Now let's look at how to attach the sheets to the surface.
Lathing
Instructions for doing work with your own hands are as follows:
- First of all, a frame is attached to the surface, in which the insulation will be located, the width of the spans should be 5 mm less than the width of the sheets in order to insert them tightly.
- Sheets are placed from bottom to top, if we are talking about walls, or from any convenient side, if the ceiling is being processed. After finishing work, it is necessary to check the surface for joints and cracks. If they are, then you need to seal them up with polyurethane foam.
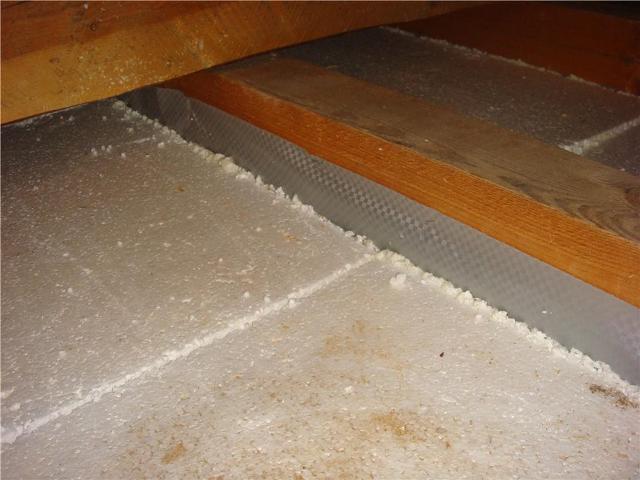
If a rough wooden floor is insulated, then a special vapor-permeable membrane is laid along the base
Using special mounts
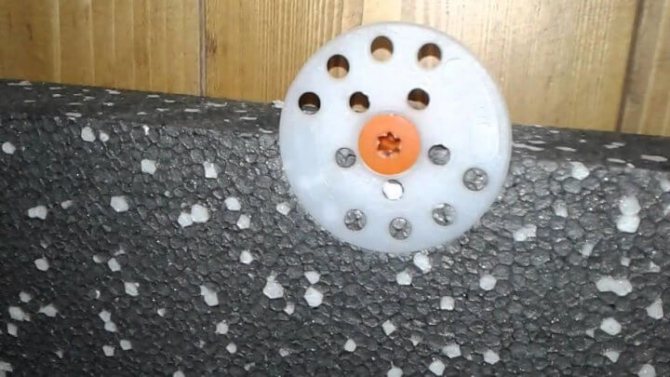
Consider how to attach foam to a wooden wall using special fasteners, which are hats with a diameter of 5 centimeters or more and self-tapping screws, the length of which should be sufficient to securely fix the insulation to the wall.
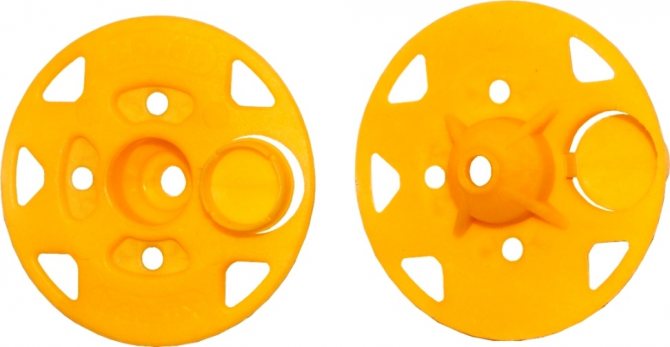
A special hold-down washer is called a rondole and has a special cover in the design that covers the screw head
The work technology is as follows:
- The first step is to prepare the base - if there are gaps or significant irregularities in it, then they must be repaired to ensure the best effect.
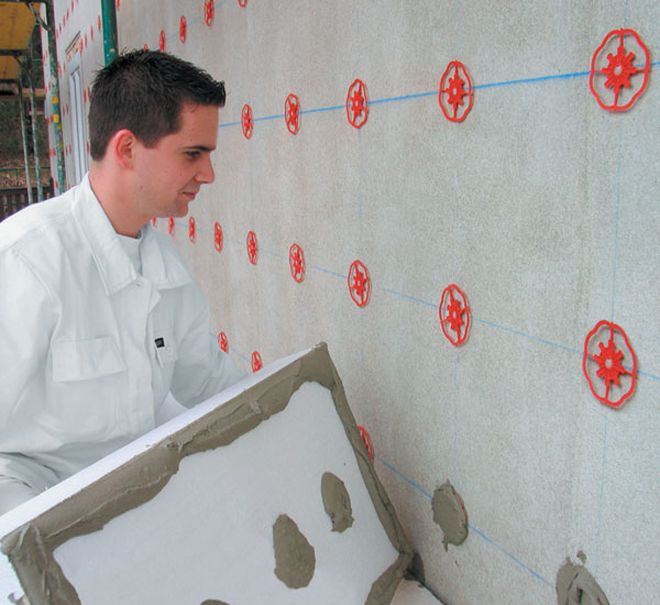
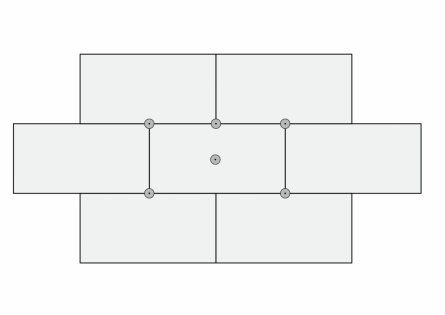
- The working process is carried out as follows: fastening is made from bottom to top, each sheet is fixed with several fasteners. The diagram below shows an option for saving fasteners, you do not need to hammer all five rondoles into one sheet, you can fix the element in the middle, and use the rest in the corners, that is, they will hold several sheets at once, which several times reduces the consumption of materials.
The correct arrangement of the clamping elements allows you to use one squeegee for four sheets at once
- After completing the work, it is necessary to carefully inspect the surface and, if there are gaps, they must be filled with foam.
Gluing
A very reliable option, and its only drawback is the high price of the compositions, which is especially noticeable with large volumes of work.
The technology is simple, but it requires accuracy:
- Before gluing the foam to the wood, it is necessary to level the surface, otherwise, with drops, the consumption of the adhesive will increase significantly, and the reliability of the connections may decrease.
- Next, you need to decide how to glue the foam to the wood, there are two main options: polyurethane foam or a special adhesive, which is produced in the same cylinders as the foam, but has improved properties and increased yield. The second option is preferable, so try to use it.
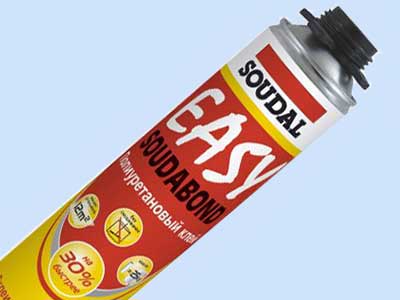
For glue, the same guns are used as for polyurethane foam
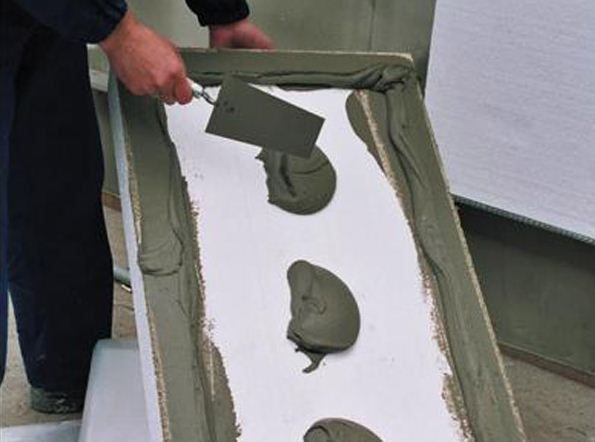
- The surface must be free of dust and free from wet areas, as this negatively affects the adhesion of the composition. The composition itself is applied to the sheets by any option convenient for you - a snake, along the perimeter, dots. The most important thing is reliability, and the rest of the nuances do not matter.
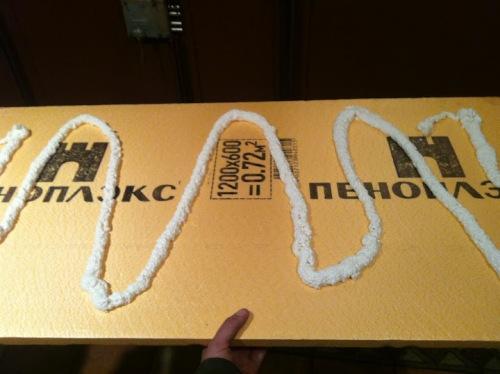
The composition is applied to the foam sheet just before it is attached
- Then the element is pressed tightly for a few seconds, after which it can be released, the glue begins to set within half an hour, complete solidification occurs in 24 hours.
Remember! The final stage is the sealing of cracks at the joints, it can be carried out either with the same adhesive composition or with polyurethane foam, there is no fundamental importance here.
Features of penoplex and fastening
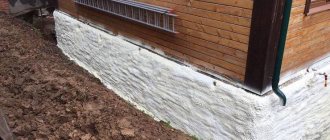
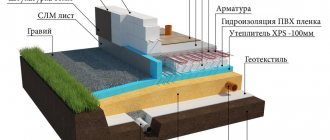
The moisture absorption coefficient of the material is ≤ 0.4%, which is an excellent indicator. The thermal conductivity coefficient is 0.029-0.033 W / (kg • K), that is, the material keeps heat for a long time and does not let it out from the insulated rooms. These complex characteristics make it possible not to use waterproofing when fixing the EPSP, which makes it cheaper to use. The foam is fixed to the concrete wall mechanically with preliminary gluing of the plates - double fastening makes the connection strong and durable. Surfaces on which it is recommended to fix polystyrene foam - floor, walls, ceiling, ceilings, etc.
With a wide spread in the dimensions of thinner slabs, it is recommended to install the foam on the wall inside the building with thinner slabs, the outer surfaces require thicker thermal insulation.
How to fix penoplex to concrete on the ceiling
On different surfaces from different building materials, the installation of foam is carried out in different ways.So, the fastening of the slabs to the wood is carried out by gluing, the fastening of the penoplex to the brick wall or to concrete requires additional reinforcement with dowels. Before you start attaching the penoplex to the wall, floor or ceiling, the surface must be prepared:
- Clean and dust off the surface to be insulated before attaching the foam to the wall;
- Saturate the risk zones with a solution of copper sulfate or other antiseptic substances - corners, lower surfaces of walls next to the floor - to prevent the spread of mold and fungal diseases;
- Extend, clean and repair cracks and cracks in the surface;
- Prime the surface with a deep penetration primer;
- Apply the putty solution to uneven surfaces and prime them again after the primer has dried.
How to glue penoplex to a wooden wall
These rules apply to brick or concrete surfaces, but how to fix polystyrene foam insulation to wood? First, the wood is impregnated with antiseptics, then - it is imperative to assemble a frame for ventilation of the inter-wall space. EPS will be glued to the frame, and the air circulating between the insulation and the wall will not allow the wood to start to rot.
jsnip.ru
Installation options and their advantages
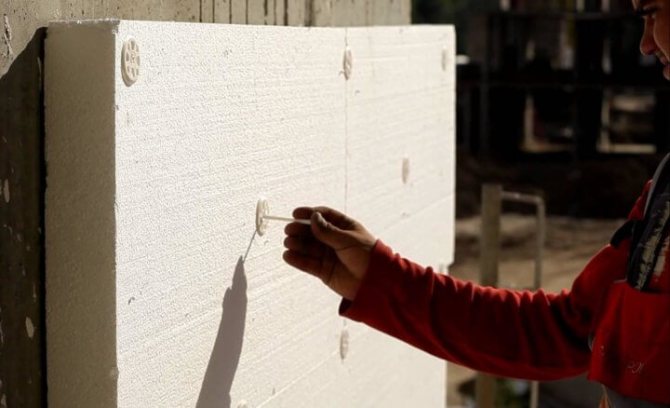
Fastening foam to the wall with fungi
Today, several popular methods of fixing foam are used, often dry or wet adhesive, dowels, or a combined fixing method are used.
Often, adhesives are used for the internal insulation of a building.
This method has certain advantages, is convenient and quick to use.
It is enough just to knead the adhesive solution or buy a ready-made one. This material allows for good adhesion to walls or other structures. To complete the interior decoration of the room, such actions will be enough.
If you carry out insulation work from the outside of the building, you can use dowels and glue at the same time. Such a decision may be justified, since in the future it will be necessary to perform the facing of the building.
The material used for the insulation must withstand the load exerted on it, so for greater confidence it is better to use additional foam fasteners to the wall.
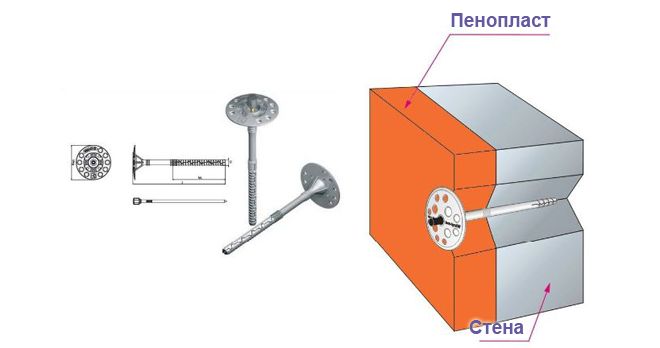
Often, special umbrella dowels are used for additional fastening. The length of the dowel is determined by the material from which the wall is made, as well as by the thickness of the insulating layer:
- You need to drive the dowel into the brick to a depth of 9 cm.
- For concrete, 5 cm is enough.
- Blocks with structural cells require a 12 cm recess.
Such dowels are simply irreplaceable for outdoor decoration, since they are able to fix the foam on the wall much more reliably than conventional glue.

Preparation for insulation
Before installing insulating elements using special fastening elements, you need to prepare the wall. If the base is prepared correctly, the installation of the insulation will be of the highest quality, reliable and fast.
Fastening the foam to the wall with dowels
You will have to perform the following sequence of actions:
- It is advisable to clean the surface of the wall from all protruding elements that may interfere with the insulation process.
- Using high-quality mortars, it is imperative to level the walls. It is not recommended to leave drops larger than 1 cm.
- Cracks are treated with polyurethane foam or cement-sand mortar.
- To prevent the appearance of mold and mildew, it is advisable to treat the wall surface with an antiseptic.
- Before insulation, the prepared surface must be covered with a primer.
When foam is used as insulation elements, a special support strip made of a metal or wooden profile is mounted at the bottom of the wall.In width, such a bar should correspond to the thickness of the insulation.
When such a bar is fixed, you need to make sure that it is in a horizontal position using a building level. When using such a base, the foam boards will not move downward under the pressure of their weight.
How is the penoplex attached correctly?
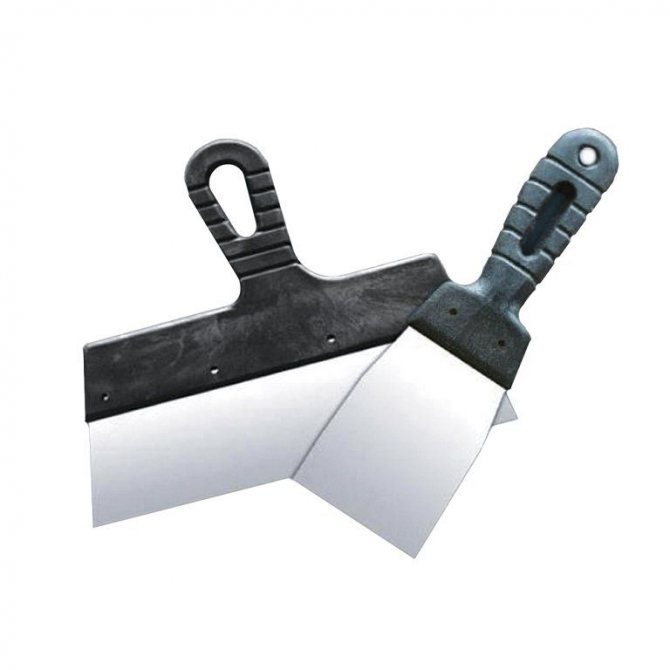
Before fixing polystyrene foam, you must prepare the following materials and tools:
http:
- expanded polystyrene sheets;
- vapor barrier film;
- plastic dowels;
- construction knife;
- mounting foam;
- construction tape;
- copper sulfate;
- puncher;
- drill;
- a hammer.
Instructions on how to properly fix the penoplex:
- Before insulation, the walls need preliminary preparation. First, it is necessary to remove old coatings from the surface (wallpaper, for example, if any). Secondly, the surface is treated with an antiseptic (copper sulfate may be a good option). This is necessary to remove mold and mildew (in cases where the wall is frozen through). And only after completing these points, you can proceed to the stage of installing expanded polystyrene sheets.
- A vapor barrier film must be attached to the surface of the wall with adhesive tape. It is important to remember that the film can only allow air to pass in one direction, which is why when attaching it, it is important to pay attention to the required side and attach the film correctly. And only after this action, you can start mounting the penoplex. It is best to start laying from a corner, moving from the floor.
- It is more convenient to fix the material with someone else. One will be able to support a sheet of expanded polystyrene, and the other, using a puncher, drill the five necessary holes (in the center and in each corner). It is important to consider the length of the dowels when drilling. With the help of this technology, all the plates are fastened.
- For the tightness of the seams, they must be filled with polyurethane foam. Insulation is carried out completely along the entire wall, it is not necessary to exclude the heating zone, and so on. After using the foam, it takes some time for it to dry and freeze, this will take about a day. When the foam dries, any excess residue can be removed with a regular knife.
- Now you can start the wall cladding stage using drywall or chipboard sheets.
http:
The instructions for attaching the penoplex are not complicated. It is enough to carefully read it and strictly follow all the recommendations.
1postroike.ru
How to attach extruded polystyrene foam to a wall
The choice of dowels and their location
Disc dowels are considered an indispensable element for fixing foam in the process of its outdoor use. Such elements insure materials against bursting under their own weight and detachment from the wall. There are several popular dowel patterns.
If the polystyrene is glued to the hardened plaster mortar, the number of fasteners should be maximum. If the base is more durable, 2-5 dowels per 1 sq. m.
If, for some reason, plaster remains on the wall, the thickness of such a layer must be taken into account when determining the length of the dowel. The fact is that the mechanical fastening should be wedged in a sufficiently strong base, and not in hardened concrete.
Before starting the insulation work, you need to determine the thickness of the plaster layer over the entire wall area. The length of the dowels is set accordingly.
Penoplex advantages
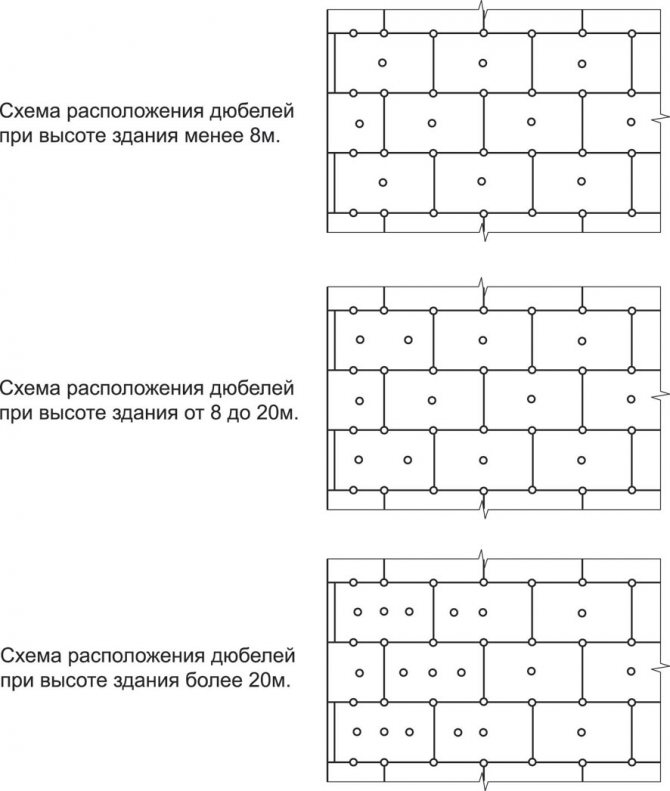
Installation diagram of dowels in concrete or solid brick.
Penoplex is an excellent thermal insulation material of the present time. It is lightweight, strong and durable. It is very easy to work with this material; it is not difficult to mount the penoplex. The distinctive characteristics of the material make it in demand and popular not only in our country, but also around the world.It is worth noting that this material is environmentally friendly and safe, which is important. Expanded polystyrene does not absorb moisture and has a low thermal conductivity. This explains the correct choice in favor of this material in order to insulate the walls. The main thing is to correctly perform the fastening technology.
Very often this material is used during the construction of private facilities. They can insulate the room on the balcony or loggia in order to expand the living area in the apartment. In this case, it will be necessary to make a frame, where the material for thermal insulation will be inserted directly. After that, you can already sew up the resulting structure with thin plywood.
Expanded polystyrene is also used in road construction. It turns out that the use of this material allows you to increase the time of use by preventing the effects of soil heaving on the road. This material can withstand very high loads.
It does not deform during use, but has a high level of frost resistance.
Fastening insulation
Fixing the foam with dowels is performed in the following sequence:
- The material must be anchored at least 4 hours after it has been attached. This is to ensure that the hardened adhesive is not destroyed during the installation of the foam fasteners.
- On the perforator along the length of the dowel used, you need to install a special stop for the most accurate drilling depth.
- The disc dowel is inserted into the drilled hole. The plastic core is neatly driven into the dowel and wedges it into the hole.
- The dowel must be driven in so that it presses the insulation lightly. It is extremely undesirable to crush the foam, this can lead to a deterioration in the thermal insulation characteristics.
If the core does not fit normally, it is enough to replace the damaged drill and make a normal hole.
Fastening to a tree
Fastening foam to wood
To determine the correct way to attach the foam to a wooden wall, you need to familiarize yourself with the modern technologies used:
- Fixation between the battens.
- Using special nails.
- Adhesive composition.
- Polyurethane foam.
Fasteners for foam plastic to wood in the form of special nails are used quite often, since such elements reliably hold the sheets. However, every place where such nails were used must be putty.
It should also be taken into account that metal elements will transmit cold through the insulation to the wall. A similar problem can be solved by using plastic fungi, as is the case with a brick wall.
Adhesives require a lot of care when used. This material should be sufficiently moisture resistant and not be afraid of temperature changes. Often a cement mortar is used for this with the addition of a small amount of glue. Conventional polyurethane foam is rarely used to fix foam. It is often used only to fill gaps.
Is Styrofoam So Good?
Wood is a material that "breathes" and this is the main advantage of wooden houses. Therefore, there are doubts about the insulation of a house made of wood with foam. Some people argue that it is possible and necessary to do this, others are sure that under the foam the tree will start to rot. However, experts say that this can be done, but only with a "breathing" insulation. Otherwise, you will deprive the building of its benefits.
There is a rule that says: the vapor permeability of materials towards the street should increase so that moisture does not escape to the outside.If this rule is neglected, then moisture will condense on the border of a dense material, which comes out of the room, which leads to the formation of condensation and decay of wood. Therefore, vapor permeability is a very important factor when choosing a heater.
Polyfoam has a lower vapor permeability than wood, so this is not the best option for insulation. But when organizing a high-quality ventilation system, the amount of escaping steam will be minimal, therefore, there will be no harm from it. Therefore, if you have a well-designed ventilation, then the foam can be used to insulate a wooden house.
Important! Under no circumstances use this material to insulate rooms and buildings with high humidity (baths, saunas, kitchens, and so on).
Installation process
Before starting the insulation, it is necessary to check all the joints between the logs or beams. If the insulating material is uneven, renew it and fill the voids with polyurethane foam. Next, boards are nailed vertically to the wall - so that their outer surface is flush with the plane of the wall. If necessary, then this will require cutting off individual logs. In the center of these boards, slats are nailed, which will serve as a frame. The installation step of the slats should be 5 millimeters less than the width of the insulation.
Next, the foam is inserted into the frame, starting from the bottom. If the distance of the frame is maintained correctly, then the material will be held in it due to the interference. If the sheets fall out, then they should be secured with foam wedges or nails. The main condition is that there are no gaps between them. Next, a diffusion membrane is placed on the material. It is fastened with a stapler, and the joints are glued with tape. After that, you can sheathe the wall with the selected facing material.
Important! When installing the diffusion membrane, carefully read the instructions for use so that it fits the right side to the insulation.
How to glue styrofoam to wood?
Having figured out how to insulate a house with foam, it is necessary to dwell in more detail on the methods of fixing it. There are several ways to do this:
- Fastening between the crate by means of an interference fit (as described above);
- Installation with special nails (fungi);
- Fastening with adhesives;
- Fastening with polyurethane foam.
The use of special nails is a fairly common practice when installing insulation, because they securely hold the sheets. But she has a drawback, which is the need to putty all the places where nails are hammered. It is also necessary to take into account the fact that metal nails will act as an additional bridge for the cold, because the metal conducts it well. You can solve this problem with the help of plastic fungi.
Adhesives do not have problems like nails, but you need to be very careful when choosing them. So, the glue must be necessarily resistant to moisture and temperature changes, otherwise it will be useless. Most often, cement mortar with the addition of glue is used for this. As for the polyurethane foam, it is rarely used for fastening, mainly, it is needed to fill all the gaps.
Advice! It should be noted that the most effective method of fastening is considered to be the "planting" of sheets on a cement mortar and their further strengthening with nails.
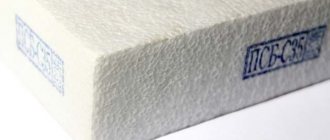
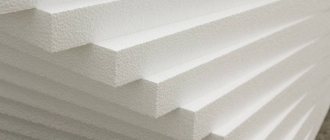
A little about extruded polystyrene foam
Many people think that insulating a wall from the outside with a special material is expensive and difficult to fix during installation, but this is far from the case. After all, we meet with this material every day in everyday life, calling it simply foam. Expanded polystyrene is an ordinary white foam, which consists of small granules, grouped in the form of panels and sheets.Foam granules contain air inside, so this insulation has a low coefficient of thermal conductivity.
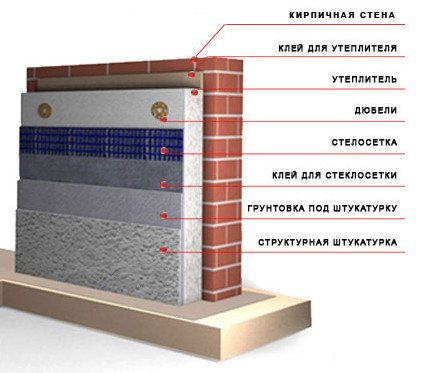
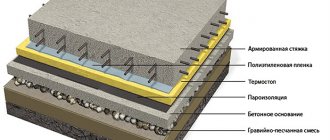
Wall insulation scheme with expanded polystyrene.
Foams are made from polystyrene mixed at high temperatures with foamed components based on freon or carbon dioxide. To obtain granules of new material, the mixture is passed under high pressure through a die with small holes that determine the size of the granules. Then, in a special compartment, sheets and panels are formed from the resulting mixture. Thus, we get a ready-made thermal insulation material familiar to us, which is used to insulate the house outside and inside.
A big drawback of foam is its high fragility, because it breaks down, experiencing even small loads, therefore, when insulating a house from the outside, it must be fastened very carefully. But an alternative to it was an analogue of extruded polystyrene foam. This material has the same properties as polystyrene, but at the same time it has good elasticity. In addition, the new insulation does not crumble, is resistant to high compression loads, has a high density and is waterproof. This is a new heat-insulating material that is made by melting pellets together in a special device called an extruder.
Insulation scope
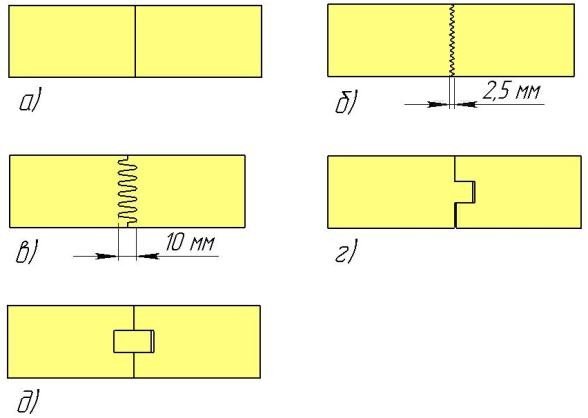
Scheme of bonding polystyrene foam with plywood: a) gluing on a smooth joint; b) gluing on a microthorn; c) gluing on a 10mm toothed spike; d) "tongue-and-groove"; e) an insertable spike ("key").
Expanded polystyrene is indispensable for floor insulation, since it does not affect the height of the room, in addition, it is used when installing floor heating systems. Such insulation is often used for buildings in which the floors are laid directly on the ground or on a specially prepared floor base. Extruded polystyrene foam is well suited for rooms with low temperatures, is able to withstand heavy mechanical loads, and is moisture resistant. Expanded polystyrene boards must be fixed directly to the concrete base, while avoiding the intersection of the installed insulation boards with concrete joints.
Another area of application of extruded polystyrene foam is thermal insulation of the walls of the house. It can be done both outside and inside. If possible, it is best to insulate the walls from the outside. It is advisable to do insulation inside if it is necessary to quickly insulate the building, if the house is old, and there is no other possibility to make insulation if the apartment is on a high floor and insulation from the outside is impossible. Basements are insulated with expanded polystyrene, and also used for basement insulation. When a monolithic foundation is being erected, the extruded polystyrene foam can be fixed as a permanent formwork, which makes it possible to use less reinforcement and concrete. In addition, it extends the service life of reinforced concrete foundations and basement walls.
This heat-insulating material is used if it is necessary to insulate balconies and loggias to increase the living space. In this case, a frame is made in which it is placed, and then everything is sewn up with plywood. Since expanded polystyrene withstands high mechanical loads, low temperatures and does not lend itself to deformation, it is used in road construction.
Installation of extruded polystyrene foam

Floor insulation with expanded polystyrene.
If you choose which insulator to mount, then it is better to give preference to extruded foam, although its price is twice as high. There are several options for how to fix extruded polystyrene foam when insulating walls from the outside. This can be done with:
- glue;
- cement mortar;
- special mastic;
- the use of mounting devices.
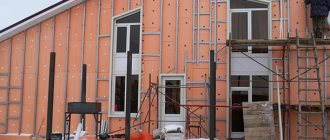
When performing thermal insulation from the outside, it is necessary not only to insulate the house, but also to protect the expanded polystyrene with the help of some kind of non-combustible material: brick, various plasters, ceramic tiles, steel or aluminum profiles. According to building codes, there must be a gap for ventilation between the trim and the thermal insulation material. This makes it possible for the insulation to remain always dry, otherwise it loses its thermal insulation qualities. But with this method, the area of the room is reduced, therefore, a different method is used during installation.
To separate the insulation from the outer wall, special materials are used that have certain properties. For external walls, a waterproofing material must be used to protect the heat insulator from moisture. To do this, you can use roofing material or glassine. In order to prevent moisture from acting on the insulation from the inside of the room, they use the so-called vapor barrier materials, which include ordinary plastic film. In the modern construction market, there is a wide selection of both waterproofing and vapor barrier materials.
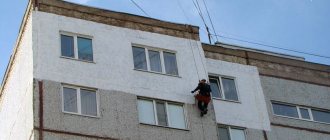
What is the best way to attach the foam to the wall
In order not to heat the air outside the house, the owners try to install thermal insulation. For this, a wide variety of materials are used, ranging from mineral wool to foam.
The most popular, due to its technical characteristics and affordable price, is polystyrene. To reduce the cost of work, the owners do all the work on their own. Therefore, they often ask questions, how to fix the foam to the wall?
How to glue foam slabs
To increase the efficiency of insulation, it is enough to glue the plates together. In this case, the correct choice of glue is of great importance. It should not contain components that destroy the foam. These include:
- solvents containing acetone;
- gas and oil products;
- alcohol solutions.
Experts recommend using polyurethane glue, PVA and liquid nails adhesive for gluing foam.
Of course, it is impossible to unequivocally answer the question of how best to fix the foam. Much depends on the nature of the surface and the operating conditions of the insulation.
Only adherence to the technology of fixing the foam, they allow high-quality insulation of the walls.
Mounting methods
In order for the insulation to fulfill its task, it must be properly fixed to the base. Professional craftsmen use several methods for attaching foam:
- On the adhesive. This option is suitable if the insulation will not be used as a basis for heavy finishing material.
- With fasteners. A more reliable method, but also suitable for spruce foam, it is planned to install a weighty decorative finish.
- A combination of the first and second options. The use of glue and dowels allows for the most reliable fixation.
Preparatory stage
First you need to buy all the necessary materials and tools that may come in handy during the installation process:
- Insulation. The required quantity is calculated in advance and must be bought with a margin. During transportation and even during the fastening process, the plates can be damaged, therefore several sheets in stock will not be damaged.
- Start profile.
- Adhesive composition suitable for outdoor use. You also need to pay attention to whether it is suitable for attaching foam.
- Fasteners (dowel-fungus) if this method was chosen for fixing.
- Deep penetration soil.
- Roller or wide paint brush (for applying primer).
- Sealant.
- Perforator.
After all the inventory and materials have been purchased, you can begin to prepare the base. For this you need:
- Remove old decorative trim.
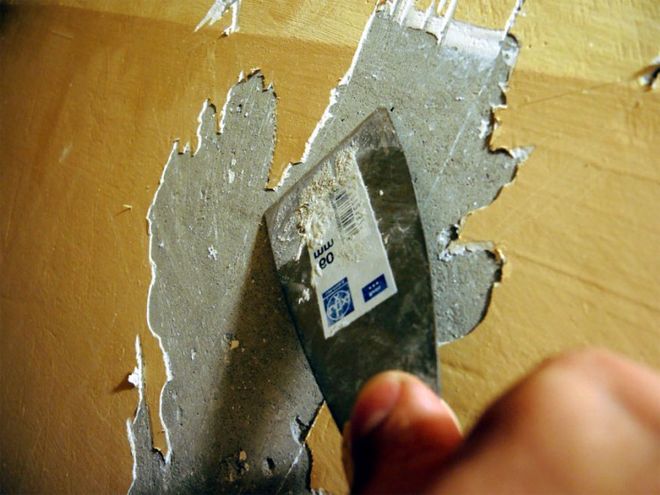
- If there are areas that crumble, then they are eliminated.
- Remove all elements of the facade that interfere with the installation process of the insulation.
- All cracks and depressions with a depth exceeding 5 mm are to be closed. For foam, it doesn't matter that the base is perfectly flat. But if there are large depressions, then with mechanical stress cracks may appear both on the insulation itself and on the decorative finish. And this reduces the effectiveness of thermal insulation.
- Cleans up stains and traces of mildew or mildew.
- The last stage in the preparation of the base will be the use of deep penetration soil. Areas of constant exposure to moisture (basement, foundation) are especially carefully passed.
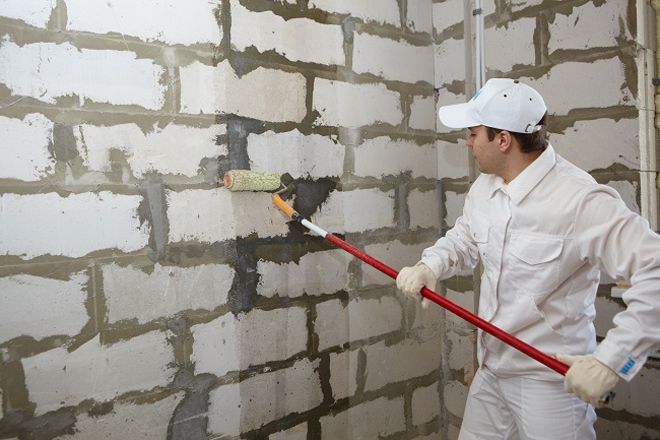
Only after the soil has dried can you start installing the foam in the chosen way. Now let's take a closer look at each method.
Preparation for fixing foam panels
For these purposes, it is first recommended to free the surfaces from any structural elements that impede the performance of work. Then, on the basis of visual data, a conclusion should be made about the advisability of carrying out restoration operations and, if necessary, repair cracks, chips, uneven drops.
The next step should be to treat surfaces with deep penetration compounds, which not only promote adhesion, but also prevent the spread of mold and mildew. Moreover, the application of the substance to the wall plane can occur by spraying or mechanical painting.
For adhesive composition
For a secure hold, you need to choose an adhesive that is suitable for outdoor use. Be sure to pay attention to the frost resistance of the composition, because it will be exposed to this effect more than once. And be sure to keep in mind that not all adhesive solutions are suitable for working with foam. When buying, read the label, manufacturers indicate for which materials the products are suitable.
For those who are wondering how to properly fix the foam with glue, now we will analyze the step-by-step instructions.
- Setting up a start profile. It is fixed around the perimeter of the entire building. It is on it that the entire construction of the insulation will rely, because its width corresponds to the thickness of the foam plate. It is imperative to ensure that the profile is installed clearly horizontally. For this, a building level is used.
- The profile is fixed with dowel-nails.
- Adhesive mortar preparation. Everything must be done clearly according to the instructions on the package.
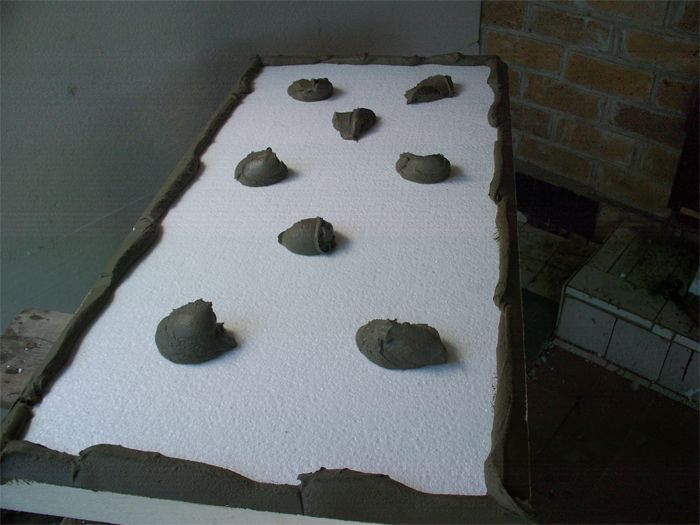
- Glue application. The solution is applied to the entire surface of the insulation with a thickness of up to 1 cm.In this case, you should not save money, because the reliability of fixing the plate will depend on the amount of glue.
- Installation of the stove. The first sheet of foam is placed in the starting profile from the corner of the building. You need to apply a little pressure on it so that the element is securely fixed.
- The next sheet is laid, stepping back 5 mm from the previous one.
- Fastening the next rows. The top slabs should be staggered so that the seams do not overlap. And between the rows, you also need to leave a small gap.
- After all the boards have been installed, the gaps are filled with sealant. You should not use polyurethane foam.
The final stage will be decorative finishing. It can only be done after the glue is completely dry.
Foam placement scheme
Further, it is advisable to decide on the layout of the insulation sheets, therefore, before cutting the foam plastic (performed with a mounting knife), it is advisable to draw up a small plan that minimizes the number of scraps due to a more optimal arrangement of the panels.
In this case, it is advisable to choose the arrangement scheme in such a way that the insulation sheets are staggered.
At the next stage, an adhesive is applied to the seamy plane of the insulation with blobs (tubercles 1.5-3 cm high) or a thin layer (depending on the curvature of the walls), after which the material is pressed tightly to the base. The vertical alignment of the wall to be insulated is controlled by a chipping cord, which is pre-stretched from one edge to the other of the surface and along which the panels are exposed.
After all the walls are covered with foam, the structure is left to dry completely, after which the required finishing operations are carried out. However, the presented method is not always acceptable, because when implementing the facade insulation technology, one should not forget about the requirements for mechanical stability, for which it is recommended to make additional fastening of sheets by a mechanical method (using fungi).
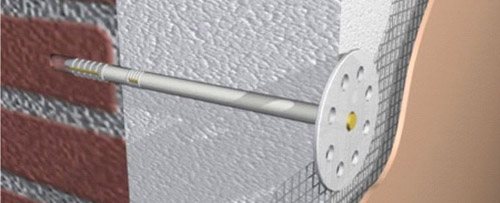
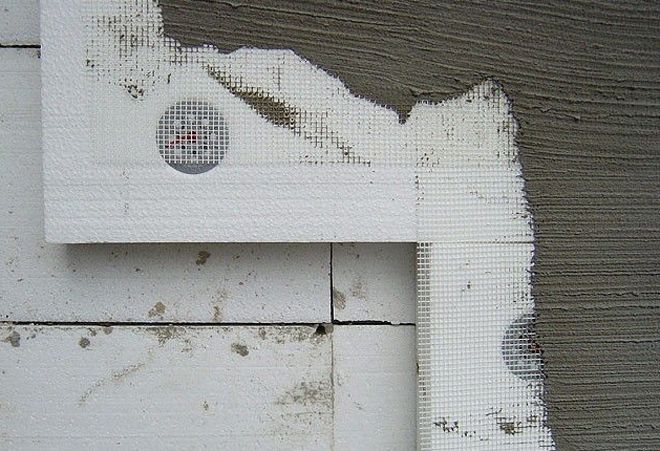
When holes with a diameter of at least 8 mm are made directly through the foam cavity in the base surface of the wall, and the legs of the fungi are sunk into them. And the process of fixing the elements occurs due to the drowning of the nail, however, such a condition should be achieved that the entire cap of the fungus is recessed into the inner part of the insulation by at least 1 mm. The location of the fixing mushrooms should be selected in such a way that each sheet has at least 5 elements (1 - center; 4 - corners), or several adjacent sheets were fixed with one mushroom.
When the balcony is insulated with polystyrene, the sheets can be fastened by mounting them against the elements of the supporting frame with their subsequent sheathing with specialized finishing materials (plastic, MDF, drywall). Therefore, having studied the method of fastening the insulation, figuring out how to sheathe a house with foam will not be difficult even for a non-professional builder.
On fasteners
To attach the foam in this way, you need to purchase special dowels with a wide head. They are called "fungi" or "umbrellas". To calculate the required number of fasteners, multiply the number of whole sheets of insulation by 5. Since the plates are fixed with 5 dowels each.
- First of all, just as in the previous version, the start profile is installed.
- Next, you need to fix the first sheet of foam. It is placed in the starting profile and, using a perforator or an electric drill, make holes with a depth corresponding to the length of the dowel plus 1-3 mm. In order not to overdo it on the drill, you can set a stop or mark with a marker.
- First, the dowel is installed, and then the core is driven into it. The head of the fastener should "sink" in the insulation by 1–2 mm.
- Fasteners are installed at the corners of the insulation sheet and one in the center. If the cap is very wide, then one dowel can hold 2-3 slabs.
- A gap is left between the elements, which is then sealed with a sealant.
- The place where the dowel is located must be wiped with plaster.
Finish the renovation of the facade with the installation of decorative finishes.
Combining option
It is in this way that the foam is attached to the brick wall. It is considered the most reliable. Here they use both an adhesive composition and fasteners. But no difficulties should arise if everything is done strictly according to the instructions.
- Setting up a start profile.
- Preparation of a cool solution.
- Applying glue to a sheet of polystyrene (around the perimeter with a dense layer, in the center - several stripes or blots).
- Attaching the sheet to the wall.
- Drilling holes in the insulation and the wall.
- Dowel and core installation.
- Securing all plates.
- Grouting the installation sites of fasteners.
- Treatment of gaps with a sealant.
- Decorative finishing.
These are the main options for attaching Styrofoam to the wall, but professionals recommend using the latter. With this method of fixing, there will be no need to worry that the insulation will fall off, and with it the entire facade decoration.
Fastening with disc dowels
When installing a heat insulator using disc dowels, special adhesive mixtures are sometimes used. They are used if the surface of the walls is uneven and has various pits and defects.
A sheet of extruded polystyrene foam is pre-treated with an adhesive and applied to the wall. The application of glue mixtures is usually done with special combs, such combs are used when laying tiles.
The alternation of the adhesive layer allows the sheets to be adjusted to each other, regardless of slight irregularities in the base, while ensuring reliable adhesion of the extruded polystyrene sheet to the base.
After the layer of glue has dried, holes are made using a perforator or impact drill, into which disc dowels are installed. Until the adhesive is completely dry, it is not recommended to install the dowels, since when installing them, the sheets can be displaced or strongly pressed, which will lead to an increased consumption of the finishing plaster or putty. Dowels are installed in the center and edges of the sheet.