An unexpected shutdown of water, insufficient heating or lack of it at all - many people certainly in their lives have come across similar and others problemsrelated with hot water... And at such moments, there is a desire to provide for yourself and your family the most comfortable living conditions. And the desire is certainly followed by the simplest solution to this problem - buying a water heater... But so that your idea does not serve as a reason for new problems, you should, first of all, familiarize yourself with the technology of its installation.
Features of using a flow type water heater
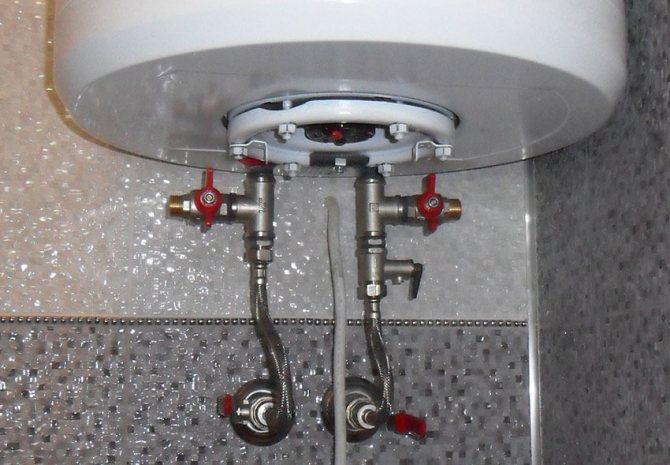
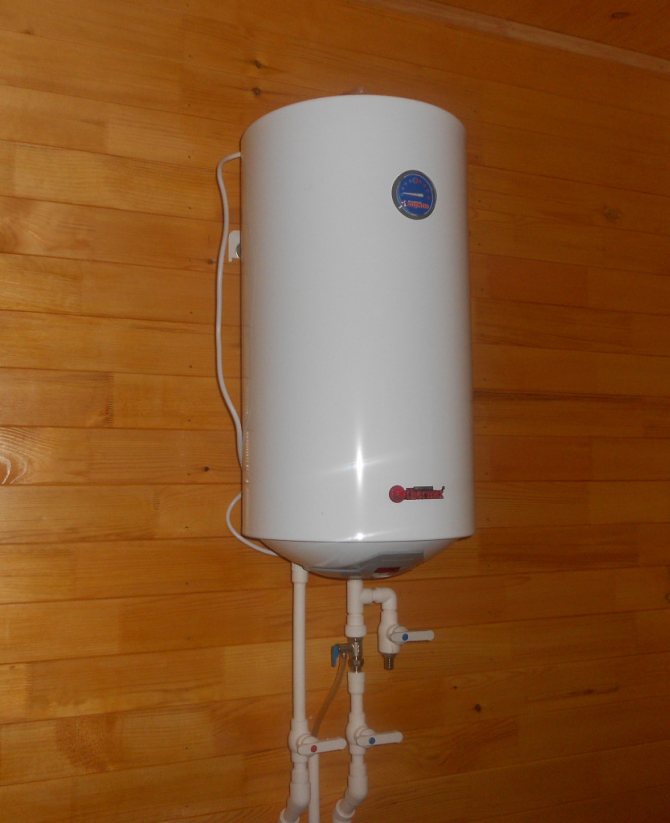
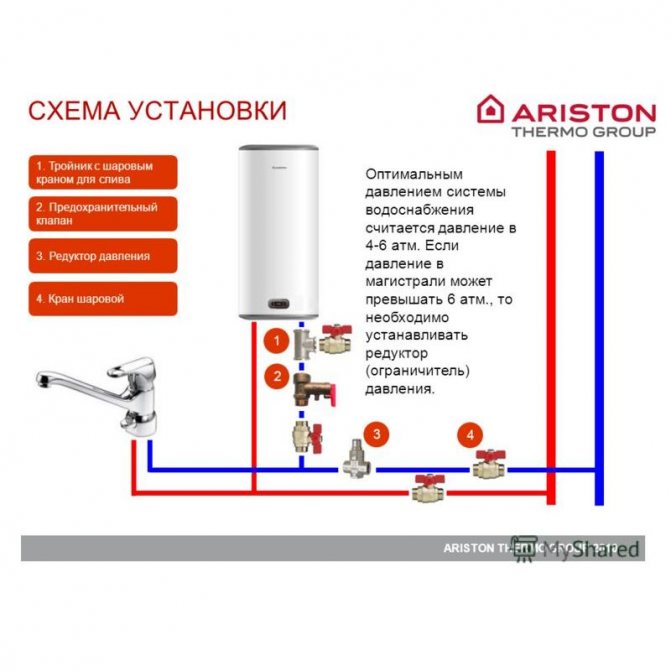
In the case of a stationary installation of an instantaneous water heater, a scheme for simultaneous supply and water intake is used. Installation is carried out in a parallel way to the water supply system of a private house or apartment. This method involves the installation of tees together with valves on each pipe. Due to this, if necessary, the flow-type heater can be completely excluded from the intra-apartment water supply system.
The cold water pipe is connected to the inlet of the boiler, and from the outlet of the device, it is connected to the hot pipe using a reinforced hose
In the case of installing a water heater in an apartment building, it is important to turn off the hot water valve on the central riser in order to prevent the heated liquid from getting into the water supply of the neighboring apartment
As you can see, it is quite simple to install both a flow-through and a storage type boiler and, quite possibly, do it yourself. And if someone still has questions, then the article provides a detailed video on inserting a water heater into the water supply system and connecting to an AC network.
Installation of instantaneous water heater
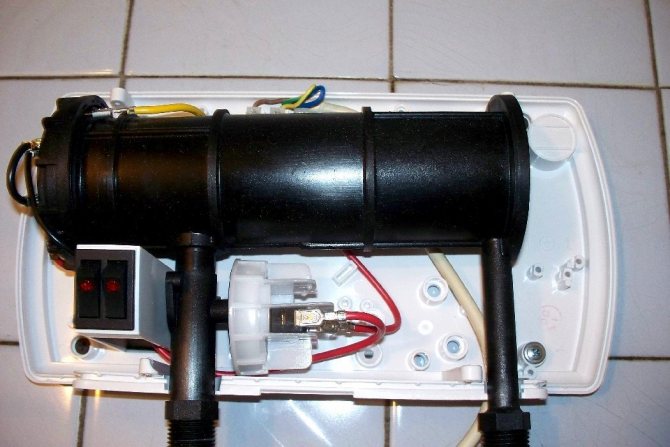
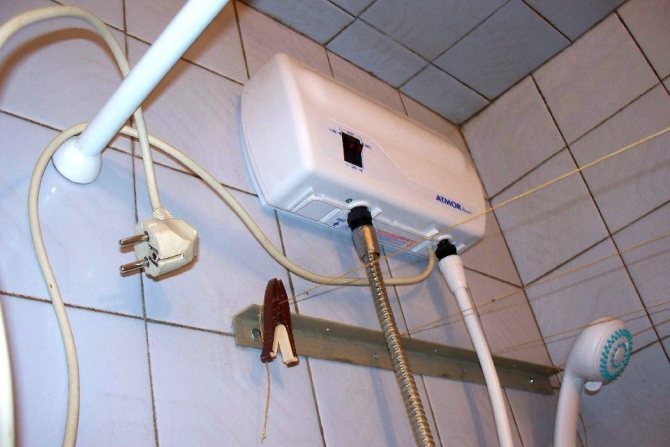
Instantaneous water heaters have light weight and size and usually installed where it is impossible to install a large storage... But due to the fact that very powerful heating elements (tubular electric heater) are installed inside them, then its installation requires certain conditions. First of all, it's good wiring. The details of this condition can be found separately, they are usually more scientific in nature. Suffice it to say that sometimes, when installing an instantaneous water heater, it is necessary to replace the wiringand sometimes a counter. The installation method independently without the appropriate technical knowledge and experience is a very difficult, sometimes overwhelming task and is certainly associated with great risk, since we are talking about high voltage.
The installation of an instantaneous water heater by specialists will practically not differ in anything: fastening, connecting, preparing, checking. The only peculiarity is the issue of wiring, which will also be solved by specialists.
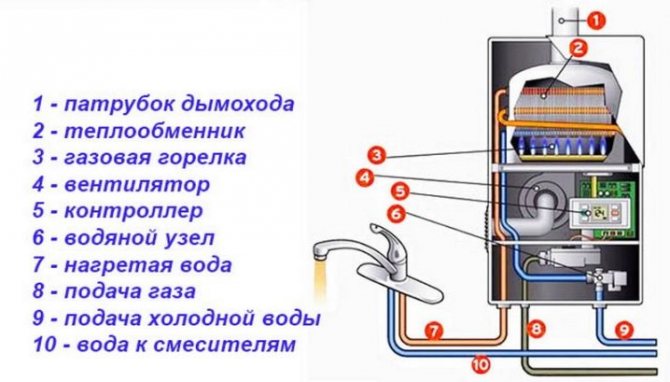
Installing a gas heater
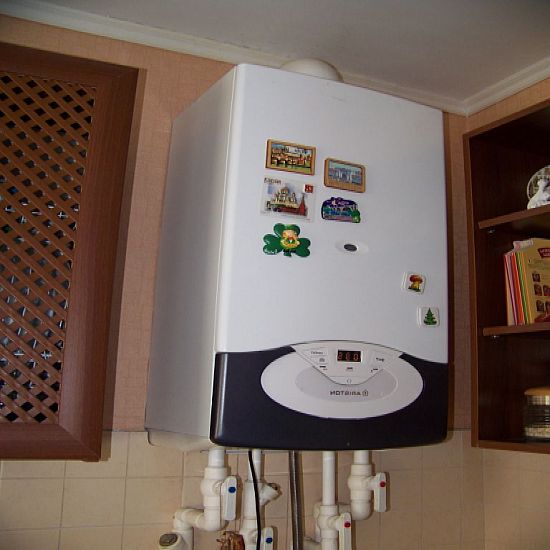
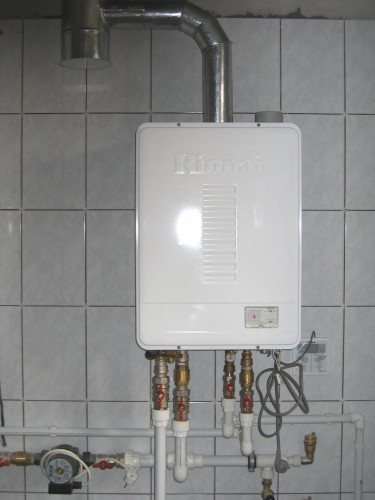
Installing a horizontal gas water heater is more complicated than an electric one. In this matter, it is better to contact professionals. But in the case of self-installation, you must clearly follow the instructions, designations and rules. The height of the ceilings should be at least two meters, and the area of the room should be more than 7.5 square meters. meters. In addition, the room must have a window, in addition, there must be a door in the room. Most often, such appliances are installed in the kitchen, next to the gas pipe.
A very good way to detect gas leaks is to install a gas analyzer. Such a device detects a propane leak and gives a warning signal. But ventilation is also required.For the gas water heater to work properly, a chimney must be connected to it. It can be included in the general system, or it can be brought out separately directly to the street. It should not have more than two right-angle bends, and its total length should not be more than three meters. When installing the equipment on a wooden wall, the chimney must not come into contact with it. It is imperative to lay thermal insulation, for example, from mineral wool.
You need to know that a gas water heater should not be placed on a load-bearing wall. The distance to the opposite wall must be at least one meter. Gas pipes cannot be installed in walls. But you also need to take into account that gas equipment cannot be placed above the stove. It is undesirable for the water heater to be constantly exposed to sunlight and overheat. In order to check the tightness of the gas pipes, you can use regular soap. It must be dissolved in a container of water, and then applied to the pipe joints with a brush. If bubbles appear, then there is a leak. And it must be urgently eliminated. Do not use fire to check pipes for leaks. This can lead to irreparable consequences.
Where is the water heater installed
Boilers are divided into several types based on the type of installation. It can be:
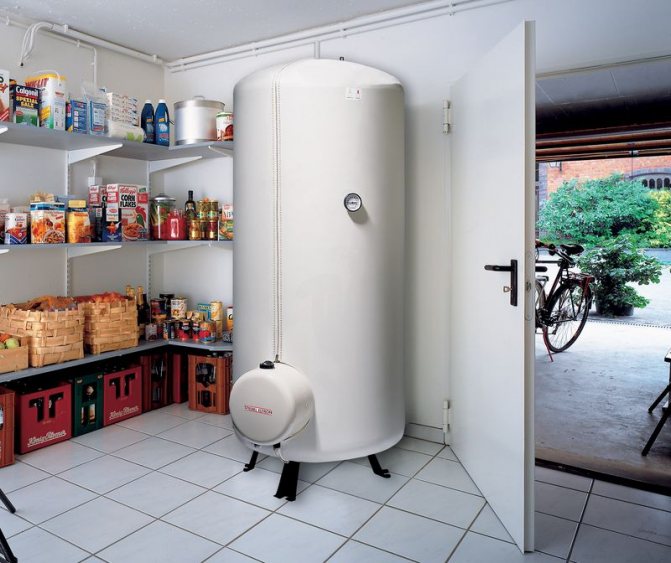
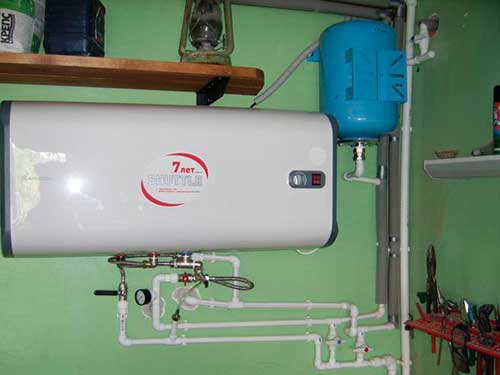
- Floor models... They are designed for a large volume of water and take up a lot of space, so they are more suitable for private houses. A stand is installed on the floor, where the body is attached. It is important that it is level. For this, adjusting bolts are provided on the bottom.
- Built-in appliances... They are installed under the sink or in specially designated cabinets.
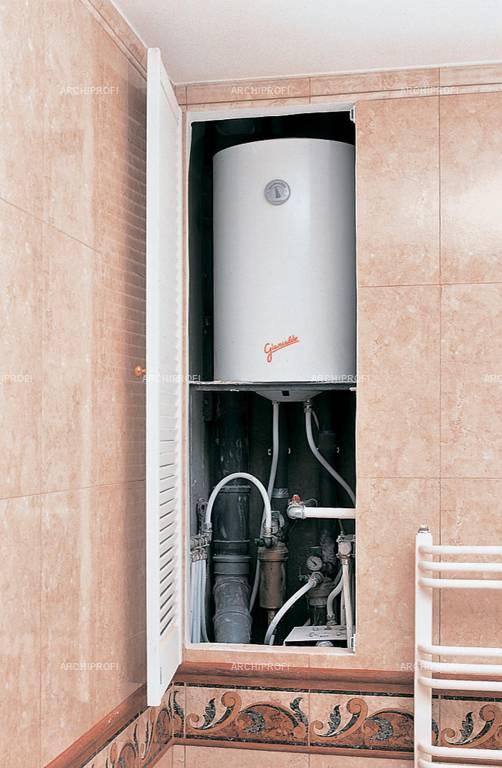
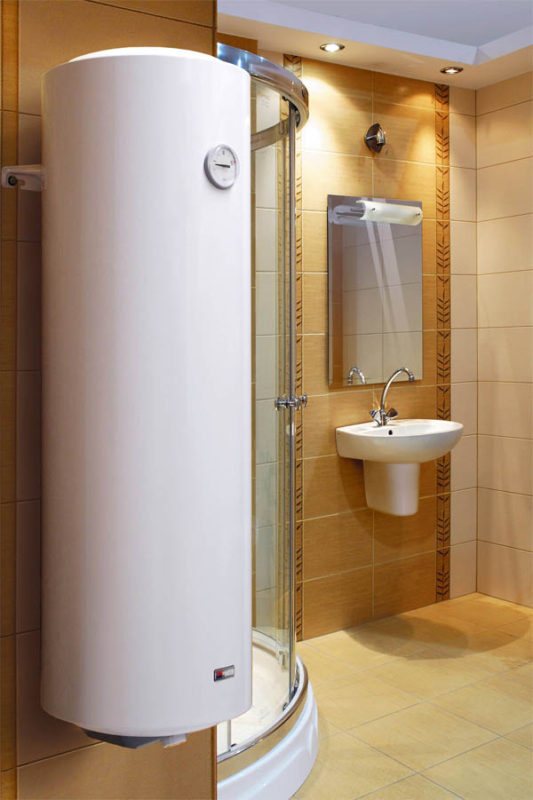
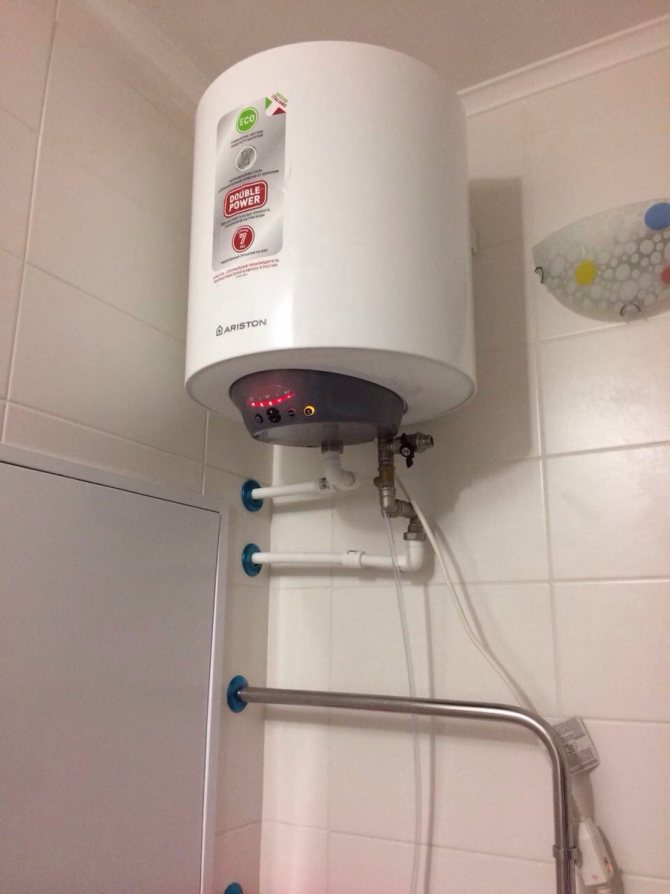
- Wall models most often bought for an apartment. They take up a minimum of space. In addition, you can choose a vertical or horizontal placement method. It is best to place it in a toilet or bathroom.
What you need to know, what rules to adhere to before installing the equipment:
- The boiler should be located close to the sampling points. The shorter the length of the pipes, the less chance of water freezing.
- When buying built-in appliances, you do not need to completely sew them into the closet. Do not place the device close to a wall or other equipment. The water heater periodically requires maintenance, and this requires space.
- Decide in advance on the model to prepare everything you need. You may have to replace the wiring for the flow-through, and for the storage one, install strong mounts in the wall.
- Appliances with a large tank capacity should only be placed on a supporting wall. Anchor bolts are considered the most reliable fasteners.
Installing a flow-through boiler
Due to the rapid heating of water, instantaneous boilers are equipped with rather powerful heating elements.
For this reason, special attention is paid to wiring. The cable cross-section must exceed 4 mm²
Be sure to find out the current strength of the machine, to which the electrical wiring is laid. The current strength for one water heater should be within 32-40 A.


The installation of an electric boiler provides for two connection methods:
- temporary;
- stationary.
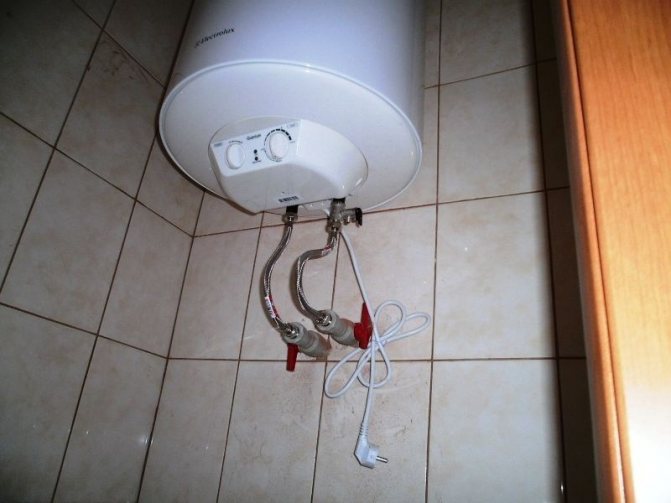
The temporary method of installing the boiler involves using a regular shower hose. The algorithm for connecting a temporary water heater is as follows:
- a tee is cut into the pipe with cold water;
- a shut-off valve is being installed;
- the tap is connected to the boiler inlet with a flexible hose;
- the tap and water heater turn on;
- the boiler outlet opens;
- after 30-40 seconds hot water will pour out of it.

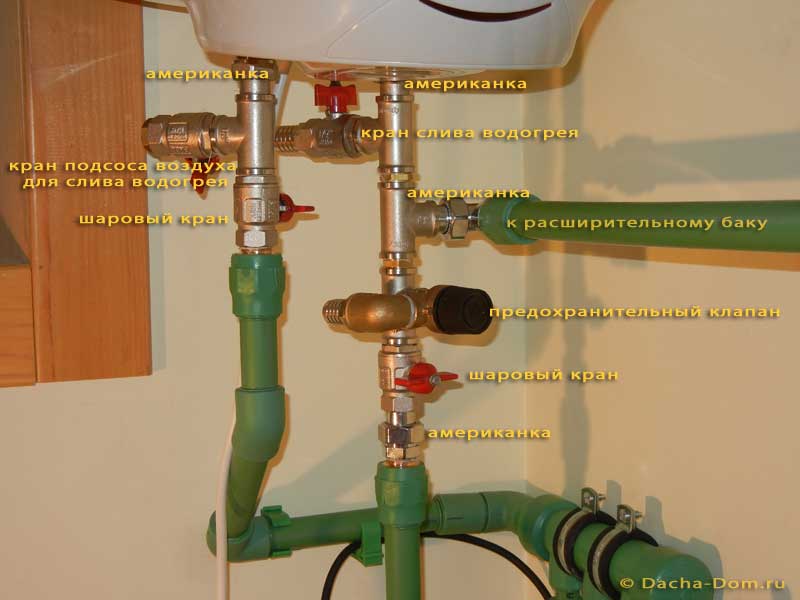
The stationary boiler installation scheme consists in a parallel water supply relative to the water supply system. The following steps are taken:
- two tees cut into a pipe with cold and hot water;
- cranes are being installed;
- for a high-quality device of all connections, fum tape or tow with paste is used;
- the boiler inlet is connected to the cold water supply pipe;
- the hot water outlet is connected to the stopcock;
- checking the tightness of the connections is carried out by opening the mixer and taps;
- if everything is in order, the water heater is connected to the electrical network.
Owners of an apartment in an apartment building must necessarily shut off the hot water riser. Otherwise, hot water will flow into the neighbors' plumbing system.
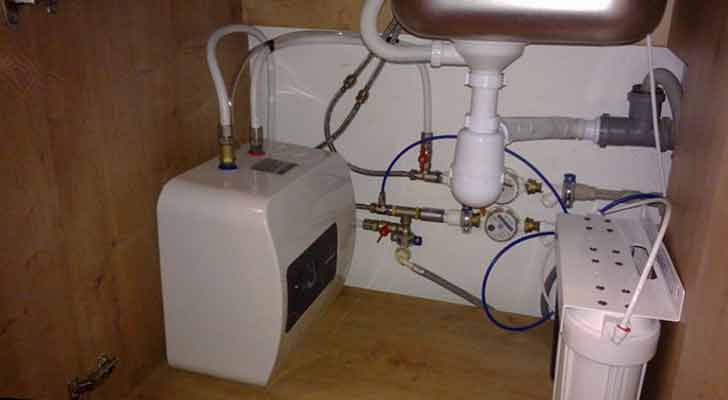
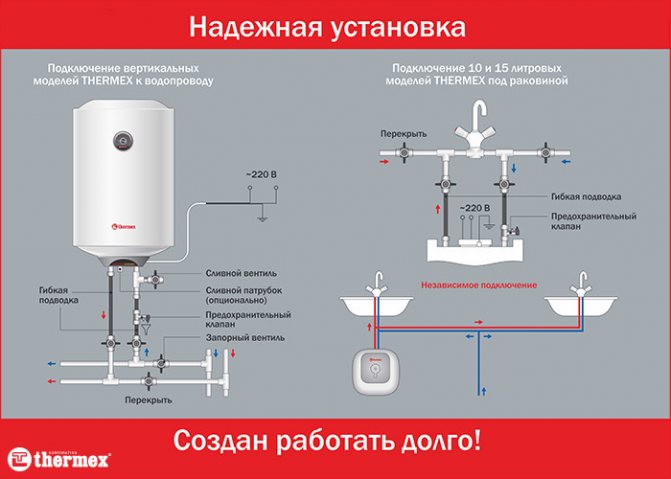
Selection and installation of a water heater under the sink
The use of small devices for heating water is often due to the lack of other sources or interruptions in hot water supply. Retail chains are sensitive to the situation and today they offer different types of devices that are of modest size and are mounted in a convenient place. Most often, the space next to the kitchen sink is used for installation.
Types of heating devices
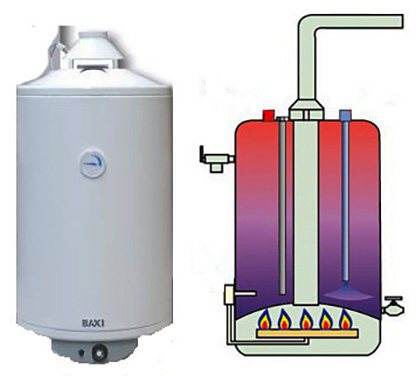
The ancestor of a series of devices for heating water, powered by electricity, is a gas appliance - a column. They were previously installed centrally in apartment buildings. Where there are problems with the gas supply, they can be replaced with electrical counterparts, because the branching of electrical networks is greater, and they are available in almost every settlement, including dacha cooperatives.
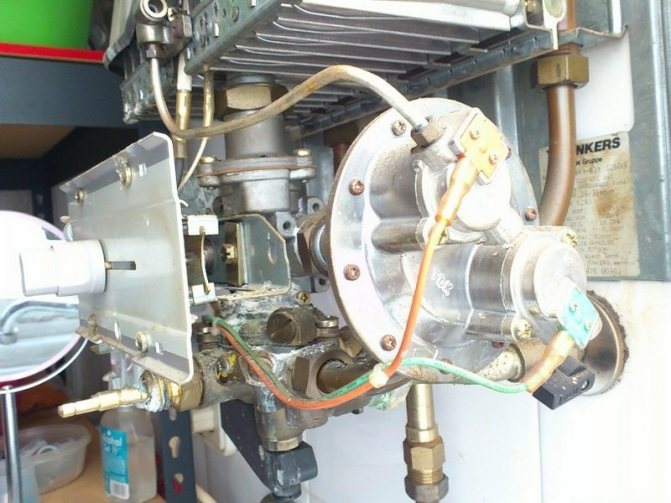
Gas water heaters differ in the degree of automation and control. The simplest ones have mechanical adjustment, the more complex and expensive ones are automatically controlled. The safety of use also depends on the degree of automation. The safety valve automatically shuts off the gas supply to the burner after receiving a fault signal.
According to the method of operation, all water heaters are divided into two groups: flow-through, storage. Let's consider each type separately.
Flowing
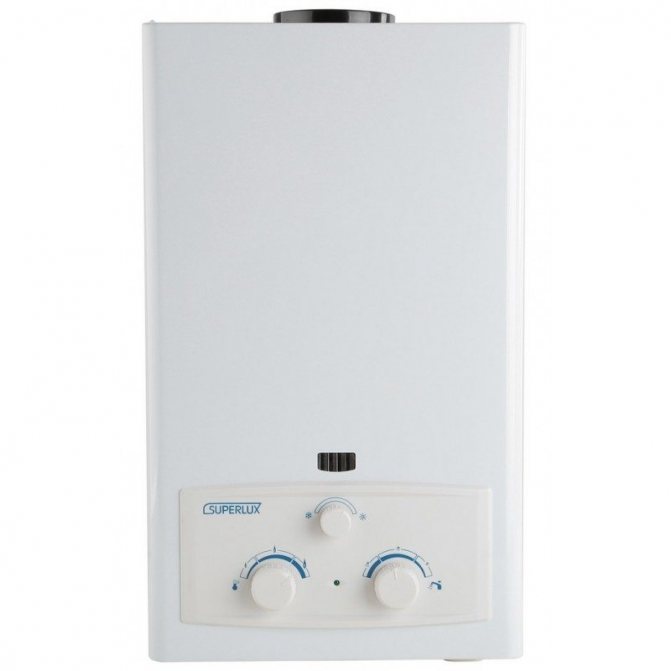
These primarily include gas water heaters. Aggregates of this type have a long history. The first models were unsightly products with manual switching and without automation. In the process of evolution, they have become real masterpieces of technical excellence: beautiful, compact and stuffed with electronics. Manufacturers have provided different color options and additional chips: automatic ignition when opening the tap, LCD display, turbocharging.
For their operation, the following conditions are required: serviceability of the unit, continuous supply of gas and water. In the absence of one of the points, the work stops. The appearance of the devices is quite suitable for the entourage of the kitchen, but installation under the sink is excluded. For safety reasons, they are installed at a certain height from the floor and they need a separate chimney.
The electric analogue is much more modest in size and looks like a small box from the side. It is easy to embed it into an existing water supply system and connect it to the electrical network. When the tap is opened, the device is triggered, and the device begins to heat the passing water stream. The resulting hot water is used for household needs. The throughput of the equipment is limited by the power consumed from the network and therefore they are not suitable for large volumes of water, but they are compact and allow for concealed placement.
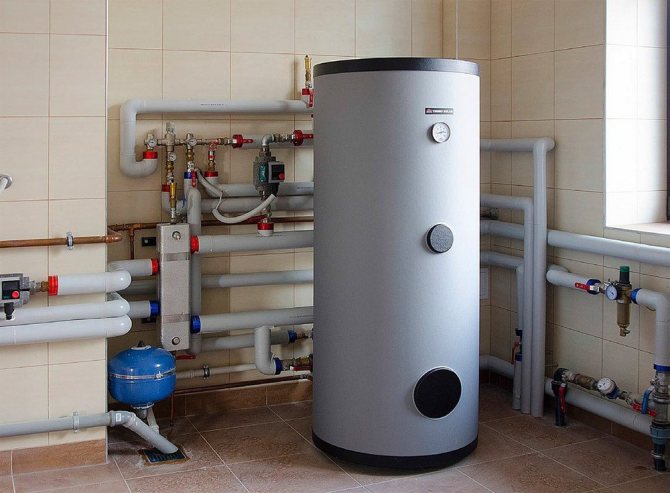
Cumulative
They differ from flowing ones in a separate container, where hot water is collected, heated and stored for a long time. For this, a wall structure with a heat insulator is used, reminiscent of a thermos. The device does not work all the time. Automatic setting allows heating and maintaining the set temperature inside the tank. When the required parameters are reached, the heating elements are turned off.
Most of these electric heaters are called boilers. They are collected in one case and are massive devices.Outside there are controls and visual controls. A prerequisite is a network connection.
Gas counterparts are more cumbersome. They are more often used by large consumers and consist of two separate elements: a heating column and a thermos tank connected in series. There is no way to place them hidden under the sink.
Boiler performance
When buying, you should use a comparative scale, which indicates the ratio between the manufacturer's declared capacity in liters per minute and the way the device is used. The usual line of boilers includes the following options:
- Up to 10 l / min - enough for a family of two;
- Up to 15 l / min - intended for a married couple with children;
- Up to 20 l / min - a universal device suitable for most families. Does not limit the application.
- Up to 25 l / min are rare and have overcapacity for home use.
Heaters power
The performance of the devices, the bill payable for energy carriers and the load on the existing networks depend on the power characteristics. If builders have saved money when building housing on electrical wiring, then consumers will get connection problems. In medium mode, the electric boiler takes about 3.6 kW / h from the network. In the case of installing a storage or instantaneous electric heater, it is better to consult a professional electrician and replace the wiring if necessary.
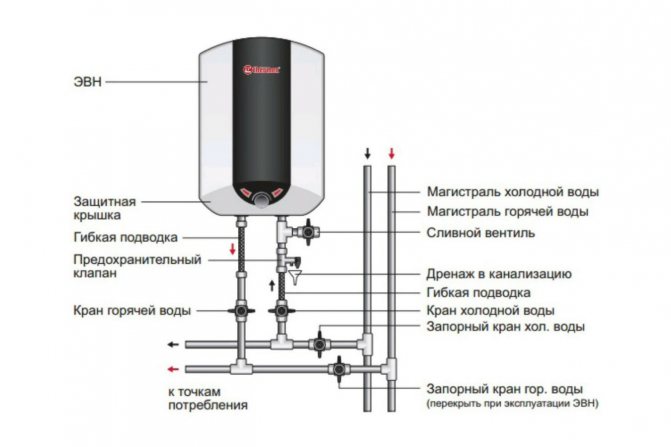
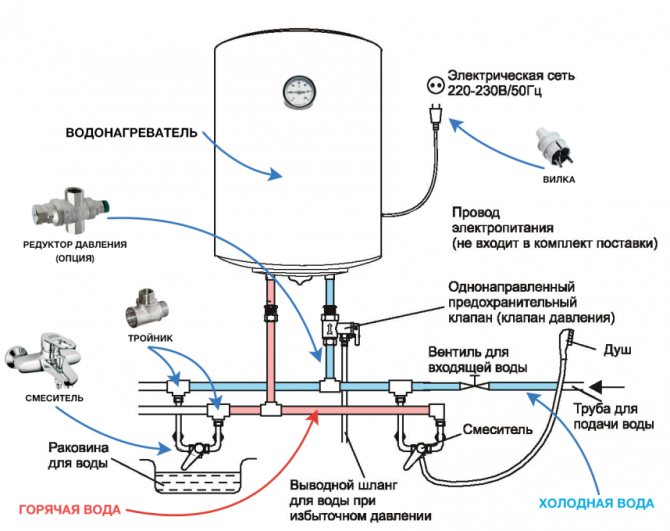
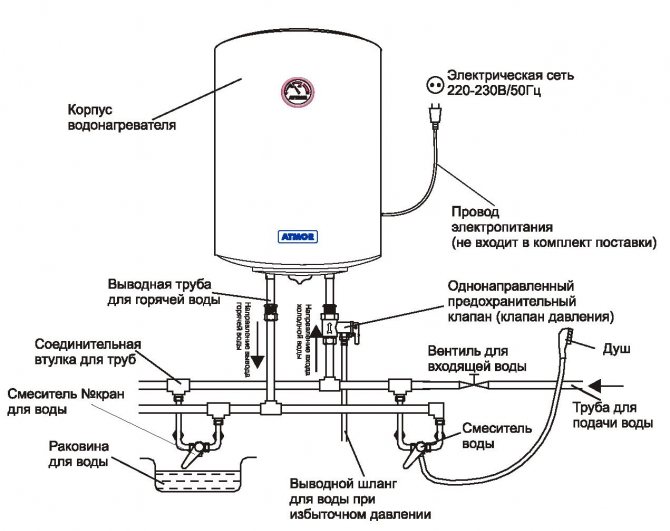
Water heater connection diagram: 1 - outlet pipe or tee, 2 - safety - check valve, 3 - PVC pipe into the drain pipe, 4 - hose into the waste pipe, 5 - connecting pipe between the safety valve and the supply pipe, 6, 7, 8 - flexible delivery hose under pressure 10 bar 9 - shut-off valve for water supply
Weak networks are a characteristic feature of houses where gas stoves are installed. If the kitchen is initially provided with electrical appliances for cooking, then the wiring can come up without alteration. Again, you should first consult with knowledgeable people.
Safety and non-return valves
In order to avoid an accident during operation, a check valve must be included in the system. It passes the water flow through itself in only one direction and performs in parallel the function of a safety device.
If the operating pressure in the system exceeds the permissible values, the safety element releases it. An expansion tank can be used to collect the released water. It is usually located between the valve and the water heater.
Video: How you can not install small boilers
Installing a storage water heater in the kitchen
Manufacturers usually complete the storage heaters they produce with all the necessary assemblies and parts for installation, but sometimes you have to go to the store and purchase additional ones. Self-installation is usually not difficult and is available to any home craftsman. The work algorithm is as follows:
- An electrical connection is made to the installation site of the water heater, a socket is mounted. Do not forget about mandatory grounding;
- The boiler is screwed to the wall in a place convenient for the consumer near the outlet. Fasteners included;
- The central cold water supply tap closes;
- A tee with a tap is inserted into the cold water pipe;
- A check valve is installed on the water supply system to the unit. If necessary, an expansion tank is mounted and connected to the place where the water is drained from the valve;
- A pipeline is laid from the valve with a suitable fitting at the end to the boiler. You can use a metal hose, rubber hose or reinforced plastic pipe;
- The outlet pipe from the boiler is connected to the mixer in any available way. It is advisable to cut another tap into the hot line;
- Water is launched into the system and the joints and joints are checked for tightness;
- The boiler is connected to the network and turns on. The required outlet temperature is set on the front panel;
- After a certain time, depending on the power and the parameters set by the user, the heater will signal that it is ready and that the hot water tap can be opened.
Video: Installation and installation of a water heater under the sink
If there is no free space for installation in the kitchen, then the boiler can be placed in another place. Often, apartment owners prefer to have water heaters in the bathroom. In this case, a separate pipe is laid from the room to the kitchen, through which hot water flows.
Installation of a storage water heater
Storage boilers are more common equipment. This is explained by the fact that they are cheaper and do not need to use powerful electrical wiring.
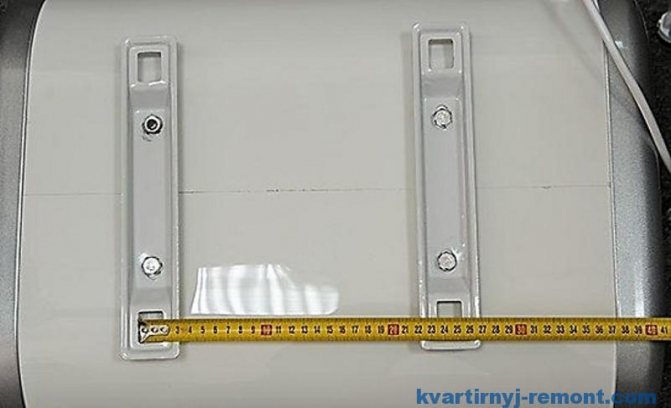
Do-it-yourself installation of a boiler begins with marking the place of its attachment. The distance between the mounting elements of the water heater is measured. It is transferred to the wall. 2 holes are drilled (depending on the boiler model, 4 holes may also be needed), dowels are inserted into them and hooks are twisted. The boiler is hung on hooks.
The connection of the boiler to the water supply system is carried out depending on whether the elements for connecting the pipes to the water heater are removed or not. If the connection point has already been prepared, then to connect the pipes to the inlet and outlet of the equipment, you can use flexible hoses, which are equipped with rubber gaskets.
The installation of a storage water heater involves the use of a valve, with the help of which the excess pressure in the system is reduced. It is recommended to use a T-piece, which is located before the shut-off valve. A tap is connected to the tee, which is designed to drain water during maintenance of the boiler.

In the absence of conclusions, they need to be drawn. In the presence of plastic pipes, the tie-in of the connecting elements is done for a maximum of 15-20 minutes. If the pipes are made of metal, then in addition to tees, a die will be needed, which should be the same size as the pipe diameter. In some cases, an adapter of the appropriate size will also be required.
The sequence of actions is as follows:
- the water supply is turned off;
- at the point of attachment of the tee, pipes are cut;
- using a die, a thread is cut;
- the thread is wrapped with tow;
- tees (or adapters) are connected to the pipe;
- cranes are being installed.
Having connected cold water, you need to connect the outlet of the boiler with a tap that will regulate the supply of hot water. By connecting the water supply, hot and cold water taps are opened. It is waited until all the air has escaped from the hot water tap and water starts to flow. All connections are immediately inspected for leaks.
After all the air has been vented, the boiler is connected to the electrical network. The source can be either an outlet or a separate machine. Normal voltage supply will be indicated by a sensor on the boiler. Temperature control is carried out according to the equipment operating instructions.
How to choose
What to look for when choosing a device?
Volume
I advise you to select the volume of the tank based on the following values:
- 10-15 liters: enough for washing a small amount of dishes;
- 30 liters: one person can shower with maximum water saving;
- 50 liters: full shower per user. The second family member will have to wait for the water in the tank to heat;
- 80 -100 liters: two people can take a shower without a pause;
- 120-150 liters: full use of hot water for a family of three to four people.
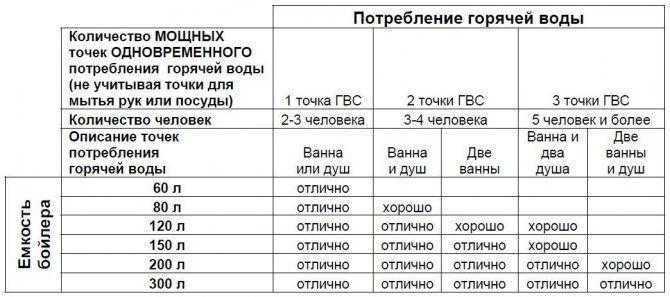
Relationship between the boiler capacity, the number of users and the comfort of using hot water.
Power
The power of the storage electric water heater varies from 1 to 3.5 kW. Usually, it grows following the volume of the tank, however, you can find boilers with the same tanks, but of different capacities.
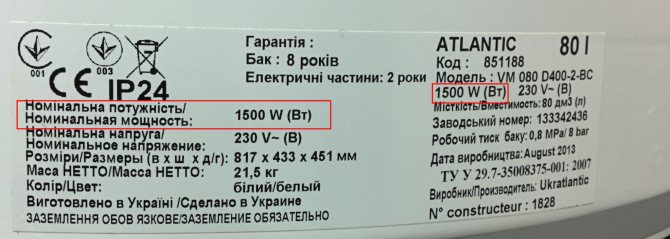
The power is always indicated by the manufacturer on the case or in the accompanying documentation.
I advise you to choose the more powerful one of these two devices.
Why?
Because it heats up the water in the tank faster to the set temperature.
But won't the increase in power affect the efficiency of the device?
Not. Electricity consumption is affected by:
- Water consumption;
- Tank surface areaincreasing following its volume. More area - more surface of heat exchange with the environment, and, therefore, more heat loss;
All manufacturers give the boiler body a rounded shape. This is done not only for aesthetic reasons, but also to reduce surface area while maintaining the same internal volume: an ideal ball has a maximum volume-to-surface ratio.
The round shape of the tank is designed to minimize its heat loss.
- Temperature heated water. The higher it is, the greater the delta of temperatures with air. Following the temperature difference, heat loss increases;
- Insulation quality tank.
The condition of the wiring can be a limiting factor for the boiler output. In many gardening associations, the power limit per house is only 2-3 kilowatts, so the owner of the house willy-nilly will have to prefer a low-power device.
Horizontal or vertical
The position of the tank is influenced by the choice of installation location:
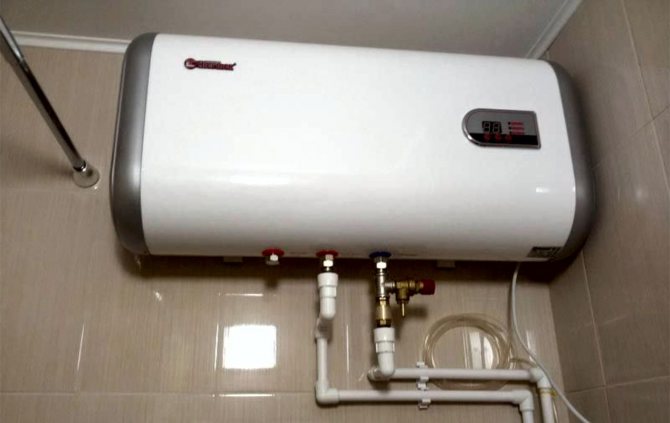
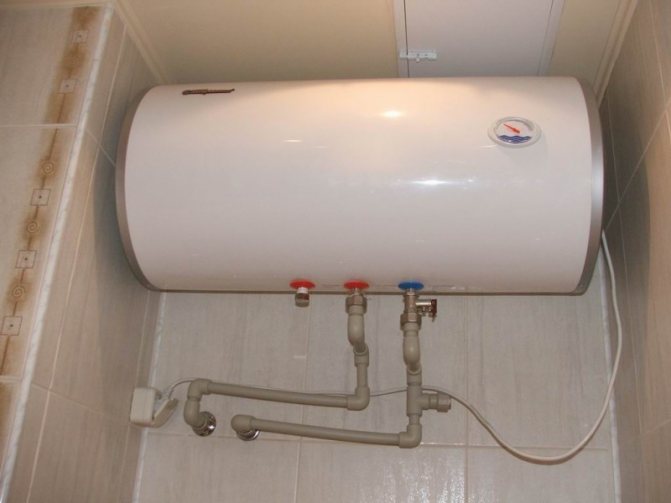
- In a compact bathroom of low height, it is more convenient to have a horizontal boiler under the ceiling. He will leave a maximum of free space at the height of human growth;
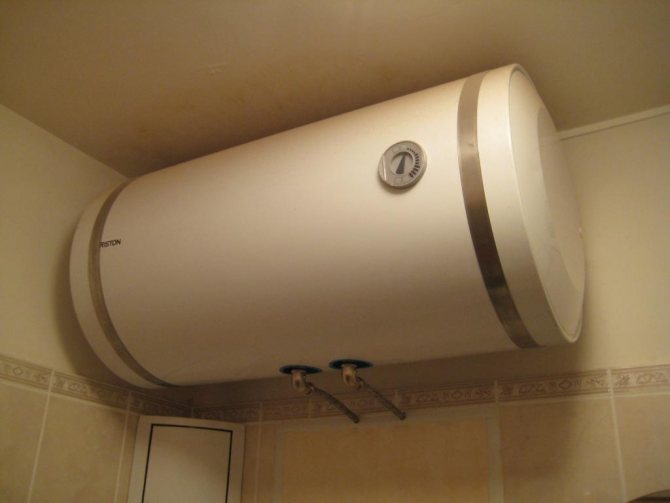
The horizontal tank is fixed to the ceiling and does not take up the useful volume of a small bathroom.
- For a spacious room, you can choose a vertical tank.
Tank material
There are three options:
| Picture | Material and Description |
| Stainless steel: complete absence of corrosion, unlimited service life, high cost. |
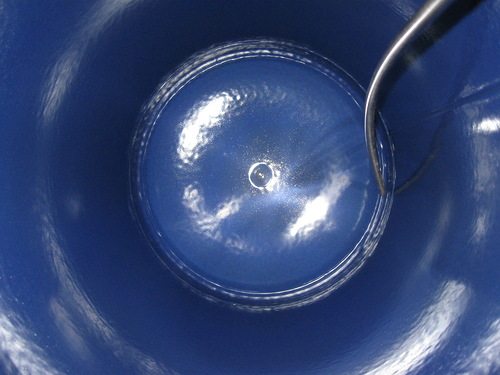
| Black steel with glass ceramic coating: middle price range. The coating reliably protects against rust, but cracks and flakes off at temperature drops. The glass-ceramic tank can be used at a hot water temperature of no higher than 50-60 degrees. |
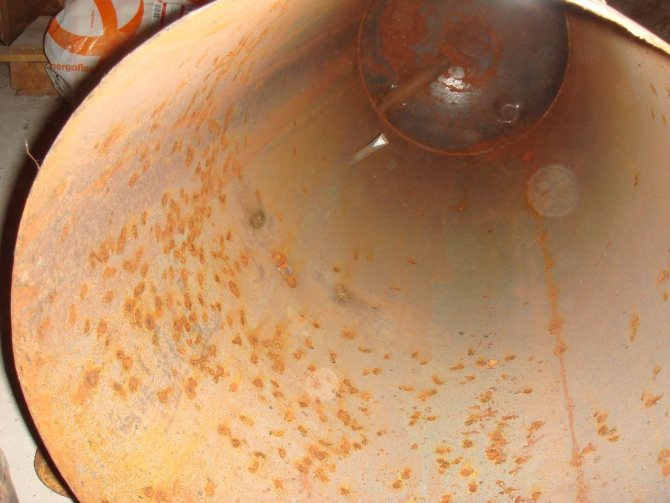
| Black enamelled steel: a budget solution. The service life of the enamel rarely exceeds 5-7 years. |

Dry heating element
What is it - dry heating element?
This is the name of the scheme in which tubular electric heaters do not come into direct contact with water, but are placed in a tube sealed on one side.
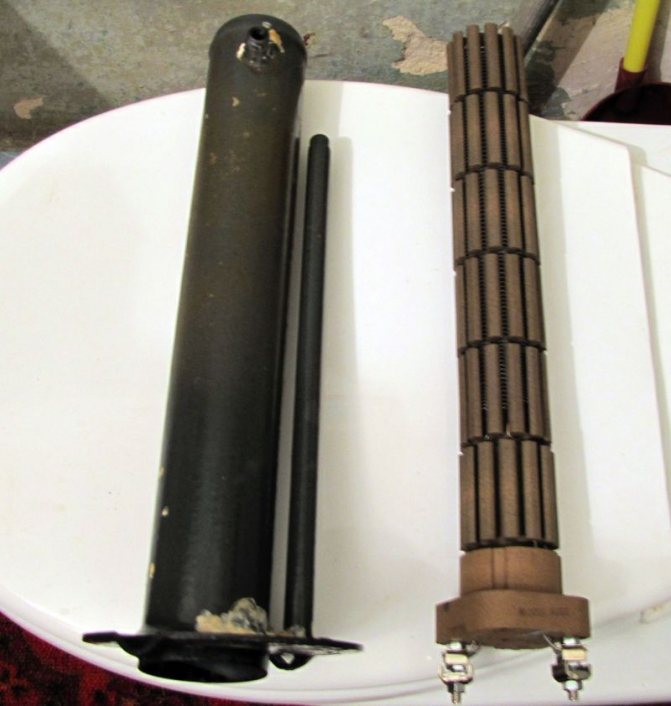
On the right is the dry heating element itself, on the left is a flask for its installation in a water heater tank.
This heating scheme has several advantages. Here is a list of them:
- Lack of limescale on the surface of the heating element, which means a constant temperature regime and maximum service life. Thermal insulating heating element scale makes it heat up to a higher temperature and fail;
- Corrosion protection: the surface of the heating element does not come into contact with water;
- Easy replacement Heating element, which does not require the discharge of water from the boiler tank;
- Heating element compatibility... All dry heating elements are cylindrical in shape and differ only in length and (less often) in diameter. For comparison, when replacing a "wet" heater, you will have to look for a product that is compatible with your boiler model and repeats the shape of the original heating element.
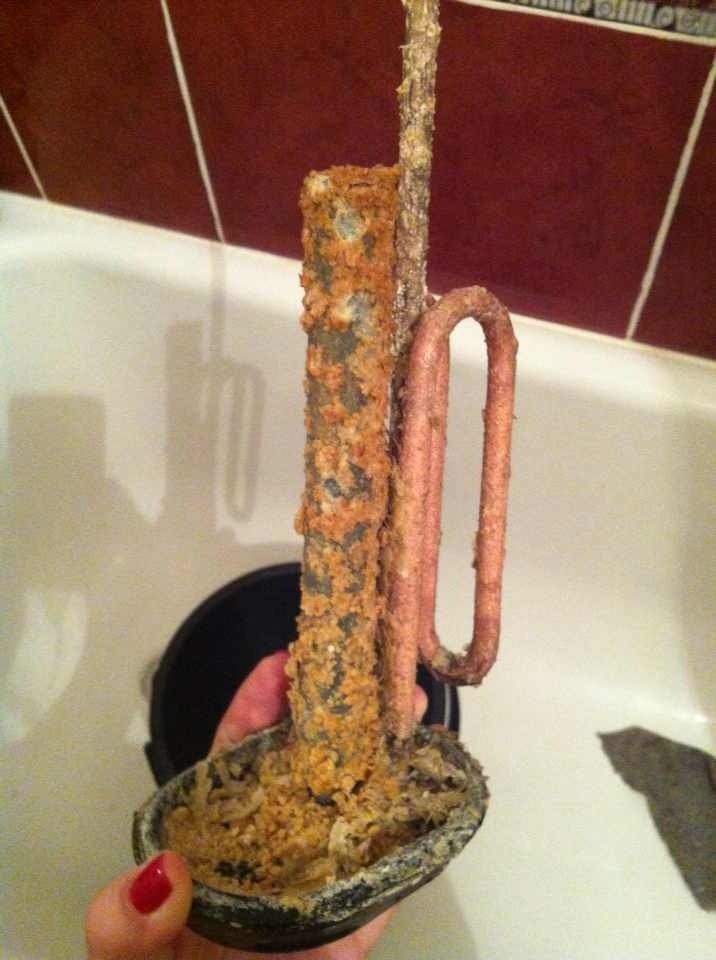
All the problems of a wet heating element are in one picture. The heater is covered with limescale and corroded. To replace, you need an exact analogue in shape and size.
The maximum power of dry heaters is 1.2 kW. In large boilers, they are mounted in pairs.
Required tools for installing the storage heater
Any editing begins with the preparation of the instrumentation.If he is fully staffed, then the work will be done quickly and efficiently.
To install the boiler you will need:
- a drill with an impact mechanism or a hammer drill plus a set of drills for concrete;
- screwdriver;
- a grinder, if the water supply is assembled from metal pipes, or a pipe cutter - if made of plastic;
- a pair of gas wrenches or adjustable wrenches;
- building level;
- pliers.
Additionally, you may need a tool for installing pipe connections:
- for steel water supply: a welding machine and a set of dies for threading;
- for polypropylene: a heater for welding pipeline parts (it is called a soldering iron or iron);
- for metal-plastic: press tongs, if you intend to use press fittings, as well as calibration to align the end of the pipe before installing the fitting.
In addition to tools, you will need a sealing material to seal threaded connections between pipeline elements. For this, experienced craftsmen use tow or sanitary linen in combination with Unipak paste, while a beginner will find it easier to work with FUM-tape or special linen thread such as "Tanget Unilok".

Installation procedure
The boiler installation process includes the following steps:
- hanging on the wall;
- connection to the water supply;
- power supply connection.
Floor-standing boilers are also produced, but in everyday life you most often have to deal with wall-mounted ones. When filled, the device has a lot of weight, so it can only be attached to a solid wall.
In this case, it is important to choose the right diameter and length of the fasteners:
Sizing table for anchor bolts taking into account the volume of the water heater and wall material
| Water heater volume, l | Pull-out load, kg | Base material (wall) | Recommended bolt diameter, M | Recommended bolt length, mm |
| 30-50 | 15-25 | Cinder block, brick | 8-10 | 80-100 |
| Concrete | 6-8 | 60-80 | ||
| 80-100 | 25-35 | Cinder block, brick | 10-12 | 100-120 |
| Concrete | 8-10 | 80-100 | ||
| 150-200 | 45-60 | Cinder block, brick | 12-14 | 120-150 |
| Concrete | 10-12 | 80-120 |
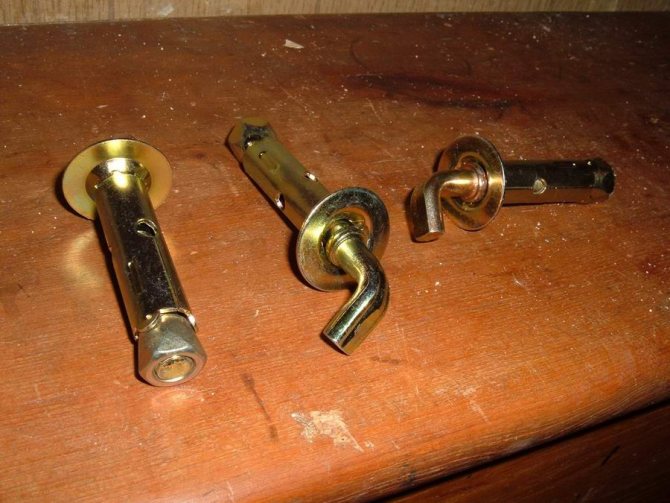
Anchor bolts with hooks are the most convenient - you just need to hang the boiler on them after screwing it into the wall. But some devices do not have hooks for hanging on such bolts - they will require anchor bolts with Phillips screwdriver or Allen heads.

Water heater connection diagram
On a thin brick wall (half or even a quarter brick thick) or folded from foam blocks, gypsum blocks, reinforced gypsum, the water heater must be fastened using ordinary bolts that must penetrate the wall through and through. A washer with a thickness of 1.5 - 3 mm is installed under the nut, the diameter of which should be the larger, the heavier the boiler is and the thinner the wall is.
When fixing devices with a volume of more than 100 liters, pieces of corners are placed under the nuts, with the help of which the load is distributed over a sufficiently large area.
Anchor bolts located at the same height should lie on a strictly horizontal line, therefore, markings for them should be applied using a building level.
The distance between the boiler nozzles and the water pipes must be sufficient to accommodate all the necessary fittings (they are listed below). Usually 30-50 cm is sufficient.
Types of boilers
Modern boilers are of two types, significantly different from each other according to the principle of water heating:
- Flowing - heats the water as it is used. The volume of hot water produced by such a water heater is unlimited. At the same time, the power consumption is very high.
- Accumulative - have a reservoir in which water is heated by heating elements. The temperature of the water in the tank is maintained at a fixed level all the time.

The choice of a boiler with a different storage tank volume is based on several rules:
- 10-15 l - such a boiler will provide hot water for small household needs (for example, a washbasin);
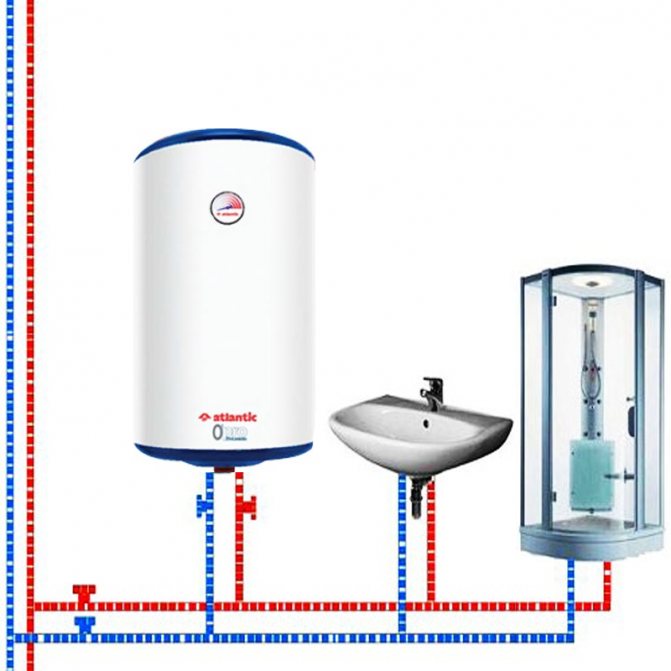
- 50 l - this volume will be enough to supply hot water to a shower cabin;
- 80-100 liters - such a volume of hot water can satisfy all needs for it (bath, shower, kitchen sink).
In everyday life, storage boilers are more in demand. And this is quite justified, because they will provide several points with hot water at once. In addition, the house will always have a supply of water.
Preparatory work
Connecting a boiler to a water supply system with your own hands is not a super difficult task that any self-respecting owner can cope with.
Preparatory work for connecting the boiler includes:
- Detailed study of the instructions attached to the boiler.
- Installing the boiler on the wall.
- Supply of water pipes to the boiler. If the boiler is located near the water supply system, and besides, it is open - the task is simplified, and this item can be omitted. Otherwise, the water supply must be connected to the boiler using metal-plastic or polypropylene pipes.
- Preparation of the necessary tools: tape measure, pipe cutter, soldering iron for plastic pipes or welding, adjustable wrench.
- Purchase of related materials: stopcocks, fittings, tees, pipes or flexible connecting hoses, American women, linen tow and fum tape.
Advice. When choosing accompanying fittings, keep in mind that cheap low-quality materials will not last long.
List of required tools
Before you learn how to properly connect the boiler to the water supply in the apartment, you should start selecting the right tools for the job. It should be noted right away that for the installation it is not necessary to use high-quality and expensive tools, most often, most of the indicated materials are at hand for every owner. If there are none, they can be easily purchased at construction points of sale.
Fastening can be done using:
- construction and assembly gun;
- hammer drill or electric drill;
- metal hooks;
- dowels;
- high quality hose;
- screws;
- cable;
- special branch pipes;
- the unit itself.
Special steel hooks with a diameter of 10 mm or more and dowels are used as fasteners for the tank. All this is fixed with a construction and assembly gun, if there is none, then the holes for the fasteners are made using a drill or a perforator.
If there is a layer of finishing material on the wall, you can use ten centimeter screws, their part made on the basis of plastic should be at least eight centimeters.
Do not use flexible hoses or cheap products when supplying water to the unit. They deteriorate very quickly and need frequent replacement. It is better to spend a little more money once on quality materials and be calm while using the installation. It is also not recommended to use metal products; copper components are ideal for such work.
What's better
To take into account all the necessary details, it is recommended to entrust the installation to specialists. In this case, the cost of installing a storage boiler will be more expensive, but you will receive a guarantee that your device will not fail tomorrow.
However, the assignment of such a responsible matter to outsiders, even professionals, is not to everyone's liking. Therefore, more and more users prefer to install the boiler with their own hands: we have provided a video of such work in our article just below. In addition, in the instruction manual for the product, the manufacturer usually cites the requirements for the correct installation of the boiler. Compliance with them step by step will allow you to do this difficult job successfully and get a number of advantages:
- Save time and money.
- Master the skills of installing a water heater, which will come in handy in case of repair work in the apartment or when servicing the water heater.
Not every boiler can be installed with your own hands: gas water heaters, for example, require only a professional approach. At the same time, the installation of an electric boiler is quite within the power of a beginner.
Preparing for installation
I want to see everything!
I want to see everything!
First of all, you must decide on the place where you want to install the water heater. In order to make marks for anchors on the wall, it is necessary to measure the distance between the fasteners on the boiler and transfer it to the wall. The fasteners are located at the back of the boiler.
It is not uncommon for bathrooms to have ceramic tiles on the walls. In this case, in order not to damage it when drilling holes, you need to purchase a special victorious drill, which will not leave unnecessary cracks on the tile.
When buying anchors, be sure to check how much weight they can support. It is necessary to take into account the weight of not only the boiler itself, but also the water that will be in it.
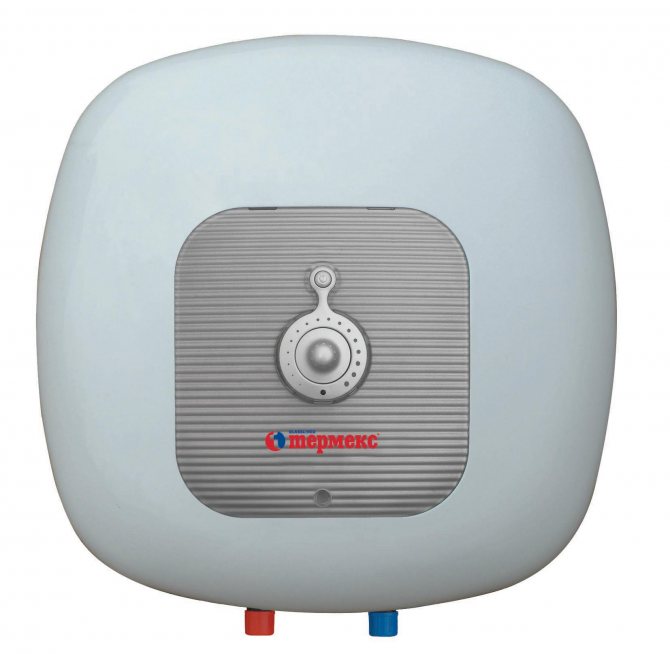
Boilers Termeks
Some Tips
- Before choosing a boiler, one should take into account not only the width and height of the wall to which the fastening will be made, but also how much the water heater will protrude forward. In addition, the installation of a boiler in an apartment, taking into account the specifics of the wall material, requires the selection of special fasteners.
- Horizontal water heaters should only be installed horizontally. Vertical ones do not need to be placed on the floor: at the bottom of the water heaters there are devices that ensure their operation.
- To connect the Termex water heater to the water supply system, it is recommended to use copper pipes in a plastic sheath. This is a more reliable option, in addition, during installation, such pipes look very neat.
- It is possible to connect Termex to the network only with a full tank. Otherwise, it may fail.
- It is not recommended to connect any other device in addition to the water heater to the same cable. In addition, the boiler must not be connected directly to the vending machine.
- Even if the water heater is not in use, it is undesirable to drain water from it.
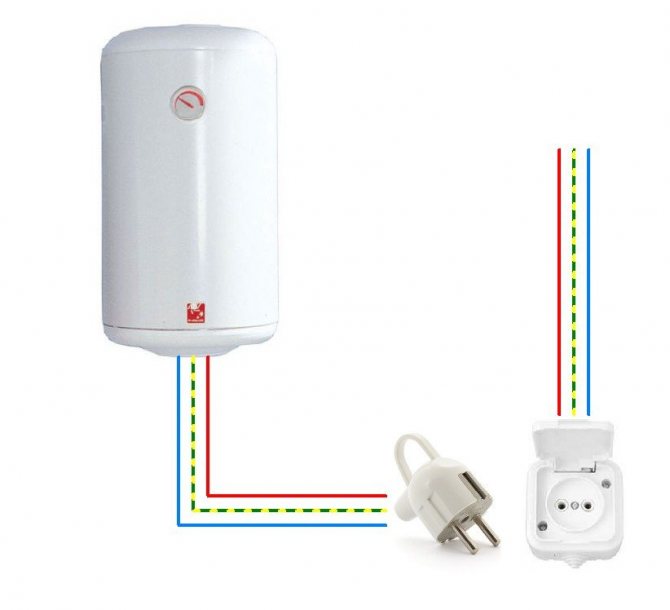
Connecting to the network
The final moment of this work will be the connection of the water heater to the power supply. To do this, we take the cable with which we connect the water heater to the power source, and strip it on both sides. It is advisable to use the box (power supply) closest to the tank.
Note!
The power supply will supply energy through an automatic machine installed next to the water heater.
The wires of the cable, previously disconnected at one end per phase, ground and zero, which are colored red (brown), yellow and blue, respectively, are connected to the water heater through the machine. The end of the cable leading to the power supply is connected without dividing.
Connecting pipes
Advantages and disadvantages of an instantaneous water heater
Installation of a water heater
Benefits
- Compact dimensions. The flow heater does not take up much space. At the same time, models of heaters are available for sale, complete with a mixer and a shower head, which allows additional savings.
- Fast heating. Unlike storage-type models, flow-through heaters begin to produce warm water already 30-60 seconds after starting.
- No restrictions on the volume of heated water. The user can get exactly as much hot water as he needs, in contrast to the storage tanks, the volume of which is limited.
- Relatively low price.
disadvantages
- Relatively high power consumption.
- Demanding wiring, machine and meter.
- Limited performance. This drawback is relevant only for low-power and compact budget models that can prepare hot water exclusively for the bathroom.If it is necessary to arrange the wiring and the kitchen, you will have to spend more money on the purchase of a more energy-intensive and dimensional model.
- Comparatively expensive operation due to significant electricity consumption.
Instantaneous water heaters are best suited for houses and apartments equipped with electric stoves. In this case, the meter and wiring will already comply with regulatory requirements.
Connecting the appliance to the water supply
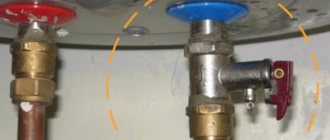
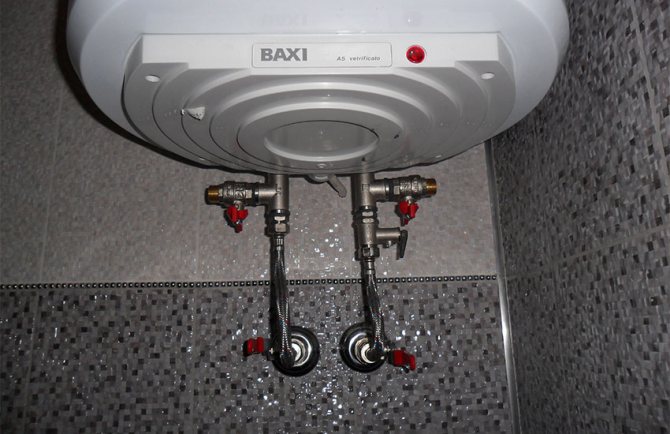
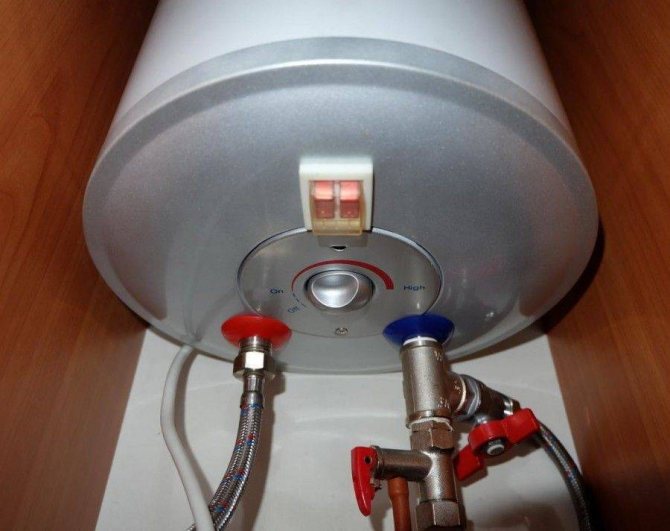
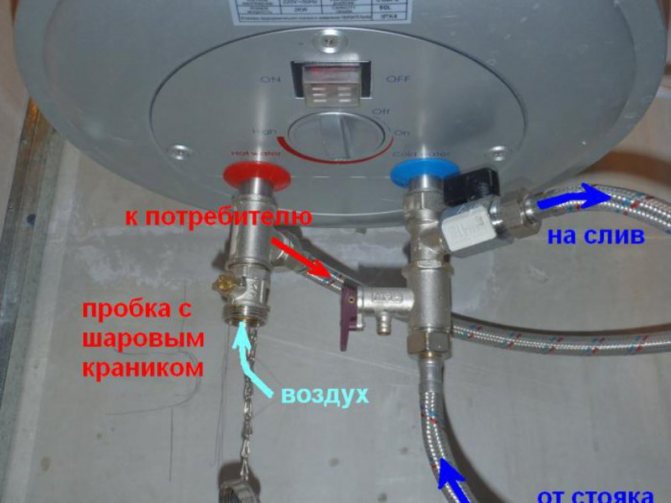
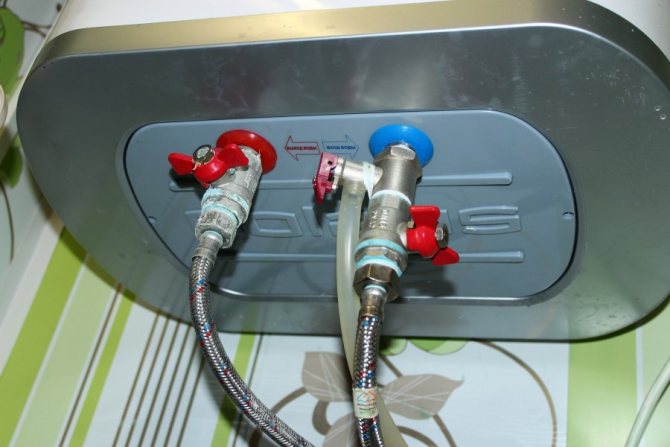
At the bottom of the device there are two outputs, which are marked in blue and red. The blue outlet is for connecting cold water, the red one, respectively, for hot water. The connection to the water supply follows a certain scheme:
- 1.Screw the safety valve to the blue outlet. It comes complete. If the valve is absent, it is imperative to purchase it, since it performs an important function - it relieves excess water pressure in the product container. It is forbidden to use the boiler without a safety valve.
- 2.The bronze check valve is screwed onto the safety valve. The role of the non-return valve is to exclude the backflow of water from the boiler into the water supply system.
- 3. It is necessary to tightly secure the ball stop valves that are installed on both outlets (blue and red) of the check valve. You can achieve better tightness by using tow or special fum tapes.
The next step is to connect the mixer of the electric water heater to the pipes.
Two connection options are possible here: flexible hoses and metal-plastic pipes. Each of these types has its own characteristics. Flexible hoses are easier to work with and can be bent easily without the need for fittings. However, such connections of even the highest quality are significantly inferior in characteristics to metal or metal-plastic pipes, since they are not always able to withstand high pressure.
Reinforced-plastic pipes are more durable, but they cannot be bent. Since a leak will necessarily appear at the bend. To connect different pipe sections, special fittings must be used. They, like pipes, can be of different cross-sections, so it will not be difficult to choose the appropriate ones. With the help of fittings, you can join pipes as needed: at an angle or in a straight line.
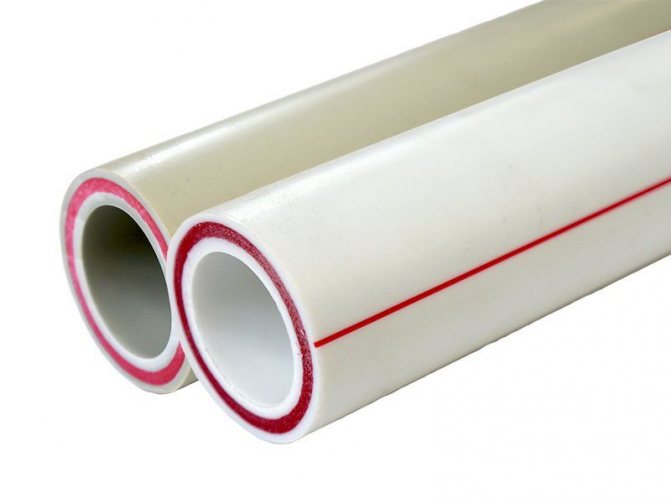
When choosing pipes made of metal or metal-plastic, it is important to know a certain nuance: for hot water, it is necessary to choose exclusively seamless pipes... They are also suitable for cold water supply, unlike seam pipes - they are suitable only for cold water supply.
To ensure greater safety in rooms that are located on high floors, where there is constant high pressure, experts recommend installing an additional pressure reducer.
Fixed or temporary installation?
stationary layout
The stationary option for connecting an electric instantaneous or storage boiler is capable of providing simultaneous supply of cold and hot water. With this option, the work is performed simultaneously with the installation of the main water supply system. The essence of this installation is to insert tees into the pipe and place valves on each of them. When using this method of connection, it is possible to avoid installing an electric boiler in the water supply system. A heating element is used to connect to a pipe with cold water, and hot water is discharged using a flexible reinforced hose or a metal-plastic pipe, which is connected to a shut-off valve.
Installation of gas equipment
Naturally, it is forbidden to install a gas boiler from scratch. This should be done by employees of the gas service. You can independently replace a gas water heater when a meter is installed by representatives of the gas service.
When installing a gas water heater, the following work is performed:
- places for holes for dowels are marked;
- holes are drilled and hooks are mounted;
- a gas boiler is hung;
- the corrugation is attached, which removes carbon monoxide into the chimney;
- the gas pipe is connected to the hole through which gas enters the boiler;
- connections are checked;
- water is supplied to the boiler and the normal operation of the system is checked.
When installing the corrugation, one end of it must be tightly joined with the elements of the chimney. The other end of the corrugation is put on the outlet of the water heater. Before purchasing the corrugation, all measurements are carefully made. Its inner diameter must match the outer dimensions of the boiler hole.


A special rubber hose is used to connect the gas pipe to the inlet. After the hose is securely fixed, all joints are covered with soapy water. The gas supply valve opens.
While the gas is directed to the boiler, you need to carefully inspect the connections. If soap bubbles appear in some area, this indicates a gas leak. With the help of a key, the nuts are tightened in the "problem" areas. If the leak could not be eliminated, it is better to contact the gas service specialists.
After correctly connecting the gas to the boiler, you need to supply water to it. Flexible hoses are also used for this. The water supply to the gas water heater is carried out in the same order as the electric boiler is connected.
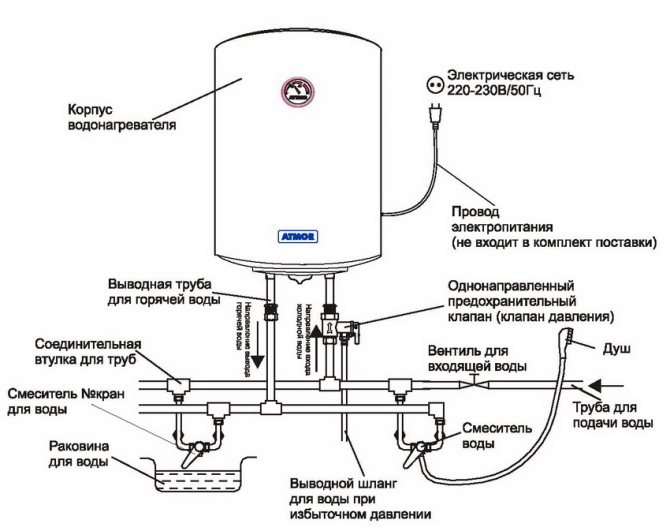
The sequence of elements is shown schematically as follows: "pipe — adapter — tap — pipe — hose — water heater". The cold water inlet is marked in blue, the hot outlet in red. To increase the operating period of the boiler, a salt filter is installed on the pipe that supplies cold water.
Hot and cold water taps are opening. We check all connections. If there are leaks, they should be repaired by tightening the nuts or using a new tow. Gas is supplied and the hot water tap opens. Hot water should come out of the mixer after 20-30 seconds.
Types of water heaters
Let's figure out what kind of boilers are: their principle of operation is different. We wrote more about this topic in the article "How to choose a water heater for an apartment." Let's recall how some of them work:
- Flow type... Equipped with flowing heating elements, the water heats up instantly, so there is constant access to it. The compact size of the case, coupled with a modern design, allows you to place them anywhere. The flow rate is calculated based on the needs of the user. The disadvantage is high power consumption. To get a strong head, choose a device of at least 6 kW. During the connection, you will have to equip a separate wiring.
- Accumulative type... There are tanks of various sizes where water accumulates. Heating takes place with the help of a heating element. The technique consumes significantly less electricity - 1.5-2 kW. Thanks to the thermal insulation layer in the housing, only 0.5 degrees of heat is lost during "rest".
Also, boilers are divided by the type of heating:
- Electric... They are connected to a 220 V network.
- Gas... They need a trunk installation. If you have gas, then choose just such a technique. This will save you fuel costs.
- Indirect... Suitable for installation in a private house, since it requires solid or diesel fuel to work.
It is safe to install only electric heaters. In other cases, it is better to consult a specialist.

Important nuances of installing a boiler
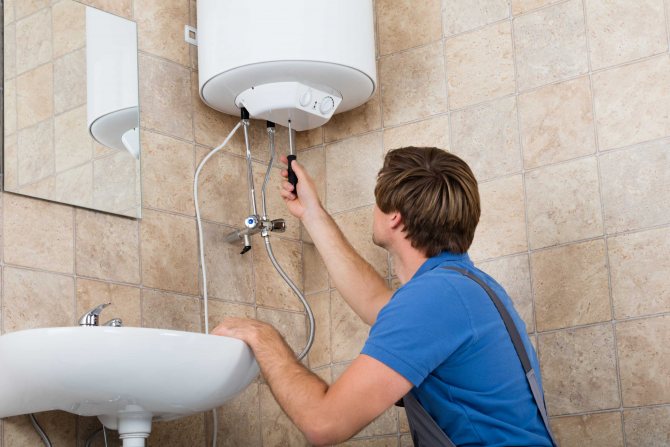
When proceeding with the installation of an electric water heater with your own hands, you should decide on the most suitable place for its placement and the conditions that must be met in order for the device to work correctly and safely.
Installation features
Do-it-yourself installation of a water heater should be in such a way that it is easy to get to it and its operation control units and perform repairs or maintenance of units. The place of installation of the water heater can only be a load-bearing wall or a partition that can cope with a double weight load
In other words, if the owner purchased a model with a capacity of 100 liters, then it must be designed for a weight of at least 200 kilograms. Attention should also be paid to the wiring in the room, which must cope with the full load. If work is carried out in an apartment where the wiring has not been changed for several decades, then it is advisable to bring a new cable of sufficient power to the water heater, taking care of its grounding
For example, if the capacity of the water heater is 2 kW, then you will have to lay a copper cable, the cross-sectional area of which should be 2.5 square meters. mm or it can be replaced with an aluminum wire with a cross section of 3.5 sq. mm. An inspection of the water pipes should be carried out to assess their condition. If damage is found, it is advisable to replace pipes by installing a metal-plastic pipeline even before installation.
Materials and tools
Even before starting work on installing a water heater with your own hands, you should take care of the availability of the necessary tools and materials:
- A hammer drill with a drill with a diameter of 10 mm, a tape measure, scissors for cutting metal-plastic pipes or a grinder.
- Wrench 24 x 27, 19 x 22, gas or adjustable wrench.
- Flat and Phillips screwdriver, pliers and wire cutters.
- Oiled tow, assembly paste or FUM tape.
- Shut-off valves - when installing a storage boiler, one will be enough, in the case of installing a flow-through one - two.
- Tees with a diameter of 0.5 inches - to make an accurate choice, the type of boiler installed should be considered. It is possible that during operation you will have to use adapters with a diameter of 0.5-0.75 inches.
- Flexible reinforced hoses.
- Reinforced-plastic pipe - to determine the length of the pipeline, one should proceed from the specific installation conditions.
You should also be ready to lay new wiring or power lines. To carry out these works you will need:
- Three-core cable, corrugated hose.
- Circuit breaker or electrical outlet.
After preparing the tools and materials, you can proceed to the installation of the water heater and the assembly of pipes and valves.
Price for external installation
If, after studying the material on self-installation of the boiler, you still decide to trust the professionals, then the price range will vary depending on the required amount of work and the volume of the device:
- The basic installation of the device includes installation, sealing, connection to the network, as well as to the water supply, valve installation and safety instructions.
- Additional services include the installation of a tee, an automatic machine, taps and valves, as well as wall perforation and cable laying.
With the help of this list, you can understand that the cost of the service varies from the work done. Before making a decision, you need to weigh all the pros and cons, after which you may come to the idea of self-installation. The most important thing is that now you know how to properly install the boiler. You never know what you can do till you try!
Cold water connection and hot water outlet
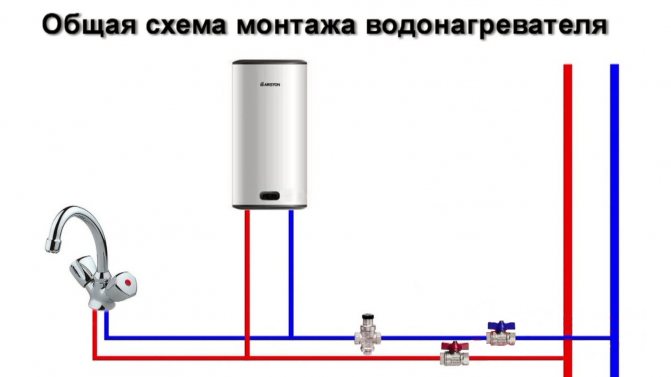
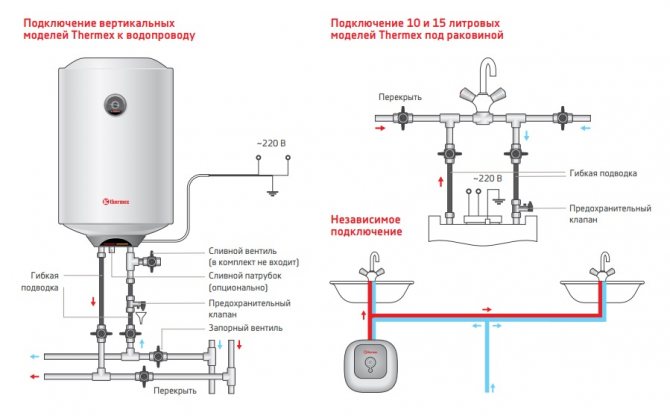
Ithaca, boiler selected, consumables purchased, instrument ready. Self-installation of a boiler does not require permits from utilities, drafting projects and other documentary evidence. In practice, the connection diagram of the boiler to the water supply system is simple. The water heater must be connected to the water supply after the water meter, for example, at the place where the valve is installed on the toilet cistern. Usually, when piping around an apartment, a ½ inch diameter is used.The insertion of the tee for connecting the boiler should be started only after the cold water has been shut off for the entire apartment.
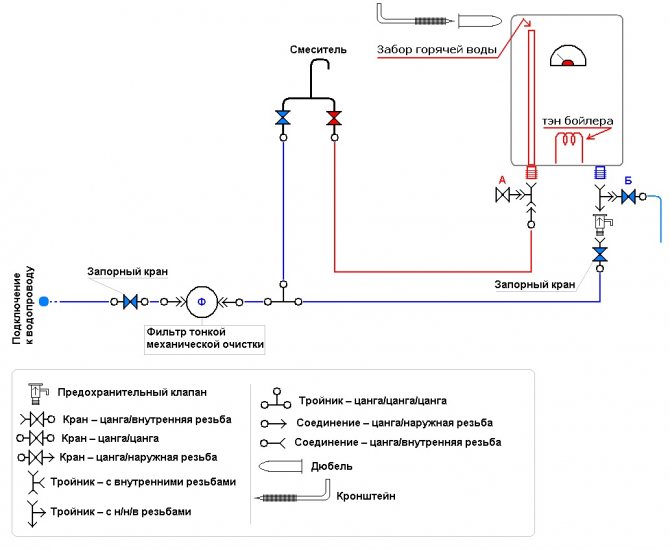
Diagram of connecting the boiler to the water supply.
To create a DHW line, a standard ½ ”fitting must be installed after the valve. All fittings, nuts and valves have a right-hand thread, that is, they must be tightened clockwise. For laying hot water, you can use ordinary fittings with a diameter of ½ "or ¾" - as you like, given the pipes already laid in the apartment. Practice shows that the average life of cheap fittings is 2-3 years, so it is better to buy high-quality fittings. For packing all threaded connections, linseed tow is used together with assembly paste or FUM tape.
Both tow and FUM tape must be wound clockwise. Tow will be enough 3-4 turns, FUM tape - 15-20 turns, the excess will be squeezed out when twisting. Do not forget to install a non-return valve on the cold water inlet connection - it must be included with the boiler. The valve is screwed onto the coupling, and a fitting is screwed onto the outlet fitting to go to the inlet pipeline. In the same way, an adapter is placed on the outlet with hot water.
After installing the fittings, the boiler can be hung on the wall and the pipes for cold and hot water can be connected. Pipes are inserted into the fitting to the end; before this, the cut end must be flared a little. Do not use maximum force when tightening the nuts on the fitting, otherwise the non-ferrous metal nut may burst. When pressure testing (checking the water supply system under pressure), it is better to tighten the nuts later if undermining is found. For the entrance and exit of the boiler, ball valves are used, as they are more reliable in operation.
Installation
What does the do-it-yourself water heater installation look like?
Let's break a big task into several smaller ones.
How to fix
Unlike a light flow heater, the mass of a storage boiler with water can reach 130-140 kilograms. In the floor version, tanks are produced from 150 liters.
In general, the boiler is only hung on a solid wall (brick or concrete). Anchor bolts are used to fasten the tank.
Anchors - standard fastening for the boiler when mounted on solid walls.
Can a storage heater be hung on a partition in a frame house or a plasterboard wall?
Yes, but with a couple of restrictions:
- There must be a wooden mortgage in the place where the boiler is attached, transferring the load to the floor or elements of a strong frame;
- Fasteners are not anchors, but studs. It does not screw in, but goes through the wall and is fixed from the back with nuts with wide washers.
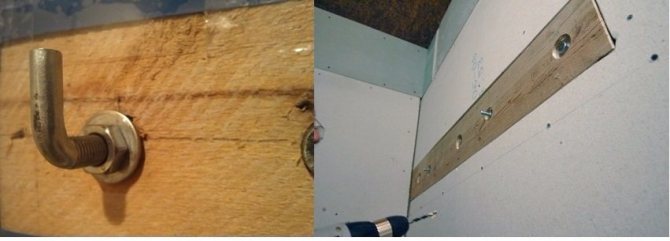
Fastening a massive boiler to a lightweight partition: the studs go through the wooden mortgages.
How to power
Unlike a voracious instantaneous water heater, storage electricity needs much less - no more than 3-3.5 kW. The boiler is within the capacity limits for a conventional Euro socket. It is she who is used to connect the device.
The connection has several subtleties.
- Location: the socket must be out of the reach of splashing water;
- Grounding: certainly. The land can be taken from the body of the shield or from a steel sheet buried in the ground with an area of at least half a square meter;
Grounding will protect you from electric shock in the event of a breakdown in the insulation of the power circuits.
- Wire thickness: it must have a cross-section of at least 1.5 mm2 for copper wire and 2 mm2 for aluminum.
How to connect to water
It is customary to install a storage water heater with rigid pipes. To connect it to cold water supply and hot water supply, it is most convenient to use:
| Picture | Type of pipes |
| Polypropylenedesigned for hot water and heating. |
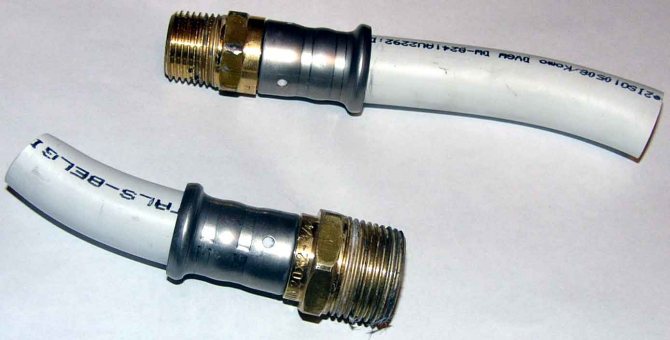
| Reinforced plastic... Preferably - on press fittings, and not on compression ones.The latter have a bad habit of leaking after several heating and cooling cycles. |
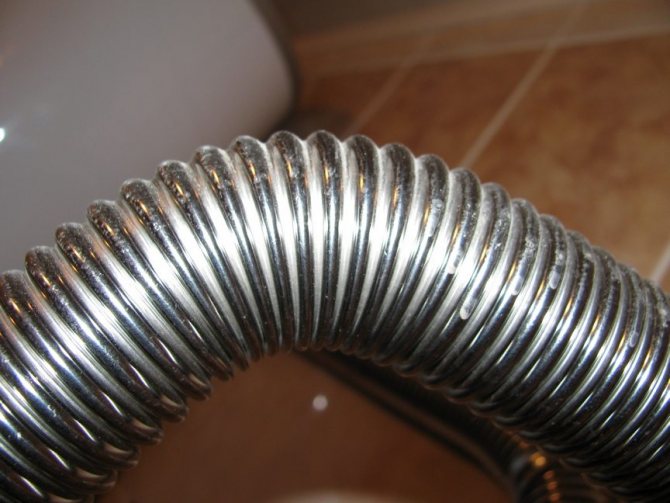
| Corrugated stainless... They are resistant to water hammer, have unlimited service life and flexibility. The bending radius can be equal to the pipe diameter, which greatly simplifies the adjustment of the dimensions of the connections. |
It is not that impossible to use flexible connections to connect the boiler - it is undesirable. Steel-braided hoses last no more than five years and are not very tear-resistant.
Connecting the connections to the tank is most conveniently done by Americans: in this case, the pipes can be disconnected for repair or replacement of the boiler in a couple of minutes.
Does the boiler need some kind of piping?
Required. It includes:
- Check valve... Its task is to prevent hot water from draining from the tank back into the water supply system when the water supply is turned off and the route is drained. The valve is placed in front of the inlet pipe;
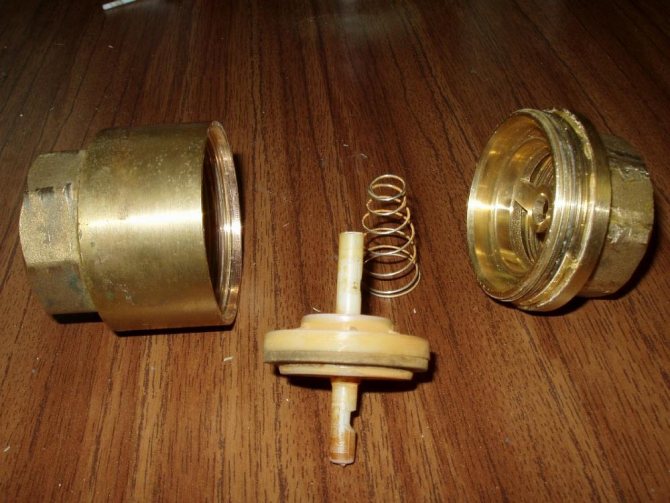
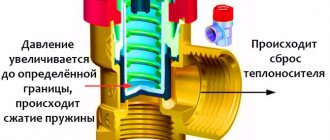
Spring check valve device. The plastic seal is pressed against the brass seat and shuts off the water. The return spring is responsible for its return stroke.
- Disruptive (aka - safety) valve... The function of the safety valve is to relieve excess pressure when heating water. As the temperature rises, its volume increases, and in the closed space of the boiler and the supply line (they are locked with a non-return valve, remember?) This can lead to the destruction of the tank or pipes.
The outlet of the valve is connected with a drainage pipe to the sewerage system. The place of its installation is between the inlet pipe of the water heater and the check valve;
Disruptive and non-return valves are often combined in one body. The resulting product is sold under the name "boiler valve".
Boiler installation diagram. The non-return and safety valves are combined in one body and are installed in front of the inlet pipe.
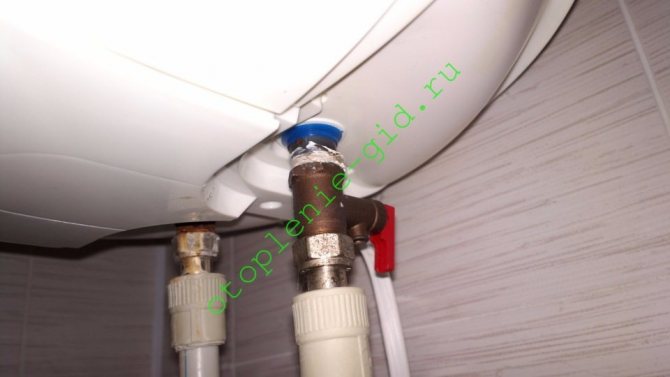
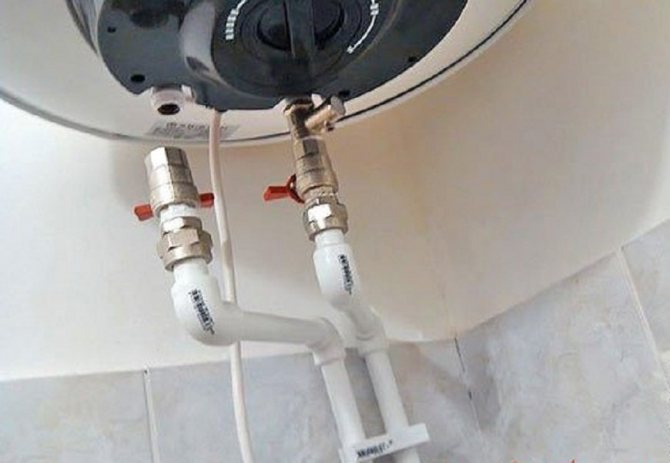
Valve appearance. In the photo - the piping to the boiler in the bathroom of my house.
- Ball Valves at the entrance and exit. They allow you to cut off the tank from the water supply system during its maintenance (descaling, replacing the anode, etc.).
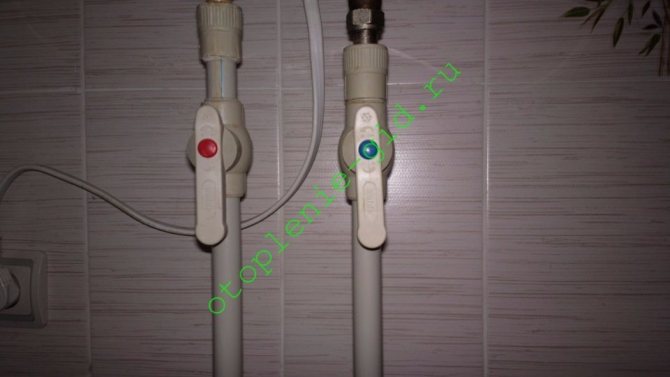
Taps on the connections allow you to cut off the water heater from the cold and hot water supply systems.
How to seal threaded connections on valves?
I use Tangit Unilok for winding, a polyester thread with silicone. In its absence, you can just as well wind up the thread with flax impregnated with quick-drying paint on an organic solvent, or with silicone sealant. The impregnation will prevent the fiber from rotting on contact with condensate and burning out in hot water.

Plumbing linen with sealant - rewinding with unlimited service life.