Wall this is the main structural part of the building. Its main purpose is to carry weight from overlying structures and transfer it to the foundation. Therefore, it must have the necessary strength (which is calculated according to special methods) and stability, as well as successfully withstand the emerging vertical and horizontal loads.
Considering also that the walls are also enclosing structures that divide buildings into separate rooms and separate them from the external environment, they must have the required design coefficient of resistance to heat transfer. That is, to maintain the required parameters of temperature and humidity in the premises.
The walls also have a decorative function, since with the help of various solutions in terms of architecture, they form the general compositional appearance of a building or structure.
Modern building technologies offer a wide variety of building materials from which walls are made. But the most popular of the materials is still brick. It can be used for both external walls and internal walls and partitions.
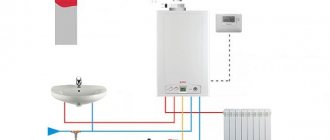
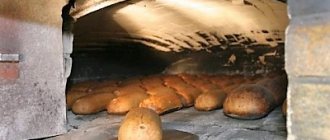
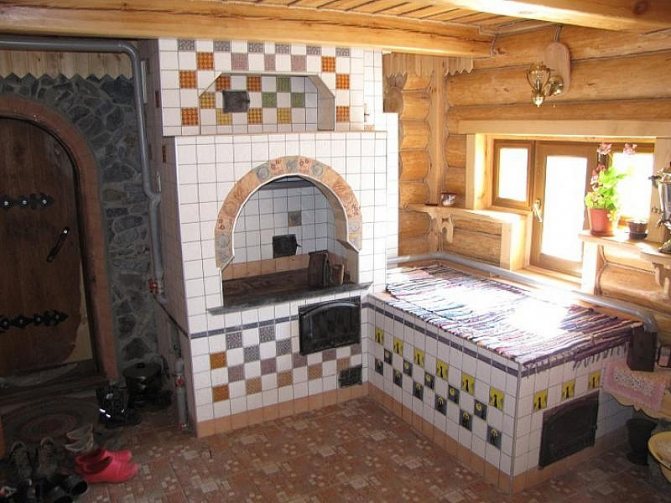
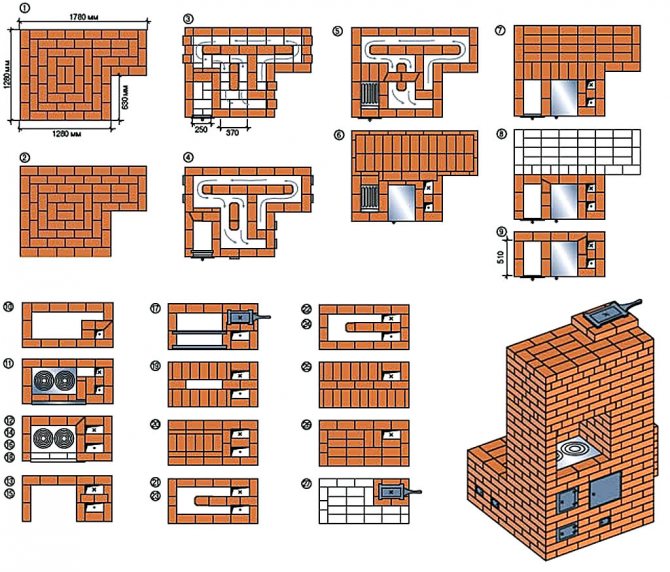
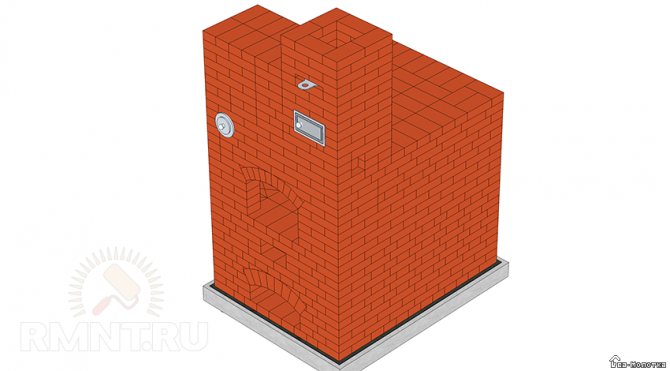
The design of the Russian (oven) oven
There are three main components in the oven:
- Foundation.
- Housing.
- Chimney.
Foundation
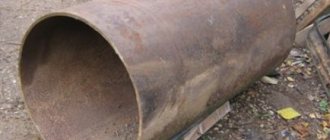
Our ancestors used rubble stone or overheated brick for the foundation. Without departing far from the traditions of the past, we will consider the option of a rubble concrete foundation for the furnace body.
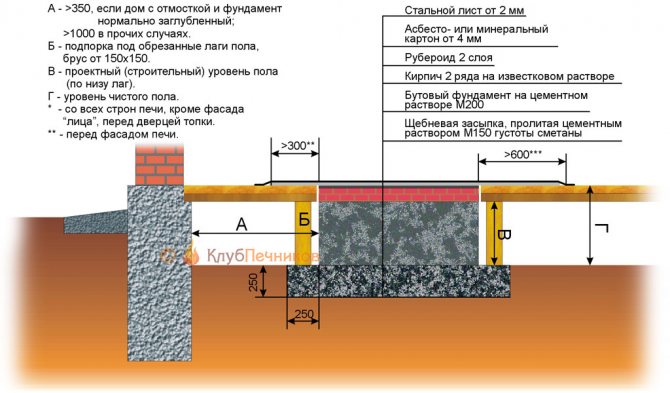
The depth of the foundation for the furnace depends on the properties of the soil, whether the building is heated during a cold period of time, what is the level of groundwater. In the case of non-constant heating of the building, the depth of the base of the foundation is provided below the depth of freezing of the soil in the coldest time.
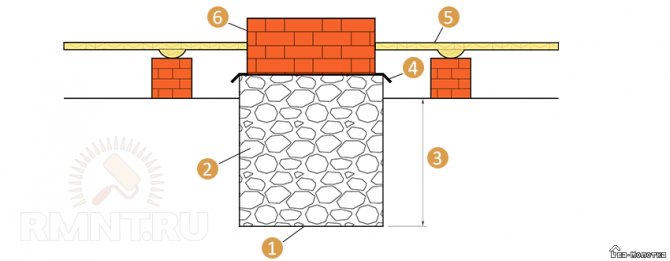
1 - the bottom of the foundation; 2 - rubble masonry; 3 - bookmark depth; 4 - waterproofing; 5 - floor level; 6 - furnace massif
Rubble concrete consists of concrete mix and rubble stone. For the foundation, it is enough to use concrete mix M200. M200 concrete mix is obtained with the following composition:
- cement M400 - 1 part;
- sand - 2 parts;
- gravel or crushed stone of fraction less than 3 cm - 4 parts.
For the manufacture of concrete, sand is taken with a minimum amount of organic, clayey, dusty, mica impurities, which significantly reduce the strength and frost-resistant properties of concrete.
Water is poured into the dry mixture of cement, sand and gravel gradually, with constant stirring of the ingredients until the required fluidity of the mixture is achieved. In this case, the volume of water is approximately equal to the volume of cement taken.
The foundation for the furnace can be constructed both with the help of formwork and without formwork with dense non-crumbling soils and the depth of the base of the foundation less than 1.25 m. In the case of a non-formwork device, the size of the pit must correspond to the size of the foundation. It is necessary to lay a layer of compacted crushed stone with a thickness of at least 10 cm under the base of the foundation.
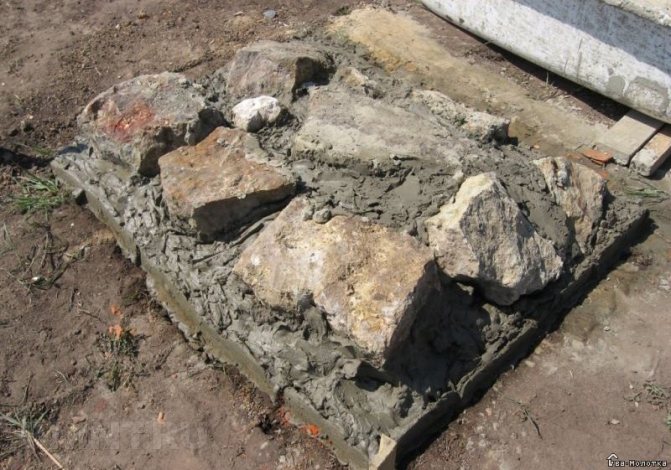
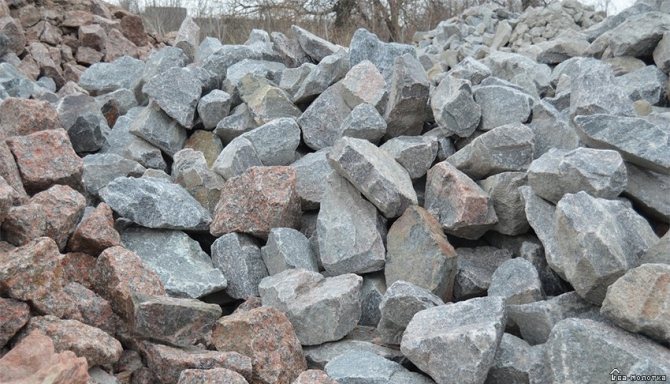
Rubble concrete masonry is the process of embedding rubble stone into a layer of a laid concrete layer 20 cm high. Rubble stone should be less than 30 cm, it is immersed in a concrete layer to a depth of more than 1/2 of its height. The gap between the stones to be laid, as well as between the stone and the formwork, is 4–6 cm. When the rubble layer is completely laid, the next layer of concrete is laid and the process of embedding the stone is repeated.
To achieve the full quality of concrete work, breaks in the process of laying the foundation are allowed only when the gaps between the stones are filled with concrete of the last layer. In dry, windy or hot weather, with interruptions in work for more than a day, to prevent rapid drying, the concrete surface is covered with some kind of material (you can tarnish) and moistened with water 3-4 times a day. Before resuming work, the surface of the last layer is cleaned of dirt and moistened with water.
Rubble stone can be replaced with fragments of red brick or pieces of concrete, while the aggregate of the concrete mixture can be brick rubble. Stones, fragments of bricks must be thoroughly cleaned of contamination before being immersed in the concrete mixture. In dry and hot weather, in the case of using broken bricks, the fragments are soaked in water before laying.
The timing of concrete gaining strength depends on its temperature. At a temperature of 10 ° C, in the first day, it will gain about 10% of its full strength, in 7 days about 60%, and in 28 days - 85%. With an increase in the temperature of concrete, the terms of its full strength gain are reduced. It is necessary to start masonry on the surface of the foundation no earlier than 14–28 days later.
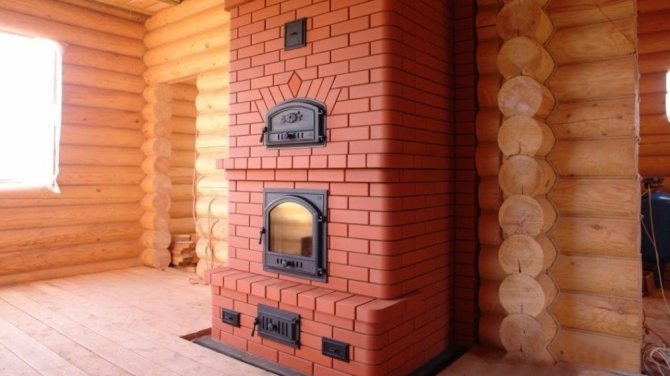
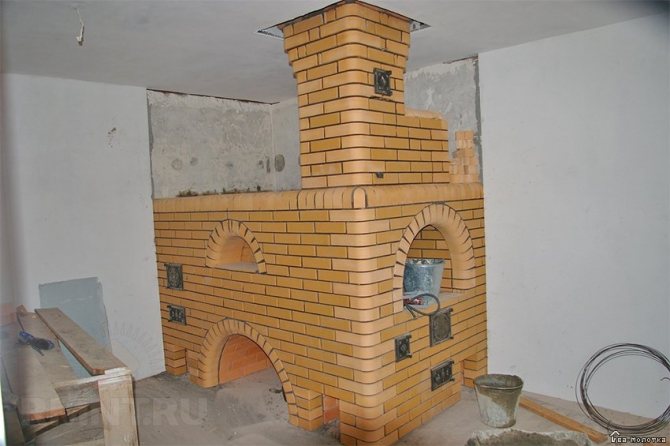
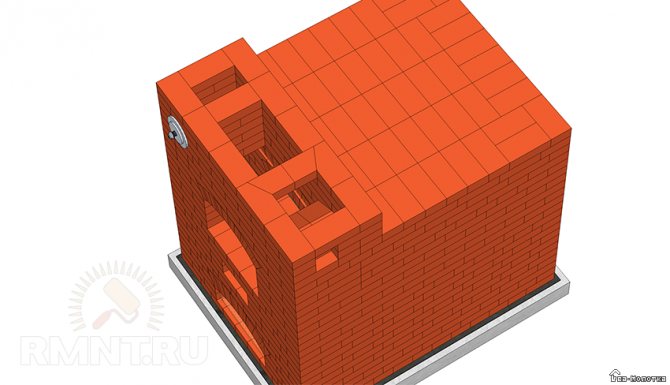
Furnace body
In a Russian hut, the stove was installed in a corner not far from the door. About 20 cm receded from one wall, and about 1 meter from the other, where the entrance door was located. In this place, a closet was often equipped, where food and kitchen utensils were stored.
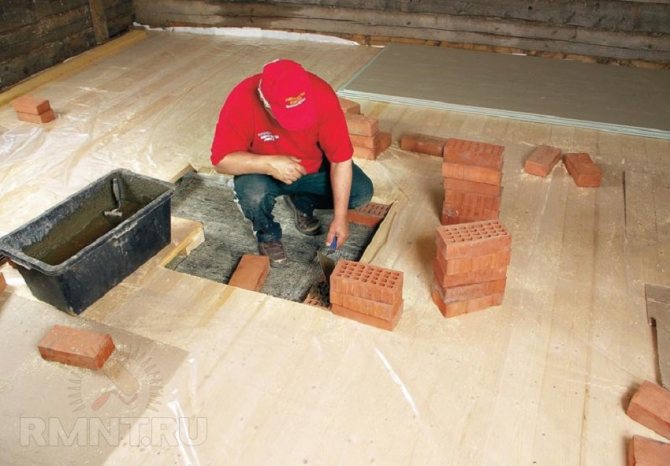
On the surface of the foundation, which has gained strength, 2 layers of waterproofing material (roofing felt, roofing felt, etc.) are laid. Next, the base of the furnace (guardianship) is laid out. In the classic Russian stove of the past, a wooden beam or log was used for this.
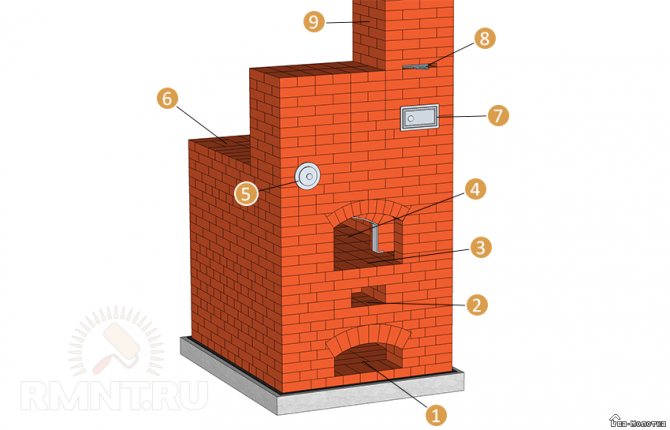
1 - baking; 2 - subset; 3 - six; 4 - under; 5 - strangler; 6 - overlap; 7 - half door; 8 - gate valve; 9 - chimney pipe
The base served for storing kitchen utensils, and equipment for the stove (grabs, pokers, frying pans) was placed in the baking oven. Now this part of the furnace is laid out mainly of brick (ordinary clay). And you need to use a full-bodied one. The brick is front and ordinary. The front one is used for cladding, the ordinary one is used for the internal masonry of the furnace. For surfaces in contact with an open fire, it is necessary to use refractory bricks (chamotte), which can withstand temperatures over 1300 ° C.


Flat pattern of walls with channels
If channels are provided in the wall for ventilation or chimneys, then special drawings of the wall sweep with channels are made.
The figure shows a flat pattern for walls with channels, as well as a wall plan. For the convenience of reading the drawing, the channels are highlighted with a solid main line. The openings in the ventilation ducts are shown diagonally, and in the flue ducts, half darkened. Exactly where these channels are located is indicated by binding to the floor of the floor and to the outer wall.
For each channel, a numerical value is indicated separately, indicating on which floor the channel begins. As you can see in the figure above, on each floor of the building there are two ventilation ducts located in the bathroom and toilet rooms and one for the chimney starting in the kitchen.
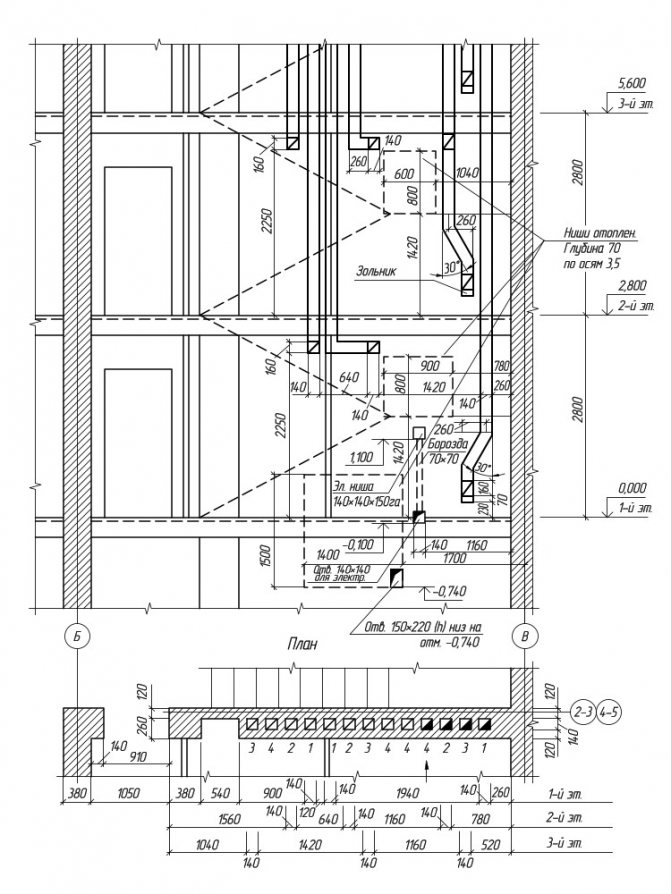
Wall sweep with ventilation ducts and chimneys
Clay-sand mortar
The amount of sand in the clay-sand mortar is determined depending on the fat content of the clay (oily - 2–4% sand, medium - 15% sand, lean - 30% sand). To achieve the highest quality masonry, sand must be sieved through a sieve with 3x3 mm cells.
Proportions of clay-sand mortar:
- Oily clay: 1 bucket of clay, 2.5 buckets of sand.
- Medium clay: 1 bucket of clay, 1.5 buckets of sand.
- Skinny Clay: 1 bucket of clay, 1 bucket of sand.
To prepare the solution, put several buckets of crushed clay in a container and fill it with water for 24 hours. Then add the required amount of sand in portions to the soaked clay, constantly stirring until a homogeneous consistency.
Materials (edit)
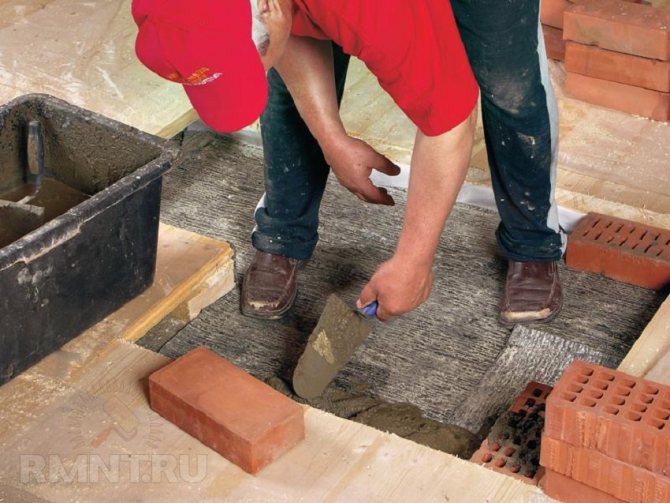
The structure of the guardhouse itself is made of ordinary clay bricks on a cement-sand mortar based on M400 cement, in a proportion: 1 part of cement and 3 parts of sand. The necessary mobility of the mortar can be checked by placing part of it on the bayonet of the shovel at an angle of 45 °. In this position, the finished solution should not drain. Before starting laying, the bricks are soaked for better adhesion to the mortar.
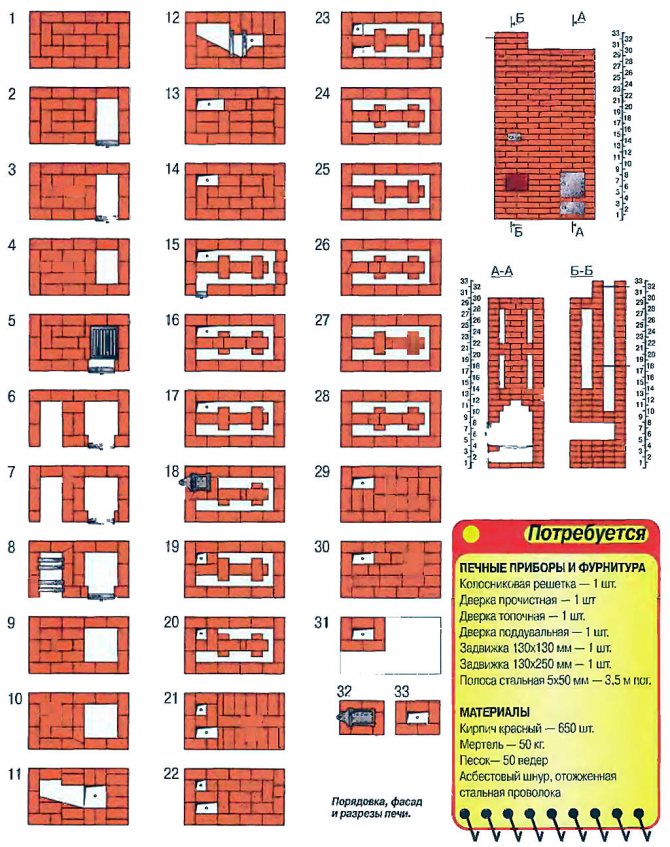
For the entire structure of the furnace, about 1500 to 2500 pieces of bricks, including refractory bricks, will be required, depending on the height of the room and the structure of the roof. The consumption of clay and sand in the mortar is about 80 buckets. From stove accessories you will need: views, latches and half-doors.
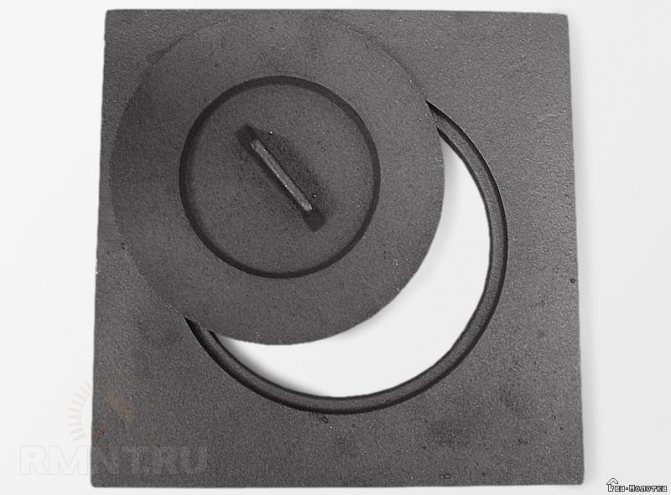
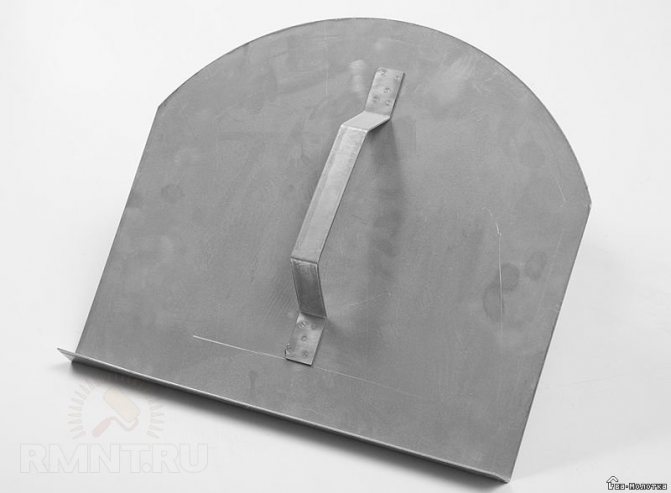
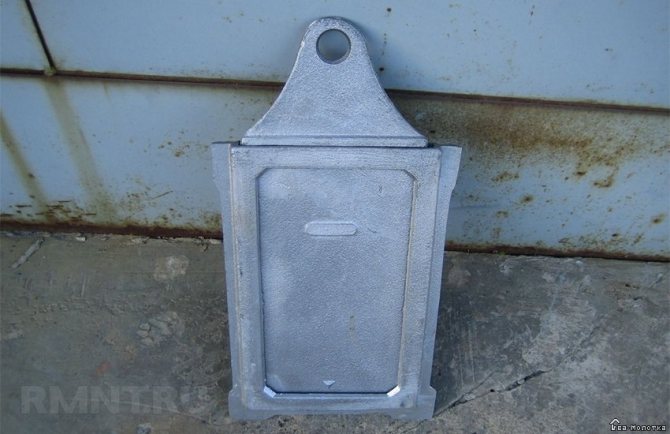
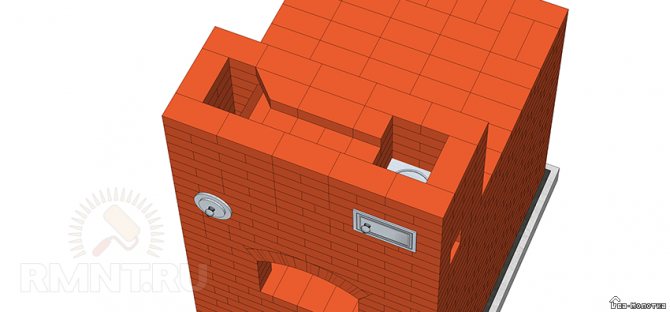
The view is installed between the high and the pipe to block the passage of hot gases from the furnace to keep the heat in the furnace. In the place where the view is installed, an opening is made for laying a half-door, which can also be used as natural ventilation of the room.
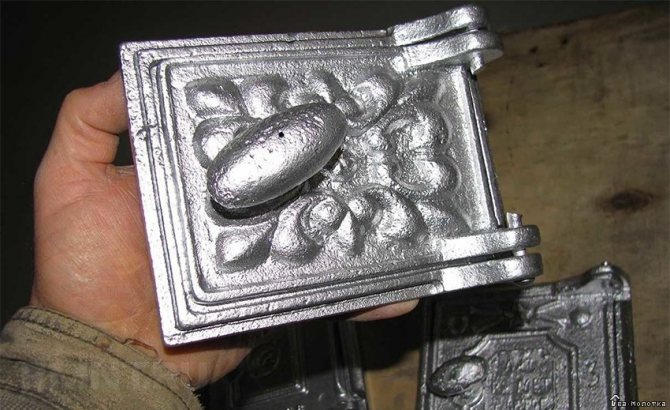
Kiln dampers are needed to cover the mouth by regulating the heat process in the kiln.
The valve is installed above the view to regulate the draft in the pipe and prevent the cold air from the pipe from falling down.
Bricks and masonry
The standard size of ceramic bricks is 250 × 120 × 65mm. When performing brickwork, the bricks are laid on a 1 cm thick mortar. In order for the masonry to be strong and stable, the bricks are laid in the masonry, with the so-called bandaging of the seams.
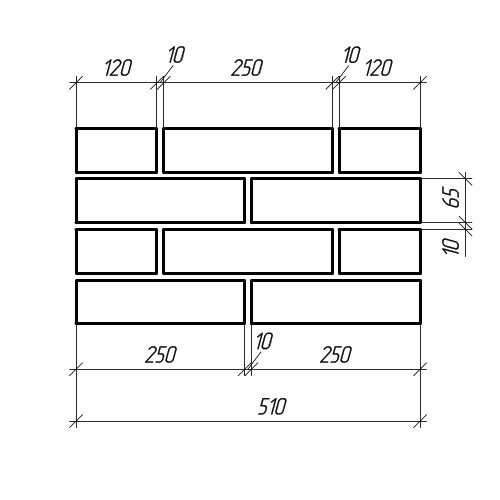
Dimensions of standard brick masonry
The thickness of the walls is taken as a multiple of the size of half of the brick. For example, 120 mm is half a brick, 250 mm is a whole brick, 380 mm is equal to one and a half bricks, 510 mm is two bricks, and so on. Ceramic bricks are made hollow and solid, that is, with or without voids.
Dimensions of brickwork
Solid bricks are used in places where there is a need to withstand distributed loads. For example, in foundations, plinths and elsewhere. Although, external walls can be laid out of solid bricks. But this should be advisable, since the thickness of the wall can grow significantly in order to ensure the standard thermal conductivity.
Hollow bricks, due to the presence of voids inside them, are less heat-conducting, that is, the walls of them can be thinner in size compared to solid ones. And due to their lower dead weight, they load less on the foundation of the building.
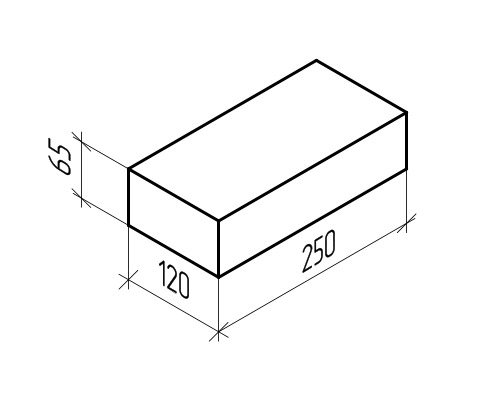
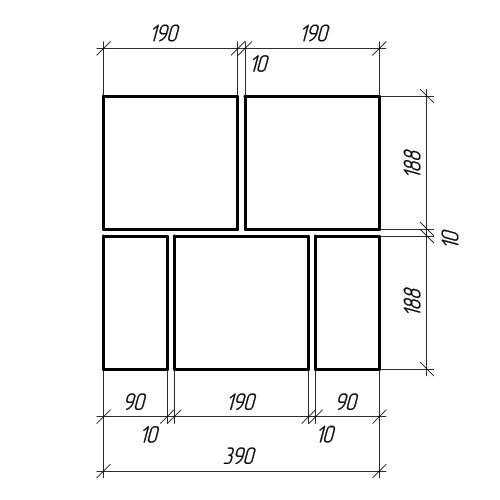
Dimensions of a standard brick
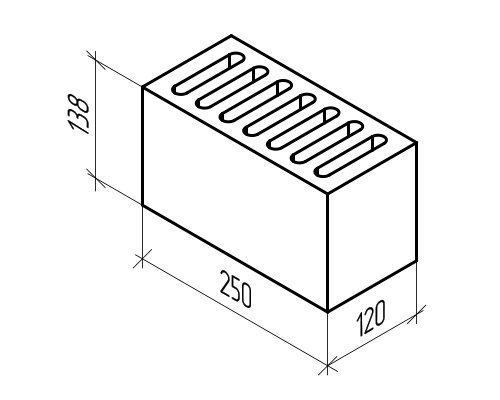
Brick with seven slotted voids
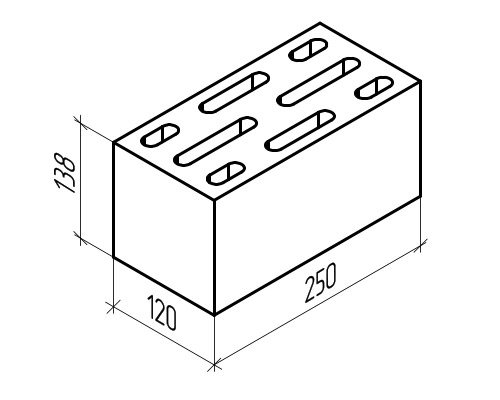
Lightweight concrete stone with slotted voids
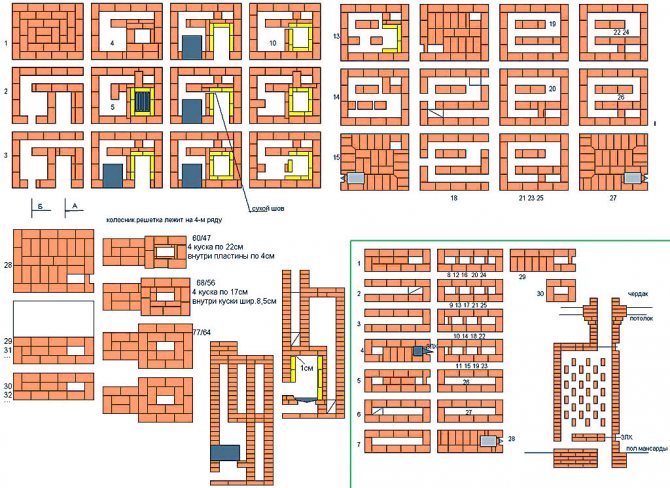
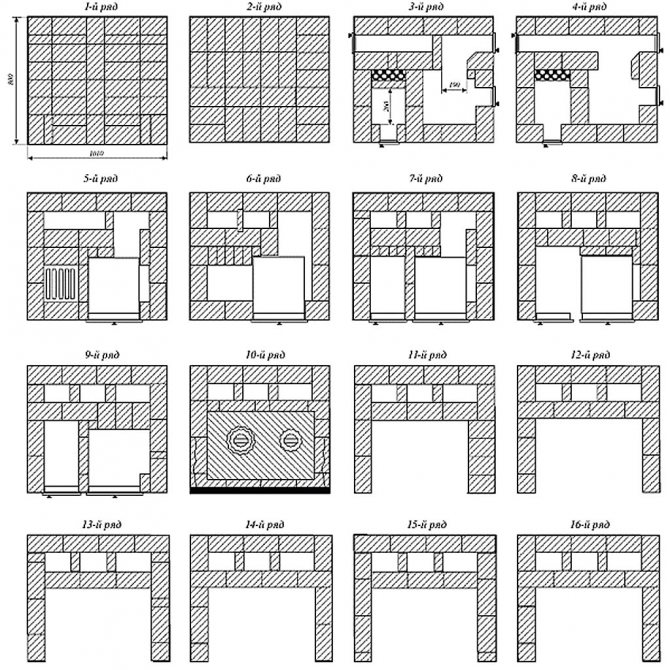
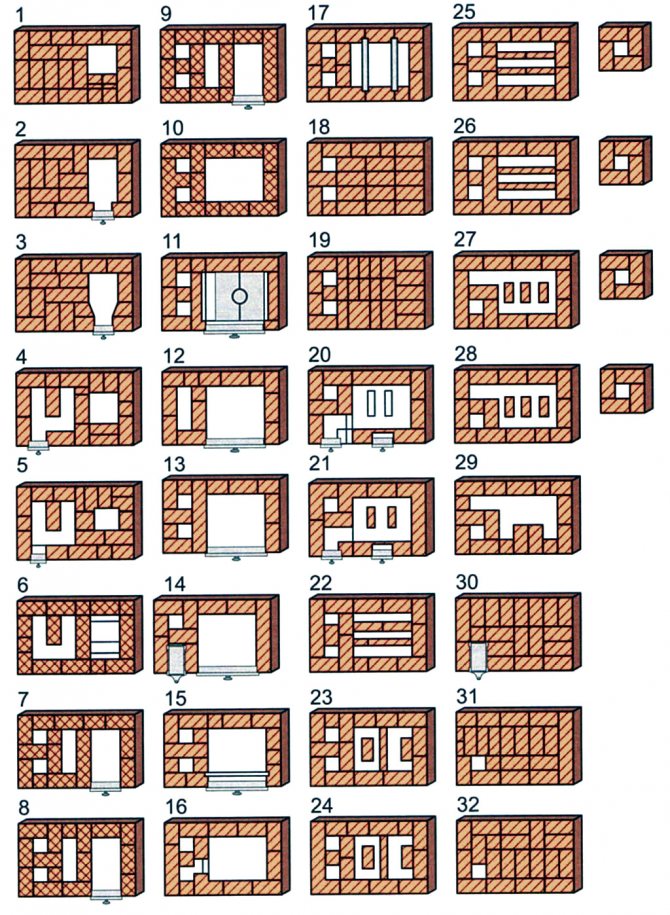
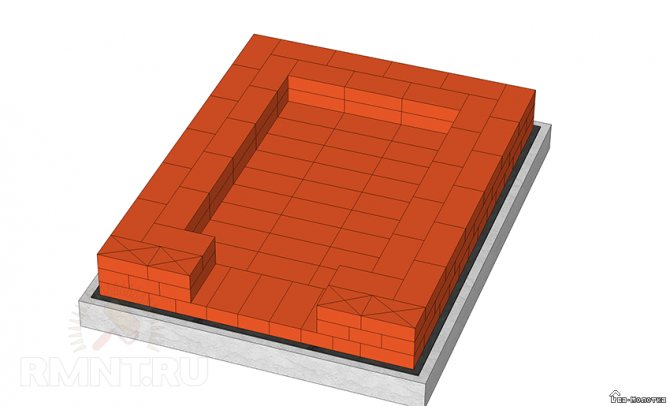
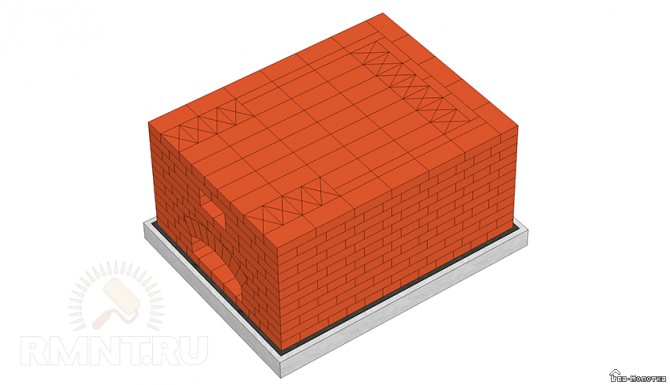
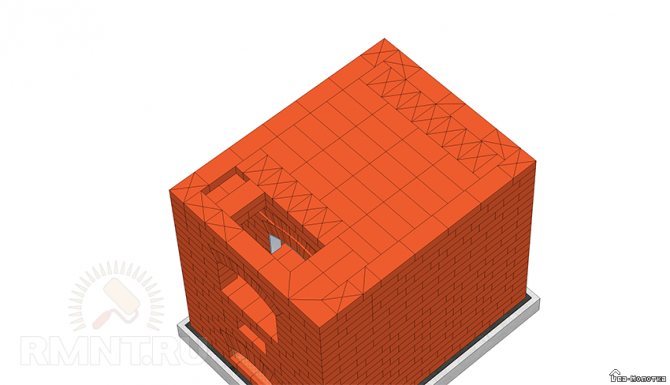
Ordering
The first row is laid on the foundation waterproofing. In the corners, 3/4 bricks and beveled bricks are used for better dressing of subsequent rows of masonry. The entire structure of the guardianship is laid out on a cement-sand mortar.

The second row is the beginning of laying the walls of the guardianship.
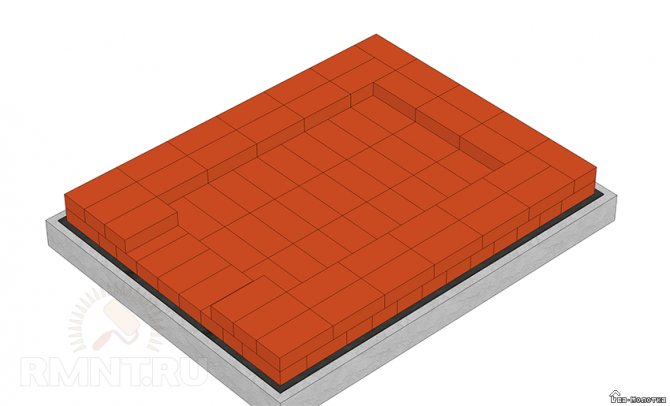
Third row. The construction of the walls of the guardhouse with the use of 3/4 bricks continues.
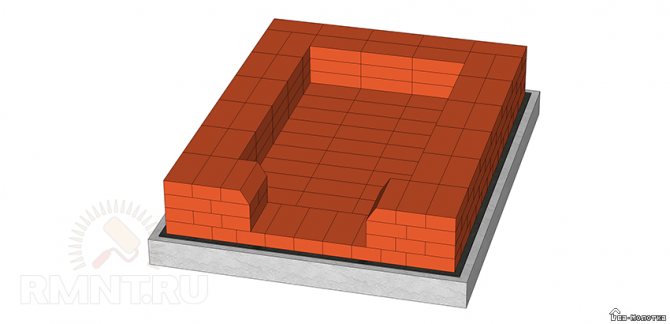
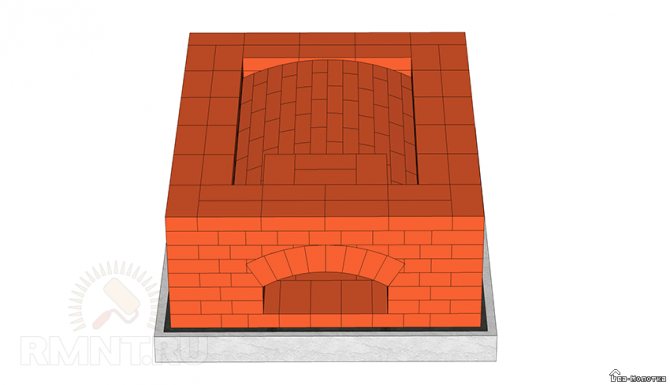
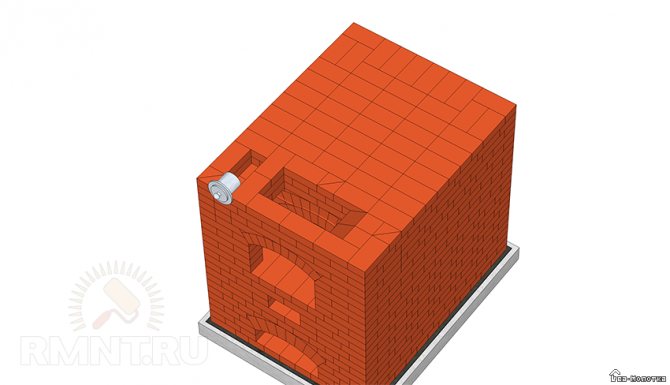
The fourth row is laid out according to the given order and involves the use of beveled bricks to support (heel) the arch.
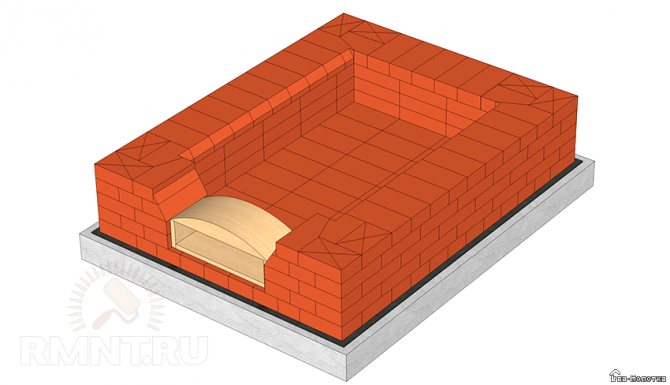
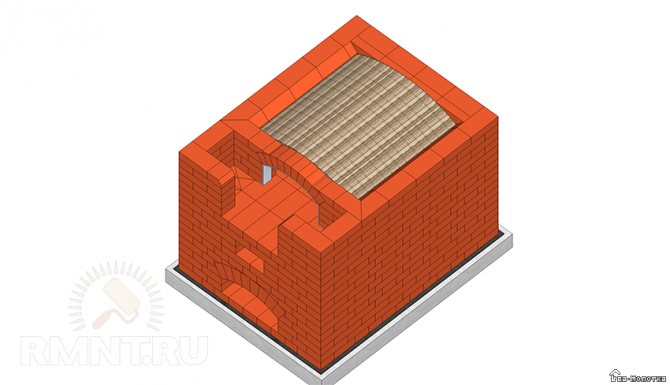
The fifth row is laid using 3/4 bricks in the corners of the kiln, beveled bricks to support the arch. The arch is also laid out here. A wooden template is pre-made, which is inserted into the opening of the sub-oven.
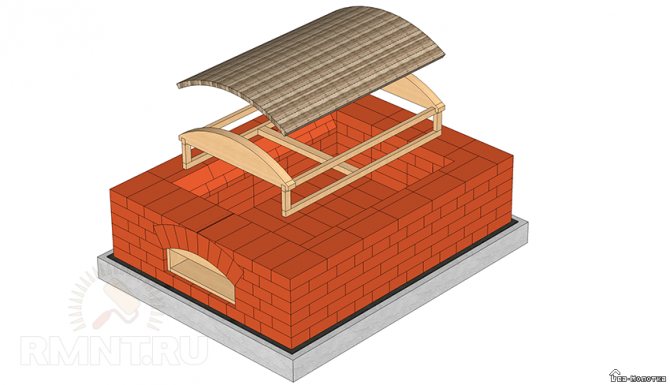
The sixth row is laid out according to the given order. A wooden template of the vault of guardianship is made in advance, which is inserted into the inside of the masonry.In the process of making a template, it is necessary to provide for its easy disassembly at the end of the laying of the vault. For a snug fit of the template to the walls of the masonry, 1-2 spacers are driven in at the bottom.
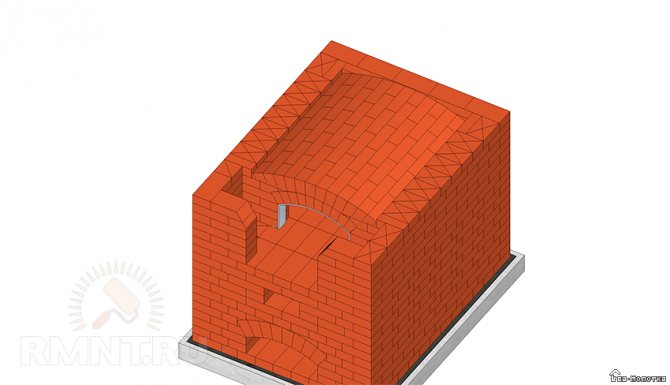
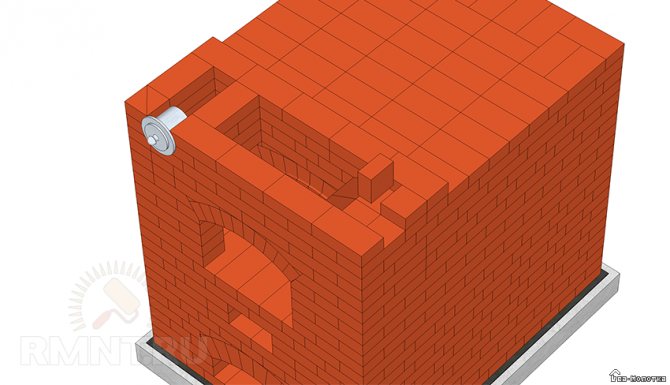
The seventh row involves laying the arch and the next row. The arch begins to lay out on both sides, gradually moving towards the middle. The last brick is called a castle brick, its role is to create compressive stress at the base of the vault, which will ensure the strength of such a structure. In this regard, the last brick is inserted into the gap less than 1/4 of the brick using a mallet. The bricks in the vault are laid as tightly as possible to each other, so the seams at the bottom are made as small as possible, and the upper gaps are made of the same size, into which, if possible, fragments of brick can be embedded.
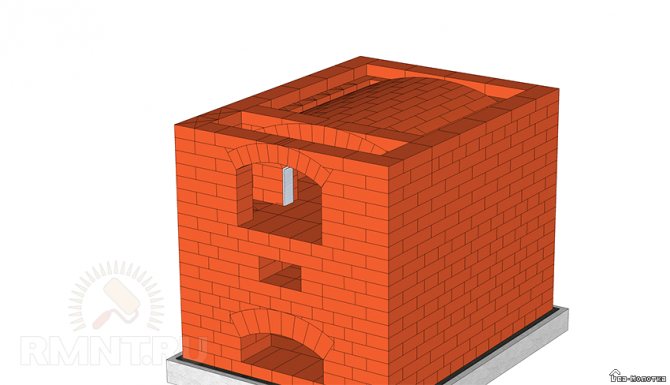
The eighth row provides for one layer of masonry walls of the guardianship in accordance with the given order with the arrangement of the site for a cold stove.
Ninth row. In addition to one row of walls, the walls of the stove are also laid out.
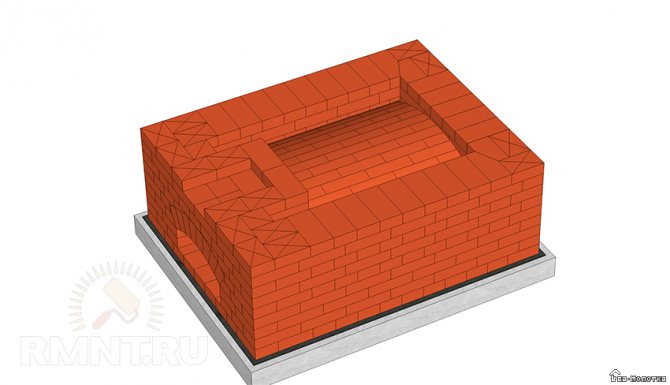
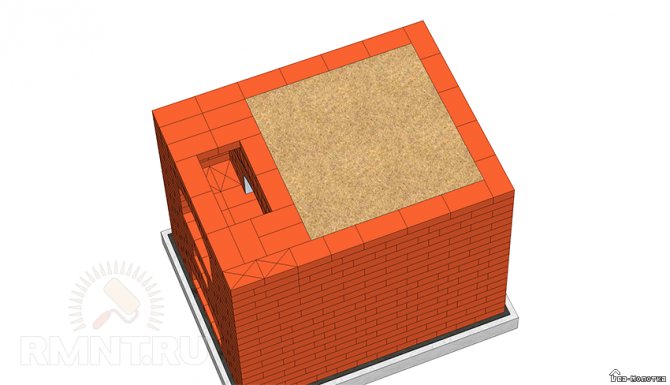
The tenth row completes the laying of the walls of the guardianship. For better insulation of the cold part of the furnace from its hot part, the inner space is covered with dry calcined sand to the upper border of this row.
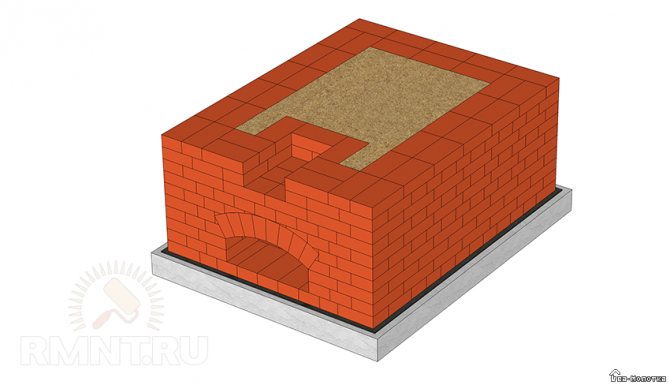
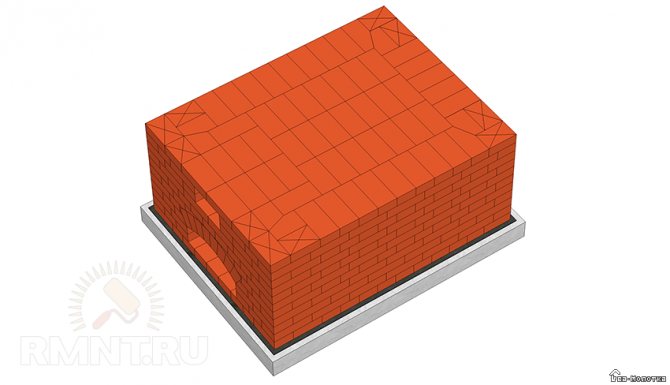
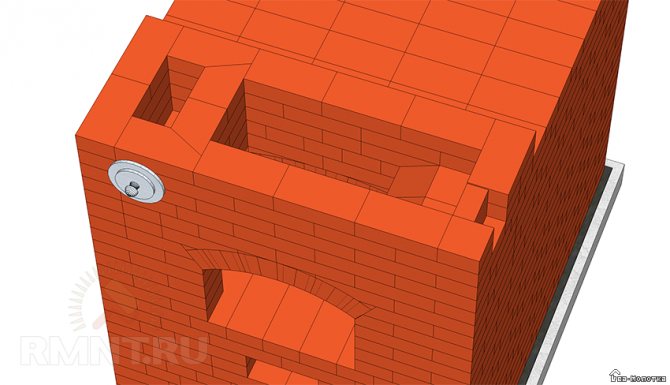
The eleventh row overlaps the guardians completely with the use of additional and beveled bricks. From this row, the cement-sand mortar is replaced by a clay-sand mortar.
The twelfth row begins the device of the hot part of the furnace (under, six). Therefore, all surfaces in contact with fire must be made of fire-resistant bricks, the dimensions of which coincide with the dimensions of an ordinary one. The surface of the hearth must be level. To do this, it is sanded with fine sand and bricks, removing all the unevenness of the masonry. In addition, for the convenience of removing coal from the hearth, its surface is made with a slope towards the mouth.
The thirteenth row lays the cooking chamber and the six. A hardened metal mouth arc is also installed here. A hardened steel wire attached to it is laid in the masonry.
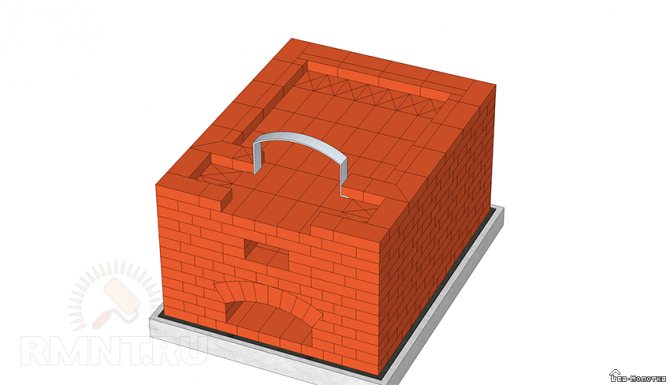
The fourteenth, fifteenth and sixteenth rows line up the walls of the furnace and the pole.
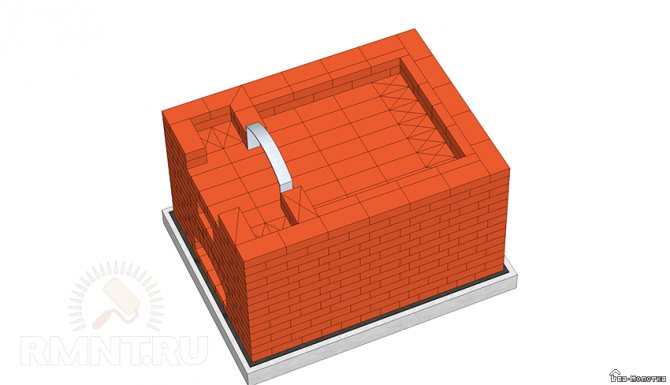

The seventeenth row is the final one in the masonry of the mouth with an arched vault. At this stage, sloped brick heels are laid out, which are the supports for the brick vault of the cooking chamber, and the formwork of the arch of the cooking chamber is inserted.
The eighteenth row is laid out according to the principle of a vault, which is described in the seventh row using clay-sand mortar and refractory bricks.
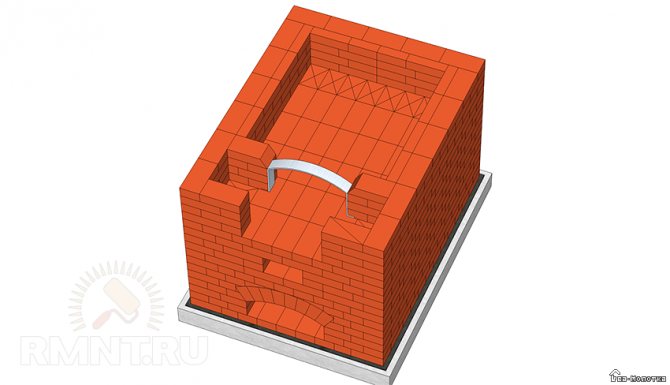
The nineteenth row involves building up the walls and arch of the six.
The twentieth row continues to build up the walls, and also partially overlaps the hole above the sixth, leaving a channel for the overtube. The inner space above the cooking chamber is filled with dry calcined sand.
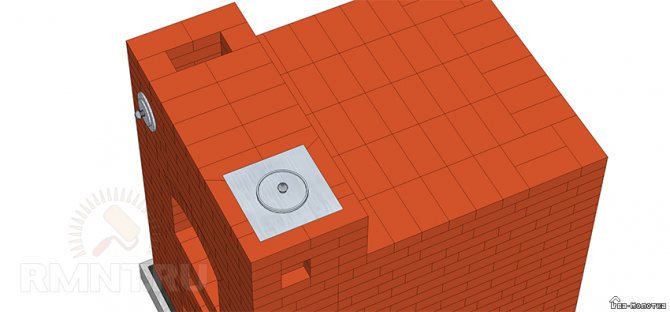
The twenty-first row covers the crucible. The overtube channel is somewhat reduced for the device of the protrusion, which prevents the penetration of sparks from the cooking space into the pipe. Here, the laying of the samovar channel begins.
The twenty-second row completes the overlap device. A strangler is installed in the samovar channel. The steel wire on its sleeve is embedded in the masonry.
The twenty-third row involves laying the overtube channel and the samovar. The strap is also attached here with the help of hardened steel wire. In this row, a small opening is made to remove soot from the channel ledge, which is covered by 1/2 brick, placed on the edge and coated with clay mortar. During cleaning, this brick is knocked out, and at the end of cleaning it is replaced with a new one. Now they often put a special metal plug instead of a brick.
The twenty-fourth row is a continuation of the laying of the above channels.
Twenty-fifth row. A channel for installing a view is highlighted in this row.
The twenty-sixth row involves building up the strangler channel, then the overtube channel is blocked and the view is installed.
The twenty-seventh row is laid out, as shown in the order. To access the view, a half-door is installed opposite it.

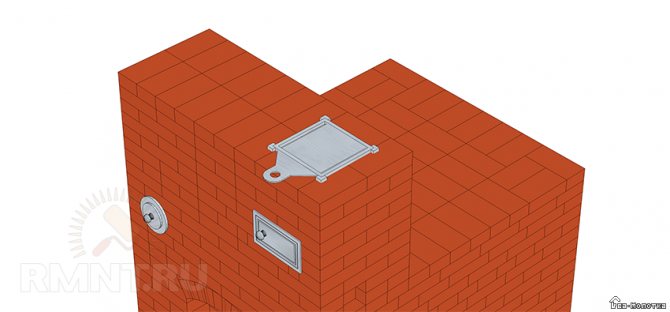
The twenty-eighth, twenty-ninth and thirtieth rows suggest further laying of canals with ligation of the sutures.

The thirty-first row, according to the order, connects the strangler and the pipe through a narrow passage.
The thirty-second row overlaps the stranglehold and the channel connecting the strap with the pipe. A valve for the tube above the pipe channel is also installed here.
The thirty-third and subsequent rows to the ceiling involve laying the pipe channel.
Not reaching three rows to the ceiling, cutting is done to increase the thickness of the brickwork. This increases the fire safety of timber floor and roof structures. Further, the pipe riser is laid out in the same dimensions as before cutting. To avoid the accumulation of condensate on the pipe walls, the pipe stand is plastered over a metal mesh. As the pipe passes through the timber roof structures, the wall thickness of the channel also increases. The upper part of the pipe must be protected from the penetration of precipitation by a metal cap. The laying of the outer part of the pipe is carried out on a cement-sand mortar. For strength, it can be plastered.
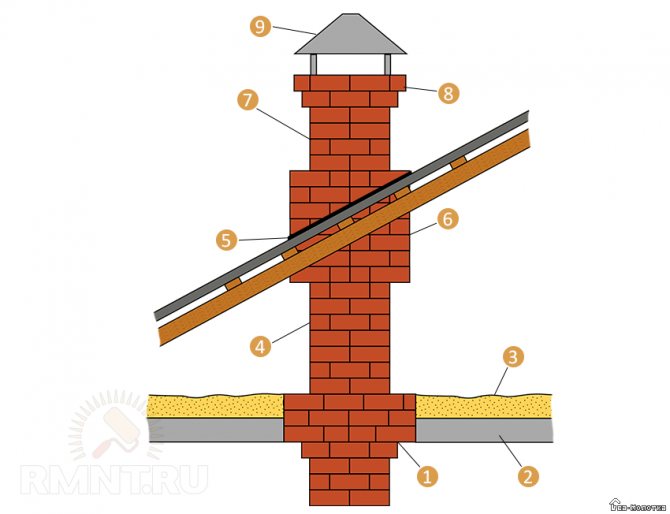
1 - cutting; 2 - overlap; 3 - insulation; 4 - pipe riser; 5 - metal sheet; 6 - otter; 7 - pipe neck; 8 - head; 9 - metal cap
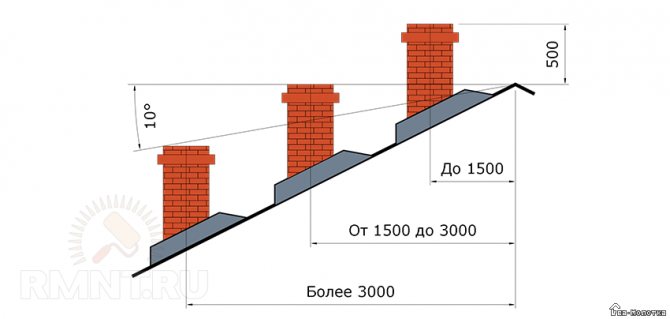
The height of the outer part of the pipe to improve traction depends on its distance from the roof ridge.
Bricklayer Measuring Tools
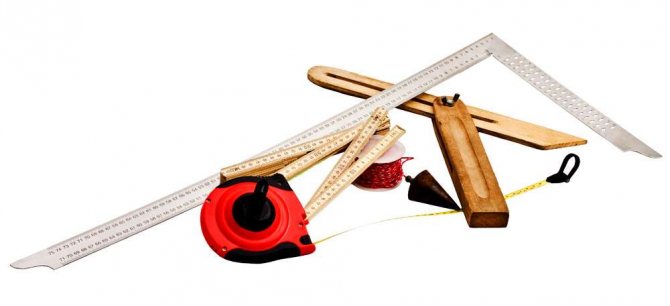
Plumb line
With the help of a plumb line, masons verify the verticality of walls, piers, pillars and masonry corners. Plumb lines weighing 200-400 g check the correctness of the masonry in tiers and within the height of the floor; plumb lines weighing 600-1000 g are used to check the outer corners of the building within the height of several floors.
Building level
The levels are produced in lengths of 300, 500 and 700 mm. They are used to check the horizontal and vertical lines of the masonry. On the body of the level there are two glass tubes-ampoules bent along a curve of a large radius, filled with non-freezing liquid so that a small air bubble remains in them. If the level applied to the masonry is in a horizontal position, the bubble, rising upwards, stops in the middle between the divisions of the ampoule.
The displacement of the bubble to the left or to the right of this position shows that the masonry on which the level is set is not horizontal, and the greater its inclination towards the horizon, the more the bubble is displaced from the middle position.
Due to the fact that the tubes are located in two directions, it is possible to check with the level not only horizontal, but also vertical planes.
The rule
A polished wooden lath with a section of 30 x 80 mm, a length of 1.5-2 m. It is also made of duralumin in the form of an H-shaped profile with a length of 1.2 m. This lath is used to check the front surface of the masonry.
Wooden square
It has a side length of 500x700 mm and is used to check the rectangularity of the corners being laid.
Mooring cord
Twisted cord 3 mm thick, which is pulled when laying versts between orders and beacons. When laying, a mooring cord is used as a reference point for ensuring the straightness and horizontalness of the rows of masonry, as well as the same thickness of the horizontal seams. With the help of a cord, it is determined what position each brick to be laid should have in a verst.
Wooden ordering
Ordering is a rail with a section of 50 x 50 or 70 X 50 mm and a length of up to 1.8-2 m, on which divisions (notches) are applied every 77 mm, according to the thickness of the masonry row. The 77mm dimension is made up of the brick height (65mm) and the joint thickness (12mm).The orders by masons are used to mark the rows of masonry, fix the marks of the bottom and top of window and door openings, lintels, girders, floor slabs and other building elements. To the outer surface of the walls, the orderings are installed in such a way that the sides on which the rows of masonry are marked are facing the inside of the building from where the masonry is carried out. The order is attached to the masonry with steel holders in a U-shape. This is done like this:
Holders are inserted into horizontal seams along the masonry every 6-8 rows in height, placing them one above the other. The staples should go into the wall with their ends and cross bar. Having laid one or two rows of bricks over the second holder, an order is inserted into the staples and fixed with wooden wedges. A mooring cord is moored to the orders, along which the masonry is led. The mooring cord is installed and rearranged using a double bracket, which is held on the ordering rail by the tension of the mooring cord and as a result of friction between the bracket and the ordering.
The order is removed together with the holders without removing the wedges, for which it is carefully rocked in a plane perpendicular to the wall surface.
The holders, overcoming the resistance of the mortar, come out of the horizontal seams of the masonry and the order is lifted up along with them. Inventory orders are also made from a metal corner profile 60 x 60 x 5 mm. On the ribs of the ordering angle, divisions with a depth of 3 mm are cut every 77 mm or holes are drilled to secure the mooring cord.