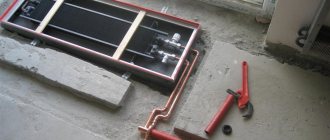
Niche for a convector built into the floor - device
The easiest way is to make a niche on the ground floor in the earthen floor.
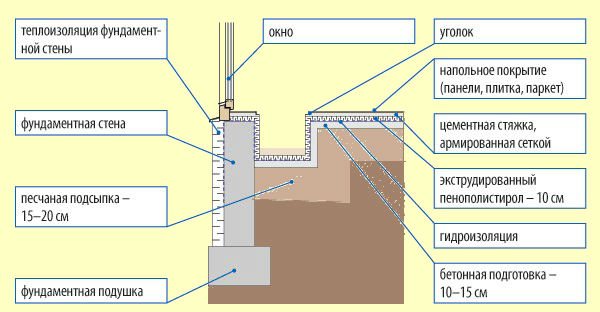
- The niche must be covered with a waterproofing layer. Moreover, the waterproofing of the niche must be combined with the waterproofing of the main floor.
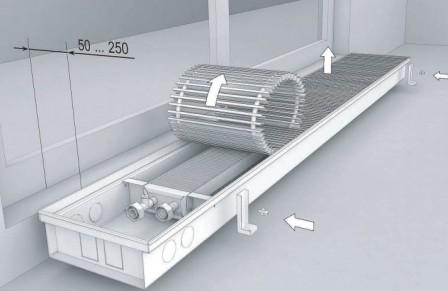
- The size of the niche must match the size of the radiators. There must be a distance of at least 100 mm from the walls of the niche to the edges of the radiator. The distance from the edge of the niche to the window should be 50-250 mm.
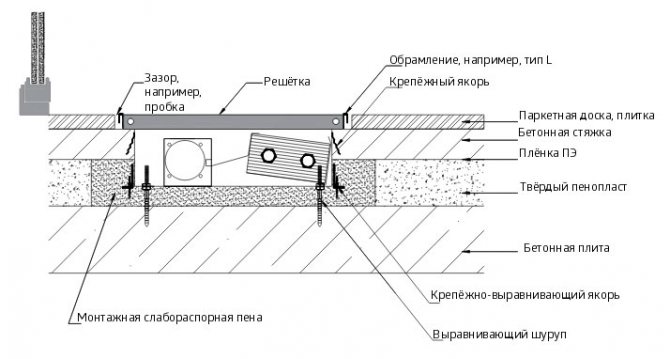
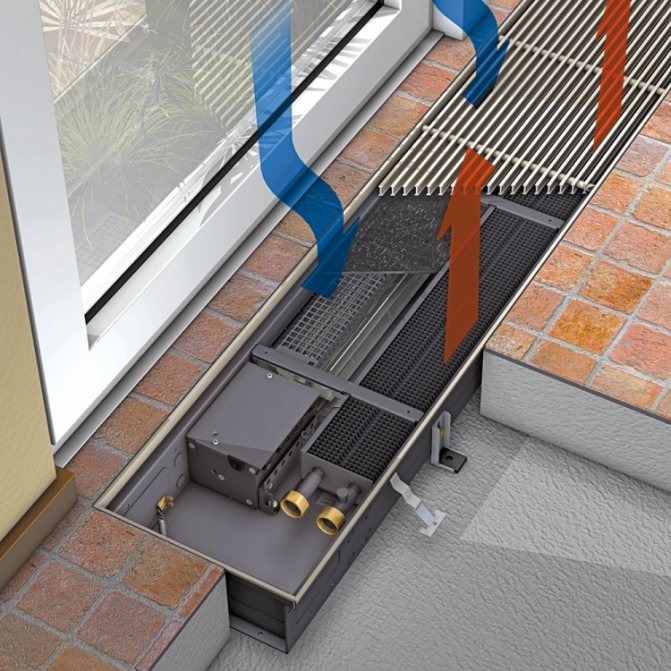
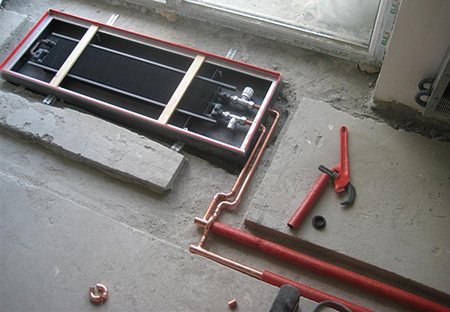
- The general design of the radiator niche is clearly visible in the figure. This is a diagram of the device for a niche for a radiator on the first floor of a house.
- If a niche needs to be made on the second and third floors, it is necessary to provide for the lowering of the floor beams to the desired height.
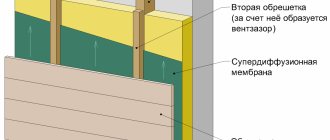
- The niche can be plastered, but first you need to insulate it. Better to use expanded polystyrene. This is a tough insulation that will further strengthen the niche. Insulation will reduce heat loss due to unnecessary floor heating.
- The niche "trough" itself is best made of galvanized steel. It will additionally serve as a thermal reflector. You can overlay a niche (instead of steel, ceramic tiles).
- The edges of the niche must be trimmed with a corner for laying the decorative grille.
Installation of radiators in a niche
We are considering the simplest convector built into the floor. This is a natural circulation convector. The niche for the convector built into the floor is already ready, we are proceeding with the installation of the heat exchanger.
The coolant moves through a two-pipe heating system. It is supplied with one pipe, with the second pipe it is removed from the radiator. A thermostat with a Mayevsky tap is placed on the input, a shut-off valve is placed on the output. Everything is the same as when installing radiators on a wall, only in a horizontal plane.
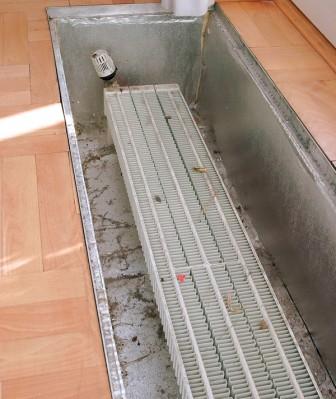
The four-pipe heat exchanger is connected as in the photo, with a snake.
The system is tested at a pressure of 25 bar. The working pressure does not exceed 15 bar. Antifreeze or other non-freezing artificial heat carriers can be used for the coolant.
This thread has 15 replies, 6 members, last updated by Alex_bdr on Aug 30 '17 at 04:27.
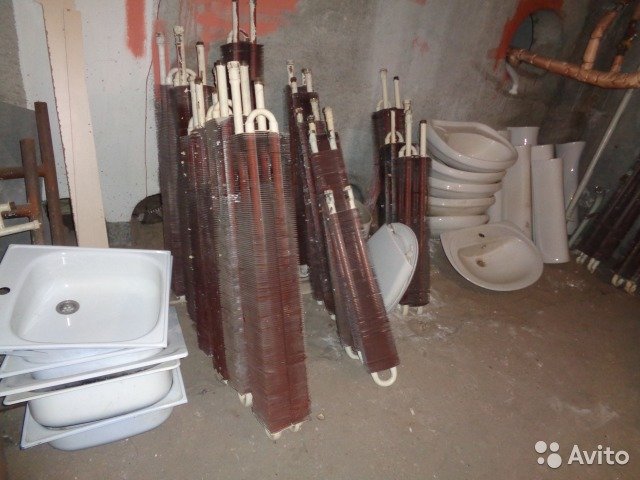
Gentlemen, an urgent question: there is a 2-storey residential building. until now, only the first floor has been heated. Electric boiler + aluminum radiators. It is urgent to start heating on the 2nd floor. The power of the electric boiler will be enough. But on the second floor there are floor-to-ceiling windows - and on the convectors built into the floor, the price tag is absolutely inadequate. I am interested in the possibility of placing ordinary Sovdep steel convectors without a decorative screen in the prepared niche in the entire wall with windows. Confused by the fact that they are designed for main heating with a high temperature. Moreover, in the rooms of 18 sq. there was a 1.5 m convector. I am planning for 18 sq. M. install a 3 m convector along the wall. Will there be sufficient heat dissipation on the second floor compared to the first when using one boiler, or is a separate boiler needed? Convectors are planned as in the picture
I'm on the phone, so I don't want to write a lot about the pros and cons and features of this solution, I'll just share an idea that, in my opinion, has more life ... Let's take a square tube. Better rectangular. The bigger, the better. We jam it on both sides, make taps and mount it on the floor. There is a flight of imagination, depending on the aesthetics and scheme of the CO. Can be cast into the floor, with a wide surface level with the floor. But then everything is welded and with thermal pads. The result is an inertial heating device. If it is terminal with a single tube, then in general it is possible to cut straight into the line. Karoch, further nuances…. Oops ... this scheme is only for the French. The rest is classic ...
If you have panoramic windows, then in any case you need to install floor convectors. Reviews indicate that to create a powerful thermal curtain, it is necessary to use radiators with forced convection. They are available in different lengths, you need to select a little less than the window opening.


Advantages and disadvantages
Concealed convectors are very popular when organizing progressive heating in houses or buildings with a design solution for organizing spaces. In this case, they are most effective. The equipment has advantages and disadvantages that you should be aware of before making a decision.
Benefits
- In comparison with circulating heating radiators, convectors maintain the temperature more accurately, heat rooms faster. This is especially noticeable in equipment with an electric coolant.
- The presence of a fan, well-thought-out finning saves up to 25% of energy resources.
- Thermal barriers are created with the directed movement of warm air masses.
- The protective grill does not heat up above 400 C, so the installation cannot harm residents and pets. It can hold up to 200 kg, children can run and jump on the surface.
- With a non-standard layout, corner or radial elements are installed.
- For electric convectors, it is not necessary to lay a piping system and allocate a special place for a boiler room.
The underfloor converter also has disadvantages.
- For electrical equipment, this is a high power consumption. The use of these installations for heating houses or apartments with an area of up to 150 m2 is economically justified; systems with a water heat carrier are used for large buildings.
- Installation of systems is carried out in specialized recesses. It is advisable to provide them at the stage of building design or before the start of reconstruction.
- Convection equipment generates dust, so the grilles and cabinet should be cleaned periodically. A standard household vacuum cleaner can handle this task.
There are several principles you can use to select equipment:
- an electric convector built into the floor, suitable for small cottages, apartments with a standard ceiling height;
- if the building is large and has an autonomous boiler, equipment with a water heat carrier should be installed - it will more efficiently cope with the task.
These are progressive economical systems that will provide heat to any building. To ensure comfortable living and working conditions, you need to pay attention to the technical parameters.
Types of floor radiators
Immediately, we note that the installation of floor convectors in a screed does not in any way depend on its type. In this case, the principle of operation of different heat exchangers is different. There are two main differences - the air circulation method:
Convector design with natural circulation.
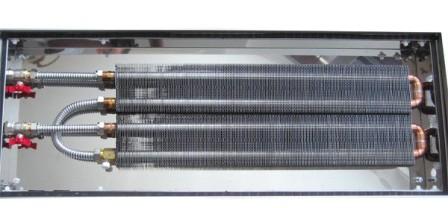
Natural circulation radiators are a copper collector of two tubes with aluminum fins, which is housed in a metal trough. In such batteries, the air moves due to the temperature difference. As you know, hot streams are lighter than cold ones, so they rise up.
In convectors with forced circulation, the air moves due to the operation of the built-in tangential fan. It looks like a wheel with curved blades. It is quiet, but there is still some noise. Floor convectors with a fan are connected to the mains, a control unit with a thermostat is installed in them.
Water convector design
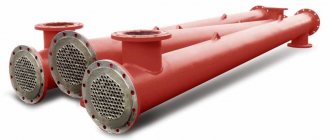
The main element of the design of such heating devices is a heat exchanger, which is a pipe curved in the shape of the letter U or, for example, a four-pipe snake, with plates put on it.Due to the presence of the latter, the heat transfer area of the device is significantly increased, and, consequently, its efficiency.
Heat exchangers, in turn, are inserted into steel cases, the configuration of which depends on the specific purpose and place of installation of the device. In order for the device to work even more efficiently, a fan can additionally be included in its design.
This device is inserted into the convector body and forced air through it. Heaters equipped with fans work even more efficiently than models with natural air circulation.
Also, in industrial convectors, special control sensors can sometimes be used. The presence of such devices allows you to regulate the operation of the device, and, consequently, to control the intensity of heating the air in the room.
Floor convectors manufacturers, prices
There is a fairly wide selection of floor convectors on the Russian market. According to reviews, the following radiator models are especially popular:
Before installing heating pipes in a private house, you need to draw up a project, preferably backing it up with a hydraulic calculation.
You can find the rules for replacing heating pipes in an apartment building here.
The range of prices is quite significant. You can find heat exchangers for 6 thousand rubles. Prices for branded products reach 60 thousand rubles. Naturally, the quality of materials also depends on the cost. The grille can be anodized and will not wear off over time. In expensive models, a stiffer trough. This extends the service life and simplifies the installation of floor convectors.
The cost of the heat exchanger should also include additional costs for piping fittings. It is likely that fasteners will also be required - in cheap models, fasteners are not female enough. We wrote here about how to choose fittings for piping a radiator in a water heating system.
Working principle in 2- and 4-pipe systems
Installation of floor convectors can be carried out in two-pipe and four-pipe circuits. In the first case, the heat exchanger works only for heating the room, and in the second - for heating and cooling. With heating, everything is simple, in this case the convector is connected and works in the same way as any other battery. When buying, you need to pay attention to the characteristics, they indicate the possibility of working with antifreezes. In two-pipe heating systems, water or propylene glycol (antifreeze liquid) can be used as the heating medium.
The principle of operation of a convector with forced ventilation.
In order for the floor convector to work in two modes (heating and cooling), it must be connected to:
- water heating system;
- fan coil.
A fan coil unit is a unit that produces cold according to the principle of an air conditioner. In this case, the heat exchanger built into the floor will act as a chiller. The difference between the chiller-fan coil tandem and split systems is that not freon, but water is used as a working substance. This is what makes it possible to install the floor convector on two systems at once. Naturally, it can only work in one of the modes one by one.
Selection of convectors
Installing an underfloor convector can seem like a rather complicated process. Therefore, we will describe everything step by step, starting with the choice of equipment. We can install electric or water heaters in front of panoramic windows or in front of the entrance area - it all depends on the type of main heating in the building.
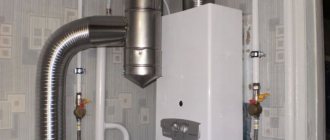
Electric floor convectors operate on a 220 Volt network and are designed to heat households that are not connected to gas mains. In their design, most often, fans of one design or another (axial or tangential) are already provided.The disadvantage of electrical appliances is their high energy consumption, but in some situations they are irreplaceable. But only wires are needed to connect them.
Installation of a water convector installed in the floor.
Water convectors have a similar design - there are heat exchangers that are connected to the heating system. For this, metal or plastic tubes are used, which require a certain skill for their laying. In this regard, electric floor convectors benefit - for their installation and connection, only wires of a suitable cross-section are needed..
When planning the installation of a floor convector, pay attention to the choice of a model with forced convection. These devices have the following advantages:
- Higher heating rate;
- Increased efficiency of work in rooms with a ceiling height of 3 meters;
- Effective removal of moisture from the entire glazing surface.
By choosing floor convectors with low-noise fans, you can increase heating efficiency and prevent a source of noise.
Installation and strapping of batteries in the floor
The difficulty of installing a floor convector with your own hands is that its grate is flush with the floor covering. Therefore, it is extremely important to precisely align the heat exchanger trough according to the water level. In this case, it is necessary that it stand firmly, because they will walk on the lattice. Installation is carried out in a cut-out niche, a screed is poured around the perimeter. Fill nuances:
- stick a damper tape around the perimeter of the case;
- do not remove the grate until the solution has completely solidified.
The convector grille must be flush with the floor.
The damper tape compensates for the thermal expansion of the screed and dampens possible vibrations from the fan operation. It is imperative that the grille is inserted into its seat. During hardening, the screed can deform the trough and the lattice will no longer be there at all.
The housing has holes for several connection options, which depends mainly on the position of the radiator in relation to the circuit. In principle, the simplest piping option is to install conventional ball valves for the supply and return. Ideally, faucet handles should point downwards so that they cannot be seen through the grate. Also, in some convectors there is not enough trough height to install the shut-off valves with the handles up.
If the electrodes for welding heating pipes are damp, then they cannot be used, at least until they are dry.
Here we compared pipes for heating a private house.
The above piping method is not suitable if you have a long heating system with several branches of different lengths. In this case, for the correct operation of the circuit, balancing is required, and for this, there must be a balancing valve on the radiator return. In addition, ball valves do not make it possible to regulate the degree of heating of the battery, which is very useful. Therefore, a thermostatic valve must be installed on the supply, preferably in tandem with a thermal head or a servo drive.
Choosing an underfloor heating system
To ensure energy savings and a comfortable temperature in winter, familiarize yourself with the technical features of the installations: power, dimensions, type of flow organization.
The size
First of all, the equipment is designed to create a thermal barrier between the glazed surface and the room, therefore, it must cover 80 - 100% of the length of the window opening. With a shorter length, significant heat loss will be observed.
The recommended height is 90-120 mm, so the niche should be arranged with small gaps. It is preferable to complete these works before the formation of the screed, but modern construction methods and specialized tools will help to make niches at any stage.
The width of the equipment is standardized.Popular sizes for natural convection are 200 - 250 mm, and for forced convection - 250 - 300 mm.
Before starting work, a calculation should be made to ensure that the geometric parameters correspond to the required power.
Power
With a standard ceiling height, floor convectors are selected at the rate of 100 V per 1 m2. By multiplying this parameter by the size of the room, you can determine the required power of the equipment. If necessary, the heating elements are installed in two rows. Fan installation improves system efficiency and automation reduces operating costs.
Forced heat exchange
Fan units are recommended for large rooms (area over 15 m2). The power of the standardized equipment is designed for the operation of the ventilation unit, therefore it has a large margin of performance, but such a system is also somewhat more expensive. When using this scheme, you can completely abandon additional sources of heat supply.
Decorative grille
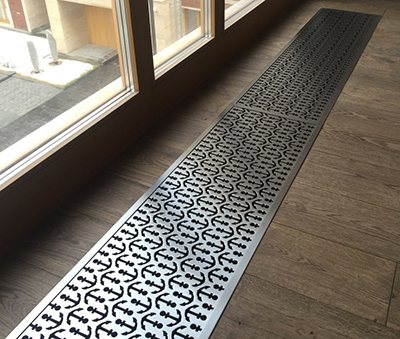
This is the only element that will be visible after the end of the installation. The grille plays not only a protective, but also a decorative role, therefore, when choosing it, you should rely on the developed interior.
These elements are made from various materials:
- polymers - inexpensive, durable and wear-resistant composition;
- if the main criterion is strength, metal elements are chosen. They can be painted in any color that will be in harmony with the flooring;
- wooden - combined with laminate and parquet. Transverse and longitudinal models are produced. The surface is sanded or varnished;
- lattices made of artificial stone will complement the strict classic interior. The shape of the panels is rectangular, and the color can be selected from a palette of shades and textures.
Correctly carried out calculation and selection of equipment will ensure trouble-free operation for decades, and the temperature in the building will correspond to the established parameters.
Advantages and disadvantages of floor convectors
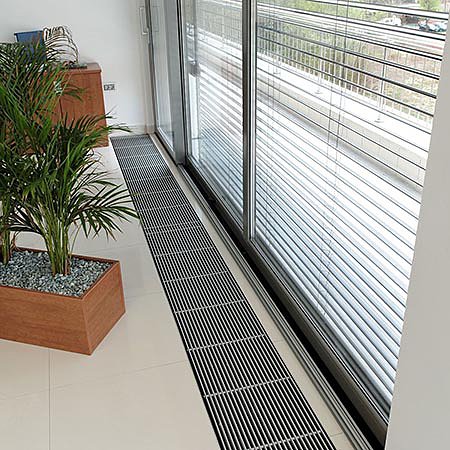
Nowadays it is fashionable to install panoramic windows. Most of the heat from the room leaves through the glass, in the same way cold gets into the room. That is why the batteries are mainly installed under the window - to create a thermal curtain. Only floor convectors are suitable for panoramic windows. The dimensions must be selected so that the heat exchanger covers the entire opening.
The main advantage is that they create a thermal curtain for panoramic windows and do not spoil the view.
The disadvantages include the convection heating method, an integral part of which is air circulation. In this case, all the dust collected in the battery trough is carried away. In fact, it is very harmful. Constant stay in a dusty room can cause the appearance of respiratory diseases, up to asthma. Therefore, do not forget to clean the heat exchanger and the more often the better. To do this, simply lift the protective mesh and remove all debris with a vacuum cleaner.
Where floor convectors are used
This type of heater is used in rooms with low windows and in other cases when there is not enough space for wall convectors and batteries. Also, the devices are used in rooms with high heat losses due to the presence of the following architectural elements:
- thin entrance doors;
- windows on the loggia;
- exits to the terraces of buildings;
- glass doors;
- large stained-glass windows;
- panoramic windows.
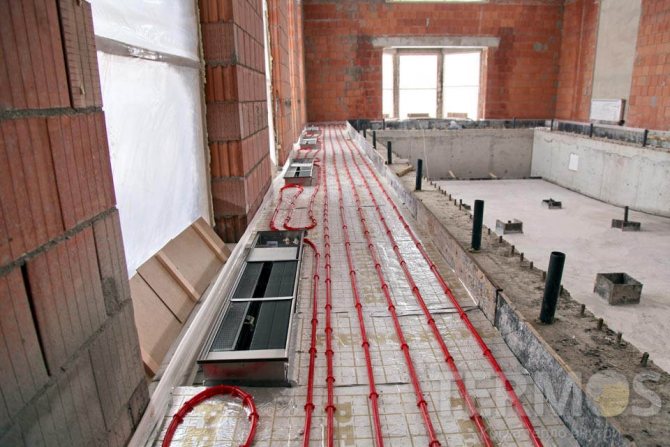
High heat loss occurs with a small ratio of wall area and glazing. This problem is only partially solved by the installation of triple (two-chamber) double-glazed windows. However, from the windows in severe frost it still blows cold. Therefore, it is possible to provide warmth and comfort only with the help of floor convectors.They do not reduce the usable area, but require special niches in the floor. Warm air enters the house through a decorative grille, which hides the place where the convectors are installed.
Niche for a convector built into the floor - device
The easiest way is to make a niche on the ground floor in the earthen floor.
- The niche must be covered with a waterproofing layer. Moreover, the waterproofing of the niche must be combined with the waterproofing of the main floor.
- The size of the niche must match the size of the radiators. There must be a distance of at least 100 mm from the walls of the niche to the edges of the radiator. The distance from the edge of the niche to the window should be 50-250 mm.
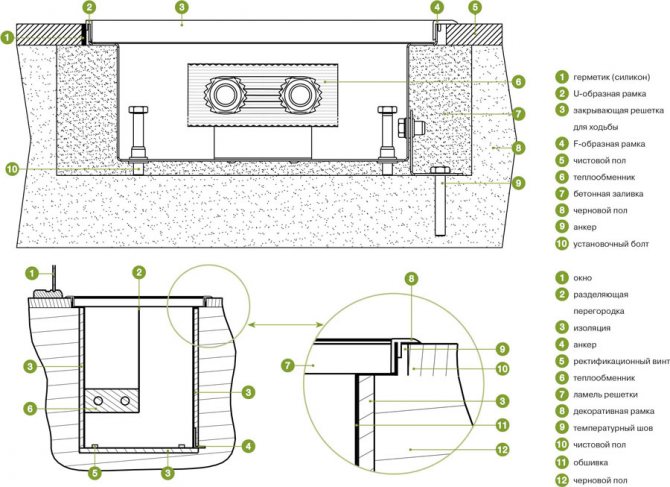
- The general design of the radiator niche is clearly visible in the figure. This is a diagram of the device for a niche for a radiator on the first floor of a house.
- If a niche needs to be made on the second and third floors, it is necessary to provide for the lowering of the floor beams to the desired height.
- The niche can be plastered, but first you need to insulate it. Better to use expanded polystyrene. This is a tough insulation that will further strengthen the niche. Insulation will reduce heat loss due to unnecessary floor heating.
- The niche "trough" itself is best made of galvanized steel. It will additionally serve as a thermal reflector. You can overlay a niche (instead of steel, ceramic tiles).
- The edges of the niche must be trimmed with a corner for laying the decorative grille.
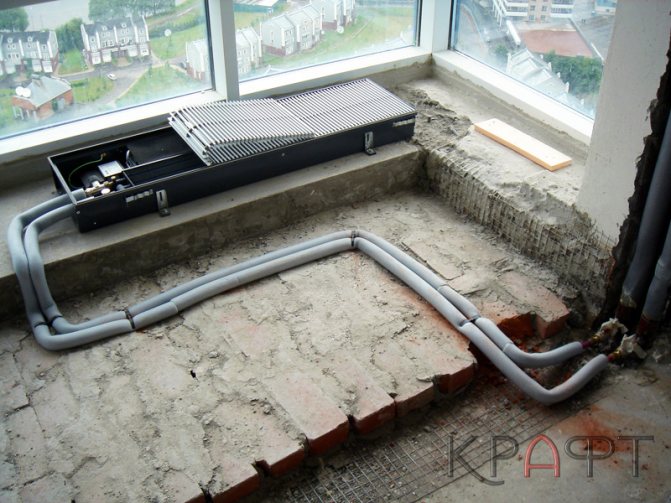
Installation of radiators in a niche
We are considering the simplest convector built into the floor. This is a natural circulation convector. The niche for the convector built into the floor is already ready, we are proceeding with the installation of the heat exchanger.
The coolant moves through a two-pipe heating system. It is supplied with one pipe, with the second pipe it is removed from the radiator. A thermostat with a Mayevsky tap is placed on the input, a shut-off valve is placed on the output. Everything is the same as when installing radiators on a wall, only in a horizontal plane.
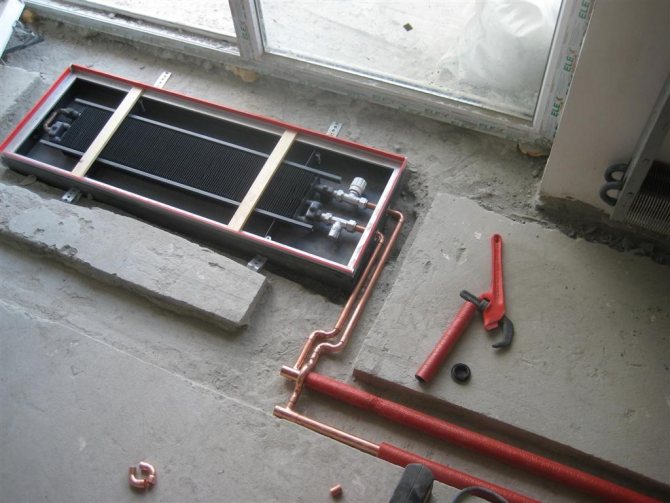
The four-pipe heat exchanger is connected as in the photo, with a snake.
The system is tested at a pressure of 25 bar. The working pressure does not exceed 15 bar. Antifreeze or other non-freezing artificial heat carriers can be used for the coolant.
If you have panoramic windows, then in any case you need to install floor convectors. Reviews indicate that to create a powerful thermal curtain, it is necessary to use radiators with forced convection. They are available in different lengths, you need to select a little less than the window opening.
Types of floor radiators
Immediately, we note that the installation of floor convectors in a screed does not in any way depend on its type. In this case, the principle of operation of different heat exchangers is different. There are two main differences - the air circulation method:
Convector design with natural circulation.
Natural circulation radiators are a copper collector of two tubes with aluminum fins, which is housed in a metal trough. In such batteries, the air moves due to the temperature difference. As you know, hot streams are lighter than cold ones, so they rise up.
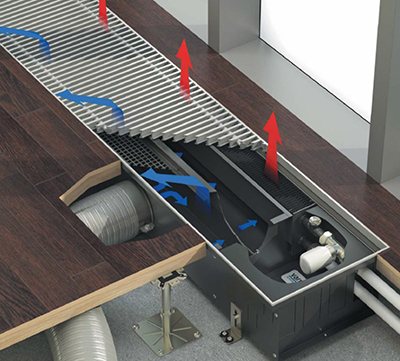
In convectors with forced circulation, the air moves due to the operation of the built-in tangential fan. It looks like a wheel with curved blades. It is quiet, but there is still some noise. Floor convectors with a fan are connected to the mains, a control unit with a thermostat is installed in them.
The battery can be heated by a liquid heat carrier or by means of a heating element inserted into the collector tubes. Separately, it is worth highlighting the universal floor convectors. In the photo above, you can see that outwardly they do not differ from ordinary ones, the difference lies in the design of the collector. These heat exchangers can work both in a two-pipe heating system and in a four-pipe system, which we will talk about a little later.
How to make a convector from a battery
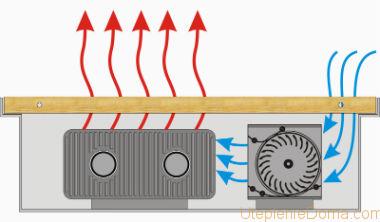
If you wish, you can, of course, make with your own hands not only a built-in, but also an ordinary external convector.It is easiest to use a conventional heating radiator as a base for the manufacture of such a device. To increase the efficiency of the battery by converting it into a convector, you can simply add several fans to this device.
To manufacture such a device, you will need to purchase about 4-5 fans. In this case, you should choose high-quality devices that work as quietly as possible. You will also need a steel or plastic corner with a shelf that is not too wide.
How to connect fans
The fan casings can be fastened together in a row, for example, using cable ties threaded through the holes in the corners. The two-pin connectors of these devices are best connected in pairs with pieces of cable, passing one behind the other.
This installation method will reduce the number of wires suitable for the power supply. Ultimately, on the one hand, a two-wire AC cable must fit the power supply, and on the other, DC wires from the fans.
If the radiator is located low, the structure assembled in this way can simply be placed on the floor under it. If there is a lot of free space between the battery and the floor, the fan unit will need to be slightly improved.
In this case, among other things, you will need to attach legs from the corner to the assembled structure. To do this, first cut off 4 segments 10-15 cm long from the corner. Further, the legs obtained in this way will need to be attached to the housings, having previously made holes for the screws.
Working principle in 2- and 4-pipe systems
Installation of floor convectors can be carried out in two-pipe and four-pipe circuits. In the first case, the heat exchanger works only for heating the room, and in the second - for heating and cooling. With heating, everything is simple, in this case the convector is connected and works in the same way as any other battery. When buying, you need to pay attention to the characteristics, they indicate the possibility of working with antifreezes. In two-pipe heating systems, water or propylene glycol (antifreeze liquid) can be used as the heating medium.
The principle of operation of a convector with forced ventilation.
In order for the floor convector to work in two modes (heating and cooling), it must be connected to:
- water heating system;
- fan coil.
A fan coil unit is a unit that produces cold according to the principle of an air conditioner. In this case, the heat exchanger built into the floor will act as a chiller. The difference between the chiller-fan coil tandem and split systems is that not freon, but water is used as a working substance. This is what makes it possible to install the floor convector on two systems at once. Naturally, it can only work in one of the modes one by one.
Device
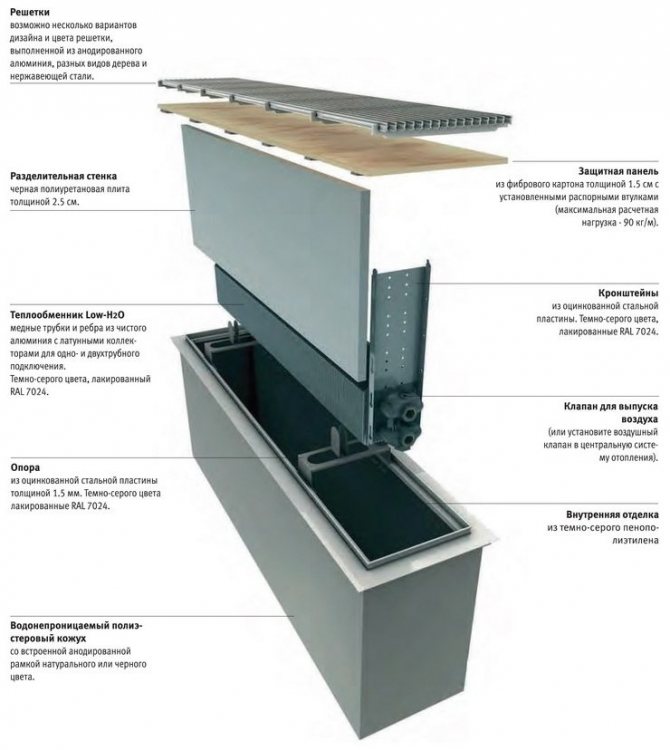
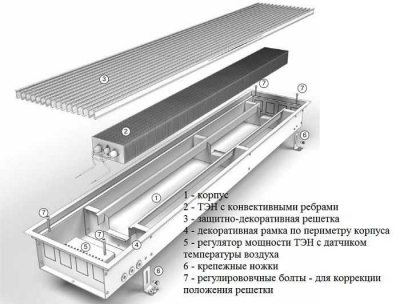
Underfloor convector components
The design of the floor convector lacks several very important elements:
Structure
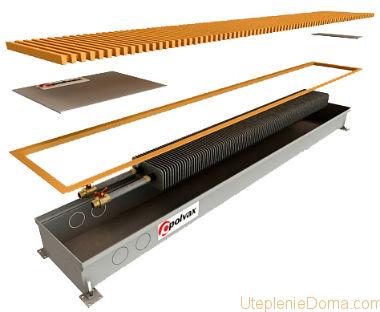
- Stainless steel box in lengths from 900 to 3000 mm. Serves as a kind of housing to accommodate all other equipment.
Stainless steel box
- Copper-aluminum heat exchanger, made in the form of an accumulation of tubes. The type of convection carried out depends on its additional equipment:
| Convection type | Heat exchanger |
| Natural | Single or double without additional mechanical devices |
| Forced | Single or double reinforced tangential fan |
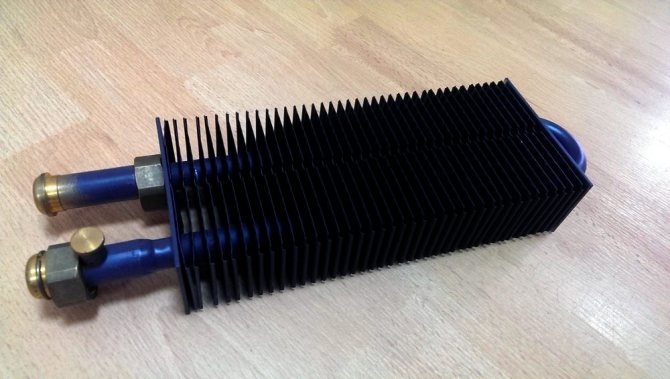
A sample of a heat exchanger carrying out natural convection of air masses
Advice: for buildings with a large area, it is recommended to choose equipment with forced convection, since natural convection may not cope with timely heating of a large volume of air masses.
- A set of stainless steel pipes for connection to a common heating system.
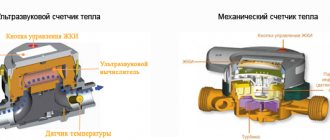
- Programmable thermostat to maintain the set temperature.
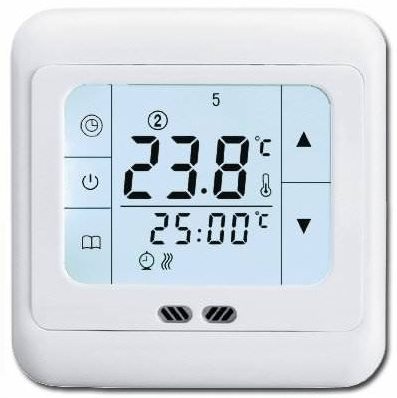
Heating convector thermostat
- Air release valve. Protects against air pockets in pipes.
- Support made of galvanized steel plate 1.5 mm thick.
Tip: be sure to make sure before buying that all interior decoration is made of stainless materials. Otherwise, the deposited condensate will cause corrosive processes.
- The dividing wall is a 25 mm thick polyurethane board.
- Decorative grill. It covers the entire apparatus, being its final part. Usually made of wood or aluminum for the interior of your home.
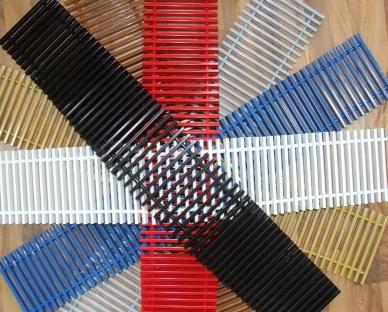
Various colors for decorative grilles
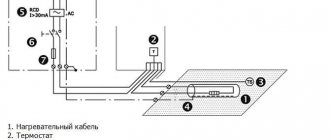
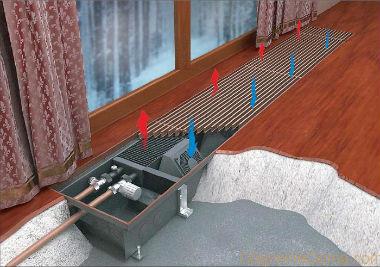
Principle of operation
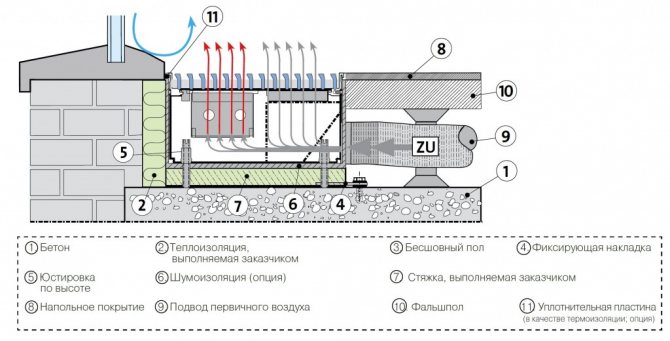
![]()
Scheme of operation of a heating convector located in an underfloor space
In fact, the principle of operation of the equipment in question is very similar to classical radiator systems:
- The heat transfer medium is supplied to the pipes of the heat exchanger.
- Cold air masses are drawn from above. In forced systems, this is facilitated by a special fan.
- Inside, the air heats up, and then rises up.
The main difference from radiators is that in this case, heating is carried out in a horizontal rather than a vertical plane, which in practice turns out to be much more rational.
The installation of the unit is carried out during the installation of the subfloor, which can be carried out by pouring concrete or constructing wooden logs. On top, any finishing floor covering you like is laid.
Laminate floor heating convector
Installation and strapping of batteries in the floor
The difficulty of installing a floor convector with your own hands is that its grate is flush with the floor covering. Therefore, it is extremely important to precisely align the heat exchanger trough according to the water level. In this case, it is necessary that it stand firmly, because they will walk on the lattice. Installation is carried out in a cut-out niche, a screed is poured around the perimeter. Fill nuances:
- stick a damper tape around the perimeter of the case;
- do not remove the grate until the solution has completely solidified.
The convector grille must be flush with the floor.
The damper tape compensates for the thermal expansion of the screed and dampens possible vibrations from the fan operation. It is imperative that the grille is inserted into its seat. During hardening, the screed can deform the trough and the lattice will no longer be there at all.
The housing has holes for several connection options, which depends mainly on the position of the radiator in relation to the circuit. In principle, the simplest piping option is to install conventional ball valves for the supply and return. Ideally, faucet handles should point downwards so that they cannot be seen through the grate. Also, in some convectors there is not enough trough height to install the shut-off valves with the handles up.
If the electrodes for welding heating pipes are damp, then they cannot be used, at least until they are dry.
Here we compared pipes for heating a private house.
The above piping method is not suitable if you have a long heating system with several branches of different lengths. In this case, for the correct operation of the circuit, balancing is required, and for this, there must be a balancing valve on the radiator return. In addition, ball valves do not make it possible to regulate the degree of heating of the battery, which is very useful. Therefore, a thermostatic valve must be installed on the supply, preferably in tandem with a thermal head or a servo drive.
Installation
Installation of a floor convector involves some difficulties, so you need to follow the recommendations and strictly follow the installation instructions.For equipment with various coolants, specialized circuits have been developed that ensure maximum efficiency.
Water convectors
The place of installation is selected according to the project:
- The niche for the installation of equipment is formed with gaps of 50 - 100 mm from the overall dimensions of the device.
- The distance from the window is 100 - 150 mm, along the length - up to 300 mm from the walls.
- The circulation system is formed from flexible reinforced hoses or rigid pipes (they will be laid in a concrete screed).

The circulation system and the power cable for the fan are supplied, which are prescribed by the installation diagram.- The floor is poured taking into account the prepared niche.
- The device is installed in the cavity and aligned in all directions using adjusting bolts.
- The device is fixed, heat and noise insulation is performed.
- The floor covering is being installed.
- The equipment is connected to the circulation system and power cable.
- The equipment starts up and is brought into operation.
- Control over the parameters is transferred to the automation.
- All slots are sealed with a liquid insulator, a decorative grille is installed.
The heating system is ready for use.