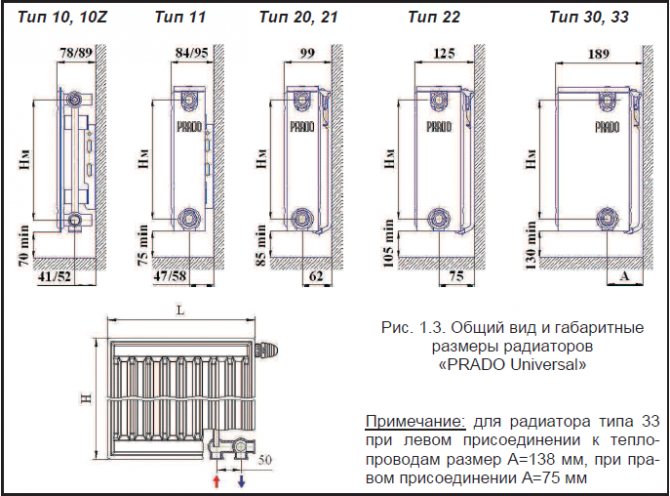
Basic (valuable and useful) information about the installation of steel heating radiators: sequence of actions, features and methods of installation, floor mount for panel batteries, advantages and disadvantages of equipment.
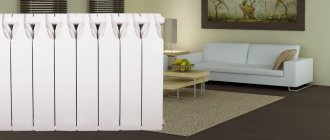
For many years in a row, panel heaters have been popular with consumers.
This is primarily due to their price and technical characteristics, but no less important is the installation of steel radiators, which is so simple that even a beginner can handle it.
Replacing the heating radiator: price
The cost of replacing a heating radiator depends on several factors:
- from the selected connection type
- from the use of welding
Consider the main options and cost
The cost of replacing a radiator for welding, depending on the type of connection:
"Side connection"
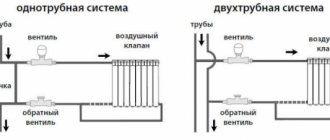
The most popular way to install radiators used in a one-pipe system.
Cost - 2 700 rubles *
Price for the PROMOTION 2500r **
** The cost is indicated when ordering from 5 heating radiators.
"Side + loopback"
This method is also used with a one-pipe system, but in the case of the last floor of an apartment building
Cost - 3 200 rubles *
"Two-pipe connection"
This installation method is applicable in cases where a two-pipe heating system is organized in your house, i.e. "Supply" and "return" are different risers.
Cost - 3 200 rubles *
"Diagonal connection"
The option is necessary when installing long radiators (more than 12 sections), which allows you to warm up the entire heater.
Cost - 4 050 rubles *
The cost of replacing a radiator without using welding:
"ECONOMY"
This method is used in cases where the old radiator has a center-to-center distance of 500 mm and there is no need to deepen into the niche under the window sill. The downside is the impossibility of regulating heat transfer.
Cost - 1 800 rubles *
"STANDARD"
The cleanest installation method. No welding is required, there is a possibility of regulating heat transfer, an aesthetic appearance. Installation is carried out using metal-plastic pipes "under the press", for connection with old iron pipes, threads are cut.
Cost - 2 250 rubles *
"Bottom connection for plastic pipes"
Radiator installation method used in new houses with horizontal distribution of polymer pipes
Cost - 2,000 rubles *
* Discounts apply when replacing 3 radiators or more!
HOW TO INSTALL A HEATING RADIATOR BY YOURSELF?
Install a heating radiator
- What is required
- Mayevsky crane
- Automatic air vents
- Plugs
- Shut-off valves
- Battery regulating taps
- Thermostats
- Related materials
Battery installation: installation features
- Heating battery installation rules
- Attaching the battery to the wall
- Fixing to the floor
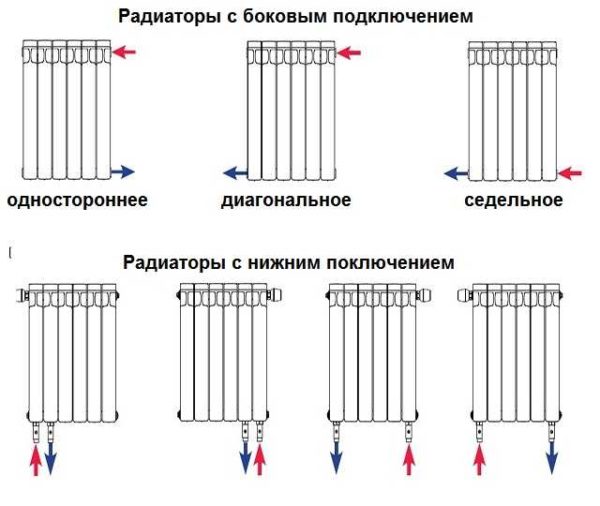
Connecting heating radiators
- One-way connection
- Diagonal connection
- Saddle connection
- Top or bottom supply of the heating medium
Replacing the heating radiator: price
- The cost of replacing a radiator for welding
- The cost of replacing a radiator without welding
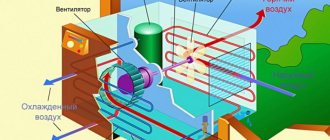
Setting and control of heating convectors
Heater adjustment and temperature control, in most modern models, is carried out automatically using a thermostat (or thermostat). Depending on the type of device, the principle of temperature regulation and maintenance changes.
- In water convectors, the control is carried out by means of thermostats, the same as those installed on conventional control radiators. When the air temperature changes, the pressure of the substance in the thermostat changes, and this activates the control valve. As a result, the supply of the heating medium (hot water) decreases or increases. Thus, the thermostat maintains the required air temperature.
- In a gas convector, the thermostat is also controlled by a valve, but this time by supplying gas to the burner. When the air temperature reaches the desired temperature, the gas supply is reduced. These thermostats, like the previous ones, can be set manually or automatically (electronic thermostats).
- Electric convectors can be equipped with mechanical or electronic thermostats. They are controlled by turning on and off the power supply to the heating element. The mechanical thermostat works by means of a bimetallic plate. It is simple to operate, but less accurate than electronic. Such a thermostat is manually controlled.
The electronic thermostat operates on a signal from a temperature sensor that measures the air temperature. The accuracy of such devices is much higher (up to 0.1 ° C). Simpler models have manual controls. More modern ones are supplemented with a wide range of functions, they allow you to program temperature modes by time and day.
The most "smart" models of thermostats on electric convectors can be controlled remotely via the Internet or a smartphone, as well as connected to the "Smart Home" system. For this, modern models of electric convectors have the ability to connect to the Nobo Energy Control system, with which you can set, control and program various temperature modes.
Thus, installing electric heating convectors is the easiest and most practical way to heat your home. And a choice of modern models with electronic thermostats and smart control options will ensure maximum ease of use.
Install a heating radiator
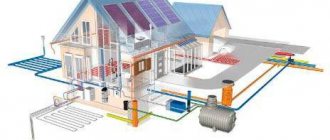
During the installation or reconstruction of the heating system, the installation or replacement of radiators and batteries will be carried out. The mentioned task can be done independently. Next, we will consider how the batteries are installed, where and how they are located, what is required for installation, etc.
What is required
For installation, you will need tools, fittings, consumables. The basic set of necessary materials and devices is suitable for any type of battery, but for cast iron products, for example, larger diameter plugs are needed. Also, in the case of installing cast-iron batteries, the STD valve for bleeding air masses is not mounted. On the other hand, it becomes necessary to use an automatic air vent.
For the installation of bimetallic and aluminum radiators, the same set of tools and fittings is required. The installation of panel steel batteries is characterized by some differences. However, they relate exclusively to the peculiarities of hanging devices. Steel panel radiators are supplied with brackets that fit through the metal arms at the rear of the unit.
Mayevsky crane (STD device) or air vent
If the system is not filled with coolant, then air can collect in the sections. To dump it, a Mayevsky crane is used, installed on the upper radiator manifold. Its installation is mandatory for radiators made of aluminum or metal alloy. Note that the size of the STD device is less than the diameter of the collector-inlet, so you will have to use an adapter for installation. Usually, Mayevsky's taps are supplied complete with adapters, so you only need to know the diameter of the upper radiator outlet.
Mayevsky crane
Automatic air vents
Air vents perform the same function as the Mayevsky crane, but they work in automatic mode. They are larger in size than the STD device and are available in nickel-plated or brass cases. Air vents are installed less often than Mayevsky taps, largely due to their unattractive appearance and bulkiness. By looking at the photo, you can get an impression of what an air vent looks like.
Plugs
Side-connected batteries have four outputs. Two are used to connect return and supply pipes, one is intended for the installation of a STD crane, the latter is closed with a plug. It is painted in the color of the radiator, so it does not spoil its appearance.
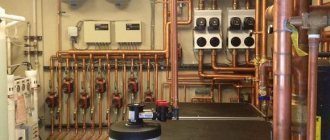
Shut-off valves
At the inlet and outlet of the coolant, shut-off or ball valves are installed, equipped with the ability to adjust. The taps make it possible to turn off the coolant supply, for example, for dismantling or renovating the radiator in the midst of the heating season. If there are no shut-off valves, then the entire riser will have to be turned off, causing discontent among residents and facing additional problems. Note that shut-off and ball valves are sold by us at a competitive price, therefore they are quite affordable. The disadvantage of ball valves is the inability to adjust the degree of heating of the radiator.
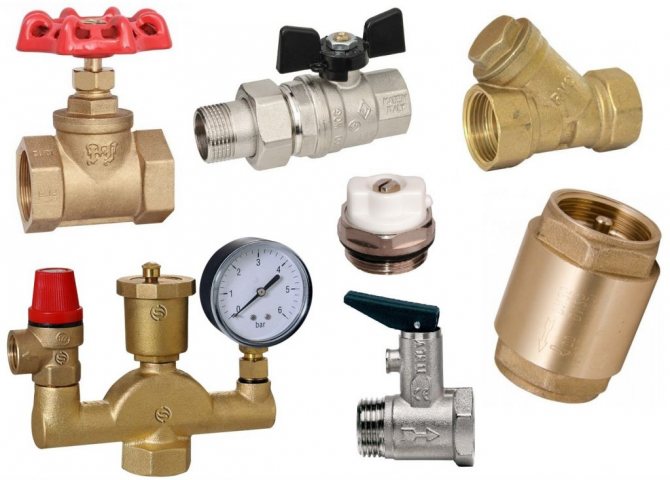
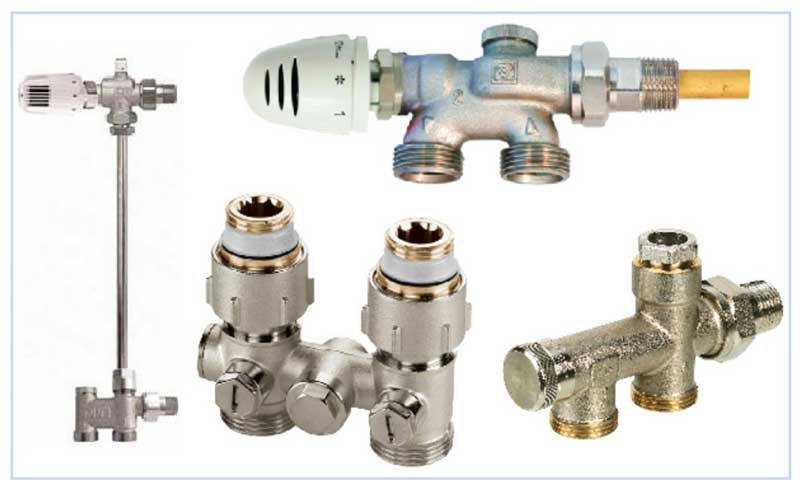
Shut-off valves and control valves for the radiator
Battery regulating taps
Along with stop valves, control valves make it possible to completely turn off the coolant supply. However, their significant advantage lies in the fact that they also allow you to change the delivery head, that is, to regulate the heat output and power of the battery. Despite the fact that control valves are somewhat more expensive, they are more convenient to use and visually look pretty much nicer.
Thermostats
These devices are mounted behind ball valves. Their purpose is to change the heat transfer of the radiator. The following types of thermostats can be distinguished:
- automatic;
- mechanical devices.
It is not recommended to install regulators in systems with a low temperature of the heating medium, as they can reduce the flow, lowering the temperature of the radiator even more.
Related materials
Brackets or hooks are required to hang radiators from the wall. Their number is directly related to the dimensions of the radiator. For example, if the device includes up to 8 sections, and its length is no more than 1 m, then 2 attachment points at the top and 1 at the bottom are sufficient. For every 5 sections (50 cm), a point is added at the top and bottom.
In addition, you will need fluoroplastic tape or linen roll. Also, for reliable sealing of joints, it is desirable to use a special paste for plumbing purposes. To install radiators-batteries, you need a drill with a bump stop, a level or level, dowels. In addition, for the installation, as well as the subsequent connection of the batteries to the risers, a die cutter is required for threading to connect fittings and pipes, or a welding machine, if the connection will be mounted for welding.
Bracket for radiator
Hanging hooks for radiator
Trouble-shooting
The main malfunctions of the system are a decrease in the room temperature below the calculated one and a violation of the tightness of the system elements. In the event that the temperature in the room has dropped, and the temperature of the incoming hot water is correct, the cause will be poor circulation of water or steam. The sources of malfunction in this case should be looked for in leaks, blockages in the system, deposits, corrosion on the inner surfaces of pipes - especially for bends and branches. Also, the cause can be air ingress, faulty taps and even an error in the installation of pipes.
Riser blockage
When the riser (separate radiator) is clogged, the resistance of the heating system sections increases and the flow rate of the coolant circulating through them decreases. As a result, the average temperatures of heating devices in these areas are reduced. When a riser is blocked in a two-pipe system, the normal temperature of the surfaces of all heating devices connected to this riser is maintained. The temperature drops sharply behind the blockage. This occurs as a result of a reduction in the flow rate of the coolant in the heating devices of the system or a complete stop of circulation through these devices. When the supply lines or heating devices are clogged, the temperature drops on the surface of individual devices, while the entire riser of the system warms up normally. Methods for determining blockages.
Blockage detection is a complex and time-consuming task. In one-pipe systems, finding a blockage in a riser by measuring the temperature, as a rule, does not give positive results due to the fact that the coolant cools down evenly throughout the riser before and after the blockage. We have to use the acoustic method, that is, listening to the system. In places where the flow area of the pipeline is narrowed, caused by a blockage, the speed of the coolant increases sharply, which leads to an increase in noise in this place.
Elimination of blockages.
After determining the location of the blockage, it is removed by hydraulic, pneumatic flushing or cleaning. Before flushing, the entire system is inspected: the tightness is checked, disassembled and cleaned. Hydraulic flushing involves pumping a stream of water through a clogged pipeline. To do this, the nearest connection after the clogged area is disassembled and a fitting with a hose is screwed in at the outlet to discharge water into the drain. In some cases, network, circulation or other pumps are used to increase the speed. The pump is connected to the clogged area by disconnecting this area from the heating circulation circuit and connecting the pump to it, also using a fitting and a hose. The above-described flushing method removes blockages caused by light particles and cleanses pipelines in places where the water velocity is relatively high. In areas where the water velocity is insignificant (in radiators, large-diameter pipelines), flushing is ineffective, since heavy particles settle out of the flushing water stream. The duration of flushing depends on the degree and nature of the contamination, as well as on the diameter and length of the area to be flushed.
Cleaning.
The heating system pipelines are cleaned if it is impossible to remove the blockage by flushing. For this, the section of the pipeline where the blockage is expected is turned off and water is drained from it. Then the pipes are disconnected from the blockage section of the pipeline and the blockage is cleaned with a thick elastic wire. After punching the blockage, a ruff is attached to the end of the wire, with which the blockage is removed. During the cleaning process, pieces of dried mortar, soil and other objects that have caused the blockage fall down. Loose dirt can also be removed with water. To do this, hoses are put on the ends of the pipeline, as in hydraulic flushing. The upper hose is connected to the mixer, and the lower one is lowered into a sanitary device - a washbasin or toilet. Open the mixer and pass water through the pipeline.
Breaking the tightness of the system and repairing pipes
This malfunction leads to a coolant leak and, if untimely eliminated, can lead to an emergency situation, which entails large material costs for its elimination. In pipelines, leakage occurs due to pipe corrosion, which causes metal destruction, the formation of through holes (holes) and pipe rupture. Corrosion also increases when the system is filled with tap (non-deaerated) water.At the beginning of the heating season, the system is usually pressurized, which, with a high degree of probability, makes it possible to judge the condition of the heating pipelines in general. Leaks can occur in places where pipes are bent, through cracks resulting from improper bending. An operative, but temporary measure for eliminating leaks in pipeline sections with a diameter of not more than 150 mm, in which a coolant circulates with low pressure and temperature, is to install clamps on damaged sections of the pipeline. This method is used when it is impossible to turn off the damaged section and empty the pipeline. However, it cannot be used to eliminate leaks on threaded, welded knee joints. As soon as it becomes possible to disconnect the damaged section of the pipeline, the clamps are removed and repaired. After the pipeline is repaired, it is tested for tightness. Leakage of the coolant in the threaded connection in most cases occurs due to poor-quality sealing made during installation in the grips between couplings and locknuts, cracks. After finding out the cause of the leakage, the threaded connection is either sorted out, performing the seal again, or it is replaced. Leakage in flange joints occurs as a result of poor tightening of the bolts, aging of the gasket, poor-quality material, and skewed flanges. If, when tightening the bolts, the leakage in the flange connection is not eliminated, then the gasket must be replaced. Leakage in a welded joint can be caused by poor weld quality, which affects thermal elongations. This malfunction is eliminated by additional welding of an effective joint. A patch is temporarily applied to the current pipe from a hose of a suitable diameter cut along the length. On top of the hose, you need to put on several loops of rigid flexible wire, located at a distance of 2.5 cm, and tighten each loop with pliers. The second option is to secure the hose with clamps. If the pipe bursts, it is better to seal the crack with epoxy glue. The adhesive is applied to a dry surface around the crack. The pipe is then wrapped with duct tape or fiberglass tape and a second layer of adhesive is applied. When a threaded pipe connection leaks, proceed as in the previous case, but without tape wrapping: the dry joint must be covered with epoxy glue. The adhesive must completely cure before the water can be connected. If a caulked joint is leaking, use a hammer and a blunt chisel to ram the groove inside the pipe flange. This is usually enough to stop the leak. But it is possible that the leak is due to a crack in the joint, which must be verified by examining the pipe. If so, the pipe must be replaced.
Errors in pipe installation
Due to improper installation, there may be a narrowing of the cross-sectional area of the pipes. This happens when tapping branches, using pipes with a long thread, which, when screwed into a tee, overlaps the section of the pipe; in case of influx of metal in the places of pipe welding, as well as due to the ingress of foreign objects during the assembly of pipes. Valves of various types have a certain direction of passage of the coolant, which is shown on the valve body by an arrow. The passage of water in the opposite direction leads to damage to the reinforcement and a decrease in the flow area. The possibility of non-compliance with the design slopes of the pipeline, which may also occur, should not be overlooked. You can try to eliminate installation errors on your own, but here it is desirable to have certain skills. If there is not enough confidence, then it is better to call specialists. In any case, it will be necessary to disassemble the pipeline, so that the need for locksmith skills and knowledge of symbols is obvious. Of course, an operation such as tightening the sealing joints can be performed independently.
Faults in heated towel rails
If the heated towel rail does not work only in your apartment, then it is possible to carry out repairs without calling a locksmith. To this end, you need to remove the heated towel rail from the mountings, having previously closed the valve of the hot water riser located on the floor or in the basement. After removing the heated towel rail, it is imperative to put plugs in the pipes so as not to deprive other apartments of hot water that have branches from this section of the riser for the time that you need to repair the heated towel rail. Cleaning.
If a blockage is found, there are two ways to remove it. 1. It is necessary to unscrew the transitions with squeegees from the heated towel rail and remove all sludge from them; then clean the heated towel rail itself with a cable or wire. To remove solid sludge, the heated towel rail must be tapped lightly (!). Then it is necessary to install the squeegees and sleeves with a thread seal. Having connected a hose to one of the squeegees, put the other end of the hose on the mixer spout and rinse the heated towel rail. 2. Putting the heated towel rail upwards, pour concentrated hydrochloric or acetic acid into it to soften solid residues of salts, preferably for a day, and then drain the acid and rinse the heated towel rail. It is advisable to carry out this type of cleaning outdoors. After cleaning the heated towel rail, close the valves on the riser, remove the plugs or jumper and put the heated towel rail in place. Then you can open the valves on the riser - the heated towel rail should work. * If it turns out that all heated towel rails on all risers in the house do not work, then you need to call a locksmith. It is not recommended to independently connect additional heating devices: it is possible to disrupt the entire heating system, which was provided for by the project.
Heated towel rail in the bathroom
Battery installation: installation features
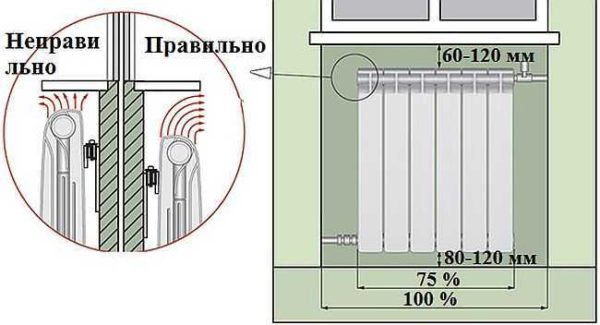
Usually the batteries are placed under a window. This feature of placement is dictated by the need to cut off the cold coming from the window by a curtain of rising heated air. If you do not want the windows to fog up, then make sure that the width of the radiator is up to 75% of the width of the window opening.
It is recommended to observe the following rules:
- the distance from the floor covering to the device is up to 12 cm;
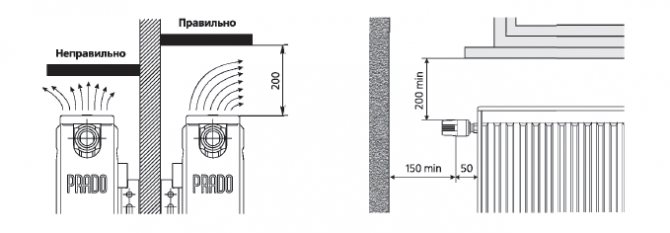
- the distance required to the windowsill is no more than 12 cm;
- the middle of the radiator corresponds to the middle of the window - the deviation is no more than 3 cm;
- the distance from the wall surface to the device to be installed is no more than 5 cm.
Compliance with these recommendations will make it possible to ensure effective heating of the room due to the normal circulation of the air heated by the coolant.
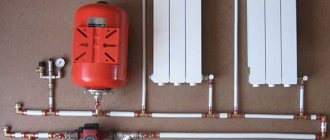
Battery Installation Guidelines
Heating battery installation rules
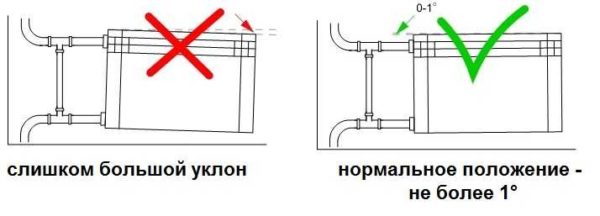
It is recommended to level the walls before hanging radiators on them. This greatly simplifies the work process. On the surface, mark the middle of the window opening and draw a horizontal line under the window sill (about 12 cm from it). Along this line, you can align the top edge of the radiator. The brackets are driven into the wall so that the device is positioned horizontally. This arrangement is optimal for rooms where a forced-type heating system is installed. If there is no pump in the system, it is better to provide for a slight slope of the radiator (up to 1.5%) along the direction of hot water flow. If the slope is greater, then there may be problems with the stagnation of the coolant.
Installation rules for heating radiators
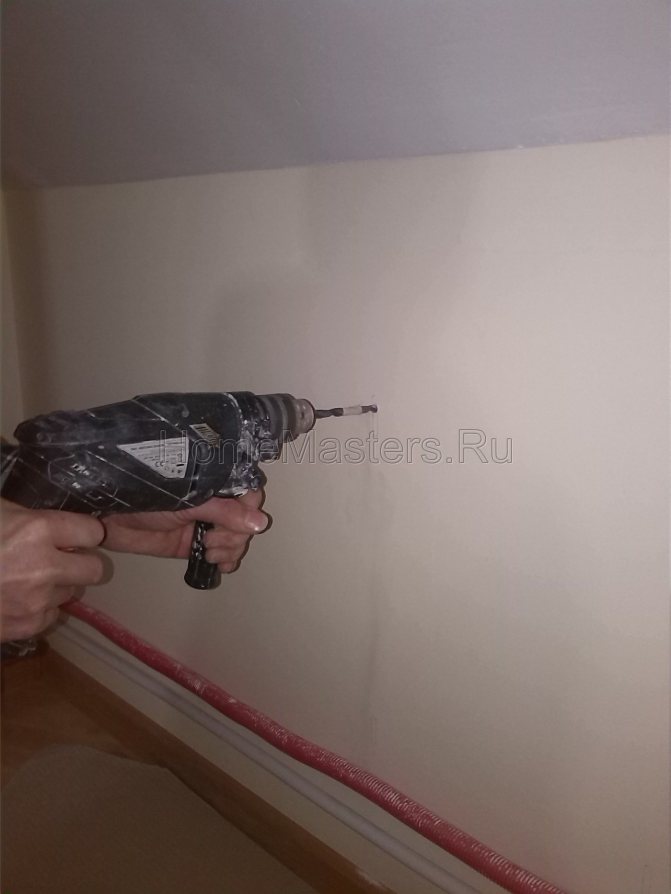
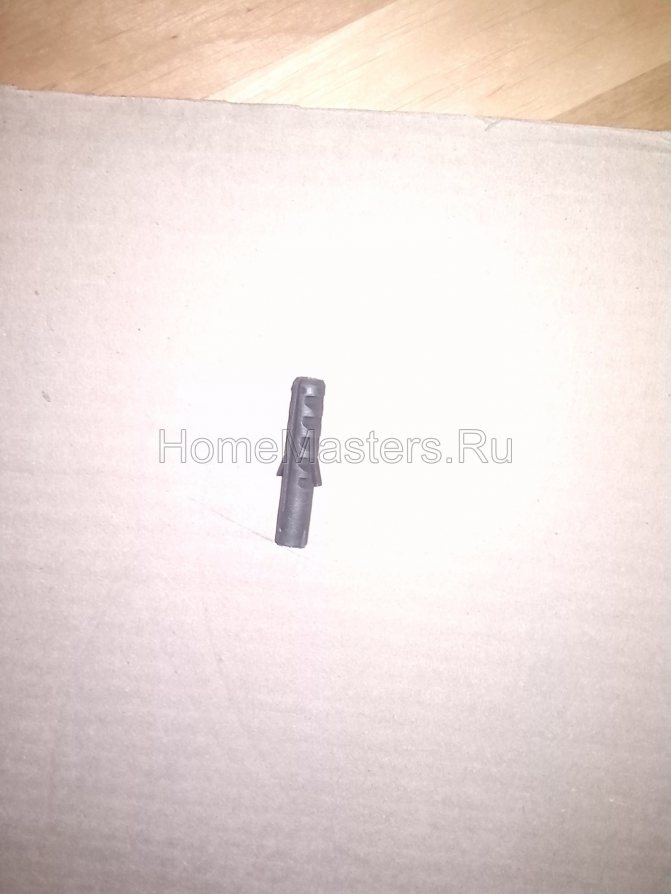
Attaching the battery to the wall
Installation of hooks is carried out by analogy with the installation of dowels. A hole of the required diameter should be drilled in the wall. Then a plastic holder is inserted into the hole, and a hook is screwed into it. If necessary, by screwing or unscrewing the hook body, you can change the distance from the battery to the wall.Due to their weight, hooks for cast iron radiators are thicker than products for metal or aluminum radiators.
When installing hooks for hanging batteries, you need to remember that the overwhelming part of the load falls on the upper fastener. The lower one helps to fix the radiator in the position selected relative to the wall. The hook on the bottom should be screwed in 1.5 cm below the collector location.
A few words about brackets
Before installing the brackets, they must be attached to the wall for marking. For this purpose, the radiator is moved to the surface of the wall, and a mark is made in the place where the bracket will be located. Drilling is then performed at the fastener locations on the bracket. Plastic dowels are inserted there, and the bracket is screwed onto screws or self-tapping screws. At the end of the work, a radiator is hung.
Fixing to the floor
In some cases, the wall cannot withstand the load created by the battery (especially, cast iron). Then choose a floor-standing installation. A number of radiators made of steel and cast iron are equipped with legs at the factory, but many do not like their appearance or technical characteristics.
For floor mounting of aluminum batteries or radiators made of aluminum and steel alloy, special brackets are used. They are mounted on the floor surface, and then a radiator is installed on them. Mounts are provided that make it possible to adjust the height of the battery installation. The brackets are attached to the floor using dowels, nails or screws.
Selection and placement of heating devices in the room
When choosing a heating device, the purpose of the room and its architectural and planning solution, the duration of stay of people in the room and the features of the thermal regime, the type of heating system, sanitary and hygienic requirements and the technical and economic indicators of the device are taken into account.
In some cases, the heating device is selected on the basis of a special technical and economic comparison of several types; sometimes the choice is due to the presence of a certain type of device.
When choosing the type of heater, they are guided by the following general considerations: with increased sanitary and hygienic requirements for the room, the devices must have a smooth surface. As you already know, these are panels, radiators and smooth-tube devices. Concrete panels in this case, especially combined with building structures, are the best way to keep the room clean. Steel panels and smooth pipe fittings can be recommended with less stringent hygiene and aesthetic considerations. Radiators are allowed only with simple sections (for example, single-column).
With normal sanitary and hygienic requirements for the room, devices with a smooth and ribbed surface can be used. In civil buildings, radiators, convectors and panels are more often used, in industrial buildings - finned pipes, as more compact devices, although in general, when choosing the type of device, all the factors listed above must be taken into account.
Placement of the heater 1 in the room (plan)
a - under the window; b - at the inner wall
Heating the room through the floor is beneficial from the point of view of creating thermal comfort for people. Underfloor heating, evenly heated to a temperature acceptable for sanitary and hygienic requirements (for example, in a living room up to 24 ° C), provides an even temperature and weak air circulation, eliminates overheating of the upper zone in the room. The relatively high cost and labor intensity of a warm floor for heating a room in most cases predetermine its replacement with vertical heating devices, as more compact and cheaper.
The vertical radiator can be installed in a room, either against an external or internal wall. When the device is placed against the inner wall of the room, not only the length of the pipes supplying and removing the coolant from the device is significantly reduced, but also the heat transfer of the latter to the room increases (by about 7% under equal temperature conditions) due to the intensification of heat transfer and the elimination of additional heat loss through the outer wall ... With all the economic rationality of such an installation of a heating device, it is permissible only in southern regions with short and warm winters.
In northern regions, it is advisable to install the heater along the outer wall of the room and especially under the window. With this arrangement of the device, the temperature of the inner surface in the lower part of the outer wall and window increases, which increases the thermal comfort of the room, reducing the radiation cooling of people. In addition, the location of the heater under the window prevents the formation of a falling flow of cold air, if there is no window sill covering the device, and the movement of air with a low temperature near the floor of the room.
It is advisable to place the vertical radiator as close to the floor of the room as possible (minimum distance from the floor 60 mm). With a significant rise of the device above the floor in the room, a zone of supercooling of the air and the floor surface is created, since the circulating flows of heated air, closing at the level of the device installation,. do not capture and do not warm up in this case the lower part of the room.
Air circulation patterns in the room (section) when placing the heater 1
a - under a window without a window sill; b - under a window with a window sill; c - against the inner wall
The lower and longer the heater itself, the smoother the room temperature and the better its working area warms up. An example of such a heating device that improves the thermal regime of the working area of the room is a skirting convector without a casing, which, due to low heat transfer per 1 m in length, is installed along the entire length of the outer wall.
A tall and short heater creates an active upward fountain of warm air above itself. Not to mention the useless overheating of the upper area of the room, in this case the cooled air descends on both sides of such a device into the working area, causing an unpleasant feeling of "blowing" in seated people.
Field studies carried out in January 1970 in a public building with double-glazed windows in metal bindings, under which convectors of the 20 KP type were installed in two rows, showed that at tn = -10˚C and tв = 22 ° С, the internal temperature the glass surface above the convectors was 19.9 °, in the middle of the window height 16.5 ° and at the top of the window 15.9˚C (the convector surface temperature was 54 ° C). The device provides thermal comfort in the working area of the room.
In another public building with triple tape-glazed windows in wooden frames, under which in some places there are Comfort-type convectors, in the same period it was recorded that at tn = -8 ° C and tw = i4 ° C the temperature of the inner surface of the wall the panel above the convector was 28 °, the glass above the convector was 12-13 ° and the glass without the convector under it was 8-9 ° C (convector surface temperature was 55 ° C).
In the first building, a stream of warm air rose from the convector, above which there is no window sill, vertically along the glass. In the second, the window sill above the convector deflected the flow of warm air into the interior of the room, and there was air circulation, shown in the figure. Although the temperature of the inner surface of the glass in this case increased, an unpleasant air flow was observed in the room, directed at a certain angle upward through the working area.
An even more unpleasant air flow for people, similar to that shown in the figure, was created in the second half of the room, where there is no device under the window, and therefore the temperature of the glass surface was relatively low.
The ability of the vertical radiator to induce an active ascending flow of warm air is used to heat a high room so as not to install a second tier of appliances. Usually, in a room with a height of more than 6 m, especially if there are second light openings in its upper part, it is recommended to place some of the heating devices (from 1/4 to 1/3 of the total heating surface area) in the upper zone or under the skylights. When using individual radiators as heating devices, such a recommendation must undoubtedly be taken into account. But with a chain arrangement of radiators and convectors (especially of the "Comfort" type) with a capacity of up to 1.5-2 kW per 1 m of length, sometimes it is sufficient to install them only in the working area of the room.
On the whole, this question, associated with natural convection near a cooling surface in the presence of cold air infiltration, does not yet have a reliable theoretical basis.
The rule of installing a heater under a window in northern regions may not be observed in a room that is periodically visited by people for a short time, or if the workplaces of people in it are removed from the outer fence. This deviation from the rules can be allowed, for example, in industrial premises with a two-meter passage by windows, lobbies and stairwells of civil buildings, warehouses and similar premises. This rule generally loses its meaning when the room is on duty in the absence of people.
Special placement of heating devices is required in staircases - a kind of vertical pipes that penetrate buildings from bottom to top. The natural movement of air in stairwells in winter, which increases with increasing height, promotes heat transfer to their upper part and, at the same time, causes hypothermia of the lower part1 adjacent to the opening external entrance doors. The frequency of opening external doors and, therefore, the cooling of the adjacent part of the stairs is indirectly related to the size of the building and in a multi-storey building is in most cases higher than in a low-rise one. Obviously, with a uniform placement of heating devices in height, overheating of the middle and upper parts of the staircase will occur and the corresponding hypothermia of the lower part.
Studies in natural conditions in Moscow have established that even when radiators are placed at 1 / 2-2 / 3 of the height of the stairwells of multi-storey buildings, there is a significant underheating of the lower and overheating of the middle and sometimes the upper (if there is no exit to the roof of the building) of their parts.
Thus, in stairwells it is advisable to concentrate heating devices in their lower part, next to the entrance doors. In low-rise buildings, this recommendation is constructively feasible; in extreme cases, it is possible to transfer some of the conventional devices (20% in two-story buildings and 30% in three-story buildings) to an intermediate site between the first and second floors.
In multi-storey buildings, a recirculating air heater is used for heating staircases - a powerful high convector type heater, located on the ground floor at the entrance. The role of the heater is performed either by a group of finned tubes or radiators (with a power of up to 5-8 kW), or a plate heater (with a power of 8-20 kW or more). Height • of the casing - the walls of the heated air duct are made no more than the height of one floor.
Recirculation diagram of one air heater.
1 - plate heater; 2 - channel; 3 - decorative grill.
Placement of heating devices
a - in a decorative cabinet; b - in a deep niche; c - in a special shelter; d - behind the shield; d - one device above the other.
Between the entrance doors to the building, that is, in the first vestibule from the street side, the installation of a heater is undesirable in order to avoid freezing of water in it or in the drain pipe if the outer door is accidentally opened for a long time.
Above, we considered the standard - open installation of the heater. In almost rare cases, the installation of the device corresponds to the standard. The devices can be placed in a wall niche, under the windowsill, in two or three rows in height, and finally, they can be specially decorated. If, according to aesthetic or technological requirements, the enclosure or shelter of the device is necessary, then its design, if possible, should not reduce (a decrease of no more than 15% is allowed) the heat flux from the coolant into the room. Therefore, the design of the device shelter should be such that the decrease in heat transfer by radiation is compensated by an increase in convective heat transfer. A vertical shield at the surface of the device, which turns the "radiator" into a "convector", will meet this condition.
The figure shows several options for installing the device and shelter structures. Compared to the location of the device, it is open against a blank wall (the standard position, with which other installation methods are compared and evaluated with a comparative coefficient β2), when placing it in a decorative cabinet with two slots 100 mm high, an increase in the calculated area of the heating surface is required by 12% (coefficient β2 = 1.12); when the devices are located in a deep open niche or one above the other in two rows - by 5%. At the same time, it is possible to use shelters that do not affect the heat transfer of the heater and even enhance the heat transfer by 10% (coefficient β2 = 0.9).
One-sided connection of pipes to a heating device with a top-down flow pattern of the coolant.
a - in a vertical single-pipe riser; b - in a two-pipe riser; c - in the "coupling" of two devices;
1 - instrument squeegee; 2 - tee; 3 - three-way valve.
The connection of heat pipes to the heating device can be one-sided and versatile. As you know, the thermotechnical advantage is versatile connection with the scheme of movement of the coolant in the device from top to bottom. However, unilateral connection is structurally more rational, and it is mainly used in practice. With a vertical single-pipe riser, this allows you to unify the length of the connections to the device and make short connections horizontal (without a slope). The unified "strapping" unit of the device contributes to the factory stocking of its parts and preliminary impersonal assembly, which is important for buildings of mass construction.
With a two-pipe riser, it is rational to use pipes supplying and removing the coolant from the device, the so-called "connections" up to 1.25 m long. With a greater distance from the riser to the device, in normal cases it is advisable to install an additional riser. The connections are made with a slope (according to the arrows above the pipes in the figure), which complicates the unification of the “piping” unit of the device with a two-pipe riser. When one-sided connection of pipes to devices is not recommended, excessive enlargement and, in particular, grouping more than 25 sections of A5 cast-iron radiators in systems with natural water movement into one device, as well as connecting more than two heating devices on the "coupler".
The versatile connection of pipes to the device is used in cases when the horizontal return line of the system is located directly under the device or when the device is installed below the lines, as well as when a large device or several devices are forced to be installed on a "coupler".
Connection of heaters on a "coupler" is allowed within one room or in the case when the next device is intended for unregulated heating of a secondary room (corridor, restroom, etc.). In a horizontal one-pipe system, devices (for example, convectors) are connected on a "coupler" with the movement of water in them according to top-down and bottom-up patterns.
The movement of water in the device according to the bottom-up scheme also occurs in a vertical one-pipe riser, flow-controlled and with closing sections offset from the axis of the riser to increase the flow of water into the device. In the riser of a multi-storey building with displaced bypass or closing sections, localization of the temperature expansion of pipes within the floor is provided without the use of special expansion joints.
Versatile connection of pipes to a heating device with a top-down flow pattern of the coolant.
a and b - into the return line, respectively, under the device and above the device; c - in a device of considerable length; d - in the "coupler" of three devices ;, 1 - tee with a plug.
Connection of pipes to the heating device with the flow diagram of the coolant from bottom to top:
a - in a single-pipe riser with displaced bypass sections, b - the same, with displaced closing sections; with a bottom-down scheme, at - in the upper floor of a vertical single-pipe riser with offset bypass sections; d - in the top floor of a two-pipe riser; d - in a horizontal single-pipe branch with axial closing sections; 1 - air valve.
The connection of pipes to the device, creating a movement of water in it according to the Bottom - Down scheme, is most often done in a horizontal one-pipe system, as well as in the upper floor of a building with a vertical heating system with a lower laying of both mains.
The figure shows the "piping" of the device in a flow-regulated riser - in a two-pipe riser.
The same connection of pipes to devices in a horizontal one-pipe water heating system is shown in the figure with a closing section.
The use of high-temperature water does not affect the way the pipes are connected to the device, but the type of shut-off and control valves and the material that seals the joints of the fittings and the device with pipes. The use of steam limits the use of the considered methods of connecting pipes to the device: steam, as a rule, is supplied to the device from above, condensate is discharged at the bottom of the device.
Related materials:
- Composition of the section "Heating, ventilation and air conditioning, heating networks" by post. 87
- The main advantages of infrared heating
- Natural circulating pressure
- Diagrams of horizontal branches of a water heating system
- Diagrams of vertical risers of a water heating system
New materials:
- Placement of heating pipes in the building
- Pipe connection
- Central heating pipes
- Regulation of the heat flow of the heater
- Calculation of the area of the heating surface of devices
Previous materials:
- Equivalent heating surface of the device
- Heat transfer coefficient of the heater
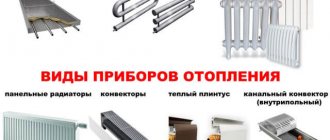
- The main types of heating devices
- Heating devices and requirements for them
- Choosing a building heating system
Next page >>
Connecting heating radiators
Separately, it is worth highlighting the stage of direct connection of heating radiators and its features.
There are 3 main options for connecting heating radiators to the system:
- one-sided;
- diagonal;
- saddle.
With the bottom connection of the batteries, the consumer does not have a choice of how to connect the heating radiator. Manufacturers in the instructions clearly indicate how the supply and return are connected.These recommendations are strictly followed, because otherwise the coolant will not circulate normally, and the battery will not heat the room.
Heating radiator connection options
One-way connection
This method of connection is most common in apartments. It can be either one- or two-pipe. Most often, metal pipes are used for connection, which can withstand high temperatures and pressures. In addition to pipes for connecting the battery, you will need 2 ball valves, 2 squeegees, 2 tees.
The pipes are connected as shown in the photo. A bypass (or bypass) for a one-pipe system is provided so that it is possible to stop the supply of coolant to the radiator without shutting down the system and draining the water. No taps are installed on the bypass so that there is no possibility of accidentally stopping the movement of the heat carrier along the riser.
To seal the threaded connections, either a linen winding or a PTFE sealing tape is used. To seal these materials, plumbing packaging paste is applied. Please note that a large amount of winding is not required to screw the valve into the manifold. Otherwise, cracks may appear.
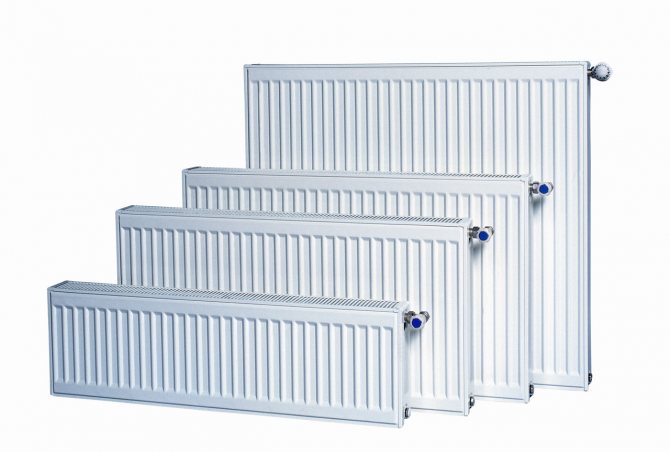
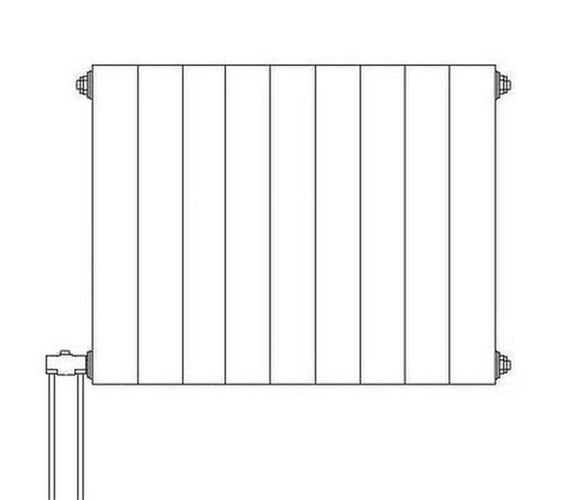
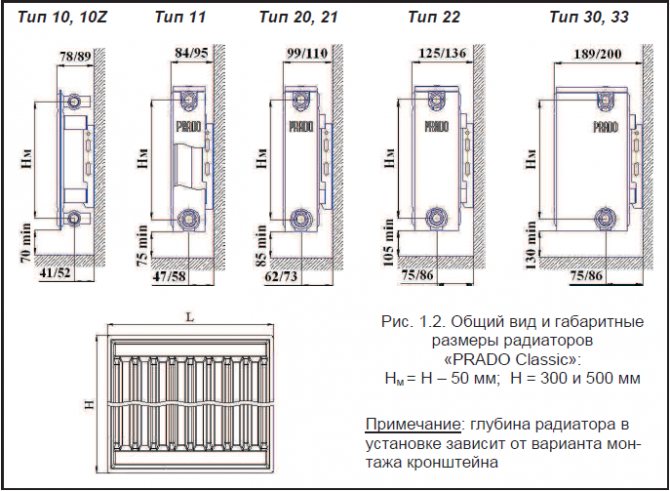
Installation methods for panel radiators
The types of connecting batteries to the heating system have long been defined.
It can be:
- Diagonal.
- Side.
- Lower.
The first way minimizes heat loss, therefore it is considered the best.
With lateral connection, the supply pipe and return are connected from one side of the radiator.
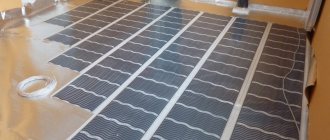
Bottom way requires a "sacrifice" in the form of 15% heat loss, but at the same time allows you to hide the pipes in the floor, which gives the room a more aesthetic appearance, and any losses can be replenished by purchasing a more powerful radiator.
The connection of steel panels depends on the type of product, so before buying them, you need to think in advance about what it will be like. If the installation is to be done in an apartment with central heating, then it is better not to change the method, but to choose radiators with the required connection method.