The question of how to choose an electric underfloor heating under the tiles is increasingly being heard in stores and on forums. You can endlessly read the reviews, but you can only find out which warm electric floors under the tiles are better to choose and how to make the installation, only by understanding the system of each.
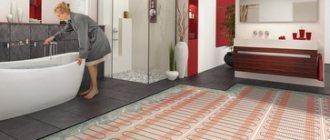
Ceramic tiles can rightfully be called the most popular option for decorating the floor in the bathroom, toilet, kitchen or hallway. All its advantages are perfectly complemented by the electric underfloor heating system, which is especially relevant in these premises.
And whether there is a choice of ceramics largely depends on the repair budget and personal preferences, then you can choose a suitable warm floor only after familiarizing yourself with the possible options, their advantages, disadvantages and installation features.
Electric underfloor heating under tiles: possible options, which one to choose
One of the advantages of electric underfloor heating is the possibility of year-round operation, which is undoubtedly important for apartments that depend on the heating season. But apart from this, electric floors in multi-storey buildings are the only possible option for additional heating.
When choosing which one is better, they take into account the possibility of performing a screed, if needed, and the permissible height to which the floor can be raised, the price range and compatibility with the selected flooring.
Cable underfloor heating
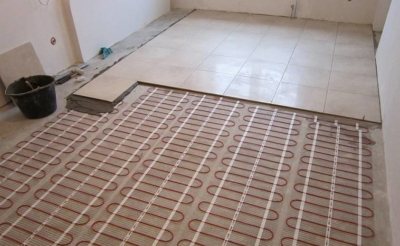
The most common arrangement of a cable underfloor heating is a special single-core or two-core cables immersed in a cement-sand screed 2-3 cm high.And together with the floor covering and the preparation of the base, the floor sometimes rises by almost 10 cm.
It should be noted right away that those electromagnetic fields, which are constantly mentioned by reviews, do indeed take place and are produced by single-core cables to a much greater extent than by two-core cables.
The installation of conventional cable floors requires certain qualifications, and the system can be turned on only after a month. This option has long lost its position in the market, and its place was taken by thermomats.
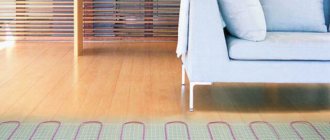
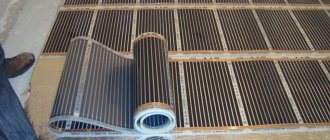
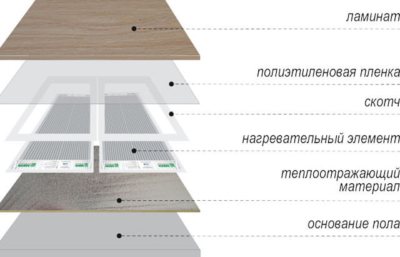
Film floor compatibility with tiles
Bimetallic floor heating is not recommended to be laid under tiles or porcelain stoneware. Carbon can be done if a few “But's” don't matter.
The problem is that the tile adhesive does not create the necessary adhesion to the film and the installation of the system has to be done in a more laborious and costly way.
In addition, many reviews talk about a decrease in the effectiveness of the film floor under the tiles, which, combined with the high cost, makes this option not very attractive.
If the choice is made in favor of the film floor, then it is worth considering two possible installation methods and choosing the most suitable one.
How to stack: technology
Electrically heated floors come in three categories. They differ in heating elements:
- mat;
- cable;
- infrared film.
Attention
The electric heating system is suitable for almost all floor coverings.
You can close the warm floor:
- laminate;
- tiles;
- parquet;
- decorative stone;
- carpet.
Under the tiles
To arrange the floor under the tiles, 10 stages of installation work are followed:
- Prepare the surface - hide cracks, irregularities with a cement screed, remove debris, prime.
- Prepare the thermostat. To power it, they use an already installed outlet or connect it directly to the network. They cut the wall under a couple of channels: a corrugation of the temperature sensor is inserted into one, the other for power wires from the heating cable.Laying of cables and mats is carried out at a distance of 10 cm from the walls.
- Calculate the number of heating elements, prepare additional materials.
- Check old electrical wiring. The power of the wiring should correspond to the area of the room - the more square meters, the more power.
- The warmth of the floor is influenced by the high-quality insulation of the base. For better thermal insulation, penofol is used - a modern material with a polyethylene base and a self-adhesive base. If the room has low ceilings, it is better to insulate the base with expanded polystyrene or polypropylene.
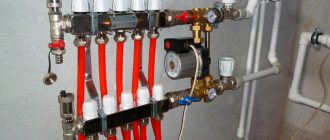
- To turn on or off the system, regulate the heating temperature, a thermostat is mounted near the outlet on the wall. In order for the heating system to work independently, a temperature sensor is installed in the floor.
- Carry out a proof test before installing the heating elements. Their resistance is measured with a multimeter. The deviation of the actual from the passport should be no more than 10 percent.
- The heating elements are fixed like this: the mats are spread out and connected to a thermostat. The cable is laid in the form of a snail / snake, secured with mounting tape.
ImportantAfter laying the material, check the resistance - its value should correspond to the data at the first measurement.
- Thanks to the screed, heat is evenly distributed over the entire surface. Usually used cement-sand - sand and cement in a ratio of 3/1. To get a viscous consistency, add water and PVA glue. When laying the mats, the screed is not made - they can be immediately covered with tiles.
- After the mortar has set, the facing is carried out. The adhesive should be marked "For underfloor heating" or an indication at what temperatures it can be used.
The following video tells you more about installing a warm electric floor under the tiles:
Under the laminate
If the packaging of the laminate says it is suitable for underfloor heating, it can be used with any kind of heating system. Installing an electric floor under a laminate is similar to installing under a tile:
- Leveling, cleaning the base.
- Installation of heat-reflecting material.
- Installation of cables or mats.
- It is recommended to install the thermostat in advance.
- Installation of a thermal sensor.
- Insulation of wiring.
- Pouring a screed with a thickness of 3 cm.
- Covering the system with polyethylene film for further installation of the laminate.
In screed
For screeds, use various ready-made mixtures. The screed is wet (based on concrete or cement) and dry.
A wet screed is used more often. Its advantages are low cost, good thermal insulation, ease of manufacture with your own hands. But with a wet screed, installation takes longer due to the drying time of the mixture.
Dry screed is a lightweight bulk material. Chipboard, plywood are laid on it. The dry screed can be poured in a thin layer, which is beneficial when the room has low ceilings. The mixture is ready to use, no need to wait for it to dry.
The floor is covered with plastic wrap, the dry mixture is poured onto it, leveled and the installation of the coating begins.
Advice
The absence of water in the composition allows the use of a dry screed in any temperature conditions, even subzero ones. However, it is afraid of water, its use is not suitable for wet rooms.
Rod infrared underfloor heating
These systems have appeared recently and have not yet become very widespread. The heating element in them is a flexible rod made of a composite material based on carbon, silver and graphite.
The rod electric floor is available in the form of a flexible wide thermomat. The rods are placed in parallel with a pitch of 10 cm and fixed on both sides on black conductive bars.
The uniqueness of the rod systems is that they are not afraid of being locked by furniture, subsequent overheating and can creep under any floor covering. In addition, reviews speak of their cost-effectiveness. The installation of a rod underfloor heating is practically no different from the installation of thermomats.
What kind of electric floor to choose?
There are several electric floor heating systems, differing in the type and layout of the heating elements.
Heating cables
This solution is the most inexpensive in terms of purchasing material, but the most difficult and laborious to install.
There are two types of heating cables available - single and double-core.
The inconvenience of single-core - a prerequisite for the "loopback" of the circuit, when both ends of the cable must be brought out to one point - the junction box. From the point of view of installation, this is far from always convenient.
Another significant disadvantage is that they work according to a resistive circuit, like a conventional heating coil, heating equally along their entire length. This significantly reduces the efficiency of the system, complicates its adjustment.
The production of two-core cables has become a big technological step forward.
They can also be assembled according to the usual resistive circuit - one conductor acts as a "spiral", and the second, through an end sleeve, provides a closed circuit. However, it is much more convenient to use special self-regulating heating cables.
Heating in them is carried out due to the passage of current through a semiconductor matrix, in which both conductors are enclosed.
The uniqueness of the system is that with heating, the conductivity of the matrix decreases, respectively, the power consumption decreases.
Moreover, such regulation occurs at each specific section of the cable. Thus, the "problem" cold places in the room will be warmed up better.
And one more significant advantage - such a cable can be easily cut to the required length (a step of 25 or 50 cm is provided).
The main disadvantage of heating cables is that they themselves have a diameter of about 8 mm, and require pouring a screed, which greatly complicates the installation of the heating system and reduces the height of the room.
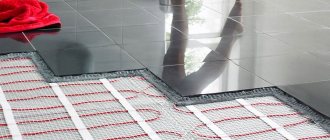
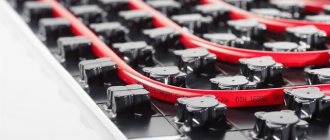
Heating mats
Heating mats are the most popular among builders. In essence, this is also a heating cable, but already laid in a zigzag manner and fixed on a polycarbonate mesh.
Such a system is more expensive, but it pays off by the ease of installation and the absence of the need to pour a screed over it - the tiles are laid directly on the mats.
An expensive but very effective solution is the use of UNIMAT rod infrared mats.
Heating elements - rods, independently of each other, are connected to two parallel conductors, and work on the principle of resistive self-regulation, reducing the overall energy consumption.
The use of such a floor heating system under the tiles also does not require pouring the screed. - the tile covering is laid on a layer of tile adhesive directly on the heating elements.
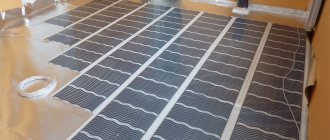
There is another type of electric underfloor heating - film with infrared radiation. They show themselves well when laying under a laminate, bag, carpet, linoleum, but it is not recommended to use them for tiles.
The fact is that the film will not give the necessary adhesion to the tile glue, and sooner or later the tile will begin to "dance" and fall out.
Technological holes, which, according to the intention of the manufacturers, should ensure reliable adhesion of the concrete base of the floor with a layer of glue, do not solve the problem.
What else is required for work
As a rule, any electric floor heating system is equipped with a special temperature sensor and a control device - a thermostat.
The automatics will provide floor heating to the temperature set by the owner, and will cut off the power supply when the set values are reached.
They are of various levels of complexity - from the simplest mechanical ones to computerized systems that are built into the “smart home” system.
In order not to heat concrete floors in vain, they use a thermal insulation system.
For this, special foil mats with a thermo-reflecting backing such as "penofol" or "izolon" are best suited.
When using electric mats for tiles, such a substrate is not made.
Laying the cable system will require a reinforcing metal or polycarbonate mesh or mounting rails to which the cable will be looped.
To provide an expansion gap along the walls, it is necessary to purchase a special damper tape.
Do-it-yourself installation of an electric underfloor heating under a tile
Before proceeding with the installation of the underfloor heating system, you need to draw up a plan for its layout on paper.
The floor areas on which household appliances or furniture will be placed are excluded from the total area; they also create a buffer zone between the electric heating system and heating pipes or other heat sources, if any.
The result is likely to end up with an irregular shape that fits into the square or rectangular shape of the room. Think over the place of installation of the thermostat. Sometimes for a warm floor you have to lay a dedicated wiring line with a suitable power.
Evgeny Filimonov
Ask a Question
The layout of the room, which will have a warm floor, needs to be thought out very well, since further rearrangement may affect the performance of the system. Preparation of the base
The installation of an electric floor heating begins with the preparation of the base. Any system is laid on a clean, flat surface; if necessary, complete dismantling of the old coating is carried out and the floor is leveled with a screed. A layer of waterproofing material is laid on the base with an overlap on the wall.
A damper tape is fixed to the wall along the perimeter of the floor, it will compensate for the thermal expansion between the floor and the wall. For waterproofing, foamed polyethylene foam, ordinary or extruded polystyrene foam with a thickness of 20-50 mm are used.
Advice! If the installation of a warm floor is provided on a veranda or loggia, a layer of insulation is laid in front of the waterproofing, it can be mineral wool or expanded polystyrene 10 cm thick.
Stages of installation of electric floors
All types of electric floors are installed in about the same way. Installation includes several stages:
- Drawing up a diagram.
- Preparatory work.
- Cable installation.
- Thermoregulation sensor installation.
- Screed.
- Installation of tiles.
It is important to correctly calculate the laying step. To do this, divide the heating area by the length of the electrical cable. Mats are easier to install than a stand-alone cable, and you can put tiles on them with glue.
The installation instructions for the warm floor are as follows:
- The screed is being waterproofed. The film is spread with an overlap on the walls.
- In order for the tiled floor to be warm, it is necessary to carry out an insulating layer. The reflective layer is at the top. The joints of the rolled strips are connected with adhesive tape.
- Next, the edge is insulated. A damper tape is fixed around the perimeter.
- Before installing the electric cable responsible for heating, it is worth checking it.
- Then they put the thermostat and the sensor. The electrical wire that will connect them is placed in the corrugation and then in a recess in the wall.
- A prerequisite is the smoothness of the corrugation angle.
- Next is the installation of the cable on the mounting tapes. They are placed perpendicular to the direction of the cable. Fixation with polyurethane foam is made every 30 centimeters.
- The cable is installed with the same pitch.
- After it, a screed or self-leveling floor is made.
- When using mats, tiles with adhesive can be laid directly on top of them.
Features of installation of cable or rod underfloor heating under tiles
Installation of thermomat under the tile differs in that it is installed without thermal insulation. Laying on old tiles is also allowed. The core floors are laid on a foil base. Further installation is carried out according to a single scheme.
The installation of a warm floor begins with the preparation of the base. After that, the thermostat is installed. The temperature sensor is placed in a corrugated pipe with a diameter of 9-16 mm, and so that the pipe is flush with the floor, a strobe is made for it.
They work in the following sequence:
- It is recommended to apply a layer of deep-penetrating primer on a clean and level surface, which will improve the adhesion of the floor to the tile adhesive.
- When the primer is dry, they begin to roll out the roll of the thermomat, placing it according to a previously prepared scheme. This will be a trial, draft layout.
- In the process, in order to rotate the strip, you will have to cut the mesh. This must be done with extreme caution so as not to damage the cable.
- When the thermomat covers the entire area, it is folded again.
- The next layout will be finishing, finishing. As it spreads, the protective strip is removed from the bottom side of the net, exposing the adhesive layer so that the newly rolled roll adheres to the entire floor surface. There is no adhesive base provided. Thermomats are glued to the floor with pieces of masking tape.
- Connect the electric floor to the network through a thermostat.
- After that, the thermomats are covered with tile glue, the layer of which should not exceed 7 cm.
- When the screed is dry, you can start laying the floor covering on the minimum layer.
Evgeny Filimonov
Ask a Question
You can turn on the underfloor heating not earlier than the complete drying of the tile glue.
Installation of thermomats
A standard heating mat kit consists of two elements:
- Thermomat in a roll with power cable.
- Corrugation with a metal probe and a plug - for installing a temperature sensor inside it. It is needed to protect the sensor from alkali and moisture. If the layer of tile glue does not allow installing the corrugation, a special moisture-resistant sensor is purchased.
Standard complete set of the system
- Thermostat. It is selected based on the maximum power consumption.
- Mounting boxes if the thermostat is to be installed in a wall.
- Remote temperature sensor (usually comes with a thermostat). It is better to take a contact sensor, and not one that will measure the air temperature.
- Wires for connecting the thermostat to the network. The cross-section is selected depending on the power of the system and the material of the wire (see the table below)
| Wire section, mm2 | 1,5 | 2,5 | 4 | 6 |
| Maximum power (copper wire), kW | 3,5 | 5,5 | 7 | 9 |
| Maximum power (aluminum wire), kW | 2 | 3,5 | 5,5 | 7 |
Fundamental rules
Connection must be made through a thermostat to maintain the set temperature.
According to the Rules for Electrical Installations (PUE), it is mandatory to install an RCD (residual current device) with a tripping current of 30 mA, 100 ms and an automatic switch of max 10 A (type C). Systems more powerful than 2 kW are recommended to be connected through a separate wiring with an automatic machine.
If you are installing in a bathroom or other wet room, the thermostat must be in an adjacent dry room.
The cable must not be shortened or cut! If necessary, cut off only the supply cable.
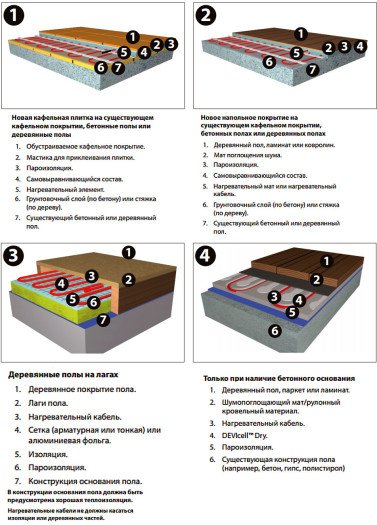
The photo shows possible installation schemes on an existing coating or a conventional screed.
System installation sequence
Determine the installation location of the thermostat on the wall and the zone where the thermostat will lie. There should be no furniture without high legs, plumbing fixtures or household appliances above the warm floor. If the screed has damping seams, the mat should not go through them. A separate thermostat and mats are used for each room.If you plan to make several topcoats with different properties in a room, you need to put a separate thermostat under each of them.
A standard thermal sensor is installed inside the corrugated tube. So that she does not create additional unevenness, a strobe is made for her in the floor and wall. The end of the corrugation is closed with a plug so that the solution does not get inside. The end of the sensor should be installed at a distance of 50-100 cm from the wall slightly below the mat, in the center between two turns of the cable. Do not make bends of the corrugation with a radius of less than 5 cm, for the possibility of replacing the sensor.
Before installing the heating mat, the concrete floor must be primed to remove dust from the surface and increase the adhesion of the tile adhesive.
Place heating mats on the selected heating area. You can cut the mesh and wrap the cable to get the shape you want, but you cannot cut it. The net is attached to the floor with tape or staples, cable upward.
Laying underfloor heating in a "dry" way
As mentioned above, the tile adhesive does not adhere to the film, therefore there must be an intermediate material between the heating system and the tile. It can be drywall or glass-magnesite sheet, which today is considered a worthy alternative to the first.
Installation of electric underfloor heating is performed in the form of a "sandwich":
- Heat-reflecting material is laid on the main floor;
- The next layer will be the warm floor itself (it is recommended to cover it on top with a thick plastic wrap);
- Drywall or LSU is cut, laid on the floor and screwed to the primary base, taking care not to damage the heating elements.
- Before gluing the tiles, it is advisable to apply a deep-penetrating primer on drywall or LSU, for example, concrete contact.
Laying technology
Installation of heating cables of both types and mats is carried out using a similar technology and has a general preparatory stage. System design nuances affect electrical connections.
Surface preparation
The first step in surface preparation is leveling. There should be no drops in level, cracks and protrusions. If necessary, fill in a new screed. The main work continues after it dries. Thorough cleaning is carried out before laying the warm floor. The surface is cleaned of dust and debris, primed. In rooms with high humidity (bathroom, toilet), the floor is waterproofed with bitumen or liquid glass.
Thermal insulation is performed to reduce heating costs. The rooms on the ground floor are insulated with foam, in the rest of the rooms it is enough to lay foil-clad foam. In places of indentation from the walls, a damper tape is placed. It compensates for the expansion of the concrete when heated.
Scheme creation and calculation
Before the start of installation work, a laying scheme is drawn up. It shows the placement of the cable (mats), the place where the thermostat is connected. The scheme takes into account the recommended distance from the walls by 50-100 mm. Areas occupied by furniture without legs are marked, on which heating elements cannot be placed.
By calculating the specific thermal power required for the room, you can choose the length of the cable. Typically, products are sold in coils of a certain size with end sleeves for connection. When choosing an electric underfloor heating, the main parameter is power. The length of the wire is calculated by dividing the total power by the linear power indicated in the characteristics. The turn pitch is determined by the formula: h = Sx100 / L, where: h - laying pitch, S - useful area, L - cable length.
Connecting a warm floor gives an additional load of several kilowatts. The wiring should be checked by an electrician. This is a guarantee to prevent fire from short circuits.
Installing a temperature sensor
The underfloor heating set is equipped with a thermostat and a temperature sensor. The thermostat can be mechanical and electronic, with its help the temperature regime is set.The sensor measures the temperature of the floor heating and is connected to the controller by a wire. A groove is made for the devices in the wall and a hole is made at a height of 80-100 cm. The sensor is placed in a corrugated pipe. It protects the device and allows it to be replaced. The thermal sensor is laid between the cable turns, the distance from the wall is 50 cm.
Installation of underfloor heating cable
Mounting tapes are fixed on the foil surface of the insulation. These are flexible metal elements with ready-made fasteners. The second option is to use fiberglass mesh. The canvas is laid out on the surface, the cable is attached to it with plastic clamps. The calculated distance is observed between the turns, their intersection is not allowed.
The system resistance is checked before installation. It must correspond to the parameters of the passport. Allowable discrepancy is 10%. A single-core cable is connected to the thermostat with two ends, and a two-core cable - with one, a sleeve is installed on the second. Installation of an electric underfloor heating under the tiles ends with a resistance test.
Laying heating mats
Electric mats are laid out on the floor according to the diagram. For turns, the mesh is cut without damaging the wires. After installation, the commutation is checked. The connection to the thermostat is carried out according to the color marking of the wires. The procedure is regulated by the manufacturer's instructions.
Filling the screed
A 5 cm thick concrete screed is poured over the heating cable. For mats, tile adhesive can be used, but the base must be at least 3 cm. The solution is carefully distributed over the surface. The next stage begins after the screed has set.
Before laying tiles on a warm electric floor, they are soaked for several hours. The cladding is mounted on a special heat-resistant adhesive. The mixture is applied to the substrate with a notched trowel. The tiles are leveled. The first heating of the electric floor under the tiles is allowed after the screed has completely dried, after 4 weeks.
Wet installation technology (screed filling)
Rigid non-loadable insulation serves as a substrate; it can be a rolled technical plug with a thickness of 2 mm, foil insulation or izolon.
- The insulating material is cut to the width of the thermal film and placed directly under each strip. Where there are cutouts in the film, they should also be on the substrate.
- A heat-reflecting material is laid on top and a heating element is glued to it with tape.
- The next layer will be plastic wrap.
- To reinforce the sand-concrete screed, a plastic mesh with a cell of 5 * 5 or 10 * 10 mm is laid on the film, which is attached to the primary screed, trying not to damage the thermal film.
- When the mesh is fixed, a thin layer of screed about 5 mm high is applied on top, it should cover only the technological holes.
- A day later, after the screed has dried, tiles or porcelain stoneware can be glued.
Evgeny Filimonov
Ask a Question
In the installation of a film underfloor heating, due to the lack of grounding, conductive materials should not be used. For example, heat reflectors based on aluminum foil or reinforcing metal mesh.