Reinforced-plastic pipes are used in almost all communication systems: plumbing, heating, designed for transporting compressed air and chemical media, including aggressive ones, they are also used for laying electrical cables and wires in them.
Reinforced-plastic pipes have a number of valuable qualities, including strength, durability, and resistance to aggressive environments.
Installation of metal-plastic pipes
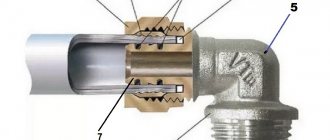
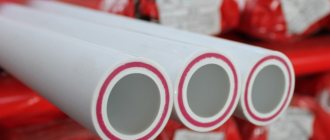
Combined pipes made of metal and polymers consist of five layers. The outer and inner layers are made of "cross-linked" polyethylene, between them there is an aluminum shell. Layers of polyethylene and aluminum are held together by adhesive interlayers.
This design provides a number of advantages to metal-plastic pipes:
- polymer layers have high corrosion resistance, providing aluminum protection against moisture and aggressive environments;
- the aluminum interlayer ensures easy do-it-yourself installation of metal-plastic pipes, due to the ability to maintain the shape that was given to the pipe.
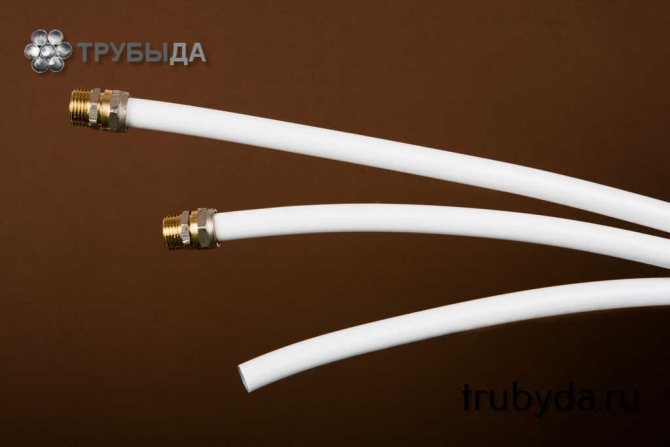
The diameters of reinforced-plastic pipes vary from 16 to 32 mm. Installation of certain types of such pipes can only be carried out using fittings of the same manufacturer, and some in this regard are universal and allow the use of any fittings.
Methods for joining metal-plastic pipes
The connection of the elements of the metal-plastic pipeline can be carried out using two types of fittings:
In the latter case, ferrules or push-in press fittings can be used.
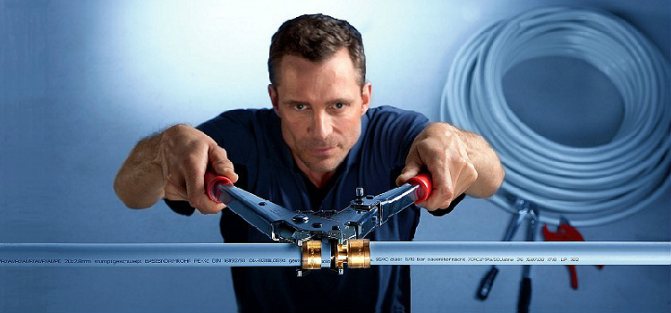
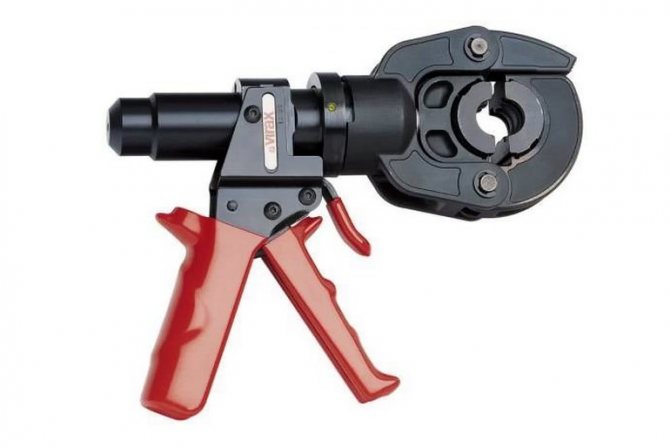
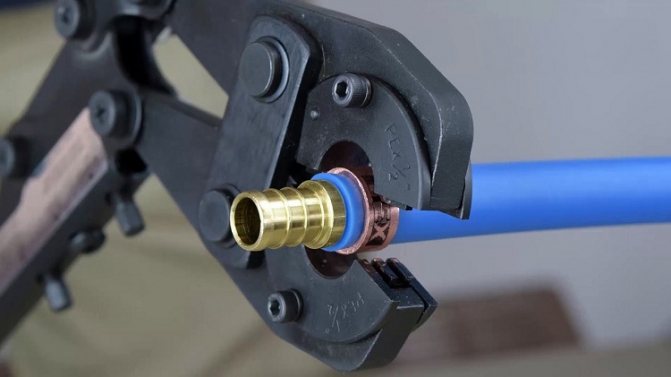
When using press fittings, a tool for installing metal-plastic pipes is required - press tongs, which can be mechanical or hydraulically driven. Mechanical pliers are usually used for domestic purposes, while hydraulic power tools are used for professional purposes.
Regardless of the type of fittings, you will need the following tools:
- tape measure,
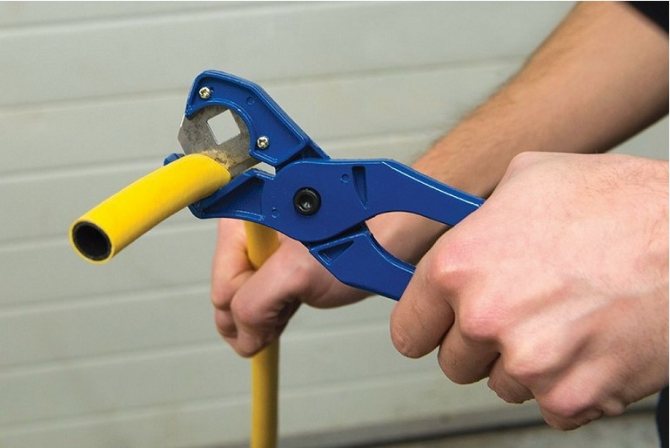
- pipe cutter,
- calibrator,
- for push-on press fitting - expander,
- wrench.
We carry out press installation
Pipeline installation using press fittings
A more reliable and durable connection is considered to be the joining of metal-plastic pipes using press fittings. True, this method makes the connection non-separable, which can interfere with the repair or reconstruction of the system.
The process of work itself is as follows:
- the section of the pipe is straightened and the marking is done;
- the pipe is cut;
- the end is processed with sanding paper, reamer and calibration is carried out;
- then the crimp sleeve included in the fitting kit is put on the pipe;
- further, it is necessary to put an insulating gasket on the fitting. It is necessary to protect the device from electrical corrosion;
- then a fitting is inserted into the pipe and crimped using a press pliers. This must be done carefully and carefully so as not to damage the connecting device. Otherwise, you will have to cut the pipe again and carry out all the procedures again.
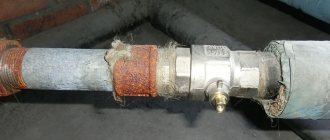
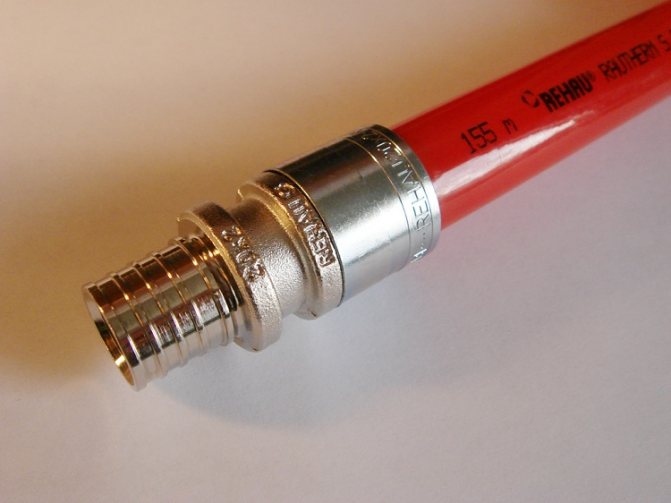
Non-separable crimp connections
You can check the correctness of the connection by the appearance of the coupling. Two uniform rings should appear on its surface. If the crimp is performed incorrectly, then it cannot be repeated. It is necessary to cut the pipe and carry out all the work again.
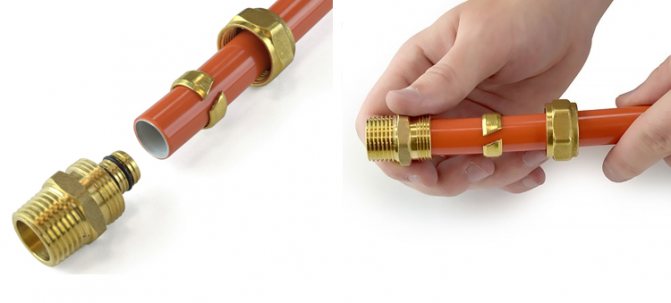
Installation of metal-polymer pipes using compression fittings
The essence of the action of compression fittings is to create pressure when the nut is screwed on the open ferrule. This creates a strong compression connection that requires two wrenches to create.
It is advisable to install a metal-plastic water supply system in a single piece without unnecessary connections from the collector to plumbing fixtures. This measure is due to the fact that during a compression connection, the fittings must be periodically tightened to maintain the tightness of the connection.
If the screw fittings are located under the floor or behind the tiles, then tightening them is either problematic or not possible.
Do-it-yourself installation of metal-plastic pipes using press fittings
The device for connecting pipes using press fittings has a number of advantages:
- unlike screw press fittings, they form permanent connections that do not need control and tightening;
- the connections are strong and durable, the service life can reach 50 years,
- permissible operating pressure at the docking points - 10 atm;
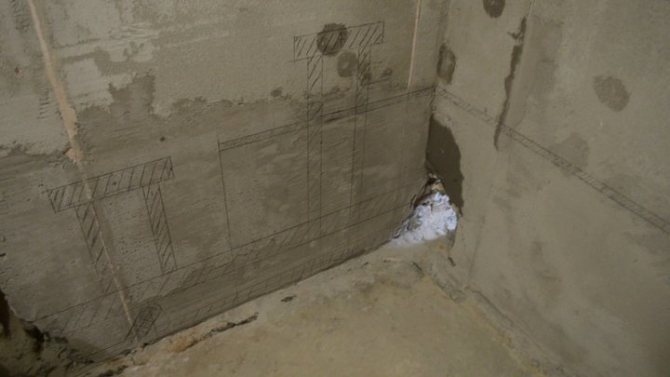
- their indoor installation, pouring with concrete is permissible.
If it was decided to use metal-plastic pipes, do-it-yourself installation can be done simply and quickly if you use press fittings, since in this case welding, soldering and threading are not required.
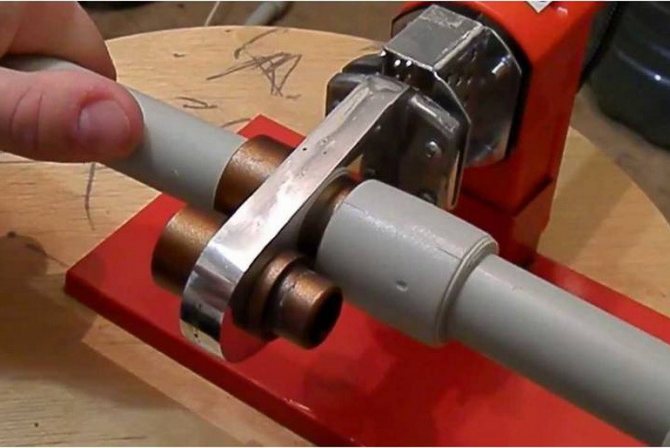
The first step in installing a pipe with press fittings is to cut the pipe at right angles. The edge is processed by chamfering, the pipe diameter is adjusted to the desired size. A stainless steel sleeve is put on the end of the pipe.
Fitting fittings are installed in the pipe up to the stop. A hand or hydraulic press clamp is applied to the sleeve. Tool handles are brought together to the stop.
Types of tools
To make a strong permanent connection using press fittings, you need to use a special tool that is classified depending on the type of drive.
Manual drive
Hand crimp pliers are more commonly used at home. This is due to the low price of the tool, the simplicity of the design. The pliers are designed to work with fittings with a diameter of up to 32 mm, which limits their scope.
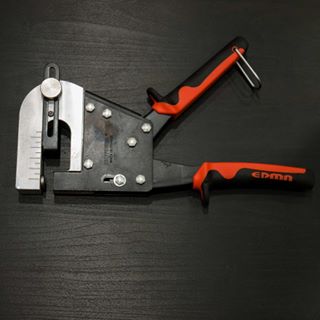
Hand pliers (Photo: Instagram / retooling)
Mechanical
The tool consists of two long handles that are connected by a gear mechanism. The principle of operation is to use a system of levers through the transfer of physical effort.
Hydraulic
Hydraulic pliers are used to carry out installation work without spending a lot of effort. The handles are connected to a hydraulic cylinder that is activated after being squeezed. The cost of hydraulic tools is higher than that of manual or mechanical tools, it needs to be serviced regularly.
Electro-hydraulic option
Electrically powered tools are used by professionals who are constantly involved in plumbing work. The power tool can be operated from a battery or after connecting to a 220 volt network. Cordless tools are low power but can be used anywhere. Electric tongs that plug into the mains are powerful, but not mobile.
Plumber (Photo: Instagram / vodobroingenering)
Basic rules for installing pipes made of metal-plastic
Reinforced-plastic pipes are highly sensitive to mechanical damage, temperature effects, poorly tolerate direct exposure to ultraviolet rays. Therefore, open laying of metal-polymer pipes is possible only in those places where the presence of these factors is excluded.
In order to easily carry out the repair of metal-plastic pipes with hidden gaskets with screw fittings, it is necessary to provide inspection hatches at the joints.These elements must not have sharp edges.
Through building structures, metal-plastic pipes are laid using sleeves. There should be a 3-5 mm gap between the inner surface of the sleeve and the outer side of the pipe, which is created using a soft non-combustible material that allows longitudinal movement of the pipe.
At all stages of pipe laying, it is necessary to remember about the inadmissibility of the formation of cracks, cuts and scratches on the surface.
Therefore, do not use sharp objects when unpacking pipes. Risks can only be applied with a marker or pencil.
For the installation of press fittings, reliable equipment is used, which excludes the creation of poor-quality connections.
Installation of metal-plastic pipes - video materials will help you cope with this process - should be carried out using hangers and supports offered by pipe manufacturers. When using metal fittings, the pipe is protected with soft gaskets.
To resolve the issue of how to repair a metal-plastic pipe, you can choose one of the options:
- to eliminate the leak, it is necessary to cut out a piece of pipe, and install a new one using a connecting fitting;
- with a small leakage point, only a connecting fitting can be supplied without buying a new pipe;
- the leak can be sealed by installing a gasket flange or covered with epoxy glue or sealant.
Reinforced-plastic pipes are the most versatile among polymer pipes, they are reliable in operation, easy to install and have an aesthetically pleasing appearance. It is these properties that explain the rise in their popularity.
General Provisions
So, you thought about it and decided to install the pipeline yourself. And rightly so, with an attentive and diligent attitude, any business argues. Where do you start?
Take a piece of paper and draw a plan of the premises where we will install the pipeline. You should get a kind of top view. As a rule, all the pipes in the apartment / house are changed at once, and this is, first of all, the kitchen, bathroom and toilet. Measure the future pipe passages carefully.
Tip: Ideally, draw straight lines with a pencil directly on the walls where the pipe will go and measure them with a tape measure.
Installation of a water supply system from metal-plastic pipes is probably the most affordable way to replace pipes without proper qualifications. Feel free to get to work.
Do not forget that the pipe is double: cold and hot, but there are a number of places where only cold passes. This is a wiring near the toilet, a connection to a washing machine, dishwasher, etc.
At this stage, you already know how much pipe you need. Now carefully consider how many pipe connections, tees, mixers and other assemblies you plan to make.
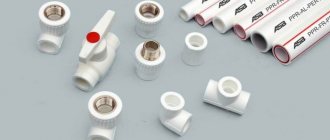
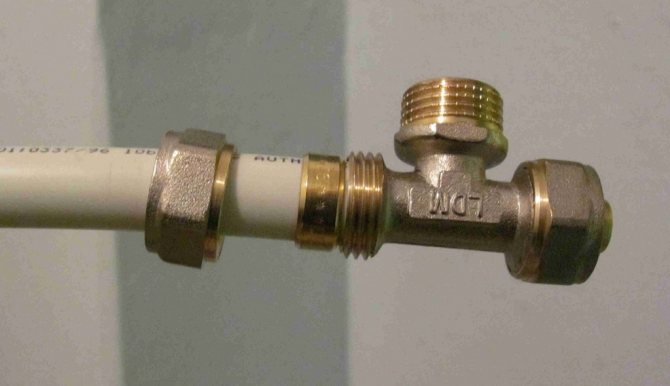
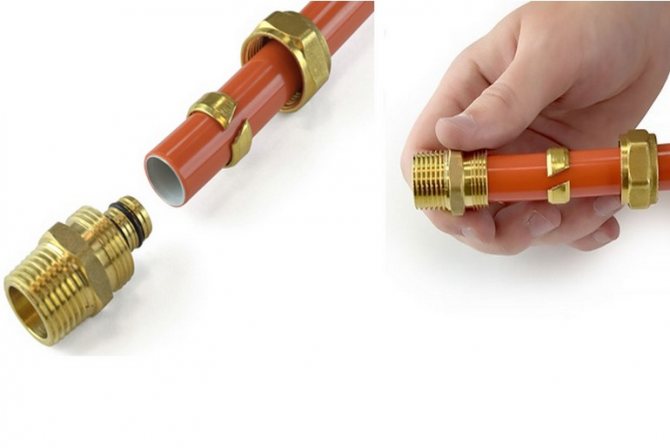
Some options for fitting to a metal-plastic pipe
Advice: it is highly desirable that at the stage of compiling the list of components, someone from experienced people helps you. The choice of the type of fitting in one place or another is important and is selected optimally.
Do-it-yourself pipe installation also implies the presence of a certain set of tools.
Let's make a list of the essentials:
- Pipe shears. This is a necessary device, do not save, buy it without fail, otherwise you risk ruining the pipe. Cutting with other tools can cause burrs, irregularities, violation of the protective layer of the pipe, which will subsequently lead to leaks.
Pipe shears
- Calibrator. It is also necessary, since after the cut, the pipe is concave a little inward, but on the contrary, it needs to be flared a little so as not to spoil the rubber seals.
Pipe calibrator
- Adjustable wrench, open-end wrenches of the required size, pliers, drill.
Advice: You can purchase the necessary tool for the installation of metal-plastic pipes together with the pipe and fitting, even get a discount by right.
So everything is ready to go. Now it is necessary to dismantle the old pipe, and with it the old valves at the entrance to the dwelling.
If you live in a private house, then simply shut off the central water supply to the house, and if in an apartment, then you will have to call a plumber to shut off the hot and cold water supply in your access riser.
Advice: it would be logical to entrust the work of replacing the valves at the entrance to the apartment to a local plumber, who will cut off the water. Otherwise, he will not get anything, and you will wait for him for a long time.
It should be noted separately that the valves at the entrance to the dwelling should only be of high quality. Choose taps that can withstand a pressure of 60 atmospheres and a temperature of 150 degrees.
Do not skimp on such valves, because in the event of an accident, they are the only gateway to the house.
Pressure testing of the water supply system
When the installation of a water supply system from metal-plastic pipes is completed, it is necessary to check it for leaks using the pressure test process:
- It is necessary to close the test area filled with water to seal it (using taps / valves).
- Connect a pump to the connection pipe of one of the taps (a manual, low-power one is suitable for a home water supply system).
- Using a pressure pump, pump water into the allocated area at a pressure greater than the calculated operating pressure, then turn off the pump, record the pressure gauge readings.
- Keep the system under pressure for some time - not less than half an hour.
- Then the current reading of the manometer is compared with the initial value. If the two values are different, something went wrong, there is a leak.
Pipe crimping pump
If you have an open gasket, the problem area can be detected visually. After eliminating the malfunction, you will have to re-perform the pressure test.
Installation
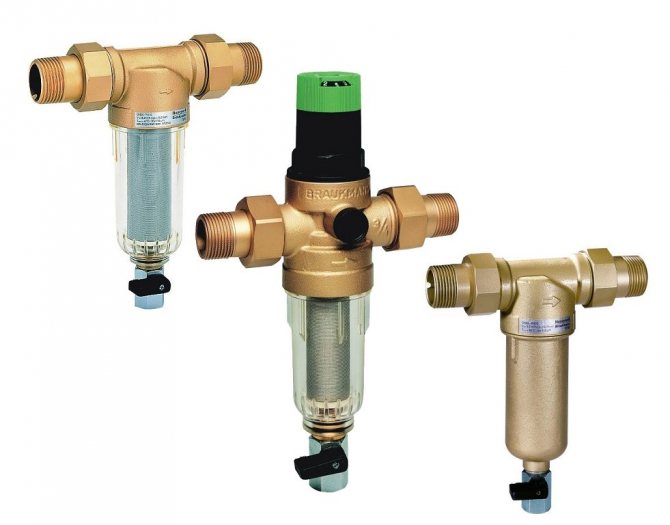
Do-it-yourself installation of metal-plastic pipes is a rather entertaining and even creative process. Now that the valves are changed, turn off the water supply and proceed with the installation. Install a coarse and fine filter behind the valve (optional).
They differ in the size of the filter mesh. The fine filter is neglected by many, and in vain. It is he who retains small particles of scale from pipes, which, falling into expensive ceramic mixers, are capable of destroying the smooth surface of ceramic plates.
In addition, it is he who stops the "fines" that accumulate in the filter on the mixer spout and reduces the water pressure.
Next, install the counters, if you use them, and start wiring.
If there are many consumers in the apartment that are connected to water in parallel, then use a collector.
This device is good in that it provides all consumers with the same pressure, and you can mount a separate valve for each branch.
A little below we will be able to see the metal-plastic pipes installation video clearly. It is useful to know the internal structure of a metal-plastic pipe.
Where to start replacing the water supply
Pipe installation begins with marking. You can sketch out a plan of the apartment on paper and mark where the water supply will pass. This will allow you to accurately determine the amount of material, fittings, adapters and tees. You can do even easier: make the markup and the necessary calculations right on the walls. You will not need to constantly look at the drawing, everything will be right before your eyes.
Please note that the eyeliner must be double: hot and cold water. Then you can make additional outlets only for cold water, for example: to the toilet or washing machine.
Important! Replacing the water supply is carried out immediately throughout the apartment. This will exclude the joints of metal-plastic and metal pipes, which will greatly simplify the do-it-yourself work.
After all measurements have been made, it is necessary to prepare the necessary tools. For metal-plastic products, this set is minimal.
You will need:
- A set of wrenches (including adjustable), hammer drill and pliers.
- Purchase a calibrator. You will need this tool for flaring pipes.
- Special scissors. Unlike metal, plastic is quite easy to cut with your own hands, you don't even need to make any special efforts.

After that, it is necessary to shut off the water supply. If you live in a private house, then there will be no special problems, it is enough just to shut off the input valves. In apartment buildings, you will have to block off the entire riser. Therefore, it is necessary to warn the neighbors in advance and call a plumber. By the way, you will need a housing office worker to replace the entrance valves near the apartment. If the installation can be done by hand, then only a professional should change the valves. Then the old water supply system is dismantled in the apartment and you can start working.
USEFUL INFORMATION: Which water heaters are better: storage or instantaneous? Difference between models
The structure of a metal-plastic pipe
As you can see, it consists of three layers: polyethylene-aluminum-polyethylene, between which there are connecting adhesive layers. Therefore, cutting and installing metal-plastic sewer pipe connections requires precision and accuracy. In the video below, you will see how to work with the pipe.
As you can see, there is nothing complicated. A little practice and everything will work out. Do not forget to process the outside and inside of the pipe cut edges before installing the fitting.
Otherwise, the rubber seals could be damaged. And in order to give the edge of the pipe a perfectly even round shape and prepare for the connection, be sure to use a calibrator.
Important: in the process of tightening the nut during installation, the connection can be easily "overtightened". When the connection is already reliable enough, a characteristic crackling sound will appear. This means that further tightening may simply ruin the connection.
The connection is tightened with two wrenches, one holds the fitting, the other tightens the nut.
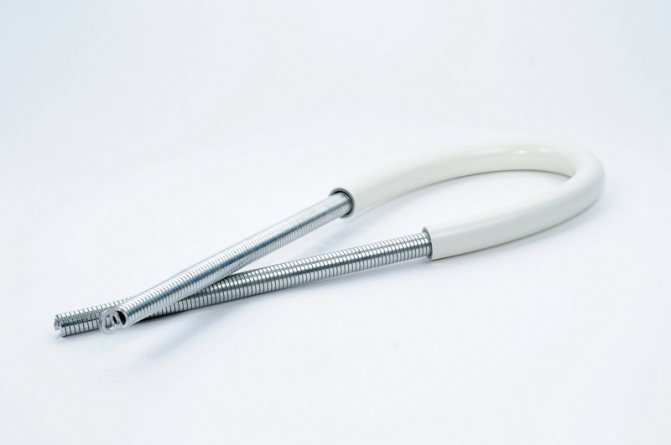
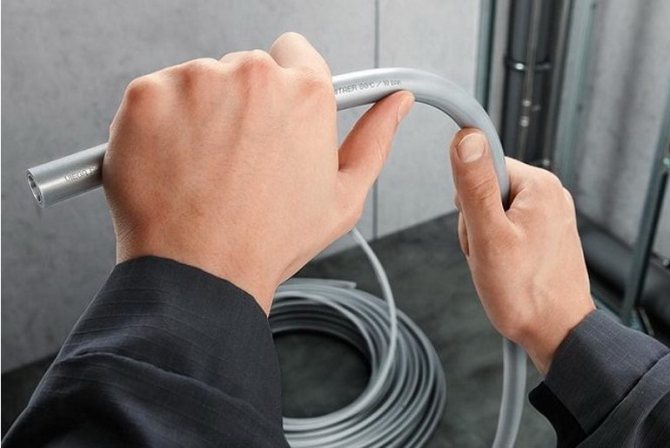
It is also often necessary to simply bend the pipe without using a fitting. In this case, a special spring will help you, which will not allow the pipe to simply fold.
Such springs can be both internal and external.
Such bending is used by installers to the maximum, because:
- Saving on fitting.
- There is no risk of leaks as no connection.
If you plan to close the pipe with a box, then use this technique.
Now let's watch a video on how to properly connect metal-plastic pipes and fittings.
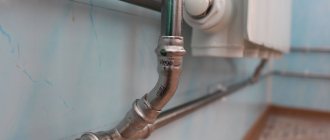
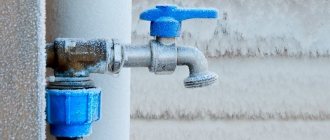
It is very convenient to fasten the pipe to the wall using special clips.
Fastening the pipe to the wall
Such a clip is attracted to the wall, after which the pipe is simply inserted into it. It is very fast and convenient. These clips are calibrated for the pipe diameter and therefore hold very well.
Repairs
Metal-plastic fitting joints of sewer pipes periodically need repair. Even if you have done all the operations correctly, after a few years, the connections may weaken from the effects of temperature differences, pressure, just from time to time.
Since the pipe itself is monolithic, it means that the repair of metal-plastic pipes is carried out at their joints - fittings.
The very first thing to do is just tighten the joint. This must be done carefully. If the leak does not stop, then you will have to disassemble the connection.
Possible reasons for the leak:
- Rubber o-rings are damaged. They need to be replaced.
- Uneven cut at the pipe. Align and calibrate the slice.
- The brass body of the fitting burst. Replace the complete fitting.
Tip: some craftsmen lubricate the joint with silicone, which provides additional waterproofing.
It is worth saying that metal-plastic pipes are produced not only for hot and cold water supply. There are also pipes for heating and sewerage. These types of metal-plastic pipes differ in that they contain not food grade polyethylene inside, but technical plastic. Therefore, the cost of such a pipe is much lower.
If you still want to make the pipeline unserviceable, then you must use not the compression fitting discussed in the article, but a press fitting.
Such pipeline assembly implies the creation of non-separable pipe joints using special press machines. It makes no sense to buy this expensive equipment for the installation of several meters of pipe, so it is better to use the services of professionals in this case. And you can pour the pipe with concrete. In this case, the question "how to repair a metal-plastic pipe" disappears by itself.
Installation of metal-plastic pipes
This article will discuss the installation of metal-plastic pipes with your own hands using threaded fittings.
The advantages of connecting and connecting pipes using special fittings are that threading is not required and the process itself takes little time.
However, the specifics of the production of pipes from metal-plastic provides for a rather careful handling of them, as well as strict adherence to the entire installation technology.
This is important, first of all, because in the overwhelming majority of cases, a hidden laying of the pipeline is required, which does not allow the slightest violation of the tightness. Currently on sale there is a wide range of fittings (shaped parts) for reinforced plastic pipes.
To view the types of threaded fittings, we offer you a page of our website - fittings for metal-plastic pipes.
Whenever you need to install a fitting, we advise you to pay attention to the quality level of the threads. It should be noted that sections where the thread is torn off are allowed only when their total length is no more than 10% of the total length of the thread.
The ends of the fittings must be flat and perpendicular to the axis of the product. The threads must be free of burrs.
All fittings, depending on the way they are connected to the pipe, are divided into threaded (screw) and compression fittings.
When using threaded fittings, the connection is achieved due to the pressure created on the open expansion ring when the nut is tightened. A special gasket is provided to ensure that the fitting body is tightly connected to the ferrule.
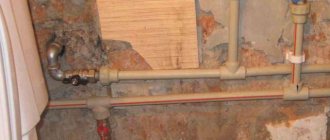
Pipeline connectors
To mount the turn of the pipeline or its branches, connectors for a metal-plastic line are used - fittings. The assembly of metal-plastic pipes in 2 options depends on the type of connector:
- a crimp nut is used (a compression connector is used);
- the press is activated (intermediate link - press connector or ferrules).
The line is hidden only with press fittings. Other connections are left in a visible place with quick access to them.
Instrument preparation
Do-it-yourself connection of metal-plastic pipes begins with the development of the layout of the highway, all devices of the heating system, the location of plumbing in the room.
DIY installation is impossible without a special tool. It is used to measure the required length of a piece, the plastic is cut into pieces, and the ends are carefully prepared before mounting the metal-plastic pipes.
- To get an even cut, you need to have a pipe cutter at your disposal. It does not break the protective layer of the plastic, so there will be no burrs on its surface.
- The cut of the section takes the desired shape when using the calibrator.
- The chamfer removes the chamfers in the cut area before joining them.
- Installation of compression connectors is carried out with an adjustable wrench and a set of open ends.
- Pressing tongs powered by electricity are used to solder metal-plastic pipes, while press fittings are used to connect. With ordinary pliers, the connection is slower.
The pipe is cut into sections at 90 degrees. Before this, a piece is measured that will be mounted on this section of the line, but taking into account the millimeters that enter the fitting. The sizing tool removes plastic deformations.
Installation of metal-plastic pipes. Fastening the fitting
It is necessary to cut a piece of pipe to the required length. We do this with special scissors.
IMPORTANT! If you use any other tools, then there is a high probability of damage to the protective layer of the pipe, moreover, the cut will most likely turn out to be uneven. In the future, this will entail problems associated with the reliability of the connections - leaks may occur in these places!
To make a high-quality and reliable seal, O-rings are used on the fitting of the fitting.
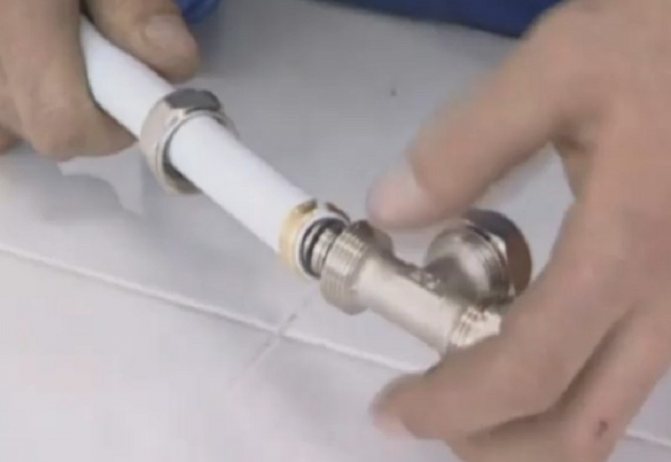
In order not to damage these rings during installation, the pipe should be expanded with a calibrator! To connect a metal-plastic pipe with a fitting, nuts and a clamping clamp are used.
To begin with, we put a nut and a clamping clamp on the pipe.
It should be borne in mind that before performing the installation of a metal-plastic pipe, it is necessary to remove sharp edges inside the pipe along the edges. This can be done with the help of a special device or with the help of improvised tools.
Sharp edges are removed so that during the installation of the pipe on the fitting, the inner edges of the pipes do not damage the rubber bands, because otherwise, insufficient tightness of the connection may occur and, as a result, leakage.
The inner sharp edge of the pipes can be removed with a small diameter sharpened drill (designed for metal work). This operation can also be performed with a round file.
Sometimes cutting pipes leads to their partial deformation. To give the pipe a perfectly round shape, you can use a special tool - a calibrator.
Using a calibrator, flare the end of the pipe, put it on the fitting union.
Aligning tightly with the fitting squeegee, return the clamping collar.
We return the fitting nut and begin to tighten.
It is important!
When tightening the nut, be careful not to use too much force. It is necessary to tighten until a certain crackling appears. If a crack appears, then the nut has already tightly squeezed the clamp around the metal-plastic pipe.
In the case when you need to bend a metal-plastic pipe with your own hands at a right angle, it is advisable to use a special spring - it will not allow the pipe to be squeezed at the bend! You can find more details on the page of our website - bending of metal-plastic pipes.
To install metal-plastic pipes to the surface, as an option, you can use special devices - clips.
There are clips in various sizes and designed for different types of pipe sizes. In order to lay the pipe along the clips neatly and evenly, it is necessary to mark them for fixing them.
The clips are fixed with screws, dowels, self-tapping screws and even nails. Since the pipe snaps into place quite easily with the clips, you don't have to work hard.
Press fitting connection
If you need to connect metal-plastic pipes - installation and direct connection is performed using fittings for metal-plastic pipes, which are of the following types:
- Press fittings (pressed);
- Screw (compression).
Compression fitting diagram
Making connections with compression fittings:
- In the case of a compression fitting, the connection is obtained due to the pressure arising in the process of tightening the nut on the open compression ring.
- To make a compression connection, special tools for the installation of reinforced plastic pipes are not required. The connection is made using two wrenches: while one is tightening the nut, the other wrench is resisted.
- If, when performing wiring, metal-plastic pipes are used, the installation should be carried out to the consuming device from the collector with one whole "thread", avoiding unnecessary connections.
- After some time, it may be necessary to pull through to maintain the tightness of the connection of the compression fittings. But if you lay pipes with several fitting connections on the floor or close them with tiles, then performing this operation or dismantling metal-plastic pipes in case of such a need will become very difficult.
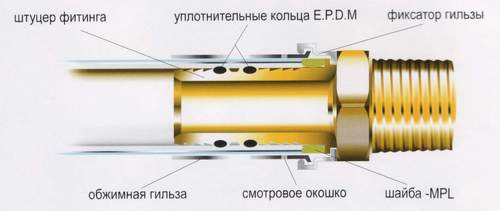
Press fitting diagram
Press fittings are durable and strong (they are guaranteed for up to 50 years), they can withstand pressures up to 10 bar, and the laying of metal-plastic pipes made with their help is quick and easy.
Reinforced-plastic pipes with press fittings are installed using a special press machine. This tool for the installation of metal-plastic pipes is simple manual and microprocessor-based hydraulic.
Read next: DIY heater how to make a homemade appliance at home
Installation instructions for reinforced-plastic pipes with press fittings:
- The pipe is cut with special scissors at right angles.
- With the help of a reamer and a special calibration tool, a chamfer is removed and the pipe diameter is adjusted for subsequent installation.
- A sleeve made of stainless steel is put on the end of the pipe.
- The fitting is inserted into the fitting pipe until it stops.
- The clamping of the press - manual or hydraulic - grips the sleeve.
- The handles of the press are brought down to the stop.
device
The connection process takes very little time and consists of the following stages:
- If necessary, a piece of pipe is cut off with a special pipe cutter or a metal hacksaw.
- The place where the compartment was produced is leveled with a calibrator
- The fitting must be disassembled. Then the fitting nut is put on the pipe with the thread facing the pipe edge. The nut should be pushed back from the edge by 20 - 30 mm.
- A collet-ring is put on the pipe and also moves slightly from the edge.
- The nipple of the fitting is inserted into the pipe until it stops, and care must be taken not to damage the rubber seals.
- The nut is tightened.
On the other hand, the fitting is connected by a threaded connection with a tap or a metal pipe, or, if it is a collet-collet system, then with a metal-plastic pipe. The fitting can also be in the form of a tee to branch off the system. If a tee is used to branch from the main line to the tap, then a tee can be used: 20 * 16 * 20.
You will need a pliers or a special electric press. Pliers are mechanical, which produce crimping using human muscular strength, and can also have a hydraulic mechanism.
Installation takes place in the following sequence:
- The pipe is cut off.
- Align the hole with a calibrator
- A sleeve for crimping is put on a metal-plastic pipe.
- A pipe is pushed onto the fitting spigot.
- Crimping is carried out using a manual or electric press.
If the connection process was carried out correctly, then the extruded rings around the entire circumference of the crimp sleeve should be visible.
The result is a very reliable connection that requires no maintenance during operation. When installing a warm floor, only press fittings are mandatory.The use of such a connection technology allows you to significantly save time on installation, this can be especially noticeable when carrying out a large amount of work.
Do-it-yourself installation of a water supply system from metal-plastic pipes involves connecting pipes. It is made using fittings, which are extruded and compression. When using a compression fitting, the joint of the pipes is obtained due to the pressure that occurs when the nut is tightened on the ferrule.
During the operation of the water supply system, compression fittings need to be pulled in order to maintain the tightness of the connection. Press fittings for pipes are stronger and more durable. Their installation involves the use of a special press machine, which is simple manual and microprocessor-based hydraulic.
Installation of metal-plastic pipes with press fittings is carried out in the following sequence:
- The pipe is cut with special scissors.
- The chamfer is removed and the pipe diameter is adjusted to the conditions of the subsequent installation.
- A stainless steel sleeve is put on the end of the pipe.
- The shaped part is inserted into the fitting until it stops.
- The sleeve is gripped by the press clamp.
- The handles of the press machine are brought together to the stop.
Thus, the installation of metal-plastic pipes is the simplest and most profitable solution when laying a water supply system. Hand-made work of high quality will ensure long-term and reliable operation of the water supply system.
Read more: Lighting in the bathroom DIY LED installation
Tools required for working with a reinforced plastic pipe
First, you need to figure out that a metal-plastic pipe, depending on the type of fittings used, can be assembled using a special press or by means of crimping nuts.
If we talk about the reliability of certain fittings, then they are approximately at the same level. The difference between them is that, unlike crimp, pressed limit switches that have leaked, there is no way to fix it. The leaked fitting should only be thrown away and replaced with a new one.
Connection of metal-plastic pipes - fittings
In addition, for the installation of such a pipe, an expensive press is required, which makes no sense to purchase it for a one-time job. Therefore, in the master class we will focus on the most common crimp fittings, which even a schoolboy can assemble with his own hands.
Tool for metal-plastic pipes
But let's go back a little and study the tool for metal-plastic pipes. To connect metal-plastic pipes, you will need four things - a pair of adjustable wrenches (better than Swedish ones), a calibrator, special scissors and a spring of the appropriate diameter for smooth bending of pipes.
- With the keys, everything is clear without words, their purpose is to tighten the nuts as much as possible.
- The calibrator is used to expand the inner diameter of the pipe at the points of its connection with the fitting.
- The appointment of scissors should also not raise any questions - with their help, pipes are cut.
- Well, the purpose of the springs has already been mentioned above.
How to bend a plastic pipe correctly
Armed with this simple and few tools, you can get to work.
Installation of a line from segments of different materials with different sections
The connection of metal-plastic pipes with metal ones is carried out with collet fittings. They are also used if the line is assembled from pieces of different sections. The thread marking of the fitting corresponds to the size of the metal pipe, and other indicators correspond to the metal-plastic pipe. Before connecting a metal pipe with a metal-plastic pipe, tow is applied to a piece of metal under the connection part. A nut and a washer are put on the metal-plastic. The connection of metal-plastic pipes is carried out, that is, the nut is tightened.
Do-it-yourself installation of metal-plastic pipes: where to start
We will begin to study working with metal-plastic pipes by learning how to cut them correctly. The fact is that this type of pipe itself is a relatively soft material - incorrect or inaccurate pressure with scissors can simply flatten the end of the pipe. A deformed pipe, even if it is leveled, crimps much worse, therefore, the likelihood of leakage increases.
Do-it-yourself installation of metal-plastic pipes - trimming
The process of cutting metal-plastic pipes looks like this: first, with a slight pressure, you need to make a small cut in half the diameter of the pipe, after which, turning the scissors in a circle, we cut the pipe to the end. In this way, a smooth and uncrinkled pipe edge is obtained.
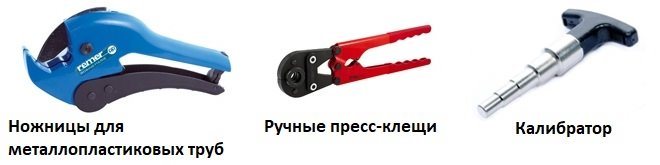
Required tools
The connections of metal-plastic pipes, as mentioned above, can be performed using fittings of various types, which are selected for each specific case. To assemble the pipeline, you will need the following tools and fixtures:
- special scissors, with the help of which metal-plastic products can be cut into pieces of the required length (in addition, such scissors are used in order to qualitatively prepare pipes for installation);
- a calibrator, necessary in order to eliminate dents formed after cutting from the end of the pipe (the calibrator also performs the function of a kind of reamer, with the help of which a chamfer is removed from the inside of the cut product);
- open-end and adjustable wrenches;
- tape measure, electric drill and pliers;
- press tongs (such a tool for the installation of metal-plastic pipes will be required if crimp-type fittings are used in the work; for the installation of metal-plastic pipes for water supply with your own hands at home, manual press tongs of a mechanical type are mainly used, and in the professional sphere, preference is given hydraulic tools);
- expander (such a tool is used if push-in fittings are used in working with metal-plastic pipes).
Specific tool for the installation of metal-plastic pipes
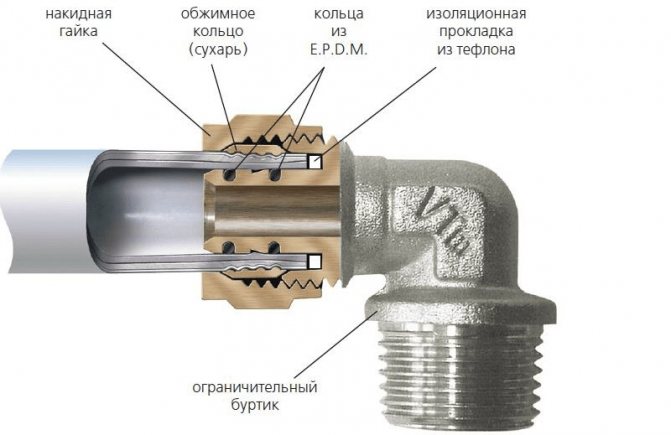
Fitting device for metal-plastic pipes
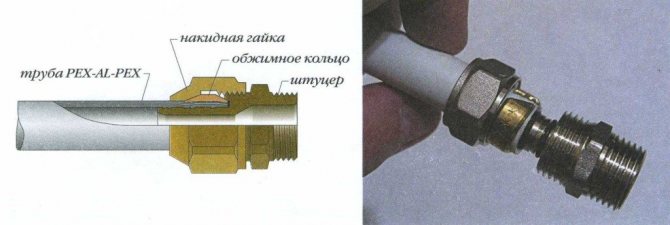
A high-quality installation is impossible without the correct connection of the pipe to the fitting. To understand the principle of their connection, it is necessary to study the design of the compression fitting.
It consists of three parts - a body (on one side of which either a threaded connection or a fitting is provided, and on the other there is a fitting with rubber O-rings), a crimp nut and a cone ring.
It is these three elements that ensure the tightness of the connection. Such a connector works quite simply - as the nut is tightened, the compression ring squeezes the pipe, forcing it tightly and with effort to fit the fitting with a rubber seal.
Device and principle of operation
Structurally, a compression fitting consists of three parts: a base, a compression nut and a compression ring (cone). The system works on the collet principle, i.e. in the process of tightening the nut, it presses on the tapered ring, which compresses and reliably presses the pipe against the base. It sounds complicated, but in reality everything is much simpler. The base has a seat for a hose of a certain diameter. It has rubber gaskets. The diameter of the seat corresponds to the inner diameter of the hose, the nut has a hole equal to the outer diameter of the pipe.
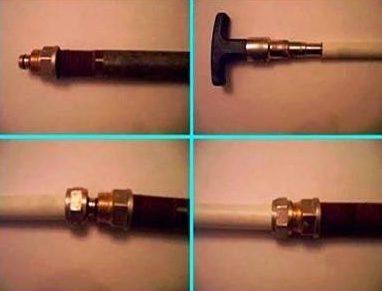
Assembly order
The fitting is installed on a metal-plastic pipe according to a certain algorithm.

Fitting installation
First, a nut is put on the pipe, so that the thread is directed towards the base (connection point). Next, the crimp ring is put on. After that, the pipe is put on the seat.The ferrule is pushed towards the base of the fitting until it becomes possible to bar the ferrule onto the threads. At the last stage, using an adjustable wrench, the nut is tightened to the stop.
Important! Over time, the pipe at the installation site of the fitting may begin to leak; to eliminate the leak, it is necessary to tighten the fitting.
Features of installing a threaded fitting
To connect a metal pipe with a metal-plastic pipe at an angle, a brass fitting with a threaded connection on one side is used. When installing such a fitting, there is a feature that must be taken into account. It is necessary to start the installation with the installation of the threaded connection, because otherwise, you will not be able to mount the connection.
It should be borne in mind that the threaded connection is not always tight; to prevent leakage, it is better to use sealants or fumlent.
Another nuance that must be taken into account when installing a fitting is the quality of the edge (place of installation) of the pipe. The butt must be cut straight and not bend or stretch.
How to connect metal-plastic pipes
Now about the direct connection of the pipe and fitting. To begin with, you need to put on a nut on the end of the pipe to be connected and then pull the brass compression ring after it.
In different models of metal-plastic pipes, the crimp ring can be made in different ways - some manufacturers make it a cone, while others make it straight with large chamfers. Those with chamfers can be installed on either side, and those made with a cone are put on the pipe with the thin side of the fitting.
Have you put it on? Now, the trimmed edge needs to be calibrated. As a rule, the inner diameter of reinforced-plastic pipes is slightly smaller than the nipple of the fitting - this is done in order to achieve a high crimp density.
In the normal state, it is rather difficult to pull the pipe over the fitting. We insert the gauge into the inner hole of the pipe and, turning it in different directions, immerse it a couple of centimeters deep.
Some craftsmen, instead of a calibrator, use the handle of an adjustable wrench - this is wrong and can lead to unpleasant consequences in the form of deformation of the pipe end and, as a result, leakage of the connection.
Working with reinforced plastic pipes - calibration
After slightly moistening the fitting with water, we put a pipe on it. It is necessary to pull it up to the very end, until the pipe rests against a small white ring. If you do not insert the pipe completely, the chances that it will be ripped off during operation increase several times. At this stage, you should check the evenness of the cut - if the pipe rested against the white ring evenly from all sides, then everything is in order.
If there is a gap of more than a millimeter on either side, then it is better to remove the pipe and cut its end again, since such a joint can lead to a leakage.
Connection of reinforced-plastic pipe and fitting
If everything is connected normally, then you can move the nut as close to the fitting as possible and use the adjustable wrenches to clamp it with all force until a characteristic squeak or squeak appears.
Do not be afraid to pull - if the fitting is of high quality, then the nut will withstand any load. If it bursts, it’s even better. You will get rid of low-quality spare parts, the operation of which could lead to a flood.
Preparation phase
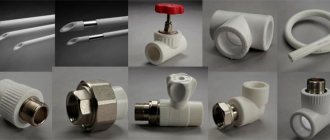
Reinforced-plastic pipes are interconnected and connected to plumbing fixtures using adapters, tees, elbows and other elements - fittings. They are of two types:
- collapsible (compression);
- press.
The difference between them is in the cost and connection technology, which will be discussed below. At the stage of purchasing connecting elements, it is necessary to take into account some points in order to make the right choice. If the system is small and is laid within the same room, then you can safely take collapsible fittings and get to work.
When you need to assemble a heating system in a two- or three-story building, then you will spend a lot of time connecting metal-plastic pipes with compression fittings, and it will be more expensive for money. It's easier to buy a set of press connectors, and then find crimping pliers for their installation, it will come out much faster and cheaper.
The next step is preparing the instrument. Regardless of the type of connection, you will need the following set:
- cutting knife;
- spring for bending the pipe;
- calibrator;
- sandpaper.
For working with multilayer pipes, there is a special knife on sale that allows you to cut accurately at an angle of 90º and leave a minimum of burrs. However, you can also use a simple sharp knife. The calibrator is a plastic or metal crosspiece with ends of different sizes for different pipe diameters. A plastic tool and a bending spring cost a penny, although some craftsmen use different fixtures instead.
To work with press fittings, a crimping pliers must be included in the installation tool. Their purchase makes sense when the volume of work is large enough, in other cases it is easier to take this tool from someone for a while. Collapsible connectors are twisted with open-end wrenches of appropriate sizes.
Before proceeding with the installation, it is necessary to prepare the necessary tools and accessories. Everything will depend on the pipe connection method you choose.
Sectional view of different fittings
There are two main ways to do docking:
- using compression fittings;
- using press fittings.

The first option is faster and does not require the use of a special tool. If installation is carried out using press fittings, then it is necessary to purchase or rent a special device - press tongs.
So, if you chose the first option of fittings, then you will need the following:
- for cutting pipes, you need to prepare special scissors or a hacksaw;
- set of wrenches;
- fine-grained sanding paper;
- a special tool for giving pipes the correct rounded shape (sweep or calibration);
- the metal-plastic pipes themselves.
If you decide to use press fittings, then you should buy (or rent cheaper) press jaws for this set. Such a tool can be either automatic or manual.
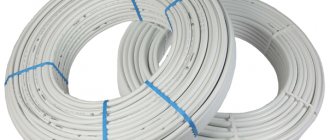
If for the installation of a water supply system the choice fell on metal-plastic pipes, then it is necessary to determine the amount of material that will be required to carry out the work.
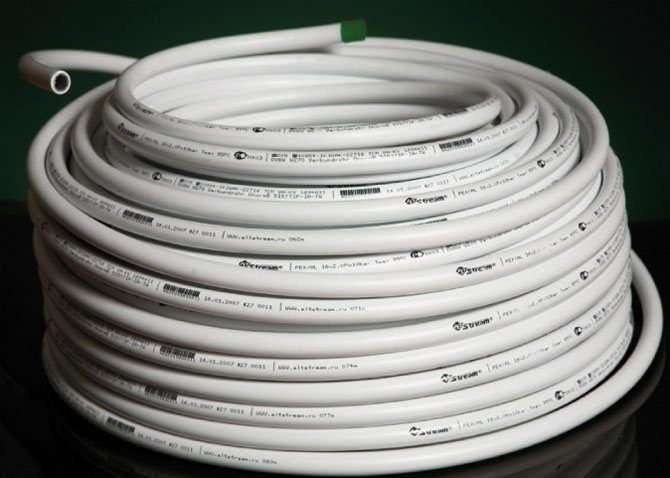
This type of material is supplied in coils from 50 to 200 m in length, but in the store you can purchase any number of running meters of metal-plastic pipe. The length of the internal water supply system is counted from the riser.
Installation is carried out along the walls, slightly above the floor level, so you need to measure the distance along the wall from the riser to the proposed installation site of the furthest crane in your room.
Then, to the resulting value, add the height from the floor to the mounting hole of taps, toilets and washing machines. As a result, you get the total length.
It should be noted right away that any pipe connection significantly increases costs, and is also a place that is critical for the reliability of the system, therefore it is very important to correctly calculate the length of the entire system at the preparatory stage.
After the measurements have been made, the resulting value in meters should be rounded up to the nearest whole number. Then it is worth deciding on the diameter.
Reinforced-plastic pipes have an outer diameter ranging from 16 to 63 mm. When installing a water supply system inside a dwelling, the best option is 20 mm. The 16 mm pipe is more suitable for the installation of the "warm floor" system, as well as for branching from the main line to taps and mixers.
If it is necessary to make a water supply to a private house from a water supply network, then the maximum diameter of this material is selected.
Read more: What is an inverter air conditioner and inverter split system how to choose the principle of operation