In what cases does it apply
The slab foundation has a large area, and therefore, when using it, the pressure on the soil is reduced.
Solid reinforcement allows you to remain intact at various ground movements, including deeply freezing and very heaving.
It is advisable to use this type of foundation on swampy and unsteady sandy soils, when building structures on them without basements.
Types of materials
Refractory materials can be roughly divided according to the method of heat transfer:
- Heat-reflecting - aimed at reflecting infrared radiation into the interior of the room;
- Preventing loss due to their physical and chemical properties.
On the video of refractory materials for the walls around the furnaces:
But all of them can also differ in the type of raw materials from which they are produced:
- With organic ingredients, for example, polystyrene foam materials, although their refractory index is very low, they are best suited for walls near furnaces with low heating;
- Inorganic - This is an extensive class of non-combustible materials for insulation of walls of various fire resistance, including very flammable ones, such as wooden floors. These include stone and basalt wool, pressed into large slabs, fiberglass wool, lightweight cellular concrete slabs with fire retardant impregnations, honeycomb plastics, foamed perlite or vermiculite, polypropylene. However, such a beautiful decorative thing as Leroy Merlin plastic sheet is definitely not suitable.
- Mixed type - these include asbestos-cement refractories, asbestos-lime or silica, foamed from a variety of inorganic substances.
Basic requirements for refractory materials
Many suburban buildings are erected from wood, whether it is a cylinder or frame house, without a stove or fireplace it is difficult to survive the frosty winter, therefore they are very careful about their arrangement, and such materials are chosen around the stoves so that they are:
- Effectively and reliably prevented any attempt at fire;
- Environmentally friendly, so that when heated, they do not emit harmful substances into the home air.
What is the composition of the kiln plaster solution that exists and is most often used, the information from this article will help to understand.
But what are the dimensions of the standard kiln brick, you can see here.
You may also be interested in knowing what kind of brick is used for laying stoves.
For walls around ovens
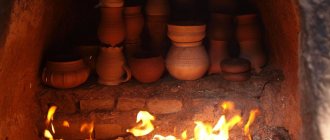
A long time ago, people used asbestos sheets to cover the walls around stoves, but it turned out to be very harmful to health and the environment - its microparticles can get into the lungs or settle on things, which leads to serious ailments, and when heated, they are also released carcinogenic substances. Therefore, the best materials can be considered:
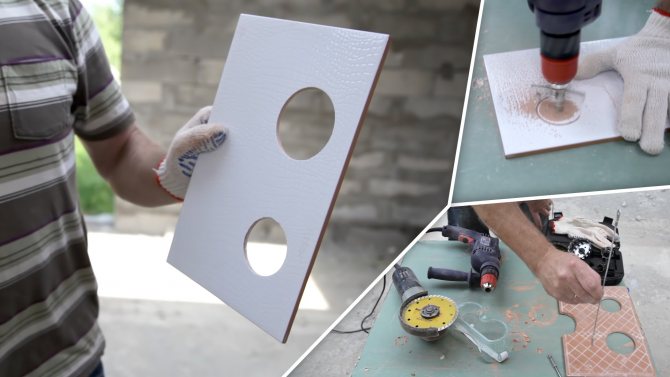
Fire resistant gypsum board. can serve as the basis for wall cladding around hot-heated stoves, and for decoration you can use porcelain stoneware tiles of the most unusual colors.
Sheets have the following characteristics:
- Fire-resistant indicator - up to 30 minutes of resistance to fire;
- Does not ignite until 1 hour of time even after the formation of a fire center;
- Slab parameters - 120 x 250 x 1.25;
- On the front and back sides, gypsum-treated cardboard, inside there are fiberglass threads that will resist fire;
- The ends of the sheets are covered with cardboard material, along which there is a joining chamfer;
- Fasteners can be carried out both on adhesives and on self-tapping screws.
Refractory minirite slabs. The material is distinguished by excellent heat-resistant properties, it is made exclusively from environmentally friendly substances, including:
- Compositions of white or gray cement make up up to 90% of the total material;
- Mineral fiber materials included;
- Fiber reinforcement plates are used for strength and durability.
Asbestos fiber is absolutely excluded from the composition, which improves the quality of the material for the home stove. It is easy to fix it to the wall with screws close to the wall itself; for reliability, you can mount 2 sheets of minrite each. Note! Leave a small distance during installation, as the material may increase in size when heated. For other walls, you can choose a similar decorative brick finish.
Protective stainless sheets - a little expensive, but reliable refractory material, with which you can protect not only the walls of the house, but also the basement, when installing a heating boiler. But in order to provide the greatest protection, special fiberglass with thermal protective properties should be laid under the stainless steel - the structure will reliably protect the house from any attempts to start a fire. Choose a substrate carefully so that it does not contain harmful phenolic resins; when heated, they release substances that are too hazardous to health.
Heat Resistant Basalt Fiber Material, pressed into mats - is characterized by hygroscopicity, a high degree of resistance to fire, can remain unchanged at temperatures up to 900 degrees Celsius.
Superisol sheets for wall insulation - a practical and versatile thermal insulation material, with a low specific weight and excellent strength and durability.
Related article: Plastering walls with cement-sand mortar
Wall insulation with heat-resistant terracotta tiles... The main advantage is the complete environmental friendliness of the material, they do not contain any chemical coloring compositions, they have excellent vapor permeability and fireproof properties. Glazed ceramic tiles for interior wall cladding also look beautiful.
For wall decoration under the boiler
A gas or steam boiler heats up very much in order to provide heat transfer to the house at the desired temperature of the carrier. Therefore, experts recommend equipping the walls with porcelain stoneware tiles with a high degree of fire resistance. The characteristics are the most reliable - it can withstand high temperatures without visible signs of fire.
It is also allowed to use sheets of fibers impregnated with gypsum, installation is very easy by sticking on walls, but plastic panels for brick for interior wall decoration are not recommended, since they do not meet fire safety requirements.
Recently, a sheet of xylolite fiber has begun to gain popularity, since it meets all environmental properties in terms of purity and the absence of any harmful emissions, even at elevated temperatures of about 1000 degrees. Also, the material is very flexible, these properties allow you to sheathe the most curved wall surfaces. It can perfectly withstand humid and damp air, its main characteristics do not change.
But what kind of mortar for plastering a home stove should be used and how to choose it is described in great detail in this article.
Where and how the oven red solid brick m 200 is used, you can find out by reading this article.
For those who are used to doing everything with their own hands, you should pay attention to how to make a clay mortar for laying stoves.
But if you want to do everything quickly and without unnecessary hassle, you should pay attention to the ready-made mortar for laying stoves.In order to make the right choice. it's worth following the link and reading the article.
But what is the price of red oven brick and how to choose it for your construction site, you can find out from this article.
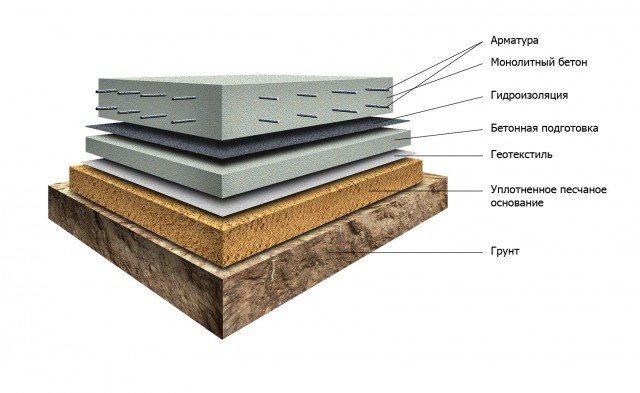
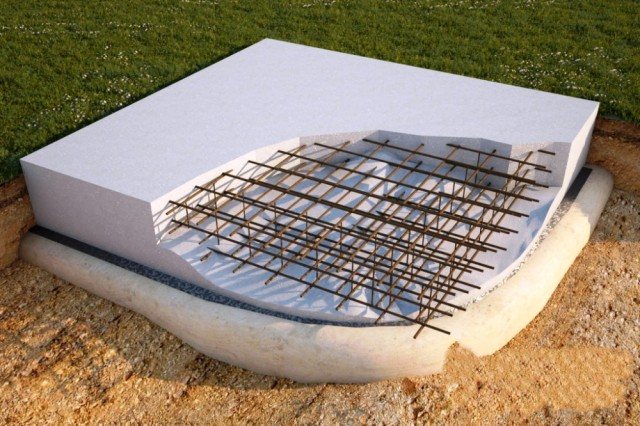
Slab foundation device
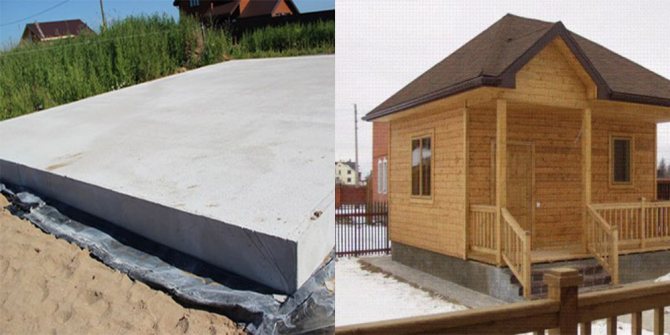
The slab foundation is a solid monolithic concrete slab, which is the foundation for the future construction. If you have swampy soils on your site, but you want to put a bath of a solid size, then there is simply no alternative to a slab under the foundation.
Stiffening trench and drain pipe
In the presence of highly heaving clayey soils, the concrete slab monolith in winter can rise with the building, and fall in the spring. For this reason, it is also called a floating foundation. Having a large area in comparison with the "strip", the slab foundation works as a solid single platform. This results in less ground pressure.
A monolithic slab in its structure can be of two types: with and without stiffening ribs. It is clear that the first option makes the foundation more resistant to deformations and horizontal displacements. This is due to the fact that the stiffening ribs go deep into the soil along the entire perimeter, much lower than the main foundation. Such a foundation structure can be figuratively represented as a cup turned upside down, only with very low walls.
The second type of foundation is easier and faster to install, but it does not have such rigid characteristics as the first. It is an ordinary flat concrete slab without any additional elements.
Slab base for a bath
The most rarely used foundation is a slab for a bath. This is due to the greatest complexity in its construction, which will be discussed in more detail below. A slab foundation for a bathhouse or a house is an example of a flat floating foundation, which is a reinforced concrete slab made directly during the construction process.
Base plate under the bath
The technology for the manufacture of such a base requires a large amount of ground work, the manufacture of a complex reinforcing frame and the obligatory high-quality compaction of the concrete pour to impart maximum strength. At the same time, a bathhouse on a slab foundation will reliably serve for decades on such problematic soils as peat and swampy, characterized by high seasonal mobility.

Advantages and disadvantages
The main advantages of a monolithic foundation are:
- Low, in comparison with other types of bases, the cost of construction. The slab is poured directly from a concrete mixer without the involvement of highly qualified specialists and the use of expensive equipment.
- Good bearing capacity of this type of foundations due to the large area and structural integrity.
- Thanks to the common slab on which the walls of the structure are located, their integrity is ensured, even with seasonal swelling of the soil.
- The construction of a monolithic slab ensures the absence of large labor costs for earthwork.
The lack of large volumes of earthworks significantly reduces the cost of the estimated cost of the foundation being erected due to the uselessness of heavy equipment on the site (bulldozer, excavator, etc.).
One of the main disadvantages of a monolithic slab is the inability to combine the structure of this foundation and the basement.
For those who have groundwater close to the site, this is not necessary, but for summer cottage construction in the absence of groundwater, such a disadvantage can be critical.
The second disadvantage of this design is its high material consumption. A lot of concrete and reinforcement is required.
The reinforcing mesh needs to be knitted, and in large volumes of the slab base it is a lot of time.
And the third drawback of a monolithic slab is that pouring can be done only under favorable weather conditions.
But comparing all the pros and cons, we can conclude that when building this type of foundation, there is a lot of savings on other materials and work, so such a foundation cannot be called particularly costly.
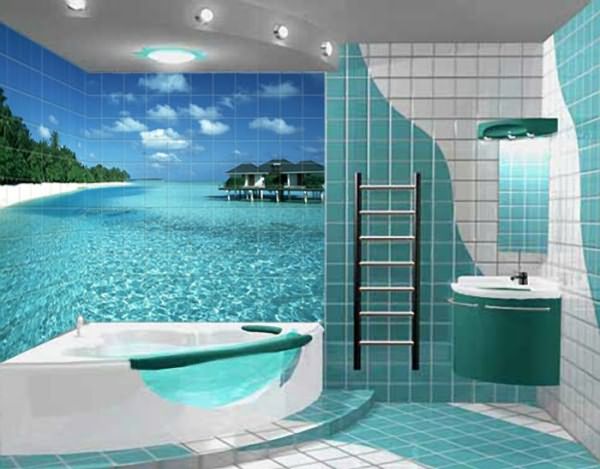
How to choose a tile for a bath or sauna
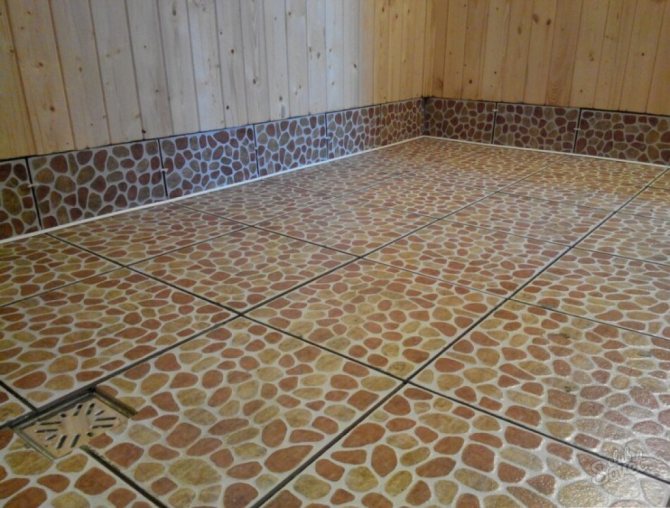
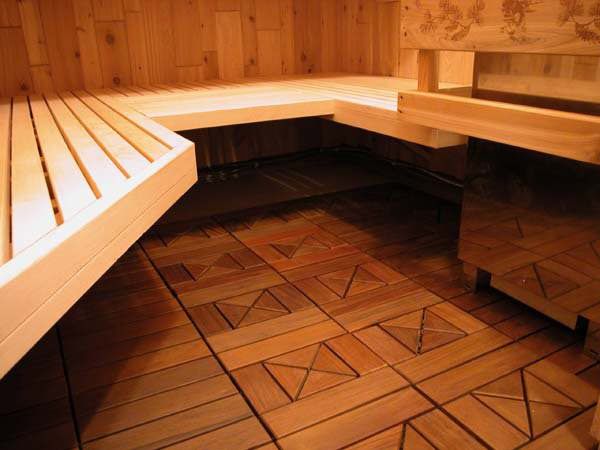
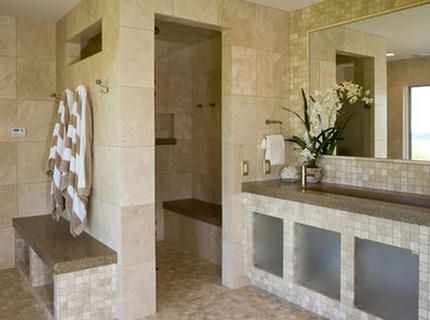
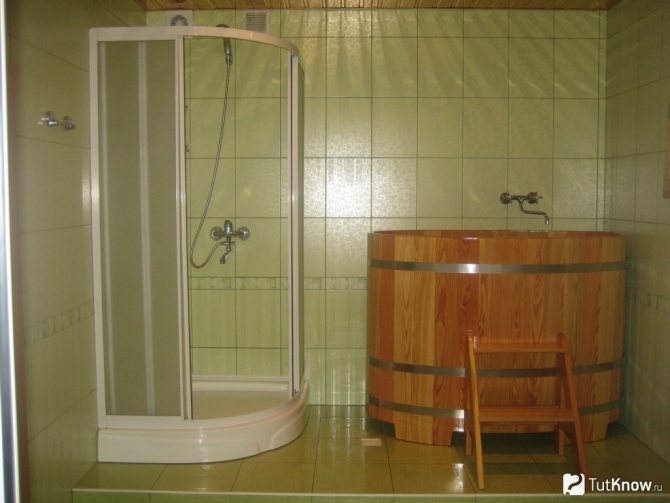
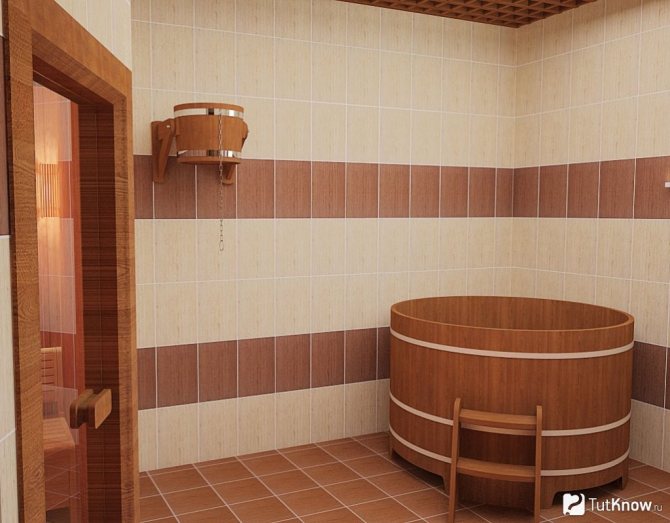
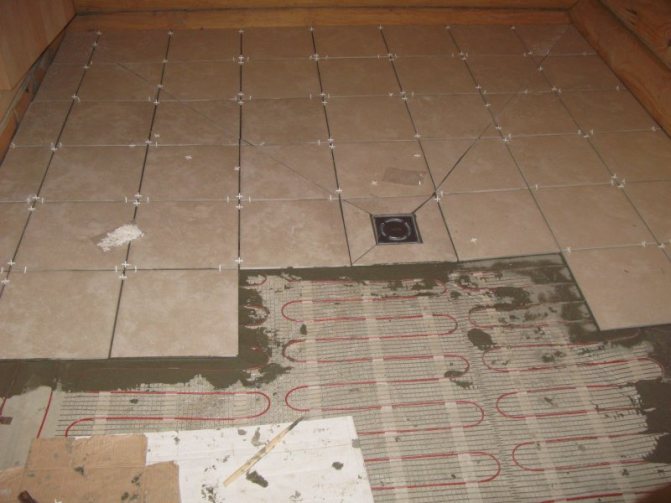
The floor in the bath can be wooden or concrete. A wooden floor, of course, requires attention and proper care, but it is pleasant and safe to walk on it, and it is better to lay ceramic or natural tiles on a concrete floor. Both from an aesthetic point of view and from a practical point of view, this option is preferable. Often tiled and walls. Especially in the washroom.
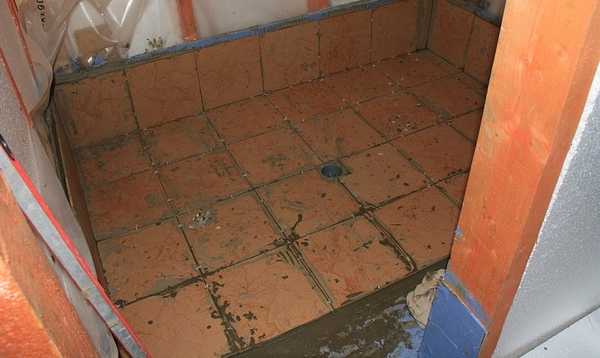
It is better to lay ceramic tiles on the cement floor in the bath.
Some people also prefer to lay out the walls in the steam room at a certain not very high height with tiles: it is the casing that is not high from the floor that begins to deteriorate and after a while requires replacement, and the tile saves us from such a nuisance. It should be borne in mind that there are many types of ceramic tiles and not every one is suitable for a bath or sauna... We'll talk about how to choose a tile for a bath below.
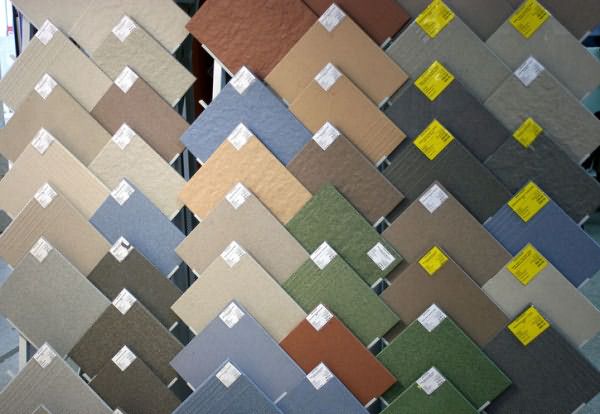
Just one of the stands of ceramic floor tiles
Types of tiles and their classification
First of all, you need to decide on the type of surface and its density. The surface can be matte and glossy. Ceramic the tiles for the floor in the bath must have a rough surface, i.e. matte. Since it is almost always humid in a bath or sauna, you can easily slip on a glossy one. The type of tile surface is characterized by the coefficient of friction, which is denoted by the letter R when marking. Glossy options have a coefficient of friction R9-R10, matte ones - R11-R13.
You need to pay attention to the porosity of the base. The more porous the material, the more water it can absorb, which is completely unacceptable for us. Choose floor tiles with the lowest degree of water absorption. The water absorption coefficient is calculated as a percentage. For baths and saunas, the smaller it is, the better:
- Porcelain stoneware has a coefficient of about 3%. It is suitable in all respects for use in rooms with high humidity.
- Tiles with a water absorption coefficient of 3% to 10% can be used in conditions of high humidity, but their resistance to abrasion, strength and reliability is lower than that of porcelain stoneware.
- Tiles with a factor higher than 10 can only be used on walls.
There is another important parameter for ceramic tiles in a bath: frost resistance. If your sauna is used only during the season, or constantly, but is not heated, then after a few cycles of freezing / thawing, ordinary tiles will crack. Therefore, you need to choose tiles with increased frost resistance. But here it must be said that this characteristic is directly related to the ability of the tile to absorb water: the less water is absorbed, the greater the frost resistance of the tile.
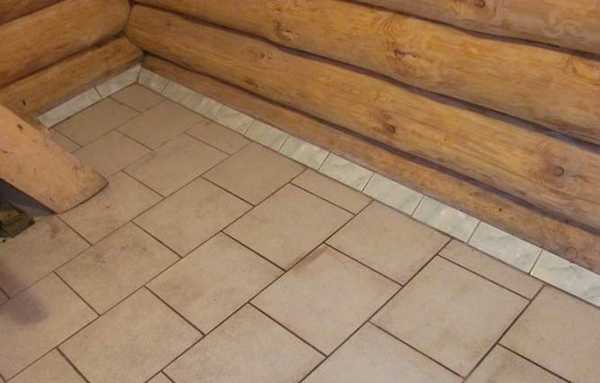
Bath floor tiled with ceramic tiles
There is also such a parameter as abrasion resistance. All tiles are divided into 5 categories: PEI1-PEI5. The tiles of the first group are suitable for a bathroom or a bathroom, but they cannot be used either for a bath or a sauna. The higher the group, the more loads it can endure. And you will have to select the necessary category based on the expected intensity of using the bath. If only home people come once or twice a week, then the second category is quite suitable ...
The technical characteristics of the tiles are clear. It is also necessary to take into account its appearance and quality. If you have little experience in tiling, it is better to choose tiles that are not very large in size, rectangular or square in shape: it is easier to install. There are six, octagonal tiles, there are collections with tiles of complex shapes, but a professional can cope with this task.In general, the sizes of ceramic tiles today are very diverse: from small mosaic tiles to large tiles (50-80cm).

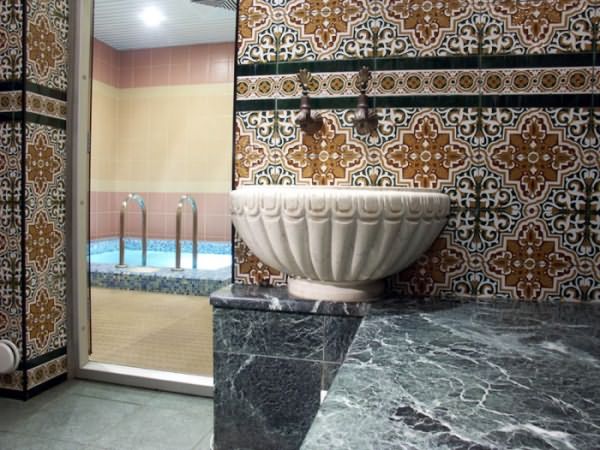
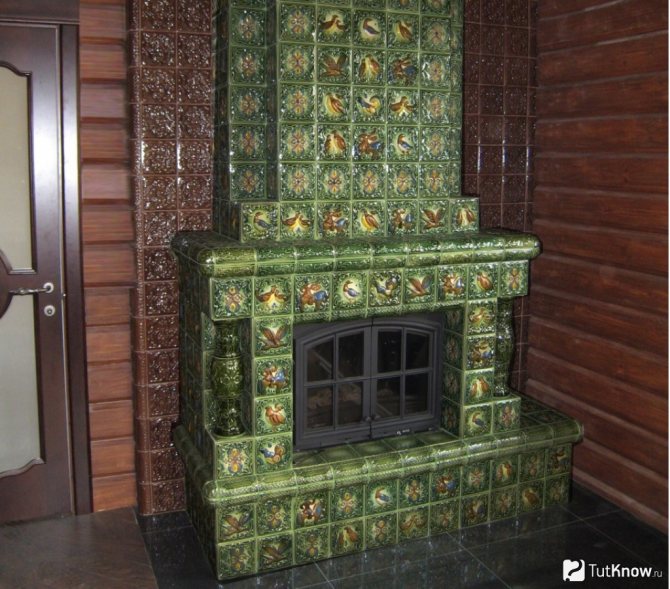
The walls near the stove are often tiled.
The quality of the tiles can be assessed by the external signs: the corners should be straight, and the surface should be flat. Take two identical tiles and stack them face to face. They must fit snugly, the angles and dimensions must match. If everything fits perfectly, the tiles are of good quality.
The tiles for the Turkish bath (hamam) are selected according to similar criteria, but preference is given to mosaics when decorating them: with its help, you can recreate the national flavor.
The tiles for the Turkish bath are selected according to similar criteria, but the mosaic allows you to recreate the national flavor
Advice!
When choosing a tile, do not forget about the accompanying materials: crosses, tile glue and grout for joints. Both the glue and grout must be moisture resistant and tolerate temperature extremes well. To choose the best option - consult the seller.
What kind of tile is
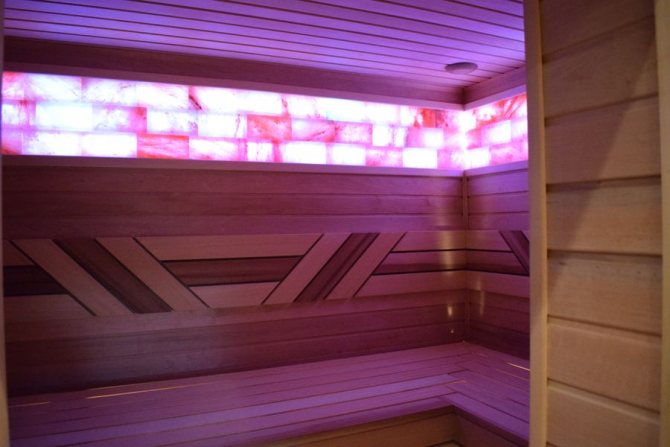
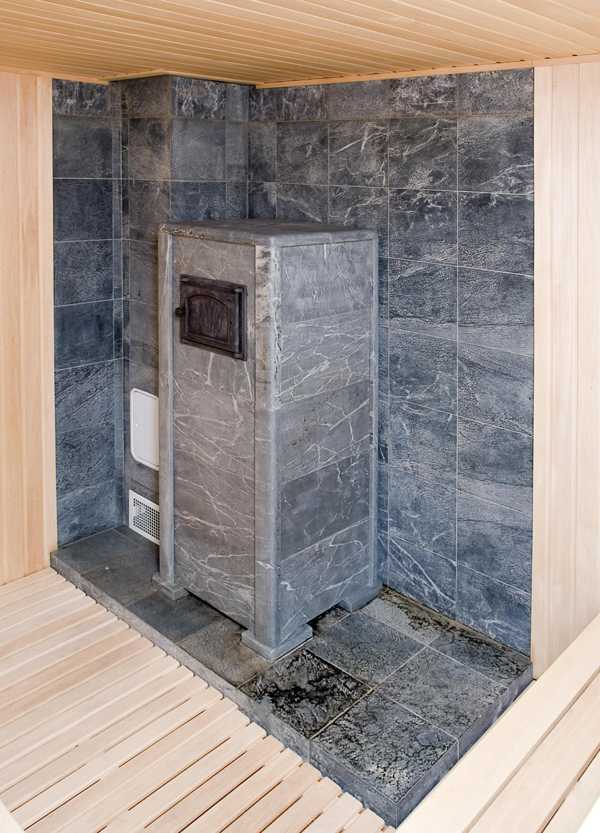
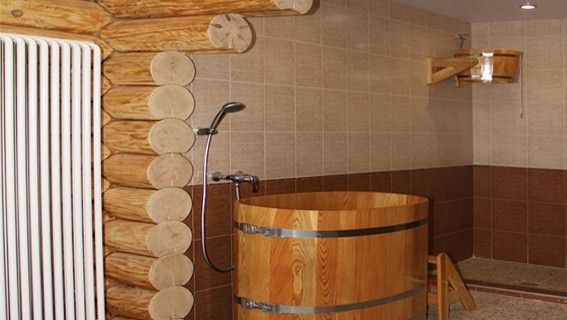
The abundance of finishing materials is amazing today. In addition to the sea of varieties of ceramic tiles, there are also tiles made from natural materials. Coil and soapstone tiles are most often used for a bath. These materials have increased strength and heat resistance, and have the ability to accumulate heat. If you do not know which tile to cover the stove - choose either a coil or soapstone - you will not regret it. These materials have only one drawback - a considerable price. No other flaws were found.
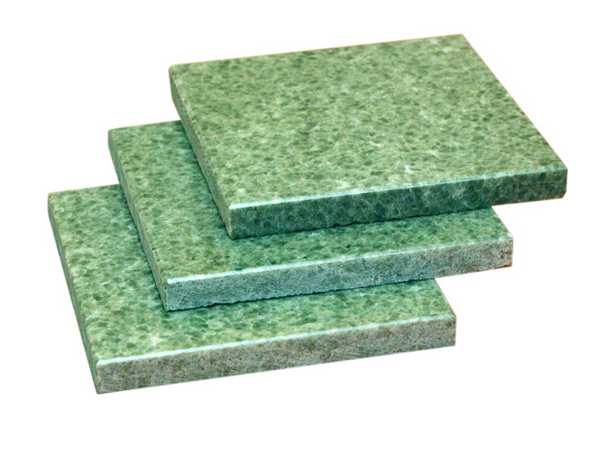
Coil tile
The appearance of natural materials is extremely attractive: the coil is painted in different shades of green, and soapstone is gray. The soapstone tile contributes to a more even distribution of heat, because it is not in vain that one of the best stones for a soapstone bath is made.
Soapstone tiles in the bath
Sauna coil tiles are most commonly used for cladding the stove and adjoining walls. It provides fire safety and has a positive effect on well-being: it stabilizes blood pressure, relieves nervous tension, and has an anti-inflammatory effect.
The wall near the stove can also be laid out with salt tiles (Himalayan, sea or ordinary). But salt tiles behave well in dry air, and in a bath with its high humidity it will gradually dissolve. But even in the sauna you will have to make sure that no drops of water fall on the salt.
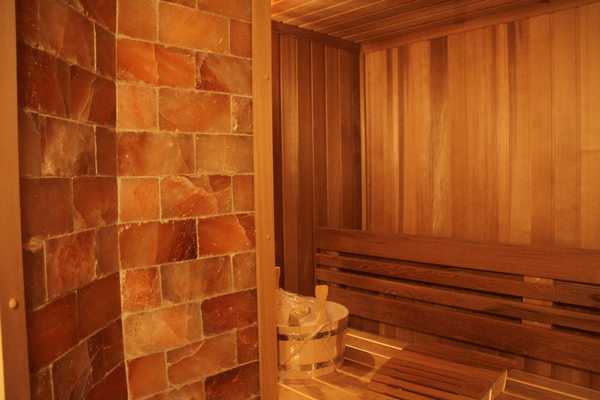
Pink Himalayan Salt in the Sauna
What is the use of salt tiles in the bath? The fact is that it has a positive effect on the body. When heated, salt releases negatively charged ions, which decontaminate the air. Once inhaled into the human body, they also cleanse most of the systems (bronchi and lungs, blood, joints and kidneys). The salt gradually deposits on the skin, also having a beneficial effect on it: it becomes smooth, elastic and velvety. But the main thing here is a sense of proportion: an excess of salt will not lead to anything good. Also, salt inhalations have a number of contraindications (skin diseases, tumors of various etiologies, pregnancy, feeding, etc.).
conclusions
- Floor tiles for a bath should be matte with a dense base, low water absorption, good frost resistance.
- The best choice of floor tiles is porcelain stoneware.
- It is possible to cover the wall near the stove with heat-resistant ceramic tiles, but if funds permit, you can use soapstone and serpentine tiles.
baniwood.ru>
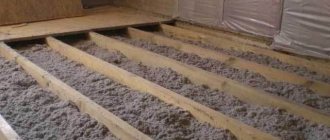
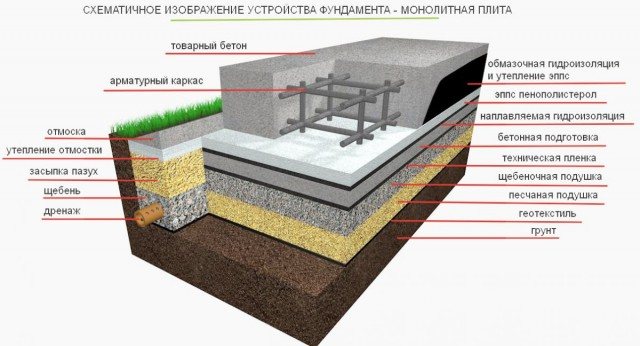
Warming and waterproofing
When using a monolithic slab in the construction of a bath, the foundation itself will be the subfloor.
Many private developers are wondering about the insulation and waterproofing of such a base.
To make a good decoupling between the foundation slab and the cold soil, you need to make it heat-insulated, that is, put the slab on a cushion made of insulation.
As a rule, extruded polystyrene foam is used for this in our country.
A kind of carpet is lined with this material, on which a layer of waterproofing is laid, and only after that, the monolithic slab foundation itself is erected. This modern material has good thermal insulation properties, does not rot, has great strength and durability.
How to choose a tile for a bath
After wood, ceramic tiles are considered the most popular material for decorating floors and walls in a bath. Its main advantage is resistance to moisture, therefore, it requires replacement less often than boards. Not all types of tiles, but there are quite a lot of them, are suitable for bath rooms; in order not to make a mistake in the choice, you need to study in advance the characteristics of the material and the requirements that it must meet.
How to choose a tile for a bath
Requirements for finishing material
Ceramic tiles can be used in all bath rooms, from changing rooms to steam rooms, but taking into account the specifics of each of them. The locker room, dressing room, rest room has the lowest humidity and the smallest temperature difference. Most often, floor tiles are used here, but walls can also be tiled.
Bath floor tiles Bath floor tiles
Since the bathhouse is periodically heated in winter, the main requirement for the tile is its frost resistance. Improperly selected material after severe frosts will be covered with cracks and the finish will have to be changed. According to the degree of wear resistance, tiles are chosen based on the number of people visiting the bathhouse and the frequency of these visits. The color, texture and shape of the material are chosen at their own discretion.
Durable, frost-resistant, moisture-proof, anti-slip tiles Frost-resistant clinker floor tiles
In a sink tile, both the floor and the walls are trimmed; since the humidity is very high here, the facing material must necessarily have good water resistance. An equally important condition is anti-slip properties for floor tiles, because slipping and injury on a wet floor is very easy. For this reason, for the floor in the sink, they choose not glossy, but matte tiles with a rough surface.
Example of finishing with sink tiles
Tiles in the sink
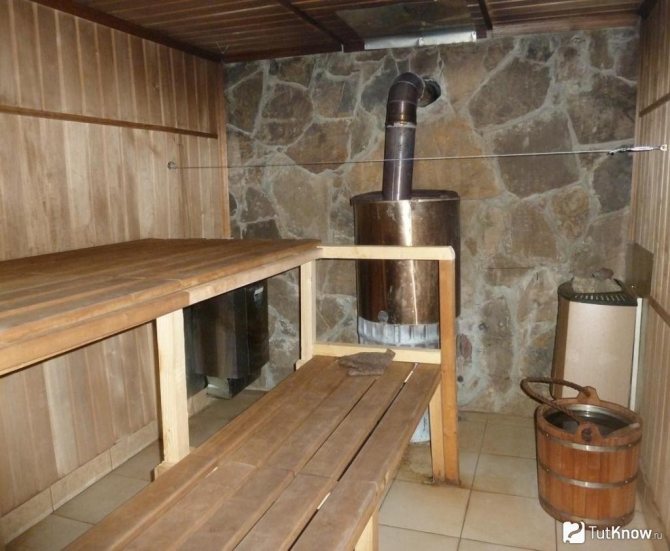
The steam room is usually finished with wood, and tiles are rarely found there. This is due to the fact that the ceramic is very hot, and therefore there is a risk of scalding. The most common use of tiles is to cover the stove and adjacent walls, less often the tiles are laid on the floor or the lower part of the walls around the perimeter of the room is covered. Of course, the tile for the steam room should be of increased heat resistance, with a low coefficient of moisture absorption, not slippery.
Finishing with paired tiles
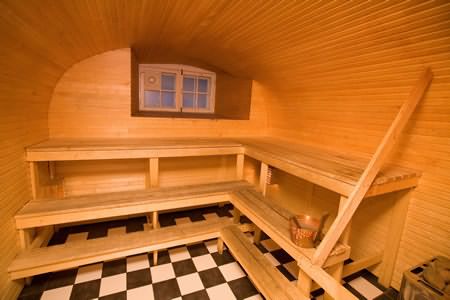
Steam room floor made of tiles
Classification of ceramic tiles
Tiles are classified according to many parameters:
- molding method;
- clay type and composition;
- processing method;
- firing method;
- physical indicators (porosity, thickness, frost resistance, moisture absorption, etc.).
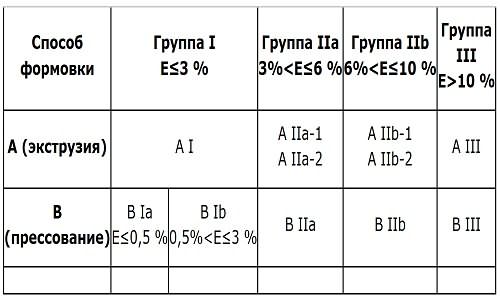
Tiles are made in two ways - extrusion and pressing. The first option involves molding by forcing the prepared clay through the holes of the extruder of a given configuration. But the second option is more common - pressing. All components for manufacturing are carefully crushed and pressed in a powdery state under high pressure. When marking, extrusion is designated with the letter "A", pressing with the letter "B"; next to the letter designation, manufacturers also indicate the degree of moisture absorption (E):
- E
- 0.5%
- 3%
- E> 10% - wall tiles.
- 3%
Classification of ceramic tiles
Tiles are made from red, gray and white clay, porcelain stoneware, soapstone, coil, quartz, chamotte, feldspar and other natural materials. Depending on the composition, the physical characteristics of the tiles also change. The most common are the following designations:
- TKSh and KSh - fireclay tiles;
- TKD - dunite;
- KF - porcelain.
The presence of the letter "T" in the marking means the heat resistance of the material, its resistance to temperature extremes.
The finished tile lends itself to additional processing - firing, glazing, polishing. Glossy types of tiles in baths and saunas are used for wall cladding, unglazed (matte) - for the floor. Both types have their own coefficients of friction, denoted by the letter "R":
- R9-R10 - glazed tiles;
- R11-R13 - matte tiles.
The higher the coefficient, the less slip on the surface when walking. For the floor in the sink and steam room, the best option is a tile with an R13 coefficient, as the safest.
Firing can be single, double and triple, and the more firing, the more porous the structure. A single firing gives the tiles the necessary resistance to chemical and physical attack, while with a double firing, the aesthetic qualities of the material are more pronounced. In the bath, double-fired tiles can only be used for the walls in the dressing room or the rest room. The number of firing times when marking is indicated by a flame with the number 1 or 2.
A snowflake on the package denotes frost resistance, and if the sun icon is shown next to it, the material is resistant to temperature extremes. It is this kind of finish that is suitable for baths and saunas, the premises of which are very hot during operation, and the rest of the time they are not heated at all. Additional information is indicated by the letters A and B:
- high frost resistance and use for external cladding - A I and B I;
- average frost resistance - A II and B II;
- indoor use only - A III and B III.
Abrasion resistance is indicated by a circular saw blade and the letters PEI, the number indicates the degree of wear resistance:
- PEI-1 is suitable for a bathroom or a bathroom, but it is forbidden to use it in baths and saunas;
- PEI-2 is suitable for hallways and corridors, can be used in dressing rooms, dressing rooms or break rooms;
- PEI-3 is designed for intensive use, perfect for all bath rooms;
- PEI-4 and PEI-5 are mainly used in public buildings and industrial facilities.

Decoding table for tile marking symbols
Important! The color of the marking also has its own meaning. According to international standards, products of the first grade are marked with red, the second grade - blue, and the third - green. The grade is determined by the percentage of rejected material: the first grade - 5% of rejects per batch, the second - up to 25%, the third - over 25%.
The presence of two identical symbols on the packaging indicates an increased quality of the material, but only within the specified criterion. For example, two snowflakes indicate the tile is extremely resistant to frost, two flames indicate the quality of the firing, and so on.
Table. Classification of tiles by technical properties
Surface type Tile type Thickness, mm Weight, kg / m2 Water absorption,%
| Glossy | White body, single firing | 8-10 | 18-20 | 0-7 |
| Glossy | Red clay, single firing | 8-10 | 16-23 | 0-10 |
| Glossy | Faience | 5-7 | 10-12 | 10-20 |
| Matt | Clinker | 20-30 | 20-25 | 0-7 |
| Glossy | Gres red | 8-10 | 18-20 | 0-4 |
| Matt | Porcelain stoneware | 8-10 | 18-22 | 0-0,5 |
Sizing and sizing tiles
The tiles are available in different sizes and shapes, which allows you to create coatings that are unlike each other. The most popular models are square and rectangular, but there are also triangular, trapezoidal, tiles with five, six and eight faces, as well as curly products with smooth lines.
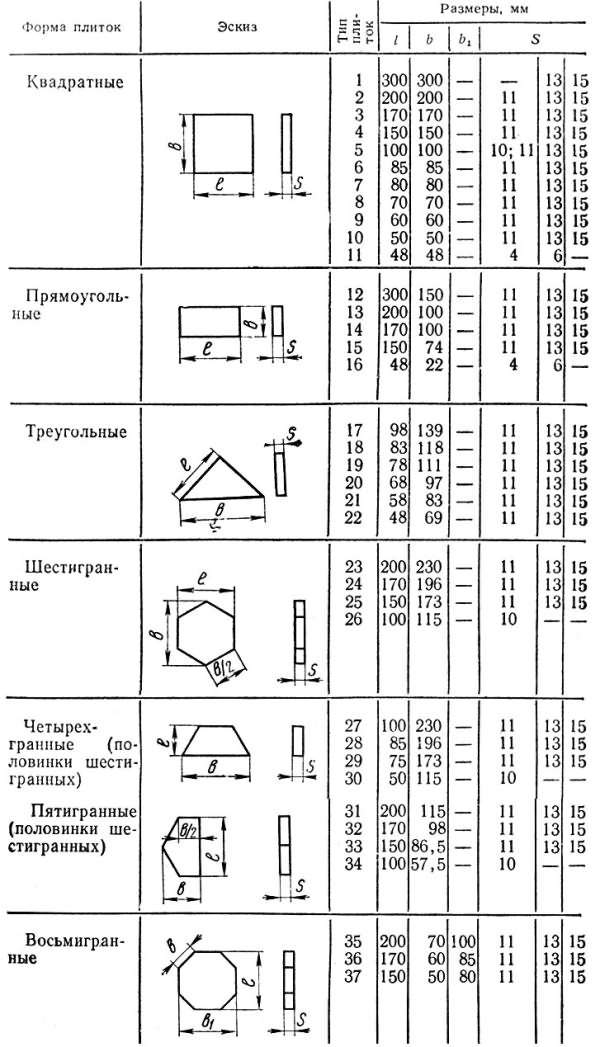
Table of sizes and shapes of ceramic tiles
Manufacturers indicate the dimensions (that is, the width and length of the tiles) on the packaging, but these values very often differ from the actual dimensions by a few millimeters. For example, purchasing a tile of 300x300 mm, the buyer, after unpacking the goods, finds a tile of 297x297 or 295x295 mm. What explains this difference?
Choosing a tile for a bath Floor tiles Floor tiles with a pattern Classic tiles, imitates parquet
The fact is that the raw materials for the production of tiles differ slightly in properties from batch to batch. It is impossible to find an identical composition for a new portion of raw materials, because clay can be different even in one area, let alone large areas. That is why it is impossible to calculate the exact percentage of compression during firing, as well as shrinkage and deformation during subsequent cooling. Although the manufacturing process is constantly improving, dimensional consistency is still a small issue for the manufacturer.
For convenience, tile calibration was introduced: the finished material passes through a special module, in which the width and length of the products are measured with a laser, and then they are sorted by caliber. As a rule, the difference between the calibers is equal to 1 mm.
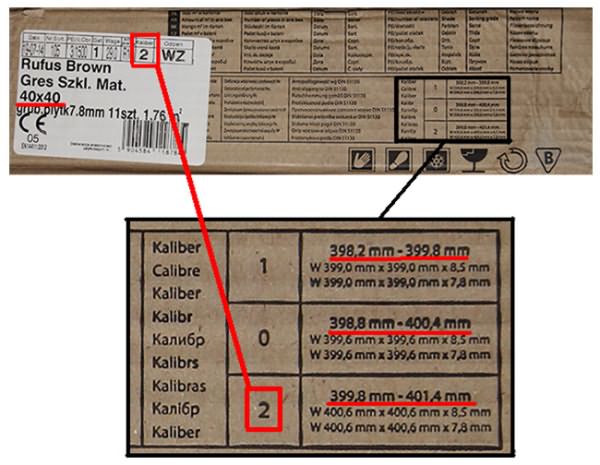
Calibrating tiles
Caliber table for tiles 300x300 mm
Actual dimensions of a tile, mm
| 295x295 | 0,5 |
| 296x296 | 0,6 |
| 297x297 | 0,7 |
| 298x298 | 0,8 |
| 299x299 | 0,9 |
| 300x300 | 0 |
| 301x301 | 1 |
| 302x302 | 2 |
When choosing a tile for a bath, be sure to make sure that the same caliber is indicated on all packages, otherwise the difference between the elements will be noticeable during installation, and more time will be required for facing. To find out the caliber, just look at the markings: it is indicated by numbers next to the dimensions declared by the manufacturer.
Types of tiles
There are a lot of types of finishing tiles, and each of them has its own advantages.
Clinker tiles
Red clinker tiles on the floor Clinker tiles
It is made from a mixture of several types of clay, fired at a very high temperature, due to which it has the highest thermal stability, strength, resistance to mechanical and chemical stress. Thickness - from 9 to 12 mm, therefore, such tiles are often used for cladding the stove and adjacent walls.
Clinker floor tiles
In terms of water resistance, clinker tiles are equal to porcelain stoneware, and therefore are ideal for floors in a sink.
Terracotta tiles
Terracotta tiles Terracotta tiles Terracotta tiles on the floor Terracotta tiles in the bathhouse on the wall
This species is distinguished by its porosity and rich brown color. Such tiles are not glazed and look as natural as possible. Due to its porous structure, the material perfectly withstands sudden temperature changes, does not deform or crack, therefore it is considered the best option for facing heating surfaces. For finishing the sauna stove, tiles with a thickness of 8 mm or more are used, with the addition of chamotte and quartz sand, as well as refractory clay.
Appearance Name of texture Standard Size (mm)
| "SHAMOT" | Straight CT1 Straight CT6 Straight CT4 | 70×240 123×263 150×310 |
| "OLD LOCK" | Straight CT1 Straight CT6 Straight CT4 | 70×240 123×263 150×310 |
| "RATED STONE" | Straight CT1 Straight CT6 Straight CT8 | 70×240 123×263 270×405 |
| "OLD BRICK" | straight CT1 | 70×240 |
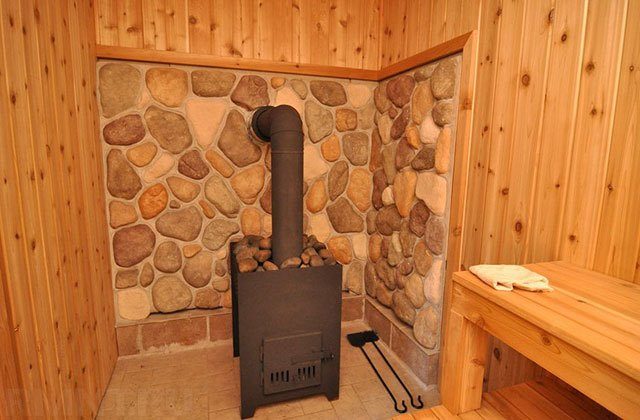
Coil tile
Furnace cladding with coil tiles Coil tiles
Serpentine is a green semi-precious mineral. Each tile from this stone has its own unique pattern, which is why it is so highly valued. In addition, the coil has certain healing properties, which are revealed when heated. That is why coil tiles are mainly used for cladding a sauna stove. The disadvantages of this material include its high cost and sensitivity to sudden changes in temperature. Direct exposure to water is also undesirable, as it washes out calcium and contributes to the destruction of the stone.
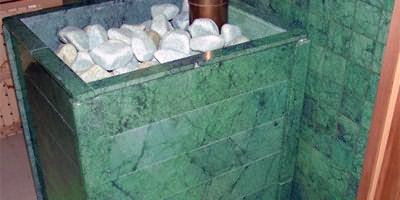
Coil tile
Video - Serpentinite or serpentine - an overview of a beautiful stone for construction and interior decoration
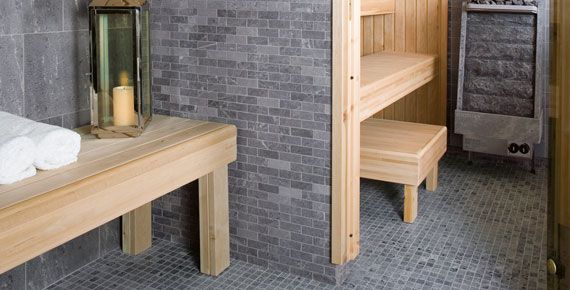
Talcochlorite tiles
Wall and oven cladding with soapstone Talcochlorite tiles Talcochlorite tiles in a steam room Combination of soapstone tiles of various textures and colors
A mountain stone called talcochlorite has the ability to heat up very quickly and retain heat. Tiles made from this stone can withstand sudden temperature changes without any consequences, and for a very long time. Despite its strength, the material is easy to process, giving the product the desired shape. The cost of soapstone tiles is very high, therefore, in most cases, they are used for facing the stove and adjacent walls, but it is rarely found as a floor covering.
NameQuantityPrice
| Tile 90x90x10 (textured) | 90 pcs. | RUB 3600.00 |
| Tile 90x90x10 (regular) | 90 pcs. | RUB 3330.00 |
| Tile 300x300x10 (textured) | 10 pieces. | RUB 5900.00 |
| Tile 300x300x10 (regular) | 10 pieces. | RUB 5300.00 |
| Tile 57x220x10 (regular) | 10 pieces. | RUB 900.00 |
| Tile 50x200x20 (torn stone) | The price is indicated for packing (0.5 sq.m.) | 3300.00 rub. |
| Corner 300x40x40 | 1 PC. | RUB 700.00 |
Tile
Tile Tile
Tiles for finishing a sink or shower room are considered the most popular material. It is easy to clean, does not emit harmful substances, has the necessary strength and durability - these are the main advantages of a completely ordinary tile.

Modern digital printing on ceramic tiles
Tiles with photo printing are appropriate for finishing the washing compartment of a bath
Ceramic mosaic
Ceramic mosaic in the interior Ceramic mosaic Ceramic mosaic with a pattern Ceramic mosaic tiles
Ceramic mosaics are used very often in saunas and baths. The most popular use of mosaics is finishing the sink and sides of the font, as well as decorating interiors with various panels. Like tiles, mosaics are highly water-resistant, tolerate temperature changes well, and serve for a long time. Laying this material requires patience and care, although the process itself is not overly complicated.
Porcelain stoneware tiles
Porcelain stoneware tiles Floor tiles, porcelain stoneware
The advantages of porcelain stoneware are undeniable: strength, very high moisture resistance, frost resistance, durability, aesthetic appearance. For saunas and baths, such a finish is ideal, and you can tile not only the floor and walls, but also the oven. Due to its texture, porcelain stoneware can be an excellent imitation of marble, terracotta, majolica and other natural materials that are not so affordable.
AppearancePackaged area, m2Tile sizePrice per m2Price per package
| Caesar | 1,307 | 33x33 cm | 615,00 | 803,81 |
| Santorini | 1,42 | 45x45 cm | 415,80 | 590,43 |
| Calsta | 1,41 | 42×42 | 495,04 | 698,00 |
| Calsta Pattern | 1,41 | 42×42 | 495,04 | 698,00 |
| Trentino | 1,215 | 45x45 | 626,00 | 760,59 |
| Mezzanine | 1,41 | 42×42 | 784,30 | 1 105,86 |
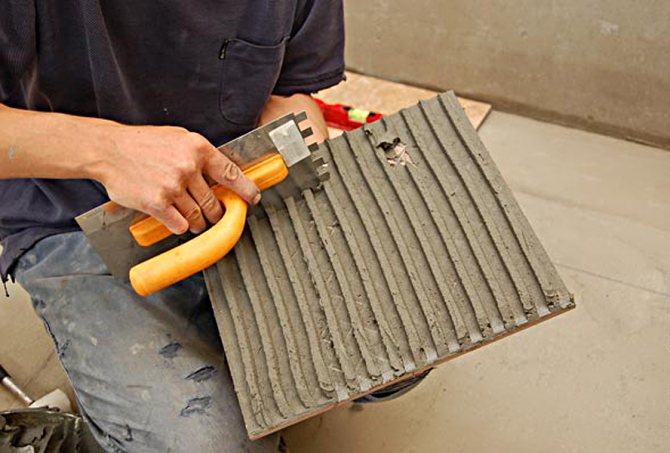
Having studied and compared the characteristics of the described types of tiles, you can easily choose a finishing material for the bath. Do not forget that tile glue and grout must also be heat and water resistant, because the quality of the coating largely depends on these components. And yet - the smaller the tile and the more complex its shape, the longer it will take to lay. If you are going to deal with cladding on your own, and do not yet have the relevant experience, it is better not to buy small figured tiles. Adjusting the edges and aligning the seams requires patience and great care, because any discrepancies are immediately striking.
Video - How to choose a tile for a bath
banya-expert.com>
Designing for a bath
When designing, you need to take into account several main factors that affect the strength of a monolithic slab.
The properties of the soil, the mass of the future structure, the level of groundwater, the distribution of loads and their direction, modeling of possible slab rolls are taken into account.
We strongly recommend ordering all calculations from a specialized organization, which, using special computing systems, will issue detailed working drawings.
Construction technology
Monolithic slab foundations, as a rule, are erected on complex soils, and therefore the most stringent requirements are imposed on their design and construction, as well as on materials, which are regulated by the following regulatory documents: SNiP 3.03.01-87 and SP 50-101-2004.
The construction of all monolithic slabs is carried out according to the same scheme:
- Project creation.
- Marking on the site of the contours of the future structure.
- Preparing the soil for the construction of the foundation.
- Laying of engineering communications in the ground (sewerage, water, etc.).
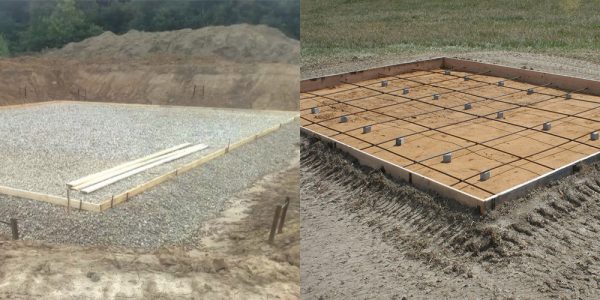
- Arrangement of a sand and gravel cushion of the required thickness.
- Laying of an insulating layer with its subsequent waterproofing.
- Reinforcement cage creation.
- Assembly and careful fastening of the formwork.
- Pouring the "sole" with concrete.
If you decide to build a monolithic slab foundation, then you need to act according to the same scheme.
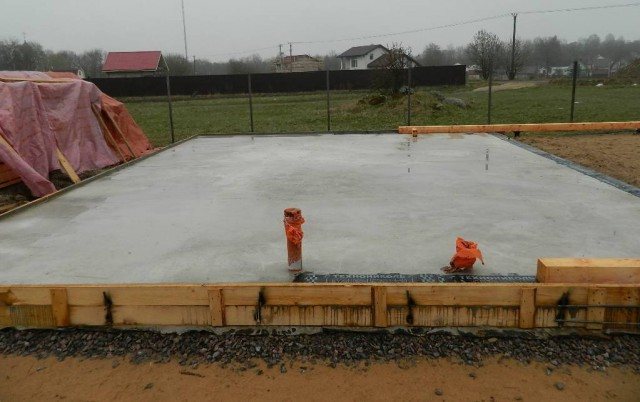
Slab foundation construction
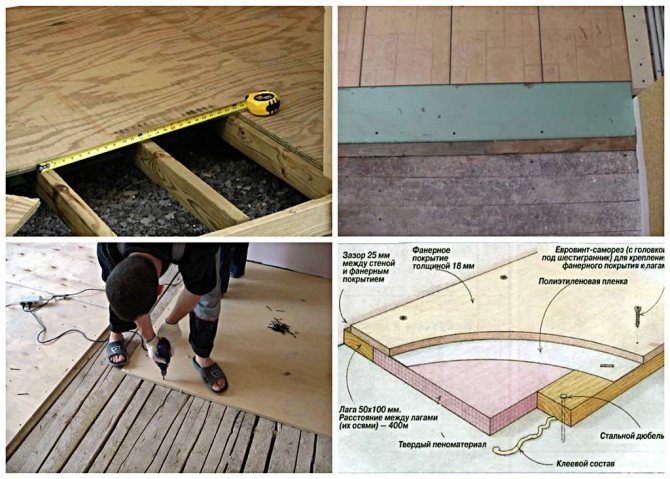
All work on the construction of a floating foundation begins with a marking. All dimensions of the future structure are accurately marked. Then a pit is pulled out 1-2 meters larger than the future building in each direction. These "extra meters" are needed for the convenience of further work. The depth of the pit can be different. It all depends on the specific conditions: the type of soil, the size and weight of the structure, the level of occurrence of groundwater, and so on. But practice shows that the depth of 50-100 cm is often used by private developers.
The next stage in construction is the filling of the drainage compensation cushion. They do it in order to eliminate or smooth out the deformation of the soil under the foundation. It is also a kind of groundwater drainage element. First, a layer of gravel is filled and leveled. After that, a layer of sand is brought in and also leveled. On clay mobile soils, this layer can reach 30-40 cm, and on lighter soils, 15-20 cm is enough. It will be a big plus if this sand is well shed with water and tamped.
After the pillow is poured and well rammed, you can proceed with the installation of the formwork. It is made from edged boards or ready-made boards. It should be borne in mind that the mass of the mortar to be poured is decent, therefore all formwork fasteners must be reliable. Often with beginners, you can see how the "mixer" comes in, starts feeding the concrete and the formwork falls apart or partially displaces under the onslaught of a large weight. You should not make such mistakes, but immediately do it reliably and conscientiously.
Don't forget about communication. They also need to be mounted at this stage. Sewer pipes, maybe a channel for an electrical input, a heating system, cold water supply are mounted in the places established by the project.
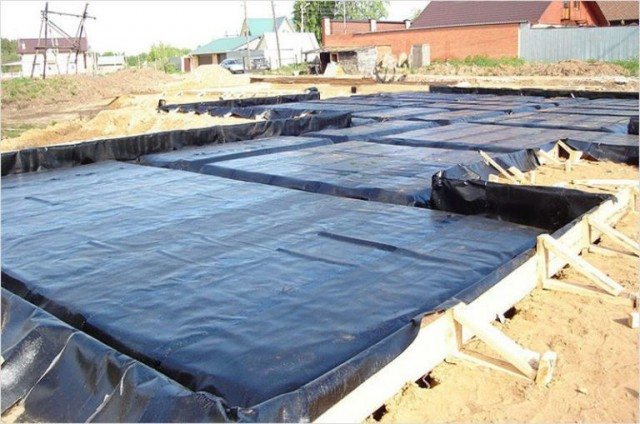
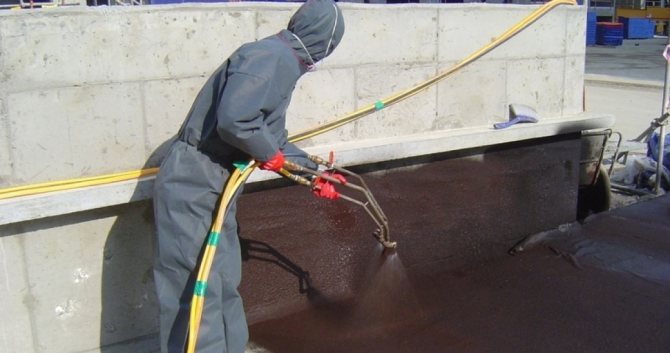
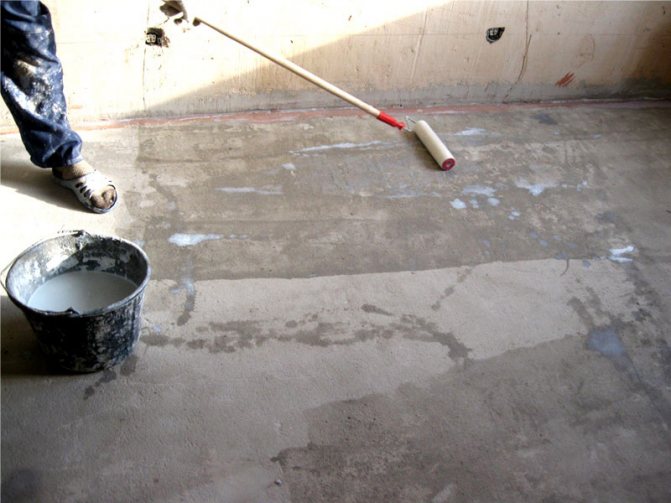
Foundation waterproofing work is the next stage of work. It is carried out with ordinary roofing material, plastic wrap or geotextile. The best option would be to use materials in two layers, with an ascent to the formwork (later to protect the ends of the slab).
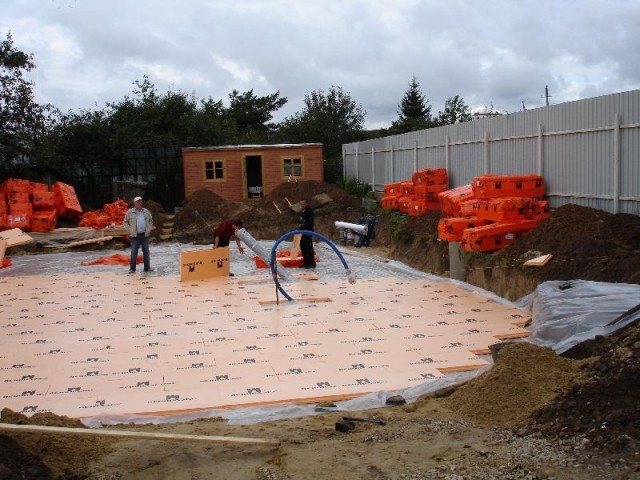
In order to insulate the slab foundation, a layer of insulation is laid on the waterproofing. For these purposes, as a rule, extruded polystyrene foam (penoplex) is used. It is advisable to make foam insulation on the vertical ends of the slab as well. But this is already the field of how the foundation itself will be ready.
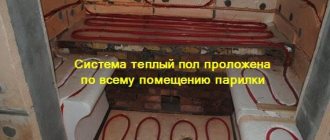
It is quite possible to make warm water floors in the slab foundation. To do this, it is enough to lay the appropriate pipes and take care of the reflective thermal insulation. You can read more about this in this article. Here is a specific description: how the warm water floors were made in a small bath with a slab floating foundation.
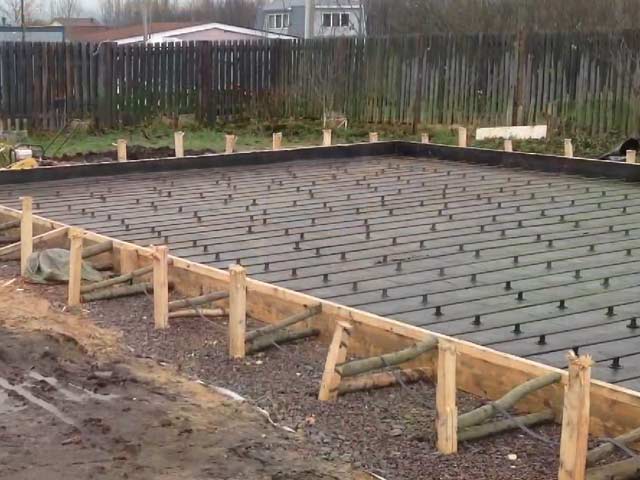
This is followed by work on the reinforcement of the slab, or rather - the manufacture of a reinforced frame. Both classical metal fittings and polymer ones are used here.For small buildings, it is advisable to purchase ready-made reinforced nets with a cell of 100-120 mm. But for large and heavy structures, it would be better to make a reinforcing frame yourself.
Insulation of the ends of the slab foundation Here, reinforcement rods with a diameter of 10-14 mm are usually used. The frame cell is mounted 20-25 mm. For fasteners, soft knitting wire or plastic clamps (usually for polymer reinforcement) are used. Welding is not used to connect metal rods, although it is not a problem for “C” grade steel.
It is very important that the entire mesh is immersed in the concrete. To do this, it is installed on special guides or gaskets are placed under it. Reinforcement should be given special attention, since the reliability and durability of the future foundation, and therefore the entire building, depends on it.
If the monolith is made with stiffening ribs, then you should not forget about them. Backfilling, drainage, waterproofing, reinforcement of dug trenches are also carried out in accordance with all the rules.
The thickness of a monolithic slab for a one-story building can be 20-30 cm. For a more solid building, it already increases and reaches 50-60 cm. The entire concrete base must be poured at one time - the monolith must be a monolith. So, it is best to order concrete ready-made in the required quantity, and not knead it yourself.
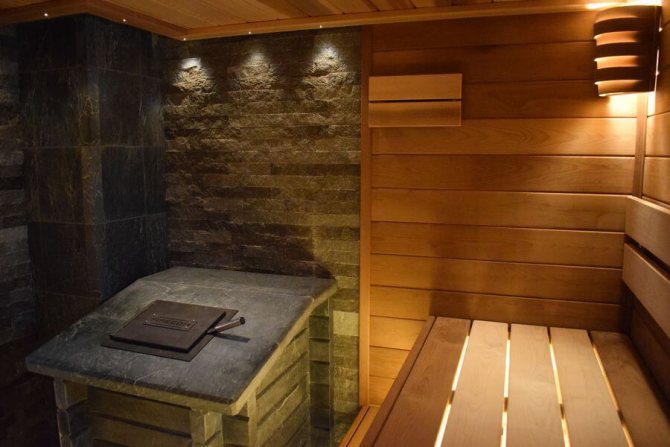
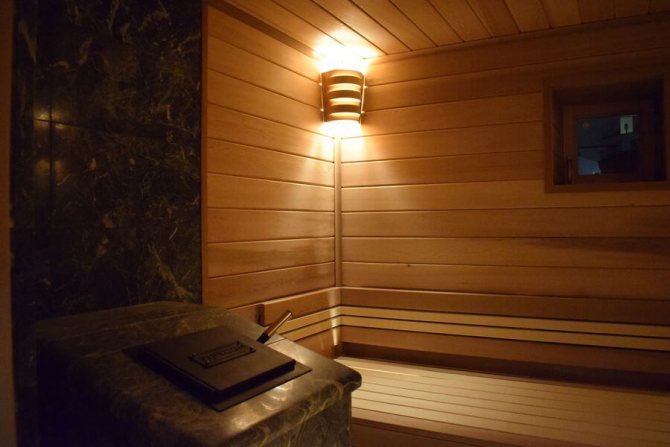
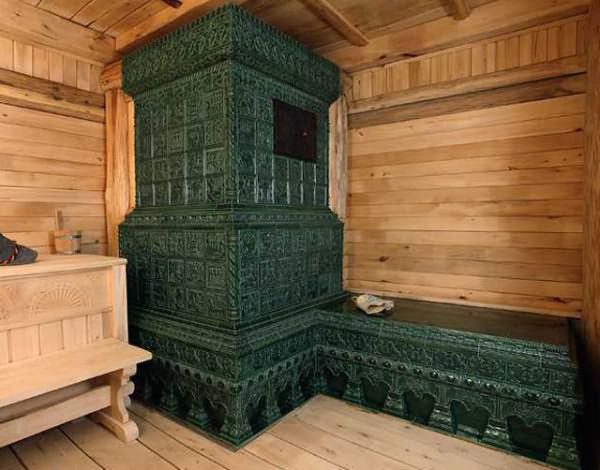
The wall near the stove in the bath - decoration features
To heat the air in the bath to the desired temperature, the stove is heated very intensively and in the process, its walls can heat up to four hundred degrees. Naturally adjacent walls also heat up, and if they are made of combustible material, and most often it is a tree, then a fire is inevitable in this case. In order to prevent such a situation, the walls near the stove in the bath are finished with non-combustible materials. We will find out which of them are best in this article.
DIY filling recommendations
- The most difficult question is the thickness of the slab. Please note that if you decide to make a monolithic slab without any calculations, according to the principle, the thicker the better, then choosing a sole thickness of 20 cm may require additional reinforcement in some especially loaded places, since the weight of the building may be too great. The plate thickness of 25 cm allows the reinforcement cage to be knitted evenly, without additional reinforcement. A thickness of 30 cm will be quite strong and durable, but no savings will be made due to the large amount of concrete used.
- When making a sand and gravel pad, sprinkle the material in layers, no more than 10 cm. Each layer should be carefully tamped. If you plan to use one sand to create a pillow, then each layer must be spilled with water.
- Before laying the insulation, the pillow should be covered with dense polyethylene to prevent water leakage from the concrete mixture. It is recommended to glue or solder the film at the joints or overlap the sheets.
- Insulation boards must be at least 100 mm. Use extruded polystyrene foam as it.
- When creating a reinforcing frame, you should know that according to SP 52-103-2007, the reinforcement of the slab should be at least 0.3%. This can be calculated independently: a slab cut is taken and the total cut area of the reinforcing rods is calculated. After that, their percentage in the plate is calculated. It can be made easier: as practice has shown, for low-rise buildings, it is enough to make a two-tier reinforcing frame with a rod thickness of 12-14 mm.
Using our recommendations and construction technology, you will certainly get a high-quality and durable monolithic slab foundation for your future bath.
Monolithic slab and its features
Monolithic slab type
A monolithic slab for a bath is a flat concrete reinforced structure, buried in the ground for a short distance.If, when constructing most types of foundations, it is a prerequisite that the base of the structure lies below the freezing line of the soil base, then the monolithic slab does not have to be lowered to such a depth. The slab foundation structure is not afraid of seasonal movements of the earth base caused by the constant change of freezing and thawing cycles, heavy precipitation. A monolithic slab is a classic example of a floating structure, which is capable of lifting and lowering along with the subgrade.
Since the concrete monolith has great strength, the seasonal movement of the soil will not cause any destruction of the walls of the bath.
Advantages and disadvantages
A monolithic concrete massif as a foundation for a bath has many advantages:
- "Floating" mobility of the foundation structure.
- High load-bearing capacity of a solid slab.
- The upper horizontal surface of the slab serves as the floor of the bathhouse.
- Unlimited service life.
The disadvantages of the foundation for a bath in the form of a slab include:
- Significant cash costs for the purchase of building material and for the production of work on the device of the monolith.
- Large amount of earthworks.
- Increased labor costs when carrying out earthworks.
When building a bathhouse on a slab foundation, all load-bearing walls rest directly on a rigid concrete base, which makes the bathhouse structure strong and reliable for several decades.
Protecting a wooden wall from the heat of the stove
Wooden baths require especially careful observance of fire safety rules during their arrangement. The source of a fire can be anything, an unextinguished cigarette, coals falling out of the furnace, an uncleaned chimney, but the main source of threat is the stove itself.
Related article: How to attach a timber to a brick wall

The surface of the stove heats up to 300 ° - 400 °, the heat falls on the wooden walls, which leads to their excessive heating and charring. Stopping the process of burning wood surfaces is extremely difficult; the best way to avoid a fire is to prevent it. There are two really effective ways to insulate the surface of wooden walls from the heat of a sauna stove - protecting equipment in the form of a screen or erecting special sheathing made of non-combustible materials.
Foundation slab manufacturing process
The sequence of the device of a monolithic slab
The technological process of constructing a foundation for a bath in the form of a slab consists in the sequential execution of a number of intermediate processes, such as:
- Preparatory work.
- Foundation marking.
- Excavation.
- Installation of restrictive formwork.
- Concrete pad and insulation.
- Assembly and installation of the reinforcement cage.
- Filling the foundation structure with concrete.
- Curing.
Attention should be paid to the quality of the materials used to perform the work. For pouring the slab foundation, it is recommended to use a concrete mixture of at least B15 class.
Whenever possible, it is best to use pre-owned, factory-made concrete of the correct grade.
Slab foundation
1. Clearing and leveling the territory... Removal of fertile soil from a building spot.
2. Markup... Having outlined the dimensions of the future bath with construction thread and pegs, add 0.5-1 meters on each side - these will be the dimensions of the pit.
3. Sand and gravel pad it is poured onto the bottom of the pit with a layer of 15 to 30 cm, leveled, spilled with water and compacted.
4. Formwork... Removable formwork is done in the same way as for strip foundations, but it is possible to make permanent formwork from fiberboard plates. In this case, the slabs are fastened with ties and corners. Like the removable formwork, this one also needs to be reinforced with struts.
IMPORTANT! Holes for communications are made at the formwork stage. If you forget something, you will have to hammer in the concrete.
5. Waterproofing... Polyethylene or geotextile is placed on the sand cushion. You can do with roofing material. It is important to make the joints of the waterproofing material with a good overlap and close the formwork with it too.
6. Reinforcement... Small baths can be reinforced with a mesh made of 8-10 mm reinforcement. The grid spacing is 10-15 cm. For heavier buildings, more durable reinforcement is needed - 12-14 mm. The same mesh is made from it. With a large thickness of the foundation, it can be reinforced several times.
7. Fill... Better to fill in one go. Pour slowly, evenly. Sealing with a vibrator is mandatory.
In a month and a half, the foundation will be ready for the next stages of construction. But in the first weeks it needs to be watered with water so that the plate does not crack when it dries.
Laying of engineering communications
At the bottom of the pit or deeper, sewer and water pipes, an electric lead-in cable are laid, if the entrance to the bath will be made by an underground cable. Sewer pipes are taken in orange, intended for laying in the ground, and water pipes are laid in a sleeve - a plastic pipe of a larger diameter, so that the pipes can be replaced. The cable is also routed in a sleeve. All pipes are laid on a sand cushion. Plumbing and sewerage can be insulated with foam sheets.
Site preparation
Monolithic foundation diagram
In order to mark the configuration of the foundation slab, it is necessary to clean the area of the site. The top soil layer is removed to a depth of 15 - 20 cm and removed from the site. The work of removing the vegetation layer can be done independently with the help of a shovel. If it is possible to use a bulldozer for these purposes, then this will make it possible to make a preparatory period in 1 - 2 hours.
The site must be freed from growing shrubs and trees by uprooting and not leaving the remnants of roots in the body of the future foundation.
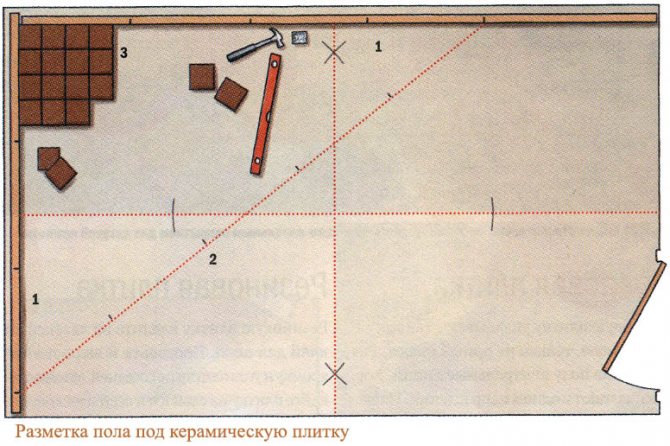
Layout work
The foundation of the slab for the bath is marked immediately along the entire perimeter of the structure. For marking, wooden pegs or trimming of metal reinforcement rods are used. You will also need a sturdy rope or colored polyester cord. The marking of the site for the construction of a bath is carried out in the following order:
- A marking peg is driven into the ground 30-40 cm into the far corner of the future foundation pit.
- In a straight line at a distance equal to the length of the building, a marking cord is pulled and a second peg is hammered.
- Next, a sequential marking and installation of marking stakes is carried out, which are installed strictly at right angles.
Thus, a regular rectangular or square linear configuration with right angles is obtained. In construction practice, a geodetic device is used to construct right angles - theodolite. Private developers do not always have the opportunity to use such a device and use the "rule of diagonals" as a check.
If the marking is done correctly, then the diagonals will be equal. An error of 10 - 15 mm is allowed.
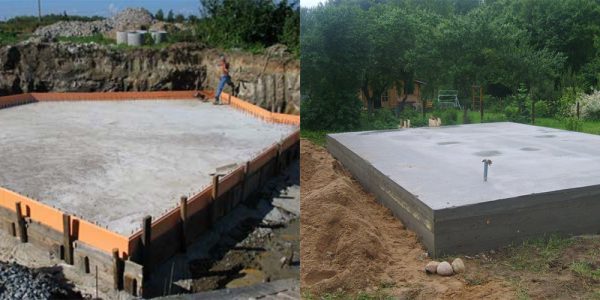
Formwork installation is an important stage of work
In order for the monolithic slab for the bath to have the correct shape, and the concrete after pouring does not flow out of the future monolithic foundation, it is necessary to install formwork along the edges of the pit. It represents shields, the width of which is 30-50 cm greater than the depth of the pit. This value will allow the future foundation to be raised above the soil layer.
Formwork panels are made from edged boards, moisture-resistant plywood, OSB, flat slate. From the outside of the future slab, the formwork must be fixed with spacers, which rest on the trims of the boards driven into the ground. Shields are mounted directly at the construction site of the slab foundation or use ready-made ones. Installation, for example, of a columnar foundation does not need formwork.
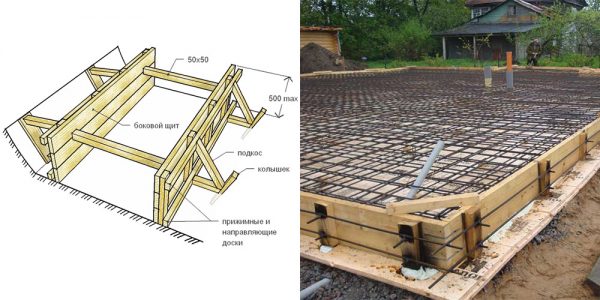
Formwork for a monolithic slab
Often, slab insulation is also installed on the inside of the formwork for a floating foundation. This is due to the small thickness of the slab, which in turn does not allow it to have high thermal insulation properties.
Earthworks - choose the soil
Under the monolithic reinforced slab, soil is selected to a depth of 60 cm and 1 meter wider than the slab. Dumping is carried out with coarse building sand, 40 cm thick with careful compaction. For a good compaction of the sand, it can be filled with water.
In this case, self-compaction of the sand will occur and the water level can be used as a reference point for uniform filling of sand into the horizon.
Mandatory element - filling the bottom of the pit
Having finished the excavation work and having rested for a couple of days, you can continue making the floating foundation with your own hands. The next stage is filling the bottom of the pit with crushed stone and sand. This is necessary to create a compensation layer that reduces the effect of soil movement on the base of the bath. The technology for performing this stage of work is as follows:
Filling the bottom of the pit with rubble and sand
- The bottom of the pre-leveled pit for the floating foundation is lined with several layers of geotextile - a special woven material widely used in the construction industry;
- Clean seeded sand, quarry or river, is poured onto the material. It is advisable to fill in several layers with moistening and tamping each. The total thickness of the sandy floor for a monolithic foundation should be at least 30 cm. You can compact bulk material manually using a simple device from a meter-long trimming of a bar or log, to the ends of which a piece of thick plywood 40x40 cm and a handle made of a wooden block are nailed. There is also a mechanical assistant for performing such work - a vibrating plate.
- Crushed stone of the middle fraction is poured onto the sand layer and also compacted.
Concrete pad and insulation
Sometimes inexperienced home builders have doubts about the advisability of arranging a preparatory cushion for a "floating" slab foundation. When building a foundation slab for a bath, the implementation of such a pillow will help to obtain an ideal flat horizontal surface for subsequent filling of the formwork with concrete. Before its construction, the bottom of the pit is covered with a waterproofing layer of roofing felt or geotextile and insulated with high-strength polystyrene foam plates. This constructional "pie" allows a small-thickness monolithic foundation slab to create a protective thermal barrier and make the floor in the bath warmer.
The preparatory concrete pad is ready for the next stage of the work in 7 - 8 days after the complete hardening of the concrete mixture.
Reinforcement cage type
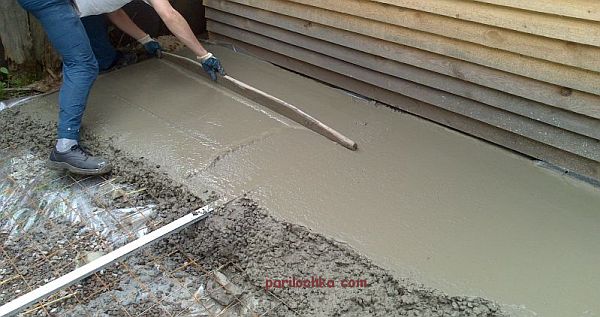
Monolithic slab concreting
The monolithic slab is poured in one go with a mixer or concrete prepared on site. For a small 4x4 bath with a slab thickness of 0.1 m, you need to prepare concrete of only 1.6 cubic meters. A simple concrete mixer can handle such a volume.
After concreting, the concrete surface is leveled according to the marks on the formwork, vibrated to remove air and compact the concrete and smoothed.
The next day, the slab is poured with water and covered with a film, for better maturation, and is constantly poured over with water so that the concrete does not dry out.
Installation of a reinforcing frame
It is impossible to obtain a high-quality slab foundation without the use of a reinforcing frame. It is made from rods connected to each other in a grid with large cells. To obtain high structural strength, reinforcement is performed both in the horizontal and in the vertical plane.
The first armored belt is installed at a height of about 5 cm from the pre-poured concrete pad. To fix this distance, pieces of chipped bricks are placed under the rods.The rods laid along and across are connected by welding or twisting from knitting steel wire. The second layer of reinforcement is laid at a distance of 20 cm from the first using a similar technology.

Reinforced framework for foundation slab
For a vertical bundle of two grids, many pieces of reinforcement 25 cm long are cut and set vertically in the corners of the cells. The fastening of the connecting rods is performed in the same way as connecting the rods of the armored belts. The upper ends of the inserts should be 5 cm below the edge of the slab.
Installation of drainage and power supply systems
An important stage in the construction of a slab foundation for a bath is the installation of sewerage systems. For the convenience of subsequent operation, you can place drainage elements directly in the foundation slab. This is much more convenient, it will allow you to keep the details of the sewer runoff in working order for a long time.
In a similar way, they can be installed in the installed sewage system and elements of the water supply system, ensuring the operation of the future bath. The absence of air water lines allows you not to worry about their thermal protection in order to avoid freezing.
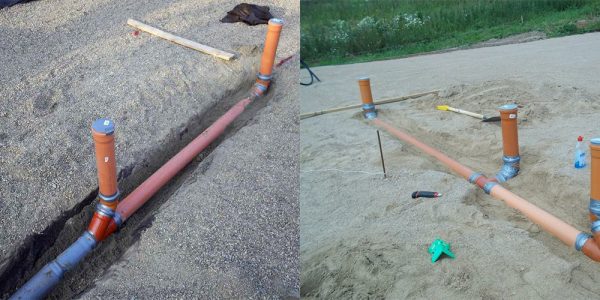
Installation of communications
In addition to waterways, during the construction of this type of foundation for a bath, it is possible to mount a power supply system in it. The absence of overhead lines will allow construction equipment to move around the territory, plant fruit trees without any restrictions.
Since a slab foundation can serve as a floor in a bathhouse, the pouring process is often combined with the installation of its heating systems. They are a spiral or winding plastic or metal pipeline embedded in concrete, through which heated water will move. This design is called a water heated floor.
Fill the slab foundation with concrete
If a columnar foundation does not require the use of concrete in its manufacture, then a lot of mixture is required for the installation of a floating foundation. In this case, the slab should be poured in full at one time. It will not work to make the required amount of concrete with a small household concrete mixer.
To obtain the mixture in sufficient volume, it must be purchased at the nearest concrete plant. The advantage of such a purchase is the delivery on the required day of the full volume by means of car mixers. The disadvantage is the high cost of concrete. This is another important element of the total cost of making a slab foundation with your own hands.
The brought concrete is poured onto a previously prepared base, gradually filling the entire space inside the formwork. With this method of pouring the foundation, you can get a slab of low quality. This is due to the presence of air bubbles in the concrete mass. To remove them and compact the concrete, a special construction tool is used.
The final stage of construction
After the floating foundation is completely filled with concrete, it is necessary to give it time for the concrete to acquire maximum properties. For this, the slab is covered with a large woven cloth and periodically moistened to prevent drying out. If this is not done, a network of small cracks may form.
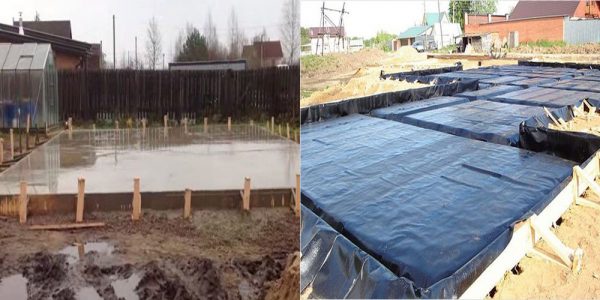
Final steps after pouring concrete
The holding time of the slab, in contrast to the columnar foundation, can range from several weeks to several months, depending on weather conditions and the thickness of the bath base. After that, you can dismantle the formwork. On the finished slab, the construction of the walls of the bath begins from blocks, bricks or wood materials.
Concrete placement
Before the start of concrete work, it is necessary to provide for the supply of utilities to the bathhouse. For this, metal sleeves are installed in the formwork for the passage of plumbing pipes and electrical cables.
Before placing the concrete, the formwork panels are covered with used machine oil or grease. It is best to lay the concrete mix at once in one day as a whole array. When laying concrete, it must be compacted using a construction submersible vibrator or a bayonet shovel. The upper part of the monolithic slab is leveled and smoothed until a flat horizontal surface is obtained.
Benefits of using ceramics
A bathhouse is a special room that maintains a high temperature and humidity. For its decoration, most often wooden boards, tiles or ceramic tiles are used.
The latter is convenient in that it can be used to trim not only the washing compartment, but also the walls in the dressing room and the rest room.
Other reasons why more and more people prefer ceramic coating in the steam room include:
- ease of installation,
- rich color palette and a large selection of ornaments,
- unpretentious care,
- long service life,
- reasonable price.
Of course, with the help of porcelain stoneware, it is unlikely that it will be possible to create an atmosphere of a traditional Russian steam room in the bathhouse. But it will be distinguished by hygiene, convenience and presentability.