Unfortunately, it happens that after 5-7 years of operation, the refrigerator breaks down. According to statistics, in 20% of cases, the installation of a thermostat on the refrigerator is required. This task is quite solvable and will not hit your wallet if you turn to professionals for help.
"Order a refrigerator repair technician RIGHT NOW and get a 7% discount" * - Mandatory fields for filling
It is possible to determine that it is the thermostat (thermostat) that is faulty by the following signs:
- the compressor does not turn on, there is no cooling;
- the compressor runs continuously, the temperature is lower than the set one;
- the thermostat knob is in the correct position, but the temperature does not correspond to the set one (as a rule, it is much higher).
Some craftsmen claim that replacing a thermostat is a simple operation, they do it themselves, but this does not always end successfully. Refrigerator repair is a business that requires professional knowledge and skills.
How the thermostat works
This is one of the key components in the refrigeration unit. It controls the temperature by turning the compressor on and off according to the signals from the temperature sensor. Modern models of refrigeration units are often equipped with several temperature sensors located next to the evaporator and in the refrigeration chambers.
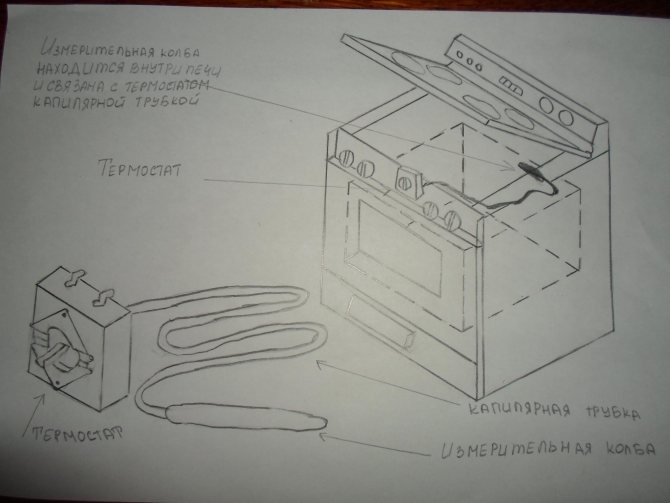
In electromechanical household refrigerators, the thermostat consists of a lever-contact group and a bellows - a corrugated cylinder filled with freon. A bellows (capillary) tube emerges from the bellows and is attached to the surface of the evaporator. It is a sensitive element that reacts to changes in temperature by changing pressure. The change in pressure acts on the lever, closing or opening the circuit, turning on or off the compressor motor. It should be noted that in the event of a breakdown, the thermostat is not repaired, but requires replacement, because usually the malfunction is caused by the failure of the bellows tube.
With models with electronic control, the situation is somewhat different, but the general principle of operation is similar.

Temperature switch replacement procedure
Repairing the refrigerator thermostat on your own will not take a lot of time. Let's take the "Nord" refrigerator as an example:
- Remove the upper hinge cover and unscrew the existing bolts.
- Remove the refrigerator compartment door.
- After that, remove the plug directly in the roof of the refrigerator and unscrew one screw - as a rule, it has a built-in hexagon.
- Unscrew the screws that hold the roof, remove it.
- Remove the temperature control knob.
- Pull out the temperature regulator, before unscrewing the 2 self-tapping screws with which the bracket is attached.
- Replace the unit with a new one and perform all the steps, but in the reverse order.
Important! Sometimes the freezer can malfunction and the entire system malfunctions, which leads to food spoilage. Find out some useful tips on how to get out of the situation if the top compartment of the Indesite No Frost refrigerator does not freeze.
By and large, wherever the thermostat is located, its repair looks approximately the same:
- Get directly to the part itself.
- Disconnect the capillary tube from the body of the evaporator itself.
- Pull it carefully directly out of the housing.
- Disconnect the relay.
- After repairs, carefully insert the new bellows tube and then securely fasten it to the evaporator itself.
- Connect all required wires and reattach the relay.
After the repair work on the replacement is completed, it is necessary to check the serviceability of the equipment.Read on our website how to set the temperature in the Samsung Nou Frost refrigerator.
How to install a thermostat on a refrigerator
First you need to determine where the thermostat is located. Next, the following actions are carried out:

- The device is disconnected from the network.
- The external elements are disassembled to gain access to the thermostat. If the temperature sensor is in the chamber, then you will have to disassemble it too. Therefore, all manipulations with modern electronic refrigerators, for example, the repair of Westfrost refrigerators, can only be trusted by professionals.
- The thermostat needs to be removed. The wires are disconnected from the terminals. If the refrigerator is electromechanical, you need to remove the lighting unit and pull out the thermocouple. If the temperature sensor is located inside the chamber, you need to cut it off from the control unit and pull it into the refrigerator chamber. The thermostat is dismantled.
- Installing a thermostat on the refrigerator. The new thermostat must be connected to the wiring. For an electromechanical refrigerator, the thermocouple is returned to its original place, the hole is sealed. In electronically controlled models, the temperature sensor is installed in its original place, the wire is pulled through the wall and connected to the control module, the connection is covered with heat shrinkage.
- The temperature sensor is checked and the refrigerator is assembled. It takes place in the reverse order of disassembly.
After completing the repair, it is necessary to check the on and off cycles. If necessary, adjust the thermostat.
Rules for dismantling the thermal relay
If the refrigerator does not turn on at all, it will be impossible to carry out the diagnostics described above. The probable cause of the breakdown is the electrical failure of this element.
But a compressor malfunction, for example, a burned out motor winding, can also become a problem. To understand if the thermostat needs replacing, it will have to be removed from the refrigerator for research.
Usually the thermostat is located next to the adjusting knob, with which the air temperature in the refrigerator is set. Two-chamber models are equipped with a set of two of these handles
First you need to unplug the refrigerator. Now you should find the place where it is located, as described earlier. Usually you need to remove the adjusting knob, remove the fasteners and remove the protective elements.
Then you need to carefully inspect the device, paying close attention to the wires through which the power is supplied.
All of them have different color coding depending on the purpose. Usually, a yellow wire with a green stripe is taken for grounding. This cable should be left alone, but all the others should be disconnected and shorted to each other.
The refrigerator is now plugged in again. If the appliance still does not turn on, the thermostat is probably working, but there are serious problems with the compressor.
If the refrigerator does not turn on at all, the reason may be not only a malfunction of the thermal relay, but also a breakdown of the compressor, for example, a burned out motor winding
If the engine is running, you can make an unequivocal conclusion that the relay needs to be replaced. Before starting work, it does not hurt to arm yourself with a smartphone or camera in order to consistently record all operations.
When installing a new thermal relay, these images can be very helpful, especially for beginners.
It is necessary to clearly remember which core of the cable was used for what purposes. Usually, a black, orange or red wire is used to connect a thermal relay to an electric motor.
A brown wire leads to zero, a yellow-green wire provides grounding, and a pure yellow, white or green wire is connected to the indicator light.
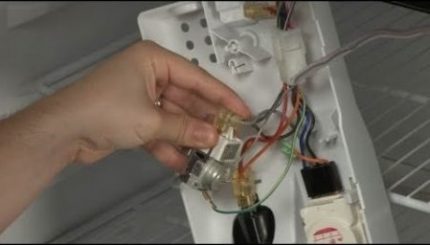
To connect the thermostat, wires with different color markings are used, you need to remember the purpose of each wire so as not to be confused during reassembly
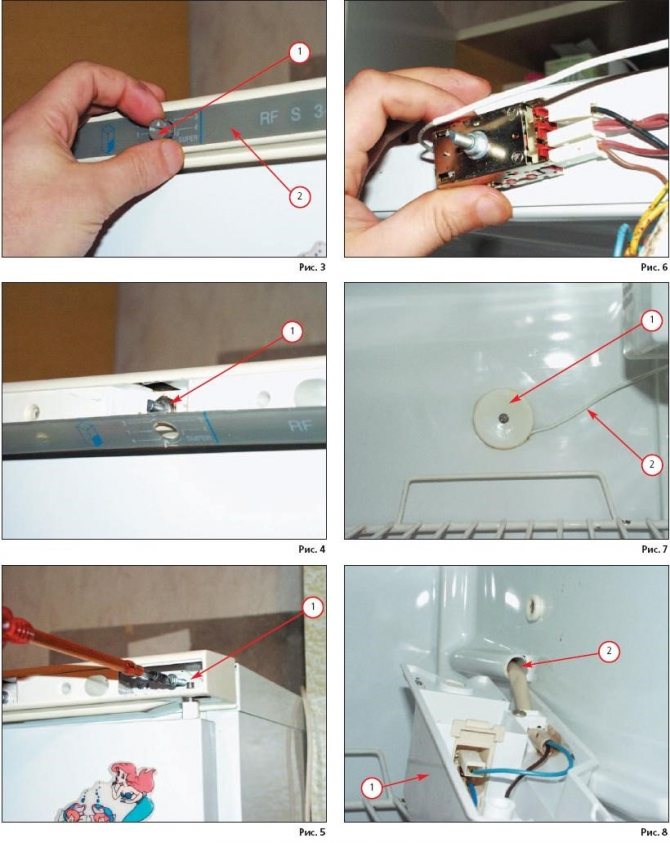
Sometimes it can be difficult to remove a damaged regulator, especially when it is placed outside. For example, in some models of Atlant refrigerators it is necessary to completely remove the chamber door from the hinges.
To do this, remove the cover that is installed above the upper hinge, and unscrew the bolts hidden under it.
Before removing the adjustment knob, you also have to remove the plugs and unscrew the fasteners. All these operations must be done carefully.
It is best to store fasteners and trims in a small container so they are not lost. The thermostat itself is usually screwed to the bracket; it must be carefully removed, unfastened and removed.
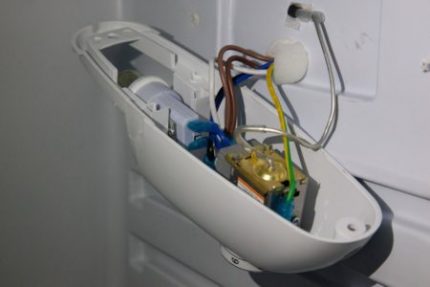
If the thermostat is located inside the refrigerator compartment, it is usually hidden under a plastic casing, where a lamp for lighting can also be mounted.
In its place, a new thermostat is installed, adhering to the reverse assembly order. Sometimes the breakdown of the thermostat is associated with a malfunction of the so-called capillary tube or bellows. If only this element is replaced, the relay can be left.
To carry out this procedure, you will have to remove the thermostat following the method described above. The bellows must be disconnected from the evaporator and carefully removed from the device body.
Now a new capillary tube is installed, connected to the evaporator, and the relay is mounted in its original place, and the disconnected wires are connected.
Secrets of installing a thermostat on the refrigerator
If you decide that you can handle replacing the thermostat yourself, then a few tips are pertinent:
Features of the thermostat installation
- The thermostat must not be placed in the area of warm air rising above a working radiator;
- The thermostat connection diagram provides that it must be raised above the floor level by at least 800 mm;
- It must be protected from direct sunlight;
- The remote sensor, if available, must be rigidly fixed to the wall;
- Do not block access to the thermostat with furniture or curtains of heat flows that form in the room.
After the end of the heating season, the thermostat should be switched to the maximum flow mode (open), in order to avoid the formation of deposits on the valve seat.
How to independently connect the refrigerator thermostat?
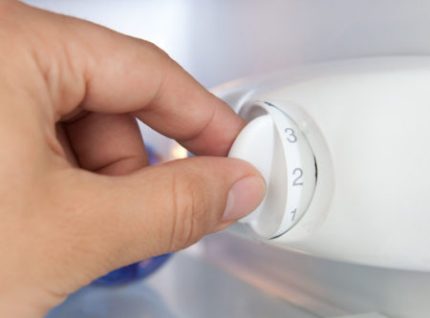
To begin with, the thermostat in the refrigerator serves to turn off / on the refrigeration compressor. When a working refrigerator is initially turned on, the thermostat contacts are closed and a command is sent to turn on the compressor. You can set the temperature in the refrigerator by turning the knob - the degree of cooling varies, as a rule, from +8 degrees to 0 degrees Celsius, a lower temperature is achieved by turning the thermostat knob clockwise until it stops.
To understand what malfunctions can be in the thermostat (thermostat) of the refrigerator, you need to understand its structure.
Refrigerator thermostat device
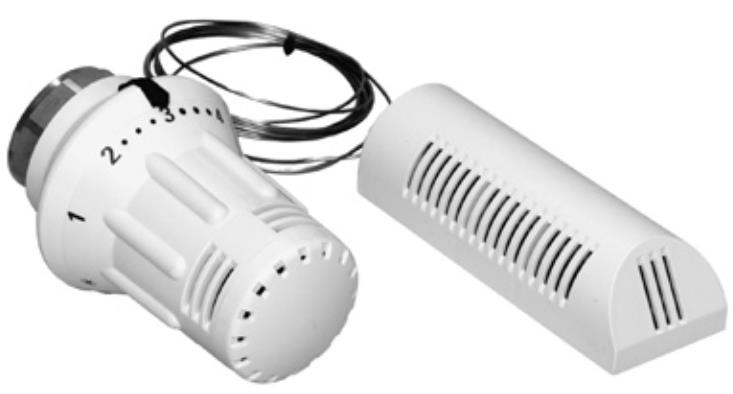
The thermostat mechanism is a lever system that controls the electrical contacts. Externally, the thermostat is a small box with a handle, on one side of which there is a tube filled with freon, and on the other side there are contacts for connecting to an electrical circuit.
The number of contacts can vary from 2 to 6, and the length of the tube filled with freon can be from 0.8 to 2.5 meters. It depends on the additional functions of the thermostat, the temperature regime and the number of plug-in refrigerator modules (light, defrost, indication). It is not recommended to disassemble the working thermostat to study the internal structure.
Principle of operation
The principle of operation of the thermostat is quite simple. The end of the thermostat capillary tube is located in the cooling zone and is attached to the evaporator of the refrigerator. The lever mechanism of the thermostat, which is located in the box, acts on the contact group when cooled - the thermostat opens. When the temperature rises, the thermostat returns to its original position - the power contacts close.
Malfunctions
Externally, the breakdown of the thermostat (temperature sensor) manifests itself in two ways. This can be a banal disconnection of the refrigerator compressor from the electrical circuit (the compressor does not turn on, there are no sounds, there is light in the refrigerator), or there can be a change in the temperature regime in the refrigerator (freezing or high temperature).
In the first case, there is a high probability of damage to the galvanized capillary tube of the thermostat, which is subject to corrosion in an aqueous environment, as a result of which the lever mechanism of the thermostat simply stops working. In the second, it is necessary to understand what exactly caused the violation of the temperature regime - corrosion, sticking of the thermostat contacts or violation of the internal factory settings of the sensor. The answer can only be given by a specialist - a refrigerator repairman.
Setting the room thermostat
But after connecting the thermostat, it needs to be adjusted. The setting can be made using the programming panel. It contains keys and microswitches.
Using the microswitches, you can adjust the following:
- Adjust the temperature fluctuation mode;
- Air cooling and heating;
- Sensor response interval. If you open the balcony for a short time, the sensor will not work.
And with the help of the keys, you can set an economical and optimal temperature regime. During the day, the required temperature will be kept, and at night it will decrease, but remain at a comfortable level, and thus fuel economy will occur. And also programs are installed in the room thermostats. From them you can choose the program that suits you.
Where to install the device
The operation of the device is influenced by 4 factors:
- sun exposure on the body;
- outside temperature;
- air circulation in the room;
- additional sources of heating.
In apartment buildings, thermostats are placed at the top, near the roofas the heat rises. This helps to balance the temperature differences in the building. In one-story houses, on the contrary, their mounted near the heater.
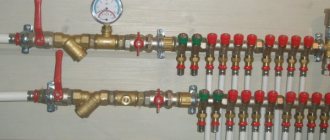
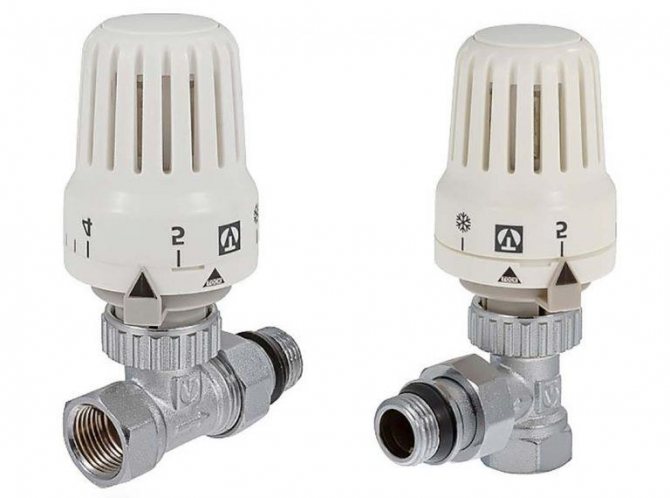
Photo 2. An electronic thermostat installed on a heating battery. The device is connected to the heating medium supply circuit.
The most favorable is the placement of a highly sensitive device on the feed. This principle has a limitation: strapping elements should not be covered with anything. The thermostat is placed in front of the battery, after branching off from the line. This allows him to regulate the temperature of the room without affecting the neighbors below.
How to remove the temperature controller
Quite simple because it consists of three steps:
- The static element is simply unhooked by hand. Use pliers if necessary (tight tight).
- The stem is slightly loosened and removed.
- Boil bypassclose up pipes.
Pre-required close the shut-off valves and drain the water.
If it is necessary to parse for verification, then in the second step, the stem is left wrung out. After a while, the radiator should warm up. Then the device is simply assembled. Otherwise, the valve is replaced.
When to change and which thermostat to put on the Gazelle
Replacing the Gazelle thermostat may be needed when antifreeze boils... In this case, the pipes on the stove will be hot, and on the radiator - cold. You can make sure that the thermostat is to blame for this by touching the pipes - the upper one will be hot, and the lower one will be cold as ice.
There are two types of thermostats on the Gazelle - small and large. On Gazelle Business a small thermostat is installed with the 4216 engine... Large ones are installed on the UMZ 402 engine. For the winter, it is better to set the thermostat to 80 degrees, while in the summer it will come down to 70 degrees.
Thermal valve for heating radiator: classification
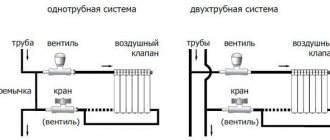
Now let's talk about the bottom of the thermostat - the valve (valve). First of all, you need to know that the industry produces control devices for different systems. And you only need to use devices for your system.
Devices for two-pipe systems have at least twice the hydraulic resistance than for single-pipe systems. This is done on purpose, since balancing in this case occurs due to the pressure drop across the valves. Therefore, devices with a small flow area are installed. By placing such a device in a one-pipe system, you will surely freeze. Therefore, be careful.
Sometimes modifications for one-pipe systems are positioned as devices for systems with natural circulation. They have reduced hydraulic resistance and can be used in single tubes.
In a one-pipe system, install thermostats with a flow capacity of at least 3 (Kvs = 3 and higher).
According to the method of piping, radiator temperature regulators are angular or straight (straight). There are also axial models. In this case, they are selected depending on the type of connection of the heater. If the pipe fits from the side, it is more convenient to put a straight valve, if from below - one of the angled ones.
Thermal valves also differ in the material from which they are made. Metals are used that have good corrosion resistance. On some of them additional protective coating is applied (usually nickel or chrome plating). So, thermostatic valves are made from:
- bronze, nickel-plated and chrome-plated;
- brass, nickel-plated;
- stainless steel.
It is clear that stainless steel is better, but such valves cost a lot, and are rarely found on sale.
Replacing the ZMZ 405 thermostat, step-by-step instructions with a photo.
Good day, dear readers. The topic of today's post is the replacement of the ZMZ 405 thermostat.
In the article, you will find a list of tools and consumables required to replace the thermostat, typical thermostat malfunctions, recommendations for modifying the engine to make it easier to replace the thermostat in the future.
The list of tools and consumables required to replace the thermostat ZMZ 406-405-409:
- screwdriver (for removing pipe clamps)
- 6 hexagon (for removing the thermostat housing)
- open-end wrench 13 (for disassembling the thermostat housing)
- yews (in them we will clamp the thermostat case for parsing)
- thermostat housing gasket
- thermostat cover gasket
- thermostat (be sure to weld and check the opening and closing temperatures)
- sealant
You may need:
- Coolant, similar to that filled in the engine.
The sequence of actions for replacing the thermostat.
Step 1 - drain the coolant using the tap on the radiator or engine block (it will drain enough to replace the thermostat from any tap).
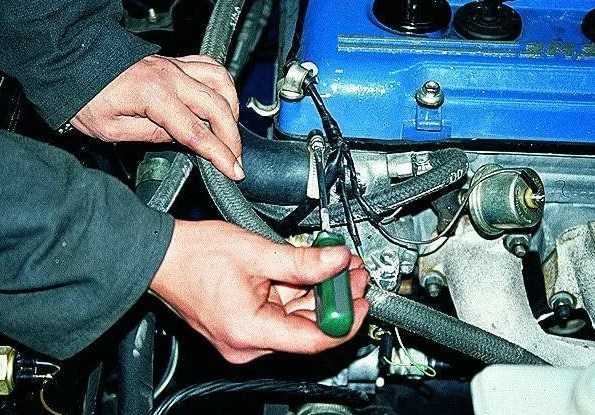
Step 2 - using a screwdriver, loosen the clamps (upper and lower) and remove the upper pipe from the thermostat cover.
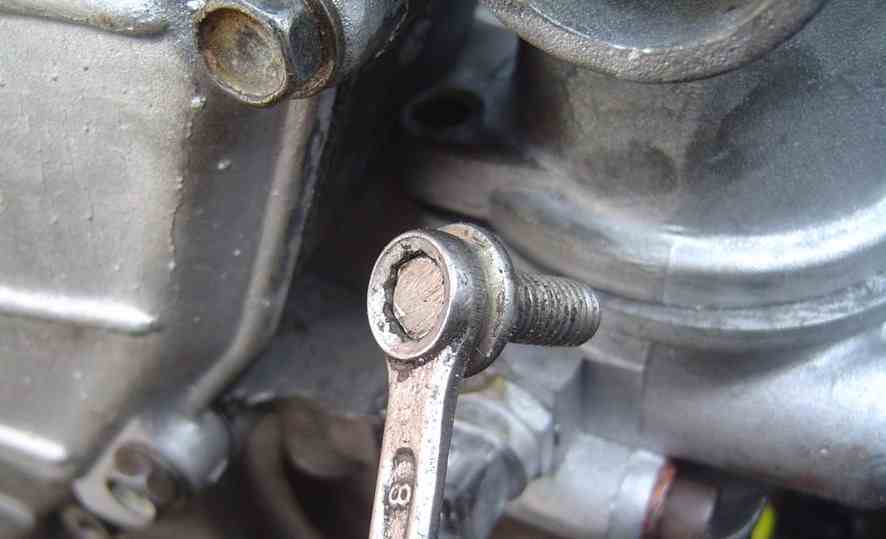
Step 3 - we unhook (after remembering, recording or photographing) all the wires going to the sensors on the thermostat housing.
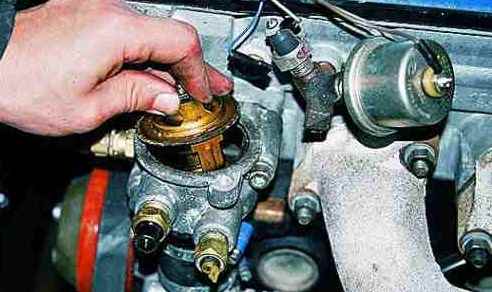
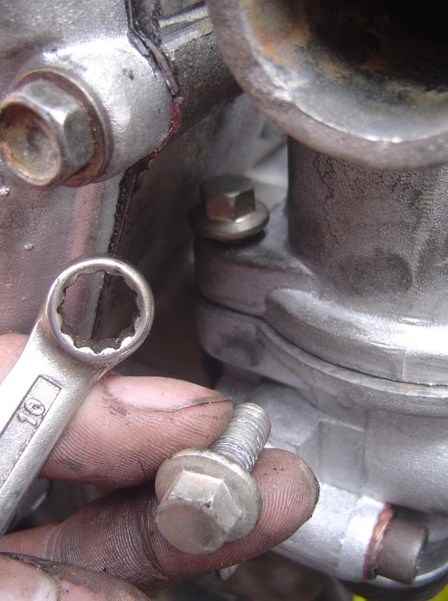
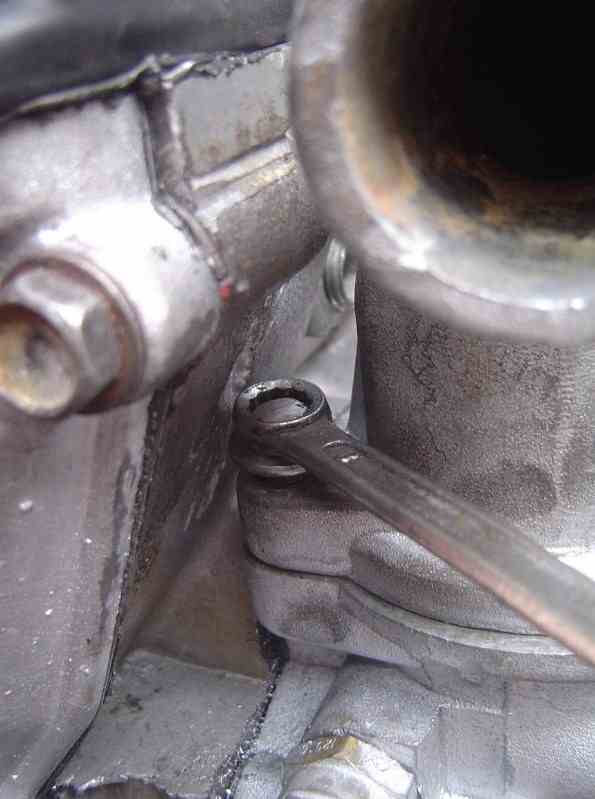
Step 4 - unscrew the thermostat housing using a hexagon
Step 5 - we clamp it in a yew, and halve it by unscrewing the top cover with a 13 key
Step 6 - we clean the thermostat housing cover, the housing itself and the cylinder head from the old gaskets.
Step 7 - change the thermostat to a NEW one, change the gaskets.
The assembly is carried out in the reverse order.
You all changed the thermostat and saved about 700-800 rubles.
Life hack or how to modify the engine to replace the thermostat without removing its case….
Since 1994, ZMZ engines have been produced with an idiotic design defect - it is impossible to change the thermostat without removing the case, since it is impossible to unscrew the top cover mounting bolt.
This is corrected by grooving the cylinder head wall with a grinder and installing a bolt with a smaller head, or a bolt for a 6-hexagon.
More details about the revision in the photo:
with a bolt with a head of 10 will not work!
but if you cut off his hat in width and height ... ..
now you can change indiscriminately
Typical malfunctions of the thermostat on the ZMZ 405 and their manifestation.
The thermostat has changed the temperature characteristics.
This is the most common malfunction on these engines. The fact is that domestic thermostats do not differ in quality and degrade over time. The result, as a rule, is a decrease in the opening temperature. As a result, the engine warms up quickly, but never warms up above a certain temperature (usually 50-60 degrees), which leads to an increase in fuel consumption and accelerated engine wear, and in winter you will also get cold in the cabin from bonuses.
This malfunction occurs due to the poor quality of the thermostat.
The thermostat is stuck closed.
This is the second most common thermostat malfunction. With this malfunction, the engine boils! The coolant squeezes out of the expansion tank and it is unacceptable to operate the car in this mode.