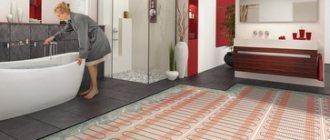
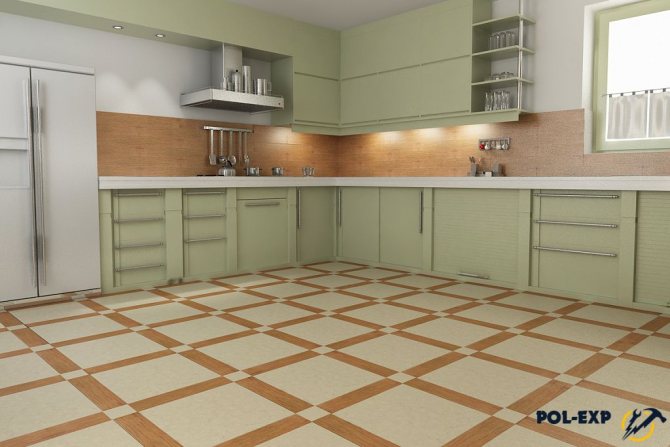

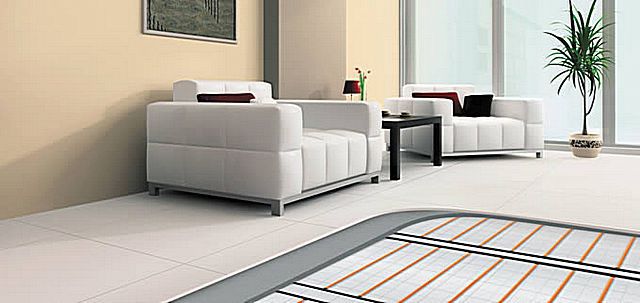
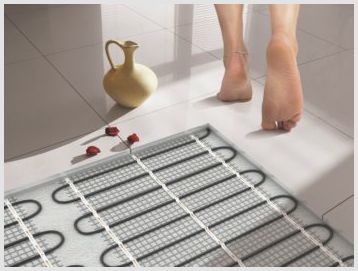
Tile is a reliable floor covering. Such a building material is durable, practical, moisture resistant and environmentally friendly. Of the shortcomings, the point is that the material is cold, so it will be uncomfortable to walk on it barefoot. An infrared heated floor under the tiles helps to solve this problem. You can equip it with your own hands. The main thing is to adhere to the instructions.
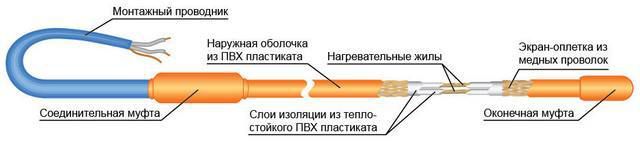
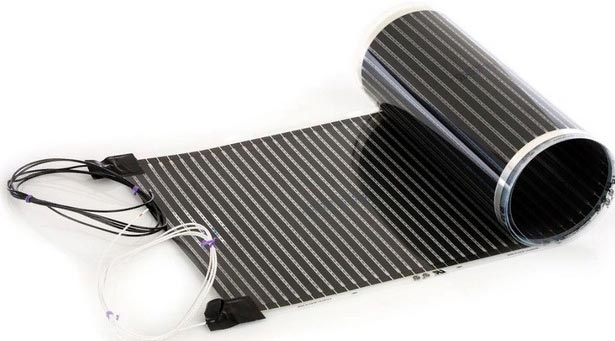
Connecting wires
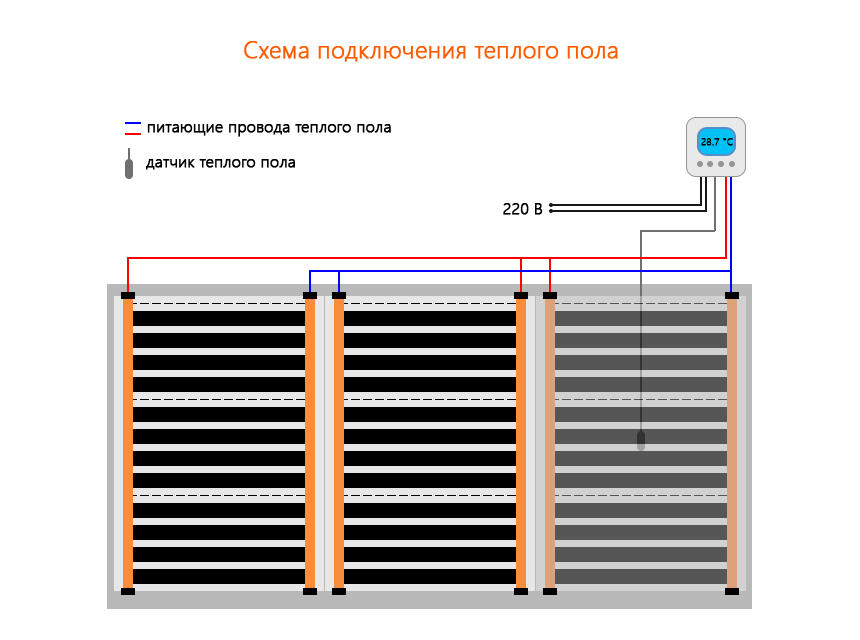
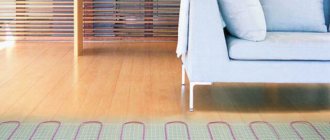
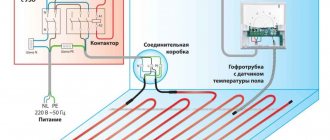
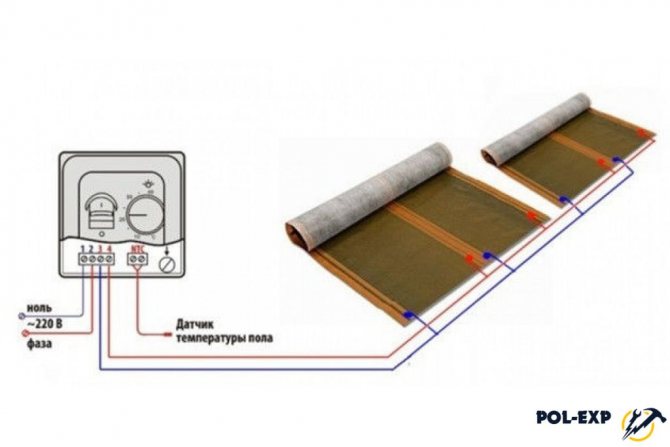
Electrical wiring diagram for underfloor heating
The connection of several strips of heating foil is done in parallel using a junction box. In the case of using a film with a grounding layer, the grounding wire is connected bypassing the thermostat (connection to the grounding layer is carried out using a separate terminal). It is recommended to use an 8-fold junction box with a minimum depth of 25 mm. After connecting the wires, perform a proof test of the system.
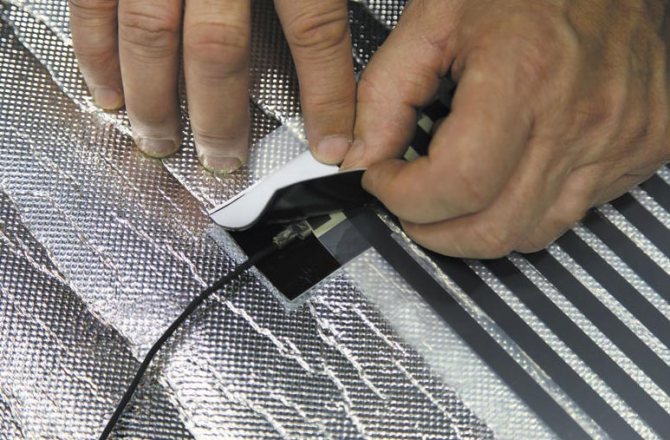
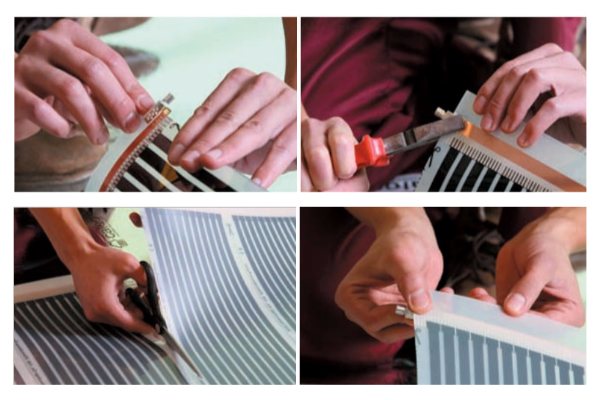
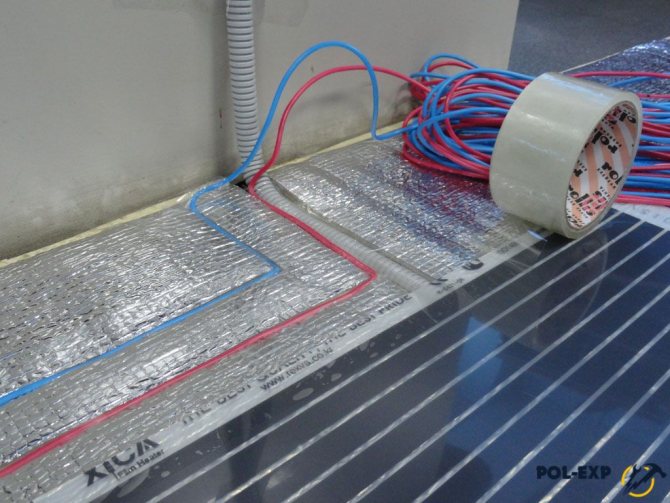
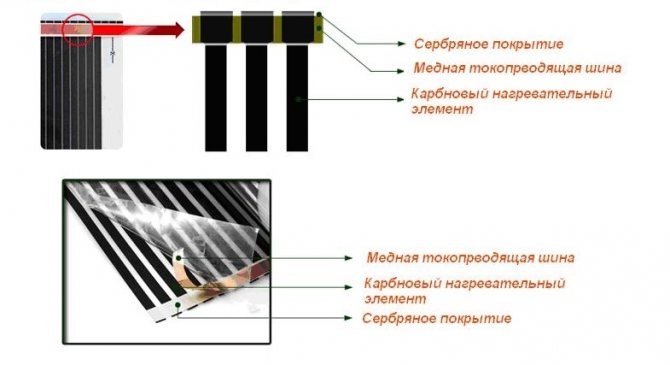
Gently lift the protective layer and insert one connector plate so that there is reliable contact with the busbar.
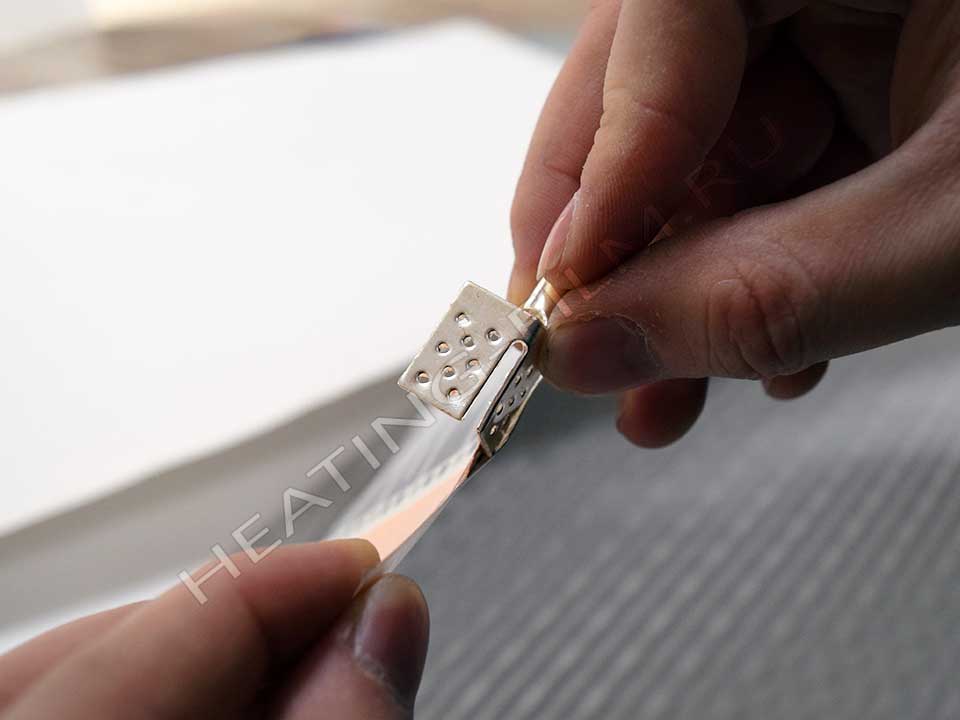
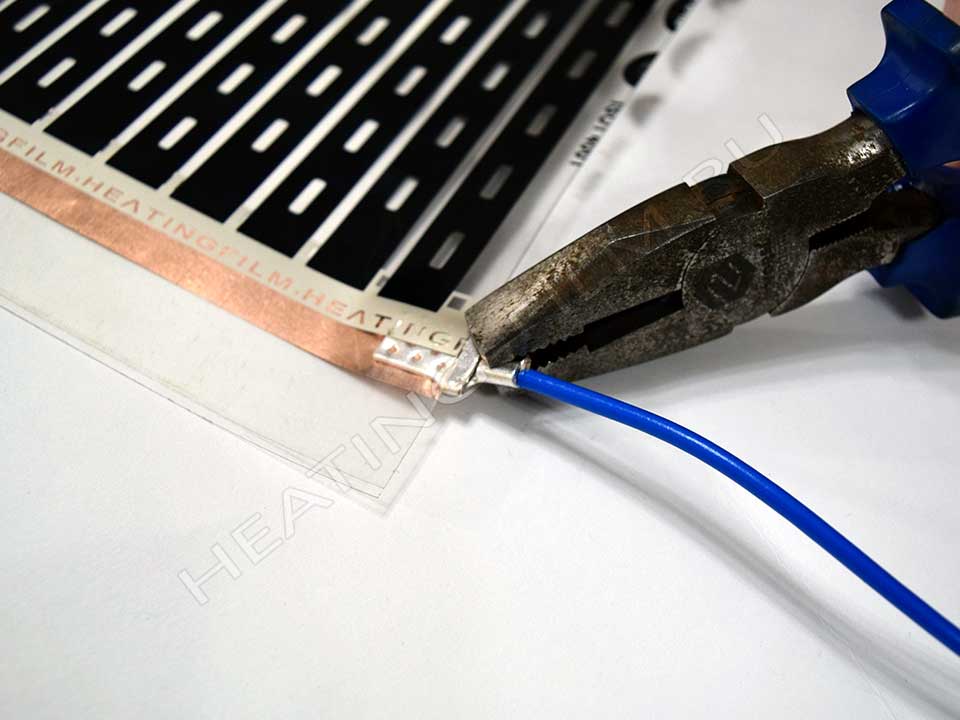
After connecting the connectors to the two copper rails, first squeeze the clips with your fingers, and then with the pliers.
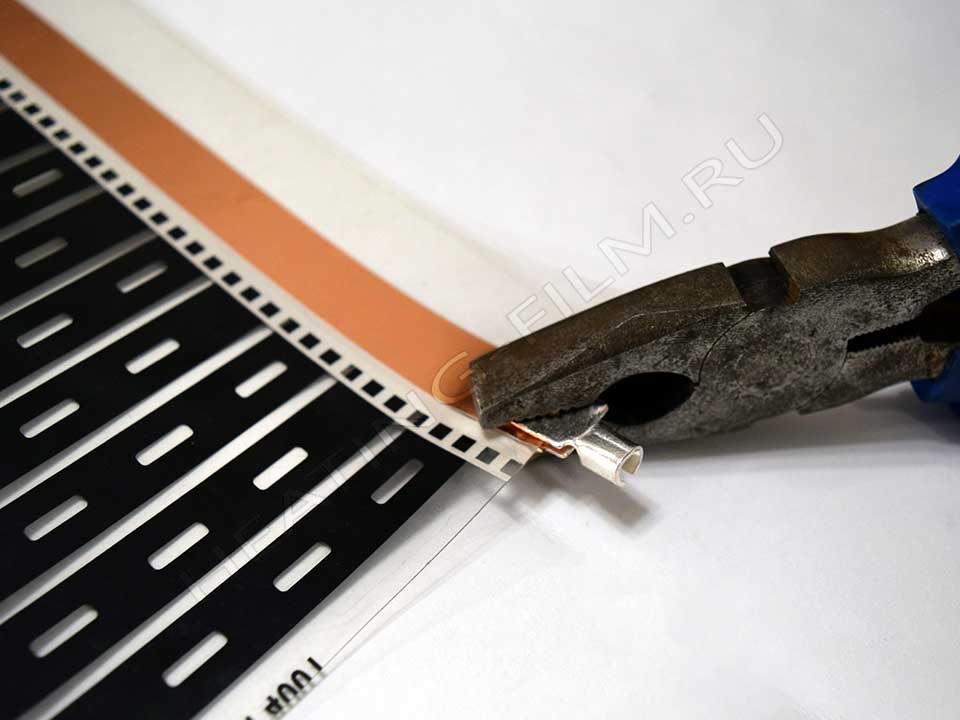
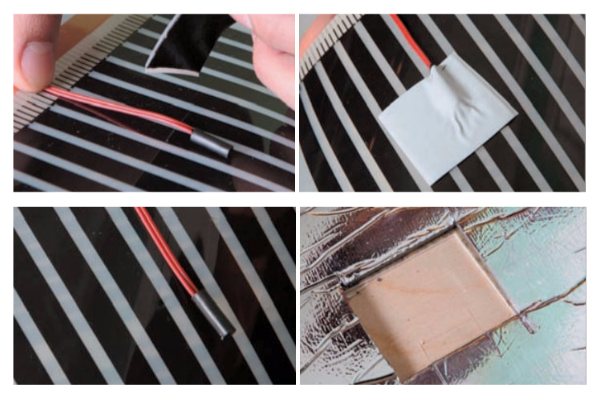
Strip the end of the wire and clamp it securely into the barrel connector of the connector with pliers.
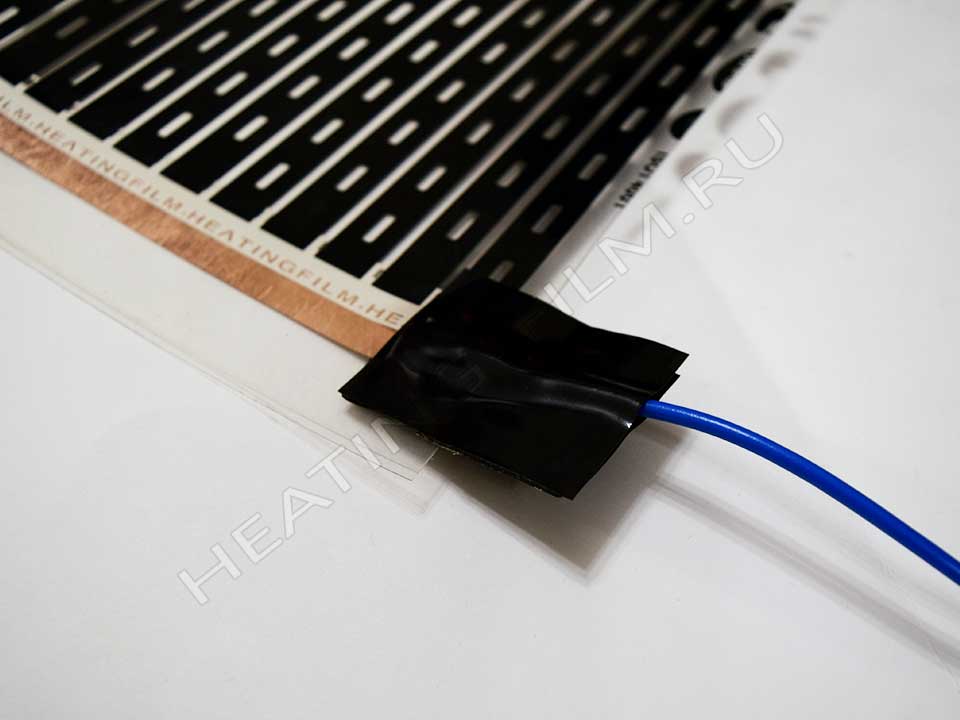
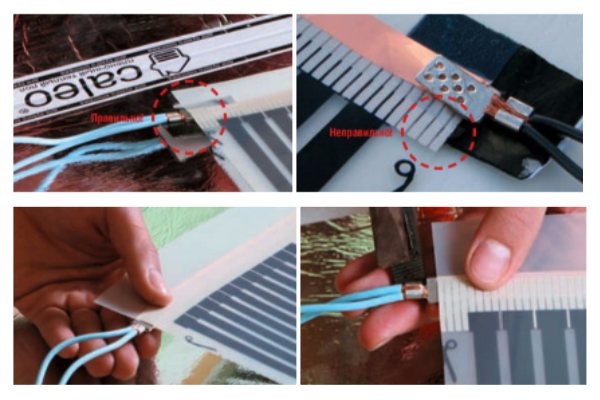
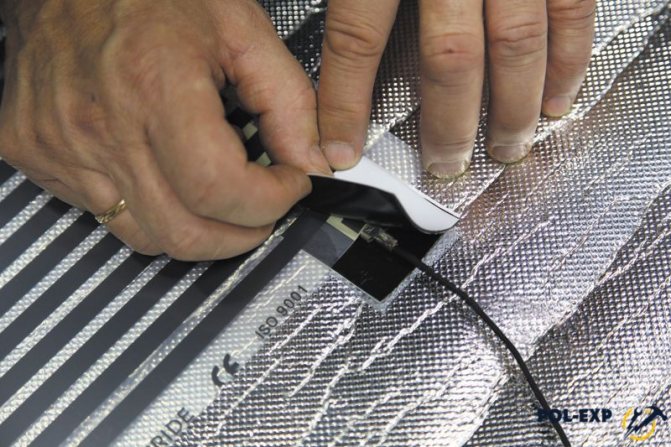
Insulate the copper busbars with 50 x 40 mm butyl rubber tape. Copper busbars with connected wires are insulated with two pieces (top and bottom).
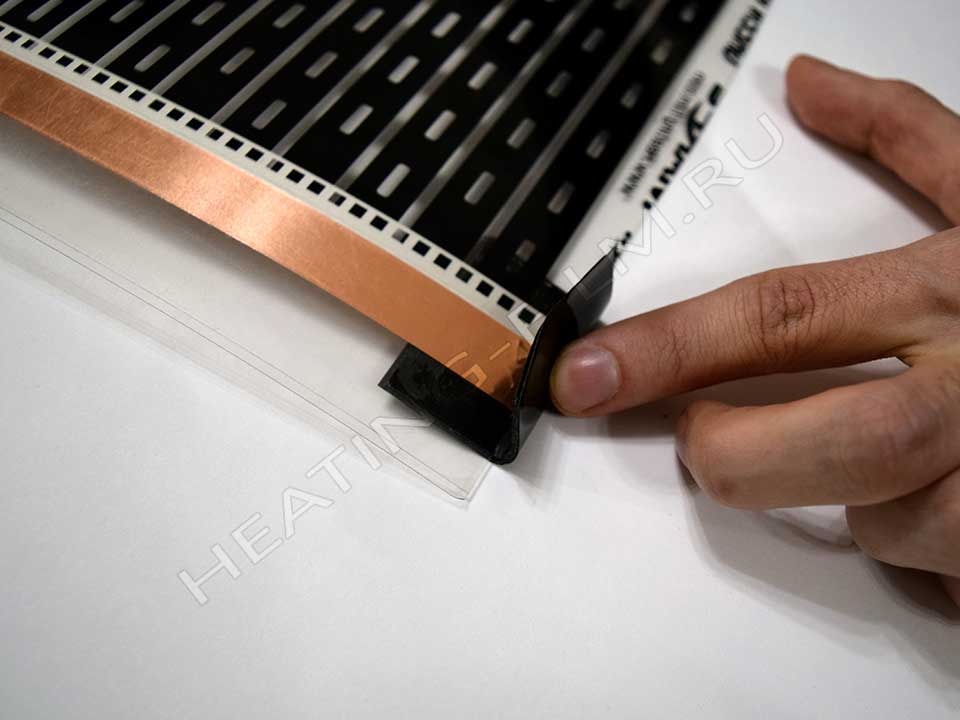
The busbar sections free from connections are insulated with one piece of insulation.
It is necessary to thoroughly "wash" the contact point with your fingers, while the 25 mm wires should be covered with insulation.
The wires are laid along the perimeter of the room in the left 50 mm gap or in the groove cut out in the thermal insulation, starting from the film strip farthest from the back box. Secure the wires with special tape. It is not allowed to lay electrical wires over or under the heating foil. Route the wires from the heating foil to the thermostat or junction box.
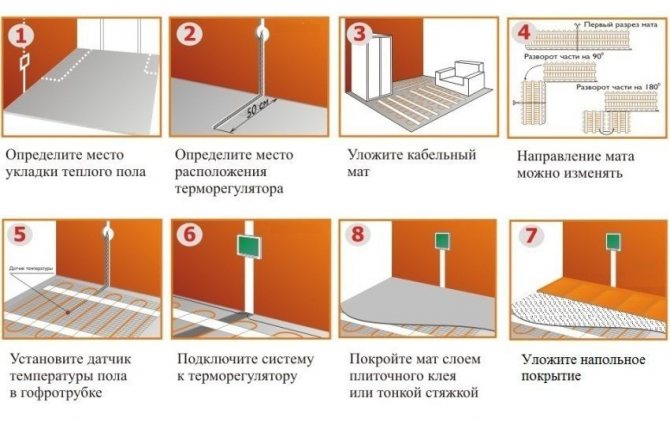
Getting started with installation
Preparatory stage
One of the important conditions for the efficient operation of a warm floor is ventilation. Therefore, laying heating elements is not permissible under low furniture. The floor must be well ventilated, the minimum gap between the floor and furniture must not be less than 3 cm.
In order for the heat energy to go up and the power consumption to be insignificant, heat-reflecting insulation is placed under the heating element. For this purpose, materials are used that have a metallized lavsan or polypropylene coating. Insulation based on aluminum foil is not used because it will erode over time.
So, let's start preparing:
- We choose a place on the wall where the thermostat will be installed and we bring the wiring to it.
- Determine the place of laying the film warm floor.
- We prepare the base, which should be perfectly flat and clean.
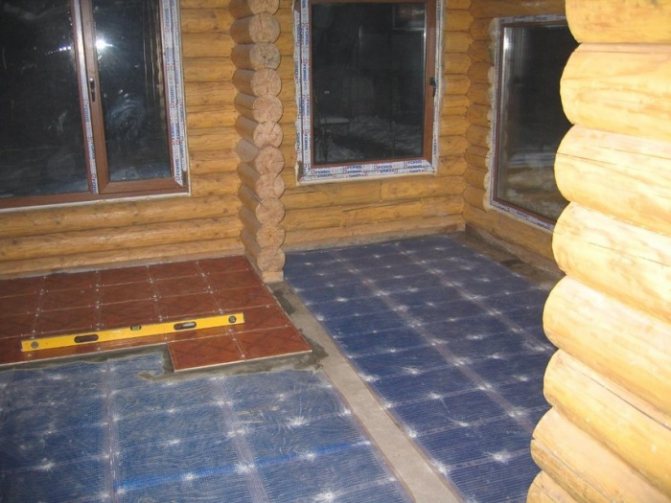
- We lay a layer of heat-reflecting material on the floor. Ideally, it should cover the entire area of the room so that the floor is even and smooth, without dents or irregularities. We fasten the material with tape to the base and glue all the joints.
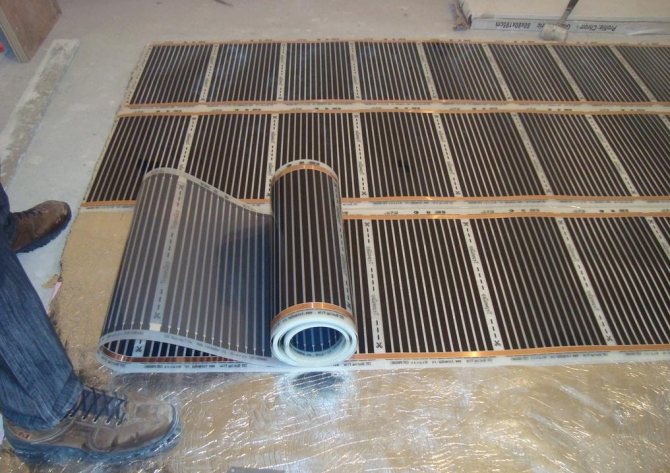
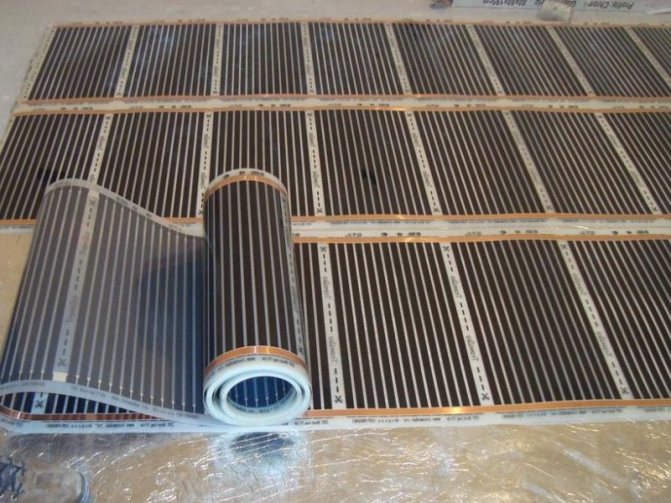
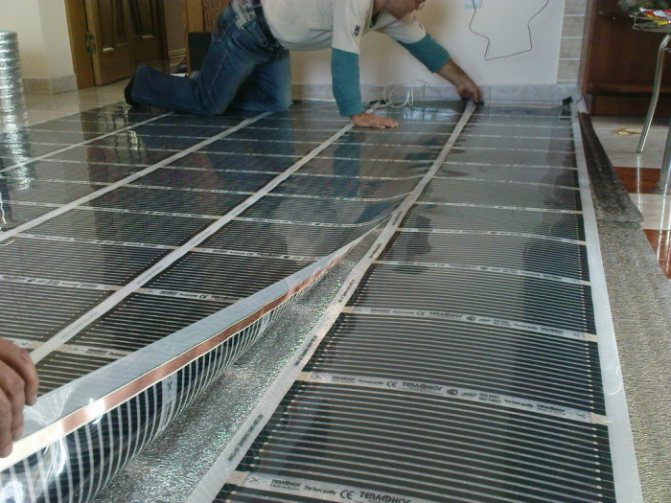
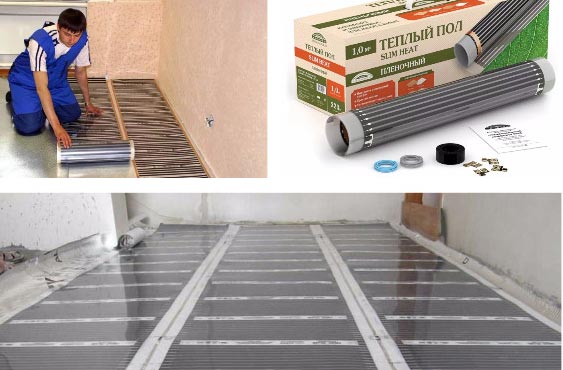
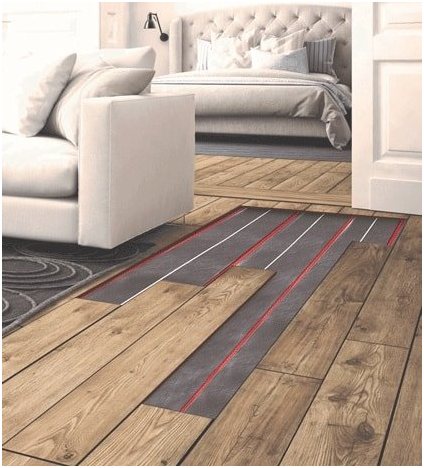
We mount the thermal film
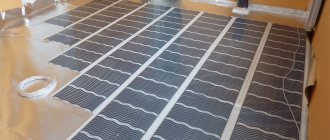
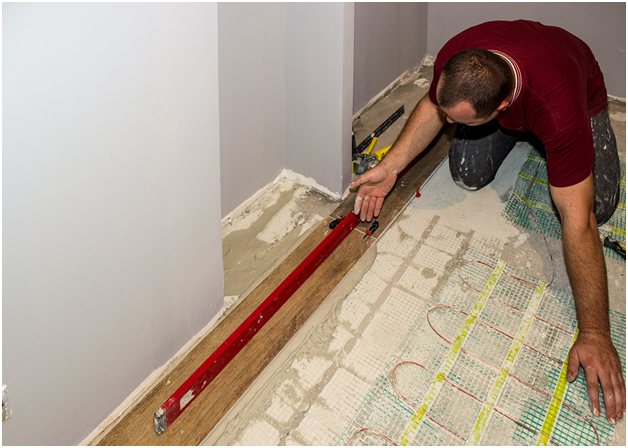
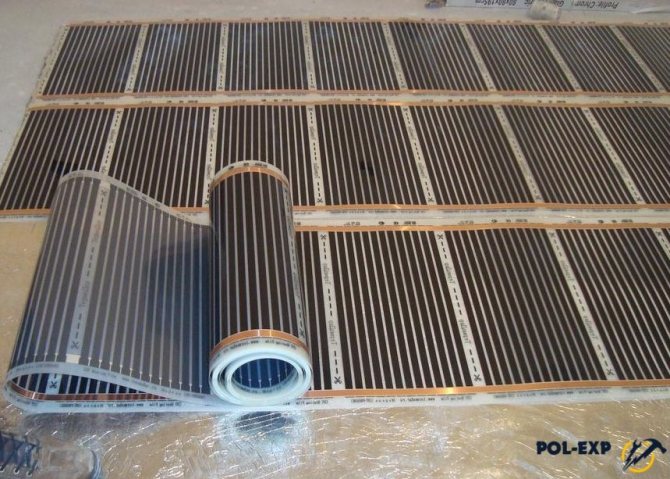
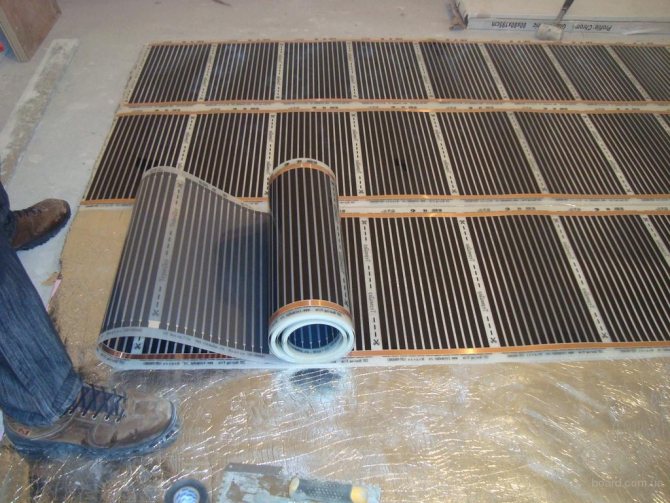
To begin with, a roll of thermal film is rolled out on the floor. It has specially marked lines along which the roll is cut to the required dimensions. In some cases, black flint strips serve as the cutting line.Place the film so that the copper contacts "look" down. To keep the number of contacts to a minimum, the film should be cut into lengths of maximum length. You can reduce the consumption of the wire by placing the contacts in the direction where the thermostat is located.
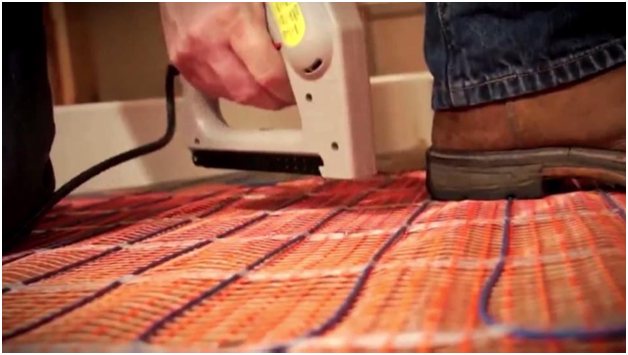
Next, a clamp is fixed on the copper strip, so that one side goes inside the thermal film, and the other is outside, on the copper strip. Fix it with pliers. All cut lines must be sealed, especially if the cut did not fall on special strips. For this, bituminous insulation is used. Next, the thermal film is fixed with tape. This is necessary so that there are no shifts and displacements of the canvas.
Connection process
We install a thermostat on the wall. The installation location must be chosen accessible, there must be an outlet or switch nearby. Guided by the connection diagram, we lay the wires connecting the heating elements and the thermostat. The wires are placed along one of the walls, using a plinth, shtrob or a special plastic box for this. After laying the wires, an unevenness is formed. To avoid this, they must be placed in a groove cut in the heat reflector. Next, the wire is connected to the clamps installed on the heating mats. The insulation at the end of the wire is pre-cut, the wire is inserted into the clamp and fixed with pliers. It is imperative to check the reliability of the fixation, the wire should not be pulled out, even if you try to pull it with force. The places where the wires are connected to the clamps are insulated with small squares of bitumen insulation, which have a small margin on all sides.
The free ends of the wire are connected to the thermostat. Each model has its own wiring diagram, so when performing this work, you must strictly follow the instructions. Further, the process of installing an external temperature sensor and connecting it to a thermostat. The sensor head is fixed underneath with bitumen insulation on the black silicon strip of the heating element. Again, you need to make a cut in the reflective insulation layer so that there are no bumps on the surface. Ideally, it is better to put the sensor in a corrugation so that in case of a breakdown it does not suffer with replacement.
If you are not an electrician or simply doubt your abilities, then find a master who can connect the thermostat. In the event that the electricity consumption of a warm floor is more than 2 kW, then it is connected to a separate machine. After everything is connected, the functionality of each heating strip is checked separately. In this case, the temperature should be at least 30 degrees. If the result is satisfactory, proceed to laying waterproofing, which will give additional protection. For this purpose, plastic wrap is used.
We lay the tiles
There are two excellent ways to lay tiles on film. The first is that the polyethylene waterproofing is covered with a plaster mesh on top, this will help to increase the adhesion. Next, a screed is made from a solution or self-leveling bulk mixture, the thickness of which is from 8 to 10 cm. The second method involves covering the waterproofing with gypsum fiber sheets. They are attached with self-tapping screws to the base between the strips of the heating element.
This work requires filigree precision, otherwise the element may be damaged. If the floor area is insignificant, then the film is attached to the wrong side of the gypsum fiber board before laying, and then everything is installed together on the floor.
Is it possible to mount a film floor under the tiles
To answer this question, it is necessary to take into account the recommendations regarding operation provided by the manufacturer. In particular, it says: "The product can be stacked under tiles, wood, laminate, linoleum, etc.".
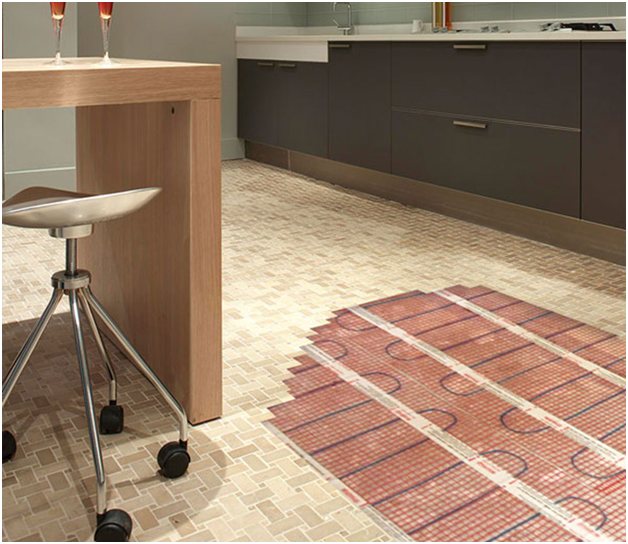
Thin electric film underfloor heating under the tiles is installed quickly, does not "steal" free space and does not affect the quality of installation.
Since the heating system is resistant to moisture and atmospheric precipitation, you can lay the film outdoors, followed by facing with porcelain stoneware. This will permanently solve the problem of icing paths, heating the garage, etc.
Laying an infrared warm film floor under the tiles with your own hands requires a certain professionalism and the availability of building material. Although the technology is fully and in detail described by the manufacturer, if in doubt about its capabilities, it is better to seek help from a specialist.

Testimonials
Film infrared floors serve as a very good alternative to other types of "warm floors", and due to physiological characteristics, a person positively perceives the heat generated by such a heating system.
Many positive reviews are associated with the use of infrared underfloor heating under tiles in rooms such as bathrooms and kitchens. However, the infrared film heating option is completely unsuitable for furnishing in homes where there are very frequent interruptions in electrical energy.
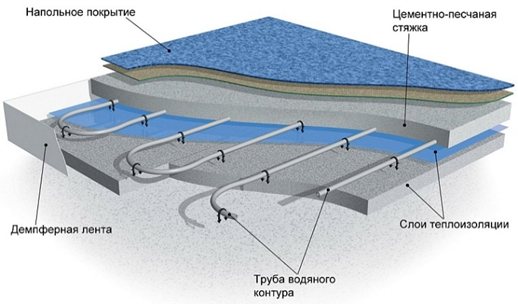
A water heat-insulated floor is a fairly simple design. Laying a warm water floor under the tiles - recommendations and step-by-step instructions, read and do.
You can familiarize yourself with the options for installing a water-heated floor under the tiles at the link.
Necessary materials
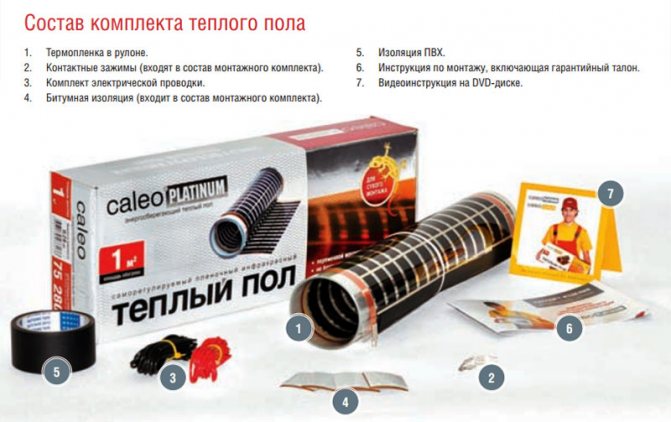
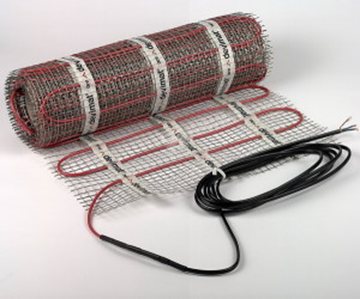
Standard complete set of film underfloor heating system
- Thermal film in a roll;
- Contact clamps;
- Set of wires;
- Self-adhesive bituminous insulation.
- Heat-reflective insulation;
- Heat-resistant polyethylene film;
- Thermostat and mounting box for it. It is selected based on the selected power of the underfloor heating and the type of installation (built-in or overhead);
- Additional thermal sensor, if necessary (one will be included with the thermostat);
- Double sided tape;
- Additional wire for mounting the thermostat. It may also be needed if you are installing several sets of underfloor heating in one room (you will need to add their power to calculate the cross-section). The wire cross-section is selected depending on the power of the system and the material of the purchased wire (see table).
| Wire section, mm2 | Maximum allowable power consumption with copper wire, kW | Maximum allowable power consumption with aluminum wire, kW |
| 1,5 | 3,5 | 2 |
| 2,5 | 5,5 | 3,5 |
| 4 | 7 | 5,5 |
| 6 | 9 | 7 |
How to mount and connect a film warm floor with your own hands
2017-12-22 Evgeny Fomenko
The technology for installing a film underfloor heating is perhaps one of the simplest among all types of underfloor heating. And, without having special skills, it is quite possible to do it yourself, without resorting to the help of specialists. It is often used as the only source of heating, but if you live in latitudes with harsh winters, it may not be enough.
The infrared floor can be used under almost any floor covering. Regardless of the surface under which we are going to lay it, the materials used do not change much. But there are slight differences. For example, if we lay under linoleum or carpet, then in order not to damage the film, we will have to use solid cushioning materials.
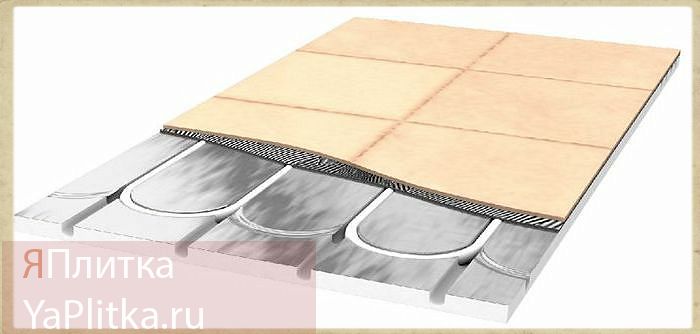
While under the tile you will have to make a cement screed on a reinforcing base. These floors are installed without preliminary surface preparation, it is enough just to carefully insulate the floor, so that the heat rises up, and does not go into the floor. Let's take a closer look at how to properly lay an electric floor heating under various materials.
So, for a parquet board or under a laminate, the pie looks like this:
- Primary gender.
- Heat-reflecting material.
- Thermal film layer.
- Polyethylene film.
- Plywood or fiberboard. These plates are used to protect the heating element from mechanical damage.
- Linoleum.
Well, and, perhaps, the most time consuming option is to lay it under the tiles. But for all the complexity of installation, this option is the most effective heating method. Because the tile heats up quickly and can keep the temperature longer.
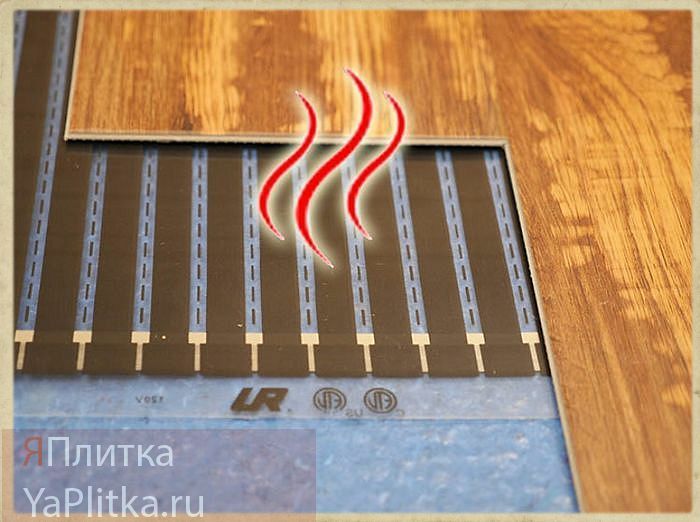
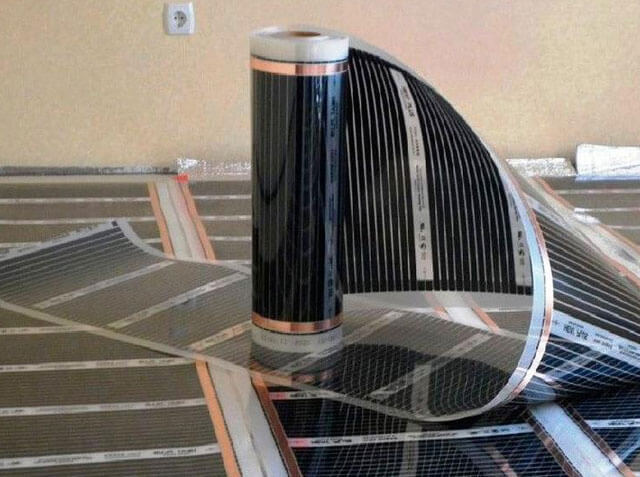
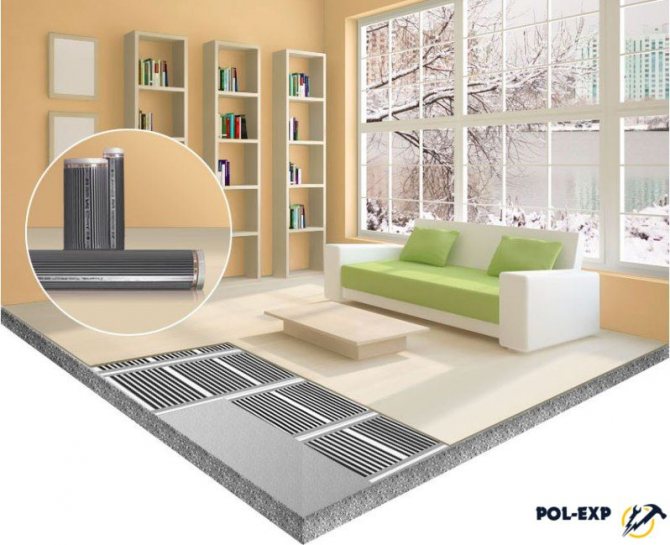
Infrared film warm floor
In order to understand exactly how a high-quality tape floor differs from other varieties on the market.
Let's take a closer look at its main distinguishing characteristics:
They are absolutely safe for humans, the element that conducts heat in them is carbon. Thanks to this system, you will be able to create comfort and keep warm in your home, your loved ones will be less sick and you will forget about frozen feet forever.
This type of heating is more useful for our body, infrared radiation is widely used in many areas, for example, in medicine. How much does it cost - this is perhaps one of the most expensive heating options, but it fully justifies its cost.
Installation of underfloor heating from foil
In order to understand how this system works, you need to understand in detail its structure. It is made of a dense thin film (polyester), divided into segments and filled with carbon paste (carbonaceous), applied by spraying. In a more expensive version, it fills the entire space completely and has a pasty consistency.
When exposed to electricity, it emits infrared radiation. The current is supplied through copper / silver wires that are connected to the power supply. The degree of heating is controlled by a thermostat connected to the floor. And he, in turn, reads the readings from the thermal sensor, which is located on the outside of the film.
To save electrical resources, it is more profitable to connect an automatic thermostat, it independently determines the most favorable operating time. This is currently relevant as electricity prices have risen dramatically.
The package includes the following components:
- Thermal insulation material that directs heat outward, and does not warm up the ceiling of the neighbors.
- Gasket material.
- Installation diagram
Consider the installation scheme for a film warm floor, namely, how to lay it on your own, I do not resort to the help of specialists, we will figure out which side to lay.
For a good connection, you need to do the following:
The entire installation, subject to the instructions, will take about 3 hours if the floor is laid under linoleum or laminate. If you have not dealt with an electrician up to this point, it is better to seek the help of a qualified technician. Since, not all errors can be corrected, and the material is quite expensive.
Underfloor heating under tiles - electric, infrared, cable and film, laying and installation
A floor tiled with ceramic tiles, with all its pronounced advantages, still has two serious drawbacks. Firstly, the point is that the surface can become slippery, especially when moisture gets on it. And three times - the ceramic coating can not be called a warm material. Walking on it with bare feet or in home shoes in winter can be very uncomfortable, especially when leaving, for example, from the shower or bath.
Electric underfloor heating under tiles laying technology
The first negative point can be avoided if you immediately select a ceramic coating for rooms with a special, non-slip surface. The second problem also has a solution - it is an electric heated floor under the tiles, the laying technology of which may differ slightly, depending on the type of heating system chosen.The work of installing an electric underfloor heating is not an easy task, but nevertheless, it is quite accessible for independent execution by a neat and diligent owner of an apartment or house, without the involvement of specialists.
What are the advantages of an electric underfloor heating?
The content of the article
1 What are the advantages of an electric underfloor heating 2 How to prepare for laying a warm electric floor 3 Cable-type underfloor heating 3.1 Types of heating cables for underfloor heating 3.2 How to calculate the required amount of cable 3.3 The process of installing a cable underfloor heating under the tiles 4 Mesh heating mats 5 Installation of a rod infrared warm floor for tiles6 Video - Film infrared floor for ceramic tiles
Heating of the floor surface, tiled with ceramic tiles, can be carried out by installing water circuits, or by using one of the existing electric heating systems. Both the one and the other type can be used both as the main source of heat and as an additional one, which increases the comfort of the premises.
Water-heated floor, of course, wins in terms of economic operation - it can even be connected to an existing central heating system if certain conditions are met. But the cost of its installation and the scale of the work are incomparably higher than any of the electrical ones. In addition, electric heating has a number of other undeniable advantages:
Any water heating circuit requires a massive screed. If we also add the diameter of the pipes themselves, then the rise in the floor level turns out to be very significant, which is far from always permissible in the conditions of city apartments. It is impossible to disregard the additional loads on the floors that arise at the same time. But some electric underfloor heating does not require a screed at all. The installation of an electric underfloor heating itself is much easier. There is no risk of hidden coolant leaks - the possibility of flooding of the lower neighbors is excluded. Electric underfloor heating does not require rather bulky and expensive adjusting equipment. Yes, and they are much easier to fine-tune. No negotiation procedures with utilities are required - the main thing is not to go beyond the allocated power supply limit for an apartment or a country house.
Electric floor heating creates the most comfortable conditions for residents - an evenly heated surface gives off heat, which rises upward, with a gradual decrease in temperature as the height increases.
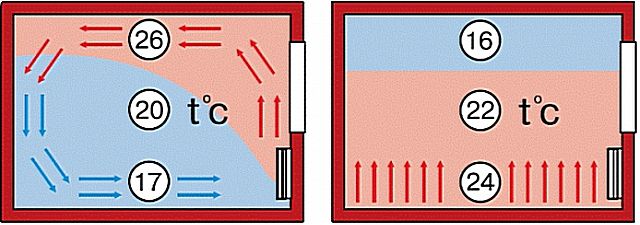
Comfortable temperature distribution during underfloor heating in comparison with classic radiator or collector heating
Ceramic tiles, laid on top of the heating system, turn into a capacious "accumulator" of thermal energy - it is pleasant to walk on them with their shoes on, and the heated layer of tiles gives off heat to the room most evenly.
There are several types of underfloor heating that can be installed under ceramic tiles. The installation technology for each of them has its own nuances. Nevertheless, there are many similarities, especially in terms of the preparation of the room and the required tool.
How to prepare for installing a warm electric floor
The first thing that draws attention is the degree of insulation of the base base of the floor. If electrical energy is spent on absolutely unnecessary heating of a floor slab or a floor laid on the ground, then the owners will simply go broke paying bills for consumed kilowatts. Usually, warm floors are laid on a base that already contains a layer of thermal insulation in its structure - this is especially important for private houses or for apartments where an unheated room is located below.Under favorable conditions, some technologies for the installation of electric heating can be limited to a thin foil thermal insulator. Second, the floor surface must be repaired. It makes no sense to lay the heating system and then - ceramic tiles, if the surface has significant irregularities, cracks or cracks, areas of instability or looseness of the old screed. Thirdly, a power line of the required power with a mandatory grounding circuit must be connected to the room, to the place of the planned installation of the thermostat. For it, a separate machine should be provided on the switchboard, and, preferably, secure yourself by installing a protective device - an RCD. For questions about wiring the line, it makes sense to contact a qualified electrician. The next question is the purchase of a thermostat with a temperature sensor. In the overwhelming majority of cases, they are not included in the underfloor heating set, but without them its work is impossible.
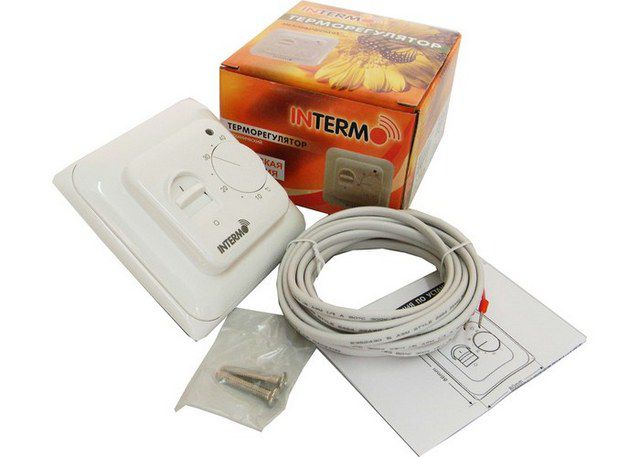
A thermostat with a sensor is not included in the standard set of electric underfloor heating
The thermostat can be chosen to your taste - with electromechanical or push-button control, with LED or LCD indication, with various designs and colors, etc. Usually all these devices are designed to be installed in a standard socket for an outlet or switch.
You also need to take care of the set of tools:
Underfloor heating installation always implies electrical work. You will need a tool for cutting wires, stripping insulation. Before switching the wires in the thermostat, it is advisable to tin the ends - which means that you need a soldering iron and the necessary consumables - solder, flux. The best way to shrink the heat shrink tubing is to use a hair dryer. By the way, although a set of underfloor heating usually includes a certain amount of "heat shrinkage", it would be nice to have at least a small reserve of your own. In the floor and on the wall, you will need to cut out grooves - for this you need to have a "grinder" with a stone disc and a perforator. the electrical circuit will need to take control measurements - the total conductivity of the circuit and its resistance - which means that a multimeter is needed. It is also recommended to check the insulation resistance - this is done with a special device - a megohmmeter.

Multimeter (left) and megohmmeter
General construction work is also ahead: sometimes it is the filling of the screed, and in any case, the laying of ceramic tiles. This means that all the necessary tools must be prepared - a mixer (nozzle for a drill) for mixing building mixtures and a container for these purposes, spatulas - ordinary and notched, as a rule, rollers and brushes for applying a primer, accessories for marking and control - a tape measure, a ruler, building level, marker or pencil, etc.
Some tools will be required in any case, others - depending on the chosen technology for laying the warm floor. This will be discussed in more detail below.
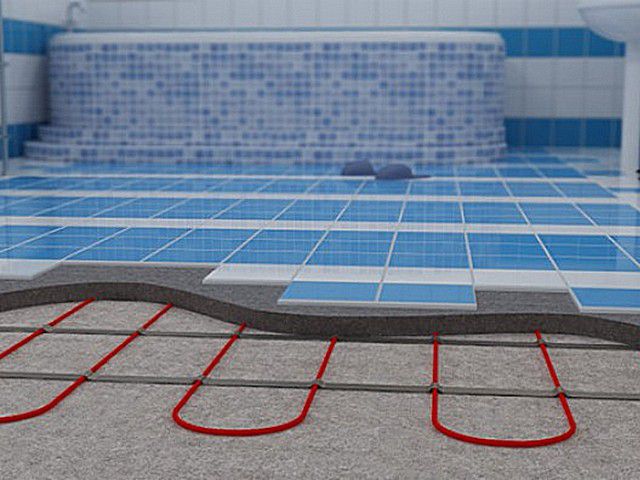
Underfloor heating cable type
Types of heating cables for underfloor heating
To begin with, we will consider the underfloor heating system with a heating cable. First of all, you need to decide on its type, since the cable can be single-core, two-core, or with a semiconductor matrix.
The single-core option is one of the most inexpensive. The conductor is heated according to the usual resistive principle, just like the spiral of an iron or heating element.
Single core heating cable structure
The price for such cables is not high, but it is also very inconvenient to work with them. The main difficulty is that both mounting ("cold") ends must converge at one point - at the place where the thermostat is installed. Considering that cable crossings on the floor are strictly prohibited, this makes it very difficult and sometimes even restricts the possibilities of laying.
Recommended: How to make a foundation for a frame house
A two-core cable is much more convenient in this regard.
The closure of the chain here is ensured by the presence of an end sleeve, there is only one "cold" end, and this makes the laying process much easier. In the role of "spiral" in different models can act as one conductor, or both at once.
Resistive type two-core cable
The main disadvantage of both mentioned cables is the simultaneous and equal heating along the entire length, which is not always convenient. And yet, the circuit itself excludes the performance of the heating system in the event of a break in any section of the heating cable
Semiconductor self-regulating cable is an innovative development.
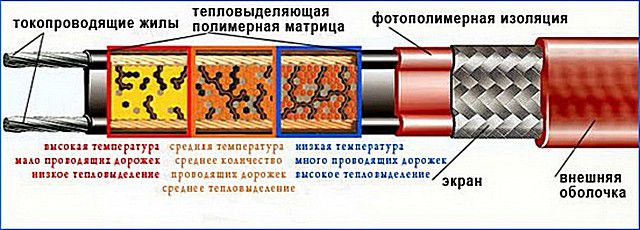
The structure and principle of self-regulation of a semiconductor cable
Metal wires here play the role of exclusively conductors, and heating occurs in a semiconductor matrix located between them. Moreover, the higher the temperature in a particular area, the lower the conductivity of the semiconductor, and the lower the energy consumption. Thus, the possibility of overheating is excluded, the economy of the system's operation increases sharply.
A semiconductor self-regulating cable is still a very expensive "pleasure", and if we consider the options from the standpoint of "price - quality - ease of installation", then a two-core resistive cable becomes the best choice. It will be discussed below.
How to calculate the required amount of cable
Work always begins with planning a cable layout scheme, a place for installing a thermostat and connecting to a power supply.
It is never planned to lay the cable under stationary pieces of furniture - for the correct operation of such a system, constant heat exchange with air is required, and in its absence, the cable may overheat and fail.

An approximate layout of a heating two-core cable
The distance from walls and furniture should be at least 50 mm, and from heating devices (for example, radiators or convectors, heating risers, etc.) - by less than 100 mm. It is strictly forbidden to plan laying with the intersection of the cable. to be guided by the fact that the cable should cover about 70 ÷ 75%! о (MISSING) t of the total area of the room.
The main planning parameters are the required cable length and the pitch between adjacent loops. These values must be calculated based on the laying area (S), the required amount of thermal energy for effective heating (Qs) and the specific thermal power of the selected cable model, calculated for 1 meter of its length (Qkb). Where do you get these values?
S is easy to find by measuring the sections on which the cable will be laid, calculating and summing up their area. The value of Q s is taken equal to:
- If underfloor heating is the only source of heating, then 180 W / m² in the case when the room is located "on the ground" or above an unheated room, and 150 W / m² - if there is a heated room below.
- If underfloor heating is considered as an additional source of heat, these values will be 130 and 110 W / m², respectively.
Specific thermal power of the cable Qkb, W / running meter, is necessarily indicated in the technical documentation of the product.
The calculation is carried out according to two formulas:
The required cable length is:
L = S × Qs / Qkb
Given the length value, you can also find the cable laying pitch - the distance between parallel laying loops:
N = 100 × S / L
In order not to bother site visitors with independent calculations, a special calculator has been placed, designed to quickly and accurately determine the cable length and laying pitch:
Go to calculations
Calculation of the length of the heating cable
Enter the requested values and indicate the planned functionality of the “underfloor heating”.
Use the slider to set the calculated area for laying the heating cable in sq. m.
Choose the functional purpose of the "warm floor"
The main source of heating. Floor on the ground or above an unheated room The main source of heating. Downstairs there is a heated room. Additional heating source. Floor on the ground or above an unheated room Additional heating source. Downstairs there is a heated room
Enter the nameplate value of the specific heat output of the selected heating cable model (W / m)
Underfloor heating cables are not sold by the meter - they are produced in an assortment of standardized lengths with installed connecting and end couplings. Therefore, it is necessary to select the closest length from the model range according to the obtained value.
By the way, it can happen that with a large area of the room, the estimated length will exceed the possible options available on sale. In this case, you will have to split the floor into two sections, and for each, make your own calculations based on its area. Each circuit in this situation must have its own thermostat.
When we decided on the length of the cable, it remains to find the distance between the turns (laying step):
Go to calculations
Enter the cable routing area again
Enter the length of the selected heating cable set
After carrying out the necessary calculations, it remains to accurately, to scale, draw a cable layout diagram in order to be guided by it during the installation process - and you can start practical work.
The process of installing cable underfloor heating under the tiles
| Illustration | Brief description of the performed operation |
| It will not be superfluous to check once again the completeness of the purchased "warm floor". 1 package; 2 - product passport and installation instructions; 3 - coil of heating cable of the required length; 4 - "cold" connecting wire, connected to the cable with a coupling; 5 - corrugated tube for placing a temperature sensor with a signal wire in it; 6 - mounting tape for fixing the cable loops on the floor; 7 - plastic plug for the corrugated tube. | |
| Additionally, a thermostat with a temperature sensor is purchased. | |
| With the scaled cabling in front of your eyes, you can get to work. | |
| In the selected place, using a special crown, a socket is cut out for installing the socket - here the thermostat will be mounted. Its height above the floor level can be any, convenient from the point of view of the owners, but not less than 300 mm. A place should be provided so that it is subsequently never covered by stationary furniture or large household appliances. Very often, the thermostat is installed near the light switch. | |
| From the finished nest vertically down to the floor level, a rectangular groove is cut, approximately 20 × 20 mm. It is necessary for laying installation wires and corrugated tubes with a temperature sensor cable in it. It is advisable to immediately fix two or three wire or other clamps in the strobe - in order to subsequently collect all the wires and the tube into one bundle. | |
| The floor is cleared of debris and dust. | |
| The floor surface is primed with a deep penetration compound. This will remove dust from the surface and ensure its good adhesion to the concrete solution of the future screed. | |
| Roll foil insulation is laid over the entire floor area. It will serve as additional thermal insulation and will help reflect the heat flow emanating from the operating cable upward towards the room. The foil layer is outward. | |
| Neighboring strips or sheets of insulation are stacked end-to-end, and the seam between them is glued with metallized tape. | |
| The next step is to lay out and fix the mounting tapes to the floor. You can fix them, depending on the type of base coating, on dowels or simply on self-tapping screws.The distance between adjacent parallel belts is from 500 to 1000 mm. | |
| Mounting tapes are very handy for cable routing. However, there is an important point to make. It happens that a layer of waterproofing is located close to the surface of the base of the floor, and it should not be disturbed by drilling holes under the dowels or screwing in self-tapping screws. You can do the following - cover the entire floor surface with a strong fiberglass reinforcing mesh. It is easy to tie the cable to it when laying it out, and in addition, the mesh will also serve as an additional strengthening of the screed. | |
| The layout of the cable begins according to the diagram. The first fixation to the mounting plate is near the connecting sleeve, so that the length of the "cold" end is enough to reach the thermostat, without tension and intersection with the rest of the cable. The "cold" wire itself can be placed along the wall up to the groove, laying it between the wall and the foil insulation. | |
| The cable loops are laid in strict accordance with the drawing, observing the calculated pitch. Special fasteners on the mounting plate (bendable "antennae") ensure reliable fixation. If a reinforcing mesh is used, then the cable can be tied up with plastic clamps - "ties". | |
| The installation ends by fixing the cable in the area of the end sleeve. | |
| Further, a temperature sensor with a signal wire is inserted into the corrugated tube. | |
| The head of the temperature sensor must reach the end of the corrugated tube. Then the hole of the tube is muffled with a special cap included in the kit - to prevent the concrete solution from getting inside during further work. | |
| A tube with a temperature sensor is installed exactly in the middle between the turns of the heating cable, fixed to the mounting strips or reinforcement mesh. Starting from the corner between the wall and the floor, the corrugated pipe is placed in a vertical groove. In this case, the bending radius should not be less than 50 mm - so as not to break the tube and thereby pinch the signal wire. The distance of the sensor from the wall is 500 ÷ 600 mm. | |
| The mounting "cold" end of the cable is also placed in the same groove. Sometimes the power supply wires are also placed here. All this is collected in a single bundle, fixed with clamps. Then the strobe can be repaired with cement-sand mortar or putty mixture. | |
| They check the conductivity of the circuit and the resistance level of the laid cable - it must correspond to the data specified in the passport. If possible, the insulation resistance is also checked. Then, in accordance with the circuit of the temperature sensor, they are connected to the terminals of the mounting conductors of the heating cable, the temperature sensor and the 220 V network. It is recommended to tin the ends cleaned of insulation before switching. After that, the system is checked for operability - a short-term, no more than 1 minute, power-up is performed. This is how the operation of both the control panel and the cable itself is checked - its heating should be felt. After checking, the power is completely turned off. For a full guarantee, it is better to uncommute and remove the thermostat again - so that before the system is started, no one could even accidentally turn on the "warm floor". | |
| Many manufacturers of underfloor heating require that in order to comply with the warranty conditions, an accurate scaled cable laying scheme be drawn up in the passport. On it, with reference to the specific dimensions of the room, the laid cable itself, the location of the end and connecting couplings, the temperature sensor and the thermostat should be shown. | |
| To ensure the contact of the future screed with the base of the floor, windows with a size of about 50 × 150 ÷ 200 mm are cut in the foil insulation between the turns of the cable. They are usually staggered with a row spacing of about 1000 mm from each other. | |
| After that, it is recommended to glue an elastic damper tape around the perimeter of the room at the junction of the wall and floor.Further, a system of beacons from metal profiles is installed so that the thickness of the screed is from 30 to 50 mm. A solution for pouring is being prepared, laid out on the floor surface on top of the laid cable ... | |
| ... and then evenly distributed and aligned using the rule. It is important to prevent air pockets - they will drastically reduce the efficiency of the warm floor and may even lead to local overheating of the cable. | |
| The screed must harden and gain strength before starting further work for at least a week. It is recommended to regularly moisten it with water during the first 3 - 4 days after initial setting and cover it with plastic wrap. | |
| After a week, you can proceed to laying ceramic tiles, after thoroughly priming the surface. The cladding technology is common, but the glue must be used one that is designed specifically for warm floors, that is, it is not afraid of temperature extremes. Even after the tile adhesive has completely hardened, you cannot turn on the heating - at least 4 weeks must pass from the moment the screed is poured. It is strictly forbidden to use heating to accelerate the solidification of mortars. The system should be started in steps - on the first day, set, for example, 15 degrees, and then add 5 degrees daily until the design temperature is reached. |
Mesh heating mats
Special heating mats have become very popular. In fact, this is the same heating cable, but already laid and fixed on the fiberglass mesh with a certain pitch.
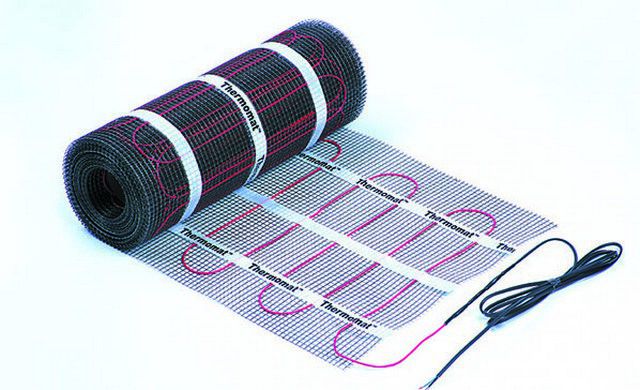
Mesh heating mats are very easy to install
The price for such kits is slightly higher than for cables, but on the other hand, laying is easier, and you can do without a screed from above at all - tiling directly on the laid mats.
Laying planning is generally the same as described above. Mats go on sale with the expectation of different areas of the insulated floor - this should be taken into account when planning and purchasing a set. They can also differ in terms of specific heat transfer. Comparison of these two parameters - the area and the required thermal power, will help you choose the right kit.
Foil insulation does not fit under such mats - therefore, the issues of thermal insulation of the floor must be thought out in advance.
Installation of underfloor heating with mesh mats is carried out in the following order:
| Illustration | Brief description of the performed operation |
| The completeness is checked, a thermostat with a temperature sensor necessary for installation is purchased. | |
| On the wall, in the same way as in the case of the cable, a socket for a socket and a strobe is marked and cut. But, in addition to this, the strobe is also marked on the floor. Its size in cross-section is the same - 20 × 20 mm, length - 600 ÷ 800 mm from the corner. | |
| First, the slots are cut with a grinder ... | |
| ... and then the concrete can be selected with a hammer drill. | |
| As a result, the vertical and horizontal grooves should converge at one point. | |
| You can immediately, after removing the debris, priming and complete drying of the surface, lay the corrugated tube with a thermal sensor. The placement of the sensor in the tube and the installation of the plug are the same as described above. The tube is first placed in a horizontal groove and fixed there ... | |
| ... and then it is stacked vertically - to the place where the thermostat is installed. To avoid creases, the turning radius is at least 50 mm. | |
| After that, the horizontal groove with the laid tube can be immediately sealed with tile adhesive up to the floor level. | |
| The mats are laid out in accordance with the previously drawn up scheme. The requirement is the same - the cables must not cross anywhere. A distance of at least 50 mm is usually left between adjacent parallel strips of the mat. The first strip should be laid so that the temperature sensor is in the center of the cable loop - both along its length and width | |
| If necessary, change the direction of laying, carefully, so as not to touch the cable itself, the fiberglass mesh is cut. | |
| The mat is given the right direction and continues to be laid. | |
| How are the mats fixed to the floor surface? Products from some manufacturers have a self-adhesive base - they are simply smoothed and pressed against the primed floor surface - such a temporary fixation will be enough before laying the tiles. If the mat is normal, then both the mesh and the cables can be point-fixed with silicone hot glue using a gun. | |
| There is another type of such mats - the cable is fixed on elastic mesh tapes. In this case, the edge of the mat is attached to special hooks (they are shown by arrows). These elements must be included in the delivery set - they have a pad with a self-adhesive layer applied. After fixing the elastic bands on the hooks, the mat itself can be stretched in the desired direction. This allows you to vary the pitch between the loops. | |
| These clips are installed at the beginning and at the end of each strip of mat. Otherwise, everything is repeated - the base can be cut to comply with the cable laying scheme. | |
| Such mats are good not only because you can change the pitch of the cable loops - there are more possibilities for laying in difficult areas. For example, the mat can be stretched diagonally or trapezoidally. | |
| After complete laying of the mat, control measurements, switching, test run are carried out - there are no special features here. Then the heating system is completely turned off - and you can proceed directly to laying ceramic tiles. | |
| Tile adhesive is being prepared (designed specifically for warm floors). Then the composition is laid out in sections directly on the laid mat and carefully, so as not to damage the cables, distributed with a notched trowel. The thickness of the adhesive layer should be 10 ÷ 12 mm. | |
| Ceramic tiles are laid directly on this layer of glue. At the same time, it is very important to achieve uniform distribution of the mixture, especially in the places where the cable passes, so as not to leave even the smallest air voids. | |
| The tile is pressed tightly, adherence to a single plane is controlled using a building level. Moving on the tiled floor is allowed after the expiration of the period specified in the instructions for the adhesive composition. However, it is better to start the warmest floor after 3 - 4 weeks. The start-up is carried out in the same way, in steps, with a gradual increase in the heating power. |
The advantage of this technology for laying a warm floor is the fact that it is possible not even to dismantle the old tile flooring. It will be enough for better adhesion to treat it with an abrasive, giving the necessary roughness for adhesion of the glue, or even simply treat it with a special primer "Betonokontakt". Thus, you can quickly and without tedious dismantling work and renew the ceramic coating, for example, in the bathroom or kitchen, and give it all the qualities of a warm floor.
You may be interested in information about what constitutes a pump-mixing unit for underfloor heating
Installation of a rod infrared underfloor heating under the tiles
Another type of electric underfloor heating, which is excellent for further tiling with ceramic tiles, are infrared rod mats.
An innovative approach - infrared rod mats
They are two parallel conductor buses, between which with a certain pitch are placed heating elements 0 rods made of a special material that has the property of becoming a source of infrared radiation under the influence of a passing current, which transfers thermal energy over a distance. Each of the rods is completely independent, and even the failure of one or more will not disrupt the overall performance of the underfloor heating system.
Moreover, the rods have the property of self-regulation - the higher the temperature, the lower their energy consumption. When the maximum heating is reached, they are simply "locked" - this gives considerable energy savings. It is important that such rod mats can be placed over the entire area of the room, regardless of the installation of pieces of furniture - they are not threatened with overheating. And in the future, you can carry out redevelopment, rearrangement in the interior, not at all fearing that this will damage the work of the warm floor.
Schematic diagram of switching infrared rod mats
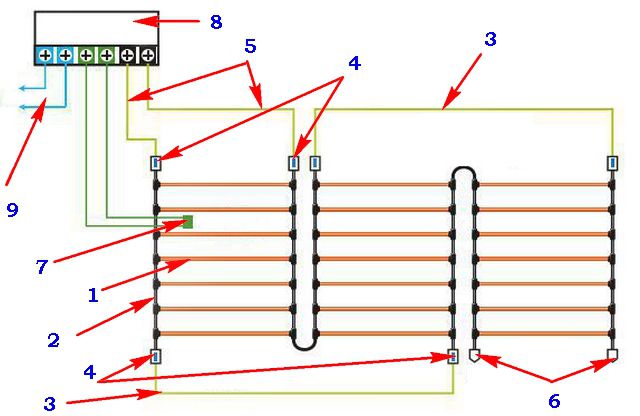
A schematic diagram of the installation of such a floor heating system is shown in the figure, and the laying technology itself will be discussed in the table below.
1 - heating rod.
2 - conductive tires.
3 - switching wires.
4 - special switching terminal connection.
5 - "cold" wires. They can be pre-installed or also require independent switching.
6 - terminal insulating sleeves.
7 - thermal sensor.
8 - thermostat.
9 - mains power supply cables.
| Illustration | Brief description of the performed operation |
| Traditionally, the completeness of the set is checked: 1 - rod mat of the required length to cover the entire insulated floor surface; 2 - installation instructions and product passport; 3 - a bundle of a commutation cable; 4 - corrugated tube with a plug to accommodate the temperature sensor. 5 - a set of crimp terminals - metal sleeves in a heat-shrinkable sheath. 6 - a set of heat shrink tubes. | |
| A thermostat with a temperature sensor is purchased separately. | |
| Another must-have is a thermo-reflective insulation. Without such a substrate, the core floor will not work correctly. | |
| The surface of the floor is cleaned of debris and dust, undergoes a primer, best of all - double. | |
| Preparing a nest for a thermostat, vertical and horizontal grooves, installing a temperature sensor in a corrugated pipe and laying the pipe itself are the same operations as when laying a mesh mat. | |
| A continuous coating is laid with a roll of foil insulation. The joints are fixed with waterproof or foil tape. | |
| The installation of the core mat starts from the area where the thermostat will be located. The mat is rolled in a straight line between two opposite walls. The distance from the walls is about 100 mm. Important - the thermal sensor should be placed strictly between the rods and approximately in the center of the width of the mat. | |
| Now you need to change the direction to the opposite. To do this, the current-carrying bus, farthest from the pivot point, is cut with pliers. | |
| The incision should be made exactly in the center between the rods. | |
| The mat unfolds and continues to be laid. This procedure is maintained until the area is completely covered. Condition - the total length of the mat should not exceed 25 meters. | |
| So that the strips of the laid mat do not move during further work, they can be fixed on the floor with tape, first along ... | |
| ... and then across. | |
| When the mat is unfolded and fixed, proceed to switching the electrical circuit. To do this, there must be a cable coil in the kit. Its cross-section fully corresponds to the power consumption of the rod mat. | |
| First of all, it is necessary to connect the cut and spaced ends of the busbar with a cable. For this, its end is stripped of insulation. | |
| The stripped conductor is inserted from one side into a connecting sleeve, which is tightly crimped at this point, ensuring reliable contact. | |
| Then a section of the switching wire of the required length is prepared. Its end is stripped of isolation. | |
| The supplied heat shrink tubing is put on immediately. It is still being pushed aside - it will be needed later. | |
| The stripped end of the cable is inserted from the other side of the sleeve, where the busbar is already crimped. The terminal is also crimped on the second side. | |
| The crimped sleeve is warmed up with a construction hairdryer.The heat-shrinkable jacket will then fit tightly around the contact joints. | |
| That's not all - a previously worn heat-shrink tube is pushed onto the terminal and also warmed up by a hairdryer. As a result, the connection receives a very reliable double insulation. | |
| Then, in exactly the same way, switching is carried out at the second cut end of the bus. This ensures the integrity of the circuit. If the mat is laid in three or more strips, the operation is repeated. In some models, it will be necessary to connect the "cold" ends to the mat in the same way, which are then brought to the place where the thermostat is installed. | |
| The next step is to install end sleeves at the far ends of the busbars. To do this, they are put on heat-shrinkable tubes, the ends of which, after heating, are tightly squeezed, achieving complete sealing of the cut. | |
| This is followed by checking the circuit, carrying out control measurements, switching the thermostat, test run - all this has already been described above. | |
| If everything is functioning properly, the system is completely de-energized, and then proceeds to preparation for laying the tiles. For this, rectangular or diamond-shaped windows are cut in the foil insulation between the rods - by analogy with the technology of laying the heating cable. | |
| This is what the floor surface will look like before tiling. | |
| One of the windows must necessarily fall on the thermal sensor. | |
| On top of the mat, you can pour a thin, about 20 - 25 mm screed, but it is quite permissible to immediately lay ceramic tiles. | |
| The solution is spread with a notched trowel with the utmost care, achieving complete uniformity and filling all voids. The tiles are laid in the usual way, with constant control of the horizontal position and thickness of the joints. | |
| The main condition for the warm floor to work correctly is that the total thickness of the tile adhesive layer and the ceramic tile itself should be approximately equal to 30 mm. Starting the underfloor heating system is the same as in the cases described above. |
We recommend: How to make soundproofing of doors with your own hands
It must be mentioned that there is another type of electric heat-insulated floors - infrared film type. Frankly speaking, a floor heating system such as an infrared warm floor for laminate, linoleum, carpet, parquet or solid board is more suitable.
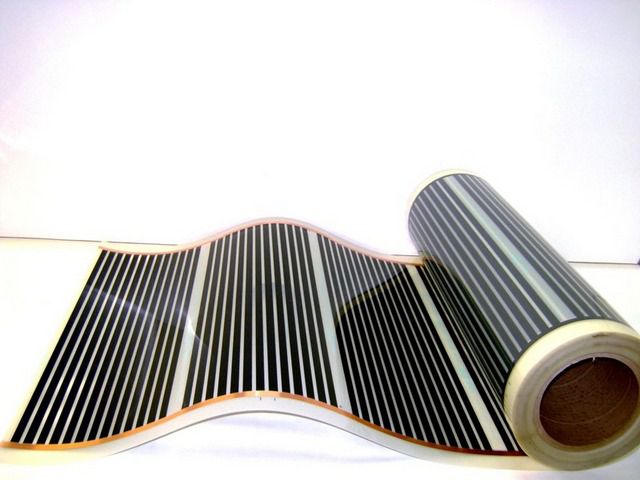
Film infrared heating element
Film elements are not combined with ceramic tiles very well. Firstly, it is difficult to ensure reliable adhesion of all layers - the subfloor, tile adhesive and tile - there is simply nowhere to cut windows in the film, and small holes will not provide good contact. Secondly, whatever you say, a cement-based layer significantly reduces the unique performance properties of such infrared heaters.
Nevertheless, craftsmen find ways to use infrared floors and in "alliance" with ceramic tiles. For example, sheets of waterproof plasterboard are laid on top of the mounted film floor. Gypsum weakly resists infrared radiation, therefore, the tile receives a reliable, even base, and the loss of infrared heating properties is not so significant.
Another option is to pour a thin reinforced screed over the infrared film elements, which will become the basis for laying the tiles. A similar technique is well shown in the proposed video:
Video - Film infrared floor for ceramic tiles
Types and types of fastening of quartz vinyl panels
There are several ways to connect tiles:
- With glue locks. Each tile has 4 adhesive strips: 2 outside and 2 inside. Thanks to them, the panels are connected to each other. The gap between them is invisible, even by touch it is very difficult to determine. It is necessary to lay this type of panel on a flat surface.In the reviews, many write that it is not necessary to remove the old coating, the main thing is that the base is even.
- Installation with glue. In this case, the quartz vinyl tile does not have any locks and is attached with a special glue to the base of the floor. This material is attached only to a perfectly leveled surface, preferably to a cement screed treated with a primer mortar.
- Glue method. The entire back of the quartz vinyl panel is coated with a compound that provides adhesion to all types of surfaces. According to reviews, most use this method of fixing tile material.
- Groove method. It is like a tile connection, with a spike on one side and a groove on the other. An even subfloor surface is also required for this coating.
- Lock connection. The basis for it is plastic, with spikes located along the edge in such a way as to be fixed in special locks that are located on the adjacent panel. For the installation of tiles with a lock connection, a flat surface is required, since this material is not flexible and plastic enough.
The process of installing tiles on a heated floor
The underfloor heating system for absolutely all floor coverings is composed of the following elements:
- material for thermal insulation at the bottom of the structure to direct heat and cut off cold surfaces;
- special pipes for the heat carrier;
- reinforcing mesh and pipe fastening elements;
- concrete screed;
- vinyl tiles for flooring.
Calculations of the location of the contours of heating pipes are made in advance. Their number is limited by the capacity of the heating boiler for heating a specific volume of liquid. One circuit - no more than twenty-five running meters of the heating pipe.
They propose to do the work in the following order:
- A thermal insulation layer is laid over the surface of the rough coating, and a damper tape is applied to compensate for the thermal expansion of concrete.
- For fastening pipes - guides. In the usual case, it is enough to lay the reinforcing mesh and fasten the pipes with clamps every twenty to twenty 5 cm. The fastening must secure the pipe, leaving room for thermal expansion.
- Pipe installation near the walls is carried out at a distance of 70 mm.
- The procedure for laying pipes provides for the outlet of the ends to the distribution manifold.
- After the pipe-laying work, a tightness test is carried out and the temperature of the liquid is brought to 20 - 25 degrees, a screed is made.
- After the final screed has dried, prepare and lay the PVC tiles.
- The surface of the screed is thoroughly cleaned of dirt, flaws are eliminated, and dust is removed.
- Leave the tile indoors at a temperature of 20 degrees for a period of at least 12 hours so that it takes on size and straightens out.
- Tiles with a locking fastening system and self-adhesive base will not be difficult during the installation process. Set from the far room corner with a ledge of each row by 1/3 or 1/2 lamellae. In this case, the projections of the following tiles are inserted into the grooves of the locks without excessive efforts. Self-adhesive tiles are straightened during installation to release air under the product and firmly adhere the coating.
- The tile, the installation process of which is planned with the use of glue, requires a scrupulous selection of it, taking into account the operating temperature conditions.
Styling option
Having become familiar with the conditions and requirements for the installation process of the hydraulic system "underfloor heating", the owners of the premises will easily select the material that is suitable for floor coverings
from the point of view of aesthetics and practical use to solve the issue of energy saving. Of interest is the process of installing a underfloor heating system.
PVC tiles
... The primary costs for the purchase of equipment and installation work will be more than justified in a short time.
One of the options for laying a final vinyl tile flooring is shown in the material below.
Laying vinyl tiles
Warm floor ‘target =“ _ blank ”>’)
Electric cable underfloor heating and PVC tiles
They represent a special mesh (cable mat) with a heating cable attached to it in a snakelike manner.
A cheaper option is also used, which implies the installation of only a cable that is fixed to the base. The system is heated by transforming electrical energy into heat.
It is impossible to lay PVC tiles directly on such a structure, since the installation of the latter requires an even base. Therefore, if you choose this type of underfloor heating, you will need to hide it under a concrete screed.
The advantages of this system include a more budgetary installation (compared to a water circuit), temperature uniformity along the entire length, the ability to install in rooms where the temperature drops to zero degrees (country houses, etc.).
Tile and porcelain stoneware are very practical materials, but they are cold for walking barefoot. The underfloor heating system solves this problem and also provides additional room heating. At first glance, an infrared heated floor under the tiles is best suited, since it has the thinnest heating elements. But in reality, the film poses more problems than it does when laid in tile adhesive. In this article, we will look at how you can install infrared floor heating with your own hands.
Fast navigation through the article
How film coatings work
There are the following types of heating systems operating on the principle of radiation of infrared rays:
- carbon;
- bimetallic.
In the first case, carbon fiber heating strips are used. The material is made from carbon paste, to which auxiliary components are added to improve properties. The strips are covered with insulation (lavsan film). This is a kind of polymer material. Properties:
- gas tightness;
- transparency;
- the material is non-hygroscopic;
- high strength when exposed to deformation loads (breaking);
- resistance to point damage;
- the film can be used as an electrical insulating material;
- not susceptible to extremely high temperatures.
Thanks to this, this type of coating allows you to operate the heating system for a long period. The graphite strips are connected to the power supply using metal conductors, which can be copper or copper-silver.
It is recommended to use this version of the IR system for heating walls and ceilings, however, if a number of conditions are met, it is permissible to install it on the floor.
The bimetallic counterpart has a different structure. It is based on heating elements made of copper with aluminum additives. The strips consist of 2 layers, each of which is made of a different metal, which ensures the required properties of the material. The connection to the power supply is made through an RCD. Tiles on an infrared heat-insulated floor of this type do not fit.
The principle of operation of a carbon film coating is based on the emission of infrared rays under the influence of a current that is supplied to the graphite strips by means of metal conductors. As a result, the tiles are heated. The finishing material gives off heat to the air, which helps to improve the microclimate in the room.
Locked Quartz Vinyl Tiles
When laying the interlocking tiles on the "warm floor", the condition must be met - leave expansion gaps along all walls from 5 to 10 mm. The gaps allow the tile to move as it expands so that the joints are not damaged.
Castle tiles Art
East
Recommended for use with electrical heating systems, it is not advisable to use water heating.Heating temperature no more than 28 ° C. In general, the interlocking tiles are sensitive to temperature extremes and change their size. The temperature gap must be at least 1 cm. This also applies to installations with "warm floors", and applications on balconies, rooms on the south side, where heating in the sun can occur.
The manufacturer advises against using any kind of underlay for the interlocking tiles, both during normal installation and when laying on a warm floor.
The brand has Art
East
there is one more
collectionARTSTONE
33/42 class, which stands out for its structure. This tile uses a rigid SPC board as the load-bearing base. This slab is a Stone Polymer Composite.
Unlike quartz-vinyl laminate with WPC (Wood Polymer Composite) board, STONE tiles from ART EAST:
78% consists of calcium carbonate and does not contain a blowing agent, wood flour and plasticizers;
thinner, but more durable, more resistant to dimensional retention with changes in humidity and temperature;
more durable due to the same denser structure.
ART STONE SPC is a stone-polymer tile with locks, the superiority of which over floors with WPC slabs has been confirmed by laboratory tests. All these characteristics make the Stone collection tiles the most suitable material for "warm floors" than other PVC interlocking tiles.
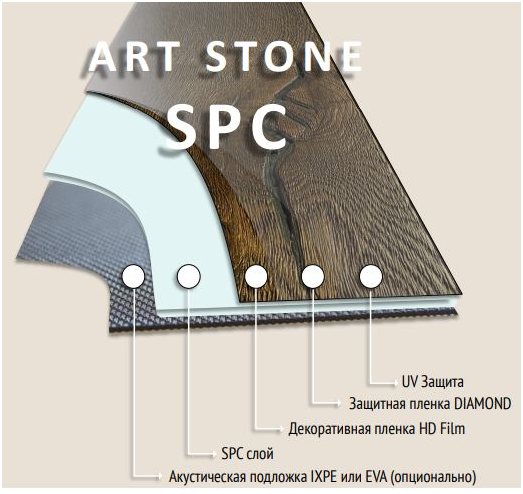
Tests show that ART STONE can withstand temperatures above 28 ° C. But the brand's representative recommends that you do not take risks and use this limitation during operation. Art Stone castle tiles can be used with any kind of floor heating systems.
PVC castle tiles Floor
Click
- in the composition of 30% quartz. Compared to other quartz vinyl coatings, it is soft. Floor Click quartz vinyl laminate with "underfloor heating" changes its dimensions and can also expand when installed in areas with intense sunlight (south-facing, with floor-to-ceiling windows, etc.). When laying, it is imperative to leave a gap of 1 cm. It is also advisable to perform expansion joints under the sills at the entrances to the rooms and every 8-10 meters of continuous canvas. Use a 1.5mm or 1mm LVT underlay. It is not recommended to lay on infrared heating, tiles can rise at the joints.
Castle tile collection Decoria
- the material is hard and quite stable, contains up to 70% quartz sand. The manufacturer advises to use a substrate when laying on a concrete screed, otherwise the floors will start to crunch. Permitted to use with heating systems, including film. Use with water systems where the temperature can exceed 28 degrees is not desirable.
It is possible to lay the decor interlocking tiles with or without expansion joints (sills).
Tiles Alpine
Floor
locks can be placed on heating systems. It is better to use a cable type to regulate the temperature and keep it no higher than 28 ° C. A gap around the perimeter of 8-10 mm is required.
Advantages of a warm floor
Below we will consider perhaps the simplest underfloor heating - an ik floor for tiles.
Its advantages are as follows:
- The air in the room does not lose its freshness, because this type of heating does not affect it in any way.
- An infrared warm floor under the tiles, emitting long wavelengths, heats not only the surface of the floor itself, but also the entire body of a person who is currently walking on it.
- This method of transferring heat allows it to be re-released from previously heated objects, which increases the overall temperature in the room even more.
- The content of negative ions in the air increases by at least 4 times.
- During operation, the infrared film does not emit dust, noise and vibration.
- The amount of generated electromagnetic radiation is so small that it can be neglected.
- This type of heating is perceived by a person much more pleasantly at the initial low temperatures in the room than in the case of water heating.
So what is a film infrared heat-insulated floor laid under the tiles? By and large, infrared heating consists of a thin film 0.3-1 mm thick, equipped with an electrically conductive element inside. Methods for installing an infrared warm floor under a tile will be described below.

Characteristics of infrared heaters
IR floors are easy to regulate in temperature - for example, by setting the thermostat to 21 degrees, you can achieve the most comfortable floor temperature. Although in general it is possible to heat the system up to 50 degrees, this is not necessary. Since now a lot of manufacturers of IR systems have appeared on the market, you can easily select equipment at a suitable price. Installation can be done independently and rather quickly, and this will also have a positive effect on the owner's wallet of the room being equipped. And in some cases, infrared floors can even replace a centralized heating system.
IR warm floor under the tiles - which one is better
Advantages of an infrared floor
IR floor has a considerable number of advantages.
- The IR system does an excellent job of heating the surrounding interior items. The wavelength is 5-20 microns, which allows it to pass through the tiles.
- Adjusting the temperature with an installed IR floor system is quite simple, which will create an optimal microclimate in any room.
- Such floors are economical, they consume little electricity.
- Human health will not suffer from significant electromagnetic radiation, as when laying a cable floor.
- IR floors can become a kind of air ionizer.
IR warm floor under the tiles - which one is better
Disadvantages of infrared systems when laying them under tiles
But IR floors also have their disadvantages. This is especially true for the option in which the system is laid under the tiles.
- Heating not only the floors, but also the room with this system is beneficial only in small rooms. Otherwise, the heating system will force you to mercilessly spend money on utility bills.
- IR floors should not be installed where they will be covered by furniture or plumbing fixtures. Therefore, it will no longer be possible to rearrange the room.
- Tile glue, like a cement screed, albeit not so intensely, will gradually damage the IR floor film, due to which its service life will significantly decrease.
- If infrared floors are out of order, they can cause a fire due to a short circuit.
- Slight adhesion of the film makes installation difficult. By the way, adhesion can be increased by placing drywall and fiberglass mesh between the heating system and the tile. But in this case, the heating capacity of the system will be somewhat reduced.

Infrared heating film Heat Plus, Hi Heat (warm floor)
- Laying floors of this type should be done on a perfectly flat surface, which requires a number of preparatory work.
Underfloor heating installation
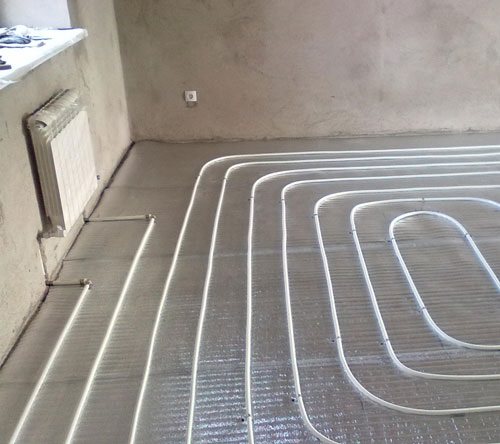
Laying the underfloor heating water circuit on an insulating material
When installing the underfloor heating system under PVC floor tiles, pipes laid in a screed are used. The installation process is as follows:
- The concrete base is cleaned of debris; if necessary, local repairs are performed.
- The overlap is leveled with construction self-leveling mixtures.
- An insulating material is laid on the base with a foil layer facing up.
- A damper tape is fixed around the perimeter of the room.
- The pipes are laid according to the chosen scheme - "snail" or "snake". Special plastic hooks are used to fix the contours. Also, pipes can be laid on a reinforcing mesh, to which they are attached with plastic braids.
- The system is connected to a manifold, filled with water and checked for functionality.
- Pipes are poured with a coupler, after turning off the system.It will be possible to turn it on only after the solution has completely dried.
If pouring the screed is not possible, for example, on a wooden base, the pipes are laid dry. In the boardwalk, channels are cut out for pipes, and after their laying, a flat plywood base is mounted under the quartz-vinyl tiles.
Wet and dry installation
Pouring concrete into an infrared floor is called wet installation. Before pouring, the plane must be prepared: lay on the floor a heat-reflecting element with low shrinkage (isolon, foil-insol or rolled technical cork). The heat reflector is cut into uniform strips and placed along the width of the substrate. The reflective element is laid in 15–20 cm increments.
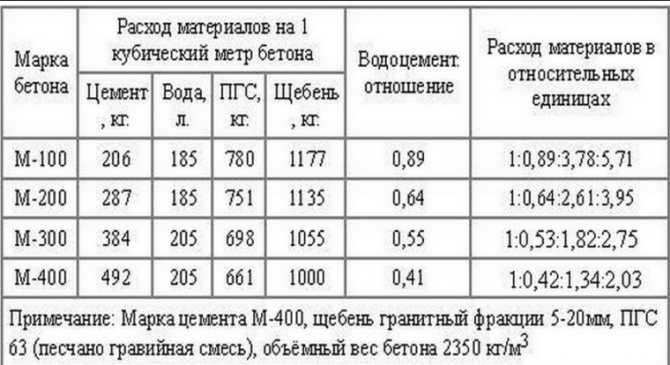
Concrete grades table for underfloor heating
Professionals advise using a painting or plastic mesh as a reinforcing element, since conductive elements can cause a fire or cause serious harm to a person in the event of a short circuit. The mesh with cells 5x5 or 10x10 is fixed to the primary screed on the dowels.
It is better to choose the drilling places in the places where the film is cut or on the sides, so as not to touch or damage the carbon strips of the infrared floor. Note that the number of mounting holes depends on the geometry of the floor. There is always more mounting space in square rooms than in houses with irregular or non-standard floor shapes.
For better contact with the primary screed, a perforated heating film is installed. If you cannot afford to buy perforated thermal film, then feel free to use the usual one. "Striped" film is sold without technological holes, so you have to make them yourself.
Types of laying electric floor heating
First, the heat-reflecting element is installed, and then the underfloor heating system is laid on it. After that, you can proceed to the penultimate stage - filling the screed with liquid tile glue, the layer of which should not exceed 5 mm.
The screed is leveled with a rule and left in this form until completely dry. With the right temperature and good ventilation, the drying period lasts from 5 to 10 days. Please note: porcelain stoneware is placed only on the hardened and dried screed.
Laying an infrared floor on a "Dry screed" is fundamentally different from the above-described installation technology on a "Wet base".
Step-by-step instruction:
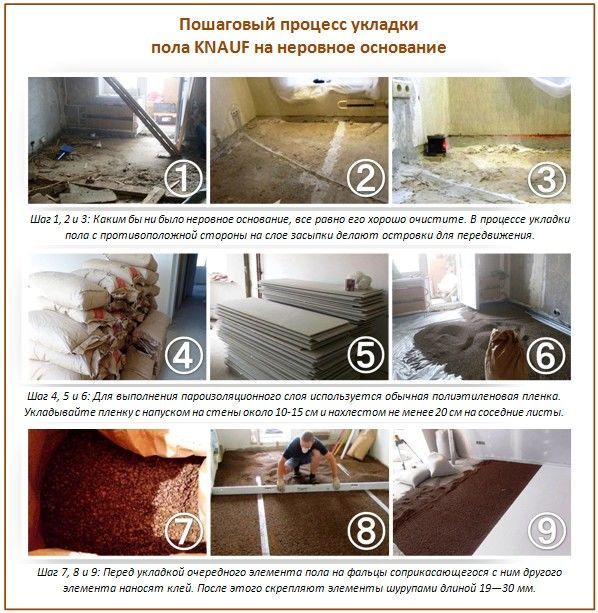
Step-by-step process of laying Knauf floors
- Level the subfloor;
- Lay the elements of the heating system according to the instructions;
- Next, sheets of gypsum fiber board are laid on the assembled structure. Features of installing gypsum fiber: first of all, a special tape is glued along the walls. Note, before gluing the tape, the floor must be leveled with self-leveling mixtures and treated with a primer. GVL boards are glued to the rough surface with glue and self-tapping screws;
- The tile can be laid exactly one day after the installation of the GVL boards.
Underfloor heating and PVC tiles
It is a complex, closed structure consisting of pipes, a pump, a distribution manifold, valves, fittings, an air vent, and fasteners.
One of the main advantages of this model is the minimum heat loss. In addition, it is environmentally friendly, does not create electromagnetic radiation (unlike electric floors).
Most often they are installed in private houses, cottages, since the installation of a heating boiler is necessary. In apartments - hydraulic compatibility with the pre-installed heat exchange system of the room is required.
Water models are demanding on the thermal conductivity of finishing materials. In this context, PVC tiles are the best choice.
The disadvantages include the risk of leakage, labor-intensive installation.
IR floor installation under the tiles on the bathroom floor
The features of the infrared floor device determine the main advantages of such a modern heating system:
- the insignificant thickness of the heating film does not significantly affect the height of the room;
- self-installation is simple and fast enough, which is explained by the implementation of connections using conventional terminal clamps and the complete absence of the need to use special fasteners;
- an emergency situation causes the RCD to turn off, but is not accompanied by leaks, as in the case of using the "warm water floor" system;
- safe operation in stand-alone mode using a timer and control system;
- high level of fault tolerance, which is due to the parallel connection of all thermal elements.
However, it must be remembered that infrared floors are highly sensitive to the thermal conductivity of the finished floor covering, therefore, under conditions of excessive pressure and load, mechanical damage is not excluded.
The use of infrared floors allows you to achieve increased energy efficiency and the highest thermal efficiency in comparison with other electrical types of the "warm floor" system.
Vinyl adhesive tiles
Vinyl tile is a fairly soft material. When heated, the tile expands greatly. Resizing can be affected not only by the floor heating system, but also by exposure to direct sunlight. Still, some manufacturers consider it possible to use their vinyl tiles and floor heating systems.
For example, a company Tarkett
gives the following instructions:
Do not install Art Vinyl tiles on a heating system that does not ensure that there is no condensation on the substrate.
Avoid the heating temperature of the base surface above 27 ° C.
Before installing modular tiles, the heating system is turned off 3-4 days before the start of work.
Installation is carried out at a room temperature of 15-28 ° C, optimally at 20 ° C.
The heating system is connected no earlier than 72 hours after the end of the installation.
Experience has shown that when heated above 27 ° C, Tarkett, Forbo vinyl tiles become soft, therefore we, as experts, do not recommend laying vinyl tiles on a “warm floor”. We believe that this material can diverge at the joints and deform under the influence of heat.
Choosing a floor heating system
In modern underfloor heating systems, either the electrical resistance of the elements ("electrical systems") or the fluids flowing in the pipes ("hydraulic systems") are used to heat the floor. All heating types can be installed as the main building system or as localized floor heating for warmth and comfort.
The warm film floor, laid under the tiles, provides the room with the required temperature, it is economical, very easy to install and safe. The tile is also considered a super floor covering, because it is durable, practical and does not require much maintenance. Ceramic tiles are an efficient heat absorber with excellent thermal conductivity. The thickness of the coating does not affect the floor level at all, no toxins during installation are also a huge plus, and installation is done very quickly and quite simply.
Carbon strip film that produces infrared heating is a completely new product. The thermal conductivity of this film is much higher than that of any analogue, but the power consumption is much less.
The system is so easy to use that sometimes it is used as a mobile one: it is laid under the carpet in winter and cleaned together in summer. The film can be mounted not only on the floor, but also in any other place: on the walls and even on the ceiling.
Before deciding to install a warm floor, you need to weigh all the pros and cons.
pros
- Modern and high-tech heating.
- Providing warm and cozy stone and ceramic tile floors.
- Indoor radiators can be replaced, saving walls and floor space for high-end finishes.
- Installation in a new building is possible.
Minuses
- Slow heating time compared to other forms of heating.
- Not all heating systems provide complete radiator replacement.
First things first!
The warm film floor should be carefully examined. Damage sometimes occurs during storage or transportation, and sometimes during installation. Therefore, it is highly recommended to check the film with a digital ohmmeter after purchase. The check should be done three times: after unpacking, installing and laying the tiles.
Laying the film floor under the tile with your own hands
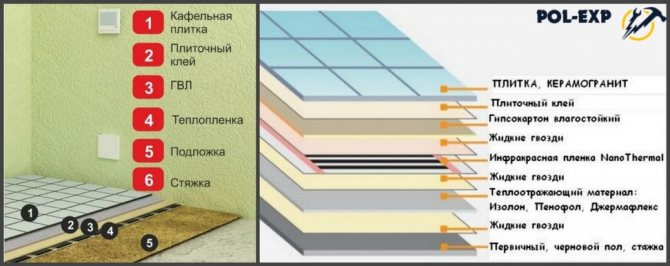
At the initial stage, preparatory work is carried out. The surface is cleared of debris and leveled. The thickness of the underfloor heating can be up to 1.5 cm.The approximate sequential layer of the materials to be laid is as follows:
- heat-reflecting substrate - 2-3 mm;
- infrared film - 0.4-0.5 mm;
- painting net - up to 2 mm;
- a layer of concrete mortar (or tile adhesive).
You immediately need to decide on:
- the location of the thermostat;
- efficient distribution of the film under the tiles.
The installation of a warm floor begins with the installation of a heat-reflecting substrate. The best option would be to use strips, the size of which is 0.6 m each. If you purchase a wide material, it should be cut off.
An infrared film is laid on top of the substrate. There are such requirements when performing this work:
- stationary furniture should not be placed on the film (it can lead to burnout of the system);
- the film should cover up to 70% of the area in the room;
- the presence of an indent from the walls at the level of 10-12 cm;
- the film is not overlapped.
It is more expedient to distribute the film along the maximum length of the room. The marked heating material is cut off. It is recommended to cut pieces of film in places where there is no graphite layer. If, nevertheless, it is necessary to cut it off along the graphite layer, then this place is subsequently insulated with scotch tape or electrical tape. The film is attached to the substrate with adhesive tape.
Next, you need to start connecting the film floor
Particular attention is paid to the correct installation of the thermostat and temperature sensor. Immediately it is worth making a reservation that one thermostat will be able to normally "serve" a room with an area of 12-15 m2
It is installed next to the supplied wiring.
The cable is fastened to the film using copper clamps. The degree of reliability of the connections is checked using the halves of the clamps, which must be in contact with each other. Bitumen tape and silicone sealant are used to insulate the clamps.
While the sealant dries, the thermostat is mounted. When using an overhead device, the cable is led outside the wall and placed in a plastic box. If the thermostat is built-in, then a hole is hollowed out in the wall for it and grooves are made for the cable.
The thermal sensor is mounted under the film. For this, a groove is made in the base, and the sensor itself is placed in a corrugated tube. The sensor wire is laid in such a way that it is located directly under the tiles.
The thermostat is securely attached to the wall and connected to the electrical cable. Foil tape is glued obliquely to the film. To ground the floor, one of its ends is connected to a wire.
With the help of a test switch on the heating system, its operability is checked. All sections should warm up for 5-8 minutes. Using a tester, the cuts and joints of the film are checked.
Further, the underfloor heating is laid in the following sequence:
- holes are made;
- dowels are inserted into them;
- the painting net is attached with self-tapping screws;
- a thin and uniform primary concrete screed is created;
- complete drying of the screed occurs;
- the last check of the functioning of the warm floor is carried out;
- a fixing screed is applied;
- after it dries, tiles are laid.
Screwing in self-tapping screws when attaching the painting net should be done very carefully. They can damage the surface of the film or contacts, which will cause an interruption in the electrical circuit. After the final fixation of the mesh, it is necessary to test the underfloor heating.
When laying the film floor, it is prohibited:
- carry out work at high humidity and air temperature below 0 ° C;
- use nails as fasteners;
- connect the film without grounding;
- bend it at an angle of 90º on an area up to 5 cm long;
- install the film in close proximity to other heating devices.
In order to avoid mechanical damage to the film, it is recommended to carry out installation work in soft shoes. You can use the infrared warm floor after about a month, when the concrete base under the tiles is completely dry.
Video on the device of the film floor:
Installation steps
Preparation
Heating elements must not be placed under low furniture. There must be good ventilation above the floor and there must be a gap of at least 3 cm.
In order to direct heat energy upward and reduce electricity consumption, heat-reflecting insulation must be installed under the heating element. You can use materials covered with a metallized polypropylene or polypropylene film, but it is forbidden to use insulation based on aluminum foil, as it will corrode over time.
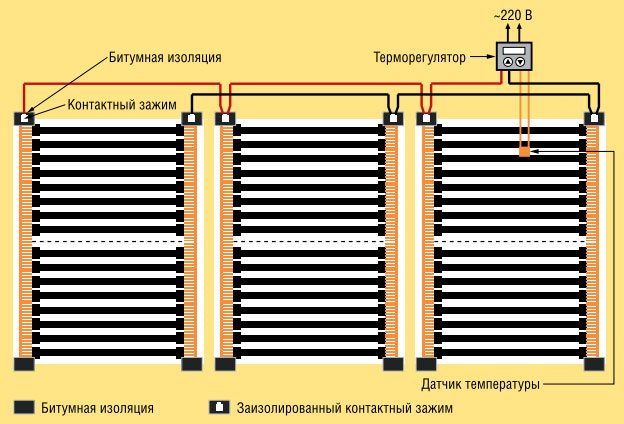
General network connection diagram
- Select in advance the installation location of the thermostat on the wall and bring the wiring there.
- Determine the zones on which the film warm floor will lie.
- Prepare a clean and level base.
- Place heat-reflecting material on the floor. It is best to lay it over the entire area of the room, and not just under the film, so as not to create unnecessary irregularities. Secure it with tape to the base and glue the joints.
Installation of thermal film
- Roll out a roll of thermal film on the floor. Along the specially marked lines or between the black silicon strips, you can cut the roll to the desired size. The copper contacts should be facing down.
- Attach a clip to the copper strip. One side of it should be inside the thermal film, and the other should be outside on top of the copper strip. To fix it, clamp it with pliers.
- Cover the cut lines with bituminous insulation. If the cut was not made along special lines, you need to isolate the entire side completely.
- Secure the thermal film with tape so that it does not accidentally move.
It is better to cut the film into pieces of the maximum permissible length in order to reduce the number of contacts. To reduce the consumption of wires, the film contacts should go towards the thermostat.
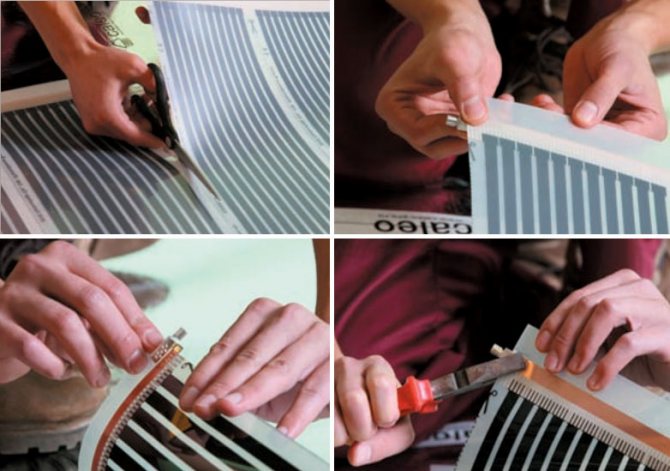
Terminal clamp installation
Connection
- Install the thermostat on the wall. It is best to mount it in an accessible location near a power outlet or switch.
- Lay the wires from the heating elements to the thermostat according to the connection diagram. The wires should run along one wall, preferably under a plinth, in a groove or plastic box.
- To prevent the wires from creating irregularities, cut a groove for them in the heat-reflecting insulation.
- To connect the wire to the clamps on the heating mats, you need to cut off the insulation at its tip. Insert it into the terminal clip and clamp it with pliers. Make sure the wire is firmly secured and not pulled out.
- At the point where the wires are connected, a square of bitumen insulation is glued to the terminals with a margin on top and bottom.
- Connect the other ends of the wires to the thermostat.The connection diagram depends on the specific model, and is indicated in the instructions.
- Install a remote temperature sensor and connect it to the thermostat. Its head is installed from below to the black silicon strip of the heating elements using bitumen insulation. A cutout is made in the reflective insulation in the place of its installation in order to avoid the appearance of a bump.
- If you do not have experience in electrical work, then the connection of the thermostat to the network must be entrusted to a professional master. If the film underfloor heating consumes more than 2 kW in total, it is recommended to connect it through a separate machine.
- After connecting, you need to check each heating strip for operability at a temperature of no more than 30 degrees.
- If everything works fine, a polyethylene film waterproofing is placed on top for additional protection.
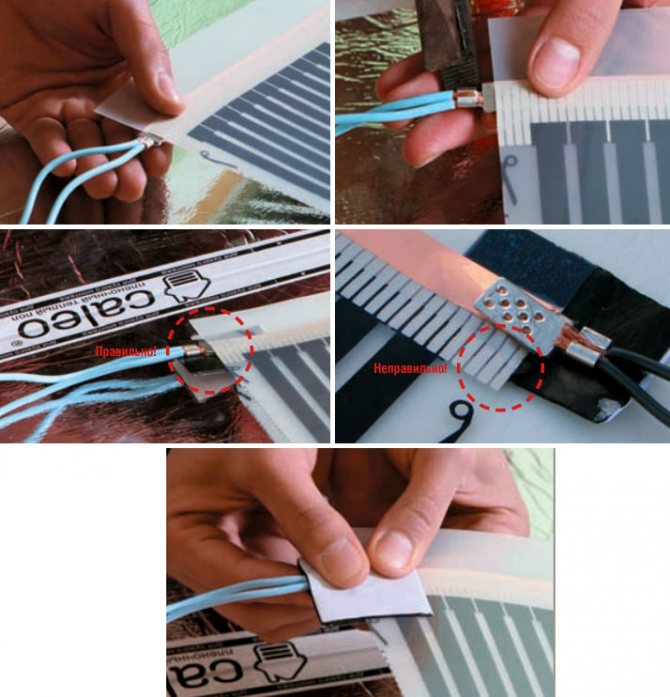
Connecting wires to the film
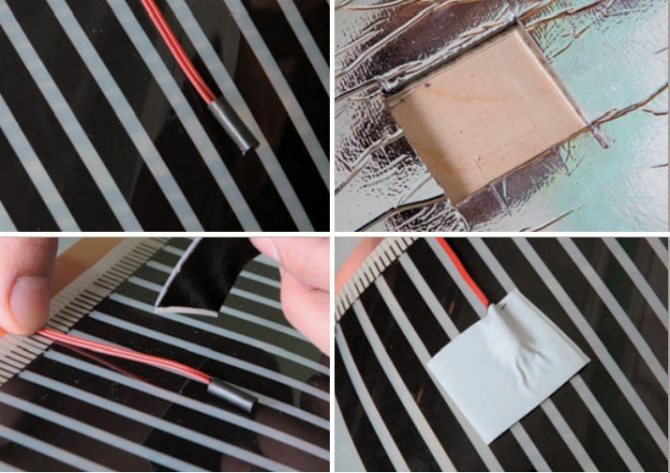
Mounting the temperature sensor
So that if the sensor breaks down, it can be easily replaced, you need to lay it on the floor and walls in a groove inside the corrugation.
Laying tiles
Then there are two ways to lay the tiles on the foil.
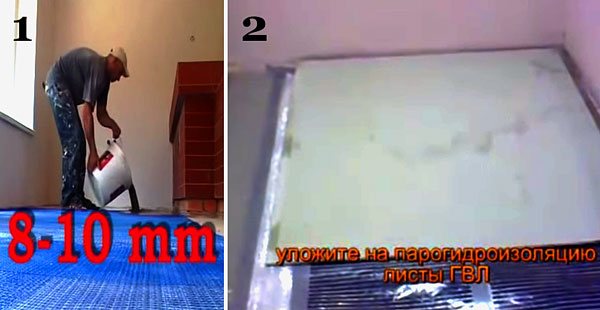
Methods for laying tiles on film
- First, a plaster (painting) mesh is fixed on top of the polyethylene waterproofing to increase adhesion. A screed or self-leveling self-leveling mixture with a thickness of 8-10 mm is poured onto it.
- The second - on top of the waterproofing, the floor is sheathed with gypsum fiber board (gypsum fiber sheets). They are attached to the base with self-tapping screws between the strips of the heating elements. This must be done very carefully so as not to damage them, retreat at least 6-10 mm. If the area is small, then you can first fix the film to the seamy side of the GVL, and then lay it on the floor.
Benefits of using quartz vinyl flooring and underfloor heating
- Thermal conductivity. Quartz vinyl tiles keep you warm.
- Fast heating. Due to the small thickness of PVC tiles (up to 7 mm), heat spreads quickly and evenly.
- Environmental Safety. There are no harmful and toxic additives in the structure of quartz vinyl: there is no emission when heated.
- Anti-static. Static voltage does not accumulate on the surface, PVC tiles do not conduct current, it is absolutely safe together with a film heating system.
- Stability. Quartz vinyl withstands temperature changes without consequences.
- Versatility. Glue or lock type quartz vinyl tiles are compatible with all types of heating, except for infrared film type.
Pros and cons of floor heating with quartz vinyl tiles
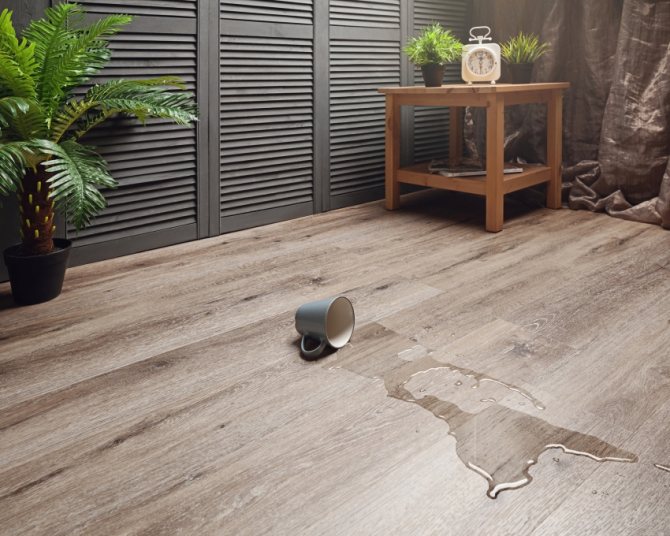
Quartz vinyl tile has good moisture resistance
Quartz vinyl tile is a modern finishing material that has the following advantages:
- Layering. Each layer is made from environmentally friendly raw materials. When heating a warm floor, the finishing coating does not emit harmful substances into the environment.
- Moisture resistance. Such a floor covering is universal and can be used in rooms with high humidity. This is convenient, since electric floor heating is often installed in the bathroom.
- Wear resistance. If we compare the coating with a laminate, it corresponds to the 32nd class in terms of wear resistance.
- Practicality. The coating is easy to care for, does not absorb dirt and can be cleaned with simple detergents.
- Fire resistance. This material does not burn and does not support a flame, therefore it can be used in rooms with high fire safety requirements.
- High thermal conductivity. A system with such a coating will evenly heat the room.
- Soundproofing properties. The multilayer structure dampens shock waves and noise up to 19 dB.
- Maintainability. The individual element can be easily removed and replaced with a new one. You do not need to call the master for this. During the operation of the electric underfloor heating, it may be necessary to replace the cable section.The finishing coat is disassembled for the duration of the repair and reassembled upon completion.
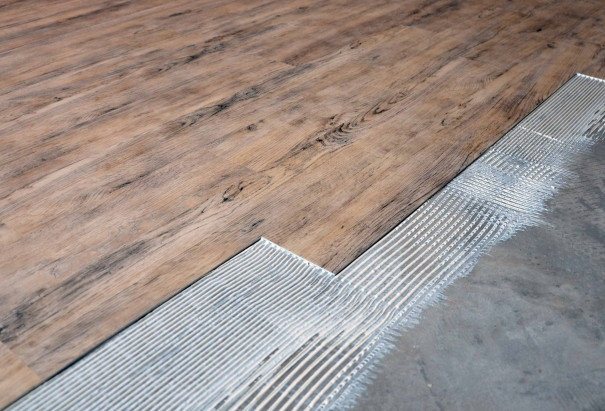
The adhesive method of laying vinyl tiles makes it difficult to dismantle
Like any other material, quartz vinyl has disadvantages:
With the glue method of installation, it will be difficult to dismantle the tiles. The surface of the quartz vinyl laid on a concrete base is cool and uncomfortable to the touch
Therefore, a warm floor in such conditions will be more than appropriate. Gaps are formed between the tiles - this is the main difference from roll materials. It is important to carefully level the base before tiling. Otherwise, all its defects will be visible.
Film properties, advantages and disadvantages
- Easy to install. Installation of the film does not require additional communications (for example, water supply). The heating system can be put into operation immediately after installation. Owners of infrared underfloor heating do not face problems with defrosting or pipe breaks. Installation is carried out in stages, that is, the infrared floor can be installed in each room separately;
Laying electric underfloor heating under tiles - High level of fire safety and absolute harmlessness to human health. A working infrared floor does not burn oxygen, while maintaining the natural level of humidity in the room. In addition, this technology does not generate electromagnetic waves and does not leave harmful combustion products in the boiler;
- Durability. The average life of such floors is about 30 years. Multilayer carbon film perfectly withstands strong pressure (ordinary thermal film is not designed for mechanical force), mechanical damage and shock. In addition, the expensive infrared cloth is not afraid of water and alkaline detergents.
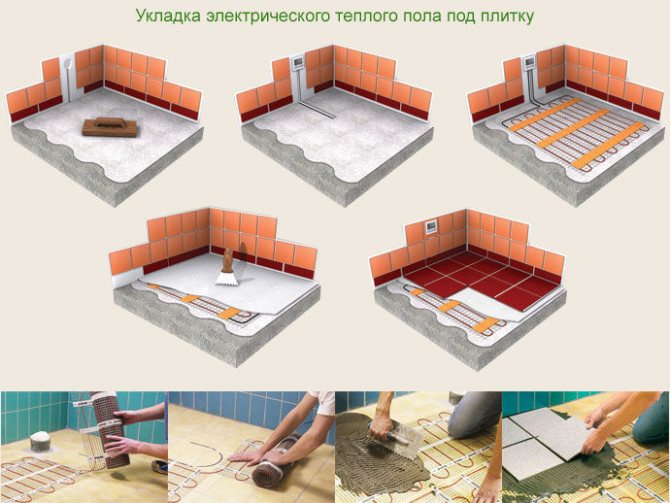
Advantages and disadvantages:
- Film underfloor heating under the tiles is easy to install and does not require the use of special tools;
- Affordable price (such a floor costs 240-260 rubles / m²).

Film underfloor heating under tiles
Weak sides:
- Less reliability (when compared with cable systems);
- Cheap film does not tolerate strong pressure and mechanical damage. It is still possible to strengthen the heating system, however, you will have to pay a round sum for high-quality films with a solid carbon coating;
- Plain film is not intended for use in saunas or steam rooms.
Film floor device
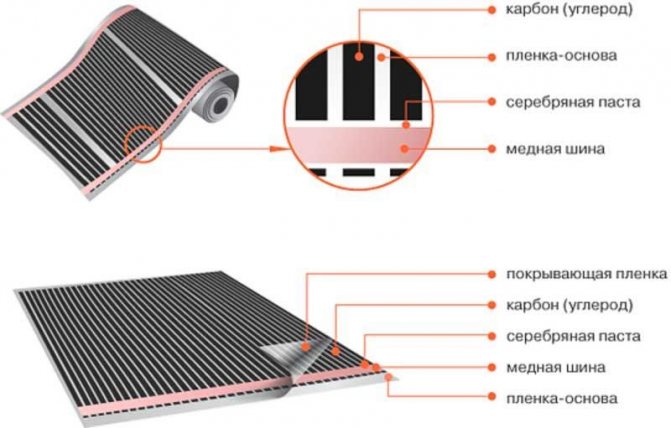
Ways of laying a film warm floor
As a rule, when laying a warm floor with power supply, three methods of their location are used:
- Flooring directly under the flooring, as in the case of a film floor.
- Location in the thickness of the screed, on which, after it dries, the topcoat is laid.
- Installation of electric underfloor heating on top of a screed under the tiles.
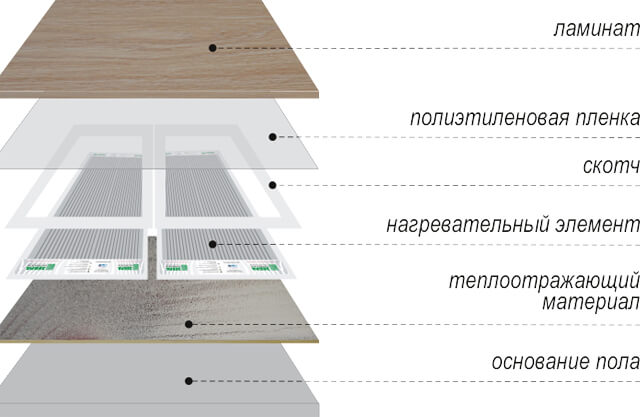
If the floor screed is in perfect condition, you can install the warm floor under the laminate or linoleum directly on it, which will significantly save time for additional work. When laying a cable electric floor in the kitchen, bathroom or on the loggia, the heating elements are hidden in the thickness of the screed, having previously laid a thermal insulating layer.
In the case of laying underfloor heating in two-story houses, where the floor insulation on the first floor has been completed, no additional screed and thermal insulation is required. Ceramic tiles laid on top and a thick layer of glue will serve as protection for the warm floor. True, you should first check the instructions for it.
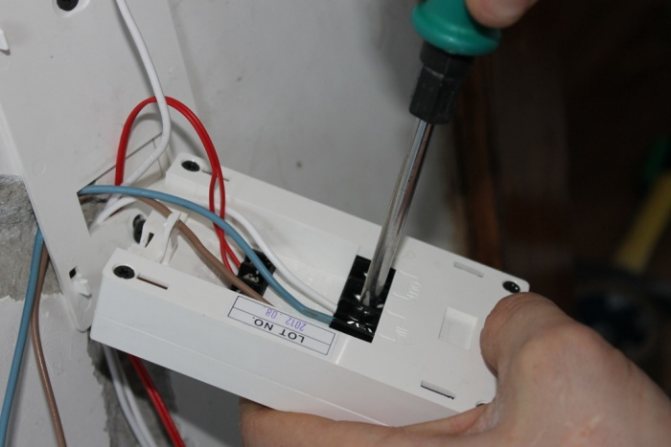
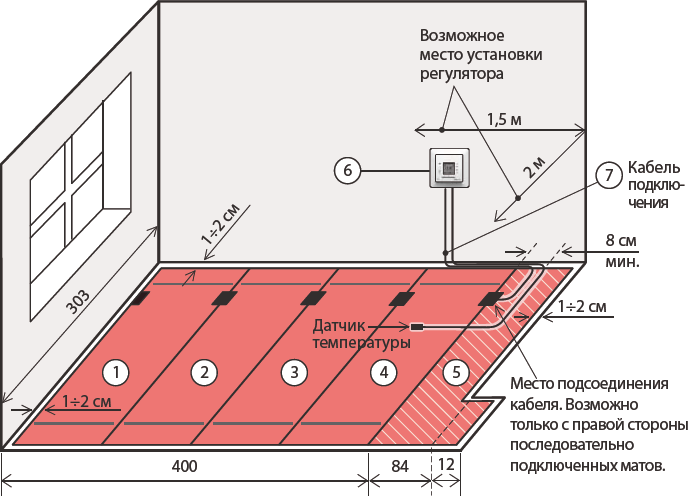
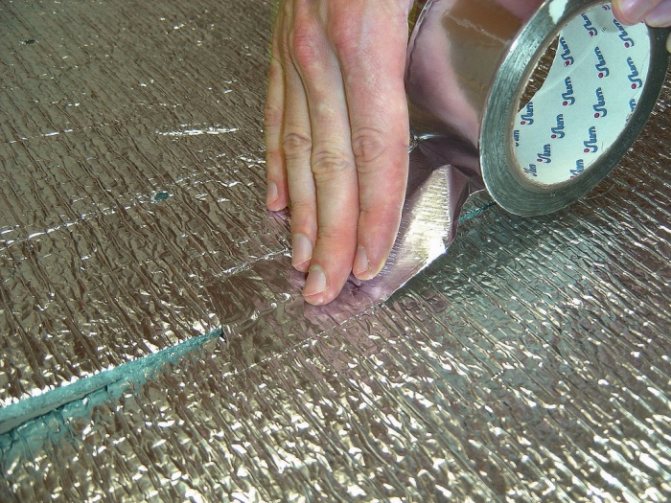
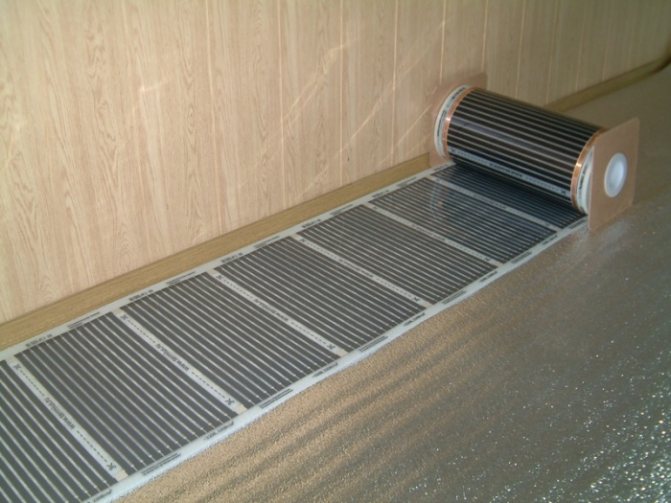
Preparation
Film systems "warm floor" are very demanding on the base, so special attention should be paid to its preparation:
- leveling the surface, cleaned of old coating and debris, by means of a "dry screed" using expanded clay sand;
- leveling the surface with cement-sand mortars and the use of self-leveling floors.
In the first variant, a certain advantage is the absence of a "wet" process, but there is a high probability of damage to the heating circuit on the expanded clay surface.

Warm floors - installation
Traditional cement screed allows to eliminate even pronounced irregularities on the base, and self-leveling floors make the surface absolutely smooth.
It should be noted that the presence of a strong and as even old base as possible allows at the stage of surface preparation to be limited only to a self-leveling solution with a thickness of 0.3-2.0 cm.
Have you decided to install an infrared floor under the tiles? You will find an infrared floor under the tiles with video instructions in the article.
Read about the pros and cons of an electric underfloor heating under the tiles here.
The types and technologies of laying cable underfloor heating under the tiles are described in this material.
Is it possible to lay the film floor under the tiles
Infrared underfloor heating is intended primarily for "dry" installation under laminate, linoleum, PVC tiles, carpet. To attract customers, many manufacturers claim that their film can be laid in a screed or tile adhesive under the tiles.
There are 3 main reasons why you shouldn't do this:
First, the film has poor adhesion. If you immediately pour a screed on it or lay tiles, it will turn out to be floating. Because of this, the concrete will have an empty sound when tapped, and if something heavy is dropped on the floor, then the screed may crack at all.
Sometimes, for better adhesion of the mortar to the top layer, they try to make many cuts and serifs. But imagine how difficult it will be to isolate it all. Moreover, you need to insulate reliably and durable, so that later you do not break the tile if you start to be shocked by leaks and the RCD will constantly work.
- Secondly, the composition of the film itself. All tile adhesives and screeds are alkaline. Over time, polyester film (PET) will erode, regardless of the thickness or number of layers. In the best case scenario, you will get short circuits and sparks from exposed electrical connections.
- Third, there are rod and cable electric floors that are ideal for under-tile installation. When installing them, you do not need to invent or invent anything, they are specially made for "wet" installation.
But there are several installation options, which are discussed below.
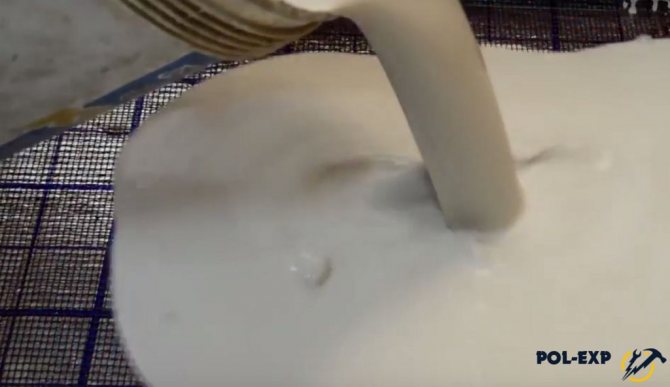
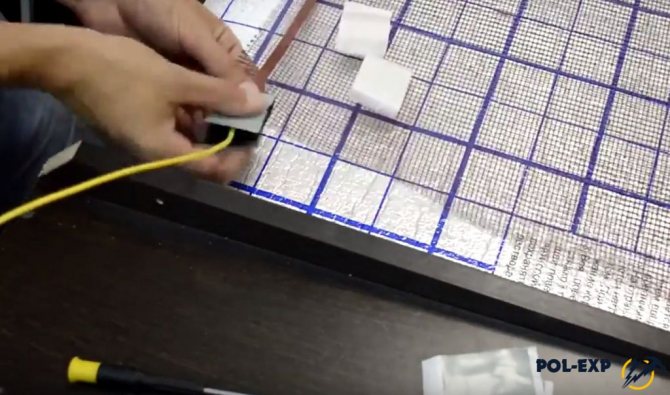
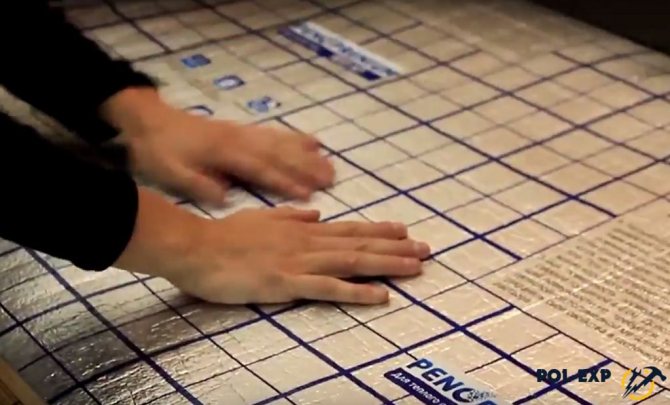

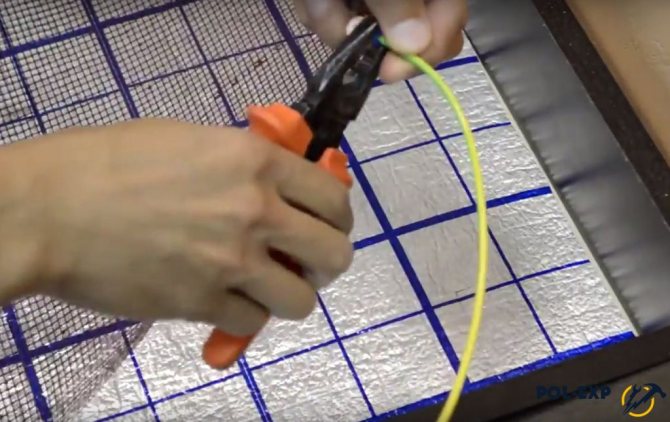
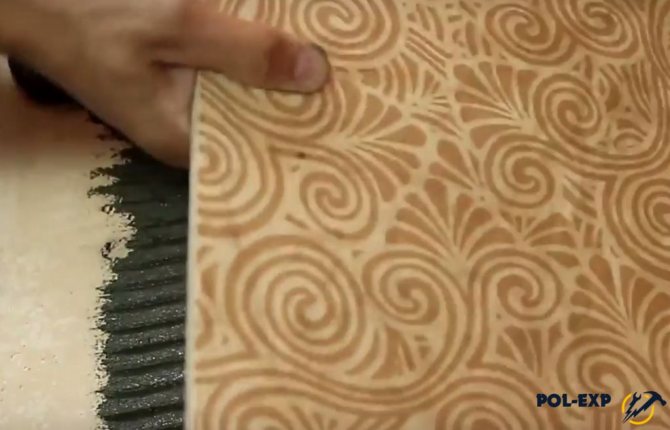
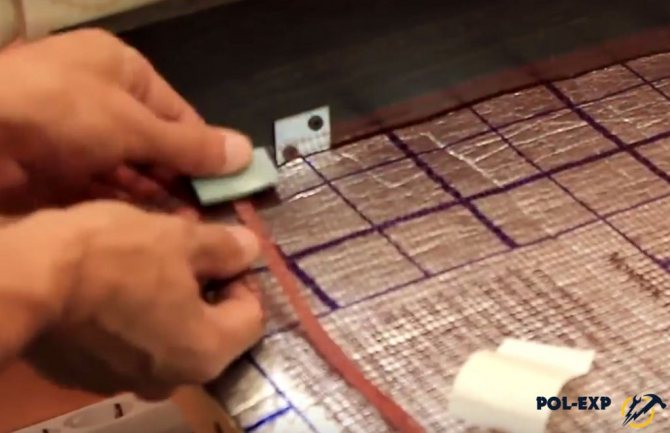
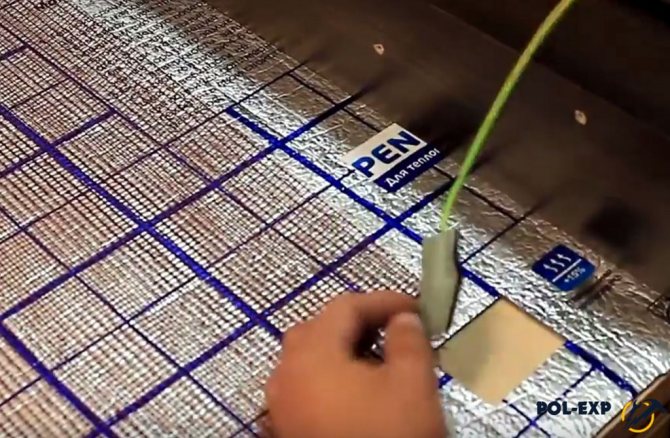
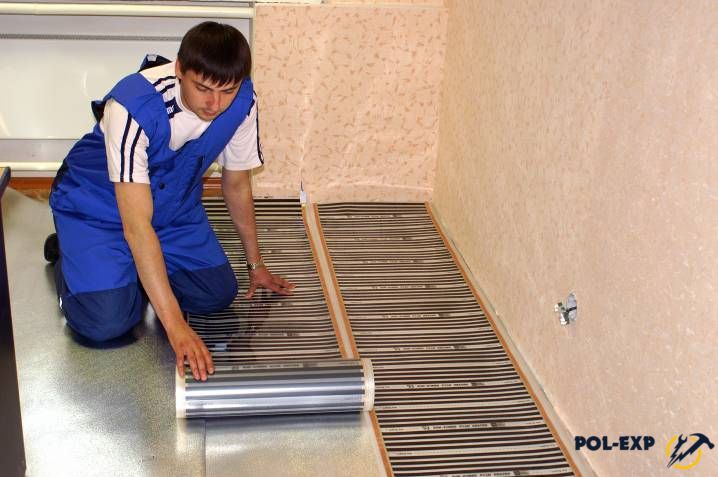

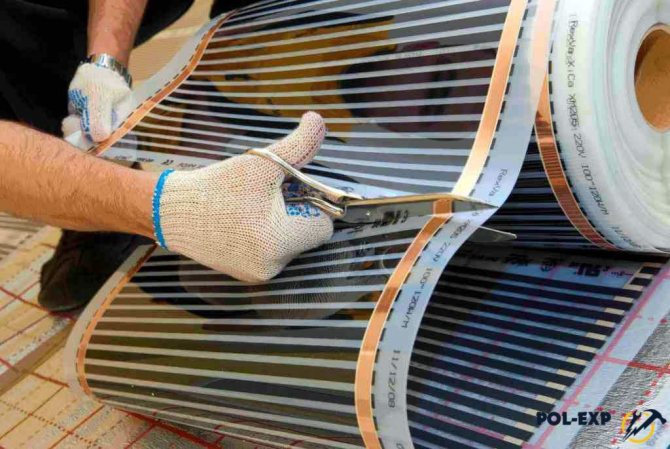
Methods for installing IR coatings under tiles
There are two technologies for installing an infrared floor under a tile: dry and wet. The first option assumes that the IR film will not come into contact with concrete. Wet installation of an infrared floor is the pouring of concrete over heating elements. Let's consider how to mount a warm floor in each of the ways in more detail.
Dry method
Dry installation is carried out as follows:
- Preparation of the premises. First, we remove all the debris and dust. Pits, cracks and bumps must be leveled and covered. If there are a lot of cracks, you can make a new concrete screed using self-leveling mixtures. Next, we mount the waterproofing membrane. If a waterproofing membrane is used, then the joints are necessarily sealed with putty or wide tape. The membrane is mounted with an overlap of 12 cm.
- Thermal insulation. Installing insulation is important to prevent heat leakage. For this, it is recommended to use insulation with a foil surface, which repel up to 90% of heat (isolon, penofol, etc.). This will help make the floor insulation as effective as possible.
- Installation of IR-film. It should be remembered that the IR-film has its own characteristics, and to prevent difficulties during operation, all work is carried out strictly according to the instructions, especially the connection of the supply wires of the heating elements. The film is laid neatly, at a distance of at least 10 cm from the wall. The elements of the heating film should not touch each other either.To do this, a gap of 5-7 cm must be left between them.
- Installation of a protective layer. This is necessary to protect the IR film from mechanical stress. Even an ordinary plastic film can act as a protective layer. The main thing is that the material is not too dense - this can reduce the efficiency of floor heating.
- Installation in the form of durable sheets. This stage involves the installation of a solid sub-floor on which the screed will be poured. For this, sheets of drywall, or chipboard panels are often used. During installation, be careful not to damage the IR film.
Important! Wood materials are less preferred. They do not transfer heat well, and this will lead to significant heat loss and a decrease in the efficiency of infrared floor heating.
- Next, we move on to laying the tiles, while using the classic technology. Installation is carried out using a conventional adhesive mixture, which is applied to the tile with a notched trowel. When laying, be sure to use a building level so that the tiles lie flat, and a rubberized hammer.
Important! Do not place infrared film under furniture. This will negatively affect both the furniture itself (it will dry out faster) and the heating elements, due to poor air circulation.
Wet method
This method is better suited for installation under a tile of a film IR heater in terms of economy and ease of installation. But in safety, the wet installation method is much inferior due to the possible contact of the screed surface with heating elements.
Step-by-step instructions for laying in this way:
- Floor preparation is similar to the dry method.
- Laying insulation and infrared films. This stage is also carried out in the same way with the dry method.
- Installation of protective film. For the wet installation method, this stage is the most important, because this is what affects the durability of such a floor. If the concrete solution gets on the heating elements, the service life is reduced by at least 30%. Choose a thick plastic wrap and carefully lay it on top of the IR film. The protective layer must be overlapped, we make a gap of at least 15-20 cm. The joints must be sealed with wide tape. For reliability, many lay the film in several layers.
- Reinforcing mesh laying. For this, a masonry metal mesh or fiberglass painting mesh is used. The installation of the reinforcement must be carried out carefully so as not to damage the protective film.
- Pouring concrete screed. If the screed is thicker than 5-10 mm, the efficiency of the IR heater drops sharply, so it is important to make a layer within these dimensions. To make the floors smoother, self-leveling ready-made mixtures are often used.
- As soon as the floors are dry, proceed to laying ceramic tiles. The installation process is carried out in the classical way.
Infrared film warm floors and PVC tiles

They appeared on the market not so long ago, but have already gained considerable popularity. They represent a flexible, thin system, the functioning of which is based on long-range infrared radiation. The heating element is a hexagonal carbon nanolattice enclosed in two layers of polymer material and connected by silver-plated copper conductive buses.
Installation is quite simple, glue is applied to the leveled base, on top of which sheets of film floor heating are laid, and then another layer of adhesive is applied to the latter, on which adhesive PVC tiles are already laid.
The advantages include high efficiency, excellent thermal conductivity, excellent maintainability of the entire complex, both PVC coating and underfloor heating. In addition, the infrared spectrum is as close as possible to the sun, therefore it acts as a kind of "native" for humans from the point of view of physiology.
An unconditional advantage is that PVC tiles transmit radiation practically without loss, which determines the effectiveness of combining such a heating system with this type of finishing flooring. It is also worth noting the simple installation, which can be done by hand.
The disadvantages include significant energy consumption (especially in large rooms), heating furniture (without legs), dependence on a constant power supply.
Advantages of quartz vinyl tiles
Quartz vinyl tiles are appreciated by many for their high strength and phenomenal durability. Among other things, due to the fact that polyvinyl chloride is part of this finishing material, quartz vinyl floor tiles acquire a natural warmth. In the reviews, buyers note that it is pleasant to the touch, unlike ceramic. The main advantages of quartz vinyl flooring:
- Environmental friendliness of the material. No harmful substances are released even at high temperatures.
- Quartz vinyl tile, reviews of which tell us that it does not absorb water at all, is widely used in rooms with high humidity levels.
- Fire resistance. Does not support the combustion process, that is, it is a self-extinguishing material.
- High resistance to chemically active substances.
- High level of wear resistance and, accordingly, durability, the service life of the tiles is 25 years.
- Resistant to temperature changes.
- Impact resistance.
- Possesses sound-absorbing qualities.
- Easy to maintain and repair. The tiles can be washed with any detergent. If repairs are required, individual tiles can be easily removed and replaced with a new panel.
- Excellent aesthetic properties.
- If you wish, you can make a "warm" floor under the quartz-vinyl tiles, there is no need to lay a substrate.
- The material is non-conductive and antistatic.