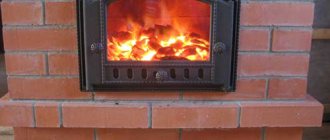
For the installation of a metal stove, the main variety of which is cast-iron, you need to prepare in advance, literally at the design stage of the bath. Because the stove is in close connection with the ventilation system of the bath, the space around it is regulated by fire safety standards, from its size and mass, (as well as the mass of everything attached, including the chimney, tanks, water, etc.), depends, sorry for pun, fundamentality of the foundation. Let's consider all the preparation phases in sequence.
Installing a metal stove in a bath: choosing a place
Where exactly in the steam room do you see the future stove? Will it be located in the corner or just against one of the walls? Where will the firebox go - to the steam room or to an adjacent room (a dressing room, for example)? What is the distance between the oven and the shelves, the opposite wall, the adjacent wall? How far from the beam will the chimney run?
All these questions need to be answered. And since some of the answers are dictated by fire safety standards, we will turn to them.
First, let's deal with
distance to wall... If it is made of combustible material, then the optimal distance would be half a meter to the oven... But who has so much space in the steam room? Only way to close the gap between them - this is either revet the wall with a non-combustible material, or replace a piece of a wooden wall with a brick... The latter is most often done when the firebox is located in an adjacent room. Considering that the furnace tunnel is usually between 20 and 30 cm, the stove cannot be very far from the wall. Furnace tunnels have different lengths. They go through the wall. Subtract the thickness of the wall. The remaining distance is the maximum how much the oven can be from the wall.
The rule about half a meter also applies to the gaps between the combustible walls and the side walls of the stove. With the same correction for non-combustible cladding or brick cut. Yes, this applies to all fuels, including shelves.
About the firebox: remote preferable for two reasons: more oxygen will remain in the steam room, and some of the heat will go to the dressing room. But there is an important point:
Regarding the beams: the distance between them should initially not be too small. For example, this maybe 90 cm... In this case, it is better to start the chimney in the middle, surrounding it with a chopping box.
And about ventilation: the inflow must be brought out next to the blowerso that oxygen-rich outdoor air enters the firebox. And ventilation is laid during construction and remodeling it is very troublesome, so once again: think ahead of time. We advise you to research materials on ventilation of baths.
Distance from brick oven to wooden wall
When building a house, you must install a heating stove. Firstly, the house will always be warm and cozy. Secondly, this option is much more economical than installing a mini-boiler room. Since there are different types of ovens, you should choose exactly the one that is suitable in size and technical characteristics.
For the most efficient heating of the house, the main thing is to choose the right type of oven and the place of its installation.
Table of contents
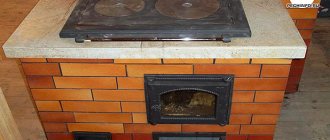
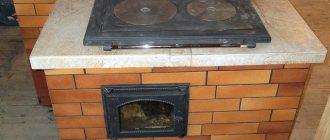
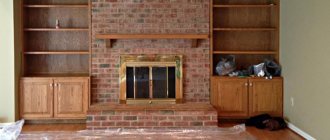
Installing a stove is a complex process that requires a lot of attention to each stage, from preparing the place for installation and ending with the nuances of removing the chimney behind the roof. In this article, we will talk about how to properly insulate a wooden wall from a steel, cast iron stove.Any wood has a tendency to ignite, so a permanently red-hot stove structure can easily cause a fire.
Any builder understands that insulating a wooden wall behind a stove is a must. Let's consider an example of installing a Bavaria fireplace stove on a wooden floor next to a wooden wall. The stove does not have a separate foundation, so a lightweight base for the metal structure is required. The base for the oven will be bricked in one layer.
In this case, wall insulation can be made in two versions: these are sheets of asbestos cement or sheets of flame (non-hot composition). There are several opinions about asbestos - sometimes they say that they emit toxic fumes. But flamm has its drawbacks: they have standard sheet sizes of 600x1200 mm, which is inconvenient when working, and also at the price they do not win asbestos cement at all.
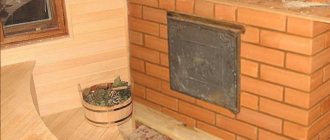
get rid of the existing partition, replace it with a fireproof one and glue it with tiles or stone. You can also place the screen, and use a circular saw to remove the tree completely on the partition. Next, finish with tiles, plaster or paint. There is no doubt that the tree should be removed. After all, if you close it from above with non-combustible materials, there is still a possibility of ignition of the wooden surface.
It is better in this case not to risk it and remove the partition from the tree. Heat radiation from the oven will not only come from the back wall. Lateral radiation will give radiation to the wall at a distance of 0.8-1 meter. You should carefully read the installation instructions - there the manufacturer describes everything very clearly, including what concerns safety. For example, when a stove with a glass door is heated, and there is a chair next to it, it is better to move it further away (more than 1 meter).
Initially, it was assumed that the base for the oven was one brick thick, but this thickness for a wooden floor is not very good. Regarding a non-combustible partition, you should also note the importance of the situation - where the chimney will pass, at what distance from the beams, walls and rafters. In the area of this Bavaria furnace, it is best to use a concrete slab as a base - lay it on beams, flush with the floors or a little more - it will turn out like a podium, reliable and ensuring safety.
However, the bottom of this stove practically does not warm up, there is an additional part for firewood, which takes on the heat. Therefore, you can make it easier - lay minerite or DSP on the floor, then tile or porcelain stoneware on mastic or hot melt glue. In the places where the chimney is laid, you can use basalt, non-combustible or kaolin wool.
Cotton wool plays the role of additional insulation and is embedded in the ceiling cut. In this case, an opening should be made in the ceiling - in accordance with safety standards - from the contour of a two-layer pipe - a sandwich, 250 mm in different directions. The cutting of the furnace should be made of non-combustible materials - superisol, minerite, calcium silicate, vermiculite. When passing through the chimney, the cut should be filled with cotton wool.
To get rid of a beautiful partition, of course, is very difficult, because it was built for aesthetics, a lot of time was spent on it, but if it was decided to put a metal stove on this wall, then you should get rid of the additional threat of ignition of wooden parts.
Cladding materials are often made of cement, which can take several years to fully harden. As a result, even after work has been completed, changes in size, bends and deflections can be observed. Some manufacturing companies (for example) use an efficient and effective method of curing the lining materials in an autoclave in a high-temperature high-pressure oven. And it turns out that shrinkage due to drying and expansion by exposure to heat can be avoided, and reliable strength is also ensured.
We invite you to familiarize yourself with the facing of the stove in the sauna
The same Nitikha panels are made of fiber cement, a versatile material that is 90% cement and 10% cellulose fibers and various mineral fillers. In this case, the technology without the use of asbestos by pressing the ingredients will be applied.
Panels of such a plan are environmentally friendly; they do not use formaldehyde resins, chlorine compounds and asbestos in their production. Fiber cement has excellent refractory properties, it fully fits into the category of non-combustible materials. Fiber cement siding has many advantages, including - with its help, you can easily select various design variations, and it is also easy to install. Instead of minerite, glass-magnetic sheets can also be used - this is a more budgetary option.
Here is another example of the manufacture of a fire-resistant wall located behind the fireplace:
- wall treatment with fire protection (approximately 5 layers);
- refractory mats are attached with a stapler;
- plates are attached through the ceramic bushings - there are gaps from the bottom and top.
Available decorative panels are low flammability according to fire classification. It turns out that only a 5 mm layer of basalt cardboard really protects the wall from fire. However, the oven is convection in nature and its outer surface does not get very hot. If you follow the manufacturer's instructions, it will not heat up more than 60 degrees.
You can pay attention to the color of the first mono-pipe, the very stove heat comes from it. From the floor to the sandwich pipe, the wall must be securely covered with superisol, especially since the stove is installed close to a wooden partition. In this case, when insulating the partition, you should also follow the cutting.
As for fiber cement slabs, you also need to be careful, they are of two types: moisture resistant for the facade and for the improvement of refractory partitions (the second option is gray, there is no paint and pattern).
Minerite panels painted with acrylic (sometimes even in several layers, 5-6) are classified as weakly combustible and weakly supporting combustion. Because of acrylic, the entire slab cannot be classified as "non-combustible", and this is very bad, such panels, supposedly resistant to fires, are often used just if it is necessary to make thermal insulation of wooden walls behind the stove - minerite panels covered with acrylic look beautiful, but, unfortunately, they will not be reliably saved from fire.
If it suddenly happened that you bought a minerite covered with acrylic, then you need to get rid of such a "protection" of the wall. The panels should be dismantled - it is not difficult, in their place you glue the gray classic minerite on the galvanized profile, and then terracotta tiles are glued to it with heat-resistant tile adhesive. With such reliable thermal insulation, you can sleep peacefully.
It also happens that gypsum is used as protection. If the plasterboard is not protected by anything, then it will not play the role of high-quality thermal insulation. If the plasterboard is fixed with a metal profile to the tree, and a tile is attached on top of the plasterboard, then the protection of such a plan takes place. Naked plasterboard should not be used for such purposes, its flammability class is G1, and not NG (non-combustible). It is necessary to take into account during installation the distance from the stove to the wall.
When the oven is operating normally, nothing should happen in any case. But the fire safety measures specified in the manufacturer's passport must be observed. The distances to non-combustible and combustible structures are clearly prescribed there. Gypsum is a good heat insulator, but its features should be taken into account.
If the wall is wooden and plasterboard is attached close to it, therefore, when it is heated, dampness will turn out behind it, since the wall is cold.The wall itself is also shaking - the tree always lives its own life with different humidity and temperature fluctuations in the environment. The profile is necessary not only for creating a ventilation air channel behind it, but also for the durability of the entire structure. Tile adhesive is needed here one that is suitable for warm floors.
It is imperative to take into account the fire safety regulations when installing important distances. If you calculate the distance from the metal firebox to the wall, then it is more logical to add another 65 mm to such indentations - this is the thickness of the brick, which any metal stove does not have.
It turns out that the open indentation to the unprotected wooden part is 320 mm (65 mm), it turns out 385 mm - this is the minimum value.
Up to the protected wood part 260 mm (65 mm), resulting in a minimum of 325 mm.
Up to an unprotected wooden wall 320 mm (15 mm), in the end - 335 mm minimum.
Up to a protected wooden wall 260 mm (15 mm), resulting in a minimum of 275 mm.
Installing an iron stove: choosing a base
Nobody just puts a metal stove on the bathroom floor. And here's why: the thing is heavy, and therefore it would simply become sag over time... And I would do it unevenly. BUT when the oven is not level, it may crack... Therefore, under it they make or a brick base, or even a separate foundation with horizontals adjusted to the level to prevent the destruction of the furnace.
To determine whether you need a lightweight or full-fledged foundation, you must first make a calculation of the mass of the furnace with all that is due to it. You will learn how to do this from our article - you are reluctant to repeat yourself, but everything is detailed there.
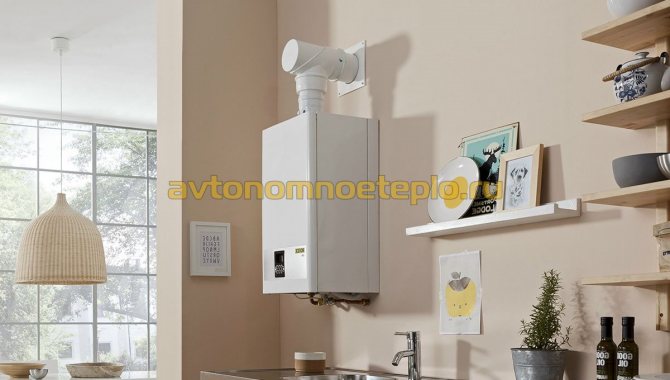
Requirements for the installation of a coaxial chimney for a gas boiler
State norms and rules for the installation of a coaxial chimney for a gas heating boiler with a closed combustion chamber are set out in
... Design, calculation and installation works are carried out in accordance with regulatory documents. Failure to comply with the recommendations leads to the refusal of the Gas Service to put the heating system into operation.
The standards regulate the distance from the coaxial chimney to the window, doorways, nearby buildings. Specifies the minimum requirements associated with the manufacture of fire protection diffusers and other safety standards. In particular, SNiP stipulates:
- The location of the coaxial chimney on the facade - the head is placed at least two meters from the ground level. The size of the hole in the wall must exceed the diameter of the coaxial pipe by 1 cm, in case of passing through a brick one, by 5 cm for a wooden wall.
- The use of coaxial chimneys in multi-storey residential buildings - the norms allow the installation of pipes of this type, subject to the following conditions. The minimum distance to window and door openings located at the same level is not less than 0.5 m. To the window located above the chimney, not less than 1 m. There is no danger of poisoning by combustion products discharged through the coaxial pipe in the case of a condensing boiler. ... Provided that the system is correctly installed, the effect of the flue gases on the residents of the upper floors is negligible. Violations during the installation process lead to condensation on the windows of neighbors.
- Fire safety standards and requirements. The size of the gap between the wooden wall and the coaxial chimney is 5 cm. The minimum gap is due to the fact that the surface of the outer contour of the pipe practically does not heat up during operation. Install non-flammable materials between the coaxial pipe and the wood wall. It is optimal to use basalt insulation. The regulated distance from the coaxial chimney, relative to windows and doors of neighboring houses and other buildings, is not less than 1.5 m.The site should not be blocked by walls, pillars, trees, etc. The removal of combustion products from the condensing boiler into a conventional chimney, instead of a coaxial one, is prohibited.
- A coaxial chimney can be either horizontal or vertical. The installation of a collective smoke evacuation system is carried out only after obtaining permission from the gas service. It is not allowed to connect boilers with forced and natural discharge of combustion products into the same network.
- Horizontal section - laying a two-channel chimney through an adjacent non-residential premises is allowed only if the pipe length does not exceed 3 meters. In turbocharged models, with the presence of the function of forced discharge of combustion products, it is allowed to increase the horizontal section up to 5 m.
- Limitations on the output through the facade. Care must be taken to prevent condensation from dripping onto the ground. The pipe is installed at a slope towards the boiler. If there is a condensate drain, it is allowed to slope the outlet pipe to the ground to drain rainwater. With a collective connection, it will be necessary to agree on the disposal of the accumulated condensate with the sanitary and epidemiological authorities.
- Installation standards - the coaxial chimney must protrude from the wall at a distance of at least 30 cm. For turbocharged boilers with a chimney section of about 1 m, a narrowing diaphragm must be installed - a unit that compensates for the insufficient length of the chimney. A diaphragm in a coaxial chimney is needed to limit the flow of air into a closed combustion chamber. The turbocharged boilers are designed to use a 5 m chimney. The diaphragm eliminates the difference.
- Coaxial pipe maintenance - the system is serviced annually, at the beginning and end of the heating season. The accumulated condensate is removed, the tightness of the joints and the absence of burnout in the structure are checked.
Requirements for the safe operation of coaxial chimney systems may change, therefore, before purchasing and installing, you should consult a specialist.
Please refer to the manufacturer's instructions for installation standards. The gas supply service and the Ministry of Emergency Situations can adjust certain rules. The following requirements are imposed on the installation of the structure:
- There must be a certain distance from the coaxial pipe to the neighboring house. To calculate it, you should know the technical characteristics of the building and the design features of the chimney. If there is no deflector, it should be 8 meters. If there is a draft amplifier, the distance from the chimney to the window must be at least 5 meters. If there is a blank wall without window and door openings, the gap can be reduced to 2 meters.
- The length of the coaxial flue must not exceed 5 meters. In apartment buildings, the pipe can be lengthened by installing collective coaxial chimneys.
- Passing through the wall, the chimney must have a certain slope. This facilitates the drainage of condensate that accumulates inside the pipe. The tilt angle should be 3 degrees. Due to the removal of condensate from the pipe cavity, it is not subject to icing.
- The distance to the ceiling should not be less than 20 cm.
- During installation, be sure to take into account the fact that the adapter and its connection points must be located before entering the wall. With the correct calculation of the material, the pipe can be assembled with minimal waste and residues.
- The coaxial chimney for a gas boiler should protrude 20 cm from the wall.This is the minimum distance, so this value is often 50-60 cm.
- Due to the peculiarities of the pipe design, situations are completely excluded when the boiler is blown out with the help of back draft. This is prevented by a valve that is installed directly in front of the firebox.
- The rules for passing through wooden walls must be followed. In SNiP, the horizontal chimney is not specified.Only general rules are given, according to which fire-prevention cuts are provided when passing through a wooden wall. These rules are observed not only in order to ensure the fire safety of the building, but in order to avoid fines and conflicts with representatives of the fire service.
- The outlet is carried out through a wall made of fireproof materials. To make a hole for the pipe, it is necessary to prepare an opening that has a slight slope to the ground, slightly larger than the diameter of the pipe. The pipe extension must be inserted into this opening so that all connections and cleaning hatch are located before passing the wall.
- To avoid icing, special accessories are installed that do not allow condensate to freeze in the pipe. The de-icing nozzle allows you to solve the problem in such a case when the desired slope is not respected. With its help, a certain temperature is maintained inside the pipe.
- The distance from the gas pipe to the coaxial pipe must be at least 60 cm.
Distance from the coaxial chimney to the neighboring house:
- if the chimney is not equipped with a deflector (a special device that is placed at the end of the pipe to increase the traction force), the distance must be at least eight meters;
- if the chimney is equipped with a deflector, but there are windows and ventilation equipment on the opposite system, then the distance should be at least five meters;
- in the case when the chimney is equipped with a deflector, and there is a blank wall opposite the coaxial chimney, the distance should be at least two meters.
The coaxial chimney must be at least 60 cm from the window opening.
The distance from the coaxial chimney to the gas pipe must be at least 20 cm.
The basic requirements for the installation of coaxial flues are regulated in SNiP 02.04.08-87 and 02.04.05-91. According to the specified standards, installation of gas pipes should be carried out. In order to ensure safety during operation, regulatory documents establish the following requirements:
- from the surface of the soil to the exit of the pipe, less than 1.5-2 m is not allowed;
- when installing the chimney under the window, it should be placed at least 1 m from the lower edge of the window opening;
- the outlet is located from doors, windows and other building elements at a distance of 0.5 m;
- before leaving the channel, there should be no enclosing elements and obstacles (walls, fences, pillars, etc.) closer than 1.5 m;
- the hole made in the brick wall should be 1 cm larger than the diameter of the outlet pipe; for wooden houses, a gap of at least 2-3 cm is left.
When installing coaxial chimneys, it is important to take into account all regulatory requirements, as well as to carry out all stages of work correctly. This will ensure the uninterrupted and long-term operation of the heating equipment.
Floor preparation before installation in a wooden bath
When the total weight of the furnace is less than 7 centners, there is no need for a foundation, but still a kind of "pedestal" of brick is being erected. It's good when this happens during the construction period. You can again calculate the position so that the base lies between the lower beams under the floor... But it happens that you have to remodel the old base for a new stove in an old bathhouse. Then you cannot do without opening the floors and checking their strength... We advise you to read the relevant paragraphs of this article, where you will find tips for strengthening beams and lags, and tables for calculating their "endurance".
Coaxial chimney device
The standard device for a coaxial chimney is:
- a straight chimney, consisting of two pipes of different diameters (a smaller pipe is located in a pipe with a larger diameter), fixed with special jumpers that prevent the pipes from touching;
- knees (bends) at ninety and forty-five degrees, as well as tees and couplings, are necessary to connect the various components of the chimney;
- adapter required to connect the chimney to the boiler;
- condensate collector;
- device for preventive inspection and cleaning of the chimney;
- the top or side tip, depending on the type of chimney design, is required to protect the chimney from contamination.
Bends of a coaxial chimney on the street are performed, if it is necessary to output an individual coaxial chimney into one collective coaxial chimney, by means of outlets at ninety degrees. Read the instructions on which firewood to choose for the fireplace and how to heat it on this page.
Preparing the walls
Above, we decided on what should be the distance to the combustible wall, and there we came to the conclusion that it is much more practical to finish them with refractories, so as not to waste steam room space... Now it's time to talk about how this is done.
So, we have three and a half options:
- we attach the refractory sheet to the wall;
- plaster the wall;
- we make a brick casing for the oven;
- we replace a part of a wooden wall with a brick.
Let's explain why 3.5 is often and the refractory is hung on the wall, and the casing is built. Moreover, the latter is placed not only for the purpose of fire safety, but also simply for safety, as well as for the redistribution of heat. You will learn more about why you need it and how to make it from this article.
As for the refractory, you can use minerite Are fiber-reinforced cement sheets with fillers. Excellent refractory properties. You just need to fix it correctly.
If the stove is almost right next to the wallthen you will need two layers of minerite with an air gap between them, which you create with the 3 cm ceramic bushings. The first layer is directly adjacent to the wooden wall, followed by the bushings and the second layer of minerite.
If the distance is greater, you can limit yourself one layer, but also he must not touch the wall - the same bushings are used to attach it to the tree.
On top of the minerite, you can put, for example, heat-resistant tiles (they put it on heat-resistant mastic) or come up with another decorative design. As an option - mirror stainless steel... Its sheets perfectly reflect heat, but at the same time they heat up themselves. Therefore, stainless steel is attached to a layer of any refractory - mineral wool, ceramic fiber, superisol, etc.
In principle, you can also plaster a combustible wall (layer not less than 2.5 cm) or use fire-resistant drywall.
Those who decide to bring the firebox into the dressing room either immediately put a brick wall, or then cut out a part of the log house or timber. Space is left in the brickwork for the combustion tunnel with a margin, where the heat insulator is then clogged, for example, mineral wool. The heat insulator is also used in the places of contact between brickwork and a wooden wall.... If you don't want to replace the entire wall, make a portal - at least one meter.
Installation of a coaxial chimney
Coaxial pipes are installed quite simply. To make their installation, no special knowledge and special skills are required. You just need to adhere to the following recommendations when performing each stage:
- The chimney is usually installed simultaneously with the installation of the boiler. First you need to find a place where the boiler will be located. A special foundation should be installed under the floor structure, the wall model is immediately fixed to the desired surface.
- Make a marking of the outlet. It should be located at a level of 1.5 meters from the ground and be slightly larger than the diameter of the pipe.
- The coaxial chimney is connected to the boiler using a special connecting element. All pipe joints are made with fastening clamps. It is absolutely impossible to use adhesive tapes and sealants.
- The passage through the wall should be insulated with non-combustible insulation.
- The pipeline is attached to the wall with brackets.
- It is strictly forbidden to install such protective elements as umbrellas, deflectors, etc. on the head of the coaxial chimney.
Coaxial chimneys are in great demand in rooms where an autonomous heating system is installed. They are very popular, are famous for their simple installation and long service life, while they are distinguished by a rather low price. When properly installed, they are several times superior to traditional chimneys.
When installing a chimney system yourself, you must adhere to the basic rules for installing a coaxial chimney for a gas boiler:
- when assembling the structure, only components recommended by the manufacturer should be used;
- the diameter of the outlet channel is selected more than the size of the branch pipe at the outlet of the heating boiler;
- if the design does not provide for a special element for the removal and collection of condensing moisture, then the pipe is placed at a slope (3-12 °);
- the chimney must not be taken outside of the street (into the basement, staircase, etc.);
- at least 0.2 m should be left between the gas pipes and the components of the chimney;
- all joints are decorated with special overlays, which are mounted using construction glue;
- it is considered optimal to use no more than 2 knees as part of the structure;
- the joints of the elements are made outside the wall (not in its thickness);
- the maximum length of the coaxial type chimney varies between 3-7 m, depending on the complexity of the route and the boiler model.
Complete with a factory-assembled coaxial chimney, detailed installation instructions must be attached. Compliance and careful implementation of these recommendations affects the operation of the boiler and the efficiency of the flue system. According to experts, the main reason for blowing out the boiler, the appearance of frost or ice, is associated with errors in calculations and when connecting the chimney.
Horizontal installation is carried out taking into account the technical characteristics of the building. Initially, the place where the pipe exits from the wall is selected. There are restrictions related to the distance to the nearest neighbor's window when removing a horizontal coaxial chimney from the wall, which must be carefully observed.
Additionally, the following parameters are calculated:
- The height of the pipe - from the outlet of the boiler to the through-hole in the wall, for floor-standing gas boilers there must be a height of at least 1 m. It is not allowed to lead the pipe directly from the outlet to the street. For wall-mounted gas boilers, a height reduction of up to 0.5 m is allowed.
- The number of rotary couplings on the site should not exceed 2 pcs.
- The maximum length of the horizontal section is 3-5 m, depending on the boiler model. To lengthen the pipe, a coupling with heat-resistant sealing rubber bands is used. The use of silicones and sealants is prohibited.
The peculiarity of using a two-channel chimney in winter is increased condensate production. The reason for moisture loss is that the system was originally designed for more favorable operating conditions. With an increased formation of condensation, it will be necessary to insulate the pipe.
Vertical installation of the chimney provides for two connection methods:
- Cascade connection diagram for collective chimneys of condensing boilers. Several heating units are connected to one pipe at once. The cascade scheme is used in apartment buildings. The chimney is installed outside or inside the building. Vertical installation of the pipe is carried out only after careful calculations and production of design documentation, taking into account the rules set out in SP 60.13330 (SNiP 41-01-2003).
- Individual connection - the maximum length of the vertical coaxial system for the removal of combustion products is 7 m, which allows installation in a two-storey building.In a house made of aerated concrete blocks, the pipe is installed exclusively inside the building. The walls of a building cannot withstand a heavy load on the walls. In brick houses, a smoke exhaust system is installed inside and outside the building. In any case, mandatory thermal insulation of the coaxial chimney is carried out.
The picture shows a horizontal coaxial chimney.
The process of installing a coaxial chimney in a wooden house can be roughly divided into several stages:
- To begin with, the location of the boiler is selected, and, accordingly, the chimney.
- Marking is applied to the surface of the wall. Keep in mind that the chimney should be located at a distance from one meter to one and a half meters above the boiler, if necessary, the chimney can be lengthened.
- A hole of the required size is made to bring the chimney out into the street.
- The chimney is connected to the boiler neck either by means of an adapter or by means of a clamp.
- The chimney system is fastened with special brackets during assembly and installation.
In order to prevent the fire of the wooden wall through which the coaxial chimney will be led out into the street, it is necessary to install a metal pipe in the prepared hole, and fill the distance between the wall and the body of the pipe with basalt wool.
The installation of a coaxial chimney, with the output of an individual chimney from the heating equipment to the street through the facade of a building in an apartment building is prohibited. That is, the exhaust of flue gases must be carried out through collective smoke ducts brought out above the roof of the building.
You can familiarize yourself with the process of installing a coaxial chimney by watching the video.
Coaxial pipe installation
Ceiling preparation and chimney installation
Many fires started from the section of the ceiling where the chimney runs. There are many errors associated with arranging the passage of the chimney through the ceilings. The cause of the fire can be:
- overheating of the pipe;
- cracks in the pipe through which sparks escape;
- errors in the distances between the pipe and the combustible cover.
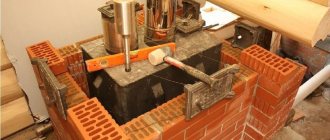
If you did not design the position of the oven in advance, then there may be a beam above it. In this case part of the beam will have to be cut and fasten with jumpers to adjacent beams. The empty space above the center of the pipe passage must be about 90 cm in diameter.
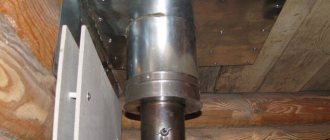
Ceiling slabs are cut with a square for installation chopping box, which is a tin box, closed at the bottom and top with stainless steel sheets, in which a hole is made for the pipe (see photo above).
The chimney is mounted from the branch pipe coming out of the oven.
whether
monotube larger diameter, you will have to put on the pipe adapter... But anyway the first pipe going through the steam room will be a monotube. It is mounted on gate, then it continues again, but without reaching (this is important!) Before the overlap, a "start" is put on it - an adapter from mono to a sandwich pipe, which will go through the overlap. Pipe connections must not enter the ceilings.
It is worth noting here that sandwiches are, of course, the most common, but this is a dangerous type of chimney - so what if the gap between the two pipes is clogged with a thermal insulator? it does not prevent the inner pipe from burning out, if the owner will often rush to heat the bathhouse. And the properties of insulation, when condensation forms in it, will not be those that are stated - it will perfectly let heat through, overheating the outer pipe.
Alternative to sandwich pipes - ceramic or brick lined chimneys, but both are heavier and more expensive. Therefore, the majority prefers to risk the whole bath.
Okay. This means that through the hole in the stainless steel, the sandwich pipe enters the chopping box.
There is a space around it that can be filled:
- expanded clay;
- mineral wool;
- sand.
Outside the box can be wrapped basalt cardboardso that it does not touch the tree.
Then the pipe is led out through the roof, through a hole with a larger diameter than the pipe. From the outside, the area next to it is coated with sealant, put on top master flash, fixed on the roof with self-tapping screws at intervals of up to 5 cm, the connection of the flush with the pipe is also sealed. It remains to install an umbrella or deflector.
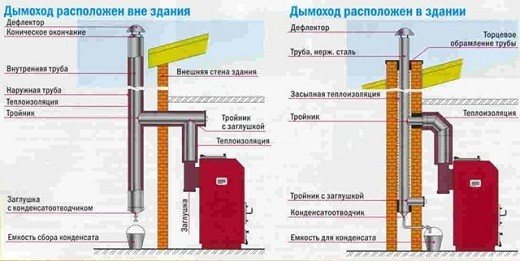
Chimney
This element must be given special attention, since safety and correct smoke exhaust depend on the chimney. Air circulation is provided. Better to take him outside. This is done when a wall in a room divides the house from the street, and not from neighboring rooms. Otherwise, you have to mount the pipe inside the house, bring it to the roof in the traditional way.
The part of the structure outside the dwelling is made multi-layer. This protects the chimney from hypothermia, condensation and air pockets. A single-layer pipe is laid inside the house (when leading to the roof through the attic).
The main indicator of the chimney is draft. To ensure it, it is required to select a diameter that strictly corresponds to the diameter of the outlet pipe. All sorts of adapters and homemade ideas put safety at risk. Do not paint the connecting parts with heat-resistant paint, otherwise you will suffer from its smell.
Important: in case of insufficient draft, preliminary heating of the chimney is required, which takes a lot of time. Therefore, a two-layer system is relevant.
Ceiling and roof insulation is done in the following ways:
- an insert made of metal or asbestos is installed in the place of the slot;
- the hole is made slightly larger than the diameter of the chimney, the gap is filled with mineral wool.
Furnace preparation
Before you tackle the chimney, the stove should already be in its intended place. But before it follows the first time heat in the yard. Doing so necessarily, because during the first fire, industrial heat-resistant paint usually sets and partially burns out. It "smokes" a little during firing and smells. This is normal and it should be.
By the way, new stones It was also nice to try it in the yard - it happens that a stench comes from them too, stinging the throat and eyes. It is better to experience this in the fresh air, and not in the steam room.
Assemble the stove according to the instructions, install it on a flat and solid base, put some piece of at least a ventilation pipe on the chimney pipe (length at least 2 meters) and heat it well once. At the same time, find out if there are structural defects, whether it smokes, in general, get acquainted.
When is it required?
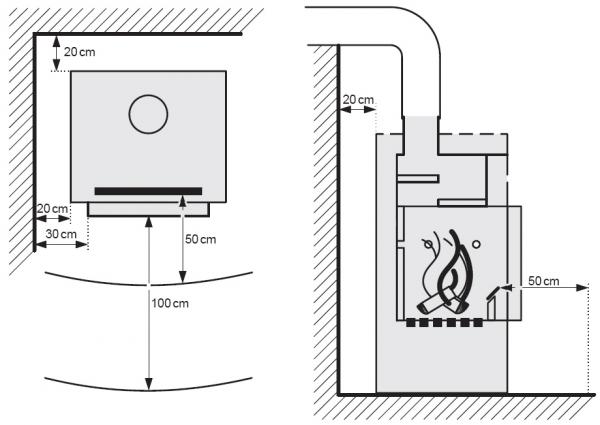
Sometimes there is no need to protect walls. If the stove is located at a safe distance from the wall from the point of view of fire safety, the arrangement of protective screens and other measures can be neglected. The distance from the walls, which is required to weaken the heat from the source, is different:
- A stove laid out in a quarter of a brick should be located no closer than 35-40 cm from the wall;
- A metal furnace without lining should be placed one meter away and no closer;
- Metal with a lined crucible can be installed 70-75cm from the wall.
However, not every steam room has the ability to meet these requirements, due to the small area. The layout of the steam rooms with an area of 6-8m² hardly contains the necessary set of items for the vaping procedure. Therefore, the need to insulate the walls with special cladding is relevant.
Installation of a hanging tank and heat exchanger
In the absence of hot water supply at the dacha, autonomous water heating becomes relevant. The boiler is not needed in the bath, the stove may well cope with the needs of the washing and heating.
You can read about the options available in the articles: about stoves with a tank and about stoves with a heat exchanger.
You can install a remote tank connected to a heat exchanger in the furnace as follows:
- Select a location so that the tank hangs above the stove. The specific height is related to the angle of inclination of the pipes.
- Do not mount the tank directly to the wall. Make a batten from the battens and attach it to it.
- In addition to the top mount, the brackets can be screwed on from the bottom.
- The tank has three or four nozzles. Two of them will connect it to the heat exchanger. Another one is needed to supply hot water to the washing or heating system.
- The latter can be replaced with a hole and serves to fill the tank with cold water. If there is one, then a check safety valve must be installed on it.
- The tank is connected to the heat exchanger using corrugated steel or copper pipes, which are connected using fittings.
- On one of the pipes, a tap must be provided to completely drain the water.
- The heat exchanger is located inside or outside the furnace (depending on the design), its fittings are connected by fittings to the tank pipes.
- If the heat exchanger is of the samovar type, it is put on a monotube of the chimney, fixed with sealant and clamps.
Sometimes the owners of the baths, without further ado, make everything simpler and this, oddly enough, also works. See how a stove with a heat exchanger is made in one bath:
Varieties
According to the method of installation and orientation in space, coaxial chimney systems are divided into the following groups:
- Horizontal flue gas duct of coaxial type - exhaust gases exit through a hole made in the wall of the building. This option is more in demand, since it is the simplest and most affordable. When installing pipes at a slight slope, an independent outflow of condensate is ensured.
- Vertical coaxial chimney for a gas boiler - the channel is directed upward through the roof. In such structures, it becomes necessary to drain condensate using special devices.
Smoke extraction systems differ in location:
- External - structural elements are located outside (on the outer wall of the house) and are attached directly to the facade. External chimneys are simple to install and operate, but they spoil the exterior of the building, so they try to place them on the back and not very visible walls of buildings.
- Internal - structural elements are placed in special shaft wells that run inside the building and are separated from living rooms. These systems are difficult to install and maintain.
The following materials are used in the manufacture of coaxial pipes:
- Plastic. The components are inexpensive, lightweight and easy to install. But they can withstand heating to a temperature of no more than 200 ° C. The plastic smoke exhaust system will last no more than 5-6 years and is recommended only for heating units with a low-temperature mode of exhaust of combustion products.
- Stainless steel. Stainless steel pipes are more practical and durable, they are not afraid of heating up to 550 ° C. Individual elements of such systems can be made of acid-resistant or galvanized metal.
Additionally: wood treatment with impregnations
Fire regulations require wood to be treated with special impregnations that reduce its flammability. However, we know very well that impregnations are not particularly desirable in the bath, because at a high temperature inside the steam room, all chemistry begins to be released into the air and poison the person. Not then we go to the bathhouse.
And yet, not all rooms experience such a temperature load as a steam room, so it would be wise to treat at least them with fire retardants, as well as the attic, especially since a large proportion of fires are caused by sparks emitted from the chimney (there would still be a spark arrester or a deflector with it).
The composition should be applied in two or three layerswhile waiting to dry between stages at least 6 hours... Yes, and pay attention to the presence of pigments to indicate impregnation if you do not want the wood to become, for example, a bright pink color. (That is, the color is not from chemicals, it is added on purpose to distinguish treated wood from untreated wood.)
***
So, you got an idea of how to put the stove correctly, it's time to put the acquired knowledge into practice. Write comments, we are interested in your opinion about what you read.
If you have not yet decided on the type of stove you need, then you should familiarize yourself with the characteristics and models of different types: gas, wood, electric. A variety of designs, sizes and prices provides the widest selection of stoves for baths and saunas. And which one is better, everyone has the opportunity to decide on their own.
Installation
A properly made chimney for a gas boiler must have a vertical position, be airtight, must be equipped with a protective cap (to prevent foreign objects from entering the chimney from the street), a condensate collector, as well as when installing the chimney, to clean the chimney from accumulated soot, must be additionally equipped with pockets with a depth of at least 25 cm.
When installing a chimney for a gas boiler, you must adhere to certain rules:
- to ensure high-quality traction, when assembling the chimney, it is recommended to make no more than three turns, moreover, the turns should not have narrowings or expansions;
- the chimney height must be at least five meters;
- the outer part of the chimney should rise above the roof (in the case of a flat roof, as well as if the chimney is located at a distance of one and a half meters from the ridge) to a height of no more than half a meter;
- the chimney should be located not below the axis of the ridge, in the case when it is located at a distance of one and a half to three meters from the ridge;
- installation of all components of the chimney system is carried out from the bottom up;
- to ensure the sealing of the chimney, special sealants must be used that can withstand temperatures up to 1000 ° C;
- the joints of pipes and other constituent elements of the chimney must be tightened with clamps;
- the joints of the chimney components should not be located in the roof and attic floors;
- the chimney is fixed with special wall brackets-brackets with a step of two meters;
- it is allowed to mount the chimney inside only if the walls are made of refractory material, or attachment pipes are additionally used.
The figure shows a diagram of connecting a gas boiler to a chimney.
When is protection needed at all?
The need to install protective skins and screens does not always arise. If a fireproof distance is maintained between the stove and the nearest flammable surface, additional protection is not needed. At this distance, the infrared rays are scattered, weaken and the amount that the wooden wall receives can no longer lead to its damage.
It is believed that the safe distance from the wall to the brick kiln (quarter-brick masonry) is at least 0.32 m, from the wall to metal oven (not lined) - not less than 1 m. For a metal furnace lined with bricks or fireclay from the inside, the distance is reduced to 0.7 m.
Thus, compliance with fire-prevention distances is more possible in large saunas, where the issue of saving space is not relevant. In family steam rooms, where every centimeter of space counts, installing a stove 0.3-1 m from the nearest walls is impractical. In this case, the established safety distances must be reduced by means of screens and skins.
And how to make a foundation for a stove, will tell the article https://stroy-banya.com/delaem_pech/kak-sdelat-fundament-pod-pech.html
Correct laying of the stove
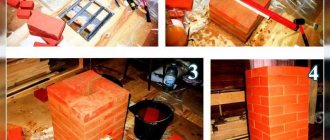
How to start laying a stove in a brick wall with your own hands? As mentioned above, from the formation of a depression under the chimney, the stove itself was blown. If the chimney has not yet been formed, it is done first. The best option is to form it from heat-resistant bricks at the maximum height, that is, without transitions.
If the stove is mounted in an opening between a wooden wall, then part of the building structure will simply have to be removed. The wall is supported by a spacer. By the way, if the installation of the finishing of the stove will be carried out in one go, then it is allowed not to make thick inter-slope seams. You can do without them by simply increasing the density of the mortar (adding more concrete) and reducing the distance of the masonry along the seam (instead of the usual 10 mm, make 5 or less).
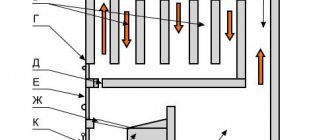
The scheme of laying the rows of the furnace.
If you look at the shape of the furnace from above in section, it turns out that it consists of 4 compartments. This is the best option. Can be reduced to 3:
- blew;
- the combustion chamber;
- chimney (coil).
The fourth chamber in question is where the soot accumulates. This part can be completely abandoned only if the stove is mounted in a bath. There, the chimney must be cleaned 1-2 times a year anyway, since due to the accumulation of moisture, the outflow of smoke decreases, and sometimes the air duct becomes clogged.
When laying the stove, it is advisable to make the distance from the blower to the combustion chamber as much as possible. At the same time, it is better to make the transition between these chambers as narrow as possible - this way the speed of movement of air masses increases.
Fortunately, they are relatively cheap. There are several advantages to this design. Firstly, the speed of the air flow increases, and secondly, the consumption of solid fuel and the efficiency of the heating structure decrease. Roughly speaking, this increases efficiency.
Protective screens near (around) the oven
Shields are insulation shields that cover the side surfaces of the oven and reduce the intensity of heat radiation. Screens are metal and brick. Typically used for metal ovens.
Method # 1 - metal screens
The most common shields are factory-made steel or cast iron sheets. They are installed around the stove, at a distance of 1-5 cm from the walls of the firebox. Depending on the need to isolate one side or the other of the oven, side or front (front) screens can be purchased. Many metal furnaces are initially manufactured with protective shields in the form of a protective casing.
Protective screens allow reducing the temperature of external metal surfaces to 80-100 ° C and, accordingly, reducing the fire-safe distance to 50 cm.The total distance from the firebox to the wall (together with a gap of 1-5 cm) will be 51-55 cm.
Installation of protective screens is not difficult. Thanks to the presence of legs, metal shields are easily bolted to the floor.
Method # 2 - brick screens
The brick screen can cover all the side surfaces of the metal furnace, representing its outer skin. Then the stove will be in a brickwork casing. In another case, the brick screen is a wall separating the oven and the flammable surface.
You can learn how to lay bricks correctly and make perfect seams here: https://stroy-banya.com/video/kirpich_block/kak-pravilno-klast-kirpich-i-sdelat-idealnye-shvy.html
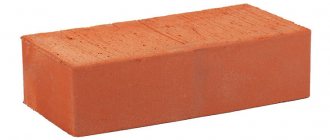
For the laying of the protective screen, solid fireclay bricks are used. The binder is cement or clay mortar. It is recommended to lay in half-brick (120 mm thick). But, with a lack of material, it is possible to allow the wall to be a quarter brick (60 mm thick), although in this case the thermal insulation properties of the screen will be reduced by half.
In the lower part of the shield, small holes are left (sometimes with furnace doors) for air convection between the brick wall and the stove.
The brick walls of the screen should end at least 20 cm above the top surface of the oven. Sometimes the laying is carried out all the way to the ceiling.
The brick screen is installed not close to the walls of the furnace, the optimal distance is 5-15 cm. The acceptable distance from the brickwork to the flammable wall is 5-15 cm.Thus, the use of a brick screen allows reducing the distance from the stove to the wooden wall to 22-42 cm (stove - ventilation gap 5-15 cm - brick 12 cm - ventilation gap 5-15 cm - wall).
If you are interested in how to brick a metal stove, we recommend reading the article https://stroy-banya.com/delaem_pech/kak-oblozhit-metallicheskuyu-pech-kirpichom.html
Fire safety when using ovens
Fire safety rules for the operation of furnaces
When heated to a temperature of 300 ° C, wood materials ignite, but if for a long time they come into contact with objects that are heated even to 100 ° C, they acquire the properties of spontaneous combustion. Therefore, during the construction of furnaces, care must be taken to ensure that the heated surfaces of the furnaces and chimneys do not adjoin the combustible parts of the building.
https://www.youtube.com/watch?v=a9fxeuKNURg
The main danger is represented by cracks that form in the smoke channels or in the stove mass due to uneven crumbling of clay mortar from the seams due to the action of high temperature. The combustion of soot, which accumulates in large quantities in the flue ducts, can also cause a fire.
For insulation, fireproof materials or red brick with low thermal conductivity, felt, and also asbestos in the form of a cord and sheets are used. Felt, which is usually 5 mm thick, conducts heat very poorly and acts as an excellent thermal insulation material. When a fire breaks out, it smolders and with a suffocating pungent smell notifies about the appearance of a fire. It is impregnated with clay mortar before laying to give it greater resistance to fire.
If you put thick-walled heat-consuming stoves on a combustible base, then the smallest distance from the floor of the house to the bottom of the ash pan should be more than 140 mm, and to the bottom of the chimneys - more than 210 mm. When laying a heat-intensive thick-walled stove on a fireproof base, all smoke flows and the bottom of the ash pan are allowed to be freely laid out at floor level.
Protective non-combustible wall cladding
Walls adjacent to the hot oven walls are susceptible to spontaneous combustion. To prevent them from overheating, special skins are used, consisting of heat-insulating and non-combustible materials.
Option # 1 - reflective sheathing
Claddings consisting of a combination of non-combustible thermal insulation and metal sheets are effective. At the same time, thermal insulation is attached to the wooden surface, which is covered from above with a sheet of stainless steel. Some people use galvanized for these purposes, but, according to some reports, when heated, it can emit harmful substances. It is better not to risk it and purchase a stainless steel sheet.
To be effective, the metal sheet of the screen must be well polished. The mirror surface helps to reflect heat rays from the wooden surface and, accordingly, prevents it from heating. In addition, a sheet of stainless steel, directing infrared rays back to the steam room, turns hard radiation into a softer one, better perceived by a person.
As thermal insulation under a stainless steel, you can fix:
- Basalt wool - it has high thermal insulation properties, it is absolutely safe when used in a bath. Has increased hygroscopicity, does not burn.
- Basalt cardboard - thin sheets of basalt fiber. It is used as a fireproof, sound and heat insulating material.
- Asbestos cardboard - sheet refractory heat insulator. Possesses high strength and durability, protects combustible surfaces from ignition.
- Minerite - non-combustible sheets (slabs) specially made for shielding stoves, fireplaces, easily combustible surfaces in baths and saunas.
A popular example of cladding using a metal sheet is such a "pie": wall - ventilation gap (2-3 cm) - insulation (1-2 cm) - stainless steel sheet.The distance from the wooden wall to the stove is at least 38 cm (SNiP 41-01-2003).
Ceramic bushings are used to fasten the cladding to the wall. They do not heat up and allow the formation of ventilation gaps between the insulation and the wall.
If the distance between the wooden wall and the stove is minimal, then the cladding is made of two layers of refractory insulation, for example, minerite. In this case, the sheets are fixed through ceramic bushings with a gap of 2-3 cm. The top sheet is closed with stainless steel.
Option # 2 - cladding with cladding
Of course, the protective sheathing with stainless steel perfectly protects the wooden walls from heat and fire. But it can spoil the impression of the most expensive finishes. Therefore, if the steam room is designed in a decorative style, the fireproof cladding is masked with heat-resistant tiles. The tiles are laid on heat-resistant glue, for example, produced by Terracotta.
The best materials for wall cladding near the stove:
- Terracotta tiles - made of baked clay. Differs in strength, heat resistance, durability. Terracotta tiles can be matte or glazed (majolica) and range in color from pastel yellow to brick red.
- Clinker tiles are also made of clay, they look like facing bricks. Unlike terracotta, clinker tiles are denser. The color scheme covers almost all colors, from white to black, including green and blue tones that are unusual for clay.
- Tiles are a kind of ceramic tiles. Usually it has an embossing on the front surface in the form of a pattern or ornament.
- Porcelain stoneware is a heat-resistant, durable tile. Depending on the method of processing the front surface, the tiles can imitate natural stone, brick, wood. The range of colors includes all natural shades, from white to black.
- Talcochlorite is a grayish or greenish rock. Possesses fire resistance, water resistance, durability.
Fastening refractory tiles directly to walls will not have a thermal insulation effect. The wall will still heat up, which is fraught with spontaneous combustion. Therefore, the tile is used only as an element of the protective "pie" of the following design: wall - ventilation gap (2-3 cm) - refractory sheet material - tiles. It is recommended to maintain a minimum of 15-20 cm from the tiles to the walls of the oven.
Any material from this list can be used as a refractory element in cladding:
- Refractory gypsum board (GKLO) is a drywall supplemented with fiberglass fibers. Resists heat stress without structural deformation.
- Minerite is a fiber-cement board, absolutely non-combustible. Minerite slabs are moisture resistant, do not rot, do not decompose.
- Glass-magnesium sheet (MSL) is a material in the form of plates, made on the basis of magnesia binder and glass fabric. It has heat and sound insulating properties, does not deteriorate under the influence of water and temperature extremes.
The protective sheathing with the mandatory observance of the ventilation gap has a very low heat absorption coefficient, so the wall under it practically does not heat up. In addition, the use of cladding makes it possible to disguise the protective "cake" and maintain the finishing of the steam room in the same style.
Safety measures when laying brick ovens
The laying of the stove is carried out according to the order.
Installation of such a furnace (1200x1200 mm) is not particularly difficult. The main thing is to adhere to the order. First, you need to lay out four rows of bricks, then you need to install two grates (250x252 mm). Laying out the fifth row, you need to leave holes, install and attach cleaning doors to the masonry.
At the same time, the boiler for hot water heating should be installed in such a way that its highest point is the place from which the pipe for supplying water from the boiler comes out. Its installation must be correct so that the boiler works well and does not collect air in it.During the laying of the sixth row, it is necessary to install and attach the fire door to the masonry.
The boiler must not come into contact with brickwork either in front or behind. Leave space for it to expand as a result of heating. The overlap of the lower heating chamber should be started with the masonry of the thirteenth row: it is laid out of refractory bricks according to the order. The laying of the fourteenth row continues, and the fifteenth row completes the overlap of this chamber.
The sixteenth second row should cover the lower heating chamber, performing the dressing of the seams. When laying the seventeenth row, four cleaning doors must be installed. With the help of this row, the dimensions of the horizontal channels should be determined at the upper heating chamber, and these channels should be closed with the eighteenth row. During the masonry of the nineteenth row, you need to install the cleaning doors, while observing the masonry seams.
Brick laying is performed on clay-sand mortar.
With the help of the twentieth row, it is necessary to determine the main dimensions of the chimneys at the upper heating chamber. From the twenty-first to the thirty-third row, the laying should be done in order, not forgetting to follow the rules for bandaging the seams. Laying out the thirty-fourth row, it is necessary to determine the dimensions of the upper horizontal channel at the upper heating chamber.
Then set the thirty-fifth row in the same way as the previous one. The thirty-sixth row should be laid out in order, observing the dressings of the seams. The installation of the thirty-seventh row should cover the roof of the stove. Then you need to block the roof of the stove with the thirty-eighth and second rows of brickwork and install a smoke damper. The thirty-ninth row should be laid out in order, then it is necessary to start installing the chimney.
Structural elements of the room in which the stove is laid out, in cases where they are made of wood or other combustible materials, are placed at a certain distance from the stove. In this case, the minimum value of the specified distance is set by the relevant regulatory documents. If there are reasons that prevent the observance of this distance, then the following requirements are fulfilled.
In those places where the chimney of the heating device passes through the floors or the roof, a special cutting (fluffing) is performed.
The standards for the thickness of the masonry, depending on the distance "smoke - combustible base" are given in table 1.
If, according to the project, the stove will be laid out between combustible wooden partitions (interior walls), then the minimum distance from them to the stove wall should be 130 millimeters. Additionally, it is necessary to insulate the wall from the side of the groove. The minimum permitted distance between the partition and the "smoke" is 250 millimeters.
In this case, the wall, made of wood, is closed with a brick wall, laid out in а bricks on felt, pre-impregnated with clay mortar (the so-called "cold quarter"). Openings with ventilation grilles are made between the walls of the furnace and the cold quarter from the bottom and top, which ensure air circulation in this spatial volume. The required height and width of the cold quarter projections must exceed 250 millimeters.
Do not forget that it is strictly forbidden to perform vertical ligation of the "cold quarter" with the masonry of the oven or pipe itself. The ash pan of the furnace must not be connected to the underground. Wooden ceilings located above the place of installation of the stove are insulated with a double layer of technical felt, pre-soaked in clay solution.
We offer you to familiarize yourself with Sauna hammam in the house
It is possible to apply plaster to the felt, followed by upholstering this place with roofing iron. At the same time, the zone of such insulation should extend by at least 150 millimeters beyond the outer dimensions of the furnace from all four sides.Floors made of combustible materials in front of the firebox are also subject to mandatory insulation, which, most often, is made of a double layer of technical felt soaked in a clay solution and then sheathed with a sheet of roofing iron. The standard sheet size is 500 * 700. The plinth located near the stove is upholstered with tin, or covered with it.
When cutting, it is necessary to take into account many additional factors: the slump of the furnace, the pipe, the building itself. It should be remembered that stone and wooden structures shrink differently. If the former demonstrate negligible values, then wooden structures can sag up to 150 millimeters.
Walls may rise slightly during caulking work. With the subsidence of the walls, respectively, the floors resting on them also subside. This can lead to cracks, and as a result, to a fire. In cases where the expected subsidence of the walls can exceed the draft of the pipes (both top-mounted and root pipes), the cutting is done so that it has a free path inside the room.
During construction, attics are often covered with light materials with low thermal conductivity, which are quite flammable (hay, dry leaves, sawdust, peat, etc.). From above, all this is covered with slag, earth or sand. The thickness of the top layer must be at least 20 millimeters. In such cases, the cutting should be raised above the backfill layer by at least 70 millimeters, and along its perimeter, backfill should be made of non-combustible materials, the thickness of which should be 100 or more millimeters.
Furnaces and pipes should be periodically inspected to detect possible defects that have appeared and promptly eliminate the latter.
In what situations do you need wall protection?
There are situations where wall protection near the stove is not needed. For example, if there is a safe distance between the stove and the closest surface from the point of view of fire regulations. This distance should be enough to scatter infrared rays so that they are weakened and their number does not damage the wall.

fireproof distance from the metal furnace to the walls of the bath
The distance from the wall is considered safe:
- to a brick oven (with masonry in ¼ bricks) - not less than 0.32 m;
- to a furnace made of metal not lined - not less than 1 m.
- to a metal furnace lined with bricks or chamotte inside - not less than 0.7 m.
Such a safe, fire-prevention distance can mainly be organized only in steam rooms with impressive parameters. In more miniature family-type steam rooms, when there is a need to save every centimeter, installing the stove at such a distance is not a justified luxury. Therefore, for such small steam rooms, it is better to use screens or special sheathing to protect the walls.
Insulating the stove in the bath from the walls: methods, SNiP, instructions with a photo
The standards for these requirements are indicated in 2 main documents:
- SNiP III-G.11-62;
- SNiP 2.04.05-91.
| Parameter | Demand |
| Installing the stove on a floor made of combustible materials. | The distance to the bottom of the stove must be at least 140 mm. |
| The size of the foundation. | When installing a steel stove on a wooden floor, the size of the foundation should be 1000 mm larger than the dimensions of the stove. |
| The ceiling is protected with an asbestos slab, plaster and sheet metal, up to 1 cm thick. | In this case, the brick-lined oven is made in height so that the gap to the ceiling is at least 250 mm. |
| When installing a steel furnace with a protective layer of thermal insulation. | The minimum distance to the floor slab is 700 mm. |
| Installation of a steel furnace without a layer of protection. | This dimension increases to 1000 mm. |
| The minimum dimensions to the walls according to SNIP from 1962 | |
| Distance from stove to wood stove with unprotected surface. | From 1000 mm. |
| The walls are lined with bricks and plastered with a 25 mm layer of lime mortar. Or an asbestos heat insulator with a thickness of 4 cm is fixed. | 130 mm |
| The wooden walls are lined with bricks, 120 mm thick and plastered with lime with asbestos. When installed on walls, protection in the form of 40 mm asbestos-vermulite plate. | 300 mm |
Having maintained the minimum dimensions, or better by making gaps with a small margin, each owner of a wooden house can be sure that its walls and ceiling are protected from high temperatures.
One of the main methods of protection is the manufacture of devices installed to protect the front and side surfaces near the stove itself.
Collapse
Reliable insulation of the stove in the bath from the walls is one of the most basic works in the construction of a bath. Protection of combustible surfaces avoids not only fire, but also deformation of the wall material. For home craftsmen, it is important to know the basic requirements and step-by-step instructions for working on thermal insulation from various materials.
First, let's figure out if it is always necessary to protect the surfaces of walls and ceilings in a bath.
If the stove is made of bricks, or is located at a distance of more than 1000 mm from the wall, it makes no sense to carry out a full cycle of thermal insulation work. In these cases, it is enough to make a protective screen from foil on moisture-resistant kraft paper. It is important to know the gaps between the wall and ovens with different surface materials:
- the oven, laid out with a wall thickness of half a brick, is recommended to be moved away from the surfaces of the bath by 350-400 mm;
- a metal stove, not lined with brick or a layer of thermal insulation, must be at least 1000 mm away from the walls;
- It is recommended to install a steel stove with an extended part of the firebox and protected by thermal insulation at a distance of 700 mm.
But most of the individual baths are small in size and it is not always possible to withstand the required clearances. Therefore, the optimal solution to the problem is to protect the walls and ceiling with a reliable layer of thermal insulation made of non-combustible moisture-resistant materials.
Example of wall protection