Using pipes
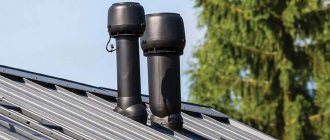
When you make ventilation passing through the wall, you cannot do without the use of pipes. At the same time, make sure that each room has its own duct device. One exit is located about a couple of meters above the foundation. Another exit can be located on the roof and removes air masses from the room. It is to him that the vault of all channels occurs.
It is necessary for the piping system to rise about a meter above the roof. Directly below the ceiling, there are entry openings that can be closed with air flow dampers.
It is possible to combine the exhaust systems of the sauna, as well as the kitchen, bathroom and toilet. Such associations are possible in the attic room. Make sure that strong seals are installed at all joints. It is also possible to install such connections inside the ceiling covering so that the lights go out to the roof through the attic. In the attic itself, insulation of passing pipe systems is carried out.
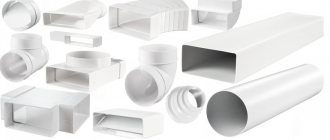
Sometimes pipes are made of polymer coatings, galvanized or concrete materials. During installation, the pipes are lowered between the walls, after which they are filled with cement. It is necessary that the outlet of the ventilation pipe be made as tight as possible. For this purpose, a rubber as well as a silicone element is used. Exhaust duct, and the outlet can also be connected by means of a corrugated pipe.
If necessary, plastic ventilation ducts can be made in the wall covering, even if the latter is not thick. You can also make an opening of 120 mm asbestos cement, where the pipe is lowered, subsequently reinforced with cement.
The pipe itself can be made by wire bonding a pair of slate half-waves of the required size. The pipe itself is fastened to the pedestal, laid out along with the partition. However, another option is also possible, when a pair of bricks are laid on the sides of the partition and the structure is installed.
Ventilation installation
Features of the installation of brick shafts
Ventilation ducts of this type are erected in most cases using the double masonry technology with a vertical square move. In this case, the construction of brick mines is carried out as follows:
- perform markup using a template;
- lay out 2-3 rows of the mine;
- buoys are installed along a plumb line - bricks laid across;
- lay out another 5-6 rows;
- rearrange the buoys.
Brick ventilation ducts can be laid using single-row or multi-row seam dressing technology. In order to exclude the possibility of penetration of combustion products into the inner space of the house, when building mines, the technique of stacking stone end-to-end is also used.

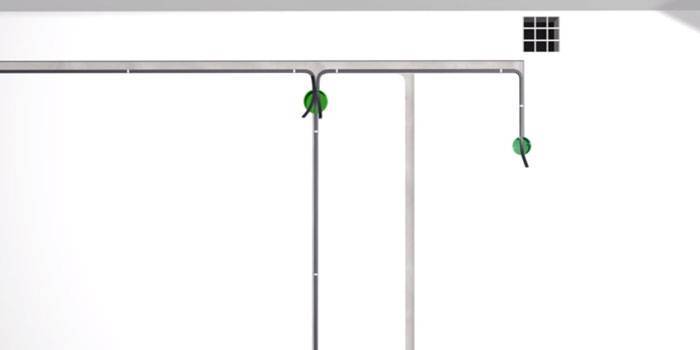
Bends around the premises from the main brick mines when arranging such ventilation systems are made using plastic pipes. All such sleeves are first combined into one main line and only then they are brought in and joined to the ventilation duct. According to the regulations, all transitions to the pipe system from the main shaft must be tight.
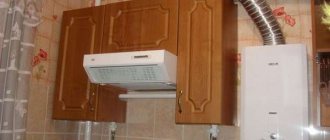
Installation of air ducts in the kitchen
Installing a hood without additional air ducts will not work. Pipes are required for their installation. As a rule, corrugated ducts or plastic ducts are used. If the hood is connected to the main ventilation system, the quality of air exchange decreases significantly.
Important parameters of ventilation ducts
- The diameter of the duct should be equal to the diameter of the exhaust duct or slightly larger. A smaller pipe diameter will lead to additional stress on the motor and the formation of external noise.
- The number of pipe bends should be kept to a minimum. It is not allowed to install the duct with areas where the angle of inclination is 90 degrees.
- The length of the ventilation duct must be less than 3 m.
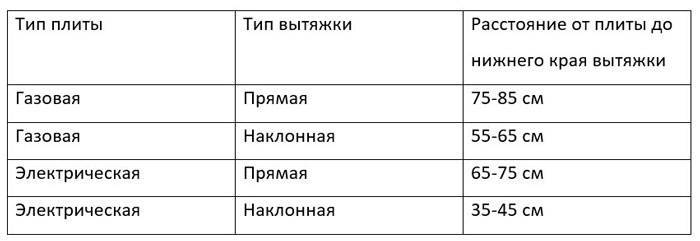
When performing installation work on installing the hood above the hob, it is worth considering the distance between these two objects, depending on the type of stove.
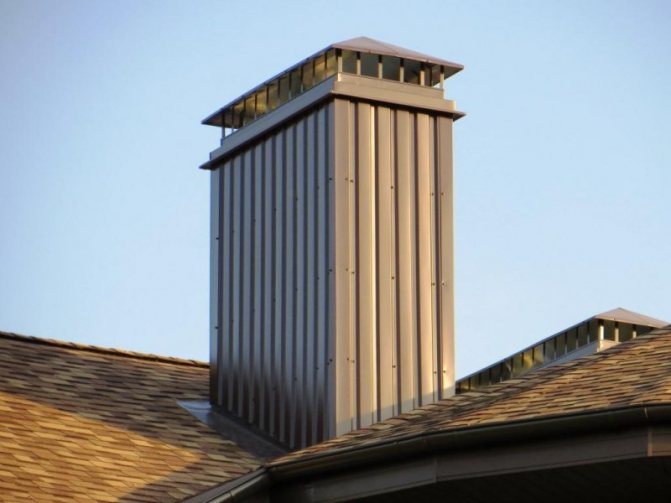
Private house ventilation shafts
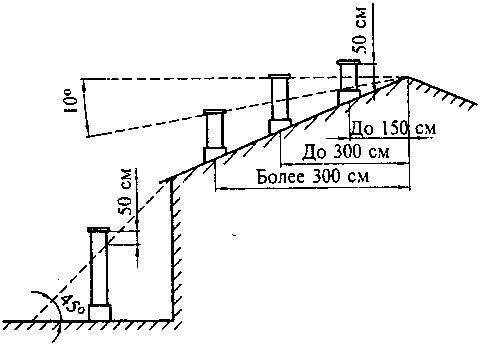
distance from the exhaust shaft to the roof ridge
Ventilation shafts in private houses are built according to the same principles as in apartment buildings. The type of ventilation is initially selected. Next, the air exchange is calculated, depending on it, the diameters and shape of the air ducts are selected.
Ventilation shafts in private homes are often replaced with air ducts. The places where air enters the house and where it is discharged outside are determined by the scheme
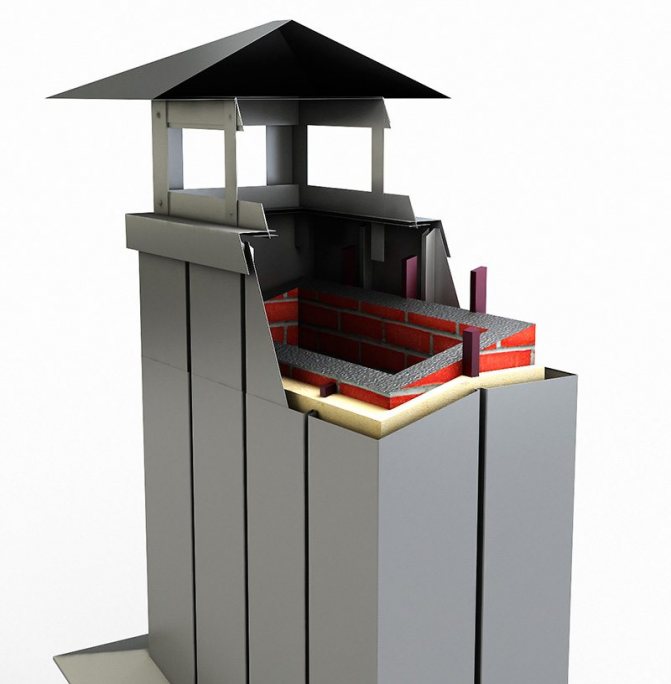
It is very important to correctly position the chimney head in relation to the roof. An umbrella is always worn on the head of the ventilation shaft of a private house.
Air ducts, as well as ventilation shafts, in private houses are made of plastic or metal pipes.
Other materials from which you can make a ventilation shaft yourself:
- boards upholstered with a metal sheet;
- plastered brick.
To improve aerodynamics and prevent the accumulation of condensate, the walls are insulated from the inside with a thin layer of mineral wool or felt, which must be plastered. It is possible to insulate the shaft from the outside, which greatly facilitates the further operation of the pipe.
Insulation progress:
- clean the surface of the walls.
- apply glue and apply insulation tightly.
- strengthen with dowels.
- plaster.
A fairly simple technology that any home craftsman can master.
Ventilation schemes for residential buildings
Depending on the construction plans, ventilation can have a completely different design. In this section, we will try to figure out how ventilation is arranged in a panel house on the diagrams and talk about the degree of effectiveness of this or that type of its implementation.
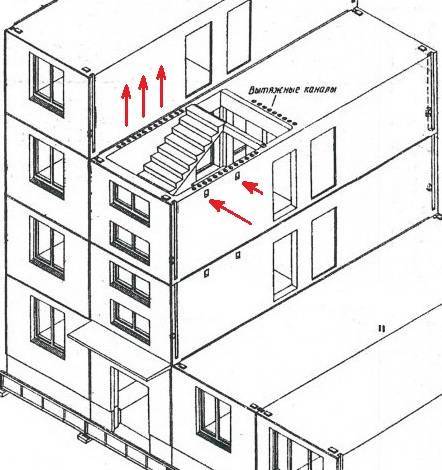
In this case, the ventilation shafts are not interconnected, it improves, and polluted air from neighboring apartments does not enter the house. Another type of such a ventilation scheme in Khrushchev is that from each apartment, separate channels lead to the roof, where they are connected into a single pipe that brings air masses to the street.
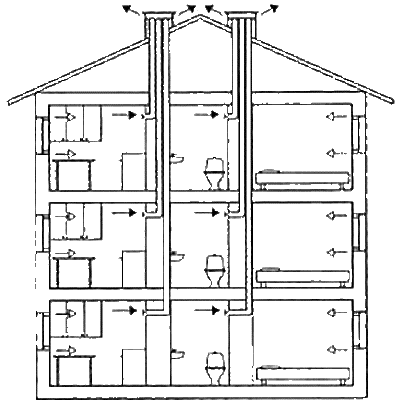
Unfortunately, quite often the simplest but ineffective ventilation method is used, in which air from all apartments enters a single large shaft - just like ventilation in Khrushchev is arranged. This saves space and costs when erecting a building, but it has a lot of unpleasant consequences:
- the intake of dust and unpleasant odors from other apartments - residents of the upper floors are especially susceptible to this, where air rises naturally;
- rapid contamination of the common ventilation pipe;
- lack of sound insulation.
There are several more ways to exhaust air through ventilation shafts - with horizontal ducts in the attic and a pipe outlet to the attic without a chimney. In the first case, horizontal air ducts reduce air draft, and in the second, the attic becomes dirty due to the lack of an outlet to the street. The ventilation scheme in Khrushchev and other Soviet-type buildings, although budgetary, is inconvenient for residents.
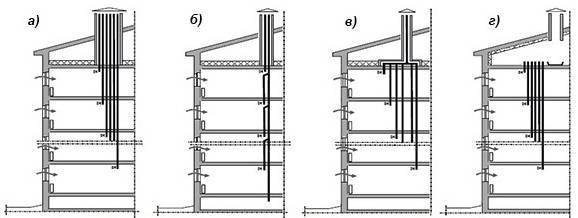
Schematic diagrams of some natural ventilation systems in residential buildings: (a) - without collecting ducts; (b) - with vertical collecting channels; (c) - with horizontal prefabricated ducts in the attic; (d) - with a warm attic
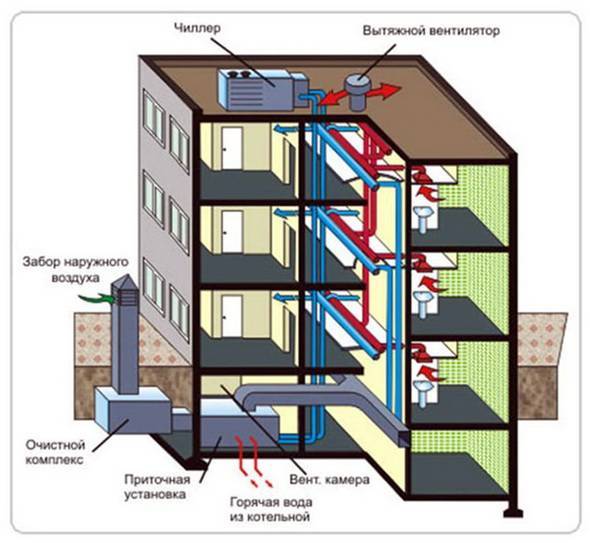
Fortunately, there is a modern ventilation system that automatically draws in and out air. Its design includes a fan that blows air into the mine. It is usually located in the basement of a building. An exhaust ventilation of the same power is located on the roof of the house, which forcefully removes polluted air masses from the air duct. This is the simplest ventilation scheme in an apartment building. It can also be arranged using energy-saving equipment - recuperators. The task of the recuperator is to take away heat (or cold) from the discharged air and transfer it to the supply air.
Ventilation shafts, as a rule, come from the basement of a multi-storey building, additionally providing it with protection from dampness and fumes. Basement ventilation is provided by natural draft, and in modern houses, air handling units are also installed here. To remove raw air from the basement, common ventilation shafts are used, leaving holes on each floor and in each apartment.
Ventilation of the basement, the place where the natural ventilation system begins, is one of the main conditions for its correct operation. For this, air holes are made in the walls of the basement through which fresh air enters the basement. It not only reduces humidity at the base of the house, but also creates traction in the common mine shaft.
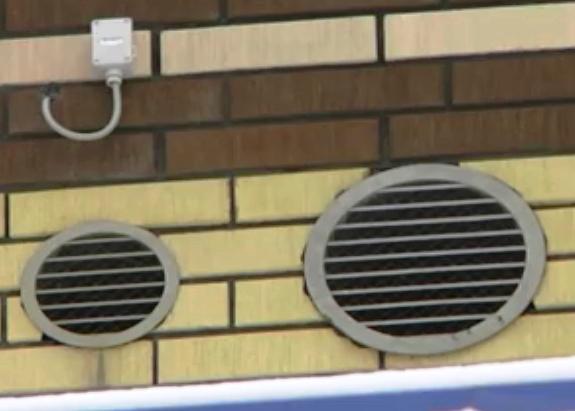
The shape of the holes can be simple - round or square. They must be located at a sufficient distance above the ground so that water and dirt from the street do not get inside. The optimal distance from the ground is at least 20 cm. The holes should be placed evenly around the perimeter of the basement, if there are several rooms in it, it is necessary to organize several air vents in each. The vents must not be closed, otherwise the whole principle of ventilation in an apartment building will be violated. To prevent animals from entering the basement, the holes are covered with a metal mesh.

Location of ventilation ducts
As you understand, there are no particularly stringent requirements for the placement of mines (except for chimneys) and cannot be. We proceed from the usual everyday logic.
Bathroom ventilation shaft
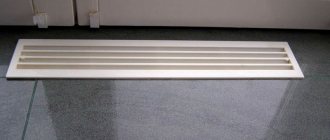
You can place the bathroom shaft in any convenient place. The size of the shaft is unchanged because current standards regulate one air flow rate of 25 m 3 / h for all types of toilets and bathrooms. Preferably over a toilet, bath or shower. Undesirable near a window or door.
Kitchen natural ventilation shaft
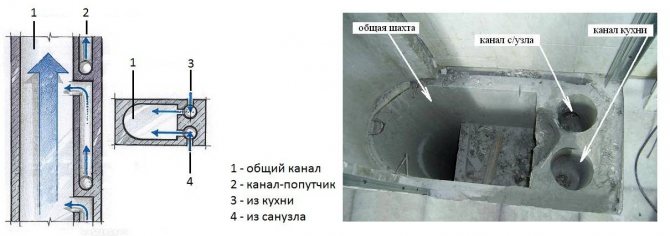
The mine of natural ventilation of the kitchen appears only in houses with a gas stove. In this case, the duct for natural ventilation is laid in the same shaft as the duct for the kitchen umbrella. The internal section of such a shaft will be as much as 600x200. If it is impossible to arrange two channels in one shaft, then 2 separate shafts can be made: 350x200 - for the kitchen umbrella, and 250x150 - for natural exhaust from the kitchen. The dimensions of the exhaust shafts are also unchanged, since the flow rates of the exhaust air are set by the standards. Preferably as close to the gas stove as possible.
Umbrella shaft (above the stove)
You should know how much controversy there has been about this mine. What am I talking about? The kitchen umbrella has a built-in fan. This fan is too weak to push the estimated amount of air into an ordinary shaft with a small cross-section, such as in apartment buildings (200x100). Not only that, the umbrella's mesh filter gets clogged with grease over time and creates a lot of resistance. The output is an umbrella-props, absolutely useless crap over a stove that neither captures nor removes cooking odors. Therefore, the minimum size of the exhaust duct that a weak umbrella fan can somehow push through is 300 × 150.
Boiler room ventilation shaft
With boiler room ventilation, everything is much simpler than it seems.New standards were introduced for boiler rooms in cottages in 2020. (SP 281.1325800.2016).
In short:
- for small boilers (in cottages up to 400m 2) - round exhaust shaft Ø200 (hole Ø250)
- for large boilers (cottages over 400 m 2) - exhaust shaft Ø250 (hole Ø315)
- the air duct is led out to a height equal to the height of the boiler pipe. Most often, the chimney and ventilation duct are carried out together in the same shaft in the construction version.
- I'll say a bonus about the inflow. For the inflow, a hole in the wall of the boiler room facing the street is used, it is located under the ceiling above the intended place of the boiler.
Recommended: Make a hole in the outer wall as far as possible from the exhaust duct (see above). (Clause 14.4 - SP 281.) The size of the opening is 500 × 150, or (if you want a square one - 300x300) I also have an article about whether supply and exhaust ventilation is needed in a private house and the criteria for its selection. And now a few rules for any exhaust shafts.
Exhaust ventilation calculation
The calculation of exhaust ventilation for large production workshops and enterprises begins with the determination of areas for the spread of unsafe substances and emissions. At the next stage, specialists determine the volumes of air masses for removal and supply in order to ensure sanitary standards.

In the absence of active sources of unwanted substances in space, it is advisable to use a simple formula:
O = m * n
- O is the volume of pure oxygen provided for by sanitary standards and regulations;
- m is the averaged value of oxygen consumption for 1 hour of active work;
- n is the constant number of workers working in the premises daily.
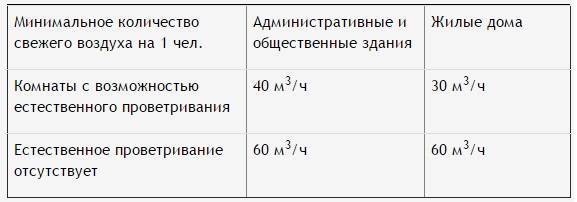
As for the value of m, it has specific definitions documented by SNiPs:
- m = 30 m3 - for ventilated rooms;
- m = 60 m3 - for facilities without access to clean air.

Description of certification of ventilation systems of industrial premises
The peculiarity of harmful substances lies in the fact that they tend to spread throughout the entire volume of the workspace, pavilion or production workshop. In this case, the main task comes down to lowering the level of their concentration to values at which a person can stay and work in the room.
There are specific thresholds for each hazardous substance. With this in mind, the volume of fresh air inflow is calculated by the formula:
O = Mb / (Ko-Kp);
- Mb is the average weight of an unwanted or potentially hazardous substance entering the workspace per unit of time (1 hour);
- Ko is the value of the remote concentration of a potentially hazardous substance in the surrounding space;
- Kp is the concentration of unwanted substances at the inlet of the air handling unit.
General device
Before making ventilation in an apartment, it is important to understand the principles of its operation, to understand how the system works, and what problems may arise in the process. If we consider it using the example of a multi-storey building, many channels are laid in it during the construction phase through which dirty air is removed from the premises.
The ventilation system is designed in such a way that the fresh flow enters in a natural way - through a doorway, windows or a window.
The advantages of a natural ventilation system are obvious:
- Minimum installation costs, which allows you to reduce the cost of the structure.
- Ability to work offline.
- Electricity independence.
- Providing optimal conditions that most favorably affect human health.

Natural ventilation also has a number of disadvantages:
- In strong winds, reverse draft may occur, which leads to the ingress of debris into the room.
- For ventilation to work normally, a special rule must be followed - the temperature inside is higher than outside.
But even a high-quality installation of ventilation in an apartment during the construction phase may turn out to be ineffective if “non-breathing” materials are used. Installation of plastic windows, sealed doors and other modern structures leads to a violation of ventilation, and then to a deterioration in the indoor climate. To correct the situation, it is necessary to check and repair the ventilation in the apartment.
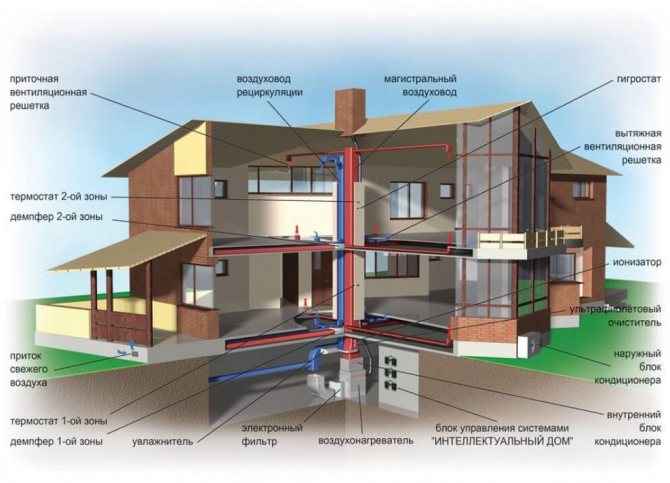
One of the options is to equip a forced-type system when fans are connected to work. Their task is to remove old air from the room and free up the area for the inlet of a clean stream. Products are installed in special holes (toilet and kitchen shafts).
Such an apartment ventilation project involves the installation of special valves that facilitate air exchange. It is through these holes that the flow enters inward, and removal occurs naturally, through the existing ventilation ducts.
Apartment ventilation project
Types and features
According to the user of our portal (nickname on the forum petrovk, Moscow) ventilation in the house can be divided into three types:
- Natural;
- Supply, or as it is also called, mechanical;
- Air handling unit with heat recovery.
petrovk:
- When designing a ventilation system, you need to be guided by the following principle - the air in the house must be completely renewed in 1 hour. For my 200 m2 frame house, I settled on a flow-through and exhaust unit with heat recovery. The installation is selected based on the number of cubes of air in the house, I have 600, I took the installation for 700 cubic meters.
It should be remembered that a comfortable environment in the house is created not only due to the supply of fresh air, but also due to the speed of movement of air flows. Supply and exhaust ventilation, due to the presence of a fan in it, creates a greater air flow than natural ventilation.
When mechanical ventilation is in operation, the air velocity in the ventilation system is on average 3-5 m3 / hour, and with natural ventilation, it is about 1 m3 / hour. Let's try to figure out if natural ventilation creates a more comfortable environment in the house. This question is not as simple as it sounds. Indeed, in order to pass the same volume of air through a mechanical and natural ventilation system, a different section of the ventilation duct is required. This means that the installation of natural ventilation will entail an increase in the channel cross-section, which is far from always possible from a technical or aesthetic point of view.
With any type of ventilation, no matter whether it is natural or mechanical, it is necessary to ensure the unimpeded movement of air throughout the house.
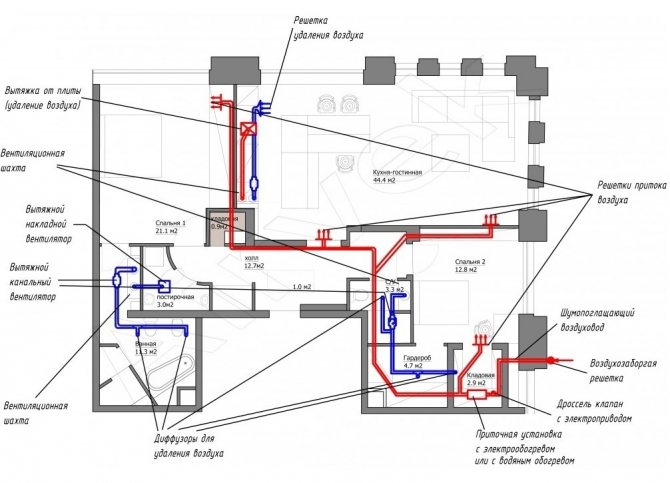
One of the options is to install doors with a transfer grille in the rooms or leave a small gap between the door and the floor. For the correct organization of the air flow, it is necessary that the air intake is carried out in the cleanest room, living room or bedroom, and the output is carried out in the kitchen or in the bathroom.
In the kitchen, above the stove, the hood should run in a separate channel. If the hood is forced, then the kitchen and bathroom can be combined with one ventilation duct. The diameter from inlet to outlet should not decrease. Due to the specifics of the kitchen hood, the air duct from it must be made round, galvanized and vertical, without knees. Do not use corrugated, aluminum or plastic ductwork.
Consultant of our forum Elena Gorbunova(nickname on the forum Matilda):
- Natural ventilation works with differential pressures at the inlet and outlet. The inlet is an exhaust valve, it is installed in the ceiling of the room or in the wall under the ceiling. The exit is the top of the pipe. The drop starts at 10 meters. The pressure difference also depends on the temperature difference. It is better in winter and worse in summer.
The natural inflow is done above the heating devices, which are usually located under the windows. Or two meters above the floor.
The question often arises,
Is it possible to combine the ventilation ducts of the kitchen, bathroom and boiler room into a single system, then put a duct fan, and take everything out through the roof with one pipe?
User of our forum Vladimir (nickname on the forum Careless Angel) believes that:
- In no case should you combine the hood with the sewer, then the whole house will stink like a toilet, regardless of whether an air duct is installed in front of the fan or after.
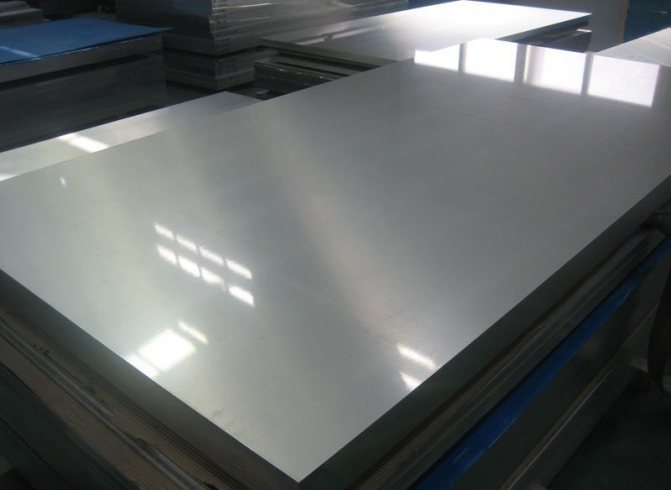
Also of great importance is the material from which the ventilation ducts are made for a private house. One of the best options is the use of spiral-wound galvanized air ducts. But with self-installation, developers massively use ventilation ducts made from a sewer pipe with a diameter of 110 mm.
Matilda:
- Sewer pipes must not be used. In general, plastic cannot be used for air ducts, unless these are special antistatic pipes. In this case, dust will stick to the walls. In addition, the sewer pipes have a small diameter. And the thrust directly depends on the diameter of the duct and the height difference. The difference in the cottages is small enough - this is not a high-rise building for you. This means that with a small diameter, there will be practically no thrust, especially in summer. And if you put a fan, then the sewer pipes will make a very unpleasant sound when the air moves.
How to decide when choosing a hood and fan
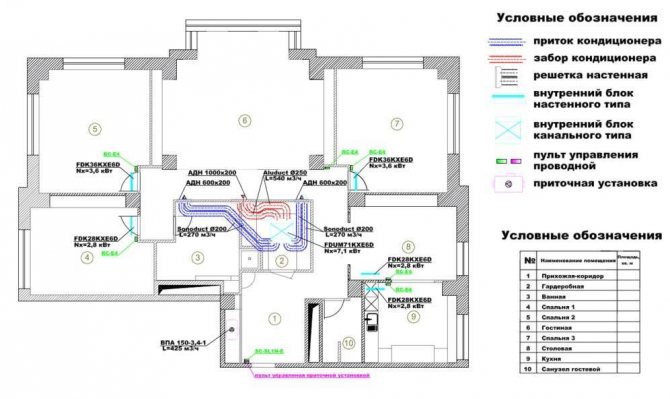
Before installing this or that system in the kitchen in an apartment, it is important to take into account not only the appearance, but also other factors that are necessary for normal life. To begin with, the size / diameter of ventilation systems is determined
To do this correctly, you need to measure the ventilation shaft - the size of the fan will be 10-15 cm larger
Next, it is important to start calculating the performance of the device. To do this, you need to carry out several mathematical actions: multiply the length with the width and height, and then subtract the volume occupied by the furniture
The resulting figure is multiplied by 6 and separately by 12. When calculating these limits, you can choose the right fan in the kitchen.
If any other room is combined with the kitchen, then both rooms are taken into account. Do not forget about the loudness of the powerful device. In general, a 6 meter kitchen will be fully equipped with a fan with a capacity of up to 180 cubic meters per hour. It is possible to install ventilation in a kitchen 10 meters in size with a capacity of 220 to 300 cubic meters.
In the case when the vein has a smaller size than the fan, you should pay attention to turbo devices with higher power.
Air ducts for ventilation for a private house - requirements and features
For the ventilation system to work with maximum efficiency, it is necessary that the inner surface of the duct has minimal resistance to air movement. Let's see how to choose the right air ducts for ventilation of your home.
Matilda:
- The main task of the duct is to allow the air to mix freely from the point of air intake to the point of its exit. And be safe from the point of view of ecology and fire safety. Any pressure loss strongly affects or negates air exchange during natural ventilation. Pressure losses arise from an uneven surface of the duct, in horizontal sections, in elbows, tees, etc. With a rectangular air duct, losses are higher than with a round one, and dust accumulates in them well.
Flexible - the corrugated duct offers the highest air resistance. And it is best used when you need to make a turn or connect a kitchen hood to the ventilation duct.
Very often, developers, for various reasons, do not want to exit through the roof, preferring to bring the ventilation duct through the wall. It is not right.
Matilda:
- Never, under any circumstances, should vent the ventilation through the wall. Spoil the facade.
In a couple of years, there will be a visible spot on the wall around the exit. And thus, it is also pointless to bring out natural ventilation, since there will be absolutely no difference in height, and, accordingly, pressure.
If, with a forced ventilation system, all air ducts are connected by elbows and adapters with one vertical channel, then it is recommended to install an E190P fan on the roof.
To control this fan, a thyristor speed controller is placed in a convenient place. And the air ducts themselves are taken with a diameter of 125 mm.
At FORUMHOUSE you will find an article about ventilation systems, a lot of useful information about the ventilation system, a fascinating discussion of the choice of material for air ducts. And after reading our video, you can clearly see how an integrated approach to the ventilation device allows not only to provide the house with fresh air, but also to save money.
How to make ventilation with your own hands
In private housing, supply and exhaust ventilation is optimal. After calculating the power and choosing a brand of equipment, ventilation in the room with their own hands can be done by anyone with the skills to work with the tool.
Step 1. Calculation of the duct cross-section. It is determined according to the formula 1m2 of the room for 15 mm holes. In some cases, instead of one large diameter duct, it is possible to replace it with two shafts.
Step 2. Punching holes with a puncher. Installation of branch pipes to protect the system from small debris in the wall openings.
Step 3. Arrangement of the opening for the shaft, laying the supply air duct. Placed horizontally or vertically, just above the floor. In the outer walls, the height of the shaft to the floor is about 40 cm, protected by a grating and a canopy.
Step 4. Exhaust duct construction. It is located under the ceiling on the wall opposite to the inflow, fastened with clamps, brackets. It is displayed at a level of 50 cm from the roof and is protected by a grill with a canopy. If necessary, use tees, adapters.
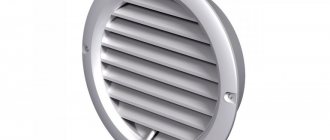
Step 5. Installation of ventilation grilles and fans. Supply and exhaust elements are located on different walls.
DIY ventilation video:
To arrange natural ventilation, it is enough to install a supply window or external wall valve and a vertical exhaust hood on the roof.
Optimal places: between the battery and the floor, above or below the window opening. It is better to arrange a window opening with a valve when ordering double-glazed windows.
You can also buy a ready-made solution - supply monoblocks. One unit contains: fan, heater and filter.
9.3.1. Air intake devices
Air intake devices are positioned so that polluted air does not enter them, therefore, during installation, a number of requirements are imposed on them:
a) air intake devices must be removed from the pollution sites horizontally by at least 10 m, and vertically by at least 6 m;
b) air intake is carried out at a height of at least 2 m from the ground level (in the green zone - at a height of at least 1-1.5 m);
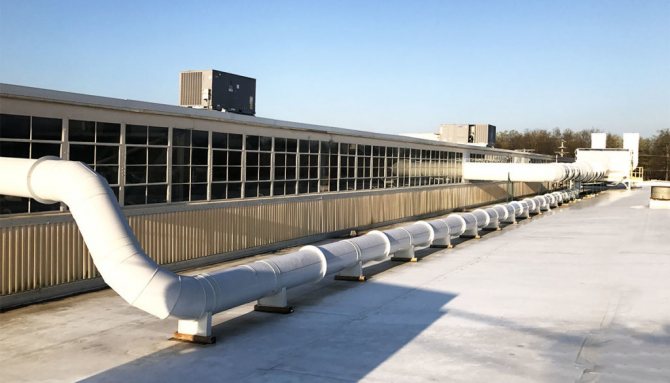
c) when air is taken above the roof, the air intake devices are located no closer than 10 m from the exhaust shafts, and if closer, then it must be 2.5 m lower.
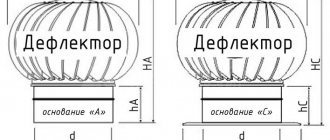
Structurally, the air intake devices can be made in the form of a free-standing shaft disconnected from the building by an air intake channel (Fig.9.5.a), in the form of an attachment shaft (Fig.9.5. the outer wall of the building (Fig. 9.5. c). In some cases, air intakes can be located above the roof of the building.
How to clean
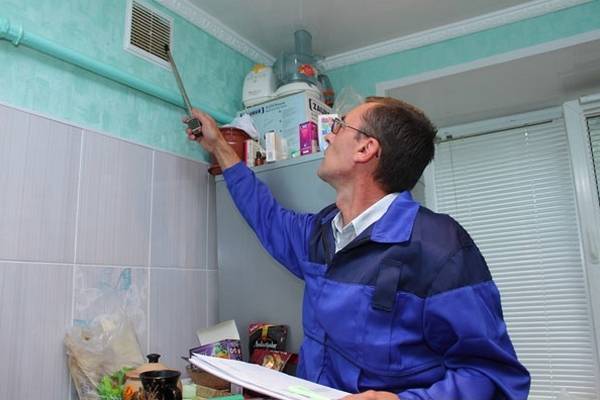
To restore normal operation of the air handling unit, start by checking each vent. If the sheets of paper are attracted with different forces, the cause is dirty boxes inside the apartment. Restoring ventilation in an apartment with your own hands, start by preparing a steel cable of small thickness or wire with an aluminum core. Take the "tool" and clean the channel from debris.
Residues can be removed with a vacuum cleaner with a long tube (you can use a vinyl spray hose). If the efforts are in vain, and the ventilation in the apartment still does not work, you will have to clean the main channel. For this, a larger diameter ruff and a barbell (as a shoulder) are useful
Next, clean the passage, but proceed carefully, because there may be nests of birds or other animals inside. If the reason was precisely pollution, the ventilation in the apartment will be restored
The approach described above is typical for a private house. If the ventilation and air conditioning of apartments in a multi-storey building with a large number of apartments is disrupted, the issue of cleaning the central canals is the task of the homeowner, and the tenant is prohibited from doing this work. If there are complaints about the operation of ventilation, you must submit an application and in this way call the master to the apartment.
What kind of ventilation is there?
Natural ventilation - the most common type of air exchange due to the difference in the density of warm air inside the room and colder outside. This type of ventilation is simple to design and operate.
Forced, or mechanical, ventilation the premises are provided by the use of fans for air movement. It can be supply, exhaust, or supply and exhaust.
Mixed ventilation - a combination of forced and natural methods of air exchange.
Checking and cleaning ventilation
From time to time you need to check the ventilation ducts for blockages. This is done in such cases:
- Annual scheduled inspection
- Initial check of ventilation ducts before use. During its implementation, the following are checked: the presence of blockages, the density of the channel and its remoteness from the smoke channel, draft.
- After repair of canals
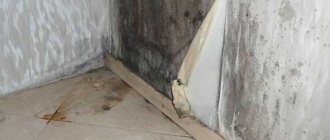
Household dust contains bacteria, mites, and their waste products. When a person breathes dusty air, they develop allergies. In addition, dust is dangerous for people with asthma. When dust accumulates in the lungs, it leads to chronic diseases of the lungs and the immune system. With the accumulation of dust in the ventilation, these organisms also accumulate, harming human health. This is how small rodents and birds find refuge there.
When the channels become clogged, their draft becomes weaker, the filters become dirty, the cross-section of the channels becomes smaller, grease and dust collects on the walls, and the supply and exhaust systems stop working. Cleaning of ventilation ducts in industrial buildings should be carried out at least twice a year, as well as in administrative and public buildings. It is necessary to clean the ventilation in the buildings of fire services at least once a year. After cleaning, the channels are disinfected, and a special journal is drawn up, in which data on the actions taken is entered.
Apartment ventilation calculation
Natural or artificial ventilation of a residential building is calculated during the construction of the building by specialists, and the residents of the building receive apartments with a "default" ventilation system. It will not work to change the ventilation system in Khrushchev; this will require serious intervention in the structure of the building. However, with the help of various devices, you can improve air circulation in your apartment. For this, it is necessary to carry out calculations.
If you are not satisfied with the ventilation in the apartment, you can install additional hoods in the kitchen and fans on the grilles in the bathroom. In this case, one should remember the basic rule - the amount of air drawn out should not exceed the amount of air entering the apartment. In this case, the ventilation systems will work as efficiently as possible. Some models of hoods and fans can operate on air intake - they should be installed if the room is not sufficiently ventilated through windows and doors.
Particular attention should be paid to the capacity of the exhaust devices; for small apartments, a capacity of 50 to 100 m³ of air per hour will be sufficient. To accurately determine what load the device will be optimal, you can measure the amount of air masses in the room.
For this, the area of the apartment is summed up and multiplied by three times. The resulting air volumes must completely pass through the fans within an hour.
Additional air flow can be organized using air conditioners, hoods and fans. Together, these devices will perform the main tasks for ventilation of premises:
- the hood in the kitchen will clean the room from unpleasant odors, grease and smoke, filling it with clean air;
- fan in the bathroom - remove humid air;
- air conditioner - to cool and dry the air in the room.
These devices will ensure good circulation of air masses in different rooms and regulate their cleanliness - they are simply irreplaceable in the bathroom and kitchen.
Types of ventilation systems in multi-storey residential buildings
Planned by painstaking calculation, even before the construction, the ventilation shaft in a multi-storey building is designed to become the "lungs" of the building. There are three main types of ventilation systems used in the construction of residential buildings:
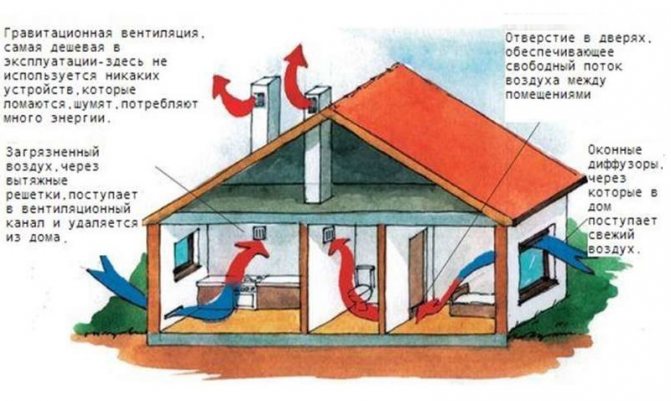
The work of natural ventilation involves the implementation of air exchange using different air densities outside and inside the premises. "Dirty" air is removed through ventilation windows located in toilets, bathrooms and kitchens. It passes through the ventilation shaft and is released into the street through the canal head located under the roof or directly above it. The inflow of clean air is carried out through the vents, not density in the window transoms, door frames.
Forced ventilation works with additional mechanical devices. They are installed individually or in a common ventilation shaft. Forced ventilation is installed in high-rise buildings, where the arrangement of individual channels is technically impossible or difficult.
The mixed scheme provides for the complex or alternate use of methods for removing air from apartments. Such a system is universal, since it initially provides for the uninterrupted operation of ventilation in a residential building. However, her device is unnecessarily expensive., which made the mixed scheme not very popular in multi-storey buildings.
Connecting the hood to electricity
This stage is the simplest. It is very good when you initially planning your kitchen, correctly laid down the location of all sockets and electric outlets.
How not to make a bunch of elementary mistakes and observe all distances, you can find in a separate article.
If you do not have a free outlet for the hood, you will have to mount it. To do this, you will need the following materials:
three-core cable VVGngLs 3 * 2.5mm2
In home wiring, use the cable of this particular brand (with the Ls index).
regular socket for current 16A with grounding contacts
The hood itself, unlike other kitchen appliances, is a low-power device. Accordingly, it is not at all necessary to pull a separate wiring under it directly from the panel room.
The same cannot be said about the hob or dishwasher.
It turns out that this unit can be connected from a common outlet group from the nearest distribution box.
Pull the strobe or cable channel from the junction box to the place of the future outlet and mount the socket box.
This outlet is located on top, almost under the ceiling, just above or to the side of the hood itself. The choice of a specific location will depend on the length of the cord and the requirement for a minimum installation height of the hood above the cooker.
Often you have to cut a hole in the nearest kitchen cabinet for this case.

Next, you remove the insulation from the cable, mark the cores and connect them together in the junction box.
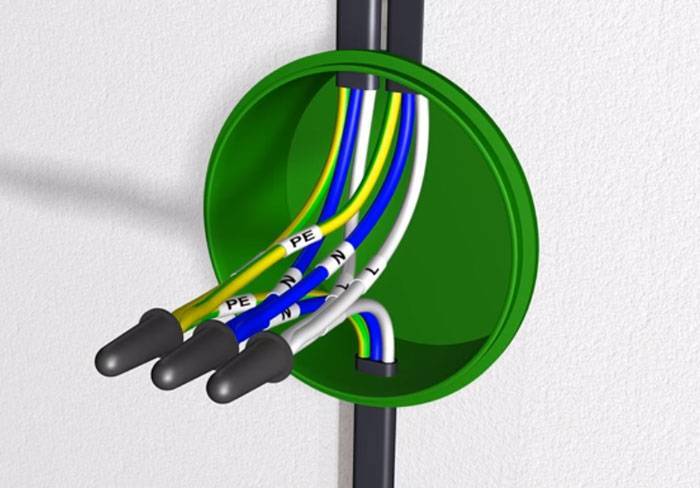
All that remains is to connect the outlet correctly.
You have the wiring for the kitchen unit ready. We pass to the duct.